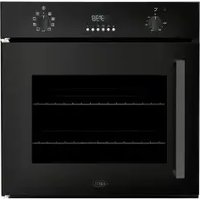
BPO60 - Oven BORETTI - Free user manual and instructions
Find the device manual for free BPO60 BORETTI in PDF.
User questions about BPO60 BORETTI
0 question about this device. Answer the ones you know or ask your own.
Ask a new question about this device
Download the instructions for your Oven in PDF format for free! Find your manual BPO60 - BORETTI and take your electronic device back in hand. On this page are published all the documents necessary for the use of your device. BPO60 by BORETTI.
USER MANUAL BPO60 BORETTI
natural_image
Technical line drawing of a front view of a microwave oven with a circular vent and ventilation grille (no text or symbols)BELANGRIJK
natural_image
Line drawing of a refrigerator interior showing ventilation duct and door mechanism (no text or symbols)BELANGRIJK:
natural_image
Interior view of a refrigerator with visible grilles and metal grilles (no text or symbols)text_image
Hand interacting with a control panel displaying various function icons and a digital display showing 00:00.text_image
Hand interacting with a black touchscreen display showing various function icons and labelstext_image
3 sec. IItext_image
① STOP START 3 sectext_image
Cooling motions Special motion Progressive the oven Over ON/OFF Lock over ON/OFF Temperature/power Lock Clock 88:88 88:88 - + 88:88De Kookprogramma's:
natural_image
Technical line drawing of a dual-chamber air vent system (no text or symbols)natural_image
Interior view of an oven with a grating tray and open door (no visible text or symbols)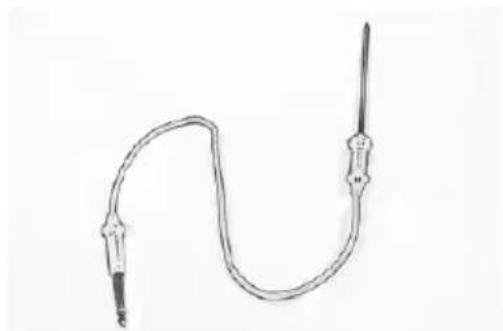
natural_image
Line drawing of a medical or electrical device with a curved tube and two vertical pins (no text or symbols)natural_image
Illustration of a person standing near a vehicle with a red number 4 in the top-left corner (no text or symbols on the diagram itself)
natural_image
Hand holding a pen writing on a surface with a circular sketch and number 5 in the top right corner (no readable text or symbols)natural_image
Hand holding a tool near a door, with an arrow pointing to the handle (no text or symbols visible)
Speciale functies
text_image
Two industrial control panel designs with icons and labels: one showing a hand interacting with a grid of switches, the other displaying a hand pointing at a 'START' button.text_image
88:88 88:88
text_image
Control panel interface with icons for navigation, speed limit, and status indicators
natural_image
Hand pointing at a black control panel with four function icons (play, audio, Wi-Fi) on the right (no text or symbols on the panel itself)text_image
13:45 - +text_image
RECIPES PERSONAL PRE SETtext_image
WHOLE IN PIECEStext_image
DO YOU WANT TO REMOVE RECIPIE ? NO YESnatural_image
Line drawing showing two steps of a hand pressing down on a wooden frame, with no text or symbols present.HET VERVANGEN VAN DE OVEN LAMP.
Belangrijk:
natural_image
Diagram showing a device inside a panel with an arrow indicating direction, no text or symbols present
natural_image
Close-up of a hand inserting wires into an electrical socket (no text or symbols visible)NL
natural_image
Close-up of a hand holding a small white object against a dark surface (no text or symbols visible)natural_image
Close-up of a hand holding a tool near a vertical object (no visible text or symbols)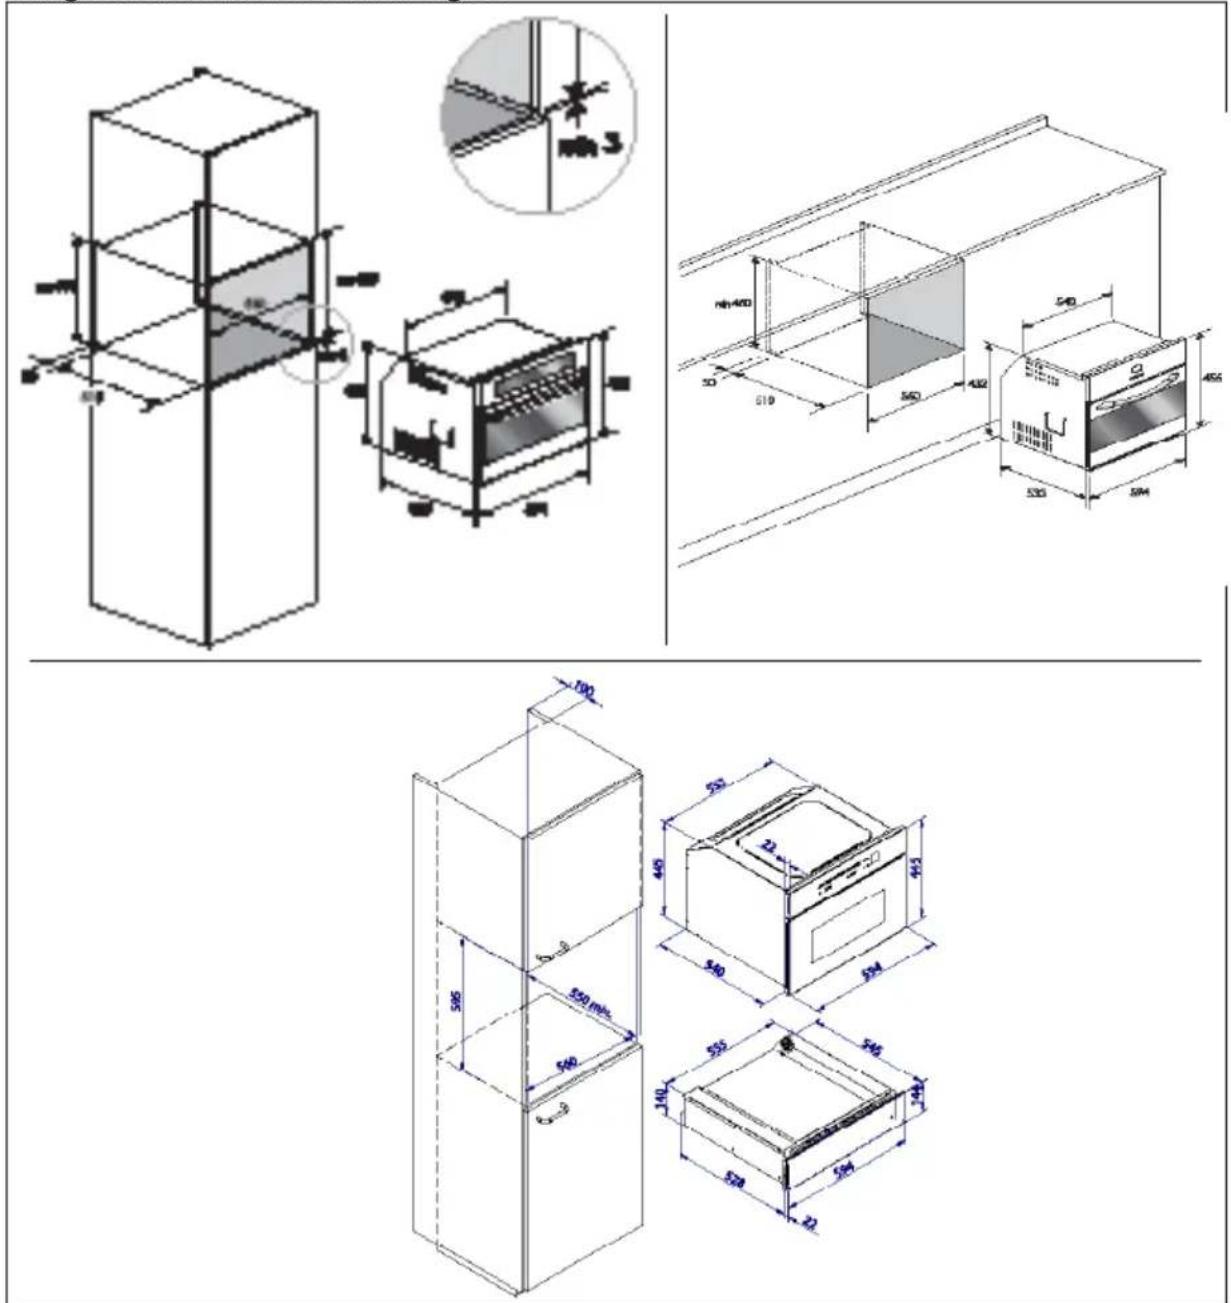
text_image
Technical drawing of a microwave oven with dimensional annotations and cross-sectional views
natural_image
Technical line drawing of a kitchen appliance with structural beams and dimensions (no text or symbols)
natural_image
Technical line drawing of a two-tiered storage unit with internal components and dimension annotations (no text or symbols)NL
we would like to thank you and congratulate you on your choice.
This new product has been carefully designed and built using top quality materials, and meticulously tested to ensure that it meets all your culinary requirements. Please read and observe these simple instructions, which will enable you to achieve excellent results from the very first time you use it. This state-of-the-art appliance comes to you with our very best wishes.
THE MANUFACTURER
NL Nederlands
EN English EN
I Italiano
FR Français
DE Deutsch
THIS PRODUCT IS DESIGNED FOR DOMESTIC USE. THE MANUFACTURER DECLINES ALL RESPONSIBILITY FOR DAMAGES TO THINGS OR PEOPLE DERIVING FROM INCORRECT INSTALLATION OR IMPROPER, ERRONEOUS OR UNSUITABLE USE.
THE APPLIANCE MUST NOT BE USED BY PEOPLE (INCLUDING CHILDREN) WITH PHYSICAL, SENSORIAL OR MENTAL IMPAIRMENTS, OR BY PEOPLE WITHOUT THE NECESSARY EXPERIENCE OR KNOWLEDGE, UNLESS THEY ARE SUPERVISED OR INSTRUCTED IN THE USE OF THE APPLIANCE BY A PERSON RESPONSIBLE FOR THEIR SAFETY.
THE APPLIANCE AND ITS ACCESSIBLE PARTS BECOME VERY HOT DURING USE. BE CAREFUL NOT TO TOUCH THE HEATING ELEMENTS INSIDE THE OVEN. CHILDREN UNDER 8 YEARS OF AGE MUST BE KEPT AWAY IF NOT CONTINUALLY MONITORED.
DO NOT PLACE POTS OR PANS OR ALUMINIUM OR SIMILAR METAL FOILS IN CONTACT WITH THE BASE OF THE OVEN FOR COOKING.
THE HEATING ACTION OF THE LOWER HEATING ELEMENT CAUSES OVERHEATING OF THE LOWER PART OF THE OVEN CAUSING DAMAGE AND SERIOUS CONSEQUENCES (RISK OF FIRE) EVEN TO THE COUNTER UNDER THE OVEN.
DO NOT USE ROUGH ABRASIVES OR SHARP METAL SCRAPERS TO CLEAN THE GLASS DOOR OF THE OVEN BECAUSE THEY COULD SCRATCH THE SURFACE AND CAUSE THE GLASS TO SHATTER.
USE ONLY THE THERMAL PROBE RECOMMENDED FOR THIS OVEN. DO NOT USE STEAM CLEANERS TO CLEAN THE OVEN.
Contents
User instructions, 37
The first time you use the oven, 37
Self-cleaning catalytic panels (Where present), 38
Respect for the environment, 38
Introduction to the oven, 39
Installation and hook-up, 39
Before hook-up, 39
Demonstration mode, 39
Setting the clock, 40
Actions that are possible with the oven off, 41
Turning on the oven, 41
Key (or child safety) function, 42
Main functions, 43
Overview of the command panel, 43
The cooking functions, 43
Control panel functions, 44
Instructions for use, 45
Food probe, 47
Special functions: Boost, Clean, 52
Oven light control, 53
Simple cooking commands, 53
Setting the temperature, 54
Residual heat, 54
Programming the oven, 54
Timer programming: cooking time, 56
Automatic function: recipes, 59
Personalising recipes, 60
Removing the oven door, 62
Installation instructions,
Install the oven in the counter 45, 64
Flush fitting 60, 65
Electrical connections, 66
natural_image
Technical line drawing of a front view of a microwave oven with a circular vent and ventilation grille (no text or symbols)IMPORTANT
The oven's data plate is accessible even with the oven fully installed. The plate is visible simply by opening the door. Always quote the details from it to identify the appliance when ordering spare parts.
User instructions
The first time you use the oven
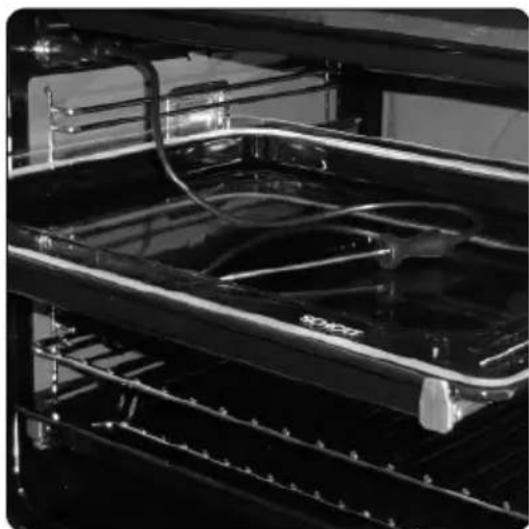
Clean the oven thoroughly with soapy water and rinse well. To remove the lateral frames from smooth-walled ovens, proceed as shown in the figure.
Operate the oven for about 30 minutes at maximum temperature to burn off all traces of grease which might otherwise create unpleasant smells when cooking.
Do not use rough abrasives or sharp metal scrapers to clean the glass door of the oven because they could scratch the surface and cause the glass to shatter.
natural_image
Line drawing of a refrigerator interior showing door, ventilation slots, and fan arrangement (no text or symbols)Important:
As a safety precaution, before cleaning the oven, always disconnect the plug from the power socket or the power cable from the oven. Do not use acid or alkaline substances to clean the oven (lemon juice, vinegar, salt, tomatoes etc.). Do not use chlorine based products, acids or abrasive products to clean the painted surfaces of the oven.
Do not use steam cleaners to clean the appliance.
Self-cleaning catalytic panels (Where present)
natural_image
Interior view of a stainless steel oven with grating and rack (no visible text or symbols)SELF-CLEANING PANELS
The CLEAN (where present) function activates the reaction that causes cleaning.
Our smooth walled ovens can be fitted with selfcleaning panels to cover the inside walls.
These special panels are simply hooked on to the walls before the side frames are fitted. They are coated in a special, micro-porous catalytic enamel which oxidises and gradually vaporises splashes of grease and oil at cooking temperatures above 200°C.
If the oven is not clean after cooking fatty foods, operate the empty oven for 60 minutes (max.) at maximum temperature.
Never wash or clean selfcleaning panels with abrasive, acid, or alkaline products.
Respect for the environment
The documentation for this appliance is printed on paper bleached without chlorine or recycled paper to contribute to protecting the environment. The packaging was designed to prevent damage to the environment; they are ecological products that can be recovered or recycled. Recycling the packing saves raw materials and reduces the volume of industrial and domestic waste.

THE PACKING MATERIAL is 100% recyclable and marked with the recycling symbol. Dispose of in conformity with local law. The packing material (plastic bags, polystyrene parts, etc.) must be kept out of the reach of children because it is potentially dangerous. THIS APPLIANCE is marked in conformity with European Directive 2002/96/EC, Waste Electrical and Electronic Equipment (WEEE). By making sure that this product is disposed of correctly, the user contributes to preventing potential negative consequences for the environment and health.
THE SYMBOL on the product or accompanying documentation indicates that this product must not be treated as domestic waste but must be delivered to a suitable collection point for the recycling of electrical and electronic equipment.
DISPOSAL MUST BE MADE in conformity with local laws on waste disposal.

FOR ADDITIONAL INFORMATION about the treatment, recovery and recycling of this product, contact the local office of competence, the domestic waste collection service or the store where the product was purchased.
BEFORE SCRAPPING, make it unusable by cutting the electrical cord.
EN
Introduction to the oven
Dear Customer, your new oven is controlled by an electronic board that constantly monitors its operation to improve its performance.
The touch controls are state-of-the-art, precise and reliable.
The interface is elegant, orderly and discrete, more intuitive than ever!
A few buttons, many functions and no combination or sequence is difficult to enter, so you can concentrate on following the recipe and the oven is ready in two clicks!
Installation and hook-up
Dear Customer, this oven is a sophisticated electronic appliance, classified as a durable good. Its installation requires qualified professionals for both the hook-up of the power line and itsplacement in the kitchen counter.
(SEE ASSEMBLY INSTRUCTIONS ON PAGE 62)
Before hook-up
When the oven is connected to the electric mains for the first time, the display will ask you to select your language; use the buttons to select the language you want;
use the button ☐ to confirm the choice;

text_image
ITALIANO ENGLISH DEUTSCH FRANÇAISE ESPAÑOL NEGERLANDS PORTUGUÉS POLSKI(from now on, the language choice will remain fixed even when their are power outages).
Now, it goes into demonstration mode.
Demonstration mode
This is the mode that the oven is normally in every time that there is a power failure and, consequently, when it is first hooked-up:
the purpose is to show how you can control it with a recorded sequence of commands.

In this mode, the oven is never REALLY turned on, i.e., the heating elements are never powered! The control panel is INACTIVE and, so, the oven will not respond to commands!


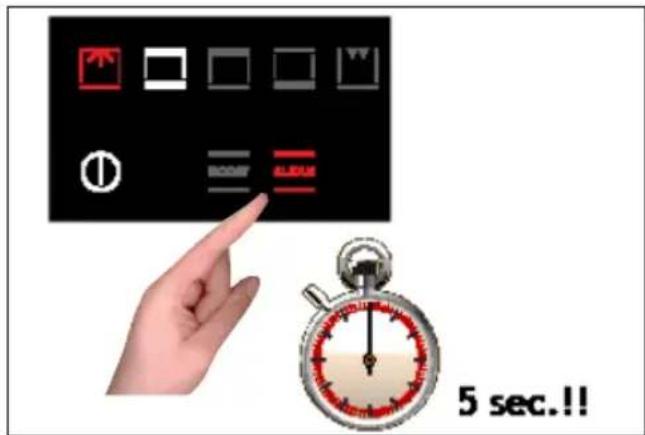
text_image
5 sec.!! DOCGTTo disable the demonstration mode, touch the light symbol for five seconds: the control will go to normal operation and ready for turning on. Now you can set the time but it is not necessary for turning on the oven.
Setting the clock
text_image
Hand interacting with a digital control panel showing icons for settings, buttons, and a timer display.The oven will signal that it is connected to the power mains with a double beep. To set the system time, press the "TIMER FUNCTIONS" button for at least 3 seconds

Each command activated is confirmed by a beep.

text_image
- + 9:20Set the clock with the + and - buttons: during setting the separator dots flash, the time has been set when the dots remain steady on.
ACTIONS THAT ARE POSSIBLE WITH THE OVEN OFF
- Turn on oven light

text_image
Hand interacting with a black touchscreen display showing various function icons and labelsThe oven light is turned on/off by touching the symbol as shown in the figure.

- Change the Language
When the oven is off, you can change the language of the display by simultaneously selecting and the + in the lower right for at least 3 seconds.
Then use ▼ to select the language and confirm the choice with .
- Setting the "minute-counter" timer function
See the appropriate section on page 58.
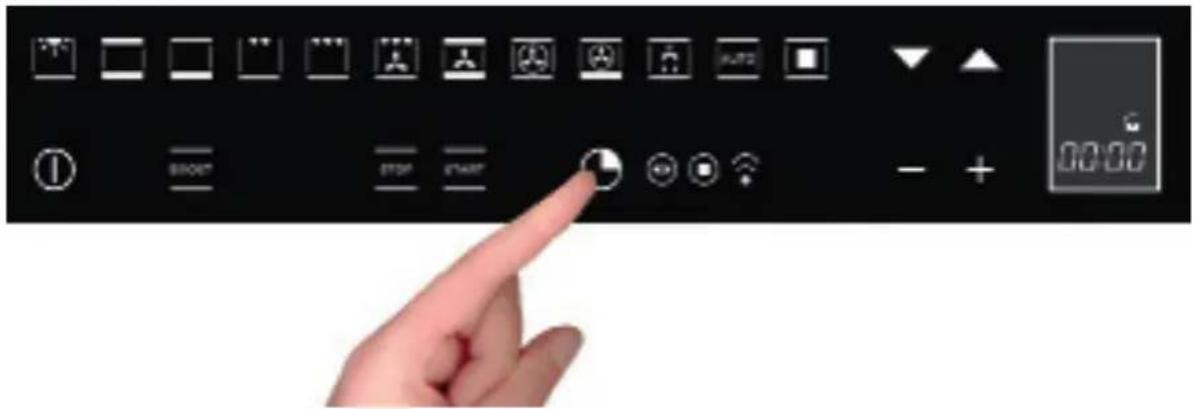
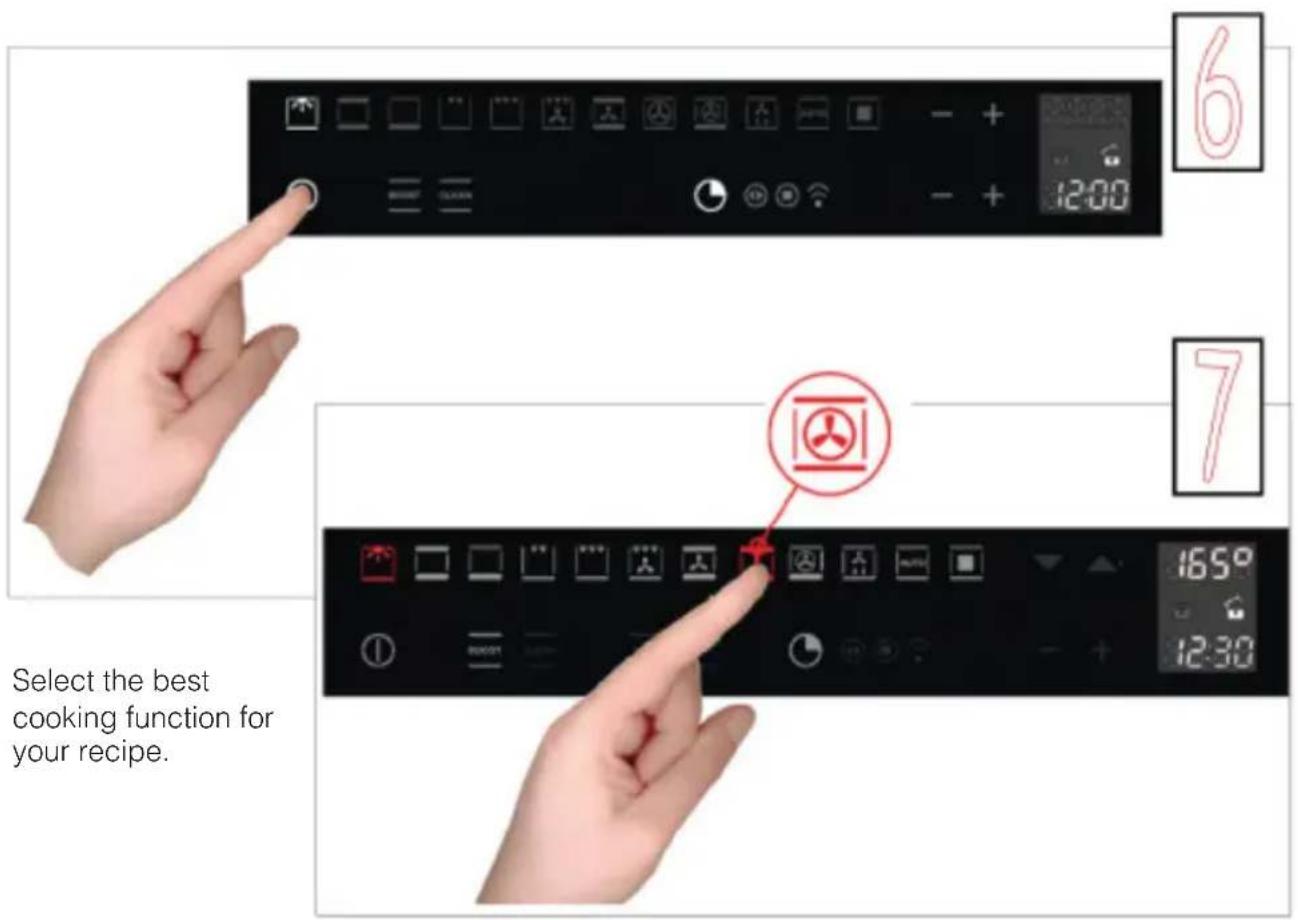
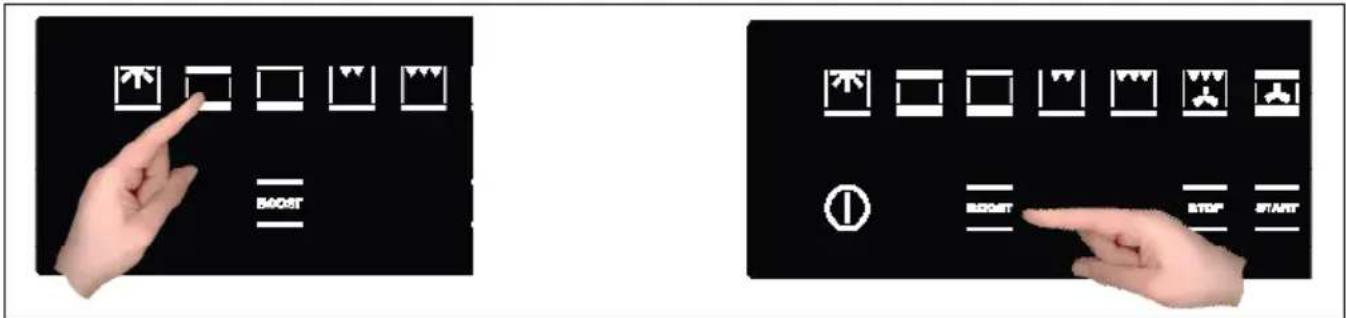
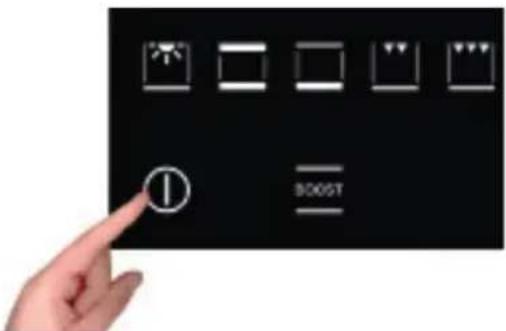
Turning on the oven

text_image
I BOOSTTurn the oven on by pressing the ⓑ symbol shown in figure.
to activate the oven functions, always press ① except for the light and timer functions, which are independent
The command activates all the icons by lighting up their backgrounds.
NOTE: Remember that the oven only turns on if the key function is deactivated

The word ON appears on the display for a minute. The control is waiting for you to select a cooking function. Otherwise, the oven assumes that it was turned on by accident and, for safety reasons, it automatically turns off displaying the word OFF for several seconds.
Key (or child safety) function

text_image
EN 3 sec. IIThe key function is activated/deactivated by pressing the button for at least 3 seconds.
You can activate and deactivate the operating mode of the oven at any time.
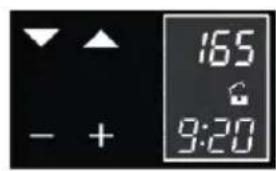
text_image
165 - + 9:20The padlock OPEN symbol means that the key function is not active.

text_image
- + 165 9:20The padlock CLOSED symbol means that the key function is active.
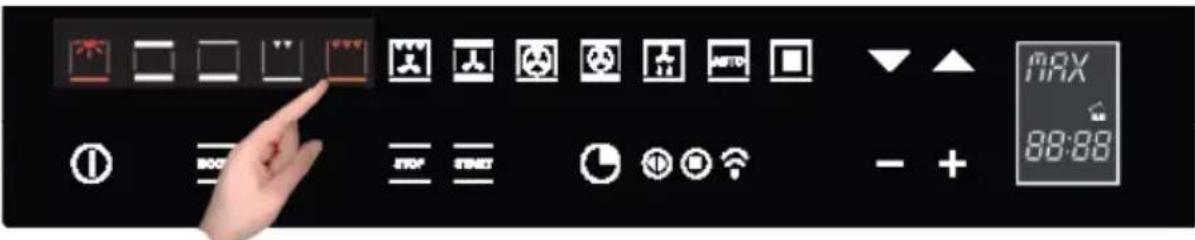
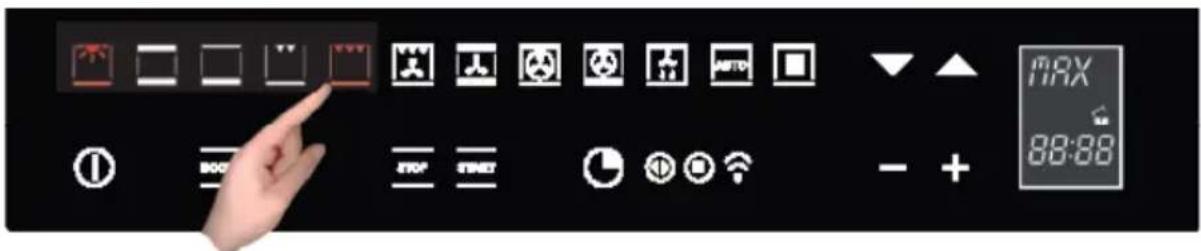
MAIN FUNCTIONS
Overview of the command panel
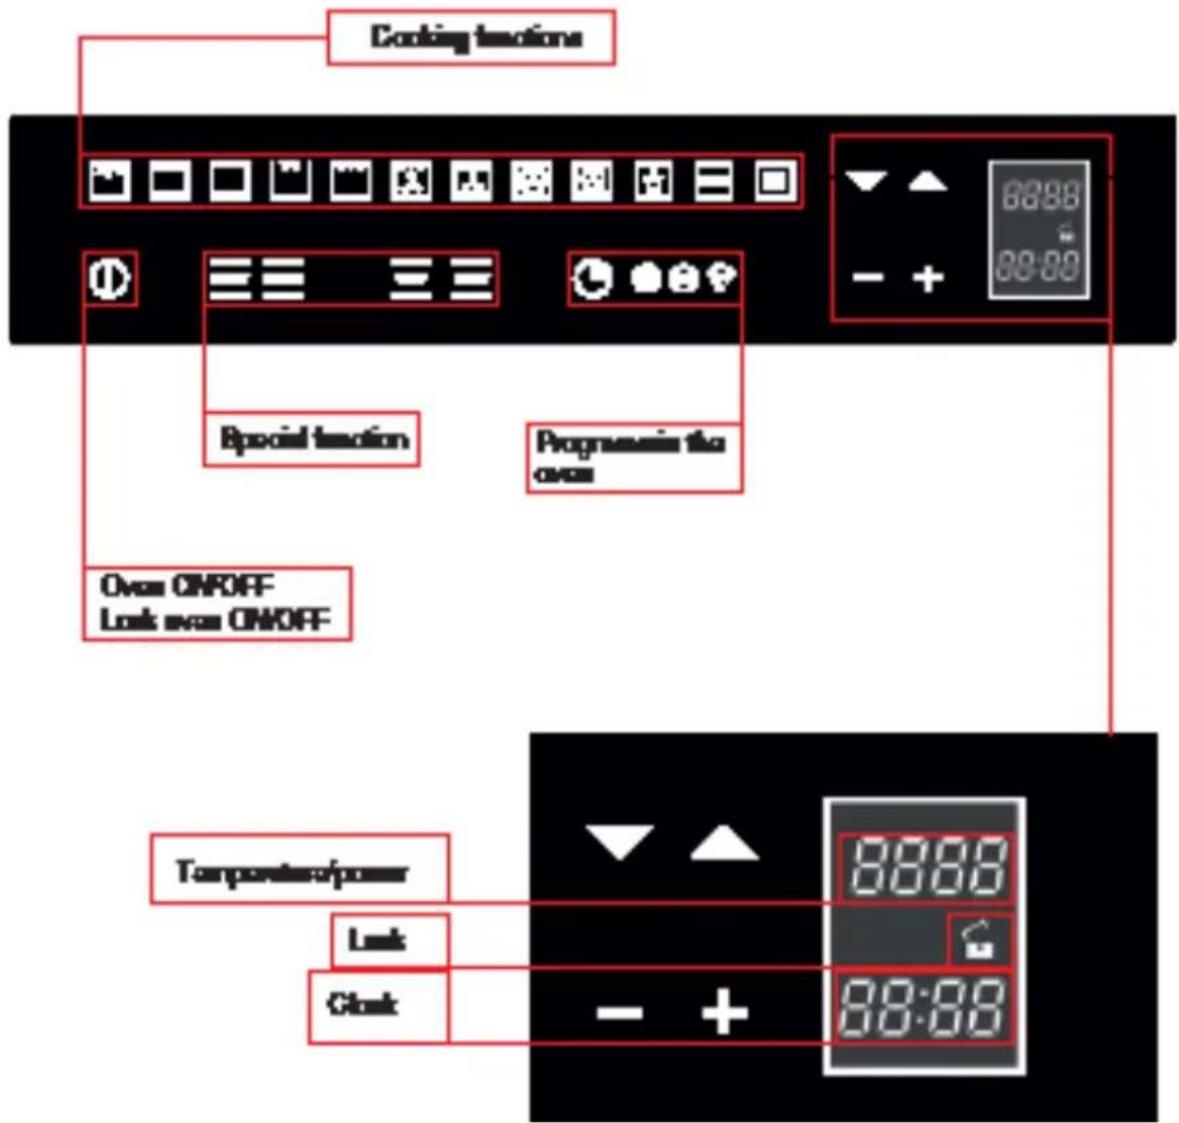
text_image
Cooling instructions Special reaction Progressive the once Over ON/OFF Lock over ON/OFF Temperature/Power Lock Clock 88:88 88:88 - + 88:88
The cooking functions
The provides eleven specific cooking functions!
To activate a function, just touch the corresponding symbol.
Each function has a temperature setting selected on the basis of cooking tests of the recipes that are typically used, which can be easily changed based on your own experience.
Attention:
"During use, the accessible parts of the oven can become very hot. Children should be kept at a distance; you should also be careful not to touch the heating elements inside the oven."
Control panel functions


The oven lamp always turns on when the door is opened and, to save energy, it is managed by the system in the other modes.

Upper and lower heating elements. Preset to 190 °C. Regulation of the thermostat from 50°C to MAX

Lower heating element. Pre-set to 50 °C. Regulation of the thermostat from 50°C to MAX

Upper heating element (grill surface and reduced power). Preset to MAX. Regulation of the thermostat from 50 °C to MAX.

Double heating element (large grill surface area). Preset to MAX. Regulation of the thermostat from 50 °C to MAX.

Double upper heating element with fan (large grill surface area). Pre-set to 165 °C. Regulation of the thermostat from 50 °C to MAX.

Upper heating element, lower with fan. Pre-set to 165 °C. Regulation of the thermostat from 50°C to MAX.

Circular heating element with fan. Pre-set to 165 °C. Regulation of the thermostat from 50°C to MAX.

Lower heating element + Circular heating element with fan. Pre-set to 230 °C. Regulation of the thermostat from 50°C to MAX.

Fan for defrosting. Regulation of the Thermostat from 0 to 60°C.

Access to preset recipes

Rapid preheating

Rapid cleaning (for ovens with self-cleaning catalytic panels)
The table below shows the results of the cooking tests conducted in our laboratories by a professional cook. In any case, these are only indicative and the values that we have selected are only a starting point for your to experiment with your own recipes to obtain better results!
| F | ||||||||
| °C | 160-200 | 160-180 | 140-160 | 200-230 | 210-220 | 160-180 | 190 | 230-MAX |
| 2-3 | 2 | 2 | 1-3 | 2 | 2-3 | 2-3 | 4-5 2-3 | |
| 30'-50' | 20'-40' | 10'-40' | 10'-20' | 45'-60' | 45'-60' | 60'-70' | 14'-18' |
| F | |||||||||
| °C | 225-250 | 160-180 | 210-230 | 160-190 | 200-220 | 160-180 | 175-190 | 190-210 | 170-190 |
| 2 | 2 | 2 | 2 | 2-3 | 2 | 2 | 2 | 2-3 | |
| 120'- 150' | 120'- 160' | 90'- 120' | 90'- 120' | 50'- 60' | 45'- 60' | 60'- 70' | 40'- 50' | 40'- 50' | |
Instructions for use
Conventional cooking


A classic system that uses upper and lower heat suitable for cooking a single dish.
It is a good idea to insert the food when the oven has reached its preset temperature, i.e., when the °C is locked and you have heard the beep.
If you need to lower or raise the temperature towards the end of cooking, press the most suitable cooking symbol and adjust the temperature as you see fit.
We recommend opening the door as little as possible during cooking.
flowchart
graph TD
    A["Top Left"] --> B["Central Column"]
    B --> C["Top Right"]
    C --> D["Bottom Left"]
    D --> E["Bottom Right"]
    E --> F["Bottom Left"]
    F --> G["Bottom Right"]
    G --> H["Bottom Left"]
    H --> I["Bottom Right"]
    I --> J["Bottom Left"]
    J --> K["Bottom Right"]
    K --> L["Bottom Left"]
    L --> M["Bottom Right"]
    M --> N["Bottom Left"]
    N --> O["Bottom Right"]
    O --> P["Bottom Left"]
    P --> Q["Bottom Right"]
    Q --> R["Bottom Left"]
    R --> S["Bottom Right"]
    S --> T["Bottom Left"]
    T --> U["Bottom Right"]
    U --> V["Bottom Left"]
    V --> W["Bottom Right"]
    W --> X["Bottom Left"]
    X --> Y["Bottom Right"]
    Y --> Z["Bottom Left"]
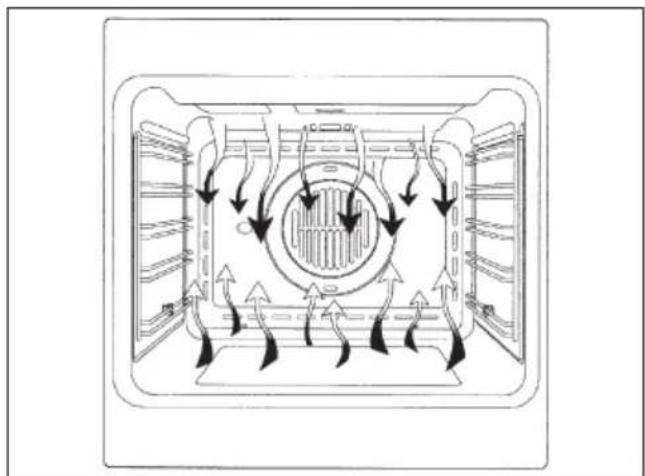
Fan cooking


In this type of cooking, a fan located in the rear part circulates warm air inside the oven, distributing it uniformly. This cooks food faster than conventional cooking.
This system is good for cooking on several shelves and even for different types of foods (fish, meat, etc.).
Defrosting

When you select ventilated cooking and set the temperature to 0 °C , the fan will circulate cold air inside the oven, favouring the rapid defrosting of frozen foods.
Pre-heating is not necessary but it is better to do it for pastries (you can increase the temperature up to 60 °C).

natural_image
Technical line drawing of a dual-chamber air vent system (no text or symbols)Grill cooking


Type of cooking for grilling or browning foods.
Some ovens can even have a motorised rod for cooking on a spit.
The grill with the food to be cooked is placed in the 1st or 2nd position from the bottom.
Pre-heat for 5 minutes. Regulate the temperature from 50^ to MAX.
Cooling fan
The fan is located on the upper part of the oven and creates a flow of cooling air inside the cabinet and across the front of the oven.
It starts when the oven chamber reaches about 80 °C.
The fan turns off when the temperature of the oven chamber falls below about 60 °C.
Food probe (or probe thermometer)
natural_image
Interior view of a modern kitchen appliance with visible wiring and metal components (no text or symbols)TEMPERATURE PROBE
Tenderness, taste and flavour are the result of precise ad functional control.
The food probe is a thermometer which, when inserted into the food, makes it possible to check the internal temperature and use it to establish the end of cooking.
For example, meat may look like it is cooked on the outside, but still be pink on the inside!

natural_image
Simple line drawing of a curved medical or electrical device with two leads (no text or symbols)The temperature reached by food during cooking is closely linked to problems relating to health and hygiene. Bacteria can be contained in every kind of meat, poultry and fish, as well as raw eggs.
Certain types of bacteria make food go off, while others, such as Salmonella, Campylobacter jejuni, Listeria monocytogenes, Escherichia coli and Staphylococcus aureus can be seriously harmful to human health.
Bacteria multiply very quickly above a temperature of 4.4^ up to 60^ C. Mince is particularly at risk from this point of view.
To prevent bacteria from multiplying, it is necessary to take the following measures:
- Do not defrost food at room temperature, always in the fridge or in the oven using function. In the latter case, cook the food immediately afterwards.
- Stuff chicken just before eating it. Never buy pre-packed ready-stuffed chicken and only buy ready-cooked stuffed chicken when you intend to eat it within 2 hours.
- Marinate food in the fridge, not at room temperature.
- Use a food probe to check the temperature of meat, fish and poultry if they are more than 5 cm thick,

to ensure that the minimum cooking temperatures are reached.
The greatest hazards are posed by poorly cooked chicken, particularly at risk from Salmonella.
- Avoid interrupting the cooking process, i.e., partially cooking food, storing it and completing the cooking process later. This sequence encourages the growth of bacteria due to the “warm” temperatures reached inside the food.
- Roast meat and poultry in the oven at temperatures of at least 165^ .
Using the food probe

The food probe socket is situated in the top front corner of the oven cavity, protected by a metal cover (1).

Lift the metal cover (2)

Push the plug in as far as it will go. If it is correctly inserted, the control will give off a double beep.(3)

natural_image
Illustration of a person in motion near a vehicle, with a numbered label '4' in the top-left corner (no readable text or symbols on the figure itself)
natural_image
Hand holding a tool near a circular object with a textured surface, no visible text or symbolsPush the probe into the centre of the food, avoiding touching bones or fatty areas.

Remember that the probe will not work if it is connected when the oven is already switched on!
text_image
Select the best cooking function for your recipe. 6 7 12:00 16:50 12:30

text_image
After 5 sec. the temperature display switches to indicate the temperature of the food probe, i.e., the temperature which must be reached inside the food.
With ▼ you can change the minimum required internal temperature in a range of +30 °C to +99 °C but we recommend consulting the table below, which is taken from the “National Food Safety Database (USA)”
Remember that, if you want to change the temperature parameters of the food probe or the internal temperature of the oven, you must proceed as follows:
- Select ▼(white for the probe and red for the oven chamber)
- with ■ you can increase or decrease the temperatures at will
| FOOD MINIMUM INTERNAL TEMPERATURE | |
| Mince | |
| Hamburger 71°C | |
| Beef, veal, lamb, pork 74°C | |
| Chicken, turkey 74°C | |
| Beef, veal, lamb | |
| Roasts and steaks: | |
| Rare | The cooking temperature for rare meat is not indicated by the NFSD as it is unsafe for health reasons |
| Medium-rare 63°C | |
| Medium 71°C | |
| Well done 77°C | |
| Pork | |
| Chops, roasts, ribs: | |
| Medium 71°C | |
| Well done 77°C | |
| Fresh ham 71°C | |
| Fresh sausages 71°C | |
| Poultry | |
| Whole chicken or chicken pieces 82°C | |
| Duck 82°C | |
| Whole turkey (not stuffed) 82°C | |
| Turkey breast 77°C | |

text_image
STOPIf the plug is removed after cooking begins, the control blocks the oven and signals the error by beeping: plug the probe in again to resume cooking!

When cooking with the aid of the food probe, all the pre-set temperatures are changed, to maintain consistency with the philosophy of use, to 165^ C: they can be varied from a minimum of 120^ C to a maximum of 250^ C. For the same reason, the defrosting function is deactivated.

EN
The end of cooking, established by reaching the internal temperature set for the food probe. All the oven programming functions (timer functions) are stopped, apart from the beeper (minute counter). When the food probe detects the temperature for which it was set, the oven is automatically turned off and you are notified by a beep and "Program finished remove the dish" on the display. When the cooking time is up, remember to disconnect the food probe and remove it from the oven. CAUTION: the probe is very hot after cooking.

natural_image
Hand holding a tool near a door, with an arrow pointing to the handle (no text or symbols visible)Special functions Boost (quick preheat)


text_image
BOOSTBOOST – FAST TIMES To shorten cooking times with fast pre-heating
This special function can be activated after selecting a cooking function and is used to reduce the time required to reach the set cooking temperature.
text_image
Two industrial control panel diagrams with labeled buttons: one showing a hand pointing at icons, the other showing a hand interacting with a device.It is possible to disconnect the turbo heat function "BOOST" or change cooking function at any time.
Clean (quick cleaning)

text_image
CLEANASSISTED CLEANING High temperature cycle (250°C), combined with self-cleaning panels for gentle, non-invasive cleaning of the cooking chamber.
Correct operation is combined with the use of the lateral panels and catalytic fan cover: the oven is treated with special enamel with a micro-porous structure, which breaks down the fat projected thanks to a catalytic oxidisation process which transforms residues into gaseous products. The turbo clean function is only activated when no cooking function has been selected, so: switch on the oven and touch the symbol as shown in the figure for five seconds.
text_image
5 sec.!!

The cleaning process takes place at a temperature of 250^ C and lasts one hour. Do not use it for cooking food!!
The oven light is activated and can be switched off and on again at any time.
All the self-cleaning panels will perform effectively for thirty cleaning processes, after this limit the panels must be replaced.
The panels should be cleaned exclusively with tap water and replacements can be ordered from your specialised dealer.
Oven light control
The light control is active on all the cooking functions and is independent, meaning that it can be switched on or off to suit your requirements, when you want!
The oven light is usually kept on throughout the heating time and then for three minutes after reaching the temperature set. From then on, the oven light switches off to save power.
To check the cooking, it may be necessary to switch on the internal light. All you have to do is touch the light symbol: the light will stay on for three minutes and then switch off automatically. Naturally you can switch it off immediately by touching the light symbol again.
Some models are equipped with a door control. This feature uses sensor technology to detect the position of the door to control the oven light: the opening of the door is indicated by a beep and the light comes on. It switches off when the door is closed again.
Simple cooking commands
Thanks to state-of-the-art controls, only two touches are required to set a cooking mode: turn on the oven and select the most suitable function for the dish you are about to cook... you choose it and you touch it!

text_image
EN 88:88 88:88
text_image
Control panel interface with icons for settings, buttons, and a digital display showing MAX and 88:88 values.
The control suggests a temperature for each function, which you can change at any time, but if you consider it suitable, you don't need to do anything else, the oven will start by itself in just a few seconds!
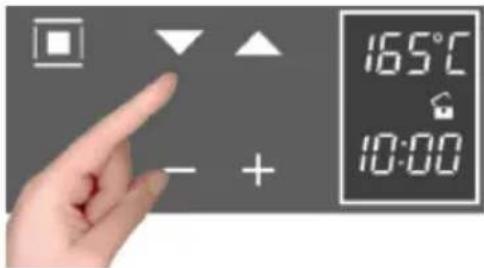
Setting the temperature
The uses a temperature probe that is accurate to ±5 ^ for the maximum reliability of the cooking temperatures requested.
You can change the temperature at any time. After selecting the cooking function, just touch the symbols and the setting range varies from +50 °C to MAX.
You don't need to confirm the change, the control turns on by itself after a few seconds.
text_image
165°C 10:00During heating, the centigrade symbol ( ^ C) flashes to indicate that it is heating up to reach the selected temperature. When the temperature is reached, it beeps.
NOTE: some models may display the current temperature in the oven until the temperature set is reached. If you want to check the temperature set, press any one of the buttons and, if you wish, you can use them to change the temperature set.
Residual heat
While cooking food, the structure of the oven stores heat. This heat is kept isolated from the rest of the kitchen thanks to generous heat insulation and certain construction techniques.
This heat is gradually dissipated over time and can still be a resource in the kitchen, if it is managed: the control shows the internal temperature after the oven is turned off until it falls to 50 °C.
EN

Use this characteristic to keep foods warm or to complete their cooking gently!
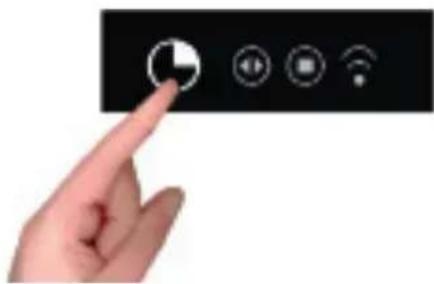
PROGRAMMING THE OVEN
The programming of the oven provides three modes for controlling the cooking time. They can be used in combination with normal cooking functions.
natural_image
Hand pointing at a black control panel with four function icons (play, audio, Wi-Fi) on the right (no text or symbols on the panel itself)The functions can be selected in sequence, from left to right, by touching the clock symbol.
At each touch, a symbol lights up in sequence.
Timer programming: cooking time

text_image
EN - + 00:00 - + 00:45Touch the timer symbol once and the relative symbol will light up. Plus, the clock display will replace the current time:
The separator dots flash to indicate that you can program the cooking time.

text_image
8:30:08 12:30Once the cooking time is entered, the display will flash the current time again and the "cooking time" symbol will be lit.
The countdown begins now. After the indicated time has elapsed, the oven will beep and the heating elements, and cooking, will be turned off. The following words will appear on the display: "Program finished remove the dish": press any button to stop the beeping or open the door.
After one minute, the oven will automatically turn off, if other cooking functions have not been set.
Timer programming: end-of-cooking time

text_image
- + 12:30Touch the timer symbol two times and the relative symbol will light up.
The separator does will flash to indicate that you can set the end-of-cooking time.
text_image
13:55 - +Set the end-of-cooking time by touching the "+" and "-" symbols.


text_image
8:30 12:30Once the end-of-cooking time is entered, the display will flash the current time again and the "end-of-cooking time" symbol will be lit.
The countdown starts now. When the set time has been reached, the oven will beep and the heating elements will turn off, ending cooking. The following words will appear on the display: "Program finished remove the dish": press any button to stop the beeping or open the door.
After eight seconds, the oven will automatically turn off, if other cooking functions have not been set.
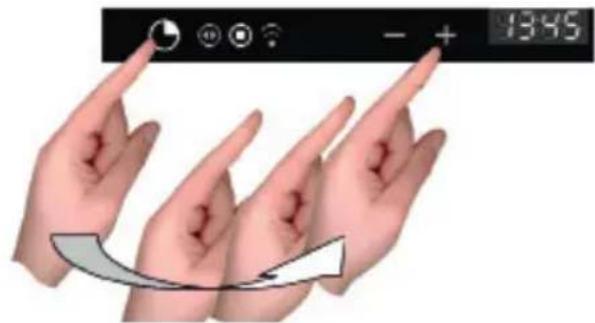
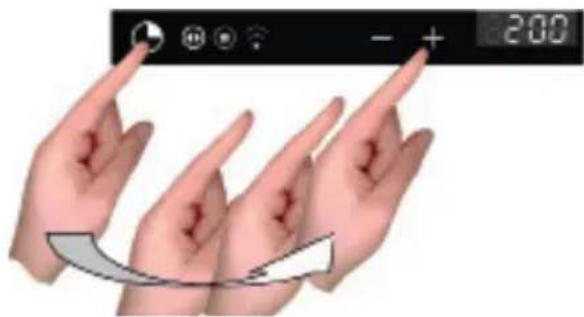
Timer programming: delayed cooking
By combining the two modes, “cooking time” and “end-of-cooking time”, you can program the oven so that cooking starts later than the current time.
For example, if you want to go out at 8:30 and you want a roast to be ready when you return at 13:00, do this:

natural_image
Packaged meat product with label and cheese, no visible text or symbolsPrepare the roast for cooking and put it in the oven
Turn on the oven, select the cooking function and set the temperature.
text_image
- + 200Then set the cooking time, which we assume to be two hours.

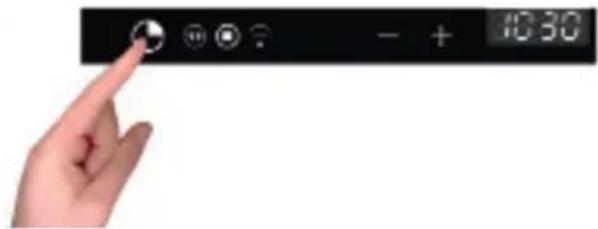
text_image
- + 10:30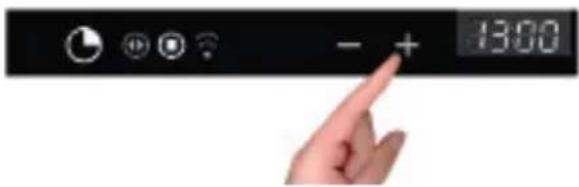
text_image
- + 13:00
Now, set the end-of-cooking time: the control normally adds the cooking time to the current time, so it proposes an end-of-cooking time, which in our case would be 10:30 (8:30+2:00).
Change the end-of-cooking time to what you want, in our example 13:00
The oven goes to standby mode, turning off the oven light.

The control automatically turns the oven on at 11:00 (13:00-2:00) and turns it off at 13:00. The roast will be ready when you return!
Programming the timer: minute-counter
The minute-counter is a function of the timer that is independent from the operation of the oven, i.e., it does not stop cooking or turn off the oven but functions as an alarm. You can set it at any time, such as to remind you when to check cooking on the burners, in addition to the oven, or for other kitchen tasks. It is even available when the oven is off and, in this case, just touch the timer function symbol one time. But, if you are using it with the oven on, you must touch the time function symbol three times:

text_image
- + 00:00The separator dots flash to indicate you can set the time.
Touch the "+" and "-" symbols to set the minutes.
The countdown starts now. After the indicated time passes, the over will and the dedicated symbol will flash: press any button to stop the beep.
Programming the timer: cancelling the program
To cancel a program, you must set the previously assigned value to zero or turn on the oven.
Automatic functions: recipes
To access the recipe function, proceed as follows:
Turn on the oven with Ⓙ
Select the AUTOMATIC function

text_image
START RECIPIES PERSONAL PREF SETEN
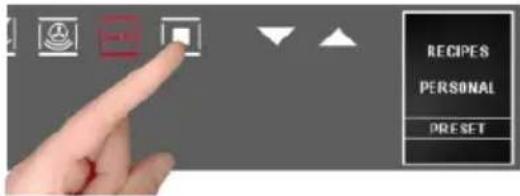
text_image
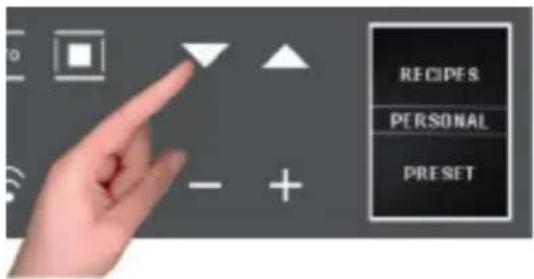
RECIPIES PERSONAL PRE SETThe display shows the 2 options:
- personal recipes;
- preset recipes
Choose the desired setting with the ▼buttons;
text_image
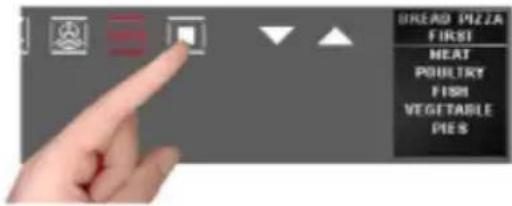
BREAD PIZZA FIRST MEAT POULTRY FISH VEGETABLE PIESusing the button, confirm the choice; the following menu appears;
press the buttons to select the type of dish and the button to confirm the choice.
text_image
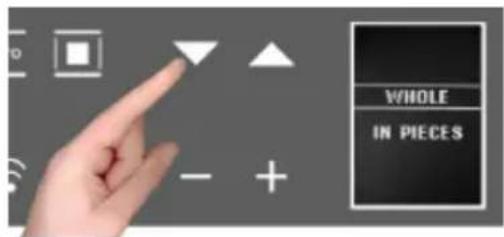
WHOLE IN PIECESPress the ▼ buttons to select the type and the to confirm the choice.

text_image
MIXED GRILLPress the ▼buttons to select the type and the to confirm the choice.
text_image
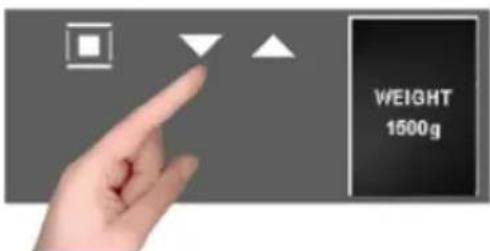
WEIGHT 1500gThe weight screen appears. Use the ▼buttons to select the preset values and confirm the choice with the □button.


text_image
NIXED GRILL 1500g LEVEL 3 80:30 STARTWhen finished with the settings, the display summarizes the recipe set. The colon in the cooking time (00:30) will be flashing to indicate that it can be changed.
To change it, use the - + buttons.
Or select the function directly and, in this way, the cooking program starts with a countdown of the preset time on the display.

ATTENTION: certain recipes use pre-heating, so put the dish in when the oven has reached the set temperature and the display shows "PRE-HEATING FINISHED PUT IN THE DISH"
When cooking is finished the display will flash "PROGRAM FINISHED REMOVE THE DISH" and, at the same time, the oven will beep until you press a key or open the door.
Note: at any moment, if you make a mistake choosing the values and/or you want to change the settings of your recipe, you can select which cancels it and allows you start over from the beginning of the procedure.
NOTE: If you are cooking with the modified parameters of a pre-set recipe, while the oven beeps at the end of cooking, you will see:

see how to save recipes in the next paragraph.
Personalising recipes
Once you have changed the cooking time of a preset recipe and executed it, you can save it for the next by storing the new parameters you used (weight and cooking time).
At the end of the cooking cycle of the modified recipe, the icon below will appear and, to save it, proceed as follows:

- with the + key select "YES"
- confirm with the time used is displayed,
- change it with + and - and confirm with the weight used appears,
- change it with + and - and confirm with ■ you will see the message
"Recipe saved POS. 001", and so on, in ascending order
Each time you access the "PERSONAL RECIPES" menu, you will find it saved in your recipes.

If there is insufficient memory for saving your personal recipes, you will see this message displayed: "MEMORY FULL UNABLE TO SAVE".

Before saving your recipe, you must delete others from the menu in this way:
text_image
RECIPES PERSONAL PRE SET- select the function 1
- select the "PERSONAL RECIPES" section where you will find all the saved recipes;
- with ▼scroll the menu and select the recipe that you want to delete.
Note: the menu provides the names by default;
When the recipe to be deleted is displayed, select holding it down until the next screen appears:
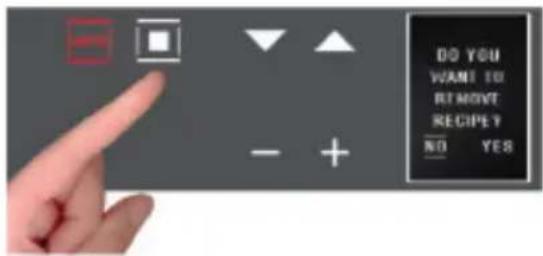
text_image
DO YOU WANT TO REMOVE RECIPIE ? NO YESBy default, the selection will be set to NO, but, by pressing the + and - scroll keys, select YES and confirm with ☐

- The display tells you that the recipe has been deleted;
Removing the oven door
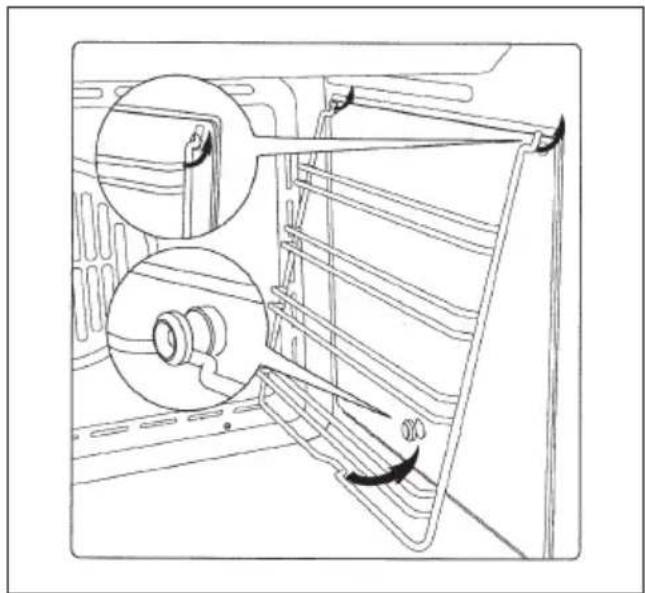
The oven door can be removed quickly and easily. To do so, proceed as follows:
- Open the door fully.
- Lift the two levers shown in Fig. below;
- Close the door as far as the first stop (caused by the raised levers).
- Lift the door upwards and outwards to remove it from its mountings.
To replace fit the door, fit the hinges in their mountings and lower the two levers.

natural_image
Line drawing of a hand holding a bracket with a black arrow indicating force or motion (no text or symbols)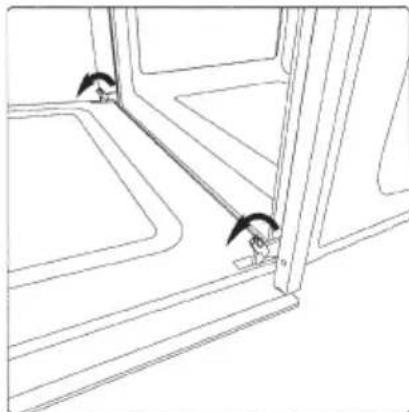
natural_image
Line drawing of a room corner with two small objects near the door (no text or symbols)Replacing the oven lamp

IMPORTANT: disconnect the appliance from the power supply line to avoid electrical shocks!
The oven lamp must have precise characteristics:
a) Structure suitable for high temperatures (up to 300 °C);
b) Power supply: see the V/Hz value on the serial number plate;
c) Power 25W;
d) Type G9 connector.
- To avoid damage, spread a tea towel for pots and pans inside the oven;
natural_image
Diagram showing a 3D object being cut off into a rectangular panel, with an arrow indicating the process (no text or symbols present)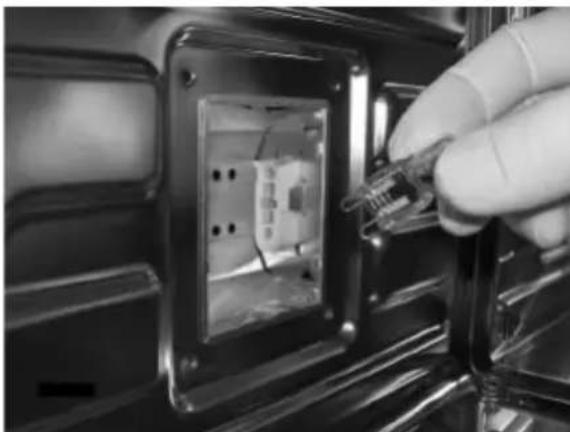
natural_image
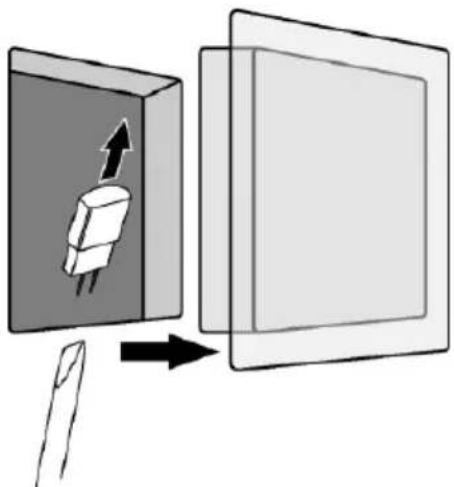
Close-up of a hand inserting a small electronic component into a black plastic electrical socket (no text or symbols visible)- Use a screwdriver to detach the glass pressure fitted on the lamp holder;
- Remove the old lamp by sliding it out of its seat and taking care not to break it;
- Insert the new bulb taking care not to touch it with your hands (we recommend using a disposable latex glove);
- Reattach the glass cover, pressing it firmly into the lamp holder until it is totally inserted in the joint;
- Connect the power line to the appliance.
EN
Installation instructions
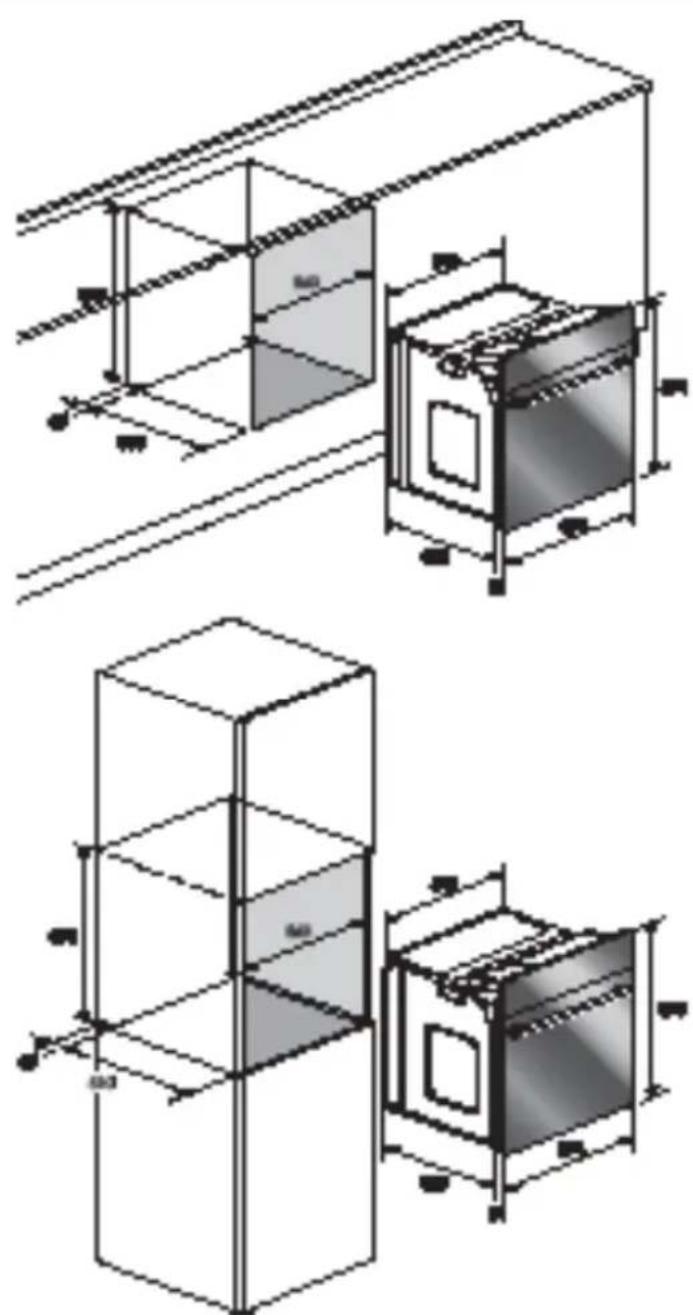
Installing the oven in a cabinet 45


natural_image
Close-up of a hand holding a small white object against a dark background (no text or symbols visible)The oven can be installed under a cook top, in a column, or combined with the relative food-warmer drawer. The dimensions of the cabinet must be as shown in the figures below. The cabinet material must be able to withstand the heat.
The oven must be centred with respect to the walls of the cabinet and fastened with the screws and bushings provided as shown in the figure to the side, taking care not to force the screws too much, breaking the bushings.

natural_image
Close-up of a hand holding a tool near a vertical object (no visible text or symbols)
text_image
Technical diagram showing structural components and dimensions of a cabinet or enclosure, including cross-sections and detailed internal layout with measurements in millimeters.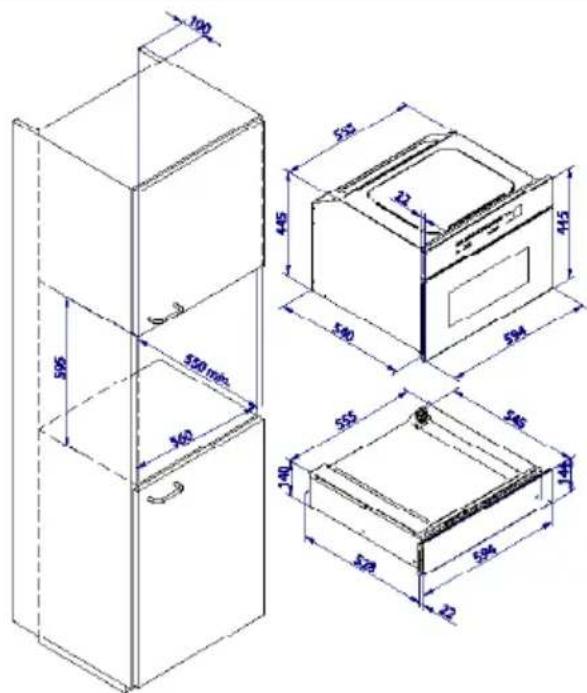
text_image
100 595 590 mm. 162 53 445 540 594 555 140 528 594 22 21Flush fitting 60
The oven can be installed under a work top or in a cooking column. Figure shows the installation dimensions.
Make sure that surrounding materials are heat resistant. Align the oven centrally with respect to the side walls of the units surrounding it and fix it in place with the screws and Allen screws provided.
See the accompanying instructions for combining the oven with multi-functional gas or gas-electric cookers.
natural_image
Technical line drawing of a two-tiered kitchen appliance assembly (no text or symbols)EN
Electrical connections
Before connecting the oven to the mains power supply, make sure that:
- The supply voltage corresponds to the specifications on the data plate on the front of the oven. - The mains supply has an efficient earth (ground) connection complying with all applicable laws and regulations. Correct earthing (grounding) is a legal requirement.
The power cable should never reach a temperature 50^ C above ambient temperature at any point along its length.
If a fixed appliance is not provided with a power cable and plug, or some other device permitting it to be disconnected from the mains electricity supply, with a gap between the contacts big enough to guarantee class III overvoltage protection, then such a device must be fitted to the power supply in compliance with the regulations governing electrical installations.
The socket or switch must be easily reachable with the oven fully installed.
N.B. The manufacturer declines all responsibility for damage or injury if the above instructionsntinfortunistiche non vengano rispettate.
| CABLE TYPES AND MINIMAL DIAMETERS | |
| SASO | |
| H05RR-F 3x1,5 mm2 H05RR-F 3x2,5 mm2 | |
| H05VV-F 3x1,5 mm2 H05VV-F 3x2,5 mm2 | |
| H05RN-F 3x1,5 mm2 H05RN-F 3x2,5 mm2 | |
| H05V2V2-F 3x1,5 mm2 H05V2V2-F 3x2,5 mm2 | |

text_image
Technical diagram showing a mechanical assembly with labeled parts L, N, and a central shaft marked 1/2
Caro Cliente,
natural_image
Technical line drawing of a front view of a microwave oven with a circular vent and ventilation grille (no text or symbols)IMPORTANTE
natural_image
Line drawing of a refrigerator interior showing door, vent, and rack (no text or symbols)
Importante:
natural_image
Interior view of a stainless steel oven with grating and rack (no visible text or symbols)PANNELLI AUTOPULENTI
text_image
1 5 sec.!! ① 80007text_image
Hand interacting with a digital control panel showing icons for settings, buttons, and a timer displaying '00:00'.text_image
Hand interacting with a black touchscreen display showing various function icons and labels like 'RESET' and a circled button.ACCENSIONE DEL FORNO
text_image
1 BOOSTtext_image
3 sec. IInatural_image
Diagram of airflow or heat transfer through a rectangular chamber with internal structures and directional arrows (no text or labels)Cottura ventilato


natural_image
Technical line drawing of a mechanical or electronic component with symmetrical arms and central hub (no text or symbols)Cottura al grill


natural_image
Interior view of an oven with visible wiring and metal bands (no text or symbols)SONDA TEMPERATURA
natural_image
Simple line drawing of a curved, looped object with two connectors (no text or symbols)
natural_image
Sketch of a car interior with a red number 4 displayed in the top-left corner (no text or symbols on the diagram itself)
natural_image
Hand holding a pen near a circular object with a textured surface, no visible text or symbolsi
text_image
Camera control panel interface with mode, battery, and display settings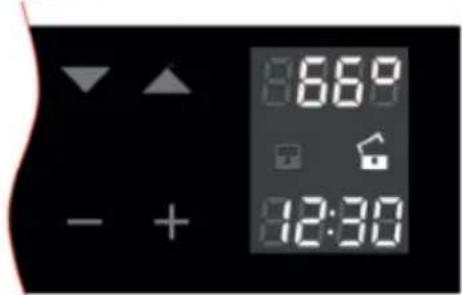
text_image
8669 - + 12:30natural_image
Hand holding a small object with an arrow pointing to it, next to a partial view of a device (no visible text or symbols)text_image
RESET STOP STARTCLEAN - PULIZIA ASSISTITA
text_image
88:88 88:88

text_image
MAX 88:88
natural_image
Hand pointing at a black control panel with four function icons (play, audio, Wi-Fi) on the right (no text or symbols on the panel itself)text_image
13:45 - +text_image
9:30 12:30text_image
RICEFTE PERSONALI IMPOSTATE START

text_image
RICETTE PERSONALI IMPOSTATEnatural_image
Line drawing showing a hand pressing down a chair frame with a tool, and a close-up of the seat being adjusted (no text or symbols)natural_image
Diagram showing a device being processed into a blank panel, with an arrow indicating the process (no text or symbols present)
natural_image
Close-up of a hand inserting a plastic clip into an electrical socket (no text or symbols visible)natural_image
Close-up of a hand holding a small white object against a dark background (no text or symbols visible)natural_image
Close-up of a hand holding a tool near a vertical object (no visible text or symbols)natural_image
Technical line drawing of a two-tiered electrical cabinet or enclosure structure with dimension annotations (no text or symbols present)text_image
Technical diagram showing mechanical assembly with labeled parts L and N, including a magnified inset view of a component.Cher Client,
Installation et raccordement, 103
Premier branchement, 103
natural_image
Technical line drawing of a front view of a microwave oven or oven unit (no text or symbols)IMPORTANT
natural_image
Line drawing of a refrigerator interior showing door, vent, and rack (no text or symbols)
Important:
natural_image
Interior view of a refrigerator with visible grilles and metal shelves (no text or symbols)PANNEAUX AUTONETTOYANTS
Installation et raccordement
text_image
Hand interacting with a control panel displaying various function icons and a numeric display showing 00:00.text_image
Hand interacting with a black touchscreen display showing various function icons and labels like 'RESET' and a circled button.text_image
3 sec. IInatural_image
Technical line drawing of a mechanical or electrical component with symmetrical arms and central hub (no text or symbols)Cuisson au gril


natural_image
Interior view of an electric oven with visible wiring and a logo on the tray (no readable text or symbols)SONDE DE TEMPERATURE
natural_image
Simple line drawing of a curved medical or laboratory device with two connectors (no text or symbols)natural_image
Sketch of a car with a red number 4 in the top-left corner (no text or symbols on the drawing itself)
natural_image
Hand holding a tool near a circular object with a number 5 in the top-right corner (no readable text or symbols)natural_image
Hand holding a small object with an arrow pointing to it, next to a curved surface (no text or symbols visible)
text_image
Two industrial control panel designs with labeled buttons: one showing hand pointing at icons, the other showing hand interacting with a touchscreen display.text_image
8:88 88:88 FR MAX 88:88
PROGRAMMATION DU FOUR
natural_image
Hand pointing at a black control panel with four function icons (play, pause, flip, Wi-Fi) on the right (no text or symbols on the panel itself)text_image
13:45 - +text_image
02:30 12:30natural_image
Line drawing of a hand opening a window frame with a black arrow indicating the direction (no text or symbols)
natural_image
Line drawing of a room corner with two small objects near the door (no text or symbols)natural_image
Diagram showing a device being processed into a blank panel, with an arrow indicating motion (no text or symbols present)
natural_image
Close-up of a hand inserting a small electronic component into a black plastic housing (no visible text or symbols)natural_image
Close-up of a hand adjusting a small white object on a dark surface (no text or symbols visible)natural_image
Close-up of a hand holding a pen, partially visible against a plain background (no text or symbols)ENCASTREMENT FOUR 45


text_image
Technical diagram showing structural components and cross-sections with dimension annotations in Chinese
text_image
Nb440 50 510 540 432 540 455 533 594
text_image
100 55 2 550 mm 540 3 55 1.50 570 22 54 445 445 594 594 594natural_image
Technical line drawing of a microwave oven assembly with mounting brackets and internal components (no text or symbols)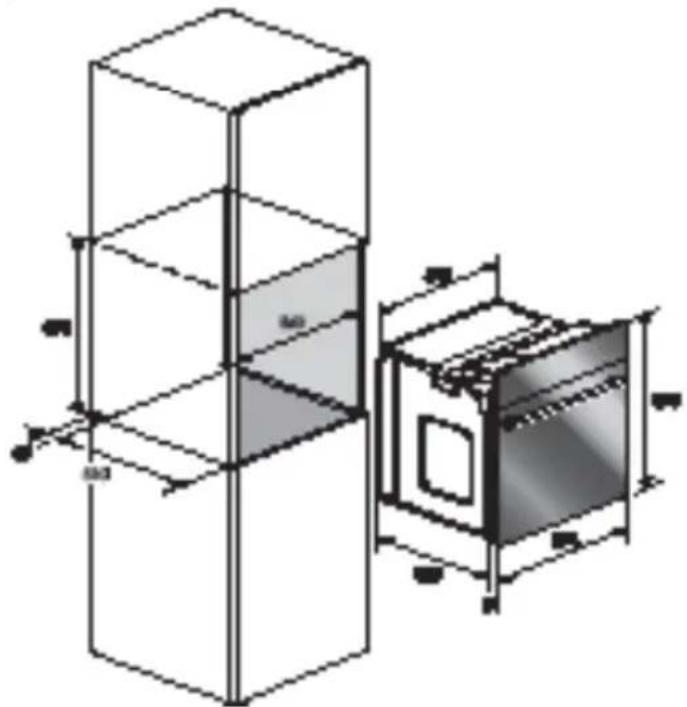
natural_image
Technical line drawing of a two-tiered cabinet and an oven, showing internal structure and dimensions (no text or symbols)text_image
Technical diagram showing mechanical assembly with labeled parts L, N, and dimension L/1, including a magnified inset view.natural_image
Line drawing of a microwave oven with a circular vent and ventilation grille (no text or symbols)WICHTIG
natural_image
Line drawing of a refrigerator interior showing door, vent, and rack (no text or symbols)
Wichtig:
natural_image
Interior view of a stainless steel oven with visible grating and rack (no text or symbols)DE
SELBSTREINIGENDE PANEELE
text_image
Hand interacting with a control panel displaying various function icons and a digital display showing 00:00.text_image
Hand interacting with a black touchscreen display showing various function icons and labels like 'RESET' and a circled button.text_image
3 sec. IInatural_image
Technical line drawing of a dual-chamber air vent system (no text or symbols)Grillen


natural_image
Interior view of an electric oven with visible wiring and a logo on the tray (no readable text or symbols)TEMPERATURSONDEN
natural_image
Simple line drawing of a curved medical or laboratory device with two connectors and a straight rod (no text or symbols)natural_image
Sketch of a mechanical component with a numbered label '4' in the top-left corner (no readable text or symbols)
natural_image
Hand holding a pen over a small object, possibly a tool or device, with no visible text or symbols.text_image
Camera control panel interface with mode, battery, and display settingsnatural_image
Hand holding a tool near a surface, with an arrow pointing to the top area (no text or symbols visible)text_image
Two industrial control panel designs with icons and labels: one showing a hand interacting with a grid of switches, the other showing a hand pointing at a 'STOP START' button.text_image
8:88 88:88
text_image
Control panel interface with icons for settings, buttons, and a digital display showing MAX and 88:88 time.

natural_image
Hand pointing at a black control panel with four function icons (play, pause, alarm, Wi-Fi) on the right (no text or symbols on the panel itself)text_image
8:30'9 12:30'text_image
13:45 - +text_image
DO YOU WANT TO REMOVE RECIPLY NO YESnatural_image
Line drawing showing a hand pressing down a chair frame with a black arrow indicating the motion direction (no text or symbols)Ofenlampe wechseln

natural_image
Diagram showing a 3D object being processed into a rectangular panel, with an arrow indicating motion (no text or symbols present)
natural_image
Close-up of a hand inserting a small plastic component into an electrical socket (no text or symbols visible)natural_image
Close-up of a hand adjusting a dark object with a small white mark (no visible text or symbols)natural_image
Close-up of a hand holding a pen, partially visible against a plain background (no text or symbols)text_image
Technical diagram showing structural components with dimension annotations and a magnified detail view labeled 'mm 3'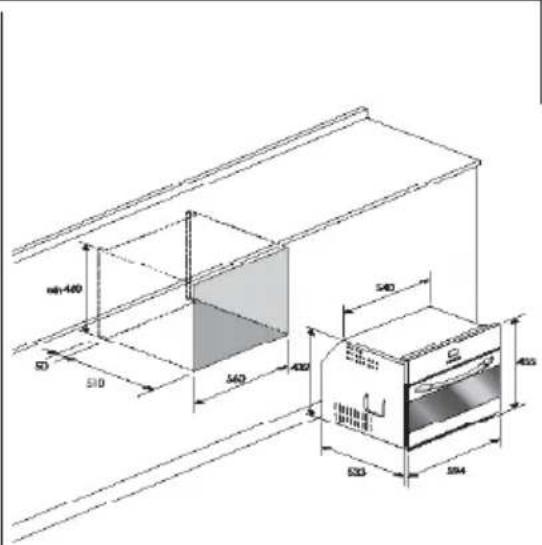
text_image
min400 50 510 540 400 540 433 533 394
text_image
100 55 22 445 340 354 55 140 528 594 22 595 350 mmnatural_image
Technical line drawing of a microwave oven assembly with mounting brackets and internal components (no text or symbols)
natural_image
Technical line drawing of a two-tiered storage unit with an oven, showing internal components and dimensions (no text or symbols)DE
S +31(0)20-4363525 (service)
E info@boretti.com
The Netherlands
N.V. BORETTI S.A.
Rupelweg 16
2850 Boom
T +32(0)3-4508180
F +32(0)3-4586847
E info.be@boretti.com
Belgium