MLBC45ZW - Oven BORETTI - Free user manual and instructions
Find the device manual for free MLBC45ZW BORETTI in PDF.

User questions about MLBC45ZW BORETTI
0 question about this device. Answer the ones you know or ask your own.
Ask a new question about this device
Download the instructions for your Oven in PDF format for free! Find your manual MLBC45ZW - BORETTI and take your electronic device back in hand. On this page are published all the documents necessary for the use of your device. MLBC45ZW by BORETTI.
USER MANUAL MLBC45ZW BORETTI
MLBC 45 MLBC 45
EN | USER MANUAL / INSTALLATION MANUAL NL | GEBRUIKSAANWIJZING / INSTALLATIEHANDLEIDING DE | GEBRAUCHSANWEISUNG / MONTAGE ANLEITUNG FR | MODE D'EMPLOI / MNUAL DE MONTAGE
www.boretti.com
| 2017 | 2016 | |||
| 金额 | 占总资产比例(%) | 金额 | 占总资产比例(%) | |
| 一、营业收入 | 3,584,968.00 | 69.99 | 3,584,968.00 | 69.99 |
| 二、营业成本 | 3,418,527.00 | 67.81 | 3,418,527.00 | 67.81 |
| 三、营业利润 | -1,432,527.00 | 15.11 | -1,432,527.00 | 15.11 |
| 四、净利润 | -1,432,527.00 | 15.11 | -1,432,527.00 | 15.11 |

text_image
BORETTIPassione in Cucina

MLBC45MLBC45
EN | USER MANUAL / INSTALLATION MANUAL
www.boretti.com
Contents
* 1. Safety Information .... 5
* 2. Advantages of the microwave oven .... 11
* 3. Before first use....12
* 4. Other important instructions....12
* 5. Description of the appliance ....13
* 6. Control panel....13
*7. Oven Functions....14
* 8. Initial Settings....15
* 9. Cooking Settings .... 16
* 10. Automatic Cooking....20
* 11. General settings....23
* 12. Timer settings....25
* 13. Safety....26
* 14. Defrosting....27
* 15. Cooking with a microwave oven....28
* 16. Cooking with the grill....30
* 17. Accessories....31
* 18. What type of containers may be used? 32
* 19. Cleaning and maintenance .... 34
* 20. Troubleshooting ....38
* 21. Technical characteristics....39
* 22. Installation....40
* 23. Tables and Suggestions ....43
* 24. Environmental protection....51
1. Safety Information
Before the installation and use of the appliance, carefully read the supplied instructions. The manufacturer is not responsible if an incorrect installation and use causes injuries and damages. Always keep the instructions with the appliance for future reference.
1.1 Children and Vulnerable People Safety
\*Warning!
Risk of suffocation, injury or permanent disability.
* This appliance can be used by children aged from 8 years and above and persons with reduced physical, sensory or mental capabilities or lack of experience and knowledge if they are supervised by an adult or a person who is responsible for their safety.
* Children should be supervised to ensure that they do not play with the appliance.
* Keep all packaging away from children.
\*Warning!
The appliance and its accessible parts become hot during use. Care should be taken to avoid touching heating elements. Children less than 8 years of age shall be kept away unless continuously supervised.
\*Warning!
When the appliance is operated in the combination mode, children should only use the oven under adult supervision due to the temperatures generated.
* If the appliance has a child safety device, we recommend that you activate it. Children under 3 years must not be left unsupervised in the vicinity of the appliance.
* Cleaning and user maintenance shall not be made by children without supervision.
1.2 General Safety
* This appliance is intended to be used in household applications and not in hotels, shops, offices and other similar environments.
* Internally the appliance becomes hot when in operation. Do not touch the heating elements that are in the appliance. Always use oven gloves to remove or put in accessories or ovenware.
* When heating food in plastic or paper containers, keep an eye on the appliance due to the possibility of ignition.
* The appliance is intended for heating food and beverages. Drying of food or clothing and heating of warming pads, slippers, sponges, damp cloth and similar may lead to risk of injury, ignition or fire.
* If smoke is emitted, switch off or unplug the appliance and keep the door closed in order to stifle any flames.
* Make sure you never catch the power cables of other electrical appliances in the hot door or the oven. The cable insulation may melt. Danger of short-circuiting!
* The tray and rack have a system for easy partial removal and handling of food. Always place these accessories inside the oven, as indicated in the Accessories section.
1.3 Microwaves Safety Instructions
\*Warning!
Do not heat liquids and other foods in sealed containers. They are liable to explode.
* Only use utensils that are suitable for use in microwave ovens.
\*Warning!
The oven cannot be used if:
- The door is not closed correctly;
- The door hinges are damaged;
- The surfaces of the contact between the door and the oven front are damaged;
- The door window glass is damaged;
- There is frequent electrical arcing inside the oven even though there is no metal object inside.
- The oven can only be used again after it has been repaired by a Technical Assistance Service technician.
* Microwave heating of beverages can result in delayed eruptive boiling. Care must be taken when handling the container.

natural_image
Two glass cups: one with a spoon inside, the other with a black 'X' symbol (no text or labels)* Take care when heating liquids! When liquids (water, coffee, tea, milk, etc.) are nearly at boiling point inside the oven and are taken out suddenly, they may spurt out of their containers. DANGER OF INJURIES AND BURNS!
To avoid that type of situation when heating liquids, put a teaspoon or glass rod inside the container.
* The contents of feeding bottles and baby food jars shall be stirred or shaken and the temperature checked before consumption, in order to avoid burns.
* Eggs in their shell and whole hard-boiled eggs should not be heated in the appliance since they may explode, even after microwave heating has ended.
\*Warning!
Do not heat pure alcohol or alcoholic drinks in the microwave. FIRE RISK!
\*Beware!
To avoid food overheating or burning it is very important not to select long time periods or power levels that are too high when heating small quantities of food. For example, a bread roll can burn after 3 minutes if the power selected is too high.
* For toasting, use just the grilling function and watch the oven all the time. It you use a combined function to toast bread it will catch fire in a very short time.
* To achieve the best results when warming up small loads (such as a glass of water, a milk mug or a popcorn bag) it is suggested that they are placed on the glass tray and position it at the 1st or higher levels.
* Turn or stir the food at regular intervals to improve heating uniformity.
* To achieve the best cooking results with microwaves the rack must be removed, place the food on the glass tray and position it at the bottom or higher levels.
* Do not place any food or recipient with food/liquid directly on the bottom of the cavity. For better heating results always place the food or recipient with food/liquid over the glass tray.
* Do not cover the bottom of the oven cavity with aluminum or tin foil sheets as there is the risk of damaging the oven.
1.4 Avoid damaging the Microwave oven or other dangerous situations by following these instructions
* Never switch on the microwave when it is empty. If there is no food inside there may be an electrical overcharge and the oven could be damaged. RISK OF DAMAGE!
* For carrying out oven programming tests put a glass of water inside the oven. The water will absorb the microwaves and the oven will not be damaged.
* Do not cover or obstruct the ventilation openings.
* Place correctly the oven accessories on the side racks (see the section "Accessories".)
* Use only dishes suitable for microwaves. Before using dishes and containers in the microwave, check that these are suitable (see the section on types of dishes).
* Never remove the mica cover on the ceiling of the oven interior! This cover stops fat and pieces of food damaging the microwave generator.
* Do not keep any inflammable object inside the oven as it may burn if the oven is switched on.
* Do not use the oven as a pantry.
* Do not use the oven for frying as it is impossible to control the temperature of oil heated by microwaves.
* Do not lean or sit on the open oven door. This may damage the oven, especially in the hinge zone. The door can bear a maximum weight of 8 kg.
* Failure to secure tightly the support with the nuts may lead to overheating and damages.
natural_image
Diagram showing a curved arrow indicating rotational motion between two horizontal lines, no text or symbols present1.5 Installation
* The installation must comply with current regulations.
* The electrical installation is to be set up so that the appliance can be isolated from the mains with a minimum 3mm all-pole contact separation. Suitable separation devices include e.g. cutouts, RCD's and contactors.
* If the electrical connection is done through a plug and this remains accessible after installation, then it is not necessary to provide the mentioned separation device.
* Protection against electric shock must be provided by the electrical installation.
\*Warning!
The oven must be earthed.
\*Warning!
The appliance is intended to be built in. Please refer to the last pages of this user manual for detailed information on the installation dimensions.
1.6 Cleaning and Maintenance
Warning!
Cut the power supply before cleaning and maintenance.
* The appliance should be cleaned regularly and any food deposits removed.
* Failure to maintain the appliance in a clean condition could lead to deterioration of the surface that could adversely affect the life of the appliance and possibly result in a hazardous situation.
* Do not use harsh abrasive cleaners or sharp metal scrapers to clean the glass door since they can scratch the surface, which may result in shattering of the glass.
* Do not use a steam cleaner to clean the appliance.
* The door contact surfaces (the front of the cavity and the inside part of the doors) must be kept very clean in order to ensure the oven functions correctly.
* Please follow the instructions regarding cleaning in the section "Oven Cleaning and Maintenance".
Warning!
Ensure that the appliance is switched off before replacing the lamp to avoid the possibility of electric shock. Please refer to the chapter "CHANGING THE OVEN LIGHT BULB".
1.7 Service and Repair
Warning!
Cut the power supply before repair.
Warning!
Only a competent person can carry out any service or repair operation that involves the removal of a cover which gives protection against exposure to microwave energy.
Warning!
If the door or door seals are damaged, the appliance must not be operated until it has been repaired by a competent person.
* If the power cable is damaged it should be substituted by the manufacturer, authorized agents or technicians qualified for this task in order to avoid dangerous situations.
* Repair and maintenance work, especially of current carrying parts, can only be carried out by technicians authorized by the manufacturer.
2. Advantages of the microwave oven
In a conventional cooker, the heat that is radiated through the resistances or gas burners slowly penetrates the foods from the outside in. Therefore, there is a great loss of energy in heating the air, the oven components and the containers holding the food.
In the microwave, the heat is generated by the foods themselves, i.e. the heat goes from the inside out. There is no loss of heat to the air, the walls of the cavity or the containers (as long as they are microwave-safe containers). This means that only the food is heated.
To sum up, microwave ovens have the following advantages:
- Savings in cooking time; in general, there is a 3/4 reduction in time compared to conventional cooking.
- Ultra fast defrosting of foods, thus reducing the danger of bacteria developing.
- Energy-saving.
- Conservation of the nutritional value of foods due to the reduction in cooking time.
2.1 Microwave oven operating mode
The microwave oven contains a high voltage valve called a Magnetron, which converts the electrical energy into microwave energy. These electromagnetic waves are channelled towards the inside of the oven by a wave guide and distributed using a metallic disperser or a rotating plate.
Inside the oven, the microwaves are propagated in all directions and reflected by the metallic walls, thus uniformly penetrating the foods.
2.2 Why the food is heated
Most foods contain water and the water molecules vibrate with the microwaves.
The friction between the molecules generates heat, which raises the temperature of the foods, defrosting or cooking them or keeping them hot.
Because heat is formed inside the foods:
* The foods may be cooked without any liquids or oils, or with very little of these;
* Defrosting, heating or cooking in the microwave oven is faster than in a conventional oven:
* The vitamins, minerals and nutritious substances are conserved;
* Neither the natural colour nor the aroma are altered.
The microwaves go through porcelain, glass, cardboard or plastic, but not trough metal. For this reason, metallic containers or containers with metallic parts should not be used in the microwave oven.
Microwaves are reflected by metal...
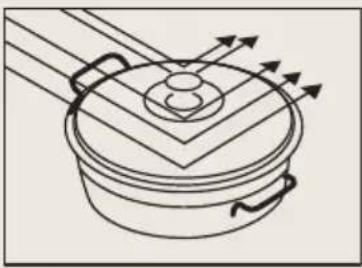
natural_image
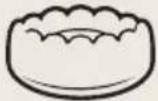
Diagram of a cooking pot with arrows indicating direction (no text or symbols)...they go through glass and porcelain...
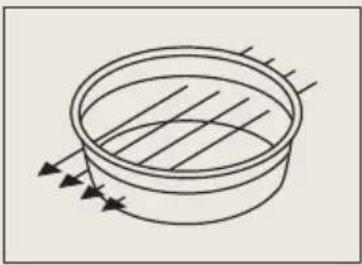
natural_image
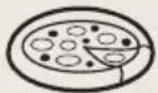
Simple line drawing of a circular container with horizontal lines inside, no text or symbols present... and are absorbed by the foods.
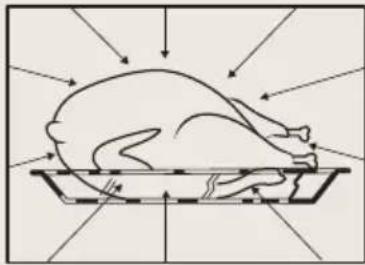
natural_image
Illustration of a roasted chicken on a tray with directional arrows indicating motion (no text or symbols)3. Before first use
There may be traces of fat and other substances in the oven as a result of the manufacturing process. These should be removed using the following procedure:
- Remove all the packaging from your oven, including the protective plastic, if any.
- Turn your oven to or at 200^ C for 1 hour.
- Cool the oven with the door open so that it ventilates, and no odors remain inside it.
- Once cold, clean the oven and the accessories.
During this first operation, smoke and smells will be produced. The kitchen should therefore be well ventilated.
4. Other important instructions
* Do not cover the bottom of the oven with aluminum foil as this may affect cooking performance and damage the enamel inside the oven and the interior of your kitchen unit.
* Do not pour water on the bottom surface when in use; this may damage the enamel.
* It is normal for condensation to occur on the oven door when cooking food with a high liquid content.
* When closing the oven door during cooking, the sound of the air inside it can be heard. This effect is normal due to the pressure exerted by the door when it is closed, guaranteeing the sealing of the cavity.
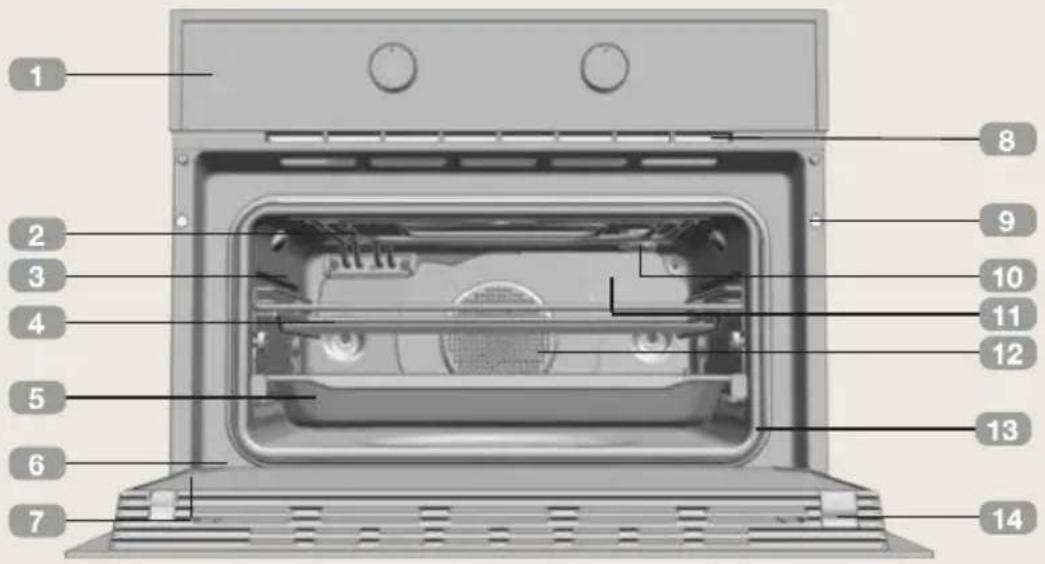
5. Description of the appliance
text_image
1 2 3 4 5 6 7 8 9 10 11 12 13 14- Control panel
- Grill element
- Tray supports
- Grid shelf
- Tray
- Hinge
-
Inner Glass
-
Air cooling outlet
- Unit mounting
- Lamp
- Back Wall Panel
- Fan
- Oven Seal
- Door
6. Control panel

text_image
1 2 3 4 5 6 7 8 9- Left knob
- Display
- On/Off key
- Cooking function key
-
Temperature key
-
Clock key
- Backward key
- Forward/ OK key
- Right knob
7. Oven Functions

Top + Bottom

Bottom
Grill + Bottom

Double Grill
Grill

Ventilated Top + Bottom
Ventilated Grill

Hot air + Bottom

Hot air
Defrost
Microwave
Combi Microwave
Slow Cooking
Eco
7.1 Combi Microwave functions
Microwave + Grill
Microwave + Hot Air
Microwave + Top + Bottom
Microwave + Grill + Hot Air
7.2 Microwaves Power Levels
| Microwave power output Food | |
| 200W Slow defrosting for delicate foods; keeping food hot | |
| 400W Cooking with little heat; boiling riceRapid defrosting, heating baby food | |
| 600W Heating and cooking food | |
| 800W Cooking vegetables and foodCooking and heating carefully,Heating and cooking small portions of food | |
| 1000W Rapidly heating liquids |
8. Initial Settings
8.1 Language Selection
When plugging the oven in for the first time, the logo will appear followed by the language selection menu. You must set the desired language in order to use the oven.
* Rotate the Right knob to select the desired language.
* Press to confirm.

text_image
11:30 AM A 钢 ESPAÑOL ITALIANO ENGLISH DEUTSCH PORTUGUÊS8.2 Setting the clock
Before setting the clock, you need to select the hour format.
* Rotate the Right knob to select the desired format.
* Press ▷ to confirm.
After this, the time needs to be set:
* Rotate the Right knob to set the clock.
* Press ▷ to confirm.

text_image
A钢 11:30 AM 24 H 12 H (AM/PM) 24 H 12 H (AM/PM) 24 H8.3 Setting the date
After setting the clock, you need to select the date.
* Rotate the Right knob to set the date.
* Press to confirm.

text_image
A钢 02.01.21 03.01.21 04.01.21 11:30 AM9. Cooking Settings
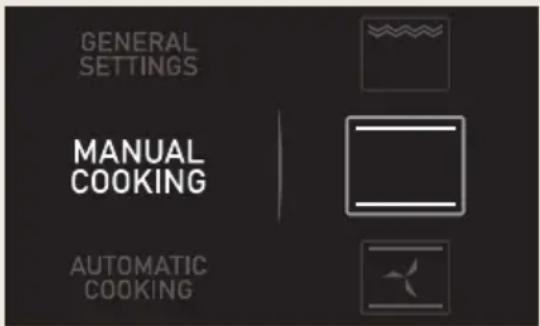
9.1 Manual Cooking
* Turn the oven on by pressing the ⏻ button.
* Rotate the left knob to select the "Manual cooking" menu.
* Rotate the right knob to select the desired cooking function.
* Press ▷ to confirm.
* Rotate the right knob to select the desired temperature.
* Press ▷ to confirm. The oven will begin cooking.
text_image
GENERAL SETTINGS MANUAL COOKING AUTOMATIC COOKINGAt any time during the cooking process, you can:
* Change the cooking function by pressing the □ button.
* Change the cooking temperature by pressing the ⏻ button.
* Program the cooking timer or a duration/ finish time by pressing the button.
* Modify programmed timers or duration/ finish times by pressing the button.
Note:
The cooking process can be canceled at any time by pressing the key.
9.2 Cooking with microwaves
* Turn the oven on by pressing the button.
* Rotate the left knob to select the "Manual cooking" menu.
* Rotate the right knob to select the microwave function 🐘.
* Press ▷ to confirm.
* Rotate the right knob to select the desired power.
* Press to confirm.
* Rotate the left knob to select the desired time.
* Press ▷ to confirm. The oven will begin cooking.
At any time during the cooking process, you can:
* Change the cooking time by pressing ⏻ button.
* Change the cooking power by pressing ⚠ button.
Note:
The cooking process can be canceled at any time by pressing the key.
9.3 Quick start
* Turn the oven on by pressing the button.
* Rotate the left knob to select the "Manual cooking" menu.
* The symbol will appear on the right side of the display.
* Press to confirm.
* Press ▷ and the microwave starts immediately to operate in the Microwave function at maximum power for 30 seconds.
* If you want to increase the operating time press ◀. Each time you press this key the operating time will be increased by 30 seconds.
Note:
The cooking process can be canceled at any time by pressing the key.
9.4 Cooking with combi microwave
* Turn the oven on by pressing the button.
* Rotate the left knob to select the "Manual cooking" menu.
* Turn the right dial until the symbol has been reached.
* Press to confirm.
* Turn the right knob to select the desired function.
* Press to confirm.
* Turn the left knob to select the desired power.
* Turn the right knob to select the desired temperature.
* Press ▷ to confirm. The oven will begin cooking.
Note:
The cooking process can be canceled at any time by pressing the ⏻key.
9.5 Defrost by time
* Turn the oven on by pressing the ⏻ button.
* Rotate the left knob to select the "Manual cooking" menu.
* Turn the left knob until the ⚙ symbol appears on the display.
* Press ▷ to confirm.
* Turn the right knob to select the defrost by time option.
* Press ▷ to confirm.
* Turn the left knob to select desired defrosting time.
* Press ▷ to confirm.

text_image
BY WEIGHT BY TIME BY WEIGHTNote:
See the Defrost chapter for advice on defrosting times.
Note:
When the display shows the TURN THE PLATE message, open the door, turn the food and press ▶to continue.
9.6 Defrost by weight
* Turn the oven on by pressing the ⏻ button.
* Rotate the left knob to select the "Manual cooking" menu.
* Turn the left knob until the symbol appears on the display.
* Press ▷ to confirm.
* Turn the right knob to select the defrost by weight option.
* Press ▷ to confirm.
* Turn the left knob to select one of the defrost by weight options.
* Turn the right knob to select the desired weight.
* Press ▷ to confirm.

text_image
BY TIME BY WEIGHT BY TIMENote:
When the display shows the TURN THE PLATE message, open the door, turn the food and press to continue.
The following table shows the defrosting by weight function programs, indicating weight intervals, and defrosting and standing times (in order to ensure the food is of a uniform temperature):
| Prog. Food Weight (kg) Time (min) | Standing time (min) | |||
 | Meat 0.10 – 2.00 2:10 – 43 20 – 30 | |||
 | Fish 0.10 – 2.50 2:20 – 58 20 – 30 | |||
 | Frozen Fruit 0.10 – 2.00 2 – 40 20 – 30 | |||
 | Bread 0.10 – 0.50 2:36 – 13 10 – 20 | |||
 | Poultry 0.10 – 0.80 2:25 – 19 10 – 20 | |||
10. Automatic Cooking
| Prog. Food Weight (kg) Time (min) | |||
 | Whole Chicken 0.5 | 50 – 1.50 42 – 76 | |
 | Whole Duck 1.1 | - 2.5 57 – 108 | |
 | Whole Goose 2 | - 4.5 82 – 169 | |
 | Whole Turkey 4 | - 10 142 – 294 | |
 | Chicken Thighs 0 | 50 – 2 38 – 73 | |
 | Pork Meat 0.5 | - 10 76 – 336 | |
 | Ox Meat | 0.5 – 5 95 – 241 | |
 | Lamb Meat 0.5 | - 6 66 – 210 | |
 | Pork Chops 0.5 | - 4 38 – 84 | |
 | White Fish 0.5 | - 5 28 – 94 | |
 | Salmon | 0.5 – 5 | 28 – 94 |
 | White Bread | 0.5 – 2 | 28 – 63 |
 | Brown Bread 1– | 4 52 – 94 | |
 | Wholemeal Bread 1 – 385 – 157 | ||
 | Thick Pizza – 11 – 13 | ||
 | Thin Pizza – | 8 – 9 | |
 | Pound Cake – 70 | ||
 | Fruit Tart Big – 50 | ||
 | Fruit Tart Small – 35 | ||
 | Sheet Cake – 35 | ||
10.1 Automatic Cooking
* Turn the oven on by pressing the ⏻ button.
* Rotate the left knob to select the "Automatic cooking" menu.
* Turn the right knob to select the food you want to cook
* Press ▷ to confirm.
* Turn the right knob to select the desired weight.
* Press ▷ to confirm.
* The programmed parameters are displayed on the screen.
* Press ▷ to confirm.
* The information regarding the level will appear on the display.
* Press ▷ to continue.
* Rotate the left knob to select whether to start the cooking process immediately or to select another start option (see Timer Settings chapter).
* Press ▷ to confirm.

text_image
MANUAL COOKING AUTOMATIC COOKING GENERAL SETTINGS10.2 Turning food
For some recipes or programs, the message Turn the plate will show, food must be turned during cooking.
The oven will notify you when to do this with an audible signal and the Turn symbol will appear on the cooking screen. Opening the oven door to turn the food will cause the audible signal to turn off automatically.

text_image
TURN THE PLATE10.3 End of a cooking process
When cooking process finishes the oven will ask you the following:
* Turn the right knob to select an option.
* Press ▷ to confirm.

text_image
HOW DO YOU WANT TO PROCEED? SWITCH OFF CONTINUE TO COOK MAIN MENU11. General settings
11.1 Language Selection
The language can be changed at any time. To change the language, proceed as follows:
* Press to turn on the oven.
* Rotate the left knob to select the "General Settings" menu.
* Rotate the right knob to select the language setting option.
* Press to confirm.
* Rotate the Right Knob to choose the language.
* Press to confirm.

text_image
AUTOMATIC COOKING GENERAL SETTINGS MANUAL COOKING 11:30 AM A 钢11.2 Setting the clock
If you wish to change the time, proceed as follows:
* Press to turn on the oven.
* Rotate the left knob to select the "General Settings" menu.
* Rotate the right knob to select the time settings.
* Press to confirm.
* Rotate the right knob to select the time format.
* Press to confirm.
* Rotate the Right Knob to set the time.
* Press to confirm.

text_image
AUTOMATIC COOKING GENERAL SETTINGS MANUAL COOKING A 钢 11:30 AM11.3 Setting the date
If you wish to change the date, proceed as follows:
* Press to turn on the oven.
* Rotate the left knob to select the "General Settings" menu.
* Rotate the right knob to select the date setting.
* Press to confirm.
* Rotate the right knob to select the new date.
* Press to confirm.

text_image
AUTOMATIC COOKING GENERAL SETTINGS MANUAL COOKING A 钢 11:30 AM11.4 Standby mode
When the oven is in Standby you can choose if you want the display to show the time or the Boretti logo.
* Press to turn on the oven.
* Rotate the left knob to select the "General Settings" menu.
* Rotate the right knob to select the Standby mode setting.
* Press ▷ to confirm.
* Rotate the right knob to choose the clock or the logo.
* Press ▷ to confirm.

text_image
AUTOMATIC COOKING GENERAL SETTINGS MANUAL COOKING 11:30 AM z^z11.5 Demo mode
To activate/deactivate the Demo Mode, proceed as follows:
* Press! to turn on the oven.
* Rotate the left knob to select the "General Settings" menu.
* Rotate the right knob to select the Demo mode setting.
* Press ▷ to confirm.
* Rotate the right knob to activate/deactivate the demo mode.
* Press to confirm.

text_image
AUTOMATIC COOKING GENERAL SETTINGS MANUAL COOKING A 钢 DEMO 11:30 AM11.6 Veggy mode
Veggy mode is suitable for vegetarians. This option hides the non-vegetarian recipes on the oven.
* Press! to turn on the oven.
* Rotate the left knob to select the "General Settings" menu.
* Rotate the right knob to select the Veggy mode setting.
* Press ▷ to confirm.
* Rotate the right knob to activate/deactivate the Veggy mode.
* Press ▷ to confirm.
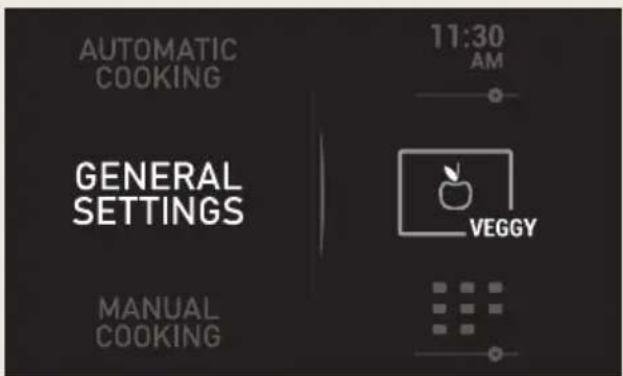
text_image
AUTOMATIC COOKING GENERAL SETTINGS 11:30 AM VEGGY MANUAL COOKING12. Timer settings
The oven gives you the following options before you start the cooking process:
START NOW – This option allows you to program the cooking time.
START T° - With this option the cooking process starts when the oven reaches the selected temperature.

text_image
END AT: START NOW START AT T°START AT – This option allows you to choose the time you want to start the cooking process.
END AT – This option allows you to choose the time you want to finish the cooking process.
An audible signal will sound at the end of the programmed time and the oven will stop heating automatically.
Tap any button to stop the audible signal and turn the oven off.
You can access the programing options at any time during cooking. Similarly, you can change an existing program.
12.1 Programming the timer options
After a cooking program is selected. The timer starts counting by increasing the time. To program one of the previous settings, proceed as follows:
* Press the button to access the timer options menu.
* Select the desired cooking time.
* Press to confirm.
* Turn the left knob to select the desired program option.
* Turn the right knob to choose the duration, temperature or start/end time depending on the chosen option.
* Confirm your choice with the ▶ button.
* For some of the options, it will be required to program the start or end time.
* Press ▷ to confirm.
* The cooking screen will then be shown again.

text_image
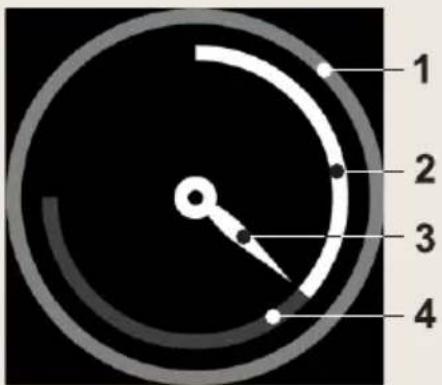
START AT T° START AT: END AT: 20:29 20:30 20:3112.2 Cooking clock description
text_image
1 2 3 41 Outer Ring
2 Remaining Time
3 Clock Needle
4 Elapsed Time
13. Safety
13.1 Safety block
This function can be selected at any time while using the oven.
* With the oven switched off. The child lock will not allow the oven to be switched on when the button is touched.
* With the oven in use. If the feature is activated while the oven is cooking or set to delay, the keypad will not respond and it will not be possible to use the dials or change the cooking settings.
To activate this feature press and hold the ◀ and ▶ buttons simultaneously until you hear a beep and the 🔒 symbol appears on the screen. The control panel is now locked.
To deactivate this feature touch and hold the ◀ and ▶ buttons simultaneously again until you hear a beep and the 🔊 symbol disappears.
14. Defrosting
Note:
See the tables at the end of the user manual to confirm the different defrosting and standing times (in order to ensure the food temperature is evenly distributed) for different types and weights of food, plus recommendations.
14.1 General tips for defrosting
- Only use microwave-safe dishes for defrosting (porcelain, glass, suitable plastic).
- The tables refer to defrosting of rawfoods.
- The defrosting time depends on the quantity and the height of the food. When freezing foods, prepare for the defrosting process. Distribute the food in parts that match the size of the container.
- Distribute the food as well as possible inside the microwave. The thickest part of the fish or the chicken legs should be placed on top. The most delicate parts may be protected using aluminium foil.
Important:
The aluminium foil should not come in contact with the walls of the cavity, as this could cause an electrical arch.
- The densest parts should be turnedaround several times.
- Distribute the frozen food in the mostuniform manner possible, because the thin, narrow parts defrost fast than the thickest parts at the top.
- Foods that are rich in fats, such as butter, cottage cheese and cream, should not be entirely defrosted. If they are at room temperature, they will be ready to serve within a few minutes. In the case of deep-frozen cream, if there are little bits of ice, the cream should be whipped before eating.
- Place poultry on a turn over plate so that the juices may drain more easily.
- Bread should be wrapped in a napkin so that it does not get too dry.
- Turn the food at regular intervals.
- Remove frozen foods from its packaging and do not forget to remove any metal clips. If the containers that are used to keep the foods in the freezer may also be used for heating and cooking, just remove the lid. Otherwise, place the foods in containers that are suitable for microwave ovens.
- The liquid that results in the defrosting process, particularly in the case of poultry, should be discarded and under no circumstances should it come in contact with other foods.
- Bear in mind that a resting period is required in defrosting function, so that the food is totally defrosted. This normally takes between 15 to 20 minutes.
15. Cooking with a microwave oven
Warning!
Read the section Microwave Safety Instructions before cooking with your microwave.
Follow these recommendations when cooking with your microwave:
* Before heating or cooking foods with peel or skin (e.g. apples, tomatoes, potatoes, sausages) prick them so that they do not burst. Cut the food up before starting to prepare it.
* Before using a container or dish make sure that it is suitable for microwave use (see the section on types of ovenware).
* When cooking food with very little moisture (e.g. defrosting bread, making popcorn, etc.) evaporation is very quick. The oven then works as if it was empty and the food may burn. The oven and the container may be damaged in such a situation. You should therefore set just the cooking time necessary and you must keep a close eye on the cooking process.
* It is not possible to heat large quantities of oil (frying) in the microwave.
* Remove pre-cooked food from the containers they come in since these are not always heat resistant. Follow the food manufacturer's instructions.
* If you have several containers, such as cups, for example, set them out uniformly on the base.
* Do not close plastic bags with metal clips. Use plastic clips instead. Prick the bags several times so that the steam can escape easily.
* When heating or cooking foods, check that they reach at least a temperature of 70^ C.
* During cooking, steam may form on the oven door window and may start to drip. This situation is normal and may be more noticeable if the room temperature is low. The oven's safe working is not affected by this. After you have finished cooking, clean up the water coming from the condensation
* When heating liquids, use containers with a wide opening, so that the steam can evaporate easily.
Prepare the foods as per the instructions and keep in mind the cooking times and power levels indicated in the tables.
Keep in mind that the figures given are only indicative and can vary depending on the initial state, temperature, moisture and type of food. It is advisable to adjust the times and power levels to each situation. Depending on the exact characteristics of the food you may need to increase or shorten the cooking times or increase or decrease the power levels.
15.1 Cooking with microwaves...
- The greater the amount of food, the longer the cooking time. Keep in mind that:
* Double the quantity » double the time
* Half the quantity » half the time
- The lower the temperature, the longer the cooking time.
- Foods containing a lot of liquid heat up more quickly.
- Cooking will be more uniform if the food is evenly distributed on the base. If you put dense foods on the outside part of the base and less dense ones on the centre of the base, you can heat up different types of food simultaneously.
- You can open the oven door at any time. When you do this the oven switches off automatically. The microwave will only start working again when you close the door and press the start key.
- Foods that are covered require less cooking time and retain their characteristics better. The lids used must let microwaves pass through and have small holes that allow steam to escape.
16. Cooking with the grill
For good results with the grill, use the rack supplied with the oven.
Fit the rack in such a way that it doesn't come into contact with the metal surfaces of the oven cavity since if it does there is a danger of electric arcing which may damage the oven.
Important points:
- When the grill is used for the first time there will be some smoke and a smell coming from the oils used during oven manufacture.
- The oven door window becomes very hot when the grill is working. Keep children away.
- Heat up the grill beforehand for 2 minutes. Unless indicated otherwise, use the rack.
- When the grill is operating, the cavity walls and the rack become very hot. You should use oven gloves.
- If the grill is used for extended period of time it is normal to find that the elements will switch themselves off temporarily due to the safety thermostat.
- Important!
When food is to be grilled or cooked in containers you must check that the container in question is suitable for microwave use. See the section on types of ovenware! - When the grill is used it is possible thatsome splashes of fat may go onto the elements and be burnt. This is a normalsituation and does not mean there is any kind of operating fault.
After you have finished cooking, clean the interior and the accessories so that cooking remains do not become encrusted.
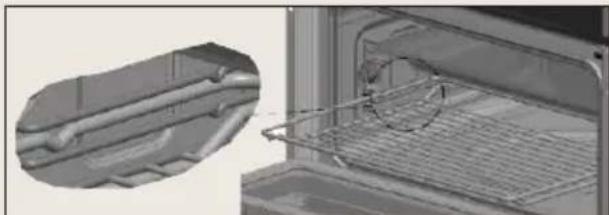
17. Accessories
Do not leave any containers or food on the oven floor. Always use the trays and racks supplied with the oven. To prepare yoghurt, place the jars on the oven floor. To cook any other food, insert the tray or rack into the runners inside the oven.
-
Between two rails of the side supports or on any of the extractable runners, if the oven has them.
-
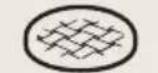
The rack and some of the trays have retention grooves to
natural_image
3D rendering of an oven interior showing a mesh rack and insulation material inside (no text or symbols visible)prevent them from accidentally being removed. Place these grooves towards the back of the oven, facing upwards.
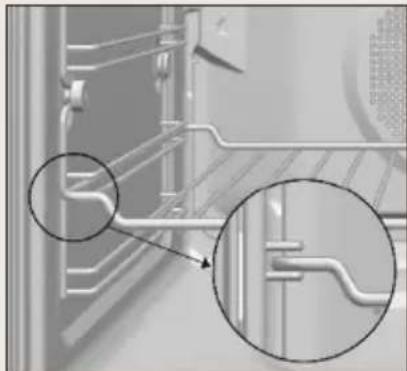
- The surface of the rack on which thecontainer will rest must be below the siderails. This prevents the container from accidentally sliding.
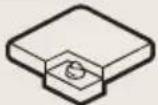
The shelf levels for cooking are as follows (from the bottom):
natural_image
Close-up of a mechanical component with two magnified views highlighting internal features (no text or symbols visible)1: Low.
2/3: Medium.
4: High.
Level 4 is suitable for grilling and toasting.
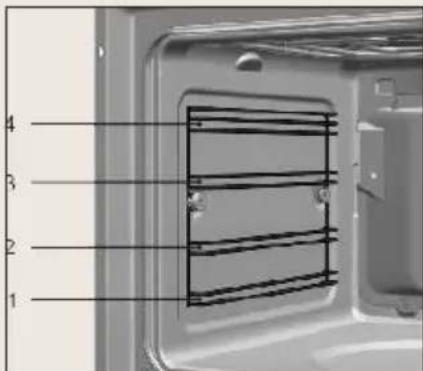
text_image
1 2 3 4Place the food in the centre of the shelf or rack for the most even result possible.
18. What type of containers may be used?
18.1 Microwave function
For the microwave function, keep in mind that microwaves are reflected by metal surfaces. Glass, china, clay, plastic, and paper let microwaves pass.
For this reason, metal pans and dishes or containers with metal parts or decorations cannot be used in the microwave. Glass ware and clay with metallic decoration or content (e.g. lead crystal) cannot be used in microwave ovens.
The ideal materials for use in microwave ovens are glass, refractory china or clay, or heat resistant plastic. Very thin, fragile glass or china should only be used for short period of times (e.g. heating).
Hot food transmits heat to the dishes which can become very hot. You should, therefore, always use an oven glove!
18.2 How to test ovenware you want to use
Put the item you want to use in the oven for 20 seconds at maximum microwave power. After that time, if it is cold and just slightly warm, it is suitable to use. However, if it heats up a lot or causes electric arcing it is not suitable for microwave use.
18.3 Grill or Hot-Air functions
In the cases of the Grill or Hot-Air functions, the ovenware must be resistant to temperature of at least 300^ C.
Plastic dishes are not suitable for use in the grill.
18.4 Combined functions
In the combined functions, the ovenware used must be suitable for use in both the microwave and the grill.
18.5 Aluminium containers and foil
Pre-cooked food in aluminium containers or in aluminium foil can be put in the microwave if the following aspects are respected:
* Keep in mind the manufacturer's recommendations written on the packaging.
* The aluminium containers cannot be more than 3 cm high or come in contact with the cavity walls (minimum distance 3 cm). Any aluminium lid or top must be removed.
* Put the aluminium container directly on top of the base. If you use the rack, put the container on a china plate. Never put the container directly on the rack!
* The cooking time is longer because the microwaves only enter the food from the top. If you have any doubts, it is best to use only dishes suitable for microwave use.
* Aluminium foil can be used to reflect microwaves during the defrosting process. Delicate food, such as poultry or minced meat, can be protected from excessive heat by covering the respective extremities/edges.
Important:
Aluminium foil cannot come into contact with the cavity walls since this may cause electrical arcing.
18.6 Lids
We recommend you use glass or plastic lids or cling film since: ONLY FOR THE MICROWAVE FUNCTION.
- They prevent excessive evaporation (especially in very long cooking periods);
- The cooking process is faster;
- The food does not go dry;
- The aroma is preserved.
The lid should have holes or openings so that no pressure develops. Plastic bags must also be opened. Baby feeding bottles or jars with baby food and similar containers can only be heated without their tops / lids otherwise they can burst.
Note:
See the table at the end of this user manual, it gives you a general idea of what type of ovenware is suitable for each situation.
19. Cleaning and maintenance
Warning!
Disconnect the appliance from the mains power supply before any operation.
19.1 Cleaning the oven exterior and oven accessories
Clean the outside of the oven and accessories with warm soapy water or with a mild detergent.
Take great care when cleaning stainless steel or painted surfaces. Use only sponges or cloths that do not scratch.
19.2 Cleaning the oven interior
Clean the oven interior regularly to remove traces of fat or food, which can later give off smoke and odors and cause stains to appear.
Use nylon brushes or sponges with warm soapy water to clean enameled surfaces such as the bottom of the oven. Clean when the oven is cold. Use oven cleaning products only on enameled surfaces and always follow the manufacturer's instructions.
Warning!
Do not clean the oven interior with steam or pressurized water cleaning equipment.
Do not use metal scouring pads, wire brushes or any utensil that can scratch the enamel.
Over time, certain types of food such as tomatoes, vinegar and salt-baked dishes may cause the enamel to change color. This is normal and does not affect the functioning of the oven. Do not try to remove these stains using aggressive methods such as those described, as this could cause permanent damage to the surface.
Clean the oven seal regularly to eliminate all traces of fat or food. This will prevent the seal from becoming damaged and breaking during subsequent cooking operations.
It is advisable to clean this seal without removing it.
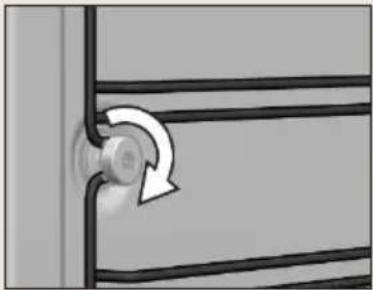
19.3 Dismantling the side supports
- Remove all accessories from inside the oven.
- Completely loosen the nut at the front of the fastening element (A), pull the supports forward (B) and remove them.
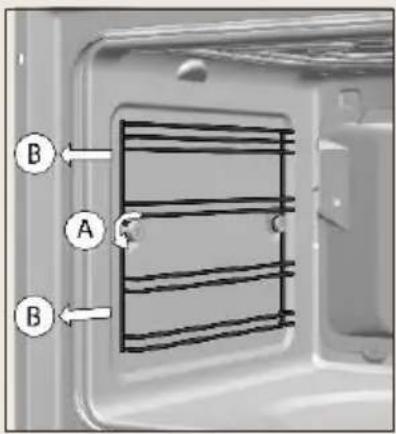
text_image
B A B19.4 Assembling the supports
- Insert the rear notch into the rear fastening nut.
- Fix the front fastening nut (C) in the front notch of the support.
- Secure the support with the nut (D) and turn until it is fully adjusted (E).

text_image
Diagram of a door panel with labeled parts C, D, and E showing internal structure and directional arrowsWarning!
Failure to secure tightly the support with the nuts may lead to overheating and damages.
19.5 Cleaning the oven door
19.5.1 Dismantling/assembling the interior glass of the door
Warning!
If dismantling the glass panes with the door fitted in the oven, always do it with the hinge in the locked position. If not, the door will close and the unmounted glass panes could break and cause injury.
Depending on the model, your oven may have 1 or 3 panes of glass. Follow the instructions for the type of door your oven has.
- Using your fingers, press the buttons located at the top of both sides of the oven door.
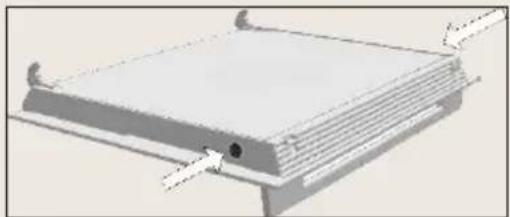
natural_image
3D rendering of a rectangular electronic device with mounting brackets and a central button (no text or symbols visible)- Keep them pressed and pull on the plastic seal above the door.

natural_image
3D diagram of a mechanical assembly with arrows indicating motion or force direction (no text or symbols)- Remove the glass panes from the door. Clean them with a glass cleaner or soap and water and a soft cloth.
Warning!
Pay attention to the order and position of the glass panes when removing them as they must be reassembled in the same order and position when you have finished cleaning them.
- Once clean, insert pane no. 3 into the same position so that the TERMOGLASS indication printed on it is visible as shown in following image.
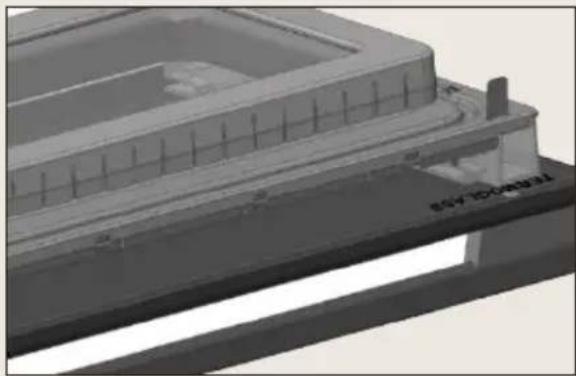
natural_image
3D architectural model of a building structure with visible foundation and window (no text or symbols)- Reattach the top seal of the door, making sure that the side tabs fit into their housings.
Warning!
Never switch the oven on if any of the glass panes on the door are missing.
19.6 Changing the oven light bulb
Warning!
Make sure the oven has been disconnected from the mains before changing the bulb.
The replacement bulb must withstand temperatures up to 300 °C . You can order them from the Technical Assistance Service Department.
19.7 Changing the upper bulb
To substitute the light bulb, proceed as follows:
-
Disconnect the oven from the power supply. Take the plug out of the socket or switch off the oven's power circuit.
-
Loose and remove the glass light cover.
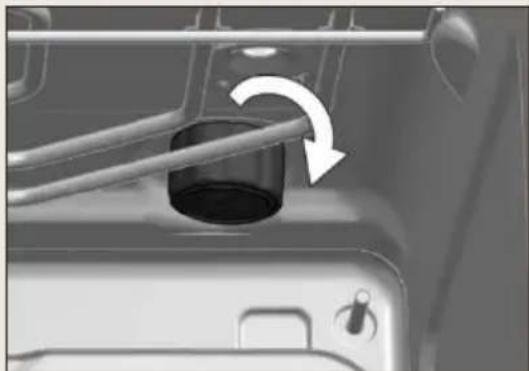
natural_image
Close-up of a car interior showing a cylindrical component being lifted by a rod with an arrow indicating rotation (no text or symbols visible)- Remove the bulb.
Warning!
The bulb may be very hot.
- Fit a new G9 230V / 25W bulb.
Warning!
Do not touch the light bulb surface directly with your fingers because you may damage the bulb. Follow the lamp manufacturer's instructions.
-
Tighten the glass light cover into place.
-
Connect the oven again to the power supply.
20. Troubleshooting
This section describes some of the most frequent problems that can affect your oven, along with the most common causes and possible solutions.
The oven stops working:
* Check the power connection.
* Check the fuses and the circuit breaker of your installation.
* Make sure the timer is either in the manual or programmed setting.
* Check the position of the control and temperature dial.
The inside light does not go on:
* Change the bulb.
* Check it has been properly installed as set out in the Installation Instructions.
Nothing happens when the keys are pressed:
* Check if the Safety Block is active.
Oven smoking during use:
* Normal during first use.
* Clean the oven regularly.
* Reduce the amount of fat or oil in the tray.
* Do not cook at temperatures higher than those indicated in the cooking chart.
The expected cooking results are not achieved:
* Check the cooking charts for guidance on how your oven operates.
My accessories and shelf supports are damaged:
* You must replace them and remove them during subsequent cleaning cycles.
The enamel color has changed or stains have appeared:
* The chemical composition of some foodstuffs may cause changes in the enamel.
* This is normal and does not damage the properties of the enamel.
If the oven is operating and there are some irregular noises:
* Check if there is any electrical arcing inside the oven caused by foreign metallic objects (see the "Ovenware" chapter).
* Check if the ovenware is touching the oven walls.
* Check if there are any loose items of cutlery or cooking tools inside the oven.
The food doesn't heat up or heats very slowly:
* Check if inadvertently metal ovenware has been used.
* Check if the correct operating times and power level has been selected
* Check if the food inside the oven is a larger amount or colder than it usually is.
The food is too hot, dried out or burnt:
* Check if the correct operating time and power level has been selected
There are some noises after the cooking process is finished:
* This is not a problem. The cooling fan keeps on working for some time. When the temperature has dropped sufficiently, the fan will switch itself off.
Warning!
Any type of repair must only be done by a specialised technician. Any repair done by a person not authorised by the manufacturer is dangerous.
21. Technical characteristics
21.1 Specifications
* AC Voltage ...... (see characteristics plate)
* Power required 3500 W
* Grill/ Maxigrill power 1400 W/ 2500W
* Lower heater power 1150 W
* Hot air power 1800 W
* Microwave power 1850 W
* Microwave frequency 2450 MHz
* Exterior dimensions (WxHxD) 455 x 595 x 562 mm
* Interior dimensions (WxHxD 475 x 365 x 232 mm
* Oven capacity 40 l
* Weight 38,2 kg
22. Installation
This information is exclusively for the installer who is responsible for assembly and electrical connection. The manufacturer will not accept liability for possible damage caused if you install the oven yourself.
22.1 Before installation
* To handle the oven, use the grips at the sides. Do not use the door handle to lift the oven.
* Do not install the oven behind decorative doors. This can cause it to overheat.
* When installing the oven under a counter, follow the instructions for installing it.
* In general, protruding elements (furniture reinforcements, pipes, socket bases, etc.) at the back of the unit must be avoided.
* When the base of the main power socket is inside the unit in which the oven is installed, this must be done in the shaded area.

natural_image
Pure geometric diagram showing a rectangular frame with a central shaded rectangle and dimension label '90' (no text or symbols beyond the label)* The unit in which the oven is installed and adjacent units must withstand temperatures higher than 85 °C.
* The installation instructions must be ad-hered to strictly. If not, the oven's ventilation circuit may become blocked, causing high temperatures that could damage the kitchen unit and the appliance itself.
* For this purpose, check the unit measurements and those of the holes to be drilled in the units, as shown in the following figures:
22.2 Column Installation
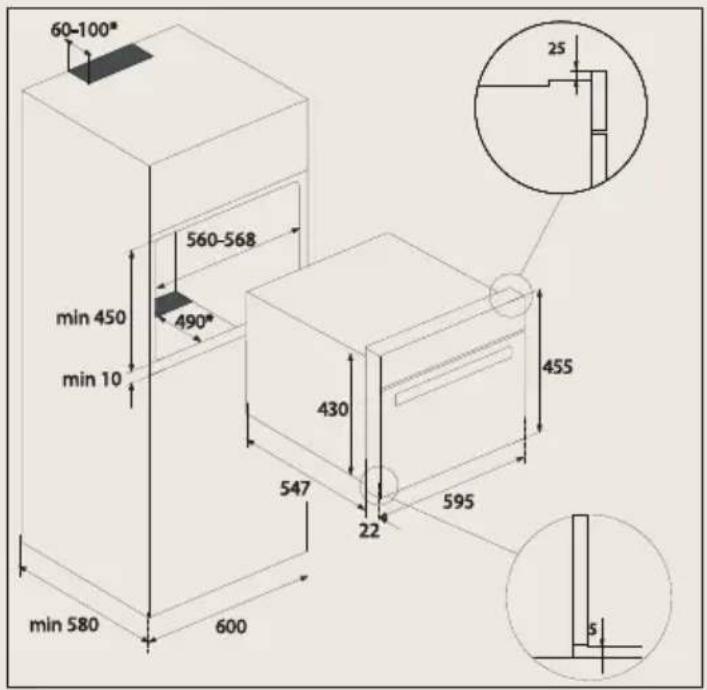
text_image
60-100* 560-568 min 450 490* min 10 430 547 22 595 455 min 580 600 25 522.3 Undercounter Installation
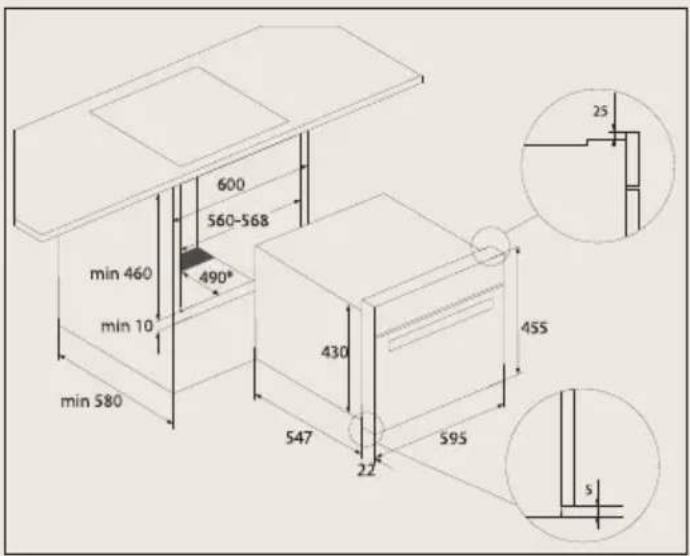
text_image
600 560-568 min 460 490° min 10 min 580 430 547 22 595 455 25 522.4 Electrical connection
The fitter must ensure that:
* The mains power voltage and frequency correspond to what is marked on the identification plate.
* The domestic wiring system can withstand the maximum power marked on the identification plate.
* After connecting the power supply, check that all electrical parts of the oven are working correctly.
22.5 Oven installation
For all ovens. After the electrical connection has been done:
- Position the oven inside the unit and ensure that the feed cable is not trapped or in contact with parts of the oven that heat up.
- Make sure that the body of the oven is not in contact with the walls of the unit and that there is a minimum space of 2 mm between adjacent units.
- Centre the oven in the unit so that there is a minimum space of 5mm between the oven and the doors of the furniture that surrounds it.
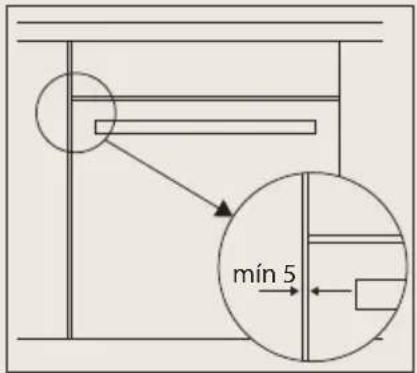
text_image
mín 5- Open the door and insert the plastic plugs supplied with the oven into their respective housings.
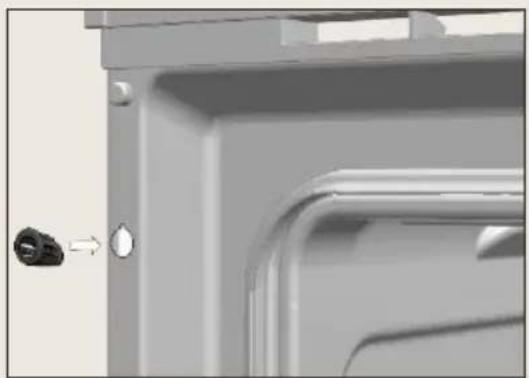
natural_image
Close-up of a mechanical component with a black connector and a small circular detail, no visible text or symbols.- Fasten the oven to the unit with the screws supplied, screwing them into the unit through the stops.
Warning!
Do not lean on the open door of the oven while executing steps 4 and 5, as the open is not secured to the unit and it could move forwards and fall to the floor.
23. Tables and Suggestions
23.1 Ovenware
| Operating mode Type of dish | Microwave | Conventional functions | Combined functions | |
| Defrost / heat | Cook | |||
| Glass and porcelain 1) Domestic, non fire-resistant, may be washed in dishwasher | yes yes | no no | ||
| Glazed ceramic Fire-resistant glass and porcelain yes yes yes yes | ||||
| Ceramic, earthenware dishes unglazed glazed without metallic decorations | yes | yes | no | no |
| Earthenware dishes glazed unglazed | yes no | yes no | no no | no no |
| Plastic dishes 2) heat-resistant up to 100°C heat-resistant up to 250°C | yes yes | no yes | no no | no no |
| Plastic films 3) Cling film Cellophane | no yes | no yes | no no | no no |
| Paper, cardboard, parchment 4) yes no no no | ||||
| Metal Aluminium foil Aluminium containers 5) Accessories (rack) | yes no yes | no yes yes | yes yes yes | no yes no |
- No golden or silver edges and no lead glass.
- Remember the manufacturer's tips!
- Do not use metal clips to close the bags. Perforate the bags. Use films only to cover foods.
- Do not use paper plates.
- Only shallow aluminium containers without lids. The aluminium must not come into contact with the walls of the cavity
23.2 Defrosting by time
| Quantity Function | Time (Min.) | Standing time (Min.) | ||
| Meat (veal, beef, pork) | 100 2-3 5-10 | |||
| 200 4-5 5-10 | ||||
| 500 10-12 10-8TW4 | ||||
| 1000 21-23 20- | ||||
| 1500 32-34 20-30 | ||||
| 2000 43-45 25-35 | ||||
| Goulash | 500 8-10 10-1 | |||
| 1000 17-19 20- | ||||
| Minced meat | 100 2-4 10-15 | |||
| 500 10-14 20- | ||||
| Sausages | 200 4-6 10-15 | |||
| 500 9-12 15-20 | ||||
| Poultry (portions) 250 5-6 5-10 |  | |||
| Chicken 1000 20-24 20-30 |  | |||
| Fish fillet 200 4-5 5-10 |  | |||
| Trout 250 5-6 5-10 |  | |||
| Prawns | 100 2-3 5-10 | |||
| 500 8-11 10-20 | ||||
| Fruit | 200 4-5 5-10 | |||
| 300 8-9 5-10 | ||||
| 500 11-14 10- | ||||
| Bread | 200 4-5 5-10 | |||
| 500 10-12 10- | ||||
| 800 15-17 10-20 | ||||
| Butter 250 8-10 10-15 |  | |||
| Cream cheese 250 6-8 10-15 |  | |||
| Creams | 250 7-8 10-15 | |||
23.3 Poultry
| Quantity Shelf Function | Temperature (°C) | Time (Min.) | Accessory | ||
| Duck 1,50kg 1 |  | 190-210 55-60 | Tray | ||
 | 170-190 45-55 | ||||
 | |||||
| Duck breast | 0,40kg 4 |  | 180-190 10-12 | Grid | |
 | 200-210 8-10 | ||||
 | |||||
| Duck thighs | 2 pieces 2/3 |  | 170-190 45-50 | Tray | |
 | 160-180 55-60 | ||||
 | |||||
| Chicken 1,20kg 1 |  | 190-210 55-60 | Tray | ||
 | 170-190 50-55 | ||||
 | |||||
| Chicken thighs | 4 pieces 2/3 |  | 190-210 25-30 | Tray | |
 | 190-200 20-25 | ||||
 | |||||
| Turkey 4kg 1 |  | 190-200 70-75 | Tray | ||
 | 180-200 65-70 | ||||
 | |||||
23.4 Meat
| Quantity Shelf Function | Temperature (°C) | Time (Min.) | Accessory | |||
| Roast veal 2kg 1 |  | 190-210 | 85-90 | Tray | ||
| 180-200 | 90-95 | |||||
| 180-200 | 80 | |||||
| Roast beef 0 | 60kg 2/3 |  | 190-200 | 45-50 | Tray | |
| 190-200 | 60-65 | |||||
| 180-200 | 35-40 | |||||
| Beef chops 0 | ,50kg 2/3 220 | 15 Grid | ||||
| Beef steak | 1kg 2/3 |  | 220 15 | Grid | ||
| 220 25-30 | ||||||
| Roast pork | 1kg 2/3 |  | 180-190 | 50-55 | Tray | |
| 170-190 | 45-50 | |||||
| 180-200 | 55-60 | |||||
| Pork chops | 0,50kg 2/3 | 200-220 | 15 | |||
| Pork Shoulder | 1,50kg 2/3 |  | 190-200 | 55-60 | Tray | |
| 190-200 | 40-50 | |||||
| Suckling pig | 1,40kg 2/3 |  | 190-210 | 60-70 | Tray | |
| 170-190 | 70-75 | |||||
| Pork ribs | 0,50kg 2/3 |  | 190-210 | 25-30 | Tray | |
| 190-210 30 | ||||||
| Ham hock | 1kg 2/3 |  | 190-210 | 50-55 | Grid | |
 | 180-200 | 45-50 | ||||
 | 170-190 | 45-55 | ||||
| Lamb | 1kg 2/3 |  | 190-210 | 35-40 | Tray | |
 | 180-200 | 45-50 | ||||
 | 190-200 | 45-50 | ||||
| Boned leg joint | 0,60kg | 2/3 |  | 170-190 45-55 | Tray | |
 | 180-190 35-40 | |||||
 | ||||||
23.5 Fish
| Quantity Shelf Function | Temperature (°C) | Time (Min.) | Accessory | |||
| Salt baked sea bass | 1kg 2/3 |  | 180-200 20-25 | Tray | ||
 | 190-200 18-20 | |||||
 | ||||||
| Sea beam 1kg 2/3 |  | 190-200 20-25 | Tray | |||
 | 190-200 10-15 | |||||
 | ||||||
| Hake medallions | 1,10kg 2/3 |  | 190-210 15-20 | Tray | ||
 | 180-200 10-12 | |||||
 | ||||||
| Salmon medallions | 1,10kg 2/3 |  | 190-200 15-20 | Tray | ||
 | 200-210 10-15 | |||||
 | ||||||
23.6 Pizza and Pasta
| Quantity Shelf Function | Temperature (°C) | Time (Min.) | Accessory | |||
| Thick crust pizza | 0,60kg 2/3 |  | 190-210 30-35 | Grid | ||
 | 190-200 20-25 | |||||
 | ||||||
| Thin crust pizza | 0,60kg 2/3 |  | 190-200 15-20 | Grid | ||
 | 200-210 10-15 | |||||
 | ||||||
| Lasagne 2/3 | 200-210 35-40 | Tray |  | |||
23.7 Bread
| Quantity Shelf Function | Temperature (°C) | Time (Min.) | Accessory | |||
| White bread 0 | 50kg 2/3 200-220 20-25 T  | |||||
Rye bread 0,15kg 2/3 200-220 10-15 Tray  | ||||||
| Wholemeal bread | 0,15kg 2/3 200-220 10-  ly ly | |||||
23.8 Vegetables
| Quantity Shelf Function | Temperature (°C) | Time (Min.) | Accessory | |||
| Baked potatoes | 1kg 1 |  | 180-190 55-60 | Tray | ||
 | 180-200 40-45 | |||||
 | ||||||
| Grilled vegetables | 1kg | 2/3 |  | 190-210 30-45 Grid | ||
| Mushrooms | 0,50kg | 2/3 |  | 200-210 | 13 | Grid |
23.9 Pastry
| Quantity Shelf Function | Temperature (°C) | Time (Min.) | Accessory | |||
| Sponge cake | 0,60kg 2/3 |  | 170-180165-170 | 50-5545 | Shallow dish | |
| Leavened dough | 0,50kg 2/3 |  | 170-190 20-25 | Shallow dish | ||
  | 170-180 25-30 | |||||
| Puff pastry 0,50kg 2/3 180-190 18-20 | Tra  | |||||
| Cottage cheese pie | 0,40kg 2/3 |  | 180 24 | Tray | ||
  | 180-190 20 | |||||
| Cheesecake 0,80kg 2/3 |  | 180 30-35 | Tray | |||
  | 180-290 25-30 | |||||
| Honey pastry | 0,60kg 2/3 |  | 170-190 40-45 | Shallow dish | ||
  | 180-190 35-40 | |||||
| Meringues 0,50kg 2/3 |  | 100-110 190 | Tray | |||
  | 100-110 170-180 | |||||
| Almond meringue biscuits | 0,40kg | 4 |  | 110-120 | 15-20 | Tray |
| Cupcakes 0,40kg 2/3 |   | 200-210200 | 30 | Capsules | ||
| Dough 0,40kg 1 |  | 200-220 | 25-30 | Tray | ||
 | 200 | 25 | ||||
| Crème caramel | 1 litre 2/3 | 100 60-70 | Fla  | |||
24. Environmental protection
24.1 Disposal of the packaging

The packaging bears the Green Point mark. Dispose of all the packaging materials such as cardboard, expanded polystyrene and plastic wrapping in the appropriate bins. In this way you can be sure that the packaging materials will be re-used.
24.2 Disposal of equipment no longer used
According to European Directive 2012/19/EU on the management of waste electrical and electronic equipment (WEEE), home electrical appliances should not be put into the normal systems for disposal of solid urban waste.
Outdated appliances should be collected separately to optimise component material recovery and re-cycling rates and to prevent potential harm to human health and the environment. The symbol of a rubbish container superimposed by a diagonal cross should be put on all such products to remind people of their obligation to have such items collected separately.
Consumers should contact their local authorities or point of sale and request information on the appropriate places to leave their old home electrical appliances. Before disposing of your appliance, render it non-usable by pulling out the power cable, cutting this and disposing of it.
24.3 Energy Information
Tested to comply with the requirements of the 66/2014 (Eco-Design) and 65/2014 (Energy Labelling) regulations in accordance with Regulation EN 60350-1.
Energy consumption measurements taken under different conditions may give different values from those indicated for your oven.
Consult the User's guide accompanying this manual to learn about the energy consumption of your oven.
You can also send questions and suggestions to
info@boretti.com
Boretti BV
Abberdaan 114
1046 AA Amsterdam
The Netherlands
| 2017 | 2016 | |||
| 金额 | 占总资产比例(%) | 金额 | 占总资产比例(%) | |
| 一、营业收入 | 3,584,968.00 | 69.99 | 3,584,968.00 | 69.99 |
| 二、营业成本 | 3,418,527.00 | 67.81 | 3,418,527.00 | 67.81 |
| 三、营业利润 | -1,432,527.00 | 15.11 | -1,432,527.00 | 15.11 |
| 四、净利润 | -1,432,527.00 | 15.11 | -1,432,527.00 | 15.11 |

text_image
BORETTIPassione in Cucina

MLBC45MLBC45
natural_image
Two glass cups: one with a spoon inside, the other with a black 'X' symbol (no text or symbols on cups)natural_image
Diagram showing a rotating mechanical component with an arrow indicating rotational motion (no text or symbols)1.5 Installatie
natural_image
Diagram of a cooking pot with arrows indicating direction (no text or symbols)natural_image
Simple line drawing of a circular container with horizontal lines and arrows indicating flow or movement (no text or symbols)natural_image
Illustration of a roasted chicken on a tray with directional arrows indicating motion (no text or symbols)text_image
GENERAL SETTINGS MANUAL COOKING AUTOMATIC COOKINGtext_image
MANUAL COOKING AUTOMATIC COOKING GENERAL SETTINGS10.2 Voedsel keren
text_image
AUTOMATIC COOKING GENERAL SETTINGS MANUAL COOKING 11:30 AM A 钢11.2 De klok instellen
text_image
AUTOMATIC COOKING GENERAL SETTINGS MANUAL COOKING A 钢 11:30 AM11.3 De datum instellen
text_image
AUTOMATIC COOKING GENERAL SETTINGS MANUAL COOKING A 钢 11:30 AM11.4 Stand-bymodus
text_image
AUTOMATIC COOKING GENERAL SETTINGS 11:30 AM z² MANUAL COOKING11.5 Demomodus
text_image
AUTOMATIC COOKING GENERAL SETTINGS A 钢 DEMO 11:30 AM MANUAL COOKING11.6 Vegamodus
text_image
AUTOMATIC COOKING GENERAL SETTINGS MANUAL COOKING 11:30 AM VEGGYnatural_image
Interior view of an oven with a rack and a circular component inserted into the tray (no text or symbols visible)natural_image
Technical diagram of a mechanical assembly with two magnified views (no text or symbols)text_image
Diagram showing a door with labeled parts C, D, and E, indicating structural components or positioning.Waarschuwing!
natural_image
3D rendering of a rectangular electronic device with mounting brackets and a central button (no text or symbols visible)natural_image
3D diagram of a mechanical assembly with arrows indicating force or movement (no text or symbols)natural_image
3D architectural model of a building structure with visible foundation and window (no text or symbols)natural_image
Close-up of a mechanical component with a rotating lever and handle (no visible text or symbols)- Verwijder de lamp.
Waarschuwing!
natural_image
Pure geometric diagram of a rectangular frame with a central shaded rectangle and dimension label (no text or symbols)natural_image
Close-up of a mechanical component with a black connector and a white droplet symbol (no text or labels)natural_image
Two glass bowls: one with a spoon inside, the other with a black 'X' symbol (no text or symbols present)natural_image
Diagram showing a rotating mechanical component with a curved arrow indicating rotation (no text or symbols)1.5 Installation
natural_image
Line drawing of a cooking pot with arrows indicating direction (no text or symbols)natural_image
Simple line drawing of a circular container with horizontal lines inside, emitting arrows (no text or symbols)natural_image
Illustration of a roasted chicken on a tray with directional arrows indicating motion (no text or symbols)text_image
DREHEN SIE DAS GARGUTnatural_image
3D rendering of a microwave oven with a close-up inset showing internal components (no text or symbols visible)natural_image
Technical diagram of a mechanical assembly with two magnified views (no text or symbols)1: Unten.
2/3: Mitte.
4: Oben
text_image
Diagram of a refrigerator interior with labeled parts C, D, and E showing internal wiring or ventilation system connections.Warnung!
natural_image
3D diagram of a rectangular electronic component with mounting holes and internal structure (no text or symbols)natural_image
3D diagram of a mechanical assembly with arrows indicating force or movement (no text or symbols)natural_image
3D architectural model of a building structure with curved roof and horizontal supports (no visible text or symbols)natural_image
Close-up of a mechanical component with a rotating lever and handle (no visible text or symbols)22.1 Before installation
natural_image
Pure geometric diagram of a rectangular frame with a central horizontal bar and dimension label (no text or symbols)natural_image
Close-up of a mechanical component with a black connector and a droplet symbol (no text or labels visible)natural_image
Two glass bowls: one with a spoon inside, the other with a black X symbol (no text or labels)natural_image
Diagram showing a mechanical component with a curved arrow indicating rotation or motion (no text or symbols)1.5 Installation
natural_image
Diagram of a cooking pot with arrows indicating direction (no text or symbols)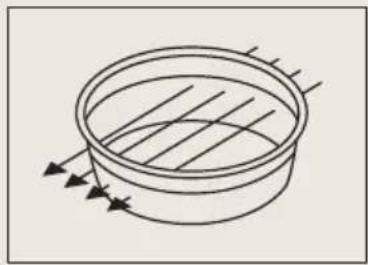
natural_image
Simple line drawing of a circular container with internal lines and arrows indicating flow or movement (no text or symbols)