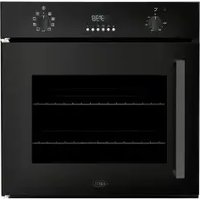
BS45 - Oven BORETTI - Free user manual and instructions
Find the device manual for free BS45 BORETTI in PDF.

| Product Type | Built-in Electric Oven |
| Model | BS45 |
| Brand | Boretti |
| Dimensions (H x W x D) | 595 x 595 x 575 mm |
| Weight | 35 kg |
| Power Supply | 230 V / 50 Hz, 3.5 kW |
| Oven Capacity | 65 Liters |
| Energy Class | A+ |
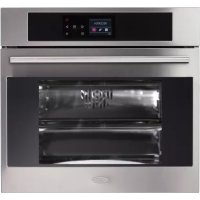
| Main Functions | Conventional, Grill, Fan-assisted, Defrost, Pizza |
| Temperature Range | 50°C - 250°C |
| Cleaning Type | Catalytic panels (self-cleaning) |
| Safety Features | Child lock, Automatic shut-off, Cool-touch door |
| Control Type | Rotary knobs and digital timer |
| Spare Parts Availability | Replacement heating elements, thermostats, door glass, shelves available from authorized service centers |
| Repairability Index | 7.5 / 10 |
| Warranty | 2 years |
Frequently Asked Questions - BS45 BORETTI
User questions about BS45 BORETTI
0 question about this device. Answer the ones you know or ask your own.
Ask a new question about this device
Download the instructions for your Oven in PDF format for free! Find your manual BS45 - BORETTI and take your electronic device back in hand. On this page are published all the documents necessary for the use of your device. BS45 by BORETTI.
USER MANUAL BS45 BORETTI
Thank you for choosing one of our products. We hope you will get the very best performance from this appliance.
Before using this appliance, carefully read the warnings contained in this instruction manual, since these are important instructions for its safe installation, use and maintenance. Carefully conserve this manual for future consultation.
The manufacturer reserves the right to make modifications considered to be necessary and useful, without any advance notice.
This appliance satisfies the following EC directives:
93/68/CEE : General Regulations and subsequent amendments
2006/95/CE : Low Voltage and subsequent amendments
2004/108/CEE : Electromagnetic Compatibility and subsequent amendments
This appliance is marked in compliance with European Directive 2002/96/EC, Waste Electrical and Electronic Equipment (WEEE).
By making sure that this product is properly disposed of, the user is contributing to preventing potential environmental and health damage.
The symbol on the product, or on the documentation that goes with it, indicates that this product must not be considered as domestic waste. It must instead be turned over to suitable collection centres for the recycling of electrical and electronic equipment.
Dispose of it in accordance with local standards for waste disposal.
For further information on the treatment, salvage and recycling of this product, contact the proper local authority, the home waste collection service or the retailer where the product was purchased.
GENERAL WARNINGS
- THIS PRODUCT WAS DESIGNED FOR HOUSEHOLD USE.
○ After having removed the packaging, make sure that the appliance is in good condition. If any doubts exist, consult professionally qualified personnel.
The packaging materials (for example: polystyrene, bags, etc.) can be hazardous for children (suffocation hazard). Keep packaging materials away from children.
- The packaging is comprised of recyclable material and is marked by the symbol . Please dispose of properly.
This manual constitutes an integral part of the appliance. We recommend keeping it in a safe place for the entire lifespan of the appliance and reading it carefully in order to install, use, maintain, clean and treat the appliance.
o Lifting and moving of appliances weighing more than 25kg must be carried out using proper equipment, or by two persons, in order to avoid risks or injuries.
- Do not leave the appliance exposed to atmospheric agents (rain, sun, etc.).
If it is ever decided to no longer use the appliance, it is recommended to render it inoperative by cutting the power supply cable after disconnecting it from the electrical socket. In addition, it is also recommended to render the parts of the appliance that could cause danger innocuous.
- Oven accessories that could come into contact with foods are constructed with materials that conform with the regulations outlined in CEE Directive 89/109 of 21/12/88.
GENERAL WARNINGS - INSTALLATION / REPAIRS -
☐ THE MANUFACTURER DECLINES ALL RESPONSIBILITY FOR ANY DAMAGE TO PEOPLE OR ITEMS CAUSED BY INCORRECT INSTALLATION OR IMPROPER, WRONG OR ABSURD USE OF THE APPLIANCE.
- Attention: earth connection is required by law.
o CONNECTION: check that the specific details on the data plate regarding the workings of the oven correspond to your electricity supply, for the mains electricity connection it is necessary to provide for a device which ensures disconnection from the mains electricity supply, with a contacts opening distance which enables complete disconnection in category III over voltage conditions, in compliance with the installation regulations.
The oven must be connected with a cable with minimum 1.0 section in the rear, using an omnipolar switch that complies with currently enforced laws, with an opening distance between contacts that is equal to or more than at least 3mm.
- The manufacturer will in no way be held liable if accident prevention standards area not observed.
- Any work on the appliance must be done with the appliance disconnected from the electrical power supply.
- If the oven is visibly damaged or malfunctioning, do not use it. Unplug it and contact customer services.
It is not recommended to use adapters, multiple plugs and/or extension cords. If it is not possible to avoid using these, always remember to use exclusively extension cords and single or multiple adapters that comply with currently enforced laws governing safety and that do not exceed the maximum capacity indicated on the extension cord or single adapter, or the maximum power indicated on the multiple adapter.
- In the event of a breakdown or if indispensable repairs are required, contact customer service.
- It is not permitted to modify, tamper with or attempt repairs on the appliance, especially with tools (screwdrivers and the like), either inside or outside the appliance.
- Inappropriate repair work may cause serious accidents, damage the appliance and equipment and lead to improper operation.
- Appliances repaired in technical service centres must undergo routine testing, especially the continuity of the earth circuit.
○ Make sure that the power cable of the electrical appliances is not trapped by the door. The electrical insulation could be damaged.
- If the power cable has been damaged, it must be replaced by customer service to prevent dangerous accidents.
GENERAL WARNINGS - FIRST USE -
o Warning: the oven must be disconnected from the electrical mains, or the electrical power supply must be unplugged, or the system main switch must be off.
Before using the oven, carefully clean the inside of the oven, the grills and the drip pan using non-abrasive soap and tepid water. Insert the grill and drip pan in their respective tracks.
Once this has been complete, connect the oven to the mains electricity supply and switch it onto the steam cycle (or the grill if available) for around 30 minutes, in order to eliminate any residues of fat, oil or resin from during its manufacture which could provoke bad odours during cooking; then, air the room.
- Once this simple operation is complete, the oven is ready for use
GENERAL WARNINGS - OPERATIONS/CLEANING -
- This appliance is to be used by adults who are familiar with these user instructions.
Children are often unable to recognize the risks entailed in using the appliance. During oven operations, make sure to keep an adequate distance.
○ Make sure that children do not play with the appliance. - The disabled must be assisted by capable adults.
Before closing the oven door, make sure there are no foreign objects or pets inside the oven.
Do not place heat-sensitive or flammable materials in the ovens such as detergents, oven sprays, etc. - Do not use the appliance to heat the room.
While it is working, the appliance will get hot. Make sure not to touch the heated parts inside of the oven. - Wait for a sufficient length of time before doing anything like cleaning the oven.
When opening the oven door, steam and hot water spray may come out of the oven. Use caution. - If the oven contains steam, it is not advisable to put your hands inside of it.
- Leave the oven door open in the supported position only.
- Do not leave the door open to avoid tripping or crushing fingers.
- Do not sit or lean on the oven door, and do not use it as a work surface.
- Do not touch the appliance with damp hands or feet.
Do not pull on the power supply cable, or the appliance itself, to remove the plug from the power socket.
Hot grease and fat catch fire easily. Be careful. Never try to put out a grease fire using water (there may be an explosion). Suffocate the flames with wet cloths. - The grill, hotplates and cooking containers will become extremely hot. Use protective gloves or hot pads.
WARNING: WE RECOMMEND USING ADEQUATE PREVENTION AND PROTECTION DEVICES WHEN DISMANTLING, MAINTAINING AND CLEANING THE APPLIANCE (GLOVES, ETC.) - Do not use steam cleaners to clean the oven
When using or cleaning the oven, be careful not to place your fingers in the door hinges or in the door itself in order to avoid crushing or injuries. - Avoid cleaning parts of the appliance that are still warm.
- Painted, chrome plated and glass parts should be washed with warm water.
- The inside of the oven should be cleaned after each use using warm water and detergent, then rinsed and dried thoroughly.
The parts in stainless steel, and in particular the areas with engraving, must not be cleaned using abrasive detergents or diluents. It is preferable to use only a soft cloth dampened with warn water or liquid dish detergent. - To clean stubborn stains, denatured alcohol may be used.
- Stainless steel may remain stained if it is in contact for an extended time with water which has excessive mineral deposits or with aggressive detergents (containing phosphorus). After cleaning is finished, thoroughly rinse and dry using a soft cloth
○ Avoid leaving acidic liquids on painted or enamelled parts (vinegar, lemon juice, aggressive detergents, etc.)
Do not use steel wool or abrasive sponges, muriatic acid or other substances that can scratch or streak, or that can cause the glass door to break. - Only use the heat sensor recommended for this oven.
It is advisable to only use water which has a low calcium content or bottled mineral water, in order to limit the formation of lime scale.
○ Empty the water pitcher after each use for hygiene reasons.
○ After cooking, and when the oven has cooled sufficiently, use a soft cloth to dry any liquid remaining on the bottom of the cooking chamber.
Use the appliance in settings where the temperature is not lower than 5^ C. If the appliance is subject to frost, the residual water contained in the hydraulic circuit can damage the pipes and the pump.
TECHNICAL DATA
Usable oven dimensions:
Width 597mm
Depth 568mm
Height 460mm
Power Draw:
Steam Cooking 800-950 W
Grill Cooking 1400-1650 W (for steam ovens with GRILL function)
Useable Volume of Oven:
27 L
Water tray capacity: 1.2 L
Voltage and power supply frequency:
220-240V\~ 50/60Hz
CONNECTION TO MONO-PHASE ELECTRICITY
For direct connection to the mains power, it is necessary to use a device that ensures that the mains power is disconnected, with a distance between contacts that allows complete disconnection in compliance with surge category III and installation regulations.
Assembly of the power cable:

natural_image
Simple line drawing of a rectangular box with a small figure inside (no text or symbols)
natural_image
Pure electrical circuit lines without any symbols- Open the terminal board by placing a screwdriver under the side flaps on the cover, pull and then open the cover (see the figure).

text_image
L N-
Install the power supply cable, unscrew the screws on the cable grip and the three screws on contacts L-N- and then attach the wires under the screw heads following the colours Blue(N), Brown(L), Green-Yellow(see the figure).
-
Attach the wire to the appropriate wire holder.
- Close the terminal board lid.
Attaching the power supply cable to the mains.
In case of direct connection to the mains, it is necessary to install an omnipolar switch between the appliance and mains power with a minimum opening between the contacts of 3mm dimensioned for the indicated capacity and in compliance with currently enforced regulations (the ground cable must not be interrupted by the switch).
The power supply cable must be positioned in a way that it does not exceed 50^ C in any area of the surrounding temperature.
The installer is responsible for correct electrical hook-up and adherence to safety regulations.
Before hook-up to the mains, make sure that:
- the socket has a ground connection and that it complies with legal regulations;
- the socket is able to withstand the oven's maximum power capacity indicated on the features plate.
- the power supply voltage is within the value80s listed in the electrical characteristics label.
- the socket is compatible with the appliance plug.
- If this is not the case, replace the socket or the plug. Do not use extension cords or multiple sockets.
- Once the appliance is installed, the electrical cable and the electrical power socket must be easy to reach.
- The cable must not be bent or compressed.
- The cable must be periodically checked and only replaced by authorized technicians.
- The Company declines any responsibility if these instructions are not adhered to.
Replacement of the power cable:
If the power cable needs to be replaced, use cables of the following type only:
- H05 RR-F,
- H05 V2V2-F (T90),
suitable for the operating capacity and temperature.
The green-yellow ground cable must be longer than the other two conductors by approximately 2cm.
Important:
any adjustments, maintenance, etc. must be executed with the oven disconnected from electricity.
To guarantee the proper functioning of the built-in appliance, the furniture unit must have suitable characteristics:
- the panels adjacent to the oven must be constructed with heat resistant materials;
- in the case of veneered wood furniture units, the glue must be heat resistant to temperatures up to 100°C;
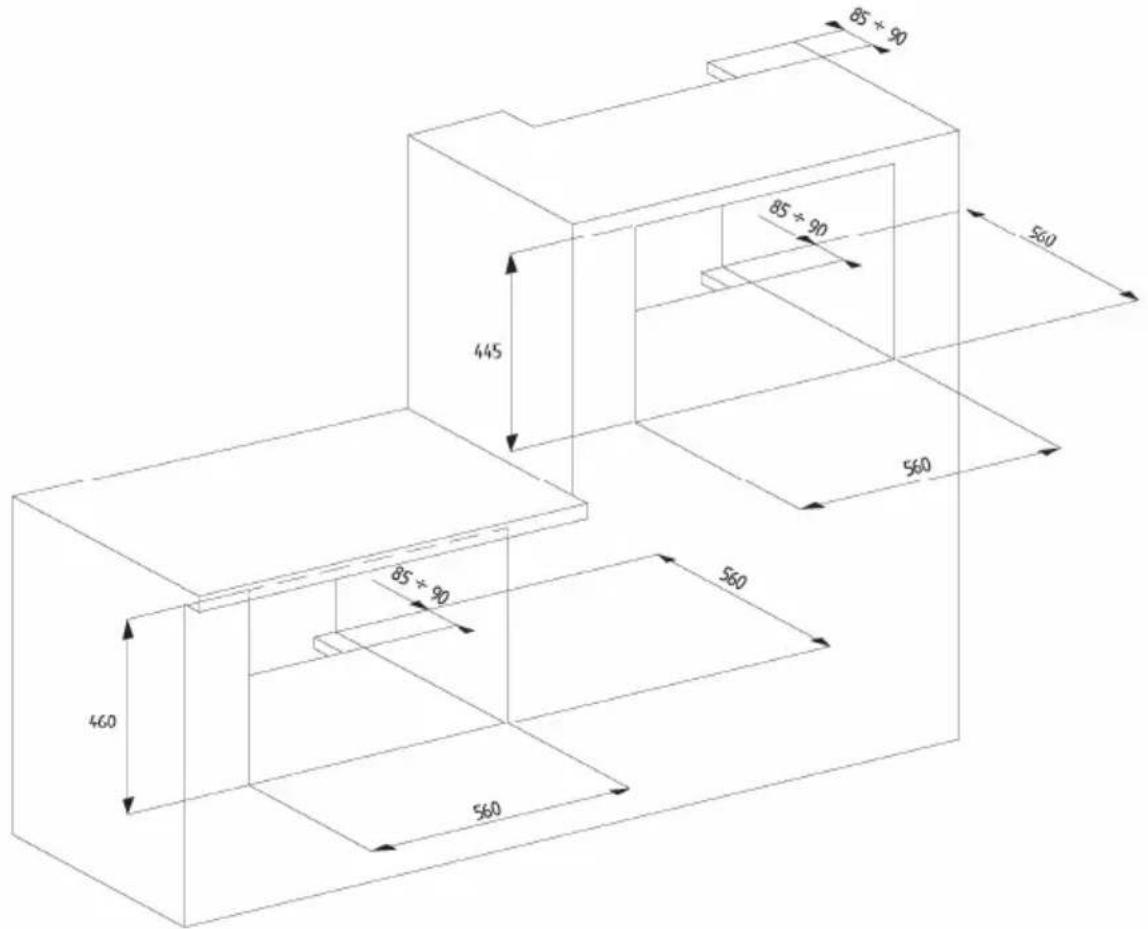
The oven must be located in a standard opening of 560mm, as illustrated in Fig. 1, whether under a counter or in a column position.
When inserting the oven into the column, in order to ensure sufficient ventilation it is indispensable to make an opening of at least 85÷90 mm as shown in the picture below.
The oven is secured to the furniture unit by four "A" screws located in the holes of the frame.
Make sure not to lift the oven by its door when inserting it. Furthermore, do not place excessive pressure on the door when it is open.
text_image
85 ± 90 85 ± 90 445 560 560 85 ± 90 460 560Oven dimensions

OVEN DESCRIPTION

text_image
1 9 8 9 2 7 63

natural_image
Line drawing of a rectangular metal grate with evenly spaced vertical slats (no text or symbols)
natural_image
Line drawing of a rectangular electronic component with mounting holes (no text or symbols)
natural_image
Simple diagram of a rectangular container with scattered circular elements inside, no text or symbols present.1 Control panel
2 Pitcher compartment
3 Pitcher
4 Perforated drip pan
5 Grill
6 Handle
7 Door
8 Cooking chamber
9 Side grills (only available with grill oven)
ACCESSORIES
The accessories supplied with the oven increase the cooking functions and possibilities. The accessories known as the drip pan and grill can be put back on the runner located inside the oven (if the oven has a grill), otherwise lay them on the bottom of the oven.
Grill
Used mainly as a support surface.

natural_image
Simple line drawing of a rectangular metal grate with evenly spaced vertical slats (no text or symbols)Perforated drip pan
The perforated drip pan is mainly used for carrying out steam cooking (fresh or frozen vegetables, fish).

natural_image
Simple diagram of a rectangular container with scattered circular elements inside (no text or symbols)Steam oven with grill (Fig. A)

text_image
MAX 0 90 200 120 160 1 3 MAX 0 50 90 50 80 70 2 4Description of the switches
- Ignition knob and grill function temperature regulation (50-MAX)
- Ignition knob and steam function temperature regulation (50-MAX)
- Programming switches for the alarm or setting the clock and cooking times.
- Red/blue(green) bi-colour light). Blue (green) working normally, red alarm state and/or error code signal.
Steam oven without grill (fig. B)

text_image
1 2- Steam knob (50°C-MAX)
- Red/blue(green) double colour light: blue (green) working normally; red: alarm state and/or error code signal.

text_image
1 2- 60' timer
- Steam knob (50°C-250°C)

GRILL (where one is present)
Function which only uses the upper heating GRILL element
The grill emits radiation which is similar to solar rays.
The radiated heat can be regulated by positioning the knob index at the desired temperature.
It is advisable to lightly oil the food, if it is meat or fish.
Insert the grill onto the available ledge. Keep the door closed.
This kind of cooking is especially suited to small amounts of food.
During cooking the light will stay on.
At the end of the cooking programme or by rotating the selector to the OFF position the light will be switched off.
NOTE: Any condensation formed on the glass in the door, on the walls and the bottom of the oven does not affect its functioning. It is advisable to dry the condensation after having finished cooking.
Grill Light
When this orange light on the left of the GRILL selector comes on, it indicates that the oven is switched on to the GRILL function. During cooking the light will stay on.
The light will be switched off at the end of cooking programme or by rotating the selector to the OFF position.
NOTE if the light is flashing, it means that there has been a problem with the mains electricity (blackout), please see the Alarm Codes Table.

STEAM COOKING
This cooking function only uses steam. During steam cooking, the steam from the boiler flows into the cooking chamber. The steam heats the cooking chamber and cooks the food.
This cooking mode is ideal for cooking any type of vegetables, and it preserves the colour, taste and above all the properties of the food.
Minimum chamber temperature 40°C maximum 100°C.
Steam Light
The steam light may give off red or blue(green) coloured light.
The blue(green) indicator shows that the oven is working in the steam function.
During cooking the BLUE (GREEN) light will stay on. At the end of the cooking or by rotating the selector to the OFF position the light will be switched off.
If during cooking, the light turns red and flashes followed by a pause, it means that there are alarm conditions, please see the Alarm Codes Table.
Alarm codes table
| Number of red light flashes | Causes Actions | |
  2, pause, 2 ,pause 2, pause, 2 ,pause | The boiler generator does contain the water needed to form the steam. | 1) Check that the pitcher is in its housing and is inserted well.2) Check that the pitcher contains water. If this is not the case, provide for topping it up with water which has a low calcium content or bottled mineral water. |
  3, pause, 3, pause 3, pause, 3, pause | a) Probable malfunction in the loading pump.b) Probable breakdown along the hydraulic circuitc) Probable electrical/electronic breakdown. | 1) Check that the pitcher is in its housing and is inserted well.2) Check that the pitcher contains water. If this is not the case, provide for topping it up with water which has a low calcium content or bottled mineral water.3) Check that the rubber ring is on the tube of the jug.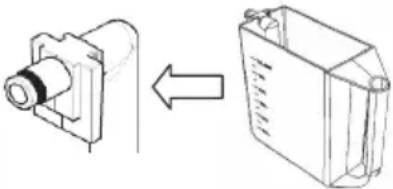 Close the door. The oven will come back on.4) If the malfunction continues, take note of the number of flashes emitted and contact an Authorised Service Centre. Close the door. The oven will come back on.4) If the malfunction continues, take note of the number of flashes emitted and contact an Authorised Service Centre. |
  4, pause, 4, pause 4, pause, 4, pause | a) Probable chamber temperature sensor malfunction.b) Probable boiler temperature sensor malfunction.c) Probable electrical/electronic breakdown. | 1) Turn the selector to the OFF position. The oven will turn itself off. The error code will be reset. Turn on the oven.4) If there is an error code, take note of the number of flashes emitted and contact an Authorised Service Centre.NOTE It is probable that the breakdown is limited only to the steam function. In this case, the use of the GRILL is permitted (where one is present). |
 alternating red/blue(green) light alternating red/blue(green) light | The indices of the selectors are both in the cooking position. | Turn the index of one of the selectors to the OFF position |
 Grill or Steam light flashing Grill or Steam light flashing | There has been a BLACK-OUT or the electrical energy was interrupted during cooking.Cooking is finished. | Turn the index of the selector to the OFF position. Wait for around 4 sec.The alarm signal should end.The cooling fan should stop.If your oven is supplied with an electronic clock, press the buttonSet the time if necessary.The oven is now ready to re-start cooking. |
NOTE A buzzer will go off at the same time as the red light comes on with the aim of drawing your attention to the oven, which will be de-activated after 60 seconds or at the end of the problem which activated it.
Oven door open during or after steam cooking.
Opening the oven door during or after steam cooking or in the first 10 minutes after the end of cooking will cause the steam light to turn RED followed by a buzzer being heard.
This alarm indicates that you must pay attention due to the steam which is released by the cooking function.
Step to one side or take a few steps backwards.
How to turn the oven off
Turn the index of the GRILL or STEAM selector to the OFF position
Cooling fan
The oven is equipped with a cooling fan command panel. (knob and oven door handle)
The fan will come on automatically around 5 minutes after cooking has started. While it is working, a flow of warm air will come out of the opening located under the command panel. Once cooking has finished, the fan will turn itself off automatically. In order to avoid the danger of overheating, this fan will also continue to function AFTER THE OVEN HAS BEEN SWITCHED OFF, until the temperature returns to a normal level.
To accelerate the cooling process, open the oven door once cooking has finished.

natural_image
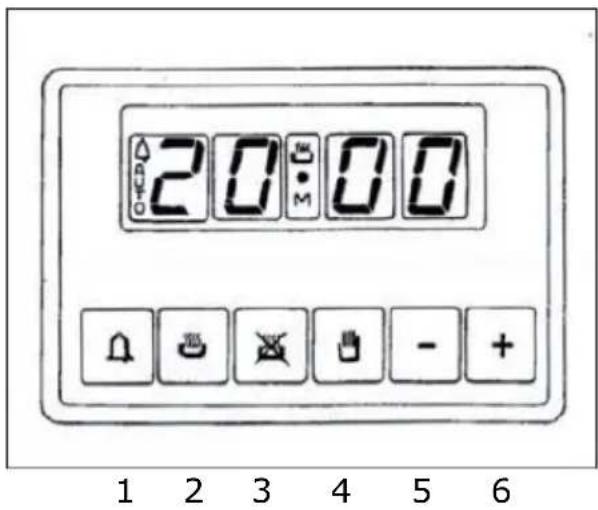
Line drawing of a kitchen oven with handlebars and control panel (no text or symbols)Electronic programmer (where provided)
The electronic programmer includes the following functions:
- 24-hour clock with illuminated display
- Timer (up to 23 hours 59 minutes)
- Programme for automatically starting and stopping the cooking process
- Programme for semi-automatic cooking (possibility of programming only at the beginning or at the end)

text_image
20 00 0 0 0 0 - +Description of buttons
1) "TIME"
2) "COOKING TIME"
3) "END OF COOKING TIME"
4) "MANUAL POSITION"
5) "SCROLL FORWARD THROUGH ALL THE PROGRAMME NUMBERS"
6) "SCROLL BACKWARDS THROUGH ALL THE PROGRAMME NUMBERS"
Description of illuminated symbols
« AUTO » - (flashing) - Programmer in automatic position, but not programmed.
« AUTO » - (on steady) - Programmer in automatic position, with program inserted.
Automatic cooking operation
Timer in operation
and « AUTO » (both flashing) – Programme error
No symbol on except for numbers on clock: programmer set in manual mode.
Digital clock
Indicates hours (0-24) and minutes.
Immediately after connection (as well as after a power outage), three intermittent numerals are shown on the display.
To set the correct time, press: ☐+ ☒: simultaneously and at the same time one of the [+] or [-] buttons until you have the correct time.
The speed with which the numerals change on the display increases substantially a few seconds after pressing the [+] or [-] buttons.
Manual cooking
(without programmer)
To use the oven without the programmer, you will need to cancel the flashing «AUTO» message.
To do so, just press the ☐ button.
If the «AUTO» message is steady, showing that the oven has been programmed, you will need to cancel the programme by pressing ☐ so that the display shows zero.
Automatic cooking
(cooking start and stop)
1) Programme the length of cooking time with □:
2) Programme the cooking stop time with 📄.
3) Select the desired temperature and function using the thermostat commands and by pressing the switch, the «AUTO» symbol on the display will indicate that the oven has been programmed.
Practical example:
As an example: you want to cook for 45 minutes, ending at 14.00.
- Press ☐ to set 0.45 on the display.
- Press ☒ to set 14.00 on the display.
After doing this, the display will once again show the current time and the «AUTO» symbol, to indicate that your programming has been understood and memorized.
At 13.15 (14.00 less 45 minutes), the oven will start automatically, and during cooking the symbols ☐ and «AUTO» will be shown.
At 14.00 the cooking will automatically stop, and a buzzer will sound, which can be stopped by pressing 📋.
Semi-automatic cooking
A. Programming the cooking time.
B. Programming the end of cooking time.
A) Set the desired cooking time using the button ☐.
Cooking will start immediately, and the display will show the symbols «AUTO» and ☐.
When the programmed time has expired, cooking will stop, and an intermittent signal will sound. You can stop the signal as described above.
B) Set the desired end of cooking time using the button
Cooking will start immediately, and the display will show the symbols «AUTO» and 📄. At the established time, cooking will stop, and an intermittent signal will sound. You can stop the signal as described above.
It is possible to view the programming status at any time by pressing the corresponding button. You can also cancel programming at any time by pressing the button ☐ and setting the display to zero.
Then by pressing the ☐ the oven will switch to manual functioning.
Electronic signal
The function of the «timer» consists simply of a buzzer which can be set for a maximum period of up to 23 hours and 59 minutes.
To set the timer, press 📋 and at the same time [+] or [-] until the display shows the desired time. When setting is complete, the clock time will once again show on the display along with the symbol 📋.
The countdown will begin immediately and can be seen on the display at any time, by simply pressing on the 📄.
After the set time has expired, the symbol 📋 will go off and a buzzer will sound, which you can shut off by pressing the 🔒 button.
ATTENTION!
A power outage will cause deletion of programmed functions, including the clock.
Once you have turned the power back on again, three intermittent zeroes will appear, and you can re-programme.
Using the mechanical 60 minutes timer - (where provided)

text_image
0 5 55 5 10 50 45 15 40 20 35 30 25The regulating knob must be turned in a clockwise direction until it reaches the 60 minutes position and then turned to the desired time by turning the knob in a counter clockwise direction. The oven will not be turned off automatically.
A minute counter ringing will advise that the cooking time is over.
Using 120 minutes cut-off timer - (where provided)

text_image
STOP 120 5 105 15 90 45 75 60The function of the programming timer is to turn on the oven for a pre-determined amount of time.
Operating:
After having set the oven, switch knob at the desired temperature, turn the timer knob in a clockwise direction to the desired cooking time (max. 120 minutes).
when the timer will return to position "0", a minute counter ringing will advise that the oven will automatically turn off.
Manual position:
If the cooking time is longer than the 2 hours program, or if you wish to use the oven manually, to turn it off when you desire, turn the knob to manual position (right before Stop position)
USING THE STEAM COOKING FUNCTION
- Fill the water container (pitcher) with water which has a low calcium content or using mineral water.
- Fill the container up to the mark (1.2 L.). Note: NEVER fill the pitcher completely, otherwise the water pumped back into the container at the end of the cooking cycle may overflow.
- Insert the pitcher into its seat.
- Push the pitcher down completely to ensure a perfect seal between the tube located in the pitcher and the hydraulic circuit inside the oven.
- Always insert the NON-perforated drip pan under the perforated drip pan to collect the condensation, juices or parts of food that may fall.
Using a cooking function that does not include steam
When the oven is used with a cycle that does not include steam, the container may remain in its seat without compromising the cooking result.
Fish recipe list
| Dish: | Cooking chamber temperature °C | Cooking time Cooking cycle |
| MUSSELS AND CLAMS | MAX 00 | ^h.30' |
| SCORPION FISH FILLET | 80 00 | ^h.30' |
| PRAWNS AND FLAT LOBSTER | MAX 00 | ^h.30' |
| TROUT | MAX | ^h.005' |
Vegetables recipe list
| Dish: | Cooking chamber temperature °C | Cooking time Cooking cycle |
| ASPARAGUS | MAX | ^h.35' 00 |
| BROCCOLI | MAX | ^h.30' |
| CARROTS | MAX | 00^h.35' |
| BRUSSELS SPROUTS | MAX | 00^h.35' |
| CAULIFLOWER | MAX | ^h.40' 00 |
| SWISS CHARD STALKS | MAX | 00^h.35' |
| GREEN BEANS MAX | 00 | ^h.40' |
| FENNELS | MAX | 00.40' |
| POTATOES | MAX | ^h.50' |
| PEPPERS | MAX | 00^h.25' |
| LEEKS | MAX | ^h000' |
| RICE | MAX | ^h.300 |
| CELERY | MAX | 0035' |
| SPINACH | MAX | 00^h.20' |
| COURGETTES | MAX | 00^h.30' |
The cooking times are based on average sized dishes.
Cooking times may vary depending on the size of the dish.
NOTE:
The settings listed in the tables, the temperatures and the cooking times can be varied for personalised cooking more in keeping with your style. New data can be entered to overwrite the data stored in the memory by following the instructions provided below:
Grill recipes list
| Dish: | Cooking chamber temperature °C | Cooking time |
| Normal meat | MAX | 00^h.15' |
| Scaled fish | MAX | 00^h.20' |
| Fish (e.g. trout, salmon) | MAX | 00^h.30' |
| Sausages | MAX | 00^h.35' |
| Toast | MAX | 00^h.10' |
WHAT TO DO IN CASE OF AN ANOMALY
| PROBLEM | SOLUTION |
| The oven does not work. Check whether | the omnipolar switch or any residual-current circuit breaker (cut-out) of the electrical system is off. In case of problems with the electrical system, consult a qualified electrician. If the oven still does not work after resetting the omnipolar switch and/or residual-current circuit breaker, contact an Authorized Service Centre. |
| The steam light is RED Close the oven door | Warning / alarm indication. |
| The steam light is flashing RED Warning / | alarm indication. See the alarm codes table. |
| Steam comes out of the oven during operation. | Check whether the door is closed correctly. Check whether the seal is damaged with, for example, cracks. In the second case, contact an Authorized Service Centre. |
WHAT TO DO IN CASE OF A BLACK-OUT
If the electricity supply is interrupted, when it comes back on again it may be necessary to reset the time, if there is an electronic programmer in the oven.
HOW TO CHANGE THE COOKING CHAMBER SEAL
The seal located around the cooking chamber must be replaced if it has any cracks. For safety reasons, the seal must be changed by an Authorized Service Centre technician.
HOW TO DISASSEMBLE THE OVEN DOOR
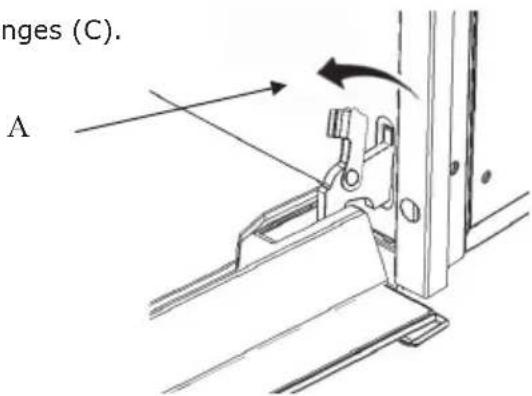
- Open the oven door completely.
- Locate the hinges (C), see the drawing to the side:

natural_image
Technical line drawing of a mechanical assembly with labeled component C (no text or symbols present)- Tip back the brackets (A) on the two hinges (C).
text_image
nges (C). A-
Grip the door on the two sides and close it slowly halfway, the brackets (A) will hook onto the door of the appliance.
-
Lift the door upwards.
-
Extract the door by rotating the lower part backwards. The brackets must come out of their seats.

natural_image
Line drawing of a hand holding a folder, with arrows indicating movement (no text or symbols)HOW TO REASSEMBLE THE OVEN DOOR
Insert the two brackets into the appropriate openings, keeping the door semi-closed.
- Open the door completely.
- Tip over the two hinges (C) moving them forward.

natural_image
Technical line drawing of a mechanical clamp or bracket assembly (no text or symbols)OVEN DETAILS
Cooling fan
The oven is equipped with a cooling fan to ensure proper operation and reduce the temperature of the external surfaces of the oven.
The fan is always active during the cooking process, and it is possible to feel the jet of air that comes out between the front panel and the door of the oven.
Golden colour of the cooking chamber
After a certain period of oven use, the cooking chamber takes on a golden colouring. This colouring of the stainless steel, due to natural causes, has no effect at all on the cooking characteristics.
SYSTEM WARNINGS:
CHECK THAT THERE IS WATER IN THE PITCHER
Generally, 1l of water in the pitcher is sufficient for the steam cooking process, before cooking and before cleaning the boiler check that there is enough.
(N.B. NEVER fill the pitcher completely, otherwise the water pumped by the steam generator back into the pitcher, at the end of the cooking cycle, may overflow from the container.)
- Insert the pitcher into its seat.
- Push the pitcher down completely to ensure a perfect seal between the tube located in the pitcher and the hydraulic circuit inside the oven.
natural_image
Simple line drawing of a rectangular box with a small human figure inside (no text or symbols)
text_image
1. Aprive lanatural_image
Line drawing of a rectangular electronic device with ports and connectors (no text or symbols)
natural_image
Simple line drawing of a rectangular metal grate with vertical slats (no text or symbols)
natural_image
Top-down schematic of a rectangular container with scattered circular elements, no text or symbols presentnatural_image
Simple line drawing of a rectangular metal grate with evenly spaced vertical slats (no text or symbols)Leccarda perforata
radar
| Position | Value | |---|---| | 0 | 55 | | 5 | 10 | | 10 | 15 | | 15 | 20 | | 20 | 30 | | 25 | 75 | | 30 | 55 | The chart displays a single data point at position 0 with a filled vertical bar between positions 45 and 60. No additional labels or categories are present.natural_image
Technical line drawing of a mechanical assembly with labeled component C (no text or symbols present)natural_image
Line drawing of a person inserting a tablet into a vehicle door panel (no text or symbols)COME RIMONTARE LA PORTA DEL FORNO
natural_image
Technical line drawing of a mechanical clamp or bracket assembly (no text or symbols)PARTICOLARITA' DEL FORNO
ALGEMENE WAARSCHUWINGEN
ALGEMENE WAARSCHUWINGEN - INSTALLATIE / REPARATIE
DEG GFABRIKANTG GWIJSTG GELKEG GVORMG GVANG GAANSPRAKELIJKHEIDG GA EVENTUELE SCHADE AAN ZAKEN OF PERSONEN VOORTKOMEND UIT EEN NIET CORRECTE INSTALLATIE EN ONDERHOUD, UIT ONEIGENLIJK, VERKEERD, ONVERSTANDIG GEBRUIK VAN HET APPARAAT.
ALGEMENE WAARSCHUWINGEN - WERKING / REINIGING -
natural_image
Line drawing of a rectangular electronic device with ports and a ventilation grille (no text or symbols)5

natural_image
Line drawing of a rectangular metal grate with evenly spaced vertical bars (no text or symbols)4

natural_image
Simple line drawing of a rectangular container with scattered circular holes, no text or symbols present.natural_image
Line drawing of a rectangular metal grate with evenly spaced vertical slats (no text or symbols)natural_image
Top-down schematic of a rectangular container with scattered circular holes, no text or symbols presentStoomoven met grill

text_image
MAX 0 80 200 120 160 1 3 MAX 0 50 90 60 80 70 2 4natural_image
Two industrial rotary dials with numerical scales, one showing a dial with a checkmark and the other displaying a dial with a pointer (no readable text or symbols)12
- Minutenteller 60'
- Stoomknop
DE FUNCTIES VAN DE KIEZER
natural_image
Line drawing of an open oven with a door and control panel (no text or symbols)radar
| Position | Value | |---|---| | Top | ✓ | | Left | 55 | | Middle | 10 | | Right | 15 | | Bottom | 20 | | Center | 30 | | Right End | 5 | The gauge displays a single data point at position 10, marked with a black dot and arrow pointing to it.natural_image
Technical diagram of a mechanical clamp or bracket assembly with directional arrows indicating movement (no text or symbols present)natural_image
Line drawing of a person using a tablet to interact with a door panel (no text or symbols)HET HERMONTEREN VAN DE OVENDEUR
natural_image
Technical line drawing of a mechanical bracket assembly with an arrow indicating motion (no text or symbols present)BIJZONDERHEDEN VAN DE OVEN
Koelventilator
text_image
Technical diagram showing a device with labeled components and a close-up of its internal circuit, including a switch and wiring.natural_image
Line drawing of a rectangular electronic device with internal components and mounting holes (no text or symbols)5

natural_image
Line drawing of a rectangular metal grate with evenly spaced vertical slats (no text or symbols)4

natural_image
Top-down schematic of a rectangular container with scattered circular particles inside (no text or symbols)natural_image
Line drawing of a rectangular metal grate with evenly spaced vertical slats (no text or symbols)natural_image
Line drawing of a rectangular container with a perforated interior and side supports (no text or symbols)FOUR VAPEUR AVEC GRIL

text_image
MAX 0 80 200 120 160 1 3 MAX 0 50 90 60 80 70 2 4natural_image
Two industrial dials with rotary controls, one showing a dial with a checkmark and the other displaying a dial with a magnified view (no text or symbols visible)1
2
natural_image
Line drawing of a kitchen oven with handlebars and control panel (no text or symbols)PROGRAMMATEUR ÉLECTRONIQUE
text_image
20:00 1 2 3 4 5 6natural_image
Technical line drawing of a mechanical assembly with no visible text or symbolsnatural_image
Line drawing of a hand holding a tablet device, with arrows indicating movement or change (no text or symbols)COMMENT REMONTER LA PORTE DU FOUR
natural_image
Technical line drawing of a mechanical bracket assembly with an arrow indicating motion (no text or symbols present)PARTICULARITÉ DU FOUR
text_image
Technical diagram showing internal components of a device with labeled parts and directional arrows, including a close-up view of the internal circuit.natural_image
Line drawing of a rectangular electronic component with mounting holes and internal structure (no text or symbols)
natural_image
Line drawing of a rectangular metal grate with evenly spaced vertical bars (no text or symbols)
natural_image
Top-down schematic of a rectangular container with scattered circular holes, no text or symbols presentnatural_image
Line drawing of a rectangular metal grate with evenly spaced vertical slats (no text or symbols)natural_image
Line drawing of a rectangular container with a perforated interior (no text or symbols)DAMPFGAROFEN MIT GRILL