BPMDN60ZWR - Oven BORETTI - Free user manual and instructions
Find the device manual for free BPMDN60ZWR BORETTI in PDF.

User questions about BPMDN60ZWR BORETTI
0 question about this device. Answer the ones you know or ask your own.
Ask a new question about this device
Download the instructions for your Oven in PDF format for free! Find your manual BPMDN60ZWR - BORETTI and take your electronic device back in hand. On this page are published all the documents necessary for the use of your device. BPMDN60ZWR by BORETTI.
USER MANUAL BPMDN60ZWR BORETTI
natural_image
Line drawing of a door frame with two arrows indicating movement or force, no text or symbols presentFiguur 1

natural_image
Line drawing of a hand pressing down on a wooden door panel with a black arrow indicating the handle (no text or symbols present)Figuur 2
natural_image
Mechanical assembly diagram showing a gear mechanism inside a housing (no text or labels)Fig. 3
natural_image
Line drawing of a person using a tool to adjust or install a mechanical component (no text or symbols present)Fig. 4
Milieuvoorschriften
natural_image
Symbol of a trash bin crossed out by two crossed lines, with a solid black rectangle below (no text or labels)natural_image
Line drawing of a person holding a wooden structure with diagonal bracing (no text or symbols)Fig. 4
natural_image
Line drawing of a person using a tool to adjust or install a mechanical component (no text or symbols present)Fig. 4
Umweltvorschriften
text_image
Symbol of a trash bin crossed out by a diagonal line, indicating no waste or dischargeBoretti would like to congratulate you on your new kitchen purchase, and to thank you for choosing a Boretti brand product.
Please read this manual carefully before going on to use the product. This will prevent possible problems and ensure that you are aware of the correct and safe use of this product
In the event that queries arise once you have read the manual or at any time during the use of your Boretti product, we will be happy to help you. Please refer to the back cover of this manual for Boretti's contact details.
We hope you enjoy using this product!
Boretti
Contents
Before First Use
Safety Instructions 34
Cleaning Before First Use 34
General Installation Instructions
Installation and connection 35
Description of oven functions
Overview 37
Digital timer 39
Maintenance 40
Environmental Regulations 41
Before First Use
Safety Instructions
This manual is part of the range cooker. It must be kept nearby during the entire lifespan of the range cooker. We recommend reading this manual carefully before using the range cooker.
The range cooker must be installed by a qualified technician in compliance with installation instructions as described in the previous chapter.
This range cooker is suitable for household use, and complies with current EU guidelines. The range cooker has been manufactured to cook and bake foods. Boretti is not liable for unauthorized use of the appliance, such as heating up a space.
Never block the openings and slots of your Boretti, so that proper ventilation is ensured.
Check the appliance after unpacking the oven. If there are visible damages do not install and use the oven and contact Boretti immediately. Boretti can not be held liable for damages after installation of the appliance.
Immediately after installation, the range cooker should be thoroughly tested, and any malfunctions reported.
Always open or close the oven door using the handle. Also, before closing the door check if there are no objects in the oven which should not be left in the oven.
Never place combustible products in your oven. Unexpected ignition could result in fire.
The range cooker is designed for use by adults, never allow children to remain near the range cooker unsupervised. Certain parts such as the grill element can become extremely hot.
Therefore do not allow children to play or be near the range cooker.
After every use, verify that all control knobs are set to "off".
In case of doubt regarding the safety instructions of your Boretti, we urgently recommend that you call Boretti. You will find our phone numbers on the back of this manual.
Do not use parchment paper when grilling.
Do not sit on the oven door or use it for support or as working table.
Never put combustible objects or products that could melt at low temperatures in the storage space below the oven.
The oven is equipped with a cooling fan which ensures that the outside cavity of the oven is as cool as possible. This fan blows air out of the front of the oven and will keep on doing this until the inside of the oven is efficiently cooled down,
Cleaning Before First Use
It is recommended to thoroughly remove all packaging residue from the range cooker, followed by cleaning according to the guidelines. Before first use of the oven, you should heat the oven at full power for 30 minutes. An unpleasant scorching smell will develop during this initial heating. This is normal.
We recommend that you ventilate the kitchen area thoroughly during initial heating.
General Installation Instructions
Your oven must be installed by a qualified technician according to legal/locally applicable codes and ordinances.
Check whether voltage and capacity agree with the features mentioned on your oven's type plate.
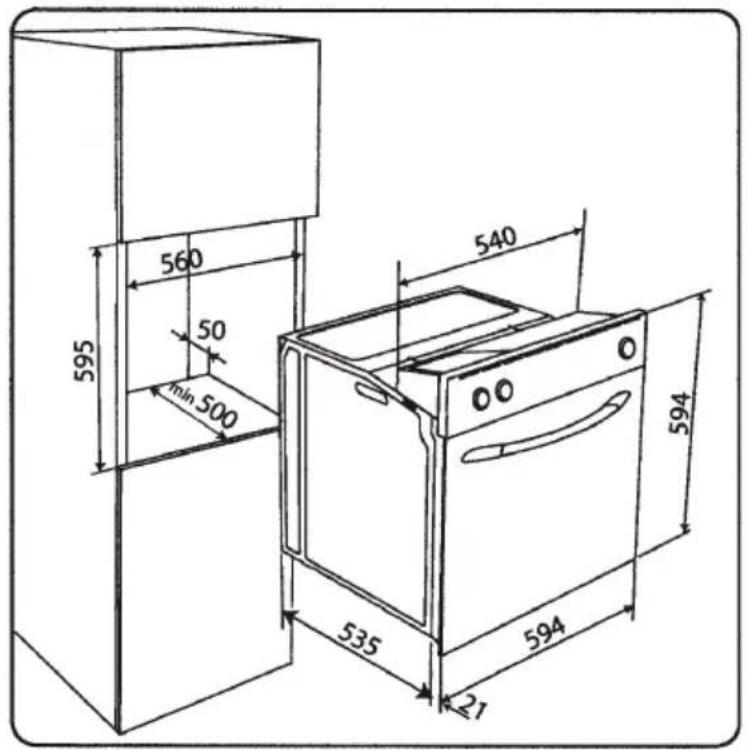
The oven can be installed under a surface or in a cabinet. Please respect the built-in cabinet dimensions as mentioned in figures 1, 2 and 3.
Please take in account that the oven requires sufficient ventilation as indicated in figures 1, 2 and 3.
The oven can be fixed by using 4 screws, delivered together with the oven.
Important: never lift the oven by using the handle!
text_image
595 560 50 min 500 540 535 594 21 594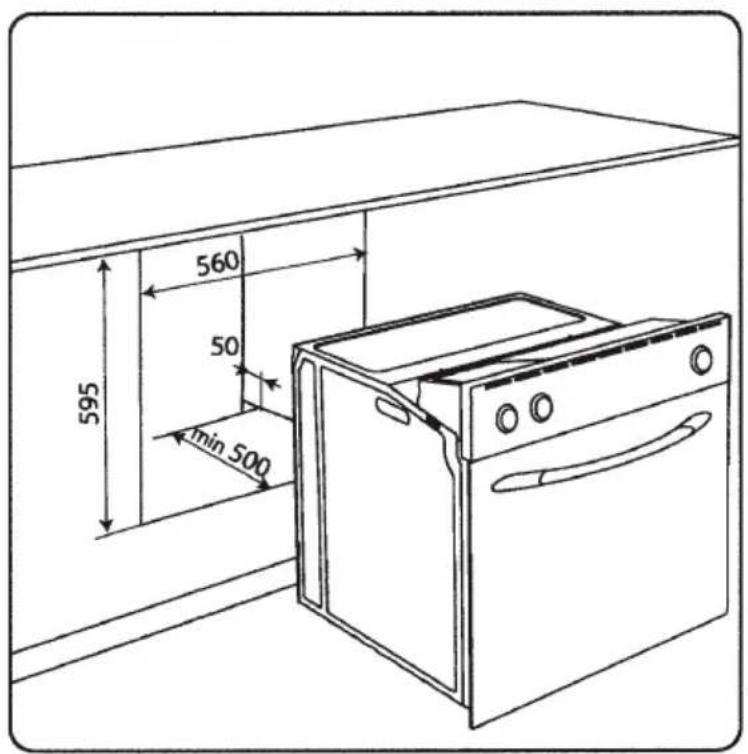
text_image
595 560 50 min 500Description of oven functions
Please note that the oven functions differ per model. Some functions mentioned in this user manual may not be available on the oven which you have purchased.
The different oven functions an be used by choosing the desired function with the function switch knob and setting the correct temperature with the temperature knob.

Thaw function
The thaw function will switch on the fan in the back of the oven so that an air stream will start flowing which will slightly speed up the thawing of your dish.

Convection Heating
The heat is supplied directly by the heating element mounted in the back of the oven around the fan. This adjustment is very suitable for baking or roasting a complete meal. It is possible to cook on several levels because of the circulating heat. Often convection heating is the most popular function of the oven.
Caution: This function is also called “intensive baking”, because it is an effective way to cook. In many cases, this function will also reduce the cook time of a dish.

Circulation Grilling
The heat generated by the grilling element will be evenly distributed throughout the oven by the fan in the back of the oven. This is suitable for grilling such foods as pork chops, sausages, skewers, etc.
Caution: The oven door should be closed during grilling. For model BMD-60 this function can be used in combination with the rotisserie.

Intensive baking
A rapid, intensive form of baking, particularly well suited for preparing various oven dishes. The upper and lower heating elements, together with the convection fan, provide the best baking results and even distribution of heat.

Centre Grill
Conventional grilling with the grilling element only. This is suitable for grilling such foods as chicken and roasts. It is also often used for cooking au gratin, or preparing deserts with caramelized sugar.
Caution: The oven door should be closed during grilling. For model BMD-60 this function can be used in combination with the rotisserie.

Double grill
With this function the complete grill element is used. Suitable for grilling large prtions of food.
Caution: The oven door should be closed during grilling. For model BMD-60 this function can be used in combination with the rotisserie.

Top Heat
This should be used to slowly brown the top of a dish, but can also be used to cook a dish au gratin more slowly than when using the grill.

Bottom Heat
This function is very suitable for dishes that need to rise. It can be used in combination with the convection function. In other words, if the product has risen, it can continue to bake with the convection function.

Bottom heat and fan
This function is very suitable for slow-cooking

Top and Bottom Heat
A function that works like a conventional oven, but includes a top heating element. It can be used for all dishes that could also be prepared in a convection oven.

Pyrolyse cleaning:
(Automatic self-cleaning cycle)
This cleaning cycle consists of the combustion of food residues at extremely high temperatures. During this cycle, the oven door is blocked. Once the oven cools off to a save temperature, the door is unlocked. Please note that even when the door is unlocked, the oven can still be hot. The residual ashes can be removed with a damp cloth.
WARNING: During pyrolysis cleaning, the oven surface will reach a higher temperature than normal.

Lighting
With this function only the lighting of the oven is turned on. The light in the oven will also switch on automatically when you select any particular oven function.
Programming of automatic start time and end time of cooking sequence
With the digital timer the following options are available:
- Indication of time (24 hours clock)
- Timer (from 1 minute till 23 hours and 59 minutes)
- Programming of automatic start time and end time of cooking sequence
- Programming of cooking time
- Programming of end time
Set the time
Upon immediate hooking up of the oven or after a blackout, three zeros will flash on the programmer panel. The oven shall not function until the time has been set.
You can adjust the time by first pushing the button ⏻ and afterwards the buttons + and - till the correct time has been set.
Timer
The timer can be set by pushing the button and afterwards the buttons + and - till the correct time has been set. After the set time has passed the oven will give a audible signal. You can turn this signal of by pushing the button.
- Set the length of cooking time by pushing the button and afterwards the buttons + and -
- Set the end of cooking time by pushing the button and afterwards the buttons + and -
- Turn the temperature and function knobs of the oven to the corrects settings. The word AUTO will appear in the display, which means the program has been memorized.
Setting end time of cooking sequence
Set the end of cooking time by pushing the button ⚫ and afterwards the buttons + and −. The word AUTO will appear in the display, which means the program has been memorized.
The oven will turn itself of after the cooking time has expired and will give an audible signal. Turn the signal off by pushing the button 📁.
Cancelling a program
You can cancel a program by pushing the button ⚙. The word AUTO will disappear from the display..
Adjusting the sound level
You can adjust the sound level by pushing the – button. You can choose from 3 different sound levels.
The sound level can only be adjusted when no programs are set.
Maintenance
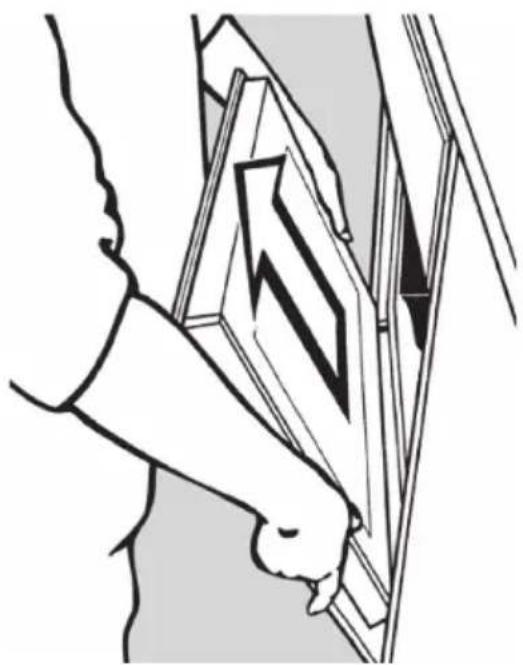
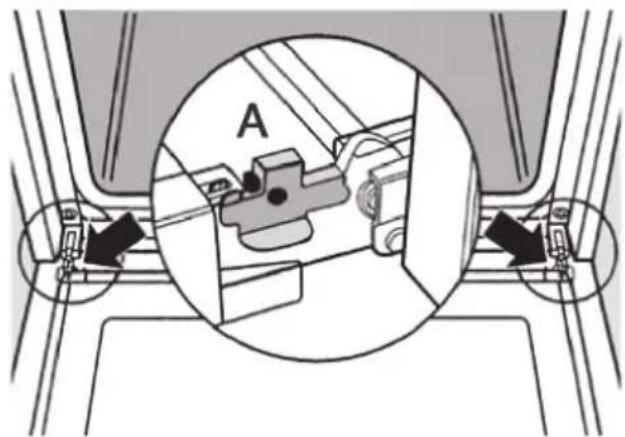
Dismantling the Oven Door
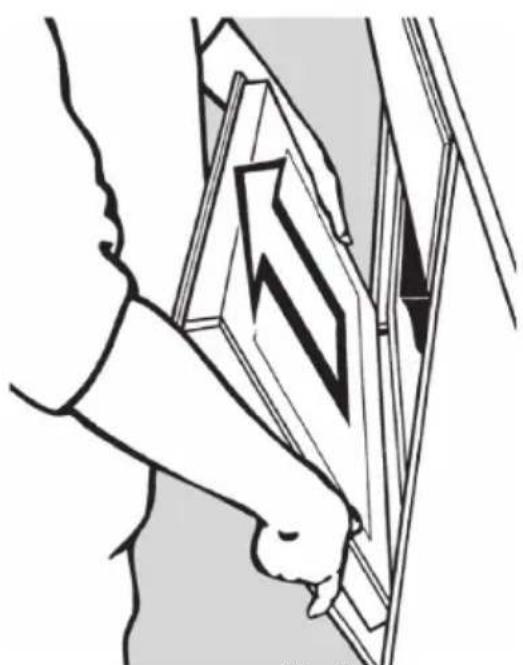
It is easy to remove the door from your Boretti range cooker. Please follow these instructions: Open the oven door completely. Move the fitted brackets to an upright position (Fig. 3) Close the door halfway. Without using force, pull the door slowly towards you (Fig. 4).
Attaching the door is done in reverse order. However, you must make sure that the little slots underneath the bracket fit onto the frame of the range cooker. This may take some practice.
Removing the Inside Panels from the Oven
In order to remove the inside panels from the oven, follow these steps:
- open the oven door completely
- remove all racks and baking sheets from the oven cavity
There are two large screws that you can unscrew on the sides, after which the side panels can be easily removed.
Cleaning the Oven Cavity
Wait until the oven has cooled down completely, then clean it with lukewarm water and a mild cleaning agent. Never use knives, steel-wool pads or other abrasive products or objects for cleaning purposes. This might damage the fi-nish on the
inside of your oven. Make sure that food spills are removed after every cooking session, in order to prevent damage. An additional advantage of regular cleaning is that there will be fewer unpleasant odours the next time you use the oven.
text_image
AFig. 3
natural_image
Line drawing of a person using a tool to adjust or install a mechanical component (no text or symbols present)Fig. 4
Environmental Regulations
Never leave packaging unsupervised. Separate the various packing materials by type, and take them to the nearest waste sorting station in your municipality.
We use non-polluting and therefore environmentally-friendly and recyclable materials for the packaging of our products. We ask for your cooperation in making sure that the packing materials are processed properly. Addresses for collection, recycling and processing centers are available at your dealer or the appropriate local institutions.
Never simply dump packaging or parts of it. This could be a choking hazard for children, particularly the plastic bags. You are also responsible for proper processing of the old appliance.
natural_image
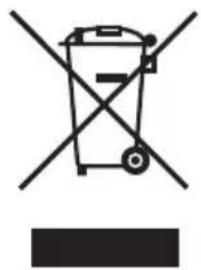
Symbol of a trash bin crossed with no visible text or labelsImportant: take the appli- ance to a local company au- thorized to collect discarded household appliances. With proper processing, valuable materials can be recycled in an intelligent fashion. Before you dispose of your appliance, it is important that you remove the door, and leave the racks in functional position in order to avoid children getting shut into the oven cavity while playing. In addition, you should cut off the electrical power cord, and remove it together with the plug. The guidelines determine standards for collection and recycling of discarded appliances which apply to the entire European Union.
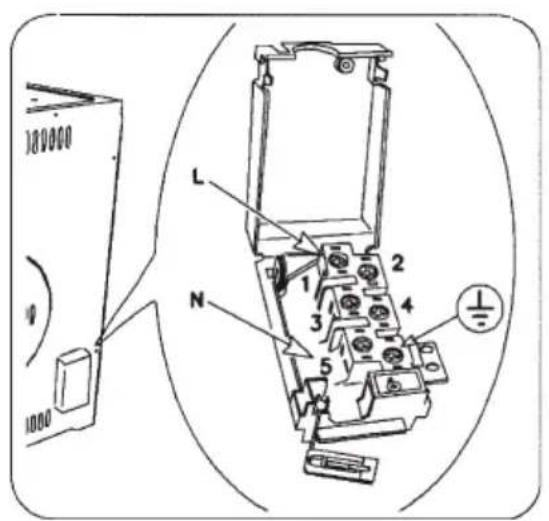
Electrical connections
text_image
180000 1000 L N 1 2 3 4 5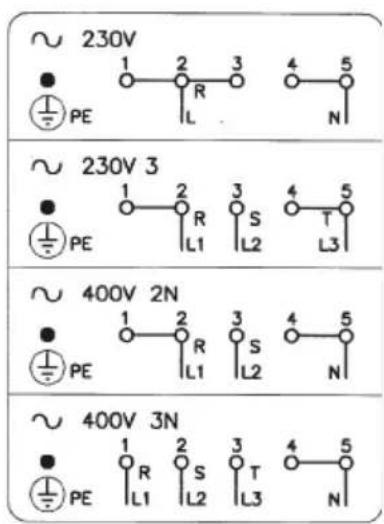
text_image
~ 230V ● ⊥ PE 1 2 3 R L 4 5 N ~ 230V 3 ● ⊥ PE 1 2 3 R L1 S L2 4 5 L3 ~ 400V 2N ● ⊥ PE 1 2 3 R L1 S L2 4 5 N ~ 400V 3N ● ⊥ PE 1 2 3 R L1 S L2 4 5 T L3 4 5 N230V\~
230V 3 *4 x 2,5 mm ^2
400V 2N*4 x 2,5 mm ^2
400V 3N\~ *5 x 1,5 mm²

text_image
BORETTIBORETTI B.V.
De Dollard 17
1454 AT Watergang
T +31(0)20-4363439
F +31(0)20-4361326
S 0900-2352673 (service)
E info@boretti.com
The Netherlands
N.V. BORETTI S.A.
Rupelweg 16
2850 Boom
T +32(0)3-4508180
F +32(0)3-4586847
E info@boretti.com
Belgium