
BP8960W - Oven GORENJE - Free user manual and instructions
Find the device manual for free BP8960W GORENJE in PDF.
| Product type | Built-in oven |
| Brand | Gorenje |
| Model | BP8960W |
| Dimensions (W x D x H) | 440 x 390 x 340 mm |
| Usable volume | 59 litres |
| Power supply | 230 V ~ 50 Hz, single-phase |
| Maximum power consumption | 3.1 kW |
| Heating elements | Top (0.9 kW), bottom (1.3 kW), grill (1.6 kW), front fan (2.3 kW) |
| Cooking functions | Static cooking, convection, grill, defrosting, fan-assisted heating, pyrolytic cleaning |
| Electronic programmer | 24h clock, timer (up to 23h59), semi-automatic and automatic cooking |
| Cleaning | Pyrolytic with cycles from 90 to 180 minutes |
| Safety | Automatic door locking above 300°C, automatic stop at end of cooking |
| Provided accessories | Rotisserie, wire shelf, drip tray, side guides |
| Energy class | Not specified |
| Net weight | Approximately 32 kg (estimate) |
Frequently Asked Questions - BP8960W GORENJE
User questions about BP8960W GORENJE
0 question about this device. Answer the ones you know or ask your own.
Ask a new question about this device
Download the instructions for your Oven in PDF format for free! Find your manual BP8960W - GORENJE and take your electronic device back in hand. On this page are published all the documents necessary for the use of your device. BP8960W by GORENJE.
USER MANUAL BP8960W GORENJE
The symbol on the product or on its packaging indicates that this product may not be treated as household waste. Instead it shall be handed o ver to the applicable collection point for the recycling of electrical and electronic equipment. By ensuring this product is disposed of correctly, you will help prevent potential negative consequences for the environment and human health, which could otherwise be caused by inappropriate waste handling of this product. For more detailed information
about recycling of this product, please contact your local city office, your household waste disposal service or the shop where you purchased the product.
DE

Installation Instruction
Warning and safety instructions Before using the oven for the first time, read these operating instructions carefully for full information on the safe installation, use and care of your new appliance.
This unit must be correctly installed in accordance with the menu-facturer's instructions by a suitably qualified person.
The manufacturers decline responsibility for damage to persons or items due to poor or incorrect installation of this appliance.
Make sure that the voltage and frequency of the mains supply correspond to the details on the rating plate which can be found on the lower part of the front of the oven.
Warning: this appliance must be earthed.
Our company declines any liability for failures in the earth connection or for earth connection that is not in compliance with the regulations in force.
Maintenance and servicing work must only be carried out after the power supply has been disconnected by switching off at the wall socket or removing the mains fuse.
Due to our policy of continuous innovation, we reserve the right to adjust or modify our product without prior notification.
Do not let children near the oven during use as external surfaces including glass will become hot so, to avoid the danger of burns or injury, and this appliance is not intended for use by young children or inform persons without supervision. Young children should be supervised to ensure that they do not play with the appliance
Supervise the use of the oven by the elderly or infirm.
Where an oven is built-under with a drawer beneath, this must be made non functioning with a 'dummy' front.
On no account should flammable materials be stored in a drawer beneath a built-under oven as there is a risk of fire.
Do not place heavy objects on the open door or sit on it as this could cause damage to the hinging.
When cooking with oil or fat, do not leave the oven unattended as there is a risk of fire.
To avoid damage to the interior enamel, do not place the oven pan or baking trays on the bottom of the oven and do not line the base of the oven with aluminium cooking foil.
During cooking, food natural produces steam which is vented away to prevent an excessive build-up within the oven.
As this steam can condense to water droplets on the cool outer trim of the oven, it may be necessary during cooking to wipe away any moisture with a soft cloth. This will also help to prevent soiling and discoloration of the oven exterior by cooking vapours.
Before using for the first time
Switch off the oven at the wall socket or remove the mains fuse before cleaning. Remove any packaging and the oven accessories from the oven. Wipe the oven interior using hot water and a mild detergent.
Rinse carefully using a damp cloth. Wash the oven shelves and accessories in a dishwasher or using hot water and a mild detergent, and dry thoroughly.
Technical details
This appliance conforms to the standard 73/23 CEE and 93/68 CEE EMC 89/336 CEE.
Voltage regulations
≈ 230 V phase + neutral.
Built-in oven dimension:
Length:440
Depth : 390
Height : 340
Volume: 59 Lt
Wattage of heating elements
Lower heating element: 1,3 kW
Top oven heating element: 0,9 kW
Grill element: 1,6 kW
Fan element (internal front part): 2,3 kW
Maximum intake of oven: 3,1 kW
Built-in installation
IMPORTANT: The unit must be correctly installed in accordance with Manufacturers instructions and by qualified person. Maintenance and service must be carried out after the power supply has been disconnected.
ELECTRICAL CONNECTION: Before connecting the appliance to the mains, ensure that:
- The voltage corresponds to the voltage specified on the rating plate at the bottom of the surround.
- The overload cut-off device and the domestic system can withstand the load of the appliance (see rating plate).
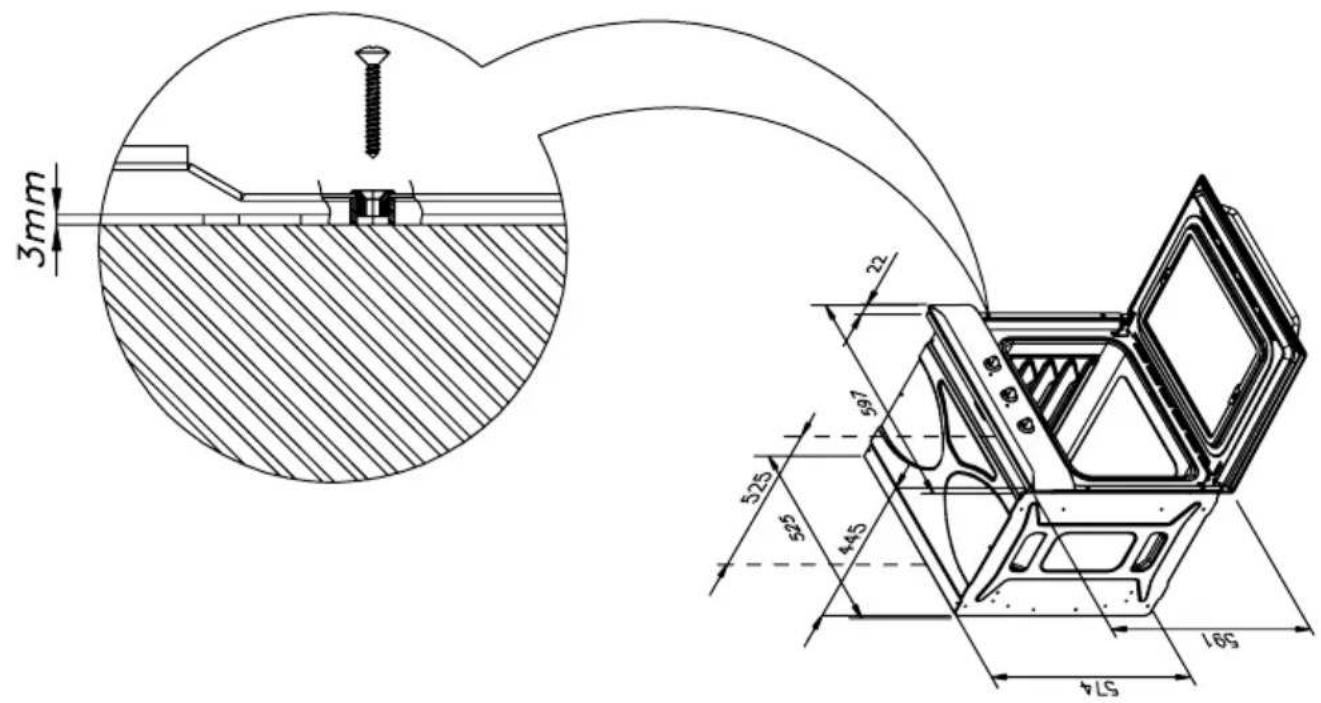
- The power supply system is provided with an efficient earth connection and that the socket or omnipolar switch, with minimum contact opening of 3mm , is easily accessible once the appliance has been installed.
- If the plug is not easily accessible, the installation personnel must provide an omnipolar switch with contact opening distance equal to or greater than 3mm .
If further mains cable is needed, it must be with minimum section are of 1,5mm type H05RR-F.
Sufficient cable must be left for easy maintenance of the appliance.
Warning: this appliance must be earthen.
Proper earthling is mandatory for the appliance.
Our company declines any liability for failures in the earth connection that is not in compliance with the regulation in force.
This appliance is designed for building-in to a standard 600mm wide oven housing.
The housing, adjacent furniture and all materials used in installation must be able to withstand a minimum temperature of 85^ plus ambient temperature during periods of operation. In addition, adjacent furniture cabinet doors must be at least 4mm from the appliance at all points. Certain types of vinyl or laminate kitchen furniture cabinetry
are particularly prone to heat damage and discoloration, any delimitation or discoloration of materials which occurs below 85^ plus ambient temperature or where materials are less than 4mm from the appliance will be the liability of the owner.
For building-under a worktop, the installation dimensions are as follows.
Attention: when the qualified person install the oven near other electrical appliances, the power cable mustn't be near or contact with side heat oven.

Oven operation
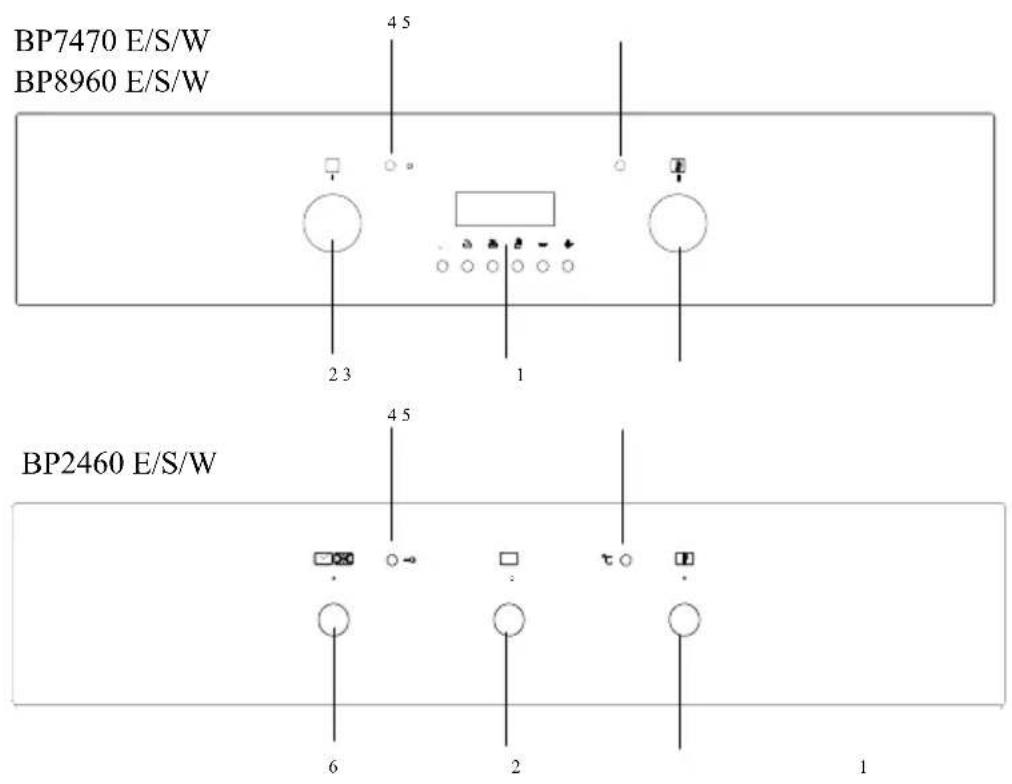
1 - Thermostat
2 - Selector
3 - Electronic programmer
4 - Red light
5 - Yellow light
6 - End of cooking timer
Your new oven incorporates a multifunction cooking system, enabling you to select the most appropriate heating method for the type of food you are preparing.
The function required is selected by turning the oven function selector knob in a clockwise direction to the appropriate symbol. The oven interior light will illuminate and the 'On' indicator light will glow. The oven functions and their symbols are:
Oven operation

Light only (BP2460 - BP7470 - BP8960)
The oven interior light comes on.

Conventional heating (BP2460 - BP7470 - BP8960)
The elements in the roof and floor operate to give a conventional static oven heating system. The oven should be preheated before use until the temperature indicator light goes out.
It is recommended that food is only placed on one shelf position when cooking with the conventional heating function. Do not use the lowest or highest shelf positions or the food may overcook.
Lower/upper resistance + ventilation (BP7470 - BP8960)
Semi forced air convection (with the door closed). The thermostat has to be set to desired temperature between 50^ to 250^ .
Recommended use : for food which needs to be cooked on the outside as an the inside (confectionery, roasted meat ).

Full grill (BP2460 - BP7470 - BP8960)
The element under, the floor of the oven operates on its own. The oven, should be preheated for 15 minutes before use.
This function is ideal for 'blind baking' pastry cases for quiches and tarts.
In this case, the food should be cooked with the oven shelf on the lowest shelf position.

Semi forced air convection (BP7470 - BP8960)
The fan operates with the infra-red grill element in the roof of the oven. The oven should be pre-heated for 5-10 minutes before use.
When roasting meats, this function will crisp the outside of the food whilst the circulating hot air ensures even cooking.
Semi forced air convection can also be used for grilling, so that food does not need to be turned so often.
Grilling must always take place with the oven door closed.
Do not use aluminium foil to cover the grill pan or heat items wrapped in aluminium foil under the grill - the high reflectivity of the foil can damage the grill element.
Keep the oven door closed when using the GRILL.
Forced air convection (BP7470 - BP8960)
The fan and an element behind the rear wall of the oven circulate hot air to give an even temperature throughout the oven.
The oven should be pre-heated before use until the temperature indicator light goes out. Food can be cooked on several shelf positions at once, saving both time and energy.
The oven temperature should be reduced by approximately 10% compared to conventional oven heating systems.

Defrosting (BP7470 - BP8960)
The fan operates but without its element, so the oven is not directly heated. The oven door must remain closed.
Frozen food can be quickly defrosted by placing in the oven pan and sliding onto the lowest shelf position. Defrosting time will be reduced by up to one third using this system.

Lower heating element only (BP2460 - BP7470 - BP8960)
The element under, the floor of the oven operates on its own. The oven, should be preheated for 15-20 minutes before use.
This function is ideal for 'blind baking' pastry cases for quiches and tarts. In this case, the food should be cooked with the oven shelf on the lowest shelf position.

Oven self-clean mode (BP2460 - BP7470 - BP8960)
Turn the selector knob to this function which can only be set via the timer, the cleaning cycle is 1,5 hours.
All internal oven accessories must be removed before using the pyrolitic function. During the pyrolitic function the oven light is disabled.
Helpful hints
- Before cooking, check that any unused accessories are removed from the oven.
- Preheat the oven at cooking temperature before use.
- Place cooking trays in the centre of the oven and allow gaps when using more than one tray for air to circulate.
- Try to open the door as little as possible to view food (the oven light remains on during cooking
- Be careful when opening the door to avoid contact with hot parts and steam.
End of Cooking
The function of the programming timer is to make the oven turn on for a pre-determined amount of time.
1.To operate.
After having set the oven switch knob to the desired temperature, turn the timer knob in a clockwise direction to the desired cooking time (maximum 110minutes). After the set time runs out, the timer will have returned to position "O" and the oven will automatically turn off.
- Manual position.
If the cooking time is longer than the hours programme, or if you wish to use the oven manually, to turn it off when you desire, turn the knob to position
- Automatic pyrolitic cleaning.
The self-cleaning function
after having set the oven switch knob to turn the timer knob in a clockwise direction to 90 minutes cooking time (it's possible turn the timer knob to 110 minutes if the oven is very dirty).
During the pyrolitic function the oven light is disabled.

ELECTRONIC PROGRAMMER (pic. 3)
Theelectronicprogrammerisa
device which groups together the following functions:
- 24 hours clock with illuminated display
- Timer (up to 23 hours and 59min .)
- Program for automatic beginning and end of cooking
- Program for semi-automatic cooking (either start or finish only).
- Displaying the required temperature
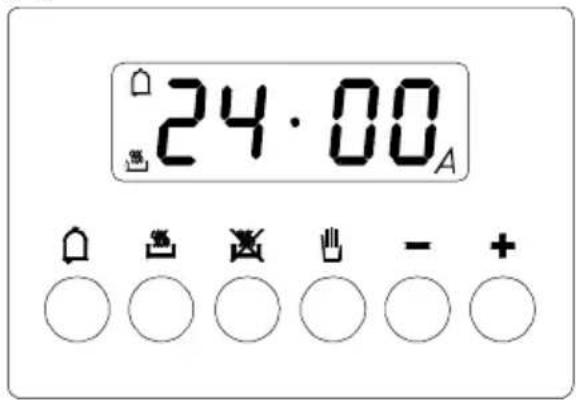
(pic. 3)
Description of buttons

“TIMER”

"COOKING TIME

“ END OF COOKING TIME ”

“ MANUAL POSITION ”

"ADVANCEMENT OF THE NUMBERS OF ALL PROGRAMS - CHECK THE INSERTED TEMPERATURE"

"TURNING BACK OF THE NUMBERS OF ALL PROGRAMS - CHECK THE INSERTED TEMPERATURE"
Description of lighted symbols
« AUTO » - (flashing) - Programmer in automatic position but not programmed.
« AUTO » - (always lighted) - Programmer in automatic position with inserted program.

Manual cooking taking place

- A Automatic cooking taking place

+Timer in operation
NOTE: After having selected the operation, a period of time will pass (about 3-4 seconds) before confirmation, during which the data may be modifies.
Digital clock
Clock numbers show hours (0-24) and minutes.
Upon immediate hooking up of the oven or after a blackout, three zeros will flash on the programmer panel.
To set the hour it is necessary to push simultaneously the and
buttons or button and AT THE SAME TIME to push the
“+” button or “-” until you have set the exact hour. When the actual time is inserted, release the buttons in order to make function the clock.
Manual cooking without using the programmer
To use manually the oven, that is, without the auxiliary
programmer, it is necessary to cancel the flashing «A» by pushing the button.
If the «A» message is displayed in permanent mode, indicating
that the oven is programmed, it is impossible to set the timer to manual function and therefore the oven cannot be switched on. In
this case the program must be firstly cancelled by pressing then the manual function can be set.
Timer
The timer can be used to measure a time period between 1 minute and 23 hours & 59 minutes.
1) Automatic cooking (start and end)
Set the length of cooking time by pushing the button.
Set the end of cooking time by pushing the button.
- Set temperature and cooking program by using the thermostat knob and the selector knob.
After this setting the symbol A will light.
An example: cooking lasts 45 minutes and is expected to stop at 14.00.
Push until having set 0.45.
Push until having set 14.00.
After having finished the setting, the clock hour will appear on the panel and «A» symbol will light. This means the cooking program has been memorized.
At 13.15 h. (14.00 h. minus 45 minutes) the oven turns on automatically.
At 14.00 h. the oven turns off automatically, a buzzer goes on until it is stopped by pushing the button.
The symbol A will flash.
2) Semi-automatic cooking A. Set the length of cooking time B. Set the end of cooking time
A) Set the length of cooking time by pushing the button. The oven will turn on immediately, the symbol «A» will light. When the set cooking time has elapsed, the oven will turn off, a buzzer will ring until it is stopped as above described. The symbol «A» will flash.
B) Set the end of cooking time by pushing the button. The oven will turn on immediately, the symbol «A» will light. At the set time, the oven will turn off and a buzzer will ring until it is stopped as above described.
The cooking program may be cancelled at any moment by pushing the 山 the oven can work manually.
NOTE: 1) and 2) functions or 1)+2 functions are active only if a cooking function has been selected.
Timer = buzzer
The timer program consists only of a buzzer which may be set for a maximum period of 23 hours and 59min To set the timer, push the button and, at the same time, + or until you read the desired time on the display.
After the setting, the clock hour and the symbol will appear.
The countdown will start immediately and may be seen at any moment on the display by simply pressing the button.
At the end of the set time, the symbol will turn off and the buzzer will ring until it is stopped by pressing the button.
It is possible to change the sound (3 levels: low - medium - high): when it sounds, push - button.
NOTE: At end of cooking time, the sound beeps every second for a maximum of 7 minutes.
Cancelling an automatic cooking program
An automatic cooking program can be cancelled whenever by pushing at the same time the button and or the button. Now the oven can work manually.
Pyrolitic cleaning
Select the self-cleaning function When selected, this will automatically set a cleaning duration of 90 minutes (it's possible to change 180 minutes if the oven is very dirty).
This function cleans by raising the oven temperature to 475^ . The resultant ash deposits can be wiped away with a moist cloth when the oven has cooled down but is still slightly warm.
If an increased cleaning duration is required, it can be increased in the following manner. Select the self-cleaning function as above.
Press the manual button on the electronic timer 1:30 will appear in the display.
For safety reasons the oven door automatically locks at temperatures above 300^ . When this occurs, the oven emits an acoustic signal and the 'lock' indicator on the fascia panel becomes illuminated.
During the pyrolitic function the oven light is disabled.
WARNING
- All internal oven accessories must be removed before using the pyrolitic function.
- It is strongly recommended that the oven be only used in pyrolitic mode with persons in attendance.
- All big food, that remaining into the oven, must be removed before using the pyrolitic function.
Replacing the oven light
ATTENTION : disconnect the appliance from the power supply.
If the oven light needs to be replaced, the protective cover "A" must be removed by turning it anticlockwise. After the light has been replaced, refit the protective cover "A".
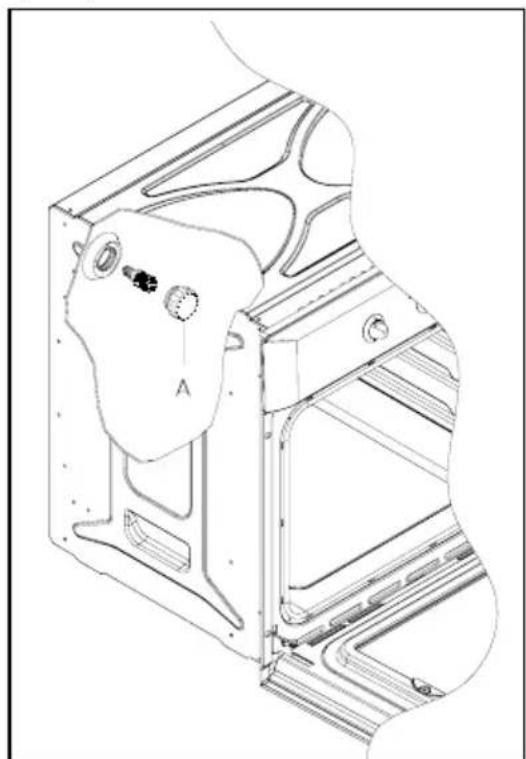
(Pic.4)
Removing the oven door (Pict.5)
To aid cleaning and make access to the oven interior easier, both oven doors can be simply removed (see diagram).
To facility cleaning of the oven, the door can Be removed via the hinges as follows:
hinges with movable bolts
The hinges A are provided with two movable bolts B.
When bolt B is raised, the hinge is released from its housing. Having done this, the door must be lifted upwards and removed, sliding it towards the outside;
grip the sides of the door near the hinges when performing these operations.
To refit the door, firstly slide the hinges into their slots.
Before closing the door, remember to rotate the two movable bolts B used to hook the two
hinges.
Do not immerse the door in water
Clean the enamelled interior surface and the glass using a damp cloth and a proprietary mild cream cleaner, rinse, then dry carefully using a soft cloth.
If necessary, the inner door glass can be removed by unscrewing the two lateral fixing screws. Make sure that the glass is dried thoroughly before re-fitting. Take care not to over tighten the fixing screws when re-fitting.
Oven accessories
The oven shelves, oven pans and trivets should be washed in hot water with a mild detergent then dried carefully, or they can be washed in a dishwasher.

How to use the turningspit (Pict.6)
In same ovens it is possible to use the turningspit and the grill together. Meat has to be inserted onto the skewers and blocked by the two clamps.
Proceed now as follows:
A. Place oven tray on the lowest position of the oven.
B. Place one of the forks support along the stainless steel rod and secure. Insert the meat onto the skewer and then put the other fork support on, securing it firmly into the meat.
C. The spit handle made of isolating material must be used for extracting the stainless steel rod from the oven and must be taken off when cooking.
For example the chicken weighing about 1,3Kg will take approximately 85-90 minutes to cook.

Oven cooking chart
| Food | Temp. °C | Shelf Position (*) | Cooking time (mins). | Cooking Function |
| Cake | ||||
| Bun 180 2 55-65 | ||||
| Fruit Cake 200 1 30-40 | ||||
| Buttermilk curd cake 180 2 35-40 | ||||
| Mould leaven cake 200 1 25-35 | ||||
| Choux pastry 190 2 20-30 | ||||
| Puff or flaky pastry 200 2 15-25 | ||||
| Biscuits 190 3 15-20 | ||||
| Lasagna | 225 2 40-50 | |||
| Meat | ||||
| Fillet beef 225 2-3 50-80 | ||||
| Roast beef | 225 2-3 | 50-80 | ||
| Roast veal | 225 2-3 | 60-80 | ||
| Roast pork | 170-180 | 2 45-60 | ||
| Roast lamp | 225 2 45-55 | |||
| Roast.beef | 225 2-3 | 50-60 | ||
| Roast hare | 200 2 60-90 | |||
| Roast turkey | 180 2 240ca. | |||
| Roast goose | 200 2 | 150-210 | ||
| Roast duck | 200 2 | 120-180 | ||
| Roast chicken | 200 2 60-90 | |||
| Thigh roe deer | 200 2-3 | 90-150 | ||
| Thigh stag | 180 2-3 | 90-180 | ||
| Fish | 180 2-3 | 10-40 | ||
| Vegetable | ||||
| Stewing vegetable | 170-190 | 2-3 | 40-50 | |
| Pizza | 240 1 15-25 | |||
| Grill cooking | ||||
| Chop | 4 | 8-12 | ||
| Pork sausage | 4 10-13 | |||
| Grill chicken | 3 25-35 | |||
| Spit chicken | 50-65 | |||
| Spit roast veal | 50-65 | |||
| Note :(*)= The start shelf position number is button oventhe oven should be preheated before use.This functions should cook with delicated food and/or preheated dish.It's possible cook same dish in different shelf position (the cooking time is the same). | ||||
" MANUELLER BETRIEB "

" ZAHLEN Auf DEM DISPLAY STEIGEND "

"ZAHLEN Auf DEM DISPLAY ABNEHMEND"

Convection air force (BP7470 - BP8960)
Adversel: Denne oven skal have jord forbindelse.
Urcite typvynilovych,alebo laminatovych
POSUN POCTU VSETKYCH PROGRAMOV - SKONTROLUJTE VLOZENUTEPLOTU"

" VRÁTENIE SPÄT POCTU VŠEKÍCH PROGRAMOV - SKONTROLUJTE VLOŽENÜ TEPLOTU"
Popis osvetlenych symbolov
Popis sviticich symbol
- AUTO - (bliká) - Programátor v poloze automatický provoz, ale nenaprogramovany.
- AUTO - (trvale svítí) - Programátor v poloze automatický provoz, s vložéným programem.
Probíha pe
ceni v manuálnim režimu.

- A
Vymna osv eleni trouby.
3aBcPmHeHn HpHrToOBJIeHHN
Taimep nporpammpoBaHn oecneuHaet yHKUHOHPOBaHne neu Ha 3apaHee ycTaHOBHeHHoe BpeM. (P:8)
1.ФyHKUHINPOBAHNE
Iocne yctaHOBKn pyKn BbIKIOaTeNa NeuHa XeNaEmy To TempePaTy, nobepHyTb pyKy TaMepa No YacobOn CTpeJIke Do DocTxKeHHa XeNaEMOro BpeMeH npiroTOBHeHn (MaKcIMMym 110 MNHyT ).
Pn3aBepueHn yCTaHOBHeHHoro BpeMeH TaMep Bo3BpaauTcB NoIOXeHne « 0 >, n ney BbIKIOuAeTcABTOMaTNUeCKN.
2.PyuHoipeKIM.
EcnnBpemnpiroTOBJeHnRABnEeTc6Oone npoDOJNKeIbHbIM NO cpaBHeHNO C nporpaMMpyEmbIM, INn npn JKeHaHN HcNoJIb3OBaHnneu B pyHOM pexKMe n eB bIKIOueHN BIOBOI MOMENT BpeMeHN, NOBepHyb pyky B noJoxKeHne
3.ABtOMaTHuecka HINPOJNTHuecka OYNCtKa.
ФункцяCAMOQUCTKINocIe yctahOBKNpyKN BbIKNIOATEIneI NOBepHyTb pyKy TaMepa no YacobOc TpeIke Ha 90 MNHT (MOXHO NOBepHyTb pyKy TaMepa do MAKCIMaHBO3HAueHn110 MNHT, cIIN neYb OChEh Ipr3HaB B TeueHn EPHKUN NPOJNTUeCKO OCHCTKN NaMNOHKA neN BbIKNIOyeHa.
3NeKtpoHHe nporpaMMpyouee yctpoiCTBO c 0To6paXeHNem TeMnepaTypbI
3NeKtpoHHe nporpamMnpyuOuee yCTpoIcTB0-3TO yCTaHOBka, BKNIOUOuaB C6Ba CneDyUOuNe 4yHKuIN:
-24-yaocobbie yacbI cOcBeuzaembIM DCNJIeEM
-()do yacOB MNHYT
-ABTOMATUeckar nporpamma hauana n OKOHuaHn npuroTOBneHn
-ПolyaВTomatNuecka nporpaMa npiroTOBHeHn (BO3MOxHOCTb nporpaMmPoBaHn TOIbKO B HauaJe IIN B KOHc)
-OTObpaXeHHe TemnepaTpybI (C) OncacHne KHOIOK:

“TANMEP”

BPEM PIPNTOBNEHNA

KOHELCBPEMEHNIPNFOTOBJIENH

"PyHoe NOJIOXEHNE

"NEPEMEUHNE BNEPED HOMEPOB BCEX POGPAMM " I KOHTPOB BBIBPAHHO TEMNEPATyPbI

"ПЕPEMESEHNE HA3AD HOMEPOB BCEX ПОГРAMM"И KOHTPOЛь ВыБPAHHОI TEMПЕPATYPbl
OnncahHe ocBeueHHbIX CMMBOIOB
A - (MraHsnn Pporpammpyiooee yctpoeCTBO B aBTOMaTneckom HO He B 3anporpaMMPOBaHHOM pexkme. A - (BKIOueHHbI Pporpammpyiooee yctpoeCTBO B aBTOMaTneckom pexkme C noDKHueHHoPporpAMMoJ.

Функюнороваимь русHom peжиме npuroToBneHn

- A ΦyHKUHOHPOBaHne B pexKHe aBToMaTnueckoro npnroTOBJIeHnA

Yka3aTb yacbl (0-24) MNHyTbI
Cpa3y nocne noDcoeHHeHnra (Takke KaK npn nppepbHaHN noaun ToKa) Ha naHeJIN NOBnIOTc TPNMURAIOue uOpbl.ДЯ BBOda ToCHORo BpeMeHn Heo6xOdmo HaxaTb N
OTNYCTNTbKnabNw

3aTeM npn NOMOuN KnaBnU [+] [Hn] yCTaHOBnTb ToUHoe BpeM. CkopoCTb CMeHbI uΦp Ha DnCnIe e YBeNnHTcra 3HaunTeJbHo CnYCTa HeCKoJIbKO CeKHyD NocNe TORO, KaK 6ydyT HxKaTb I KhoNk [+] []
PnroTOBHeHne B pyHOM pexKmE (6e3 nporpaMMpyoero ycTpoiCTBa)
Дянспльбзоваяnew6e3 nporpaMMpyuOero yctpoiCtBa Heo6xOIMO ydaNtB MraIoOee yka3aHne «A».ДЯ 3TOrO Heo6xOIMO haxatb KnaBnWy
Ecnn CnHAn «A» He MnaeT 3To 06o3Haayet, YTO neyb 3anporpaMMnpObaHa, Heo6xOIMo Chauana ydaNTb nporpaMMy, Haxmamr n nepeBOdA dncnne B HynEBoe noJoxHe.
IIphroTOBJIeHHe B ABTOMaTHueckOM peKHMc (HaHaIO H KOHeI IIpHroTOBJIeHH)
1)3aiporpaMMHpoBaTbBpeMnIPOIOJXHTeJIbHOCTH IIpHROTOBIIeHHNIOpeDCTBOM
2)3aIpOpaMMHPOBaTbBpeM3aBepIIeHHn IIpHrTOBJIeHHNIOcpeJCTBOM
3) Bb6paTb JeklaemyIO TeMIIepaTypy H cyHKUHO IIOpeCTBOM KOMAHI TepMOcTaTA H IIpeKJIHOHaTEJ.
IocJIe BbIOJIHeHHaAHbIX OIEpaHn Ha IHCIIe 6yET IOCTOARHHo IOKIOUHeH cHMBOI «A», yKa3bIaRa HA To, YTO IIeB 3aIIporpAMMPOBaHa.
IIpaKTTHueckn IIpHMeP: Heo6xOJHMo yCTaHOBHTb BpeMa IIpHrTOBJIeHHra 45 MHHyT H 3aBepIeHHe B 14.00.
-ⅡyTeM HaxKaTHa yCTaHOBm Ha dHcPiIee 0.45.
-ПутмHAЖКАТЯ yctaHOBmHaДHcIIJIe 14.00.
IocJIe BbIIIOJIHcHHaIIHbIX OIIepaIHn Ha IIINCHIIIE 6yIyT BbIBeHEbI TcKyuIeE BpeM H cHMBOJI «A» Iyra3aHHraTO, YTO HAIIe IporpamMPOBaHHe 6blIO npHHrTo H coXpaHeHO B IaMaTH.
B 13.15 (14.00 45c)MHHyc MNHYT NeYb
ABTOMaTHueCKH IIOJIKIOHTcR, H IIpH
IIpHTOBOTJIeHHI IOBRTcC HMBOJIbI N «A»
B14.00 hacOB npHROTOBJeHHe oCTaHaBJIHBAeTcABTOMATHueCKN,IOIaBA3ByKOBOCHrHAJ,KOTOpbI PpeKpaAaeTc IyTeM erO HxKaTHra
No.1yabTOMaTHueckn peKHM npHrTOBJIeHH
A. IporpamMnpoBaHne BpeMeHH npHrTOBJIeHH.
B. IporpamMHPoBAHHe BpeMeHH 3aBepHHeHH npHrTOBJIeHH.
A)YcTaHOBHTbKeJIaEMoe BpEmIINPnHrTOOBJIeHHN IIHNIOOMNI KHOIIKN .IINrTOOBJIeHHc HAHHeTcR He3aMeIInTEJIbHO,B TO BpeM KaK Ha IHCIIIEe IOBHTcR CHMB OAn «A». IIO HCTeueHHN 3aIIpOgPaMMPOBaHHOro BpeMeHH IIPOUeCC IIINrTOBJIeHHN 3aBePIIaeTcR, H3JaETcR IIpePBbHcTB3ByKOBoi CTHHaJI.IIpePBAtb 3BYKOBoCHHaJI B COOTBcTcTBHH C INPbBEJHHBM BBIIe YKa3AHmH.
B)YCTAHOBHTbKcJIaEMOE BpEMHaBepHCHNHPHROTOBJIeHHNpyTcMHaKaTHN KHOIIKN. IPhroTOBJIeHHHe HauHcTeH3aMeIINTEJbHO,BT OBPemKaKHaHcIIIEeIOHBtCCHMBoJI(A>。IpnIOCTHKeHHNycTaHOBJIeHHORO BpEmHN, IPhroTOBJIeHHe 3ABepHIIaETcHIOJaETcIpepbIBHCbH3BYKOBoCHrHaJI.IpePBATb 3BYKOBO CHHaJI B COOTBeTcTBHH C IIpHBcJIeHHbIMN BBIIICyKa3AHMRN.
MoKHO OTO6pa3HTb peKHM IporpamMPOBaHHB IIO60H MOMENT IyTcH MaKaTHa COOTBeTcTBYIOIe H KHOIIKN. TaKKe B JIO60H MOMENT MOXHO aHHyIpOBAbI IbporpamMPOBaHHe IyTeH HaKaTHa KHOIIKN
IIPHMEUAHHE: 3TH IBe FyHKHH
aKTHBHpOBaHbI
TOAko eCAH FyHKHH IIpHROTOBAeHH
6b1aa
BbI6paHa paHee
3JektpoHHoe cHrHaJIbHoe yctpoCTBO
Функия «Таймер» COCTOH TOTьko H3 3ByKOBOrO cnHаJIbHOrO yctpoIcTBa, KOTopbIMoKeT peRyInpOBaTbcHa MaKCHMaJIbHbI INepHOД 23 Yaca 59MHHT
IpyperpOBKN TaHMepa HaaKaTB KHOINKY H BTOJKeBpeMn [+] [H]IOOTOpaeHHHa IHCIIIEe KcJaEMo BpeMeHH.
Ipi3aBepHHeHH peryJInpOBKn Ha IINcIIe 6yJeT OTO6paKeHo BpeMBAmeC CCHMBIOIOM
O6paTHbIOTcETHaHHTcHHe3aMeIITHe bHO MoKet OTO6paKaTbcH Ha HcPiEe B JIO60MOMeHT IyEM HaKaTHa KHONK
HCTeueHHyctaHOBJEHHORO BpeMeHH cHMBOJI BBKJIOHAcTcH, HIOIKJIOHAcTc3BYKOBOI CHHAJI, KOTOpBIMoKET6bITb IIpePBAH IYTeM HAKAITH KHOIIKN
HpoJHTueckaa oHcTka
Bbipb yHKHIO cMOOHCTKN
IocJIe BbI6opa IaHHoH cyHKINN BpeMa OCHTKN 90 MHHyT
ycTaHaBJIHBAeTcA aBTOMaTHYeCKN (MOxHO H3MeHHTb JaHHbI IepHoID BpeMeHN IO 180 MmHyT, cJIn IIeYb OueHb rpa3Ha
JaHHa yHKnna oecneuHbaeT ouHcTKy neu, yBeJnHbA TeMnepaTy 1o 475^. OTIOKeHHcaKn, IIpn HAJIuHN, MOrY 6bITb ydaJIeHb BJIaKHO TpIkoIIpn OXIAJxHHO, HO eIe TEOIIOI Neu. EcIN IeYb HjKHaTeCBA6OJIee IPOJOJIKHTeJIbHOJ OOHCTKe, MoKHO yBeJInHTb IPOJOJIKHTeJIbHOCTb cJeIyIOIHm 6pa3OM: BBi6paTB YHKUHO camOOHCTKN, B COOTBeTcTBHN C IIpHBeIeHHbIMn paHee YKa3aHHaMn, HaKaTb KHOIIky pyHOrO peKHMa Ha 3JIeKTpoHHom TaMepe, Ha INcIIIee IOBJIeTc8 01:30.
B IIeJx 6e3oIacHocTH IBePua Neu 6JIOKHypeTcA ABToMaTHueckn IIpH TeMIIepaType BbIe 300^ . KOrda 3TO npOHcxOHT, Neyb H3JaET 3ByKOBo CHrHaJI, H Ha IpeDHe IaHeJIb BKJIIOyaeTcJ AmIOUka "3aKpbITo". B TeueHHe IIHpoJIHTHueCKo OYHCtKN JAmIOUka Neu H ocTaETCa BBIKJIOUeHHoH.
IpeynpeKdHne
Bce akceccyapbI doJxHbI BbIHMaTbcra H3 Neu Ipea 3aynckom yHKnn ca0oOHTK.
HactoTeJIbHo peKomeHdyecTc HcNoJIb30BaTb daHHyO fYHKnIO caMOOHCTKN TOJIbKO B IIpncyTcTBHN KOro-JIN60.
Bce 3NaHTeJIbHbIe IIIIeBBIe ocTaTKn DoJIKbI yJaJIaTbcN H3 NeuH IpeI 3aIyckOM fYHKnH caMoOChTKn.
3aMeHa lamnbI dyxOBKn - Pnc.4
DyXOBKa obOpdyoBaHa JAmnO, ImeoUe
cJeDyUOuNe xapaKTeepnTuKn:
25BT
Pe3b60BOn 10KoJb E-14
T 300°C
BHIMAHHE:OTKnIOuHTe 3JIeKTpnuYeCKoe nITaHHe DyXOBKn.
3aMeHnB Iamny, yCTaHOBNTe 3aunTHbI
nlaΦoH A Ha MeCTO.

Pnc.4
DemoHTaX DBepuI dyxOBKn - Pnc.5
IЯ obJeHnY uCTKn DyXOBKn MOxHO CHaTb ee DBepuy, BbINOJIHB C neTЯMn CneDyIoUne onepaun:
TnC NOBnKhbIM pbHaKaMa
IeTnA o6OpyIOBaHbI DByMnOdBHXHbIMnpbuaKamnB.
Ecn pyuakok B 6bIn noHrt, neTna
OCB60KdaetcB CBOem rHe3ne. Pocne
3TOrO DBepu MOxHO NOHrB BBepx IN CHrTb,
BbIDBNHyB Bnpeed. JnBbINONHeHn3ToI
Oepaunn BO3bMntecb 3a DBepuy no 6okam, PAnOM C nTJAmN.
IyCTaHOBKn DBePcHa MeCTo Heo6xOJIMO
ChaHaJa yCTaHOBntb NETJIN NO IN MECTaM.
IpeTeKa3aKpbITbDbepuy,He 36yBte ONyCTNTb DBA NOdBnXhblx pbuXkBa B
KOTOpBle 6blnn nCNoJb3OBAHbI IaueJIeHnne neTeb.

Pnc.5
PoiIb3OBAHne BepTeIOM (ecIINpeDyCMatpNaBaTcra) - Pnc. 4
Pa60Ty BepteJa MoXHo CoHcTaTb c pa60Toi
rPnIa. HAdeB IpoDyKtBi Ha BepTeB InpOJbHOM
HaPpaBJIeHN, 3aKpeNITe IN DByM BAJIKAmN.
3aTeM BblONHIne CneDyIOUee:
A) BCTaBbTe KOHeu BepTeHa B noIbI BaI DnIraTeJI, paCNOJIOKeHHOrO Ha 3aIHei CTeHKe DyXOBKn;
B) YctaHOBInTe onOpy B KaHaBky BepTeJa;
C) CHIMNTE pyHKy, OTBnHTNB ee;
D) YCTaHOBnTe IpoTnBEHb IJIЯ JInpa Ha cMbii HIXKHi yPoBeHb;
E) NpebeDnte ceIeKTop B noIOXeHne "Fpnlb" ***, YTO6bl BKJIOUHJNCBUNrAteJIb;
F)ПослесаВершени�OTOBКИпиВиNTHTepyKByBepTeLa N BblbTe erO n3 dYxOBKn. (Pnc.2)

Pnc.4
OpheHTpOBOuHa Ta6JHua IaI npHrTOBJeHH 6JIIOB HneH