
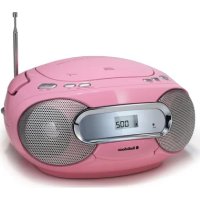
CD1577 - Cd player/recorder AudioSonic - Free user manual and instructions
Find the device manual for free CD1577 AudioSonic in PDF.
| Brand | AudioSonic |
| Model | CD1577 |
| Product type | CD player/recorder |
| Power supply | Mains AC 230V~50Hz and batteries (2 AA batteries) |
| Power consumption | 15 W (estimated) |
| Disc compatibility | CD, CD-R, CD-RW |
| Supported formats | Audio CD (not MP3/WMA) |
| Built-in radio | FM/AM |
| Auxiliary input | Yes (AUX IN jack) |
| Audio output power | 2 x 5 W (estimated) |
| Playback functions | Play, pause, forward/backward search, repeat (1 track/all), programming (20 tracks) |
| Laser type | Class 1 |
| Protection class | Double insulation (Class II) |
| Dimensions (W x H x D) | 280 x 200 x 100 mm (estimated) |
| Weight | 1.5 kg (estimated) |
| Included accessories | Power cable, user manual |
| Maintenance | Soft, dry cloth, do not use chemical products |
| Safety | Do not expose to water or moisture, do not open the casing |
| Environment | Recycle according to the WEEE directive |
Frequently Asked Questions - CD1577 AudioSonic
User questions about CD1577 AudioSonic
0 question about this device. Answer the ones you know or ask your own.
Ask a new question about this device
Download the instructions for your Cd player/recorder in PDF format for free! Find your manual CD1577 - AudioSonic and take your electronic device back in hand. On this page are published all the documents necessary for the use of your device. CD1577 by AudioSonic.
USER MANUAL CD1577 AudioSonic
natural_image
Red and white portable audio recording device with digital display showing 0.34 (no visible text or symbols on device body)INSTRUCTION MANUAL
GEBRUIKERSHANDLEIDING
BEDIENUNGSANLEITUNG
MODE D'EMPLOI
MANUAL DE INSTRUÇÕES
IMPORTANT SAFETY INSTRUCTIONS
- Read these instructions – All the safety and operating instructions should be read before this product is operated.
- Keep these instructions – The safety and operating instructions should be retained for future reference.
- Heed all warnings – All warnings on the appliance and in the operating instructions should be adhered to.
- Follow all instructions – All operating and use instructions should be followed.
- Do not use this apparatus near water – The appliance should not be used near water or moisture – for example, in a wet basement or near a swimming pool, and the like.
- Clean only with dry cloth.
- Do not block any ventilation openings. Install in accordance with the manufacture's instructions.
- Do not install near any heat sources such as radiators, heat registers, stoves, or other apparatus (including amplifiers) that produce heat.
- Protect the power cord from being walked on or pinched particularly at the plugs, convenience receptacles, and at the point where they exit from the apparatus.
- Unplug the apparatus during lightning storms or when unused for long periods of time.
- Refer all servicing to qualified personnel. Servicing is required when the apparatus has been damaged in any way, such as power supply cord or plug is damaged, liquid has been spilled or objects have fallen into the apparatus has been exposed to rain or moisture, does not operate normally, or has been dropped.
- Please keep the unit in a good ventilation environment.
- CAUTION: These servicing instructions are for use by qualified service personnel only. To reduce the risk of electric shock, do not perform any servicing other than that contained in the operating instructions unless you are qualified to do so.
- WARNING: Please refer the information on exterior bottom enclosure for electrical and safety information before installing or operating the apparatus.
- WARNING: To reduce the risk of fire or electric shock, do not expose this apparatus to rain or moisture. The apparatus shall not be exposed to dripping or splashing and that no objects filled with liquids, such as vases, shall not be placed on apparatus.
- WARNING: The battery (battery or batteries or battery pack) shall not be exposed to excessive heat such as sunshine, fire or the like.
- WARNING: Excessive sound pressure from earphones and headphones can cause hearing loss.
- -- WARNING: The mains plug is used as disconnect device, the disconnect device shall remain readily operable.
- ☐ This is CLASS II apparatus with double insulation, and no protective earth provided.
20.
- This lightning flash with arrowhead symbol within an equilateral triangle is intended to alert the user to the presence of non-insulated "dangerous voltage" within the product's enclosure that may be of sufficient magnitude to constitute a risk of electric shock.
- Warning: To reduce the risk of electric shock, do not remove cover (or back) as there are no user-serviceable parts inside. Refer servicing to qualified personnel.
-
The exclamation point within an equilateral triangle is intended to alert the user to the presence of important operating and maintenance instructions in the literature accompanying the appliance.
-
Invisible laser radiation when open and interlocks defeated. Avoid exposure to beam of laser.22. Minimum distances of 5 cm around the apparatus for sufficient ventilations.
-
Do not install this equipment in a confined space such as a book case or similar unit. The ventilation should not be impeded by covering the ventilation openings with items such as newspaper, table-cloths, curtains etc.
-
No naked flame sources, such as lighted candles, should be placed on the apparatus.
-
Attention should be drawn to environmental aspects of battery disposal.
-
CLASS 1 LASER PRODUCT
CLASS 1 LASER PRODUCT APPAREIL À LASER DE CLASSE1 PRODUIT LASER DE CLASSE1
This product contains a low-power laser emitter.
WARNINGS RELATING TO THE USE OF BATTERIES
Batteries must be inserted taking care to match the polarities shown. Make sure that the (+) and (-) terminals are placed in the right direction.
Never use batteries that show signs of electrolyte leaks or cracking.
Never dispose of used batteries in an open fire.
Keep batteries out of reach of children.
Never recharge disposable batteries.
Never short circuit battery terminals.
Always remove used batteries from the appliance case.
Do not try to open the batteries.
Do not mix up different kind of batteries or new and already used batteries together.
Only use batteries of the recommended or equivalent type.
Remove batteries from the appliance before disposing of it at the end of its service life.

natural_image
Color palette bar with grayscale shades and a central crosshair (no text or symbols)ENGLISH


430body XE En.indd 章节1:2
GB-4

2009-7-14 13:28:05

natural_image
Color palette bar with grayscale gradient and a small circle on the right (no text or symbols)POWER SUPPLY
AC Power ③
Connect one end of the mains lead to the AC input socket and the other end to an AC outlet.
Note:
- The installed batteries are automatically disconnected when the mains lead is connected to the unit.
- To shut the power off completely pull out the plug from the wall socket. Pull out the plug from the wall socket to protect the device in case of lightn and thunderstorms. Always turn the main switch to the OFF position.
Battery power
Installing batteries
Install six "C/R14" batteries (not supplied).
Caution on batteries
To prevent battery electrolyte leakage, which may result in injury and damage to the unit or other objects, observe the following precautions:
- All batteries must be installed with the proper polarity (see diagram on the rear of the unit).
- Do not mix new with old or used batteries.
- Only use batteries of the same type and brand.
- Remove the batteries when they are not to be used for a long period time.
- When the batteries have become discharged, they must be disposed of in a safe manner which complies with all applicable laws.
- Battery shall not be exposed to excessive heat such as sunshine, fire or the like.
GENERAL OPERATION
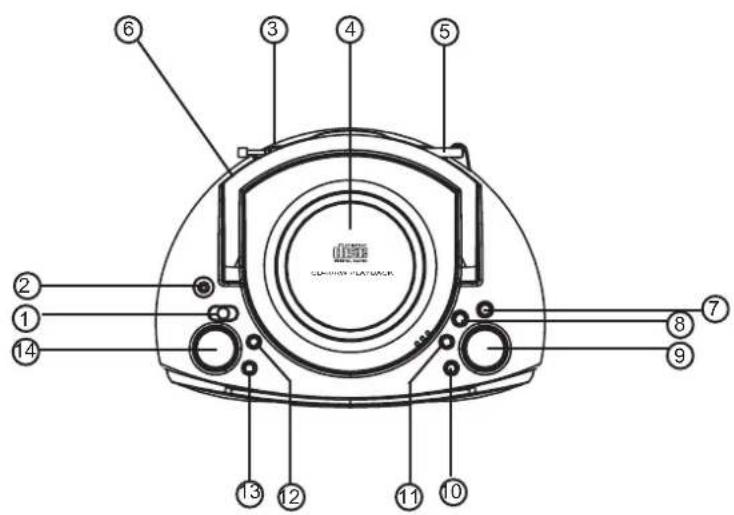
Adjusting the volume ⑭
Turn the VOLUME control.
CD PLAY ① ⑦
- Set the function switch to CD.
- Press the CD compartment lid (OPEN/ CLOSE portion) to open it. "-" appears on the display.
- Place the disc with the label facing up on the turntable. (Place only one disc at a time.)
- Press the CD compartment lid (OPEN/ CLOSE portion) to close it. The total number of tracks on the disc appears on the display.
- Press the ▶/II button. The current track number appears. Play starts from the first track.
- To start play from the desired track, select the track by using the ◀◀◀ or ▶▶▶| button, then press the ▶/|| button.
GB-5


Note:
If no disc is loaded or the disc is located with the label facing down, "no" appears. If these occur, load the disc correctly or replace the damaged disc.
- Press the STOP button to end disc play back.
When the last track has been played, the player stops automatically.
- To turn the CD player off, set the SW/OFF to OFF.
Note:
- Do not open the CD compartment during CD play. Always press the STOP button and wait for the disc to stop rotating before opening the CD compartment.
- This unit can play back the CD-R/RW as well. However, some CD-R/RW can not be played back depending on the recording conditions.
- This unit cannot playback MP3/WMA CD or Video CD.
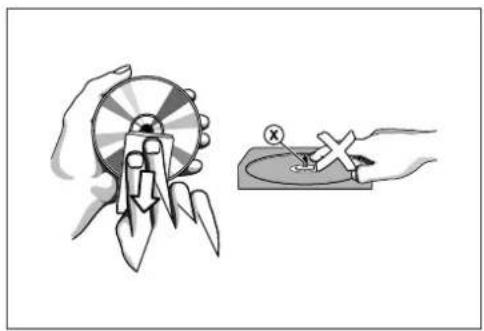
Notes on handling compact discs
- Do not expose the disc to direct sunlight, high humidity or high temperature for extended periods of time.
- Discs should be returned to their cases after use.
- Do not apply paper or write anything on the disc surface.
- Handle the disc by its edge. Do not touch the playing surface (glossy side).
- Fingerprints and dust should be carefully wiped off the playing surface of the disc with a soft cloth.
Wipe in a straight motion from the center to the outside of the disc.
- Never use chemicals such as record cleaning sprays, antistatic sprays or fluids, benzene or thinner to clean compact discs.
Temporarily stopping play ⑦
Press the ▶/II button, “▶” and track number blink on the display. To resume play, press the button again.
Skip play ⑧ ⑪
To skip to track 6 while track 3 is playing, press the ▶▶l button repeatedly until "06" appears on the display. To skip back to track 3 while track 6 is playing, press the ◀◀◀ button repeatedly until "03" appears.
Search (forward/reverse) ⑧ ⑪
If the ▶▶| or |◀◀ button is pressed during play, the player will search at high speed in the forward or reverse direction while the button is being pressed. When the button is released, normal play will continue.
Repeat play ⑫
Press the REPEAT button repeatedly to select the various repeat play mode. Each time the button is pressed, the mode changes as shown below:
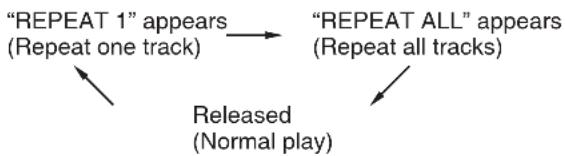
flowchart
graph TD
    A[""REPEAT 1" appears\n(Repeat one track)"] --> B[""REPEAT ALL" appears\n(Repeat all tracks)"]
    B --> C["Released\n(Normal play)"]

natural_image
Color palette bar with grayscale gradient and a circular target symbol (no text or labels)PROGRAMMED PLAY ⑬
Up to 20 tracks on a disc can be programmed for play in any order.
- Press the PROG. button, the program number "01" appears briefly, then the track number "00" and "PROG" blink on the display.
- Select a track by using the ◀◀◀ or ▶▶▶ button.
- Press the PROG. button.
- Repeat steps 2 - 3 to programme additional tracks.
- Press the ▶/II button to start playback. "PROG" remains lit.
When all programmed tracks have been played, the player stops automatically.
- The programme contents are retained in memory.
To cancel the programmed play
- In stop mode press the PROG. button. The programmed track number and "PROG" blink on the display.
- Press the STOP button at least 3 seconds. The total track number of the disc appears. The programmed play is canceled.
Checking the programme
In stop mode press the PROG. button repeatedly, the programme numbers and programmed track numbers sequentially appear on the display.
Changing a programme
To add a new track to a programme:
- In stop mode press the PROG. button repeatedly until the last program number is displayed briefly, "00" appears.
- Select a track as explained above.
- Press the PROG. button
To change a track:
- In stop mode press the PROG. button repeatedly until the programme number to be replaced appears briefly, then the track number blinks on the display.
- Select a track as explained above.
- Press the PROG. button.
Note:
Programmed details cannot be partially deleted or inserted.
WHAT TO DO IF...
If an abnormal display indication or an operating problem occurs, disconnect the mains lead and remove all batteries. Wait at least 5 seconds then reconnect the mains lead and reinstall the batteries. Resume the operation.
LISTENING TO OTHER SOURCES ②
- Connect the audio cable (not supplied) from the audio output socket of a video/auxiliary equipment to the AUX IN socket.(Stereo Mini Plug: 03.5)
- Set the function switch to AUX IN.
- Follow the instructions supplied with the other equipment.
GB-7


LISTENING TO THE RADIO ①
- Select FM or AM with the function switch.
- Tune in a desired station by turning the TUNING control.
- When finish listening, turn the main switch to the OFF - "O" to shut the power OFF.
- To avoid unnecessary electrical use, always turn the main switch to the OFF when the device is not in use. The main switch located at the rear of unit (6).
To improve reception
FM: Pull out the telescopic aerial and adjust its position.
AM: Rotate the unit.
MAINTENANCE
Precautions & General Maintenance
- Place the set on a hard and flat surface so that the system does not tilt.
- Do not expose the set, batteries or CDs to humidity, rain, sand or excessive heat caused by heating equipment or direct sunlight.
- Do not cover the set. Adequate ventilation with a minimum gap of 6 inches between the ventilation holes and surrounding surfaces is necessary to prevent heat build-up.
- The mechanical parts of the set contain self-lubricating bearings and must not be oiled or lubricated.
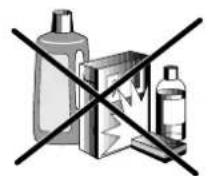
• To clean the set, use a soft dry cloth. Do not use any cleaning agents containing alcohol, ammonia, benzene or abrasives as these may harm the housing.
CD player and CD handling
• The lens of the CD player should never be touched!
- Sudden changes in the surrounding temperature can cause condensation to form and the lens of your CD player to cloud over. Playing a CD is then not possible. Do not attempt to cl an the lens but leave the set in a warm environment until the moisture evaporates.
• Always close the CD door to keep the CD compartment dust-free. To clean, dust the compartment with a soft dry cloth.
- To clean the CD, wipe in a straight line from the centre towards the edge using a soft, lint-free cloth. Do not use cleaning agents as they may damage the disc.
- Never write on a CD or attach any stickers to it.
natural_image
Illustration of a hand holding a rocket launcher and a hand using a tool to test a test sample (no text or symbols present)GB-8

natural_image
Color palette bar with grayscale gradient and a central crosshair (no text or symbols)TROUBLESHOOTING
Troubleshooting
If a fault occurs, first check the points listed below before taking the set for repair.
Do not open the set as there is a risk of electric shock.
If you are unable to remedy a problem by following these hints, consult your dealer or service centre.
WARNING: Under no circumstances should you try to repair the set yourself, as this will invalidate the warranty.
-Problem
- Solution
No sound /power
-Volume not adjusted
- Adjust the VOLUME
-power cord not securely connected
- Connect the AC power cord properly
—Batteries dead/ incorrectly inserted
- Insert (fresh) batteries correctly
Display does not function properly/No reaction to operation of any of the controls
-Electrostatic discharge
- Switch off and unplug the set. Reconnect after a few seconds
no disc indication
-No CD inserted
- Insert a CD, CD-R or CD-RW
-CD badly scratched or dirty
- Replace/ clean CD, see Maintenance
—Laser lens steamed up
- Wait until lens has cleared
-CD-R is blank or the disc is not finalized
- Use a finalized CD-R
CD playback does not work
-CD badly scratched/ dirty
- Replace/ clean CD (see maintenance)
—Laser lens steamed up
- Wait until lens has adjusted to room temperature
The CD skips tracks
-CD damaged or dirty
-Replace or clean CD
-Program is active
- Quit Program mode(s)

natural_image
Color palette bar with grayscale shades and a central crosshair (no text or symbols)Environmental information
We have done our best to reduce the packaging and make it easy to separate into 3 materials: cardboard, paper pulp and expandable polyethylene.
Your set consists of materials which can be recycled if disassembled by a specialized company. Please observe the local regulations regarding the disposal of packaging, dead batteries and old equipment..
Instructions on environment protection
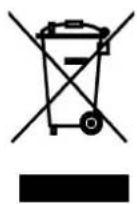
Do not dispose of this product in the usual household garbage at the end of its life cycle; hand it over at a collection point for the recycling of electrical and electronic appliances. The symbol on the product, the instructions for use or the packing will inform about the methods for disposal.
The materials are recyclable as mentioned in its marking. By recycling, material recycling or other forms of re-utilization of old appliances, you are making an important contribution to protect our environment.
Please inquire at the community administration for the authorized disposal location.
GB-10
BELANGRIJKE VEILIGHEIDSINSTRUCTIES
natural_image
Crossed product lines and boxes symbolizing toxicity or clearance (no text or labels)natural_image
Illustration showing a hand holding a circular object with arrows, and a hand holding a small container with an 'X' mark (no text or symbols present)NL-8
PROBLEMEN OPLOSSEN
PROBLEMEN OPLOSSEN
STROMVERSORGUNG
AC Strom③
natural_image
Crossed warning symbol with three items: a bottle, a box, and a bottle (no text or labels)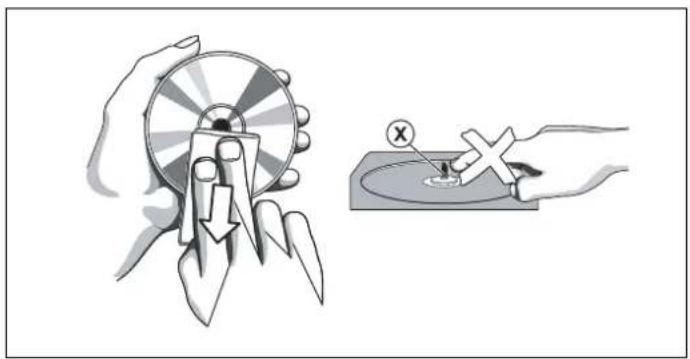
natural_image
Illustration showing a hand holding a circular object with arrows and a magnified view of a small object on a surface (no text or symbols)FEHLERSUCHE
Fehlersuche
CLASS 1 LASER PRODUCT APPAREIL A LASER DE CLASSE 1 PRODUIT LASER DE CLASSE 1
Installez six piles "C/R14" (non incluses).
natural_image
Illustration of two hands holding a circular object with a downward arrow, no text or symbols present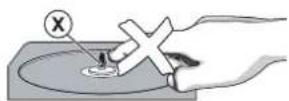
DÉPANNAGE
Dépannage
natural_image
Illustration showing a hand holding a circular object with arrows and a magnified view of a small object inside a bowl (no text or symbols)natural_image
Crossed product lines and packaging symbols (no text or labels)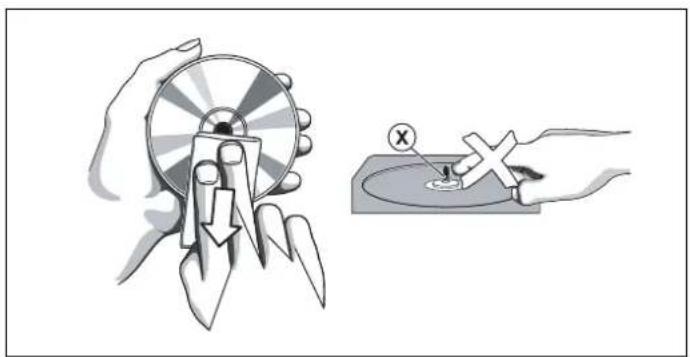
natural_image
Illustration showing a hand holding a circular object with a downward arrow, and a hand holding a rectangular object with an X mark (no text or symbols)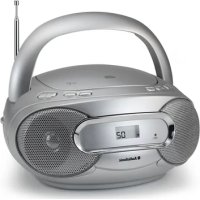
- IMPORTANT SAFETY INSTRUCTIONS
- WARNINGS RELATING TO THE USE OF BATTERIES
- POWER SUPPLY
- AC Power ③
- Battery power
- Installing batteries
- Caution on batteries
- GENERAL OPERATION
- Adjusting the volume ⑭
- CD PLAY ① ⑦
- Note:
- Notes on handling compact discs
- Temporarily stopping play ⑦
- Skip play ⑧ ⑪
- Search (forward/reverse) ⑧ ⑪
- Repeat play ⑫
- PROGRAMMED PLAY ⑬
- To cancel the programmed play
- Checking the programme
- Changing a programme
- To add a new track to a programme:
- To change a track:
- WHAT TO DO IF...
- LISTENING TO OTHER SOURCES ②
- LISTENING TO THE RADIO ①
- MAINTENANCE
- Precautions & General Maintenance
- CD player and CD handling
- TROUBLESHOOTING
- No sound /power
- Display does not function properly/No reaction to operation of any of the controls
- no disc indication
- CD playback does not work
- The CD skips tracks
- Environmental information
- Instructions on environment protection
- BELANGRIJKE VEILIGHEIDSINSTRUCTIES
- PROBLEMEN OPLOSSEN
- STROMVERSORGUNG
- AC Strom③
- FEHLERSUCHE
- DÉPANNAGE
Brand : AudioSonic
Model : CD1577
Category : Cd player/recorder