
CDCX504MP - Car stereo AIWA - Free user manual and instructions
Find the device manual for free CDCX504MP AIWA in PDF.
| Product type | CD/MP3 car stereo with FM/AM tuner |
| Brand | Aiwa |
| Model | CDCX504MP |
| Dimensions (device) | 178 x 50 x 176 mm (w/h/d) |
| Mounting dimensions | 182 x 53 x 161 mm (w/h/d) |
| Weight | Approximately 1.2 kg |
| Power supply | Vehicle battery 12 V DC (negative ground) |
| Maximum output power | 52 W x 4 (at 4 ohms) |
| Speaker impedance | 4 - 8 ohms |
| FM frequency range | 87.5 - 108 MHz |
| FM sensitivity | 9 dBf |
| AM frequency range | 530 - 1,710 kHz |
| Frequency response (CD) | 10 - 20,000 Hz |
| Signal-to-noise ratio (CD) | 120 dB |
| Playable formats | Audio CD, CD-R/RW, MP3 (ISO 9660 level 1/2, Joliet, Romeo) |
| Radio functions | Automatic memory (BTM), local search, mono mode, 30 presets (6 per band, 5 bands) |
| CD player functions | Repeat (track/album/disc), random, ID3 display, scroll |
| Equalizer | 7 preset curves (HIP-HOP, VOCAL, CLUB, JAZZ, POPS, ROCK, CUSTOM) |
| Auxiliary input | 3.5 mm AUX jack (front) |
| Audio outputs | 2 AUDIO OUT REAR jacks (switchable rear/subwoofer) |
| Theft protection | Detachable front panel with storage case |
| Supplied accessories | Installation parts, front panel case, mini remote control RM-Z304 |
| Fuse | 10 A |
| Maintenance and cleaning | Clean the front panel with a soft, dry cloth; clean connectors with a cotton swab moistened with alcohol |
| Safety | Do not expose to high temperatures; do not use non-standard discs; use only a 10 A fuse |
| Spare parts and repairability | Replaceable fuse; release keys for removal; contact Sony (or Aiwa) dealer for parts |
Frequently Asked Questions - CDCX504MP AIWA
User questions about CDCX504MP AIWA
0 question about this device. Answer the ones you know or ask your own.
Ask a new question about this device
Download the instructions for your Car stereo in PDF format for free! Find your manual CDCX504MP - AIWA and take your electronic device back in hand. On this page are published all the documents necessary for the use of your device. CDCX504MP by AIWA.
USER MANUAL CDCX504MP AIWA
FM/AM Compact Disc Player AUTOESTEREO PARA DISCO COMPACTO
Operating Instructions....us
Mode d'emploi....FR
For assistance and information
visit us on the internet at
www.us.aiwa.com
call toll free 1-800-BUY-AIWA (United States only)
CDC-X504MP

Warning
This equipment has been tested and found to comply with the limits for a Class B digital device, pursuant to Part 15 of the FCC rules. These limits are designed to provide reasonable protection against harmful interference in a residential installation. This equipment generates, uses, and can radiate radio frequency energy and, if not installed and used in accordance with the instructions, may cause harmful interference to radio communications. However, there is no guarantee that interference will not occur in a particular installation. If this equipment does cause harmful interference to radio or television reception, which can be determined by turning the equipment off and on, the user is encouraged to try to correct the interference by one or more of the following measures:
- Reorient or relocate the receiving antenna.
– Increase the separation between the equipment and receiver. - Connect the equipment into an outlet on circuit different from that to which the receiver is connected.
- Consult the dealer or an experienced radio/TV technician for help.
You are cautioned that any changes or modifications not expressly approved in this manual could void your authority to operate this equipment.
CAUTION
The use of optical instruments with this product will increase eye hazard.
Owner's Record
The model and serial numbers are located on the bottom of the unit.
Record these numbers in the space provided below.
Refer to these numbers whenever you call upon your Sony dealer regarding this product.
Model No.CDC-X504MP
Serial No.
PRECAUTIONS
- If your car has been parked in direct sunlight, allow the unit to cool off before operating it.
- Power antenna will extend automatically while the unit is operating.
If you have any questions or problems concerning your unit that are not covered in this manual, please consult your nearest Sony dealer.
Moisture condensation
On a rainy day or in a very damp area, moisture condensation may occur inside the lenses and display of the unit. Should this occur, the unit will not operate properly. In such a case, remove the disc and wait for about an hour until the moisture has evaporated.
To maintain high sound quality
Be careful not to splash juice or other soft drinks onto the unit or discs.
For installation and connections, see the supplied installation/connections manual.
Notes on discs
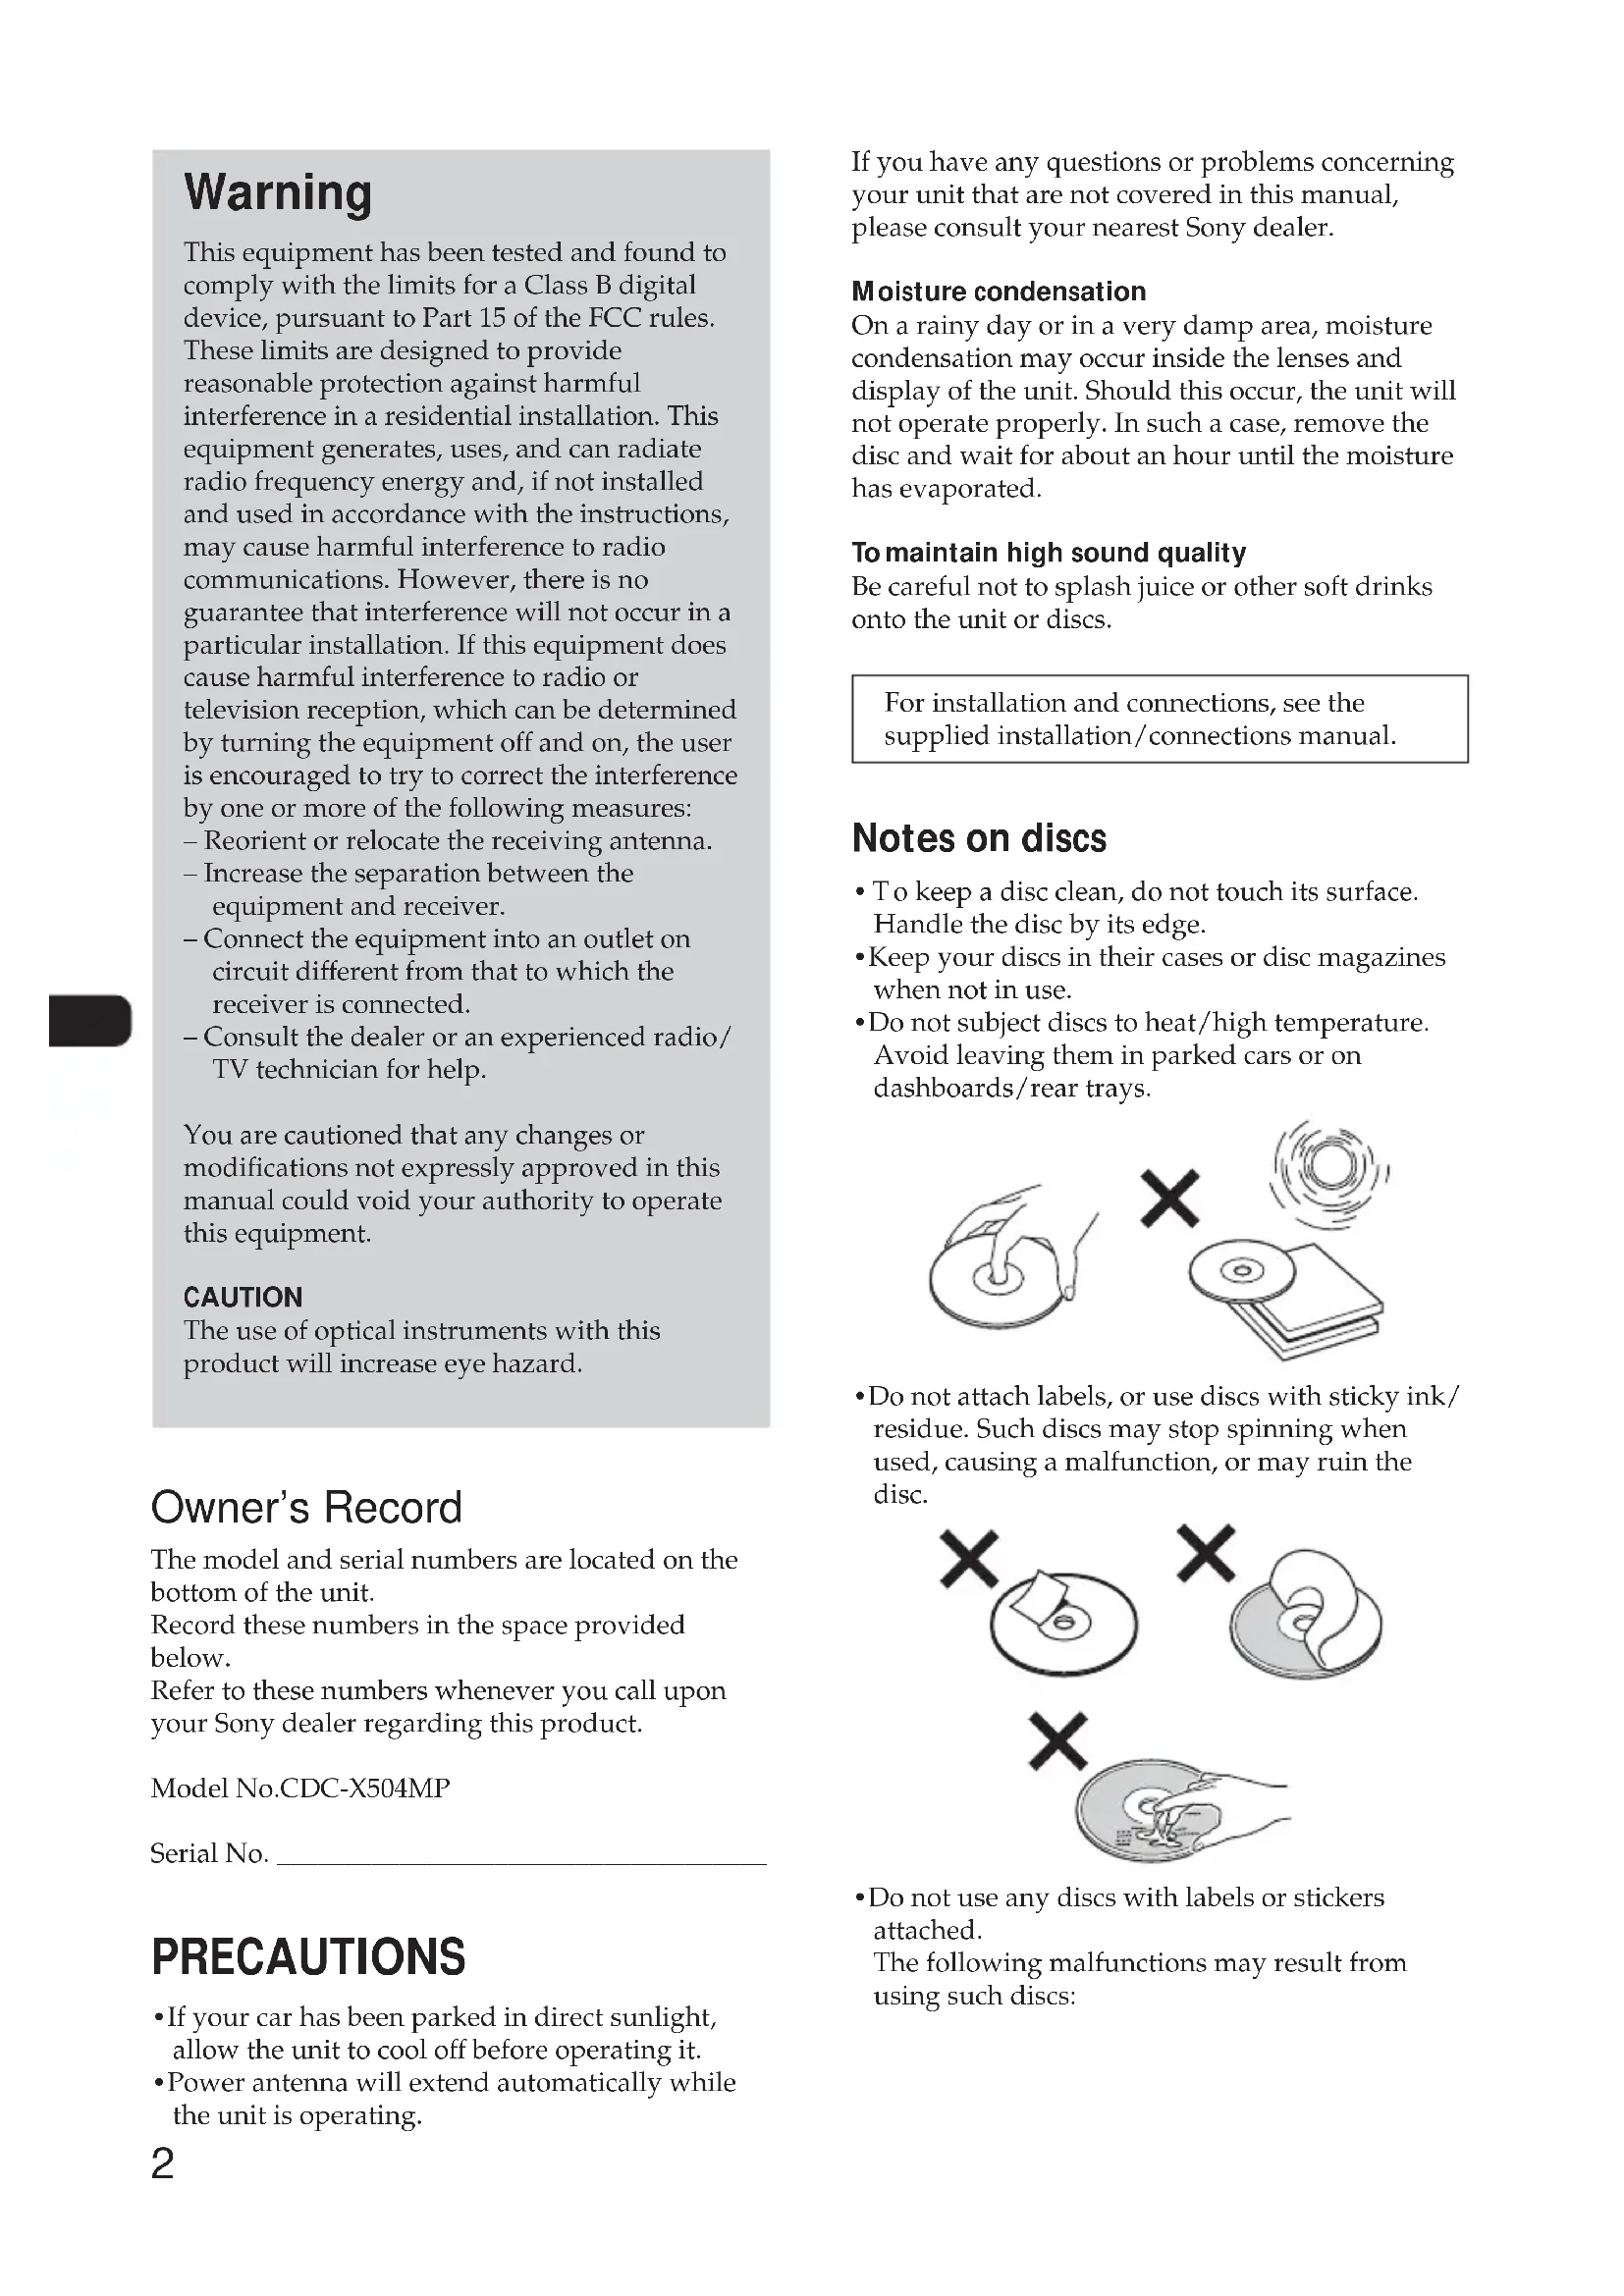
- To keep a disc clean, do not touch its surface. Handle the disc by its edge.
- Keep your discs in their cases or disc magazines when not in use.
- Do not subject discs to heat/high temperature. Avoid leaving them in parked cars or on dashboards/rear trays.
natural_image
Simple line drawing showing a hand holding a circular object, a cross symbol, and a CD/DVD (no text or labels)- Do not attach labels, or use discs with sticky ink/residue. Such discs may stop spinning when used, causing a malfunction, or may ruin the disc.
text_image
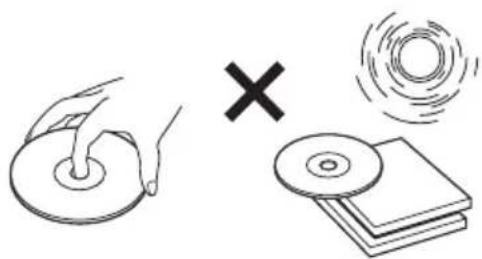
Medical illustration showing three different anatomical or pathological views with 'X' symbols indicating exclusion or absence.- Do not use any discs with labels or stickers attached. The following malfunctions may result from using such discs:
- Inability to eject a disc (due to a label or sticker peeling off and jamming the eject mechanism).
- Inability to read audio data correctly (e.g., playback skipping, or no playback) due to heat shrinking of a sticker or label causing a disc to warp.
• Discs with non-standard shapes (e.g., heart, square, star) cannot be played on this unit. Attempting to do so may damage the unit. Do not use such discs.
- You cannot play 8 cm (3 in) CDs.
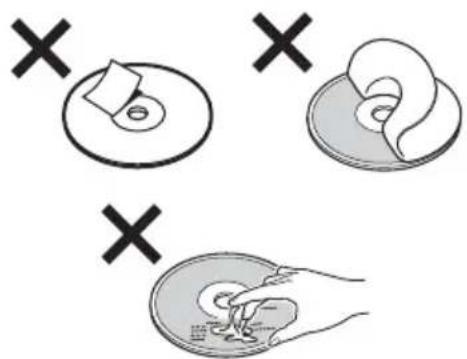
- Before playing, clean the discs with a commercially available cleaning cloth. Wipe each disc from the center out. Do not use solvents such as benzine, thinner, commercially available cleaners, or antistatic spray intended for analog discs.
natural_image
Hand holding a CD or DVD disc with arrows indicating direction (no text or symbols)Music discs encoded with copyright protection
This product is designed to play back discs that conform to the Compact Disc (CD) standard. Recently, various music discs encoded with copyright protection are marketed by some record companies. Please be aware that among those discs, there are some that do not conform to the CD standard and may not be playable by this product.
Notes on CD-Rs (recordable CDs)/CD-RWs (rewritable CDs)
This unit can play the following discs:
| Type of discs Label on the disc | ||
| Audio CD MP3 files |  |  |
| MP3 files |  |  |
- Some CD-Rs/CD-RWs (depending on the equipment used for its recording or the condition of the disc) may not play on this unit.
- You cannot play a CD-R/CD-RW that is not finalized*.
- You can play MP3 files recorded on CD-ROMs, CD-Rs, and CD-RWs.
- A CD-R/CD-RW to which a session can be added can be played.
* A process necessary for a recorded CD-R or CD-RW disc to be played on the audio CD player.
TABLE OF CONTENTS
GETTING STARTED
Resetting the unit.... 4
DEMO (demonstration) mode 4
Theft protection.... 4
BASIC OPERATION, AUDIO AND CLOCK ADJUSTMENT
Turning the unit on....5
Setting the clock 5
Adjusting sound 5
RADIO OPERATION
Storing stations automatically 7
Receiving the stored stations 7
Storing stations manually....7
CD PLAYER OPERATION
Playing a disc 8
Reading the display....9
OTHER FUNCTIONS
Using auxiliary equipment 10
Various settings 10
CARD REMOTE CONTROL
Names of parts 11
Preparations 11
Replacing the battery 11
TROUBLESHOOTING
General 12
Radio reception 12
CD play 13
ERROR DISPLAYS/MESSAGES
Error displays 13
Messages 13
ADDITIONAL INFORMATION
About MP3 files 14
Maintenance 16
Removing the unit 16
Specifications.... 17
GETTING STARTED
Note
Some buttons on the unit are assigned two or more functions. For detailed descriptions, refer to the related pages.
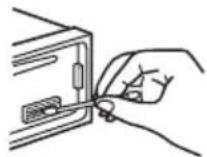
Resetting the unit
Before operating the unit for the first time, or after replacing the car battery or changing the connections, you must reset the unit.
Remove the front panel and press the reset button with a pointed object, such as a ballpoint pen.
Front panel detached
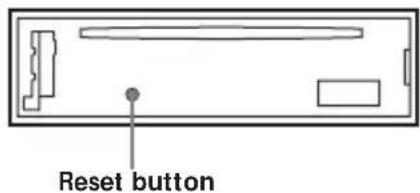
text_image
Reset buttonNote
Pressing the reset button will erase the clock and some memorized functions.
DEMO (demonstration) mode
The unit has an extra display (DEMO) mode which demonstrates the illumination modes of the unit. When you deactivate the unit by pressing OFF, the clock is displayed for about 10 seconds, then the unit switches to DEMO mode.
To cancel DEMO mode
1 While in DEMO mode, press and hold PUSH-MENU until "SET" appears on the display.
2 Press SEEK (+) or SEEK (-) to select "DEMO."
3 Turn PUSH-MENU to select "DEMO OFF."
To resume DEMO mode, repeat the above and select "DEMO ON" at step 2.
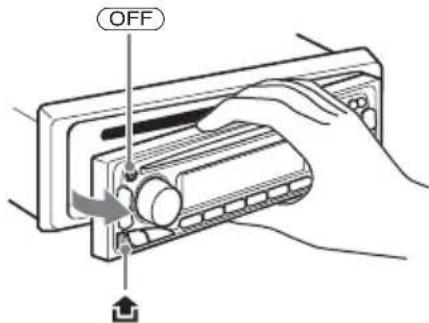
Theft protection
Take the front panel with you when leaving the car, and keep it in the supplied carrying case.
Caution alarm
If you turn off the ignition switch to the OFF position without removing the front panel, the caution alarm will beep for a few seconds. If you connect an optional amplifier and do not use the built-in amplifier, the beep tone will be deactivated.
To detach the front panel
1 Press ▲ to remove the disc.
2 Press OFF*.
3 Press then pull it off towards you. (Hold the panel with one hand to prevent accidentally dropping it.)
text_image
OFF* If your car has no ACC position on the ignition switch, be sure to turn the unit off by pressing OFF until the display disappears to avoid car battery drain.
To attach the front panel
1 Engage the right side of the front panel to the right catch on the unit.
2 Push the panel forward until it locks.
Be sure not to press any buttons and the display window.

text_image
Diagram of a device rear panel with labeled components and directional arrows indicating movement or flow.Notes
- If you detach the panel while the unit is still turned on, the power will turn off automatically to prevent the speakers from being damaged.
- Do not subject the front panel to heat/high temperature or moisture. Avoid leaving it in a parked car or on a dashboard/rear tray.
- Do not put anything on the inner surface of the front panel.
BASIC OPERATION, AUDIO AND CLOCK ADJUSTMENT
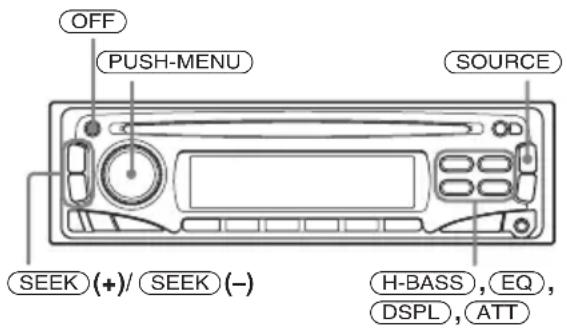
text_image
OFF PUSH-MENU SOURCE SEEK (+)/ SEEK (-) H-BASS, EQ, DSPL, ATTTurning the unit on
Press SOURCE on the front panel.
The unit also turns on when you insert a disc.
To deactivate the unit
Press OFF.
The clock appears. After about 10 seconds, the unit switches to DEMO mode (page 4).
To turn the unit off
Press and hold OFF until everything on the display clears.
This operation is required to avoid car battery drain, if your car has no ACC position on the ignition switch.
Setting the clock
The clock uses a 12-hour digital indication.
1 Press and hold DSPL until the clock appears.
2 Turn PUSH-MENU to set the hour.
3 Press DSPL.
4 Turn PUSH-MENU to set the minute.
5 Press DSPL.
To display the clock
Press DSPL.
To return to the former display, press DSPL again.
Adjusting sound
To adjust the volume
Tum PUSH-MENU.
"VOL (volume)" appears on the display.
To attenuate the sound
Press ATT.
"ATT•ON" appears on the display.
To restore the previous volume level, press ATT again.
To adjust sound stage (DSSA\*)
You can adjust sound stage and tone balance to best serve a particular seat in the car.
* DSSA : abbreviation of "Drivers Sound Stage Adjustment"
1 Press PUSH-MENU.
2 Press SEEK (+) or SEEK (-) to select "DSSA."
3 Turn PUSH-MENU to select "L" (for the front left seat), "R" (for the front right seat), or "OFF."
To adjust DSSA manually, press PUSH-MENU after step 3 above, then press SEEK (+) or SEEK (-) to select "BAL" or "FAD," and turn PUSH-MENU to adjust it.
To adjust the sound characteristics
You can adjust the balance, fader, low pass filter and subwoofer volume.
1 Press PUSH-MENU.
2 Press SEEK (+) or SEEK (-) to select "BAL," "FAD," "LPF" or "SUB."
Each time you press SEEK (+), the item changes as follows:
$$ \mathrm{LOW} ^ { 1} \rightarrow \mathrm{MID} ^ { 1} \rightarrow \mathrm{HI} ^ {* 1} \rightarrow $$
$$ \text { BAL (balance; left - right) } \rightarrow $$
$$ \begin{array}{l}\text { FAD (fader; front - rear) } \rightarrow\\text { DSSA } \rightarrow\end{array} $$
$$ \begin{array}{l} \text { LPF (low pass filter) } ^ { 2 * 3} \longrightarrow \ \text { SUB (subwoofer volume) } ^ { 2 * 4} \end{array} $$
*1 When EQ is activated (page 6)
^2 When “SUB” is selected (page 10)
^3 The cut off frequency is adjustable to 78 Hz, 125 Hz or OFF.
^4 The volume level is adjustable between -10 and +10, or to ATT (attenuated).
3 Turn PUSH-MENU to adjust the selected item.
To reinforce the bass sound (H-BASS)
Press H-BASS.
Each time you press -BASS , the H-BASS mode is turned on and off.
Note
The H-BASS adjustment does not affect the signal output from the AUDIO OUT REAR connectors on the rear panel at the "SUB" (sub-woofer) position.
You can select an equalizer curve for 7 music types (HIP-HOP, VOCAL, CLUB, JAZZ, POPS, ROCK, CUSTOM).
You can store a different equalizer setting for each source.
To select the equalizer curve
1 Press SOURCE to select a source (TUNER, CD or AUX).
2 Press EQ repeatedly to select the desired equalizer curve.
To cancel the equalizing effect, select "OFF."

To adjust the equalizer curve
You can adjust and store the equalizer settings for different tone ranges.
1 Follow the steps 1 and 2 above.
2 Press PUSH-MENU.
3 Press SEEK (+) or SEEK (-) to select the desired tone range; "LOW," "MID," or "HI."
4 Turn PUSH-MENU to adjust to the desired volume level.
The volume level is adjustable from -10 to +10 dB by 1 dB steps.
5 Repeat steps 2 to 4 to adjust the equalizer curve.
Note
When EQ is set to "OFF," you cannot adjust the equalizer curve settings.
To restore the factory settings
You can restore the factory settings for the equalizer curve settings while adjusting them.
During adjustment, press and hold
PUSH-MENU until the equalizer type (such as HIP-HOP) appears on the display.
RADIO OPERATION
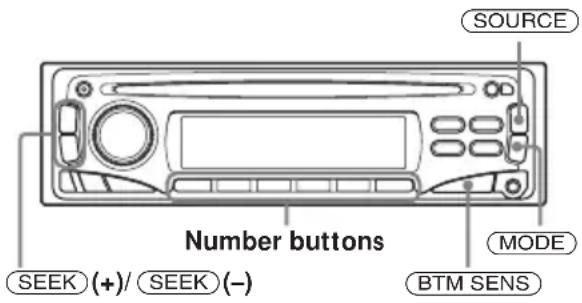
The unit can store up to 6 stations per band (FM1, FM2, FM3, AM1 and AM2).
Caution
When tuning in to stations while driving, use Best Tuning Memory to prevent accidents.
text_image
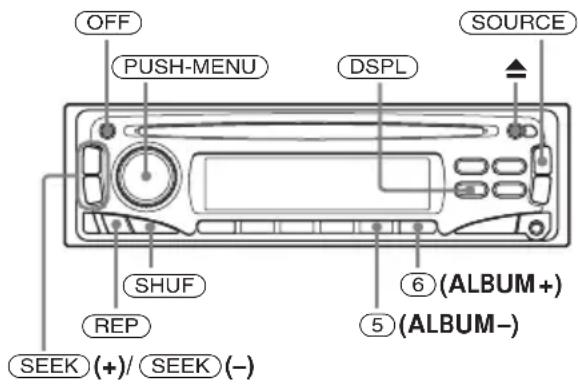
SOURCE Number buttons SEEK (+)/ SEEK (-) MODE BTM SENSStoring stations automatically
- Best Tuning Memory (BTM)
1 Press SOURCE repeatedly to select the radio.
2 Press MODE repeatedly to select the band.
3 Press and hold BTM SENS until "BTM" flashes on the display.
The unit stores stations in the order of their frequencies on the number buttons.
A beep tone will be heard when the setting is stored.
Notes
- If only a few stations can be received due to weak signals, some number buttons will remain their former settings.
- When a number is indicated on the display, the unit starts storing stations from the one currently displayed.
Receiving the stored stations
1 Press SOURCE repeatedly to select the radio.
2 Press MODE repeatedly to select the band.
3 Press the number button (① to ⑥) on which the desired station is stored.
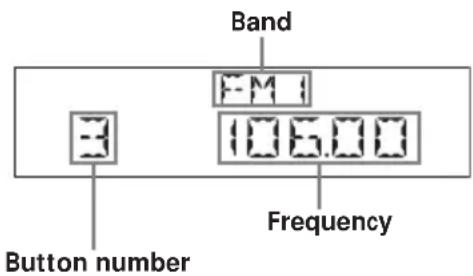
text_image
Band F-M 1 106.00 Frequency Button numberAutomatic tuning
If preset tuning does not work, try the automatic tuning.
Press SEEK (+) or SEEK (-) to search for the station.
Scanning stops when the unit receives a station. Repeat the operation until the desired station is received.
If the automatic tuning stops too frequently
Press BTM SENS repeatedly until "LOCAL•ON" appears on the display.
The "LCL" indicator is displayed.
Only the stations with relatively strong signals will be tuned in (local seek mode).
To cancel the local seek mode, press BTM SENS once or twice so that the "LCL" indicator disappears.
If you know the frequency of the station (manual tuning)
Press and hold SEEK (+) or SEEK (-) to locate the approximate frequency.
Then press SEEK (+) or SEEK (-) repeatedly to fine adjust to the desired frequency.
Monaural mode
If FM stereo reception is poor, receive the station in monaural mode.
During radio reception, press BTM SENS repeatedly until "MONO ON" appears on the display.
The "MONO" indicator is displayed.
To return to normal radio reception, press BTM SENS again.
Storing stations manually
You can store only the desired stations on any chosen number buttons.
1 Press SOURCE repeatedly to select the radio.
2 Press MODE repeatedly to select the band.
3 Press SEEK (+) or SEEK (-) to tune in to the desired station.
4 Press and hold the desired number button (① to ⑥) until "MEM" appears.
CD PLAYER OPERATION
In addition to ordinary CD play, you can enjoy the unit's following features:
- MP3 files *1 can be played.
- CD-R/CD-RW which can have a session added can be played.
- CD TEXT information is displayed when a CD TEXT disc ^*2 is played.
^*1 For more information about MP3 files, see “About MP3 files” on page 14.
^*2 A CD TEXT disc is an audio CD that includes information such as the disc name, artist name, and track names. This information is recorded on the disc.
Playing a disc
text_image
OFF PUSH-MENU DSPL SOURCE SHUF REP SEEK (+)/ SEEK (-) ⑥(ALBUM+) ⑤(ALBUM-)Insert a disc with the label side facing up.
"CD" appears on the display, and play starts.
If a disc is already inserted, press SOURCE repeatedly until "CD" appears to start play. In normal play, when the last track finishes, the unit returns to the first track and continues to play.
| To Press | |
| Stop play ▲ or OFF | |
| Eject the disc ▲ | |
| Skip tracks | SEEK (+)/SEEK (-)(◄◄/►►)(once for each track) |
| Fast-forward/reverse | SEEK (+)/SEEK (-)(◄◄/►►)(Press and hold to desired point.) |
| Skip albums* 5 (ALBUM-) or6 (ALBUM +)(Press and hold to desired album.) | |
* A vailable only when an MP3 file is played.
Notes
- Depending on the condition of the disc, it may not play back.
- A CD-R or CD-RW may take some time to start playing, but this is not a malfunction.
- While the first/last track is playing, if (SEEK) (-) or (SEEK) (+) is pressed, playback skips to the last/first track.
- If you play a high-bit rate MP3 file such as 320 kbps, sound may be intermittent.
Repeat and shuffle play
You can select:
- REP • TRACK – to repeat the current track.
- REP·ALBM* – to repeat the tracks in the current album.
- SHUF•ALBM* – to play the tracks in the current album in random order.
- SHUF•DISC – to play all tracks in the disc in random order.
* A vailable only when an MP3 file is played.
During play, press REP or SHUF repeatedly until the desired repeat or shuffle mode appears on the display.
To return to normal play, select "REP•OFF" or "SHUF•OFF."
Note
During shuffle play, pressing ◀◀◀ allows you to skip only to the beginning of the current track, not to the previous track.
Reading the display
When the disc/album/track changes, any prerecorded title ^1 of the new disc/album/track is displayed.
If the Auto Scroll mode is turned on, names exceeding 8 characters will be scrolled.
There are following displayable items:
- Track number/elapsed playing time
• Disc name ^1 /artist name ^2 - Album name ^3
- Track name ^13
• ID3 tag ^3 - Clock
To Press
Switch display item DSPL
*1 "NO NAME" is displayed when there is no prerecorded name to display.
^2 Only for CD TEXT discs with the artist name.
^*3 Only for MP3 files.
Only track name/artist name/album name in ID3 tag is displayed.
"NO ID3" is displayed when there is no ID3 tag to display.
Notes
- Some characters cannot be displayed.
- For some CD TEXT discs with very many characters, information may not scroll.
- This unit cannot display the artist name for each track of a CD TEXT disc.
To turn on/off the Auto Scroll mode
1 Press and hold PUSH-MENU until "SET" appears on the display.
2 Press SEEK (+) or SEEK (-) to select "A.SCRL."
3 Turn PUSH-MENU to select "ON" or "OFF."
Notes on MP3
• ID3 tag applies to version 1.0, 1.1, 2.2, 2.3 and 2.4.
- Some characters cannot be displayed. Characters and signs which cannot be displayed appear as “*”
The maximum number of characters for album (folder) name/track (file) names that can be displayed is 64 each. ID3 tag is up to 30 characters (1.0, 1.1, 2.2 and 2.3) or 126 characters (2.4).
- In the following cases, elapsed playing time may not be displayed accurately.
- when an MP3 file of VBR (variable bit rate) is played.
– during fast-forward/reverse.
OTHER FUNCTIONS
text_image
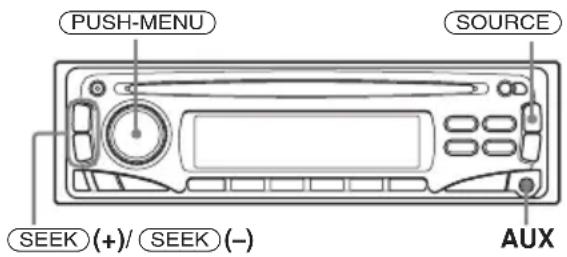
PUSH-MENU SOURCE SEEK (+)/ SEEK (-) AUXUsing auxiliary equipment
You can listen to equipment (such as a cassette, MD, or MP3 portable player) connected to the unit. Refer to the operating instructions for the corresponding equipment for more detailed information.
Be sure to remove the inserted CD to prevent possible damage to the unit before connecting the equipment.
1 Connect a cassette/MD/MP3 portable player or other equipment to the unit's AUX jack (3.5 mm dia.).
2 Press SOURCE repeatedly until "AUX" appears on the display.
Various settings
To align the sound levels (Source Level Adjustor)
Volume may vary each time you change the source mode. In this case, you can align each source mode's volume to almost the same level.
1 Select the source mode to be adjusted.
2 Press and hold SOURCE until "LEVEL 0" appears on the display.
3 Turn PUSH-MENU to adjust the level.
The volume level is adjustable from -6 to +6 dB by 1 dB steps.
To change the display and beep tone settings
You can set the dimmer of the display, and turn on or off the VU level meter and the beep tone. Proceed as follows while the unit is turned on. There are items that cannot be selected if you operate when the unit is deactivated.
1 Press and hold PUSH-MENU until "SET" appears on the display.
2 Press SEEK (+) or SEEK (-) to select "DIM," "VU" or "BEEP."
Each time you press SEEK (+), the item changes as follows:
DIM (dimmer) →
VU (VU level meter) →
A.SCRL* →
BEEP (beep tone)
* Auto Scroll, available when source is CD (page 9)
3 Turn PUSH-MENU to change the setting for the selected item.
To select the type of equipment connected to the rear panel
You can connect a power amplifier or a sub-woofer to the AUDIO OUT REAR jacks on the rear of the unit.
When a power amplifier or a sub-woofer is connected, select the type of the connected equipment correctly.
1 While the unit is deactivated (clock or DEMO is displayed), press PUSH-MENU.
2 Turn PUSH-MENU to select "REAR" (for a power amplifier) or "SUB" (for a subwoofer).
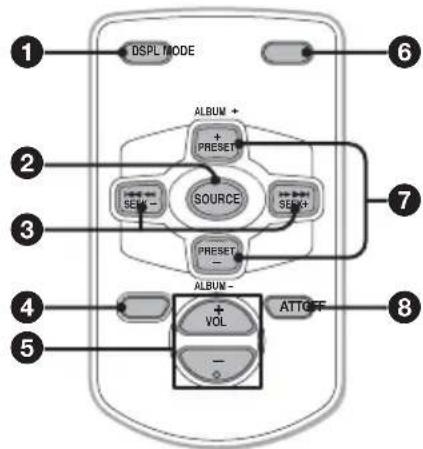
CARD REMOTE CONTROL Names of parts
flowchart
graph TD
    A["1 DSPL MODE"] --> B["2 ALBUM + PRESET"]
    B --> C["3 SEM - SOURCE"]
    C --> D["4 ALBUM - VOL"]
    D --> E["5 - ATTGFF"]
    E --> F["6"]
    C --> G["7"]
    G --> H["8"]
① DSPL button
② SOURCE button
③ SEEK (+/-) buttons
4 OFF button
⑤ VOL (+/-) buttons
6 MODE button
⑦ PRESET/ALBUM (+/-) buttons
⑧ ATT button
Note
If the display disappears by pressing OFF, it cannot be operated with the remote control unless SOURCE on the unit is pressed, or a disc is inserted to activate the unit first.
Preparations
A lithium battery is installed in the remote control at the factory.
Before you use the remote control, be sure to remove the insulating sheet by simply pulling it out.
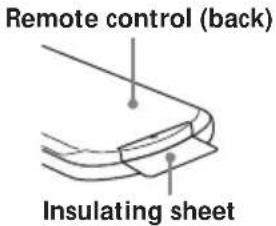
text_image
Remote control (back) Insulating sheetReplacing the battery
1 Insert the tip of a pointed object Ⓐ into the hole Ⓑ and pull out the battery holder to remove the lithium battery (CR2025).
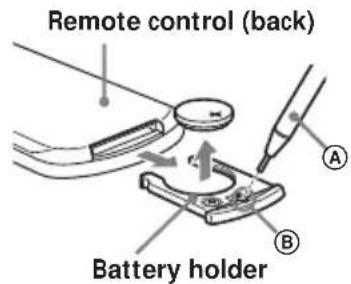
text_image
Remote control (back) Battery holder2 Install a new lithium battery (CR2025)* with the ⊕ side facing up in the battery holder, and push the battery holder into the unit until it clicks.
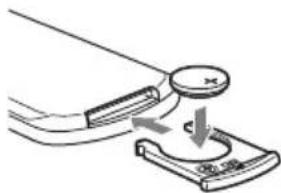
text_image
Diagram showing a mechanical or electrical component with labeled parts and directional arrows indicating motion or force.* Use of any other battery may present a risk of fire or explosion.
Note
When the infrared receptor on the main unit is exposed to direct sunlight, it may not respond to signals from the remote control.
Notes on lithium battery
- Keep the lithium battery out of the reach of children. Should the battery be swallowed, immediately consult a doctor.
- Wipe the battery with a dry cloth to assure a good contact.
- Be sure to observe the correct polarity when installing the battery.
- Do not hold the battery with metallic tweezers, otherwise a short-circuit may occur.
WARNING
Battery may explode if mistreated. Do not recharge, disassemble, or dispose of in fire.
TROUBLESHOOTING
The following checklist will help you remedy problems you may encounter with your unit. Before going through the checklist below, check the connection and operating procedures.
General
No sound.
- Turn PUSH-MENU to the right to adjust the volume.
- Cancel the ATT function.
- Set the fader control to the center position for a 2-speaker system.
The contents of the memory have been erased.
- The reset button has been pressed.
→ Store again into the memory.
• The power lead or battery has been disconnected. - The power connecting lead is not connected properly.
No beep sound.
• The beep sound is canceled (page 10).
- An optional power amplifier is connected and you are not using the built-in amplifier.
The display disappears from/does not appear on the display window.
- The display disappears if you press and hold OFF.
→ Press and hold OFF again until the display appears. - Remove the front panel and clean the connectors. See "Cleaning the connectors" (page 16).
Stored stations and correct time are erased.
The fuse has blown.
Makes noise when the ignition key is in the ON, ACC, or OFF position.
The leads are not matched correctly with the car's accessory power connector.
No power is being supplied to the unit.
- Check the connection. If everything is in order, check the fuse.
- The car does not have an ACC position. → Press SOURCE (or insert a disc) to turn on the unit.
The power antenna does not extend.
The power antenna does not have a relay box.
Radio reception
Preset tuning is not possible.
- Store the correct frequency in the memory.
• The broadcast signal is too weak.
The stations cannot be received.
The sound is hampered by noises.
- Connect a power antenna control lead (blue) or accessory power supply lead (red) to the power supply lead of a car's antenna booster (only when your car has built-in FM/AM antenna in the rear/side glass).
- Check the connection of the car antenna.
- The auto antenna will not go up. →Check the connection of the power antenna control lead.
- Check the frequency.
Automatic tuning is not possible.
• The local seek mode is set to "ON."
→Set the local seek mode to "OFF" (page 7).
• The broadcast signal is too weak.
→Perform manual tuning.
A program broadcast in stereo is heard in monaural.
→Cancel monaural reception mode (page 7).
CD play
A CD cannot be inserted.
- Another CD is already inserted.
- The CD has been forcibly inserted upside down or in the wrong way.
Play does not begin.
• Defective or dirty CD
- CD-R/CD-RW that is not finalized.
- Some CD-Rs/CD-RWs may not play due to its recording equipment or the disc condition.
MP3 files cannot be played back.
- Recording was not performed according to the ISO 9660 level 1 or level 2 format, or the Joliet or Romeo in the expansion format.
- The file extension ".MP3" is not added to the file name.
- Files are not stored in MP3 format.
MP3 files take longer to play back than others.
The following discs take a longer time to start playback.
-a disc recorded with complicated tree structure.
- a disc recorded in Multi Session.
- a disc to which data can be added.
A disc is automatically ejected.
The ambient temperature exceeds 50°C (112°F).
The operation buttons do not function. CD will not be ejected.
Press the reset button.
The sound skips from vibration.
- The unit is installed at an angle of more than 45^ .
- The unit is not installed in a sturdy part of the car.
The sound skips.
Dirty or defective disc.
ERROR DISPLAYS/ MESSAGES
Error displays
The following indications will flash for about 5 seconds, and an alarm sound will be heard.
ERROR
• A CD is dirty or inserted upside down.
→Clean or insert the CD correctly.
• A CD cannot play because of some problem.
→Insert another CD.
FAILURE
The connection of speakers/amplifiers is incorrect. →See the installation guide manual of this model to check the connection.
HI TEMP
The ambient temperature is more than 50^ C ( 112^ F).
→Wait until the temperature goes down below 50^ C ( 112^ F).
NO MUSIC
A CD which is not a music file is inserted in this unit. →Insert a music CD in this unit.
OFFSET
There may be an internal malfunction. →Check the connection. If the error indication remains on, consult your nearest Sony dealer.
RESET
The CD unit cannot be operated because of some problem. →Press the reset button.
Messages
L.SEEK +/-
The Local Seek mode is on during automatic tuning (page 7).
$$ " L" \text { or } L" L \quad \text { and } L" $$
You have reached the beginning or the end of the disc and you cannot go any further.
If these solutions do not help improve the situation, consult your nearest Sony dealer.
ADDITIONAL INFORMATION
About MP3 files
MP3 (MPEG 1 Audio Layer-3) is a standard technology and format for compressing a sound sequence. The file is compressed to about 1/10 of its original size. Sounds outside the range of human hearing are compressed while the sounds we can hear are not compressed.
Notes on discs
You can play MP3 files recorded on CD-ROMs, CD-Rs, and CD-RWs.
The disc must be in the ISO 9660 ^4 level 1 or level 2 format, or Joliet or Romeo in the expansion format. You can use a disc recorded in Multi Session ^2 .
^*1 ISO 9660 Format
The most common international standard for the logical format of files and folders on a CD-ROM. There are several specification levels. In Level 1, file names must be in the 8.3 format (no more than 8 characters in the name, no more than 3 characters in the extension ".MP3") and in capital letters. Folder names can be no longer than 8 characters. There can be no more than 8 nested folder levels. Level 2 specifications allow file names up to 31 characters long.
Each folder can have up to 8 trees.
For Joliet or Romeo in the expansion format, make sure of the contents of the writing software, etc.
\*2 Multi Session
This is a recording method that enables adding of data using the Track-At-Once method.
Conventional CDs begin at a CD control area called the Lead-in and end at an area called Lead-out. A Multi Session CD is a CD having multiple sessions, with each segment from Lead-in to Lead-out regarded as a single session.
CD-Extra: The format which records audio (audio CD data) as tracks on session 1, and records data as tracks on session 2.
Mixed CD: In this format, data is recorded as track 1, and audio (audio CD data) is recorded as track 2.
Notes
- With formats other than ISO 9660 level 1 and level 2, folder names or file names may not be displayed correctly.
- When naming, be sure to add the file extension ".MP3" to the file name.
- If you put the extension ".MP3" to a file other than MP3, the unit cannot recognize the file properly and will generate random noise that could damage your speakers.
-
The following discs take a longer time to start playback.
-
a disc recorded with complicated tree structure.
- a disc recorded in Multi Session.
- a disc to which data can be added.
Cautions when playing a disc that is recorded in Multi Session
- When the first track of the first session is audio CD data:
Only audio CD data of the first session is played back.
Any data in subsequent sessions is skipped.
- When the first track of the first session is not audio CD data:
- If an MP3 file is in the disc, only MP3 file(s) play back and other data is skipped. (Audio CD data is not recognized.)
- If no MP3 file is in the disc, "NO MUSIC" is displayed and nothing is played back. (Audio CD data is not recognized.)
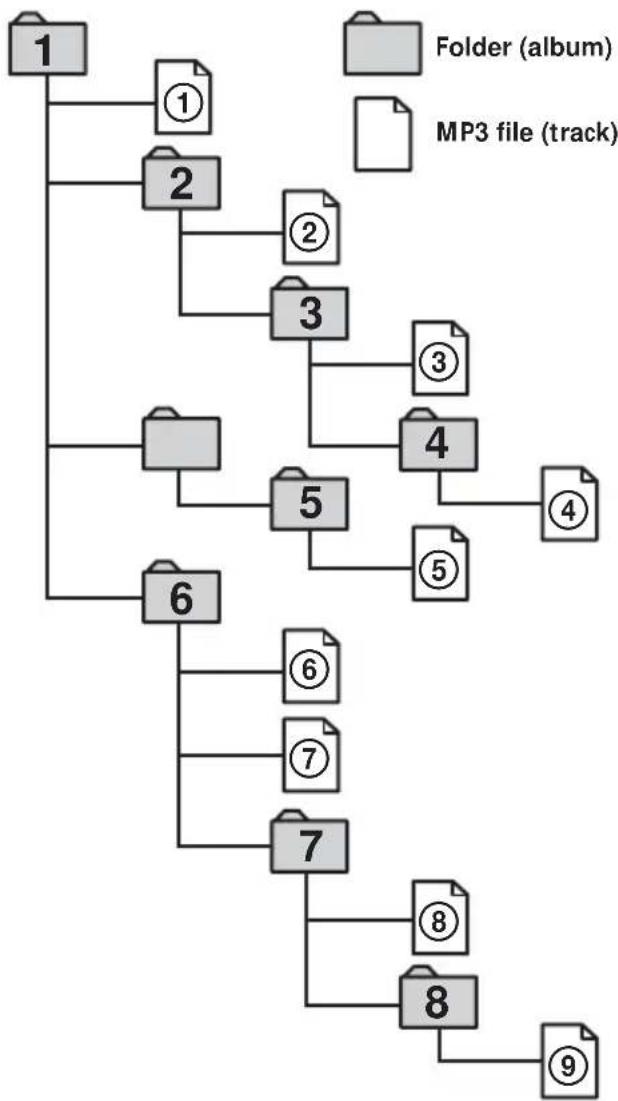
The playback order of the MP3 files
The playback order of the folders and files is as follows:
flowchart
graph TD
    A["1"] --> B["①"]
    A --> C["2"]
    C --> D["②"]
    C --> E["3"]
    E --> F["③"]
    E --> G["4"]
    G --> H["④"]
    C --> I["5"]
    I --> J["⑤"]
    I --> K["6"]
    K --> L["⑥"]
    K --> M["⑦"]
    K --> N["7"]
    N --> O["⑧"]
    N --> P["8"]
    P --> Q["⑨"]
    style A fill:#ccc,stroke:#333
    style B fill:#ccc,stroke:#333
    style C fill:#ccc,stroke:#333
    style D fill:#ccc,stroke:#333
    style E fill:#ccc,stroke:#333
    style F fill:#ccc,stroke:#333
    style G fill:#ccc,stroke:#333
    style H fill:#ccc,stroke:#333
    style I fill:#ccc,stroke:#333
    style J fill:#ccc,stroke:#333
    style K fill:#ccc,stroke:#333
    style L fill:#ccc,stroke:#333
    style M fill:#ccc,stroke:#333
    style N fill:#ccc,stroke:#333
    style O fill:#ccc,stroke:#333
    style P fill:#ccc,stroke:#333
    style Q fill:#ccc,stroke:#333
Tree 1 Tree 2 Tree 3 Tree 4 Tree 5 (root)
Notes
- A folder that does not include an MP3 file is skipped.
- When you insert a disc with many trees, it takes a longer time to start playback. We recommend that you make only one or two trees for each disc.
• Maximum folder number: 150 (including root folder and empty folders)
• The maximum number of MP3 files and folders that can be contained in a disc: 300 When a file/folder name contains many characters, this number may become less than 300. - To specify a desired playback order, before the folder or file name, input the order by number (e.g., "01," "02"), then record contents onto a disc. (The order differs depending on the writing software.)
Maintenance
Cleaning the front panel
Wipe the surface with a soft, dry cloth. Do not use liquid cleaners or aerosol cleaners.
Cleaning the connectors
The connectors need to be cleaned occasionally. Wipe the surface of the connectors with a cotton swab slightly moistened with alcohol.
Main unit
Back of the front panel
Notes
- For safety, turn off the ignition before cleaning the connectors, and remove the key from the ignition switch.
- Never touch the connectors directly with your fingers or with any metal device.
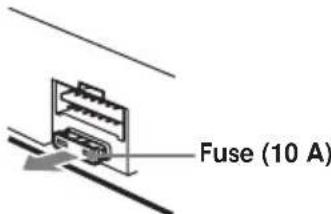
Fuse replacement
When replacing the fuse, be sure to use one matching the amperage rating stated on the original fuse. If the fuse blows, check the power connection and replace the fuse. If the fuse blows again after replacement, there may be an internal malfunction. In such a case, consult your nearest Sony dealer.
text_image
Fuse (10 A)Warning
Never use a fuse with an amperage rating exceeding the one supplied with the unit as this could damage the unit.
Removing the unit
1 Remove the protection collar.
① Detatch the front cover (page 4).
②Engage the release keys together with the protection collar.
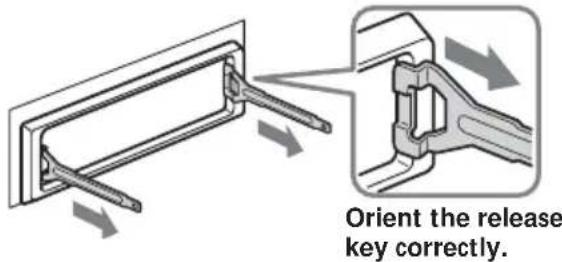
text_image
Orient the release key correctly.③Pull out the release keys to remove the protection collar.
natural_image
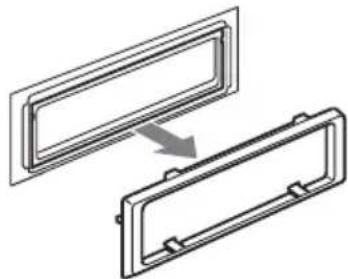
Diagram showing two rectangular metal components with a directional arrow indicating transformation (no text or symbols)2 Remove the unit.
①Insert both release keys together until they click.
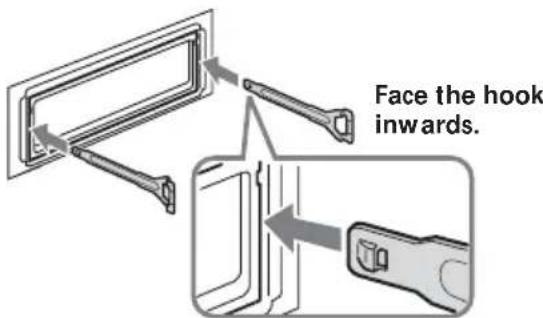
text_image
Face the hook inwards.② Pull the release keys to unseat the unit.
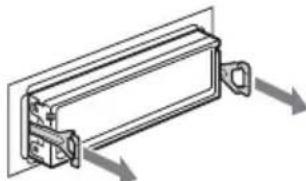
natural_image
Technical line drawing of a mechanical component with directional arrows indicating motion (no text or symbols)③Slide the unit out of the mounting.
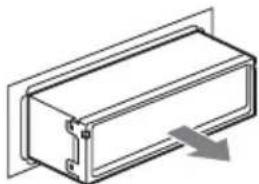
natural_image
Isometric line drawing of a rectangular electronic component with a gray arrow indicating direction (no text or symbols)Specifications
AUDIO POWER SPECIFICATIONS POWER OUTPUT AND TOTAL HARMONIC DISTORTION
23.2 watts per channel minimum continuous average power into 4 ohms, 4 channels driven from 20 Hz to 20 kHz with no more than 5% total harmonic distortion.
Tuner section
FM
Tuning range 87.5 - 107.9 MHz
Antenna terminal External antenna connector
Intermediate frequency 10.7 MHz/450 kHz
Usable sensitivity 9 dBf
Selectivity 75 dB at 400 kHz
Signal-to-noise ratio 67 dB (stereo), 69 dB (mono)
Harmonic distortion at 1 kHz 0.5 % (stereo), 0.3 % (mono)
Separation 35 dB at 1 kHz
Frequency response 30 - 15,000 Hz
AM
Tuning range 530 - 1,710 kHz
Antenna terminal External antenna connector
Intermediate frequency
10.7 MHz/450 kHz
Sensitivity 30 ∝ V
CD player section
Signal-to-noise ratio 120 dB
Frequency response 10 - 20,000 Hz
Wow and flutter Below measurable limit
Power amplifier section
Outputs Speaker outputs
(sure seal connectors)
Speaker impedance 4 - 8 ohms
Maximum power output
52 W · 4 (at 4 ohms)
General
Outputs Audio outputs terminal (rear/sub switchable) Power antenna relay control terminal Power amplifier control terminal
Inputs Antenna input terminal
Tone controls Low:
±10 dB at 60 Hz (HIP-HOP)
Mid:
±10 dB at 1 kHz (HIP-HOP)
High:
±10 dB at 10 kHz (HIP-HOP)
Power requirements 12 V DC car battery
(negative ground)
Supplied accessories Parts for installation and
connections
Front panel case (1)
Card remote control
RM-Z304
Design and specifications are subject to change without notice.
PRECAUTIONS
natural_image
Illustration showing a hand holding a disc and a CD with a cross symbol (no text or labels)text_image
Diagram showing three types of medical or laboratory devices with 'X' symbols indicating failure or absence, likely for diagnostic or experimental purposes.natural_image
Hand holding a CD or DVD disc with arrows indicating direction (no text or symbols)text_image
Diagram showing a device rear panel with labeled components and directional arrows indicating movement or flow.Remarques
text_image
Diagram showing a mechanical or electrical component with labeled parts and directional arrows indicating motion or movement.natural_image
Diagram showing two rectangular metal brackets with a directional arrow indicating transformation (no text or symbols)natural_image
Pure mechanical assembly diagram showing a rectangular component with mounting brackets and directional arrows indicating motion (no text or symbols)natural_image
Isometric line drawing of a rectangular electronic component with a gray arrow indicating direction (no text or symbols)Spécifications
Radio
FM
Plage d'accord
87,5 - 107,9 MHz
natural_image
Simple line drawing showing a hand holding a disc and a CD with a cross symbol (no text or labels)text_image
Diagram showing three stages of a medical procedure: disc, cross-sectional view, and endoscopic view with X marks indicating failure or rejection.natural_image
Hand holding a CD or DVD disc with a pen, showing a circular object and directional arrows (no text or symbols)text_image
Diagram showing a device rear panel with labeled components and directional arrows indicating movement or flow.Notas
text_image
Diagram showing a mechanical or electrical component with labeled parts and directional arrows indicating motion or force.natural_image
Pure electrical circuit lines without any symbolsFusible (10 A)
Advertencia
natural_image
Diagram showing two rectangular metal components with a directional arrow indicating transformation (no text or symbols)natural_image
Pure mechanical assembly diagram showing a rectangular component with mounting flanges and directional arrows indicating motion (no text or symbols)natural_image
Isometric line drawing of a rectangular electronic component with a downward arrow indicating compression or dislocation (no text or symbols)Especificaciones
Aiwa Strategic Accounts Partnership Inc. ("Aiwa") warrants to the original consumer purchaser that this product is free of defects in material and workmanship at the time of purchase.
WARRANTY PERIODS
During the applicable LABOR warranty period, Aiwa will pay labor and service charges for the repair of defects or, at its option, will replace a defective product with a new or remanufactured equivalent product. During the applicable PARTS warranty period, Aiwa will supply at no charge new or rebuilt replacement parts in exchange for defective parts. However, after the LABOR warranty period, all labor and service charges are your responsibility. Replacement parts are warranted for the remainder of the original PARTS warranty period.
The LABOR and PARTS warranty periods for your product are listed below. All warranty periods commence with the purchase date.
LABOR PARTS
Car Audio 1 year 1 year
WHO PERFORMS AIWA'S WARRANTY?
Aiwa's warranty obligations must be performed by an Aiwa Authorized Service Center. For the name of the Aiwa Authorized Service Center nearest to you call toll free 1-800-289-2492 (1-800-BUY-AIWA).
WHAT YOU MUST DO
To obtain warranty performance, you must take the product, or deliver the product freight prepaid, to an Aiwa Authorized Service Center. If shipped, the product must be packaged so that it is protected from possible shipping damage. You must pick up the product when warranty performance is completed or, if you choose, and the product was received by the Service Center during the LABOR warranty period, the repaired product will be returned to you freight prepaid. You must present to the Service Center, or include with your shipment, a dealer's bill of sale, or other original evidence, showing the date and place of purchase and describing the product purchased. Be sure to include your return address and daytime telephone number where you can be reach should the need arise.
WHAT THE WARRANTY DOES NOT COVER
This warranty does not cover (1) products purchased outside of the U.S.A.; (2) product set-up, adjustment of controls, repair of antenna systems outside the unit; (3) removal or reinstallation, batteries, carrying case, AC adapters and other accessories packaged with the product; (4) defects occurring after purchase due to repair or service other than by an Aiwa Authorized Service Center, product modification, accident, misuse, abuse, or negligence; or (5) reception problems caused by signal conditions, or cable or antenna systems outside the unit. This warranty will not apply if the serial number of the unit has been altered or removed.
REPAIR OR REPLACEMENT AS PROVIDED IN THIS WARRANTY IS THE PURCHASER'S EXCLUSIVE WARRANTY REMEDY. IMPLIED WARRANTIES, INCLUDING THE WARRANTIES OF MERCHANTABILITY AND OF FITNESS FOR A PARTICULAR PURPOSE, SHALL NOT EXTEND BEYOND THE DURATION OF THE APPLICABLE PARTS WARRANTY PERIOD. IN NO EVENT SHALL AIWA BE LIABLE FOR INCIDENTAL OR CONSEQUENTIAL DAMAGES IN CONNECTION WITH THIS PRODUCT. Some states do not allow limitations on how long an implied warranty lasts or the exclusion or limitation of incidental or consequential damages, so the above limitations or exclusion may not apply to you. This warranty gives you specific legal rights, and you may also have other rights which may vary from state to state.
IF YOU NEED HELP: For the latest in Product Information, Parts, Service Center listings and F.A.Q. information visit us on the web at www.us.aiwa.com or call 1-800-BUY-AIWA.
For further Aiwa information, please call 1-800-BUY-AIWA.
Visit us on the Internet at www.us.aiwa.com
D 455724401

- Lead-free solder is used for soldering certain parts.
- Halogenated flame retardants are not used in the certain printed wiring boards.
- Halogenated flame retardants are not used in cabinets.
• Paper is used for the packaging cushions.