
CDC-X15 - Car radio AIWA - Free user manual and instructions
Find the device manual for free CDC-X15 AIWA in PDF.


| Product Type | Car Stereo / CD Receiver |
| Brand | Aiwa |
| Model | CDC-X15 |
| Power Output (Max) | 40 W × 4 |
| Power Supply | 12 V DC (11–16 V allowable), negative ground |
| Frequency Range (FM) | 87.5 – 108 MHz |
| Frequency Range (AM) | 530 – 1710 kHz |
| Detachable Control Panel | Yes |
| CD Playback | Yes (standard 12 cm CDs) |
| CD Frequency Response | 17 Hz – 20 kHz (+0/-3 dB) |
| CD Dynamic Range | > 80 dB |
| CD S/N Ratio | > 85 dB |
| Tone Control | Bass ±10 dB at 100 Hz, Treble ±10 dB at 10 kHz |
| Pre-amp Output Voltage | 1.2 V (max) |
| Load Impedance | 4 Ω |
| Dimensions (W × H × D) | 182 × 53 × 153 mm (7 1/4 × 2 1/8 × 6 1/8 in) |
| Accessories Included | Carrying case |
| Preset Stations | 18 FM + 6 AM |
| Playback Modes | Normal, Intro, Repeat, Random, Program |
| FCC Compliance | Class B digital device (Part 15) |
Frequently Asked Questions - CDC-X15 AIWA
User questions about CDC-X15 AIWA
0 question about this device. Answer the ones you know or ask your own.
Ask a new question about this device
Download the instructions for your Car radio in PDF format for free! Find your manual CDC-X15 - AIWA and take your electronic device back in hand. On this page are published all the documents necessary for the use of your device. CDC-X15 by AIWA.
USER MANUAL CDC-X15 AIWA
For your convenience, record the model number and serial number (you will find them on the bottom of your set) in the space provided below. Please refer to them when you contact your AIWA dealer in case of difficulty.
Model No. CDC-X20M, CDC-X15
Serial No.
TABLE OF CONTENTS
PRECAUTIONS 3
DETACHING THE CONTROL PANEL 4
CONTROL PANEL 5
This equipment has been tested and found to comply with the limits for a Class B digital device, pursuant to Part 15 of the FCC Rules. These limits are designed to provide reasonable protection against harmful interference in a residential installation.
This equipment generates, uses, and can radiate radio frequency energy and, if not installed and used in accordance with the instructions, may cause harmful interference to radio communications. However, there is no guarantee that interference will not occur in a particular installation. If this equipment does cause harmful interference to radio or television reception, which can be determined by turning the equipment off and on, the user is encouraged to try to correct the interference by one or more of the following measures:
- R eorient or relocate the receiving antenna.
- Increase the separation between the equipment and receiver.
- C onnect the equipment into an outlet on circuit different from that to which the receiver is connected.
- C consult the dealer or an experienced radio/TV technician for help.
CAUTION
Modifications or adjustments to this product, which are not expressly approved by the manufacturer, may void the user's right or authority to operate this product.
PRECAUTIONS
- Do not attempt to disassemble this unit. Laser rays from the optical pickup are dangerous to the eyes.
- Make sure that pins or other foreign objects do not get inside the unit; they may cause malfunctioning, or a safety hazard such as electrical shock or exposure of laser rays.
- When your car is parked under direct sunlight in summer, there may be a considerable rise in temperature inside the car. Ensure to let the ambient temperature cool down before operating the unit.
- This unit is designed to be operated on a 12 volt DC negative ground electrical system only.
- When replacing the fuse, be sure to use the fuse whose amperage rating is identical. Use of a fuse with higher amperage may cause serious damage to the unit.
Notes on CDs
- A defective or soiled disc inserted into the unit can cause sound to drop out during playback.
- Handle the disc by holding its inner and outer edges.
- Do not touch the surface of the unlabeled side of the disc.

natural_image
Line drawing of a hand pressing down on a circular object (no text or symbols)- Do not stick paper or tape etc. on the surface.

- Do not expose the disc to direct sunlight or excessive heat.
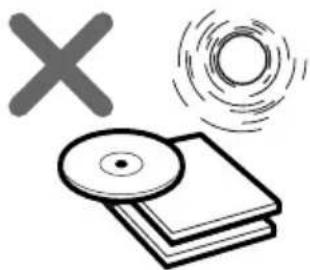
natural_image
Illustration of a CD, a stack of books, and a cross symbol (no text or labels)- Clean the disc before playback. Wipe the disc from the center outward with a cleaning cloth.
- N ever use solvents such as benzine or alcohol to clean the disc.

natural_image
Illustration of hands using a tool to cut or mark a circular object with arrows indicating direction (no text or symbols)- S maller 3-inch (8cm) CDs can not be played on this unit. And do not use adaptor as it may cause malfunctioning.
DETACHING THE CONTROL PANEL
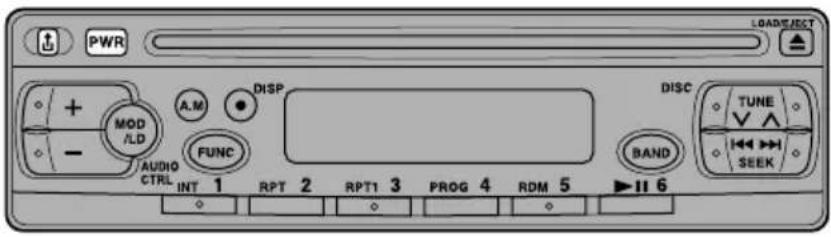
You can detach the control panel from the unit and carry it with you when you leave your car unattended.
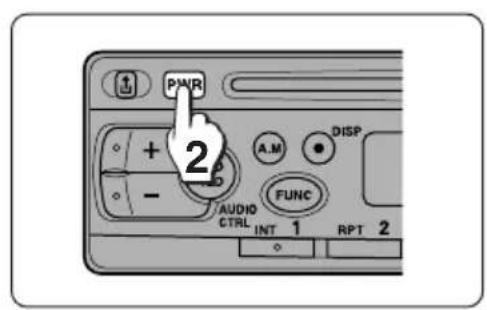
1 If a disc is inserted, remove it to prevent possible damage to the unit.
2 Press PWR to turn the unit off.

3 While supporting the control panel with one hand, press ↑ to release one side of the panel. Care must be taken not to drop the panel as it may suddenly eject at this point.
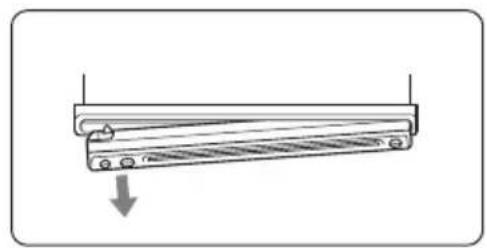
natural_image
Diagram of a mechanical device with a downward arrow indicating force or movement (no text or symbols present)4 When the control panel is lifted from the unit, remove it by pulling away from the unit.
Note
- Put the control panel inside the supplied carrying case to protect it from being damaged when you carry it with you.
Attaching the control panel

CONTROL PANEL

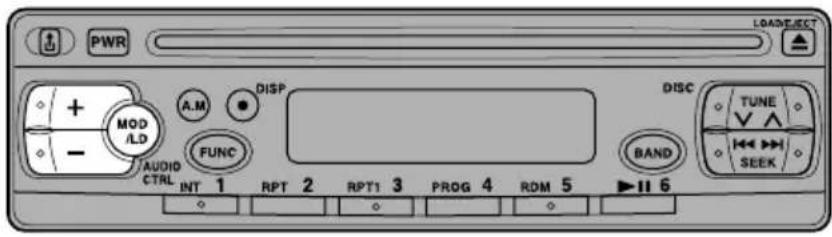
Display window

① ↑ (detach) button
②PWR (power) button
③A.M (auto memory) button
④DISP (display) button
⑤FUNC (function) button
⑥Disc compartment
⑦BAND button
⑧LOAD/EJECT ▲ button
⑨ AUDIO CTRL +/- (audio control) button
⑩MOD/LD (mode/loudness) button
⑪ Preset Station buttons 1 – 6
⑫INT (intro) button
⑬RPT (repeat) button
⑭RPT1 (repeat 1) button (CDC-X20M only)
⑮PROG (program) button
⑯RDM (random) button
⑰▶II (play/pause) button
⑱ SEEK ◀◀/▶▶I button
⑲ TUNE/DISC ∨/∧ button (CDC-X20M only)
TUNE ∨/∧ button (CDC-X15 only)
⑳DISC indicator
②1ST (stereo) indicator
⑳RNDM (random) indicator
⑳PROG (program) indicator
⑳INT (intro) indicator
⑲RPT1 (repeat, repeat 1) indicator
⑳LUD (loud) indicator
⑳Main Display section
Press PWR or any other button (except ↗).
To turn off the unit
Press PWR.
SELECTING FUNCTION

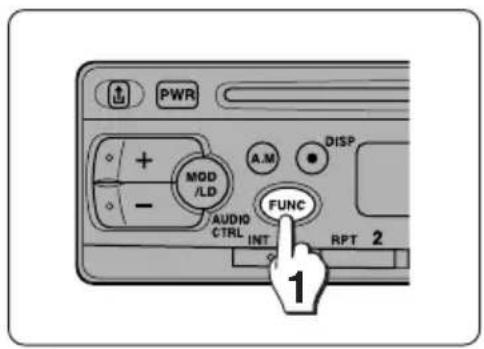
To select the function
Press FUNC repeatedly.
The function changes in the following order.

flowchart
graph LR
    A["Radio CD→CD changer*"] --> B["Empty Process"]
* CMT indicator lights up when ADC-M35 is connected. (CDC-X20M only)
SOUND ADJUSTMENTS

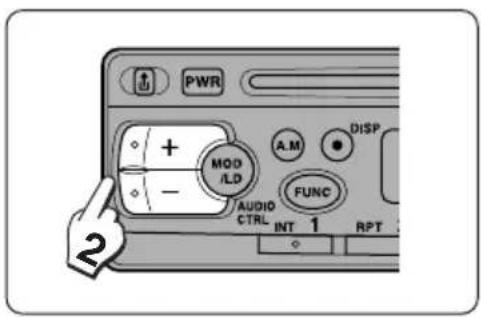
1 Press MOD/LD to select the mode you want to adjust from VOL (volume), BAS (bass), TRE (Treble), BAL (balance), and FAD (fader).
The mode indicator lights up in the following order.

flowchart
graph LR
    A["→ VOL"] --> B["BAS"] --> C["TRE"] --> D["BAL"] --> E["FRD"]
The selected mode changes to the volume mode when MOD/LD is pressed for more than 5 seconds.
2 Press + or — (for less than 0.5 seconds) to adjust the sound quality.
To change the level rapidly, press and hold + or - down longer.
| + side | - side | |
| VOL | Increases the volume level. | Decreases the volume level. |
| BAS | Increases the bass level. | Decreases the bass level. |
| TRE | Increases the treble level. | Decreases the treble level. |
| BAL | Decreases the level of the left speaker(s). | Decreases the level of the right speaker(s). |
| FAD | Decreases the level of the front speakers. | Decreases the level of the rear speakers. |
Note
- Without selecting any mode with MOD/LD, only the volume level can be adjusted by pressing+ or -.
LOUD (loudness) function
Press MOD/LD for more than 1.5 seconds to reinforce bass and treble especially when listening at low volume level. To cancel the loudness, press MOD/LD for more than 1.5 seconds again.
To set the turn-on volume level
The unit can be set to always turn on at the same volume level.
After adjusting the volume with + or −, press and hold PWR down for more than 2 seconds until a beep tone is heard.
RADIO OPERATION


1 Press any button (except ↩) to turn on the unit.
The radio frequency is displayed.
If the radio frequency is not displayed, press FUNC to select the radio operation.

2 Press BAND to select the desired band from FM1, FM2, FM3, and AM.
The band indicator [FM1, FM2, FM3, or AM] is displayed.

3 Press TUNE √/∧ repeatedly to tune in the desired station.
Press ∧ to increase and ∨ to decrease the frequency. To change the frequency rapidly, press and hold ∧ or ∨ down longer.
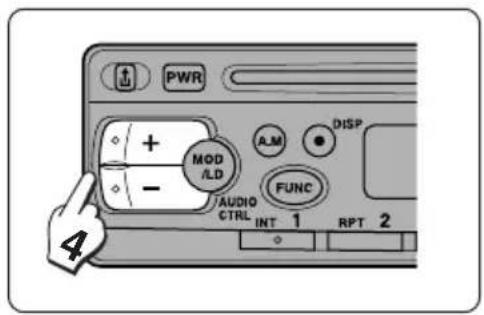
4 Adjust the volume with + or -.
Note
- FM1, FM2, and FM3 have the same frequency range.
- ST indicator lights up when an FM stereo broadcast is received with a sufficient signal strength.
Seek Tuning
The seek function is used to search for the station automatically.
1 Press BAND to select the desired band.
2 Press SEEK ◀◀◀/▶▶▶ to start the seek function.
Press ▶▶▶ to search for the higher frequencies and ◀◀◀ for the lower frequencies.
The seeking stops when the nearest station with good reception is tuned in.
Press ▶▶▶ or ◀◀◀ repeatedly until the desired station is received.
To turn off the radio
Press FUNC or insert a disc.
The radio is turned off and the CD operation starts.
PRESETTING STATIONS

Up to 6 stations for each band [FM1, FM2, FM3, and AM] can be stored on the preset station buttons.

1 Press BAND to select the band from FM1, FM2, FM3, and AM.
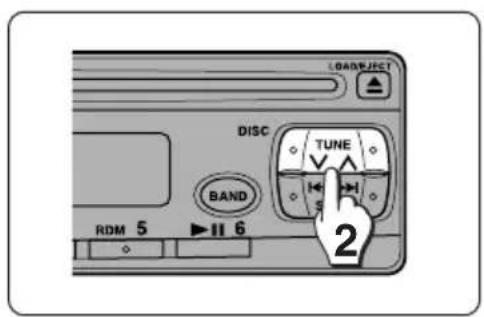
2 Tune in the station to be preset.
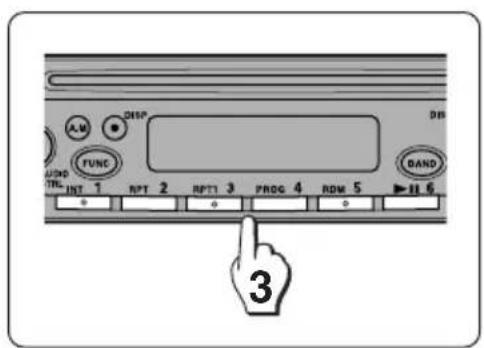
3 Press one of the preset station buttons (1 – 6) for more than 2 seconds until a beep tone is heard. The number of the pressed preset station button is displayed.

4 Repeat steps 2 and 3 to preset other stations.
Note
- As FM1, FM2, and FM3 have the same frequency range, up to 18 stations can be preset for FM.
- When a station is preset on the preset station button on which another station of the same band has already been preset, the previously preset station is automatically erased.
Automatic Presetting
The automatic presetting function is used to automatically preset up to 6 stations for each band.
1 Press BAND to select the band.
2 Press and hold A.M down for more than 2 seconds until a beep tone is heard.
The scanning starts from the currently displayed frequency to higher frequencies and stops when 6 stations have been preset or the receivable frequencies have been scanned once.
Note
- The presetting is not performed if there is no station to be tuned in.
- When the automatic presetting is performed, the previously preset stations are automatically erased.
- To stop the automatic presetting, press A.M again or press any of the preset station buttons (1 - 6).
To scan the preset stations
Press A.M for less than 1 second.
Each preset station is tuned in for 5 seconds in order.
To stop the scanning, press A.M again or any of the preset station buttons (1 - 6).
To tune in the preset stations
Press BAND to select the band and press the preset station button (1 - 6).
The number of the preset station button is displayed and the preset station is received.
CD PLAYBACK

Press any button (except ↩) to turn on the unit.

1 Insert a disc with the labeled side up to start playback.
If a disc is already inserted, press FUNC to select the CD operation.
DISC indicator lights up, and the track number and elapsed playing time are displayed.

2 Adjust the volume with + or - .
Press these buttons to operate CD playback.
| Press | To |
| ▲ | Load or eject a disc. |
| ▶II | Pause play.The track number and elapsed playing time flash on and off.To resume play, press ▶II again. |
| ^ | Forward on the disc. Press and hold ∧ down until the start of the desired passage, then release it. |
| ∨ | Reverse on the disc. Press and hold ∨ down until the start of the desired passage, then release it. |
| ▶▶I | Skip to the next track with a short press (for less than 0.5 seconds).Each extra press skips forward one extra track.To skip forward rapidly, press and hold ▶▶I down until the desired track number is displayed, then release it. |
| ◀◀ | Restart the track currently in play with a short press (for less than 0.5 seconds).Each extra press skips backward one extra track.To skip backward rapidly, press and hold ◀◀◀ down until the desired track number is displayed, then release it. |
Note
- The disc is neither inserted nor ejected when the unit is not turned on.
- S maller 3-inch (8 cm) CDs can not be played on this unit. And do not use an adaptor as it may cause malfunctioning.
- The playback starts from the first track on the disc only when inserting a disc. In other cases (when switching from the radio operation or turning on the unit), the playback starts from the beginning of the track being played when the playback has stopped.
- A disc can be inserted by putting it into the disc compartment slot, and either pushing it lightly with fingers or pressing LOAD/EJECT ▲.
Intro Play
Press INT during playback.
INT indicator lights up and the first 10 seconds of all the tracks on the disc are played in order.
When the desired track is found, press INT again. The unit returns to the normal playback.
Note
- The intro play cannot be performed with the repeat or random play.
Repeat Play
Press RPT during playback.
RPT indicator lights up and the currently selected track is played repeatedly.
To cancel the repeat play, press RPT again.
Note
- If the repeat play is not selected, all the tracks on the disc are played repeatedly.
- The repeat play cannot be performed with the intro or random play.
- The repeat play cannot be performed by pressing RPT 1. (CDC-X20M only)
Random Play
Press RDM during playback.
RNDM indicator lights up and the tracks on the disc are played randomly.
To cancel the random play, press RDM again.
Note
- The random play cannot be performed with the intro or program play. If the repeat play is selected during the random play, the random play is canceled.
- During the random play, even If ◀◀◀ is pressed repeatedly, the track currently in play is restarted.
PROGRAM PLAY
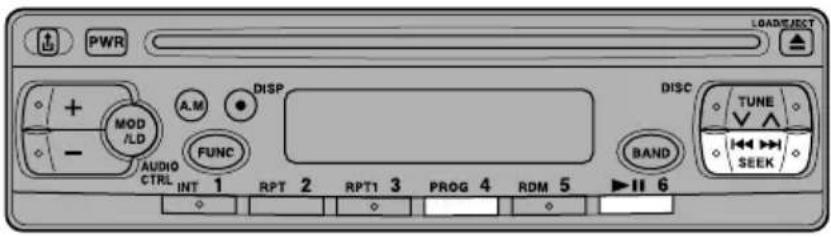
Up to 10 tracks can be set in the program memory in any order.
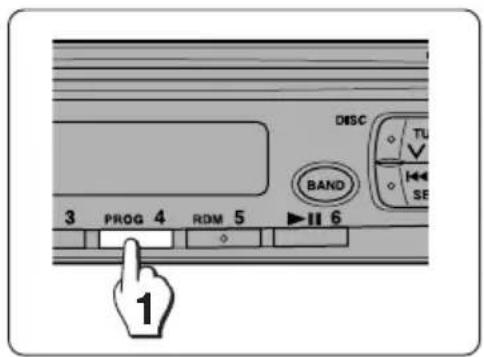
1 Press PROG.
PROG indicator lights up.

2 Select a desired track by pressing SEEKI◄◄/►► until its number is displayed.

aTrack number
b Program number
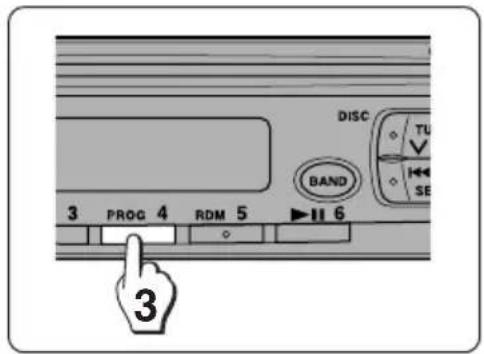
3 Press PROG to set the track in the program memory.
If PROG is not pressed within 5 seconds, the program play is canceled.
4 Repeat steps 2 and 3 to set other tracks.

5 To start the program play, press ▶II.
To confirm the programmed tracks
Press PROG in sequence.
The track and program numbers are displayed in the order of the playback.
To stop the program play, press PROG again.
Note
- The program memory of the disc is not erased even after turning off the unit. The program memory is erased when ejecting the disc and inserting another disc.
- The program play cannot be performed with the intro, repeat, or random play.
SETTING THE CLOCK

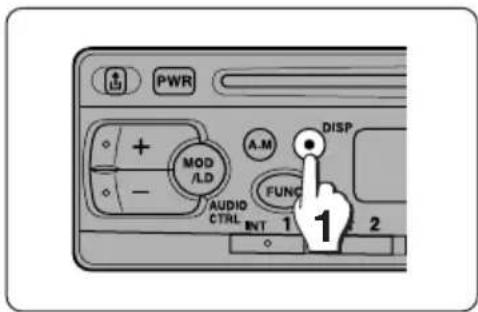
1 Press any button (except ↩) to turn on the unit.
Press DISP, and clock indication will be displayed for 5 seconds.
- If you do not proceed with step 2 within 5 seconds, the clock indication will disappear.

2 Press and hold down BAND.
Press TUNE ∨ to adjust the hour. Press TUNE ∧ to adjust the minutes. When depressing BAND, the clock is set.
CD CHANGER (CDC-X20M only)


1 Press FUNC and select CMT to start playing from disc 1.
The disc and track numbers are displayed.

2 Adjust the volume with +/-.
You can play CDs with this unit by connecting the optional AIWA ADC-M35 compact disc changer. Make sure that the disc magazine loaded with the discs is inserted into the connected compact disc changer.
Press following buttons to operate the connected compact disc changer.
| To do this Press this button | |
| To pause ▶II | |
| To resume ▶II | |
| Exit the CD mode and turns the unit off. PWR |
To skip tracks
| Buttons | Short press* | Long press |
| ▶▶I | Skips to the next track | Advances rapidly. Releases to resume play. |
| ◀◀ | Skips back to the beginning of the current track. | Reverses rapidly. Releases to resume play. |
* Press for less than 0.5 second.
To switch to another disc
- To start playing the previous disc in the disc magazine, press DISC √.
- To start playing the next disc, press DISC ∧. The number of the disc (1 - 6) is displayed.
Note
CD changer does not work by pressing PROG and RDM.
Repeat play
To repeat the current track, press RPT (the "RPT" indication is displayed). To repeat the current disc, press RPT 1 (the "RPT 1" indication is displayed). To cancel, press the same button again.
Intro play
- Press INT. (The "INT" indication is displayed.) The first 10 seconds of each track on all the discs in the disc magazine will be played in sequence.
- To cancel intro play, press INT again. By pressing one of the following buttons you can cancel repeat play and intro play: DISC ∧, DISC ∨, ►▶, ◀◀, INT, REP, REP 1, PW.
SPECIFICATIONS
RADIO SECTION
FM
Frequency Range: 87.5 MHz – 108 MHz
Usable Sensitivity: 12.7dBf
50 dB Quieting Sensitivity:
17.2 dBf
IF Rejection: 80 dB
Frequency Response: 30 Hz – 15,000 Hz
S/N Ratio: 63 dB
Stereo Separation: 35 dB at 1 kHz
Alternate Channel Selectivity:
70 dB
Capture Ratio: 3 dB
AM
Frequency Range: 530 kHz – 1,710 kHz
Usable Sensitivity: 30 μV (30 dB)
CD SECTION
Frequency Response: 17 Hz – 20 kHz +0/-3 dB
Dynamic Range: More than 80 dB
Channel Separation: More than 65 dB
S/N Ratio: More than 85 dB
Wow/Flutter: Unmeasurable
AUDIO SECTION
Max. Power Output: 40 W × 4
GENERAL
Power Supply Voltage:
14.4 V (11 to 16 V allowable),
DC, negative ground
Load Impedance: 4 Ω
Tone Control: Bass ± 10 dB at 100 Hz
Treble ± 10 dB at 10 kHz
Pre-amp Output Voltage:
1.2 V (max.)
Installation Size: 182 (W) × 53 (H) ×
153 (D) mm
(7 1/4 (W) × 2 1/8 (H) ×
6 1/8 (D) inches)
Accessory Supplied: Carrying case (1)
- Specifications and external appearance are subject to change without notice due to product improvement.
TROUBLESHOOTING
In the following cases, the corresponding error code indicator is displayed.
Internal CD player:
| Error code | Cause | Solution |
| E--2, E--3,E--6, E--8 | The disc is not inserted or ejected properly. | Press RESET and insert the disc again. |
| E--4, E--5,E--7 | The disc cannot be read properly. | The disc may be damaged or dirty.Insert another disc. |
| E--9 | The ambient temperature is too high. | Allow the unit to cool off (by moving the car out of direct sunlight, etc.). |
CD CHANGER:
| Error code | Cause | Solution |
| E--1 | The disc magazine is not properly inserted in the compact disc changer. | Re-insert the magazine. Refer to the instruction manual of the compact disc changer. |
| E--2 | No discs are loaded into the disc magazine. | Insert discs properly. Refer to the instruction manual of the compact disc changer. |
| E--3 | Focus error. | Check that the discs are loaded properly into the disc magazine (right side up, etc.) |
| E--4 | Problem with the compact disc changer. | Reset the unit by pressing the reset button. If this does not correct the problem, consult an AIWA service center. |
| E--5 | The compact disc changer is overheated. | Allow the changer to cool off by moving the vehicle out of direct sunlight. |
Reset button
The reset button is visible when you detach the control panel. Try pressing this button if a connected compact disc changer does not operate properly. When you press this button, use the tip of a pointed object such as a pencil or toothpick.
Note that the memory contents, however, will be erased by pressing this button.

Reset button (CD CHANGER)
The reset button is visible when the disc magazine door is opened. Press this button in the following cases:
- All the connections have been completed.
- The unit malfunctions. (For example, the unit does not load a CD properly.)
- An error code appears in the display window of the connected car stereo.
When you press this button, use the tip of ball-point pen or any similar pointed object.

- TABLE OF CONTENTS
- CAUTION
- PRECAUTIONS
- Notes on CDs
- DETACHING THE CONTROL PANEL
- Note
- Attaching the control panel
- CONTROL PANEL
- To turn off the unit
- SELECTING FUNCTION
- To select the function
- SOUND ADJUSTMENTS
- LOUD (loudness) function
- To set the turn-on volume level
- RADIO OPERATION
- Press any button (except ↩) to turn on the unit.
- Press BAND to select the desired band from FM1, FM2, FM3, and AM.
- Press TUNE √/∧ repeatedly to tune in the desired station.
- Adjust the volume with + or -.
- Seek Tuning
- To turn off the radio
- PRESETTING STATIONS
- Automatic Presetting
- To scan the preset stations
- To tune in the preset stations
- CD PLAYBACK
- Insert a disc with the labeled side up to start playback.
- Adjust the volume with + or - .
- Intro Play
- Repeat Play
- Random Play
- PROGRAM PLAY
- Press PROG.
- Select a desired track by pressing SEEKI◄◄/►► until its number is displayed.
- Press PROG to set the track in the program memory.
- Repeat steps 2 and 3 to set other tracks.
- To start the program play, press ▶II.
- To confirm the programmed tracks
- SETTING THE CLOCK
- Press and hold down BAND.
- CD CHANGER (CDC-X20M only)
- To switch to another disc
- SPECIFICATIONS
- RADIO SECTION
- FM
- AM
- CD SECTION
- AUDIO SECTION
- GENERAL
- TROUBLESHOOTING
- Reset button
- Reset button (CD CHANGER)
Brand : AIWA
Model : CDC-X15
Category : Car radio