MWG 731 H - Microwaves CLATRONIC - Free user manual and instructions
Find the device manual for free MWG 731 H CLATRONIC in PDF.

| Product type | Microwave with grill and hot air |
| Brand | Clatronic |
| Model | MWG 731 H |
| Power supply | 230 V, 50 Hz |
| Main functions | Microwave, Grill, Hot air, Combined microwave+grill, Combined microwave+hot air, Quick defrost, Multi-stage cooking |
| Microwave power levels | 10 levels (100% to 10%) |
| Hot air temperatures | 10 settings from 95°C to 230°C |
| Timer | Up to 95 minutes |
| Child safety | Yes (key lock) |
| Turntable | Yes |
| Grill | Yes, with grill rack |
| Included accessories | Glass tray, guide ring, grill rack |
| Capacity (approx.) | Approx. 20 L |
| Dimensions (W x D x H, approx.) | 450 x 350 x 300 mm |
| Weight (approx.) | 12 kg |
| Cleaning | Damp cloth for interior, accessories hand-washable |
| Warranty | 24 months |
| Repairability | Do not repair yourself, contact a qualified technician |
| Safety instructions | Read the manual carefully, do not heat liquids in sealed containers, risk of delayed boiling |
| Automatic programs | 8 pre-set programs for different foods and weights |
Frequently Asked Questions - MWG 731 H CLATRONIC
User questions about MWG 731 H CLATRONIC
0 question about this device. Answer the ones you know or ask your own.
Ask a new question about this device
Download the instructions for your Microwaves in PDF format for free! Find your manual MWG 731 H - CLATRONIC and take your electronic device back in hand. On this page are published all the documents necessary for the use of your device. MWG 731 H by CLATRONIC.
USER MANUAL MWG 731 H CLATRONIC
natural_image
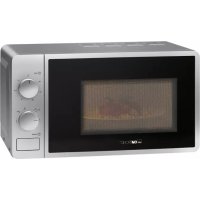
Exterior view of a silver MiKONIC microwave oven with digital display and control buttons (no text or symbols on main body)MWG 731 H
Inhalt
Contents
D Übersicht Bedienelemente . . . . . . . . . . . . . . . . . . . . . . . . . . . . . . . . . . . . . . . . . . . . . . . . . . . . . . . . . . . . . . . . . . . . . . . . . . . . . . . . . .
General Safety Instructions
- Read the operating instructions carefully before putting the appliance into operation and keep the instructions including the warranty, the receipt and, if possible, the box with the internal packing.
- The appliance is designed exclusively for private use and for the envisaged purpose. This appliance is not fit for commercial use. Do not use it outdoors (except if it is designed to be used outdoors). Keep it away from sources of heat, direct sunlight, humidity (never dip it into any liquid) and sharp edges. Do not use the appliance with wet hands. If the appliance is humid or wet, unplug it immediately. Do not put it in water.
- When cleaning or putting it away, switch off the appliance and always pull out the plug from the socket (pull on the plug, not the cable) if the appliance is not being used and remove the attached accessories.
- Never leave the appliance unsupervised. To protect children from the dangers posed by electrical appliances, make sure that the cable is hanging low and that children do not have access to the appliance.
- Check the appliance and the cable for damage on a regular basis. Do not use the appliance if it is damaged.
- Do not try to repair the appliance on your own. Always contact an authorized technician. To avoid the exposure to danger, always have a faulty cable be replaced only by the manufacturer, by our customer service or by a qualified person and with a cable of the same type.
- Use only original spare parts.
- Pay careful attention to the following "Special Safety Instructions".
Special Safety Instructions for this Machine
- WARNING! DELAYED BOILING! During boiling, in particular when liquids (water) are re-heated, it is possible that the boiling temperature has been reached but some of the typical bubbles of steam have not yet started to rise. The liquid does not boil evenly. This so-called delayed boiling may lead to the sudden formation of bubbles of steam and boiling over when the vessel is removed and slightly shaken. There is a danger of scalding! So that boiling is even, place a glass rod or the like - but nothing metal - into the vessel.
- Do not warm liquids in closed vessels. Danger of explosion.
- If smoke is produced turn the device off and remove the mains plug. Keep the door closed in order to smother any flames that might arise.
- The contents of baby bottles and jars of baby food must be stirred or shaken and the temperature checked prior to consumption. Danger of burning!
- Please do not attempt to repair the equipment yourself. After removal of the cover you risk being affected by micro wave radiation.
Overview of the Controls
1 Door lock 4 Drive axle 7 Timer
2 Viewing window* 5 Slide ring 8 Grill heating
3 Cover** 6 Revolving tray 9 Grill stand
* Please never remove the foil on the inside!
** Please never remove the cover!
Information concerning grill and combined operation
- As irradiated heat is used during grill and combined operation please use only heat-resistant tableware.
- When operating the grill alone only metallic or aluminium tableware may be used - but not during combined or microwave operation.
- Do not place anything on top of the housing, as this becomes hot. Always keep the ventilation slits clear.
- Please use the grill stand to bring the food to be cooked up to the heating element.
Initial Operation
- In case you would like to place resp. build your micro wave oven in a cubboard or cabinet please make sure to keep a safety distance to the cubboard of 10 cm on each side of the equipment.
- Remove all the accessories from the oven compartment, unpack them and place the sliding ring in the middle. Position the glass plate on the drive axle such that the plate fits into the hollow sections of the drive shaft and is lying level.
- Inspect the machine for visible damage, in particular in the area of the door. If any type of damage whatsoever is found, the machine must not be used.
- In order that there is no interference from other electrical equipment during the operation of the microwave oven, do not place your machine in the direct vicinity of other electronic equipment.
- Remove any adhesive protective foil from the housing.
- Please never remove the films on the inner side of the door!
- Insert the plug into a correctly installed safety socket of 230 V, 50 Hz.
- Do not remove any fitted parts from the oven interior nor from the inside of the door!
Setting the Time
- Please press the CLOCK/TIMER button.
- Turn the TIME/MENU regulator until the desired hour is set.
- In order to set the minutes, please press the CLOCK/TIMER button again and then turn the TIME/MENU regulator until the desired minutes display is reached.
- Please press the CLOCK/TIMER button again; the set time will now appear in the display.
GB
Using the Oven
What you should know about microwave operation:
- Your oven works with microwave radiation which heats up water particles in food in a very short time. There is no heat radiation and therefore no browning. For this reason the machine is not suitable for drying objects.
- Only food should be heated with this oven.
• The machine is not suitable for baking in deep fat. - Do not heat too large quantities at the same time, otherwise the machine will be less efficient.
- In order to interrupt the cooking process, please press the STOP/RESET button.
- Do not heat any enclosed food such as eggs, sausages, preservatives in jars, etc, as there is a danger of explosion!
- Microwaves supply a great deal of energy immediately. Pre-heating is therefore unnecessary.
- The microwave oven does not replace the traditional cooker. It mainly serves for:
- defrosting frozen or deep frozen food
- rapidly warming up or heat food or drinks
- some types of cooking food
- Only suitable tableware should be used, such as:
- glass, porcelain, ceramics, heat-resistant plastic or special microwave crockery.
- Please do not us plastic or paper dishes like plates, cups etc.
- In the table below you will find general instructions on selecting the kitchenware and utensils.
| Machine Microwave Grill Hot Air Combination | ||||
| Heat-resistant glass YES YES YES YES YES | ||||
| Glass not resistant to heat NO NO NO NO | ||||
| Heat-resistant ceramics YES YES YES YES YES YES YES YES YES YES YES YES YES YES YES YES YES YES YES YES YES YES YES YES YES YES YES YES YES YES YES YES YES YES YES YES YES YES YES YES YES YES YES YES YES YES YES YES YES YES YES YES YES YES YES YES YES YES YES YES YES YES YES YES YES YES YES YES YES YES YES YES YES YES YES YES YES YES YES YES YES YES YES YES YES YES YES YES YES YES YES YES YES YES YES YES YES YES YES YES Yes YES YES YES YES YES YES YES YES YES YES YES YES YES YES YES YES YES YES YES YES YES YES YES YES YES YES YES YES YES YES YES YES YES YES YES YES YES YES YES YES YES YES YES YES YES YES YES YES YES YES YES YES YES YES YES YES YES YES YES YES YES YES YES YES YES YES YES YES YES YES YES YES YES YES YES YES YES YES YES YES YES YES YES YES YES YES YES YES YES YES YES YES YES YES YES YES YES YES YES YOY | Air Combination | |||
| Heat-resistant glass YES YES YES YES YES YES YES YES YES YES YES YES YES YES YES YES YES YES YES YES YES YES YES YES YES YES YES YES YES YES YES YES YES YES YES YES YES YES YES YES YES YES YES YES YES YES YES YES YES YES YES YES YES YES YES YES YES YES YES YES YES YES YES YES YES YES YES YES YES YES YES YES YES YES YES YES YES YES YES YES YES YES YES YES YES YES YES YES YES YES YES YES YES YES YES YES YES YES YESYES YES YES YES YES YES YES YES YES YES YES YES YES YES YES YES YES YES YES YES YES YES YES YES YES YES YES YES YES YES YES YES YES YES YES YES YES YES YES YES YES YES YES YES YES YES YES YES YES YES YES YES YES YES YES YES YES YES YES YES YES YES YES YES YES YES YES YES YES YES YES YES YES YES YES YES YES YES YES YES YES YES YES YES YES YES YES YES YES YES YES YES YES YES YES YES YES YES YES YES | Air Combination | |||
| Heat-resistant glass YES YES YES YES YES YES YES YES YES YES YES YES YES YES YES YES YES YES YES YES YES YES YES YES YES YES YES YES YES YES YES YES YES YES YES YES YES YES YES YES YES YES YES YES YES YES YES YES YES YES YES YES YES YES YES YES YES YES YES YES YES YES YES YES YES YES YES YES YES YES YES YES YES YES YES YES YES YES YES YES YES YES YES YES YES YES YES Yes | Air Combination | |||
| Heat-resistant glass YES YES YES YES YES YES YES YES YES YES YES YES YES YES YES YES YES YES YES YES YES YES YES YES YES YES YES YES YES YES YES YES YES YES YES YES YES YES YES YES YES YES YES YES YES YES YES YES YES YES YES YES YES YES YES YES YES YES YES YES YES YES YES YES YES YES YES YES YES YES YES YES YES YES YES YES YES YES YES YES YES YES YES YES YES YES YES | Air Combination | |||
| Heat-resistant glass Yes No Yes Yes Yes Yes Yes Yes Yes Yes Yes Yes Yes Yes Yes Yes Yes Yes Yes Yes Yes Yes Yes Yes Yes Yes Yes Yes Yes Yes Yes Yes Yes Yes Yes Yes Yes Yes Yes Yes Yes Yes Yes Yes Yes Yes Yes Yes Yes Yes Yes Yes Yes Yes Yes Yes Yes Yes Yes Yes Yes Yes Yes Yes Yes Yes Yes Yes Yes Yes Yes Yes Yes Yes Yes Yes Yes Yes Yes Yes Yes Yes Yes Yes Yes Yes Yes Yes Yes Yes Yes Yes Yes Yes Yes Yes Yes Yes Yes Yes Yes YesYes Yes Yes Yes Yes Yes Yes Yes Yes Yes Yes Yes Yes Yes Yes Yes Yes Yes Yes Yes Yes Yes Yes Yes Yes Yes Yes Yes Yes Yes Yes Yes Yes Yes Yes Yes Yes Yes Yes Yes Yes Yes Yes Yes Yes Yes Yes Yes Yes Yes Yes Yes Yes Yes Yes Yes Yes Yes Yes Yes Yes Yes Yes Yes Yes Yes Yes Yes Yes Yes Yes Yes Yes Yes Yes Yes Yes Yes Yes Yes Yes Yes Yes Yes Yes Yes Yes Yes Yes Yes Yes Yes Yes Yes Yes Yes Yes Yes Yes Yes | Air Combination | |||
| Heat-resistant glass Yes No Yes Yes Yes Yes Yes Yes Yes Yes Yes Yes Yes Yes Yes Yes Yes Yes Yes Yes Yes Yes Yes Yes Yes Yes Yes Yes Yes Yes Yes Yes Yes Yes Yes Yes Yes Yes Yes Yes Yes Yes Yes Yes Yes Yes Yes Yes Yes Yes Yes Yes Yes Yes Yes Yes Yes Yes Yes Yes Yes Yes Yes Yes Yes Yes Yes Yes Yes Yes Yes Yes Yes Yes Yes Yes Yes Yes Yes Yes Yes Yes Yes Yes Yes Yes YesYes Yes Yes Yes Yes Yes Yes Yes Yes Yes Yes Yes Yes YesYes Yes Yes Yes Yes Yes Yes Yes Yes Yes Yes Yes Yes Yes Yes Yes Yes Yes Yes Yes Yes Yes Yes Yes Yes Yes Yes Yes Yes Yes Yes Yes Yes Yes Yes Yes Yes Yes Yes Yes Yes Yes Yes Yes Yes Yes Yes Yes Yes Yes Yes Yes Yes Yes Yes Yes Yes Yes Yes Yes Yes Yes Yes Yes Yes Yes Yes Yes Yes Yes Yes Yes Yes Yes Yes Yes Yes Yes Yes Yes Yes Yes Yes Yes Yes YesYes Yes Yes Yes Yes Yes Yes Yes Yes Yes Yes Yes Yes YesyesYes Yes Yes Yes Yes Yes Yes Yes Yes Yes Yes Yes Yes Yes Yes Yes Yes Yes Yes Yes Yes Yes Yes Yes Yes Yes Yes Yes Yes Yes Yes Yes Yes Yes Yes Yes Yes Yes Yes Yes Yes Yes Yes Yes Yes Yes Yes Yes Yes Yes Yes Yes Yes Yes Yes Yes Yes Yes Yes Yes Yes Yes Yes Yes Yes Yes Yes Yes Yes Yes Yes Yes Yes Yes Yes Yes Yes Yes Yes Yes Yes Yes Yes Yes Yes Yes Yes Yes Yes Yes Yes Yes Yes Yes Yes Yes Yes Yes YesYesYes Yes Yes Yes Yes Yes Yes Yes Yes Yes Yes Yes Yes Yes Yes Yes Yes Yes Yes Yes Yes Yes Yes Yes Yes Yes Yes Yes Yes Yes Yes Yes Yes Yes Yes Yes Yes Yes Yes Yes Yes Yes Yes Yes Yes Yes Yes Yes Yes Yes Yes Yes Yes Yes Yes Yes Yes Yes Yes Yes Yes Yes Yes Yes Yes Yes Yes Yes Yes Yes Yes Yes Yes Yes Yes Yes Yes Yes Yes Yes Yes Yes Yes Yes Yes Yes Yes Yes Yes Yes Yes Yes Yes Yes Yes Yes Yes Yes Yes | Heat-resistant glass Yes No Yes Yes Yes Yes Yes Yes Yes Yes Yes Yes Yes Yes Yes Yes Yes Yes Yes Yes Yes Yes Yes Yes Yes Yes Yes Yes Yes Yes Yes Yes Yes Yes Yes Yes Yes Yes Yes Yes Yes Yes Yes Yes Yes Yes Yes Yes Yes Yes Yes Yes Yes Yes Yes Yes Yes Yes Yes Yes Yes Yes Yes Yes Yes Yes Yes Yes Yes Yes Yes Yes Yes Yes Yes Yes Yes Yes Yes Yes Yes Yes Yes Yes Yes Yes Yes Yes Yes Yes Yes Yes Yes Yes YesYesYesYesYesYesYesYesYesYesYesYesYesYesYesYesYesYesYesYesYesYesYesYesYesYesYesYesYesYesYesYesYesYesYesYesYesYesYesYesYesYesYesYesYesYesYesYesYesYesYesYesYesYesYesYesYesYesYesYesYesYesYesYesYesYesYesYesYesYesYesYesYesYesYesYesYesYesYesYesYesYesYesYesYesYesYesYesYesYesYesYesYesYesYesYesYesYesYesYesYes YesYesYesYesYesYesYesYesYesYesYesYesYesYesYesYesYesYesYesYesYesYesYesYesYesYesYesYesYesYesYesYesYesYesYesYesYesYesYesYesYesYesYesYesYesYesYesYesYesYesYesYesYesYesYesYesYesYesYesYesYesYesYesYesYesYesYesYesYesYesYesYesYesYesYesYesYesYesYesYesYesYesYesYesYesYesYesYesYesYesYesYesYesYesYesYesYesYesYes Yes | Air Combination | ||
| Heat-resistant glass Yes No Yes Yes Yes Yes Yes Yes Yes Yes Yes Yes Yes Yes Yes Yes Yes Yes Yes Yes Yes Yes Yes Yes Yes Yes Yes Yes Yes Yes Yes Yes Yes Yes Yes Yes Yes Yes Yes Yes Yes Yes Yes Yes Yes Yes Yes Yes Yes Yes Yes Yes Yes Yes Yes Yes Yes Yes Yes Yes Yes Yes Yes Yes Yes Yes Yes Yes Yes Yes Yes Yes Yes Yes Yes Yes Yes Yes Yes Yes Yes Yes Yes Yes Yes Yes Yes Yes Yes Yes YesYesYesYesYesYesYesYesYesYesYesyesYesYesyesYesyesYesyesyesYesyesyesyesyesyesyesyesyesyesyesyesyesyesyesyesyesyesyesyesyesyesyesyesyesyesyesyesyesyesyesyesyesyesyesyesyesyesyesyesyesyesyesyesyesyesyesyesyesyesyesyesyesyesyesyesyesyesyesyesyesyesyesyesyesyesyesyesyesyesyesyesyesyesyesyesyesyesyesyesyesyesyesyesyesyesyesyesyesyesyesyesyesyesyesyesyesyesyesyesyesys | Air Combination | |||
| Heat-resistant glass Yes No Yes Yes Yes Yes Yes Yes Yes Yes Yes Yes Yes Yes Yes Yes Yes Yes Yes Yes Yes Yes Yes Yes Yes Yes Yes Yes Yes Yes Yes Yes Yes Yes Yes Yes Yes Yes Yes Yes Yes Yes Yes Yes Yes Yes Yes Yes Yes Yes Yes Yes Yes Yes Yes Yes Yes Yes Yes Yes Yes Yes Yes Yes Yes Yes Yes Yes Yes Yes Yes Yes Yes Yes Yes Yes Yes Yes Yes YesYesYesYesYesYesYesYesYesYesYesYesYesYesYesYesYesYesYesYesYesYesyesYesYesYesYesYesYesYesYesYesYesYesYesYesYesYesYesYesYesYesYesYesYesYesYesYesYesYesYesYesYesYesYesYesYesYesYesYesYesYesYesYesYesYesYesYesYesYesYesYesYesYesYesYesYesYesYesYesYesYesYesYesYesYesYesYesYesYesYesYesYesYesYesYesYesYesYesYesYesYesYesYesYesYesYesYesYesYesYesYesYesYesYesYesYesYesYesYesYesYesyes | Air Combination | |||
| Heat-resistant glass Yes No Yes Yes Yes Yes Yes Yes Yes Yes Yes Yes Yes Yes Yes Yes Yes Yes Yes Yes Yes Yes Yes Yes Yes Yes Yes Yes Yes Yes Yes Yes Yes Yes Yes Yes Yes Yes Yes Yes Yes Yes Yes Yes Yes Yes Yes Yes Yes Yes Yes Yes Yes Yes Yes Yes Yes Yes Yes Yes Yes Yes YesYesYesYesYesYesYesYesYesYesYesYesYesYesYesYesYesYesYesYesYesYesYesYesYesYesYesYesYesYesYesYesYesYesYesYesYesYesYesyes | Air Combination | |||
| Heat-resistant glass Yes No Yes Yes Yes Yes Yes Yes Yes Yes Yes Yes Yes Yes Yes Yes Yes Yes Yes Yes Yes Yes Yes Yes Yes Yes Yes Yes Yes Yes Yes Yes Yes Yes Yes Yes Yes Yes Yes Yes Yes Yes Yes Yes YesYesYesYesYesYesYesYesYesYesYesYesYesYesYesYesYesYesYesYesYesYesYesYesYesYesYesYesYesYesYesYesYesYesYesYesYesYesYesYesYesYesYesYesYesYesYesYesYesYesYesYesYesYesYesYesYesyes | Air Combination | |||
| Heat-resistant glass Yes No Yes Yes Yes Yes Yes Yes Yes Yes Yes Yes Yes Yes Yes Yes Yes Yes Yes Yes Yes Yes Yes Yes Yes Yes Yes Yes Yes YesYesYesYesYesYesYesYesYesYesYesYesYesYesYesYesYesYesYesYesYesYesYesYesYesYesYesYesYesYesYesYesYesYesYesYesYesYesYesYesYesYesYesYesYesYesYesYesYesYesYesYesYesYesYesYesYesYesYesYesYesYesYesYesYesYesYesYesYesYesYesYesyes | Air Combination | |||
| Heat-resistant glass Yes No Yes Yes Yes Yes Yes Yes Yes Yes Yes Yes Yes Yes YesYesYesYesYesYesYesYesYesYesYesYesYesYesYesYesYesYesYesYesYesYesYesYesYesYesYesYesYesYesYesYesYesYesYesYesYesYesYesYesYesYesYesYesYesYesYesYesYesYesYesYesYesYesYesYesYesYesYesYesYesYesYesYesYesYesYesYesYesYesYesYesYesYesYesYesYesYesYesYesYesYesYesYesYesYesYesyes | Air Combination | |||
| Heat-resistant glass yes | Air Combination | |||
| Glass not resistant to heat no | NO NO NO | |||
| Heat-resistant ceramics | YES YES YES | |||
| Microwave plastic tableware | YES NO NO NO | |||
| Kitchen paper | YES NO NO NO | |||
| Metal tray | NO YES YESYES | YESYES | NOYES | NO |
| Metal grill stand | NO YES YESYES | YESYES | NOYES | NO |
| Aluminium foil/container | YESYES | YESYES | YESYES | NO |
Operation only as a Microwave
- Place the food to be heated in a suitable piece of tableware.
- Open the door and place the vessel in the middle of the glass plate. Then close the door. (For safety reasons the oven only operates when the door is tightly closed.)
-
Please press the MICROWAVE button.
-
Set the desired cooking time using the TIME/MENU regulator. The cooking time depends on the quantity and constitution of the contents. With a little practice you will quickly learn to estimate the cooking time.
GB
Please note:
- Preparation of food in the microwave is very much faster than in a standard oven. If you are not sure of what cooking times to set, start on a low level and continue cooking the food again if necessary.
- The control lamp in the START button flashes. Please press the START button. The machine will switch on automatically and the lamp in the interior of the oven will light up.
- After the time has finished, the machine will switch off automatically. You can then remove the food.
Please note:
A cover should be placed over the food when operating the microwave.
How to set the various power levels (in %) for microwave operation
| In order to select the percentages, press the MICROWAVE button | ||
| Press: Power Description | ||
| 1x 100% (P-HI) Full power | ||
| 2x 90% (P-90) | ||
| 3x 80% (P-80) | ||
| 4x 70% (P-70) High | ||
| 5x 60% (P-60) | ||
| 6x 50% (P-50) Medium | ||
| 7x 40% (P-40) | ||
| 8x 30% (P-30) Low | ||
| 9x 20 % (P-20) | ||
| 10x | 10 % (P-10) | Very low |
| 11x 0% (P-0) | ||
Operation only as a Grill
The grill function is particularly suited to grilling items which need to be cooked for a short time, as well as steaks, cutlets, kebabs, sausages and small pieces of chicken and turkey. In the same way you can use the grill function to prepare dishes which need to the browned on top.
GB
If for example you would like to use the grill for 12 minutes, proceed as follows:
- Please ensure that no programmes are still activated.
- Press the GRILL function button.
- Turn the TIME/MENU regulator to 12:00.
- Please press the START button.
When the grill function is used, the maximum power is automatically selected. The maximum grill duration is 95 minutes.
Operation only with Hot Air
During cooking with hot air, the hot air circulates in the interior of the oven. This causes the food to brown more quickly and become crisper. The microwave oven can be programmed for up to 10 different temperatures and for up to 9 hours and 30 minutes.
Cooking with Hot Air
Please press the HOT AIR button and set the desired temperature.
| Press: Temperature °C | |
| 1x 230 | |
| 2x 215 | |
| 3x 200 | |
| 4x 185 | |
| 5x 170 | |
| 6x 155 | |
| 7x 140 | |
| 8x 125 | |
| 9x 110 | |
| 10x 95 |
Assuming that you would like to cook at 185^ C for 40 minutes, proceed as follows:
- Please press the HOT AIR button four times.
- Turn the TIME/MENU regulator clockwise to 40. The display will now show "H 40". "H" stands for hour, and the number "40" stands for the minutes that have been set. Please note that it is not possible to set the number of seconds.
- Now press the START button.
- "40:00" appears in the display.
Please note:
- It is possible to program up to 9 hours and 30 minutes. After the time has elapsed 4 acoustic signals sound and the word "END" appears in the display. Press the STOP/RESET button or open the door. The word "END" will disappear.
- While cooking with hot air it is possible to check the temperature by pressing the HOT AIR button.
Preheating and Cooking with Hot Air
You can program your microwave oven in such a way that the microwave can be preheated and the hot air then used.
Assuming you would like to preheat the oven to 170^ C and then cook for 35 minutes:
- Please press the HOT AIR button five times.
- Then press the START button. PREH now flashes in the display.
- Once the oven reaches the programmed temperature, a signal is sounded and PREH lights up.
- Please open the door and place the items to be cooked in the middle of the rotating plate.
- Turn the TIME/MENU regulator and set the time to "35".
- Press the START button again.
Combined Use of the Grill and Microwave
This combination allows you to use the grill and the microwave on two different settings.
-
Please press the GRILL+MICROWAVE button once* or twice** (see the Combination 1 and 2 below) in order to set the desired combination.
-
Now set the desired time using the TIME/MENU regulator. After you have pressed the START button the time begins to count down.
Please note:
- Here it is possible to set up to 95 minutes.
- You can see the settings during cooking by pressing the GRILL+MICROWAVE button.
Combination 1\*
The maximum cooking time that can be set here is 95 minutes. The percentage distribution of grill and microwave is 70% for the grill and 30% for the microwave.
Assuming you would like to select combination 1 for 25 minutes:
- Please press the STOP/RESET button.
- Then press the GRILL+MICROWAVE button once.
GB
- Please set the time to "25".
- Then press the START button.
Combination 2\*\*
The maximum cooking time that can be set here is also 95 minutes.
The percentage distribution of grill and microwave is 55% for the microwave and 45% for the grill. This function can be used for omelettes, gratinated potatoes and poultry.
Assuming you would like to use combination 2 for 12 minutes:
- Please press the STOP/RESET button.
- Press the GRILL+MICROWAVE button twice.
- Turn the TIME/MENU regulator to "12".
- Then press the START button.
Combined Use of Hot Air and Microwave
The device has 4 pre-programmed settings. This makes it easier for you to work both with hot air and with the microwave function.
Please press the HOT AIR+MICROWAVE button in order to select the hot air temperatures.
| Program | Press | Temperature |
| COMB 1 1x 230 | ||
| COMB 2 2x 200 | ||
| COMB 3 3x 180 | ||
| COMB 4 4x 150 |
(°C)
If you would like to set a time of 25 minutes by using "COMB 3", in order to bake a cake for example:
- Please press the HOT AIR+MICROWAVE button three times.
- Turn the TIME/MENU regulator to the desired time (25).
- Start the process with the START button.
Please note:
The maximum time that can be programmed is 9 hours, 30 minutes. After the time has finished, 4 acoustic signals are sounded and the word "END" appears in the display. Press the STOP/RESET button or open the door. The word "END" disappears.
During cooking with hot air you can check the temperature by pressing the HOT AIR+MICROWAVE button.
Rapid Defrosting of Frozen Food
Assuming that you would like to defrost frozen food and set the time to 5 minutes:
- Set the TIME/MENU regulator to "08". Please press the IND. button (individual).
- Then use the TIME/MENU regulator to set the desired time (5:00 min).
Please note:
- As a general rule, 500 g of frozen food requires approx. 5 minutes to defrost.
- If the frozen food has not fully defrosted after this time, set the time at 1 minute intervals.
If the frozen food was frozen in a plastic container, we recommend that the frozen food is briefly defrosted and then transferred to kitchenware which is suitable for use in a microwave.
The maximum time that can be set for defrosting is 45 minutes.
After this time has expired, 4 acoustic signals are sounded and the word "END" appears in the display. Press the STOP/RESET button or open the door. The word "END" disappears.
Cooking in Several Steps
You can set the programmes in such a way that it is possible to select three different functions.
Assuming you select the following program for cooking:
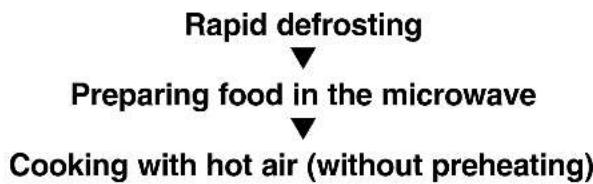
flowchart
graph TD
    A["Rapid defrosting"] --> B["Preparing food in the microwave"]
    B --> C["Cooking with hot air (without preheating)"]
- Turn the TIME/MENU regulator to "08". The word "Code" appears in the display.
- Press in the IND. button (individual).
- Then use the TIME/MENU regulator to select the desired time for defrosting.
- Please press the MICROWAVE button to start the machine.
- Press the TIME/MENU regulator again and set the desired time.
- Press the HOT AIR button and choose the desired time.
- Turn the TIME/MENU regulator.
- Press the START button.
GB
Preset Programmes
| Codes | CODE number in the display | Quantity stated Press the Cooking time in grams "IND" button in minutes | |
| 01 1 | 40-200g 1x 5:40 | ||
| 2 280-400g 2x 9:40 | |||
| 3 420-600g 3x 13:00 | |||
| 4 560-800g 4x 17:00 | |||
| 02 1 | 250-310g 1x 2:20 | ||
| 2 500-620g 2x 4:00 | |||
| 3 750-930g 3x 5:40 | |||
| 4 1000-1240g 4x 7:20 | |||
| 03 - Without separate setting of the weight 2x Ind. time selection | |||
| 04 - Without separate setting of the weight 1x 3:40 | |||
| 05 - Without separate setting of the weight 2x 3:30 | |||
| 06 1 | 170g 1x 12:00 | ||
| 2 | 300g | 2x 15:00 | |
| 3 | 540g | 3x 23:00 | |
| 4 | 800g | 4x 30:00 | |
| 07 - | - 1x 40:002x | Ind. time selection | |
| 08 - | - 1x Defrosting with ind. time selection | ||
If you would like to heat up a pizza for example with a weight of approx. 120g - 140g, please proceed as follows:
- Turn the TIME/MENU button to "05" and "CODE" appears in the display.
- Press the IND button once and the baking time (1:10 min) appears.
- Press the START button.
- In order to heat up a pizza with a higher weight, please press the TIME/MENU button until "05" appears.
- Press the IND button twice and the baking time (3:30 min) is displayed.
- Then press the START button.
Please note:
Individual Cooking Program
- Please turn the TIME/MENU regulator to code number "07". The word "Code" appears in the display.
- Press the IND button. The stored time appears in the display.
- In order to change the stored time, press the IND button again. Now use the TIME/MENU regulator to set the desired cooking time.
- Press the START button.
This time will now remain in the memory until you enter a new time or the mains power supply is disconnected.
Additional Practical Tips
TIMER:
- Keep the CLOCK/TIMER button pressed for 3 seconds.
- Turn the TIME/MENU regulator to the desired time and this will then appear in the display.
- Press the START button.
This program can be used parallel to the microwave program, the grill and the hot air program.
Please note:
The maximum time that can be set is 95 minutes. The time which is counting down remains visible in the display for 3 seconds. The clock or the cooking time then reappears in the display. Once the set time has expired, a long sound is heard.
Press the CLOCK/TIMER button and then the STOP/RESET button in order to stop the clock.
Child Lock
The child lock protects the device from being used by children without supervision. The child lock is activated as follows:
Keep the STOP/RESET button pressed down for 3 seconds. A signal is heard and the word "LOCK" appears in the display. All buttons are now blocked.
The child lock is deactivated as follows:
Repeat the above procedure. The word "LOCK" disappears.
Fast Start/Stop
You can use this setting for procedures which are often repeated. The microwave then runs at 100%.
Press the START button at rapid intervals in order to set the cooking time. The maximum switch-on time is limited to 10 minutes. The microwave starts automati-
GB
cally after 2 seconds. After the time has expired a signal is sounded and the word "END" appears in the display. The display goes off when the STOP/RESET button is pressed or the door is opened.
You can interrupt the running time as follows:
- Press the STOP/RESET button once (the lamp in the START button flashes). In order to continue the process, press the START button again.
- If you would like to interrupt the process, press the STOP/RESET button.
- Instead of pressing the STOP/RESET button you can also interrupt the running time by opening the door.
You will find recipe books at specialist bookshops.
Cleaning
- Disconnect the oven from the power supply.
- Clean the inside of the oven after use with a slightly damp cloth.
- Clean the accessories in the usual way in soapy water.
- The door frame and seal and neighbouring parts must be cleaned carefully when dirty with a damp cloth.
This device has been tested according to all relevant current CE guidelines, such as electromagnetic compatibility and low voltage directives, and has been constructed in accordance with the latest safety regulations.
Subject to technical changes without prior notice!
Guarantee
The device supplied by our Company is covered by a 24 month guarantee starting on the date of purchase (receipt).
During the life of the guarantee any fault of the device or its accessories *) ascribable to material or manufacturing defects will be eliminated free of charge by repairing or, at our discretion, by replacing it. The guarantee services do not entail an extension of the life of the guarantee nor do they give rise to any right to a new guarantee!
Proof of the guarantee is provided by the proof of purchase. Without proof of purchase no free replacement or repair will be carried out.
If you wish to make a claim under the guarantee please return the entire machine in the original packaging to your dealer together with the receipt.
*) Damage to accessories does not mean automatic free replacement of the whole machine. In such cases please contact our hotline. Broken glass or breakage of plastic parts are always subject to a charge.
Defects to consumables or parts subject to wearing (e.g. motor pistons, kneading blades, drive shafts, spare remote control, spare toothbrushes, saw blades, etc.) as well as cleaning, maintenance or the replacement of said parts are not covered by the guarantee and hence are to be paid!
The guarantee lapses in case of unauthorized tampering.
After the expiry of the guarantee
After the expiry of the guarantee repairs can be carried by the competent dealer or repair service against the payment of the ensuing costs.