
TravelPilot 43 - Gps BLAUPUNKT - Free user manual and instructions
Find the device manual for free TravelPilot 43 BLAUPUNKT in PDF.
| Product type | Car navigation GPS |
| Brand | Blaupunkt |
| Model | TravelPilot 43 |
| Dimensions (estimated) | 120 x 80 x 15 mm |
| Weight (estimated) | 150 g |
| Power supply | Built-in rechargeable battery, charging via USB port (car charger included) |
| Screen | Color touch screen (approx. 4.3 inches diagonal) |
| Main functions | GPS navigation, built-in TMC receiver for traffic info, address search, points of interest (POI), route planning, voice assistant, preloaded maps |
| Connectivity | Mini-USB port, microSD card slot, GPS receiver, TMC antenna integrated into charger cable |
| Included accessories | Cigarette lighter charger, mini-USB cable, windshield mount (typical) |
| Safety | Do not use while driving; do not expose to prolonged sunlight; use the provided car mount to avoid obstructing visibility |
| Maintenance and cleaning | Clean with a soft, dry cloth; do not use sharp objects on the screen |
| Warranty | 24 months from date of purchase (subject to presentation of proof of purchase) |
| After-sales service | Contact via blaupunkt.de or https://blaupunkt.rma-service.com |
| Compliance | Directive 1999/5/EC (declaration available on www.blaupunkt.de) |
Frequently Asked Questions - TravelPilot 43 BLAUPUNKT
User questions about TravelPilot 43 BLAUPUNKT
0 question about this device. Answer the ones you know or ask your own.
Ask a new question about this device
Download the instructions for your Gps in PDF format for free! Find your manual TravelPilot 43 - BLAUPUNKT and take your electronic device back in hand. On this page are published all the documents necessary for the use of your device. TravelPilot 43 by BLAUPUNKT.
USER MANUAL TravelPilot 43 BLAUPUNKT
First Service Center
Kleine Duselstr. 21
DE-30171 Hannover
Thank you for buying the Blaupunkt navigation system.
A good choice. We wish you a lot of fun and congestion-free kilometres with your new Blaupunkt navigation system.
In the worst case we will help you.
For technical questions and / or problems, please contact us by phone at +49 (0)511 / 123 83 506 or via E-Mail to support@first-servicecenter.de
The complete manuals for the hardware and software and manuals for other languages can be downloaded as well from www.blaupunkt.de
Please register your product as soon as possible on our website. This will give you benefits such as latest software and the latest map data, etc. - Most of it, of course, free.
Updates and additional maps, you can also order over our website www.blaupunkt.de.
Dear Customer,
Thanks for using a navigation system of Blaupunkt.
- Blaupunkt reserves the rights of final interpretation of the manual.
The product is subject change without notice. Please accept our apology for your inconvenience. - Please back up your data and information in the GPS navigator. Blaupunkt assumes no responsibility for any loss caused by material loss.
- The manual might contain a few mistakes though it has been checked. If any mistake is found, please contact the Blaupunkt customer service center.
- Please read the instructions in this manual and use only accessories of Blaupunkt to avoid unpredicted damage. Failure to follow the instructions will invalidate warranty and might endanger personnel safety, for which Baros GmbH assumes no responsibility.
- Data of navigation electronic maps might be inconsistent with actual traffic signals due to transportation development. Please follow traffic regulations and signs and drive according to road situation. Operating the GPS navigator device while driving might cause serious accidents. Baros GmbH assumes no responsibility for accidents and loss due to improper use.
- For information of software update and upgrade, please go to our website www.blaupunkt.de
The pictures in the manual are subject to the material object.
In case that your navigation-system contains a built-in TMC-receiver for reception of traffic-information, its antenna is integrated into car-charge-cable. For correct reception of traffic-information, the car-charger needs to be connected to the USB-port of the navigation-system!
Please use only a blunt stylus or fingertips to operate your device. The screen surface is easily scratched. Do not use objects with sharp edges or long fingernails.
For your own safety, do not operate the controls of the product while driving. Use this product prudently. The product is intend to be used only as a navigation aid. It is not for precise measurement of direction, distance, location or topography.
The calculated route is for reference only. It is the user's responsibility to follow the traffic signs and local regulations along the road.
When you get off the car, do not leave your device on the dashboard that is subject to direct sunlight. The overheating of the battery can cause malfunction and/or danger.
GPS is operated by the United States government, which is solely responsible for the performance of GPS. Any change to the GPS system can affect the accuracy of all GPS equipments.
GPS satellite signal can not pass through solid materials (except glass). When you are inside a tunnel or building, GPS positioning is not available.
A minimum of 4 GPS satellite signal is needed to determine current GPS position. Signal reception can be affected by situations such as bad weather or dense overhead obstacles (e.g. trees and tall buildings).
Other wireless devices in the vehicle might interface with the reception of satellite signals and cause the reception to be unstable.
A car holder id needed when using the device in a car. Be sure to place the device in an appropriate place, so as not to obstruct the driver's view or deployment of air bag.
Components

SN Component
Explanation
| 1 | nower key nowering on/ off the device or enter sleep mode | |
| 2 | Reset key Restart the system | |
| 3 | SSB nort | Exchanging data over MIžI SSB cable. Charge the GnS |
| 4 | nower Indicator The light is red during charging, it will turn green when the battery is fully charged. | |
| 5 | Display | Map and control elements |
| 6 | Micro-SD slot | For inserting an optional flash-memory-card |
| 7 | Speaker | |
Getting started
When using the navigation software for the first time, an initial setup process starts automatically. Do as follows:
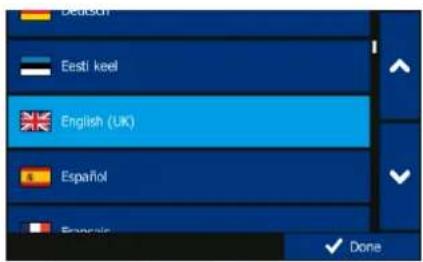
Select the program language. If your preferred language does not appear on the screen, tap,
/ordrag the list up or down with your finger to view all available languages. Tap
English (UK) to select your preferred language. Tap Done to confirm your selection, and proceed to the next page.
Read the Software and Database End User Licence Agreement, and tap Accept if you agree with the terms of use.
You are now asked whether you allow the software to collect usage information and GPS logs that may be used for improving the application and the quality and coverage of maps. Tap Yes to allow the anonymous statistics or disable this function.
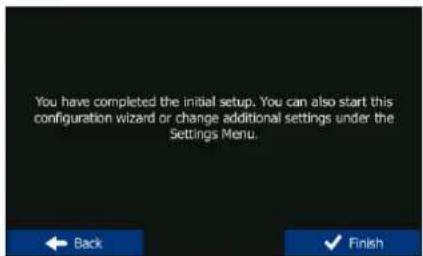
The Configuration wizard starts. Tap Next, to continue.
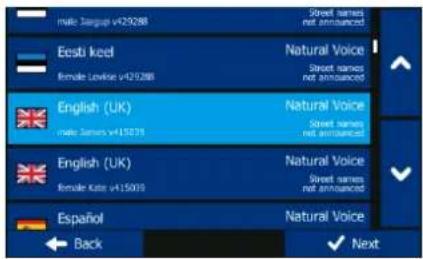
Select the voice guidance language profile. If your preferred language does not appear on the screen, scroll the list for other available profiles. Tap any item in the list for a short voice sample. Tap to confirm your selection, and proceed to the next page.
Set your preferred time format and units. Tap Next to confirm your preferences.
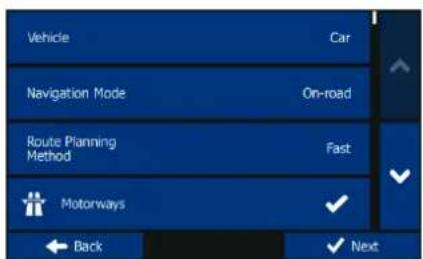
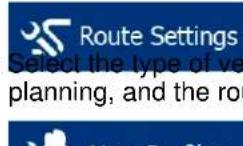
Set your preferred route planning options. Tap Next to confirm your preferences.
The initial setup is now complete. Tap Finish.
The application starts.
Startup screen: the Navigation menu

After the initial setup, and whenever the software is started, the Navigation menu appears. You have the following options:
Destination
- Tap to select your destination by entering an address or selecting a place of interest, a location on the map or one of your Favourite destinations. You can also look up your recent destinations from the Smart History or by entering its coordinate.
S Route Options
- Tap to display the route parameters. You can view the route in its full length on the map. You can also perform route-related actions such as editing or cancelling your route, setting a start point for the route, picking route alternatives, avoiding parts of the route, simulating navigation or adding the destination to your Favourites.
+ More...
- Tap to simulate demo routes or to run some additional applications.

- Tap tostomise the way the navigation software works.
Show Map
- Tap to start navigating on the map.

- Tap to open the Traffic Summary screen.

- Tap Navigation and exit the software.
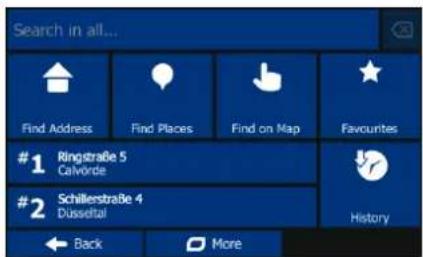
Destination menu
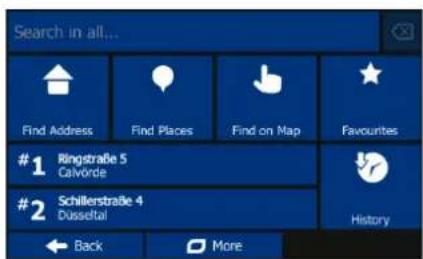
In the Navigation menu, tap Destination. The Destination menu provides you with the following options:
- Tap to specify an address as your destination.
Tap toselect a place of interest as your destination. - Tap to locate to a location selected on the map.
Tap to choose from the list of your favourite destinations. - Tap #1 or #2 o navigate to the recent destination that is shown on the button.
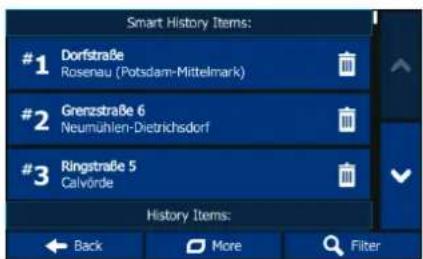
Tap to choose from the list of all recent destinations. - Tap More for other search methods.
Navigating to an address
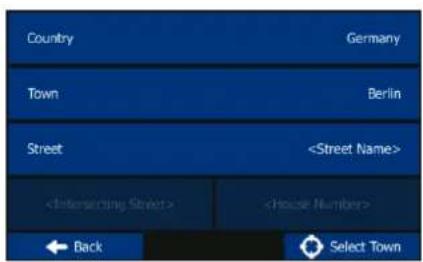
In the Navigation menu, tap Destination, then tap End Address. By default, the screen proposes the city or town where you are located.

If needed, change the country. Tap the button showing the name of the country.
- Use the keyboard to enter the name of the country.
- After entering a couple of characters, the list of countries that match the entered string appears. Tap the country of your choice.

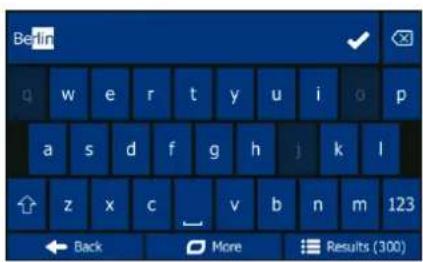
If needed, change the city/town. Tap the button showing the name of the city/town, and use the keyboard to enter a part of its name. As you enter letters, the most likely city/town name is always shown in the input field. You have the following options:

ect the city/town that is offered in the input field.
-
Tap to correct your entry.
-
Tap Results to browse the list of city/town names matching your input. Select a city/town from the list.
-
Tap Results to browse the list of city/town names matching your input. Select a city/town from the list.


Enter the street name:
- Tap Street Name.
-
Use the keyboard to enter a part of the street name.
-
Tap to select the street that is offered in the input field or tap to browse the list of all streets matching your input. Select a street from the list.

Enter the house number:
- Tap House Number.
- Use the keyboard to enter the house number.
- Tap Done to finish entering the address.

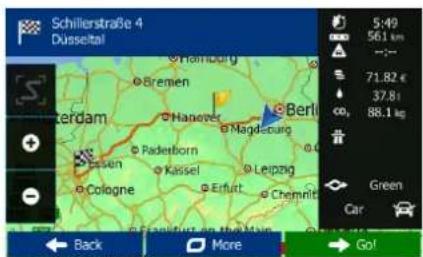
The map appears with the selected destination in the middle. Tap another map location if necessary, then tap Next to confirm the destination.

After a short summary of the route parameters, the map appears showing the entire route. Wait for a few seconds or tap GO! and start navigating.
Quick Find
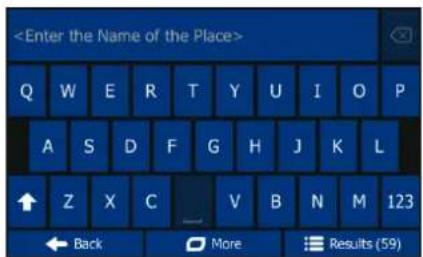
With the help of Quick Find, you can search for a location near to a known Place of Interest. Search for the Place by its name first and then find your destination on the map. Do as follows (starting from the Navigation menu):

Tap Destination.

Tap Search in all...

Start entering the name of the Place of Interest on the virtual keyboard.

After entering some letters, tap Results, and select the Place from the list of matching place names.

Scroll down the list if necessary, highlight the desired Place and tap Select.

Check the details of the Place, and then tap Select.

An overview map is displayed with the selected Place in the middle. Browse the map, and tap the map location that you want as your destination. The red Cursor appears where you tap the map.

Tap Select .

After a short summary of the route parameters, the map appears with the selected destination in the middle. The route is automatically calculated. Tap GO! and start navigating.
Navigating to a place of interest
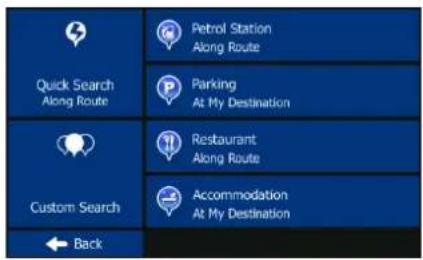
On the Map screen, tap Menu to return to the Navigation menu. In the Navigation menu, tap
Destination, then tap are offered the following preset search categories:

- Tap to get a list of petrol stations along the route or if it is not available, around your current position or your last known position.
- Parking At My Destination
- Tap to get a list of parking lots near the destination or if it is not available, around your current position or your last known position.
- Restaurant Along Route to get a list of restaurants along the route, around your current position or your last known position.
- Tap Accommodation At My Destination to get a list of accommodations near the destination, around your current position or your last known position.
You can also tap search for a place by entering its name.
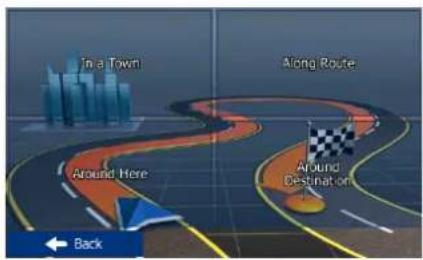
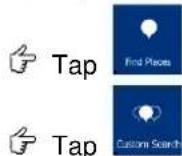
If none of the above is appropriate, tap to find a place of interest at the following locations:

- Tap to search around the current position or if it is not available, around the last know position.
In a Town Tap to search for a place within a selected city or town.

Along Route to search along the active route, and not a
This is useful when you search for a later stopover that results in a minimal detour only, such as searching for upcoming petrol stations or restaurants.
An example of navigating to a place of interest
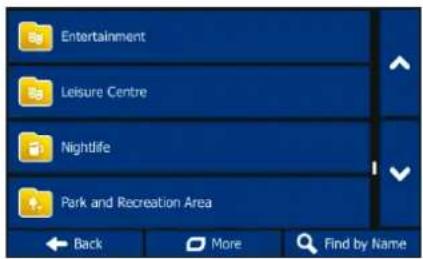
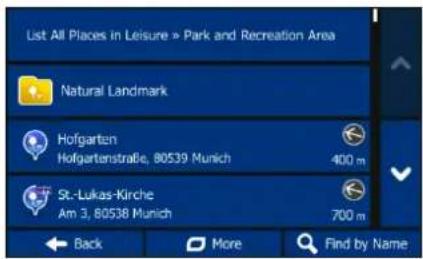
Example: To find a park around your destination, do as follows (starting from the Navigation menu):
Tap Destination.
Tap Around Destination.
The list of place categories appears. Tap or slide your finger to browse the list, and tap Leisure
List All Places
Tap to browse the whole category, or tap to narrow down your search.
Tap any of the list items.
Check the details and the location of the place, and then tap Next.
After a short summary of the route parameters, the map appears showing the entire route. Wait for a few seconds or tap GO! and start navigating.
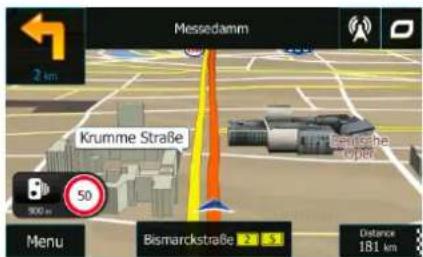
The Map screen
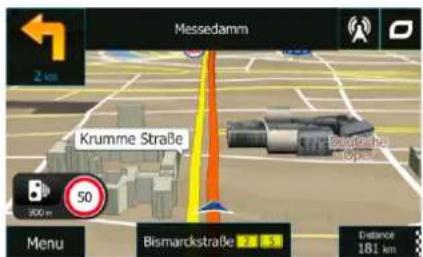
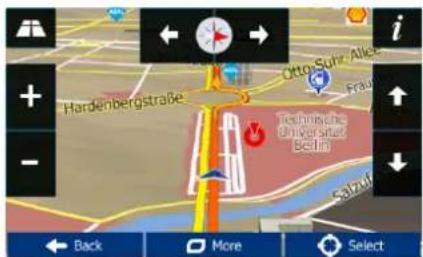
The Map screen is the most important and frequently used screen of the software. The Vehimarker (a blue arrow by default) represents your current position, and the orange line shows the recommended route. There are screen buttons and data fields on the screen to help you navigate. During navigation, the screen shows route information.
- At the top of the screen, you see your heading and the house numbers on left and right if you have not selected a route destination. When navigating a route, you see the next manoeuvre and the next street/road on your route. Tap either of them to open the route itinerary.
- Tap to open the Quick menu with a selection of functions that are useful during navigation.
- Tap the map anywhere to explore the map around your current position. Additional map control buttons appear.
Distance
-
Tap 16.9 ~km to open three data fields on the map. Tap any of them to suppress the others. The default values for navigation (you can change them in Map settings):
-
the remaining distance to the destination,
the remaining time of the trip, and
the estimated time of the arrival at the destination. -
Tap Menu to open the Navigation menu.
Please NOTE that the map screen can be different depending on the model (for example, 3D buildings)
'More' menu
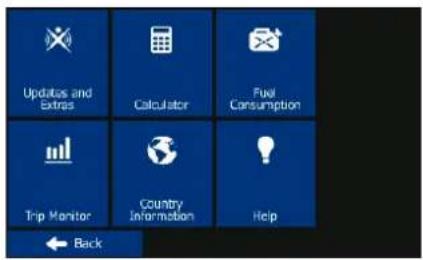
The 'More' menu provides you with various additional applications. In the Navigation menu, tap + More...

·:Access the scientific calculator application.

: Aococ your saved trip and track logs.

Country information, such as speed limit, maximum blood alcohol level or compulsory equipment.

- : Run the Demo and watch sample route simulations to see how navigation works, read the Software and Database End User License Agreement, or check the map and other contents of the application.
tap
Settings menu
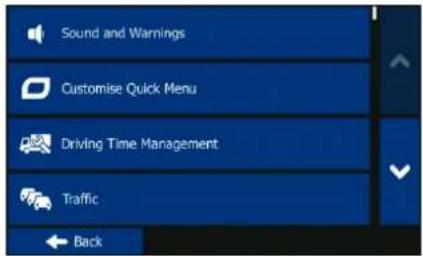
In the Navigation menu, tap (scroll the list to see all):

The Settings menu provides you with the following options
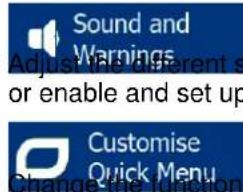
:Chang Quick Menu buttons in the Quick menu of the Map screen.
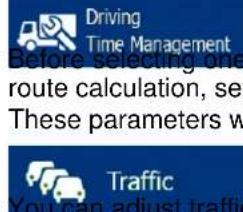
- : You can adjust traffic related settings such as using preloaded statistical or online traffic, or select whether to take traffic events into consideration when calculating the route.
- If more drivers use TravelPilotfor navigating, their settings can be remembered by using one of the user profiles.
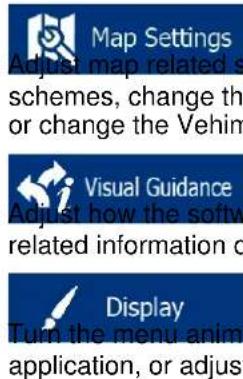
- : Turn the menu animations on or off, select a different skin for the application, or adjust the display backlight
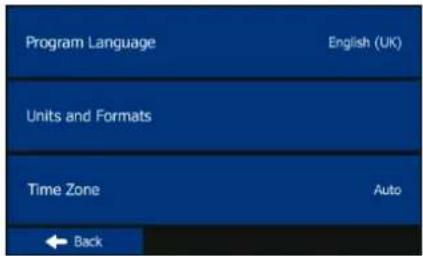
Regional
: Change the program language, the time format, units or the time zone. Trip Monitor
: Turn the automatic trip or track log saving on or off, check the current size of the trip database.
1010 Log Collection
: The application collects usage information and GPS logs that may be used for improving the application and the quality and coverage of maps. Here you can enable or disable collecting these logs.
Start Configuration Wizard basic soft
process.
Reset to Defaults
Guarantee
Please keep the proof of purchase for this device for the entire duration of the guarantee period, as it must be produced in the event of any claim.
You (as the end user) receive a 24-month guarantee from the date of sale. The article has been manufactured using the most modern production methods and subjected to strict quality controls.
Please contact only the manufacturer (not the dealer where you purchased it) in the event of any defects during the guarantee period.
Hotline: +49 (0)511 - 123 83 506 or: support@first-servicecenter.de
The guarantee does not cover damage caused by improper use or external influence (water, falling, sunlight, breakage or impact).
Declaration of Conformity
Hereby Baros GmbH, declares, that the devices Blaupunkt TravelPilot 43 / 53 and 73, are in compliance with the essential requirements and other relevant regulations of Directive 1999/5/EC.
The Declaration of Conformity can be found at: www.blaupunkt.de
Userinformation/Contact
If your device has a defect or you have problems with it, please contact our Service & Support Centre
If you need to send your device to us, please attend to the following points:
- Use only the original packaging
- Add a detailed error description
- Add your full name and address and a copy of your purchase receipt
- Stamp and send the package to us (sufficient postage)
Address of our Service Center:
First Service Center
Kleine Duxelstr 21
DE-30171 Hannover/Germany
You can call also our hotline: +49 (0)511 - 123 83 506 or you can send a Fax to: +49 (0) 511-161253 6 or you can contact us by support@first-servicecenter.de

BLAUPUNKT
Klantenservice/Contact

- The complete manuals for the hardware and software and manuals for other languages can be downloaded as well from www.blaupunkt.de
- Dear Customer,
- Components
- SN Component
- Explanation
- Getting started
- Startup screen: the Navigation menu
- Destination
- S Route Options
- + More...
- Show Map
- Destination menu
- Navigating to an address
- Quick Find
- Navigating to a place of interest
- An example of navigating to a place of interest
- The Map screen
- Distance
- 'More' menu
- Settings menu
- Guarantee
- Declaration of Conformity
- Userinformation/Contact
- Address of our Service Center:
- BLAUPUNKT
- Klantenservice/Contact
Brand : BLAUPUNKT
Model : TravelPilot 43
Category : Gps