
PED Basic - Sewing machine BROTHER - Free user manual and instructions
Find the device manual for free PED Basic BROTHER in PDF.
| Product Type | USB Card Writer for Embroidery |
| Brand | Brother |
| Model | PED Basic |
| Approximate Dimensions | 100 x 60 x 20 mm |
| Approximate Weight | 100 g |
| Power Supply | Via USB port (bus-powered) |
| Connectivity | USB 1.1 |
| Compatible Operating System | Windows 98, ME, 2000, XP |
| Supported File Formats | .pes (embroidery data) |
| Main Functions | Simple pattern editing, selection and resizing, saving to original card, 3D preview, printing |
| Card Capacity | Variable depending on patterns; built-in capacity indicator |
| Maintenance and Cleaning | Clean with a soft, dry cloth; avoid liquids and shocks |
| Safety | Do not insert metal objects into the slot; do not expose to heat sources or moisture |
| Spare Parts and Repairability | Optional original cards available; repair by authorized after-sales service |
| General Information | Domestic use; compliant with FCC Class B and EN55022 Class B regulations |
Frequently Asked Questions - PED Basic BROTHER
User questions about PED Basic BROTHER
0 question about this device. Answer the ones you know or ask your own.
Ask a new question about this device
Download the instructions for your Sewing machine in PDF format for free! Find your manual PED Basic - BROTHER and take your electronic device back in hand. On this page are published all the documents necessary for the use of your device. PED Basic by BROTHER.
USER MANUAL PED Basic BROTHER
Federal Communications Commissions (FCC) Declaration of Conformity (For USA Only)
Responsible Party : Brother International Corporation
100 Somerset Corporate Boulevard
Bridgewater, NJ 08807-0911 USA
declares that the product
Product Name: Brother USB Writer
Model Number: PED-Basic
complies with Part 15 of the FCC Rules. Operation is subject to the following two conditions: (1) this device may not cause harmful interference, and (2) this device must accept any interference received, including interference that may cause undesired operation.
This equipment has been tested and found to comply with the limits for Class B digital device, pursuant to Part 15 of the FCC Rules. These limits are designed to provide reasonable protection against harmful interference in a residential installation. This equipment generates, uses, and can radiate radio frequency energy and, if not installed and used in accordance with the instructions, may cause harmful interference to radio communications. However, there is no guarantee that interference will not occur in a particular installation. If this equipment does cause harmful interference to radio or television reception, which can be determined by turning the equipment off and on, the user is encouraged to try to correct the interference by one or more of the following measures:
- Reorient or relocate the receiving antenna.
- Increase the separation between the equipment and receiver.
- Consult the dealer or an experienced radio/TV technician for help.
- Changes or modifications not expressly approved by the manufacturer or local sales distributor could void the user's authority to operate the equipment.
Canadian Department of Communications Compliance Statement (For Canada Only)
This digital apparatus does not exceed the Class B limits for radio noise emission from digital apparatus as set out in the interference-causing equipment standard entitled "Digital Apparatus", ICES-003 of the Department of Communications
Radio Interference (Other than USA and Canada)
This machine complies with EN55022 (CISPR Publication 22)/Class B.
Congratulations on choosing our product!
Thank you very much for purchasing our product. To obtain the best performance from this unit and to ensure safe and correct operation, please read this instruction manual carefully, and then keep it in a safe place together with your warranty.
Please read before using this product
For safe operation
- Avoid dropping a needle, a piece of wire or other metallic objects into the card slot.
- Do not store anything on the unit.
For a longer service life
- When storing the unit, avoid direct sunlight and high humidity locations. Do not store the unit close to a heater, iron or other hot objects.
- Do not spill water or other liquids on the unit or cards.
- Do not drop or hit the unit or cards.
For repairs or adjustments
- In the event malfunction occurs or adjustment is required, please consult your nearest service center.
Notice
The purpose of instruction manual is not to explain how to use your computer and it's Windows based program. Please refer to the Windows manuals for additional information on installation of programs. It may also be helpful if you visit the web site for www. microsoft. com for driver updates.
Caution
This software included with this product is protected by copyright laws. This software can be used or copied only in accordance with the copyright laws.
"SAVE THESE INSTRUCTIONS"
"This product is intended for household use."
"For additional product information and updates, visit our web site at: www.brother.com"
Windows is a registered trademark of Microsoft Corporation.
IBM is a registered trademark of International Business Machine Corporation.
Pentium is a registered trademark of Intel Corporation.
Before Use
Product description 1
Package includes 1
■ Optional supplies. 1
Principal parts. 1
Installing the Software
System requirements 2
■ Installation 2
Online registration 5
Uninstalling 5
Technical support 5
Getting Started
Operation screen 6
Operating procedure 8
Selecting patterns 9
Other operations 9
Menu Bar Commands
File 10
Print 10
Print Setup 10
Print Preview 11
Exit 12
Option 12
Select System Unit 12
Help 12
Contents 12
Using 13
Online Registration 13
About PED-Basic 13
Before Use
Product description
This system allows you to perform simple editing operations of embroidery data (.pes files) created with our embroidery design software, then write them to original cards. PES files can also be purchased or obtained from the Internet.

This product cannot be used to create embroidery data.
Package includes
Check that the following items are included. If anything is missing or damaged, contact your service representative.
USB card writer box
CD-ROM


Original card

Instruction manual

Optional supplies
Original card


The only original cards that can be used with this USB card writer box are those like the one enclosed or optional original cards of the same type.
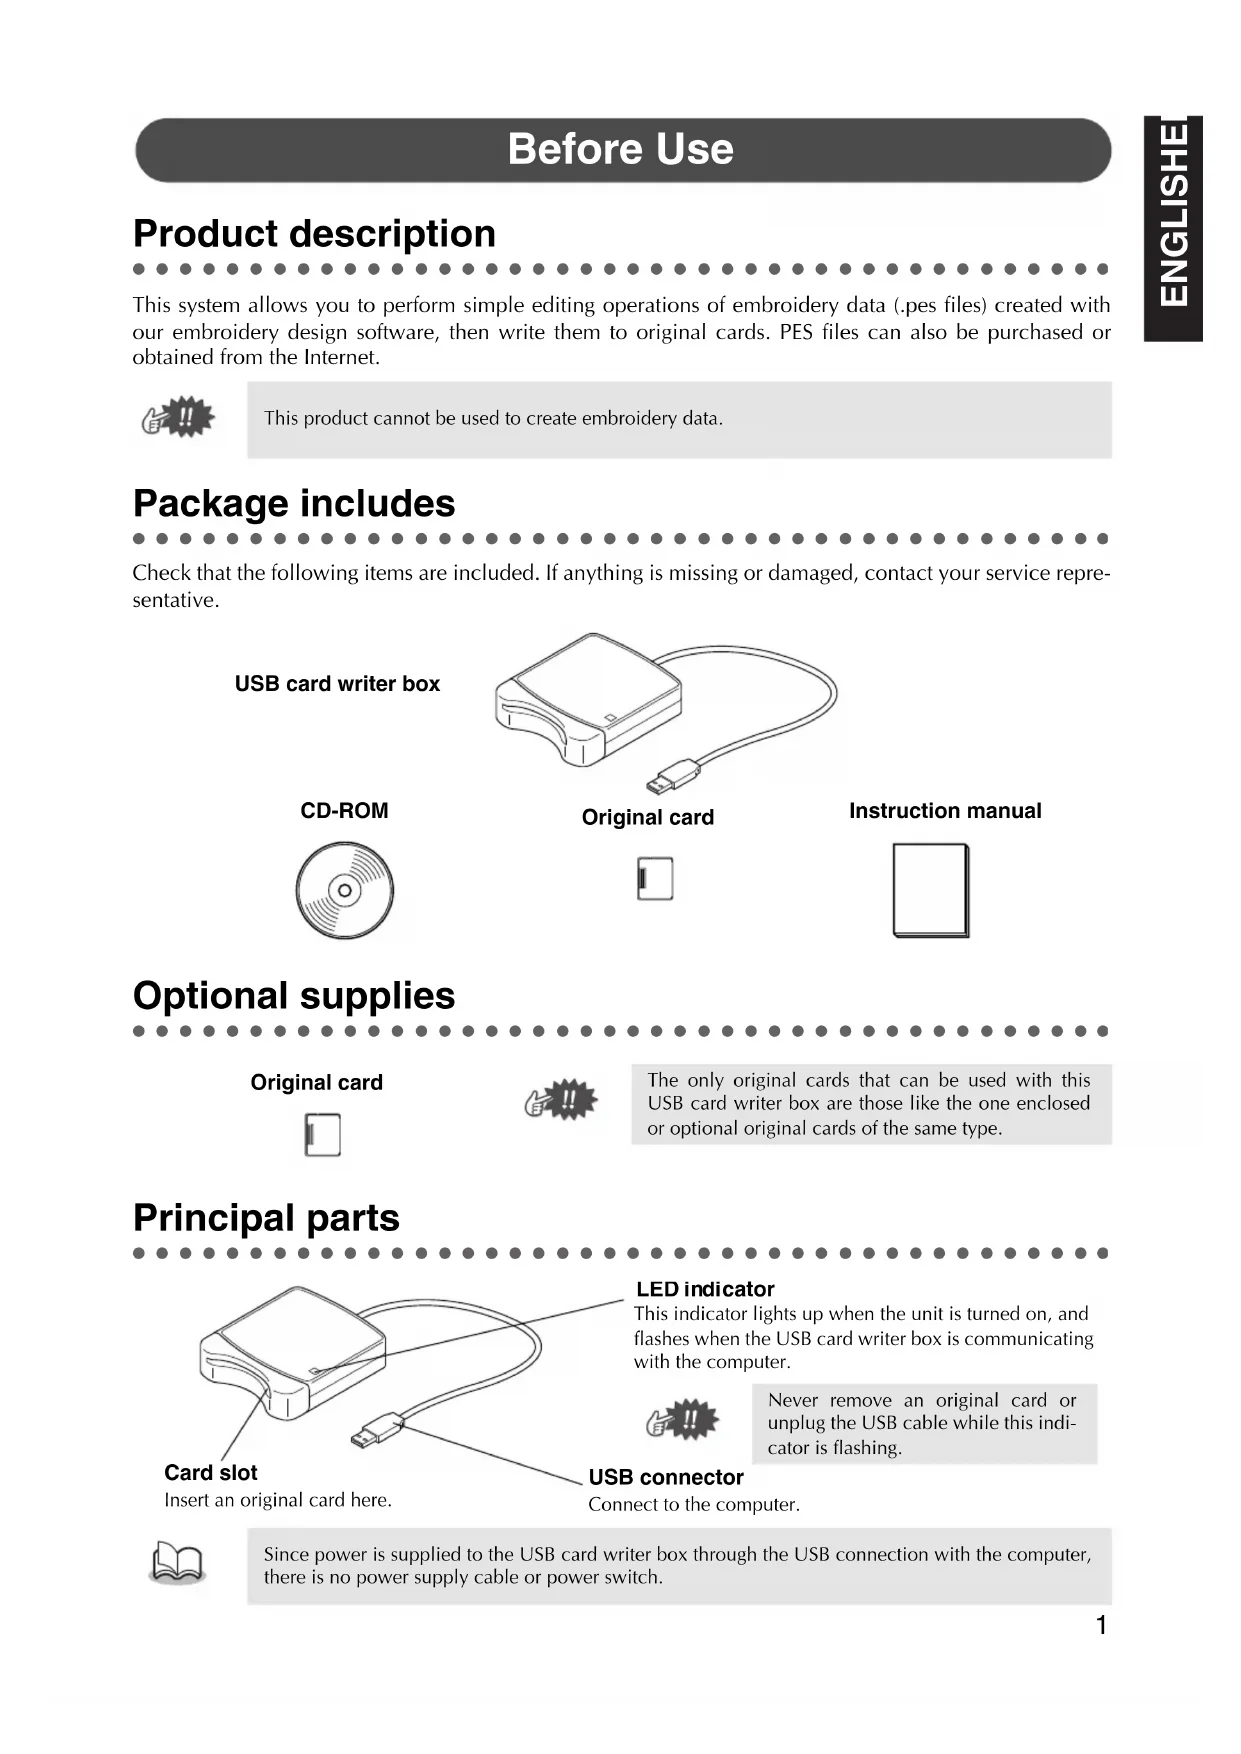
Principal parts
Insert an original card here.
LED indicator
This indicator lights up when the unit is turned on, and flashes when the USB card writer box is communicating with the computer.

Never remove an original card or unplug the USB cable while this indicator is flashing.
USB connector

Connect to the computer.
Since power is supplied to the USB card writer box through the USB connection with the computer, there is no power supply cable or power switch.
Installing the Software
System requirements
Before installing the software in your computer, make sure that the computer meets the following requirements.
| Computer | IBM PC or compatible (DOS/V) computer originally equipped with a USB port |
| Operating system | Windows 98, ME, XP or 2000 |
| Processor | Pentium 133 MHz or higher |
| Memory | Minimum 32 MB (64 MB or more is recommended) |
| Hard disk free space | Minimum 10 MB |
| Monitor | SVGA (800 × 600), 16 bit color or higher |
| Port | USB Ver. 1.1 |
| Printer | Printer supported by your system (for printing pattern information) |
| CD-ROM drive | Required for installation |

- Power is supplied to this USB card writer box through the USB connection. Connect the USB card writer box to a USB connector of the computer or to a self-powered USB hub that can supply enough power to the card writer box. If the card writer box is not connected in this way, it may not operate correctly.
- This product may not operate correctly with some computers and USB expansion cards.
Installation
This section describes how to install the driver and application software.

Be sure to perform the installation according to the following instructions. If the installation is interrupted or not performed according to the instructions, the software will not be installed correctly.

The following installation procedure includes descriptions and dialog boxes for Windows 98. The procedure and dialog boxes for other operating systems may be slightly different.

Turn on the computer and start Windows.
Quit all other applications.

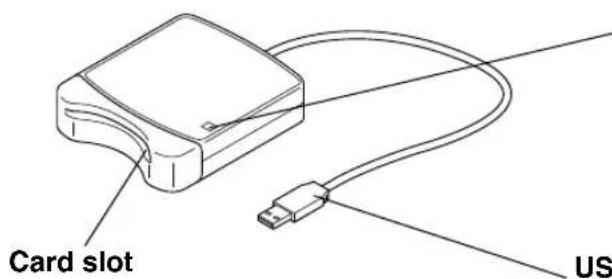
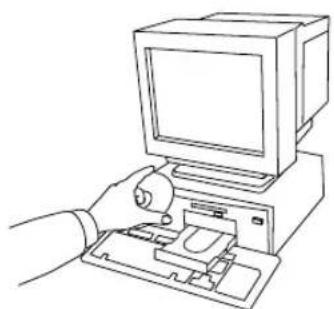
Plug the USB connector into the USB port on the computer.
Make sure that the connector is fully inserted.
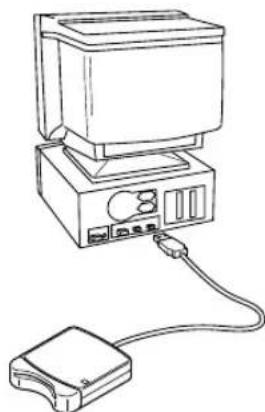
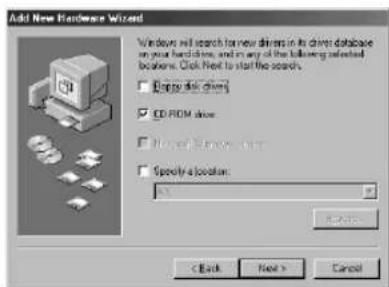
After a short while, the first Add New Hardware Wizard dialog box appears. Click [Next].

When using XP, select "Install from a list or specific location (Advanced)" on the first Wizard screen and click [Next].
Make sure that "Search for the best driver for your device. (Recommended)" is selected, and then click [Next].
5 Insert the enclosed CD-ROM into the computer's CD-ROM drive.
Select "CD-ROM drive", and then after 5 to 10 seconds, click [Next].

Depending on the operating system, the dialog box shown in step 9 may also appear; however, the operation described in step 8 should be performed before continuing to step 9.
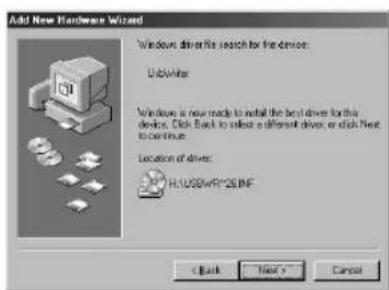
When UsbWriter appears, click [Next].

Depending on the operating system, the message "No digital signature." may appear; however, the installation can be continued.
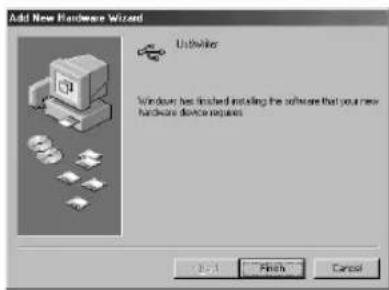
When the dialog box shown at the right appears, click [Finish].
This completes the installation of the driver software.

A message may appear, indicating that the computer should be restarted; however, it is not necessary to restart yet, so click [Cancel].


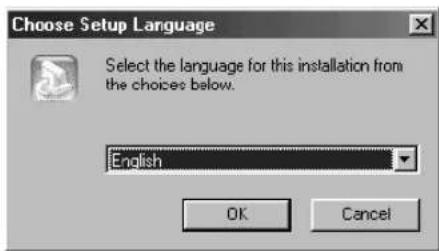
The Choose Setup Language dialog box appears. Select the desired language, and then click [OK].

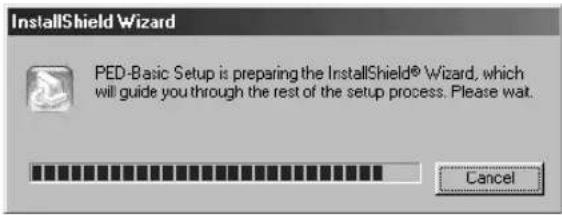
After a short while, the application installer automatically starts up.
If the installer does not automatically start up:
1) Click the [Start] button.
2) Click [Run].
The Run dialog box appears.
3) Type in the full path to the installer, and then click [OK] to start up the installer. For example: D:\Setup (where "D:" is the name of the CD-ROM drive)

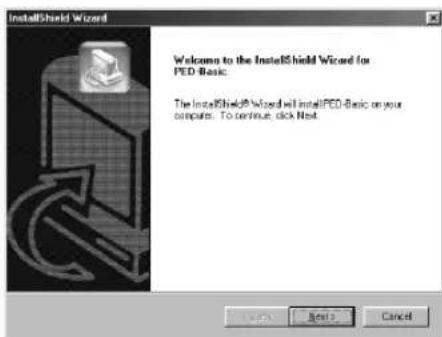
When the InstallShield Wizard appears, click [Next] to continue with the installation.

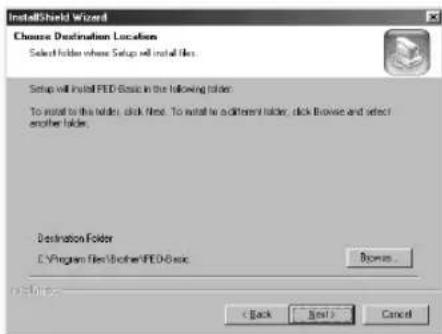
Click [Next] to install the application into the default folder.
To install the application into another folder:
1) Click [Browse]. Select the drive and folder (if necessary, type in the name of the new folder).
2) When the desired folder is selected, click OK.
3) The "Choose Destination Location" shows the selected folder. Click [Next] to install the application into that folder.
Click [Back] to return to the previous step.
Click [Cancel] to exit.

When the installation is completed, the dialog box shown at the right appears.

With Windows 98 and ME, the computer must be restarted. Be sure to click [Restart] to complete the setup.

With other operating systems, it is not necessary to restart the computer. Click [Finish] to complete the setup.
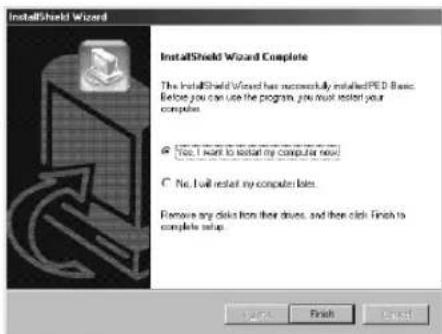
This completes the entire setup operation.
Online registration
If you wish to be contacted about upgrades and provided with important information such as, future product developments and improvements, you can register your product online by following a simple registration procedure.
Click Online Registration on the Help menu to start up the installed Web browser and open the online registration page on our Web site.
In addition, while registering, trial embroidery data can be downloaded at no cost from the online registration page of our Web site.
For details on downloading, refer to our Web site.

Online registration may not be available in some areas.
Uninstalling

Turn on the computer and start Windows.
Click the Start button in the task bar, select [Setting], and then click [Control Panel].
In the Control Panel window, double-click "Add/Remove Programs".
In the Add/Remove Programs Properties dialog box, select program, and then click
[Add/Remove].
Technical support
Please contact Technical Support if you have a problem.
Please check the company web site to find the Technical Support address for your area.

Have the following information ready before contacting Technical Support.
- The make and model of your PC you are using as well as the Windows version. (Please check the system requirements for this product once again. See page 2.)
Information on any error messages that appear.
Getting Started
Operation screen
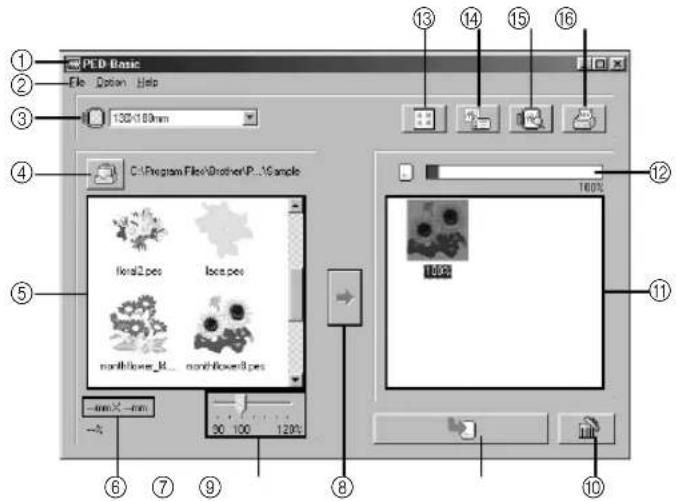
| NO. | Name/Button Function | |
| ① | Title bar | This allows you to adjust the size of the window or quit the application. |
| ② | Menu bar | This contains commands for the various functions that you can perform. (See page 10, "Menu Bar Commands") |
| ③ | Hoop size selector | This is used to select the size of the embroidery hoop that can be used with your embroidery machine. (See page 8, "Select the embroidery hoop size.")Do not select a hoop size larger than the embroidery hoop that can be used with your embroidery machine. The created card will not work correctly with the embroidery machine.If you change the hoop size while selecting patterns, remove the patterns that have already been selected. |
| ④ | Browse button(图) | Select the folder where the pattern file (.pes) is saved. (See page 8, "Select the folder.")For details on .pes files, refer to "Product description" on page 1. |
| ⑤ | Available patterns list | Images of the pattern files (.pes) saved in the folder selected after clicking ④ are displayed here. The name of the file appears below the image.Patterns that are either too large or have too many stitches for the embroidery hoop size, selected with the "Hoop size selector" (③), are crossed out with a red ⑥Patterns that are larger than the specified embroidery hoop size are marked with a yellow ⑦ The program will automatically reduce the design to fit within the hoop size specified. It may be possible to reduce the design more by using the "Pattern size slider" (⑦), but, 90% is the lowest it can be reduced.Patterns created for the optional extra-large embroidery hoop are marked with the ⑧ symbol. |
| ⑥ | Size display | This displays the size of the pattern selected in the "Available patterns list" (⑤).This is available only if one pattern in the Available patterns list (⑤) is selected.If the pattern is sized, the new pattern size is displayed here. |
| ⑦ | Pattern size slider | This can be used to size the pattern selected in the “Available patterns list” (5). The pattern size can be changed by a ratio between 90% and 120%.The pattern cannot be sized to exceed the size of the selected hoop size.The new size can be checked with the “Size display” (6).This is available only if one pattern in the Available patterns list (5) is selected. |
| ⑧ | Select button | Click this button to add the pattern selected in the “Available patterns list” (5) to the “Selected patterns list” (11). (See page 8, “Select the patterns.”) |
| ⑨ | Write button (11) | Click this button to write to an original card the patterns displayed in the “Selected patterns list” (11). (See page 9, “Write the data to an original card.”) |
| ⑩ | Deselect button (11) | Click this button to remove the pattern selected in the “Selected patterns list” (11). |
| ⑪ | Selected patterns list | Patterns selected with ⑧ are displayed here. The data will be written to an original card in the order displayed. |
| ⑫ | Card capacity indicator | This shows the capacity of the patterns selected in the “Selected patterns list” (11). (See page 9, “Reading the Card capacity indicator:”) |
| ⑬ | Icon size button (11) | Click this button to switch between large and small the display size of the pattern images shown in the lists. Example) |
| ⑭ | Properties button (11) | Click this button to display the information (size, number of stitches, and colors) for the pattern selected in the “Available patterns list” (5) or the “Selected patterns list” (11).This is available only if one pattern is selected. |
| ⑮ | Preview button (11) | Click this button to display a three-dimensional image of the pattern selected in the “Available patterns list” (5) or the “Selected patterns list” (11).Click the button indicated on the right at the bottom of the dialog box to change the display magnification as described below.Zooms so that the image fills the dialog boxZooms so the pattern can be compared relative to the size of the embroidery hoop |
| ⑯ | Print button (11) | Click this button to print the information for the pattern selected in the “Available patterns list” (5) or the “Selected patterns list” (11) according to the settings specified after clicking [File], then [Print Setup].This is available only if one pattern is selected. |
Operating procedure
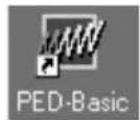
1 Start up the application.
From the desktop, double-click the icon shown at the right.

Make sure that the USB card writer box is connected to the computer's USB port and that an original card is inserted.
2 Select the embroidery hoop size.
With the Hoop size selector, select the size of the embroidery hoop that can be used with your embroidery machine.
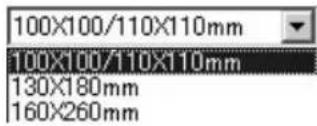

Do not select a hoop size larger than the embroidery hoop that can be used with your embroidery machine. The created card will not work correctly with the embroidery machine.
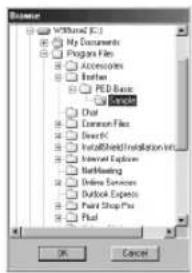
3 Select the folder.
1) Click. The Folder dialog box appears. Select the folder where the pattern file (.pes) is saved, and then click [OK].

If an original card was selected the patterns saved on the inserted card can be seen.
2) Images and file names for the pattern files saved in the selected folder appear in the "Available patterns list".

If there are any patterns on the card that you do not wish to erase, be sure to add them to the "Selected patterns list". (See page 8, "Select the patterns.")

Available patterns list" Selected patterns list
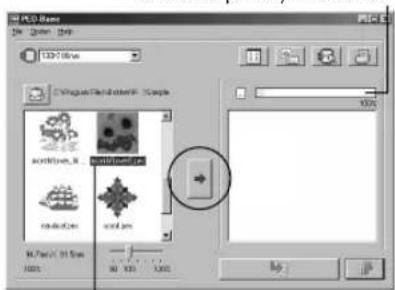
4 Select the patterns.
1) From the "Available patterns list", click the pattern that you want to write to the card. The highlighted pattern is selected.
2) Then, click to add the selected pattern to the "Selected patterns list".
3) Continue this operation for all patterns that you wish to write to an original card. Viewing the "Card capacity indicator" during this process will allow you to plan which designs you would like to save an original card.
"Card capacity indicator"
Highlighted

If an original card was selected, the patterns saved on the inserted card can be seen.
- If there are any patterns on the card that you do not wish to erase, be sure to add them to the "Selected patterns list".
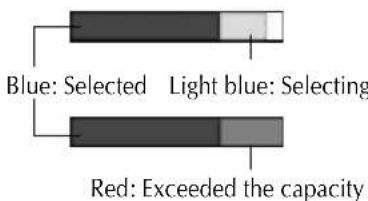
Reading the Card capacity indicator:
The part indicating selected patterns is shown in blue, and the part indicating the pattern being selected is shown in light blue. If the part indicating the pattern being selected appears in red, the size of the selected patterns has exceeded the capacity of an original card.
5 Size the pattern.
1) To size the pattern, click the pattern in the "Available patterns list" to highlight it.
2) Use the "Pattern size slider" to change the size of the pattern, and then click

The range in which the pattern can be sized is between 90% and 120% .
- In addition, the pattern cannot be sized to exceed the size of the selected embroidery hoop.
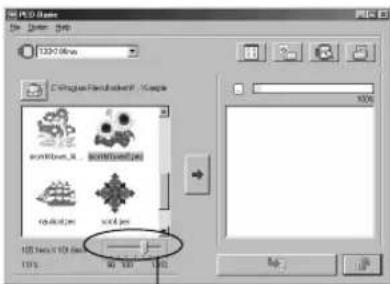

This function is not available if more than one pattern is selected.
6 Write the data to an original card.
After the patterns to be written to the card are selected...
1) Check that an original card is inserted into the USB card writer box.
2) Then click to write the data to the card.
The data is written to an original card after all data already on the card is erased.

If there are any patterns on the card that you do not wish to erase, be sure to select the card in the Folder dialog box, and then add the patterns to the "Selected patterns list".
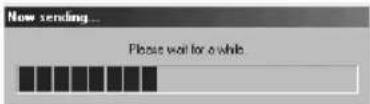
After a short while, the data is finished writing to an original card.
Now, the card containing the data can be used with the embroidery machine.

Do not remove the card or unplug the USB cable while data is being written to the card (while the LED indicator is flashing).
Selecting patterns
To select a pattern, click the image for the pattern in the "Available patterns list" or the "Selected patterns list". To select multiple patterns, hold down the Ctrl key or Shift key while clicking the patterns or use dragging operations. The various buttons that are available while the patterns are being selected appear clear; the buttons that are not available are dimmed.
Other operations
Select a pattern, and then click the selected pattern with the right mouse button to display a pop-up menu containing the various functions available at that time.
Menu Bar Commands
File

Function
Prints the information (pattern, size, number of stitches, and colors) for the selected pattern according to the Print Setup settings.
Operation

Select one pattern from the "Available patterns list" or the "Selected patterns list".

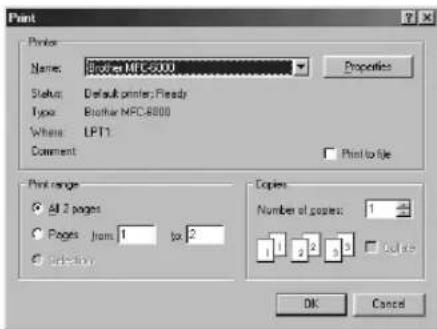
Click [File], then [Print] from the menu bar or click
The Print dialog box appears.

Select the appropriate settings. ("Page range", "Copies", etc.)

Click [OK] to start printing.
Click [Cancel] to stop the operation.
Click [Properties] to change the printer properties.

The printed information differs depending on the pattern that is selected and the specified Print Setup settings. (See page 10, "Print Setup").

Print Setup
Function
Allows you to specify the print settings.
Operation

Click [File], then [Print Setup] from the menu bar.
The Print Setup dialog box appears.

Select the appropriate "Paper" and "Orientation" settings.
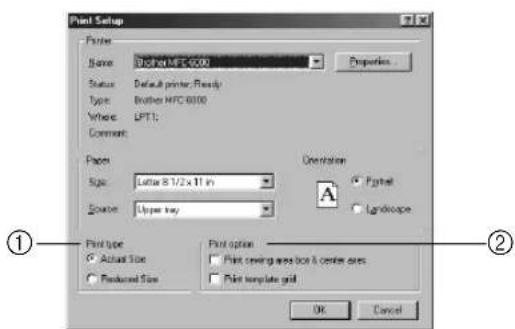

Select the appropriate "Print type" and "Print option" settings.
Click [OK] to confirm the settings.
Click [Cancel] to stop the operation.
Click [Properties] to change the printer properties.
About Print type and Print option:
① Print type
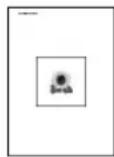
Actual Size:
For each pattern, an image of the pattern in its actual size is printed on the first page, and the pattern information (size, number of stitches, and colors) is printed on the second page.
Reduced Size:
For each pattern, a reduced image of the pattern and the pattern information are printed on one page.
First page Secon
d page
First page

- With both settings, the file name is printed on all pages.
- With patterns for optional hoops (100 × 172 ~mm and 130 × 300 ~mm) , an image of the entire pattern is printed on the first page. On the following pages, an image of the various sections that make up the pattern and the pattern information are printed according to the selected Print type setting.
② Print option
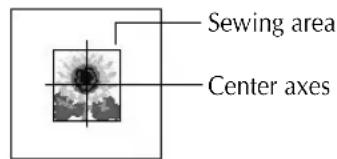
Print sewing area box & center axis:
The sewing area of the pattern and the center axes are printed in black. This setting is only available when Actual Size is selected for the Print type setting.
Print template grid:
A green grid is printed to represent the grid printed on the embroidery sheet supplied with the embroidery hoop for your machine.
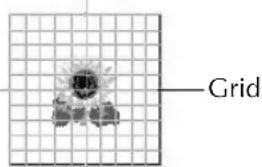

If you cut out the grid sheet, you can use it for a template for design placement on your garment.

The size of the grid that is printed may differ slightly from the grid printed on the embroidery sheets for some home embroidery machines.

Print Preview
Function
Allows you to preview the pages before they are printed.
Operation

Select one pattern from the "Available patterns list" or the "Selected patterns list."

Click [File], then [Print Preview] from the menu bar.
An image of the pattern selected for printing is displayed.
![BROTHER PED Basic - Click [File], then [Print Preview] from the menu bar. - 1](/content/2026/02/371996/images/568f48f88c354990f4b725ecb63d0e5fb8e66368c99fd70f7062b01213415b38.jpg)
The information that will be printed differs depending on the specified Print Setup settings. (See page 10, "Print Setup").
![BROTHER PED Basic - Click [File], then [Print Preview] from the menu bar. - 2](/content/2026/02/371996/images/72d8de35947251660857efd203f673ee05b93d2d727a72f288c7987d56163652.jpg)
Click [Close] to close the dialog box.
![BROTHER PED Basic - Click [Close] to close the dialog box. - 1](/content/2026/02/371996/images/13ea4144decef71180a99587b4369bb126ae5e67c1aec5ee241eb9a206439830.jpg)
Exit
Function
Quits the application.
Operation

Click [File], then [Exit] from the menu bar. The application quits immediately.
Option
Select System Unit
Function
Allows you to select the unit of measurement (millimeters or inches).
Operation

Click [Option], then [Select System Unit] from the menu bar.
The Select System Units dialog box appears.
![BROTHER PED Basic - Click [Option], then [Select System Unit] from the menu bar. - 1](/content/2026/02/371996/images/e83c9fc9628152cd79fe5609b4898b322cabb2d9b3fda6075ad7e4ce99a8196f.jpg)
Select the appropriate units (mm or inch).

Click [OK] to confirm the setting.
Click [Cancel] to stop the operation.
![BROTHER PED Basic - Click [OK] to confirm the setting. - 1](/content/2026/02/371996/images/c67b3daee3d5ce6280c2b52c241cfaf44f84e87cb41383a5870a30d3045a7961.jpg)
Help
Contents
Function
Displays the help for this application.

Click [Help], then [Contents] from the menu bar.
The contents of the help appears.

Using
Function
Explains how to use the on-screen help system.
Operation

Click [Help], then [Using] from the menu bar.
The Windows standard explanation about how to use the help system appears.

Online Registration
Function
Displays the online registration page from our Web site.
Operation

Click [Help], then [Online registration] from the menu bar.

The installed browser is started and the online registration page is opened from our Web site.

This function only works if the Internet browser is correctly installed and the Internet connection environment is established.
- Online registration is not possible in certain countries and regions.

For details, refer to page 5.

About PED-Basic
Function
Displays version and copyright information.
Operation

Click [Help], then [About PED-Basic] from the menu bar.
A dialog box appears.

Click [OK] to close the dialog box.
Partie responsible : Brother International Corporation
100 Somerset Corporate Boulevard
Bridgewater, NJ 08807-0911 USA
Assistance technique
100 Somerset Corporate Boulevard
Bridgewater, NJ 08807-0911 USA
Produkname: Brother USB Writer
100 Somerset Corporate Boulevard
Bridgewater, NJ 08807-0911
Verenigde Staten
100 Somerset Corporate Boulevard
Bridgewater, NJ 08807-0911 USA
100 Somerset Corporate Boulevard
Bridgewater, NJ 08807-0911 USA
dichiarachéil prodotto
Read the following before opening the CD-ROM packet
Thank you for choosing this product.
The following agreement terms have been established for this product. Only users who agree to the terms are permitted to use this product. Before opening the CD-ROM packet, carefully read the following "Software License Agreement". By opening the CD-ROM packet, you agree to the terms of use for this product. The product cannot be returned after it has been opened.
Software License Agreement
- General terms
This is an agreement between you (the end-user) and our company for the use of this product. - Use of this product
The user may install and use this product with one computer. - Limitations on duplications
The user may not duplicate this product, except for backup purposes. - Limitations on modifications
The user may not alter or disassemble this product in any way. - Limitations on transfer
This software may not be transferred to or used in any other way by a third party. - Warranty
We accept no responsibility for your choice or use of this product or for any damages that may arise out of its use. - Others
This product is protected by copyright laws.
- Limitations concerning les modifications
- Federal Communications Commissions (FCC) Declaration of Conformity (For USA Only)
- Canadian Department of Communications Compliance Statement (For Canada Only)
- Radio Interference (Other than USA and Canada)
- Congratulations on choosing our product!
- Please read before using this product
- For safe operation
- For a longer service life
- For repairs or adjustments
- Notice
- Caution
- "SAVE THESE INSTRUCTIONS"
- Before Use
- Installing the Software
- Getting Started
- Menu Bar Commands
- Product description
- Package includes
- USB card writer box
- CD-ROM
- Original card
- Instruction manual
- Optional supplies
- Principal parts
- LED indicator
- USB connector
- System requirements
- Installation
- Online registration
- Uninstalling
- Technical support
- Operation screen
- Operating procedure
- Start up the application.
- Select the embroidery hoop size.
- Select the folder.
- Select the patterns.
- Reading the Card capacity indicator:
- Size the pattern.
- Write the data to an original card.
- Selecting patterns
- Other operations
- File
- Function
- Operation
- Print Setup
- About Print type and Print option:
- ① Print type
- Actual Size:
- Reduced Size:
- ② Print option
- Print sewing area box & center axis:
- Print template grid:
- Print Preview
- Click [File], then [Print Preview] from the menu bar.
- Click [Close] to close the dialog box.
- Exit
- Click [File], then [Exit] from the menu bar. The application quits immediately.
- Option
- Select System Unit
- Click [Option], then [Select System Unit] from the menu bar.
- Select the appropriate units (mm or inch).
- Click [OK] to confirm the setting.
- Help
- Contents
- Using
- About PED-Basic
- Assistance technique
- Read the following before opening the CD-ROM packet
- Software License Agreement
Brand : BROTHER
Model : PED Basic
Category : Sewing machine