
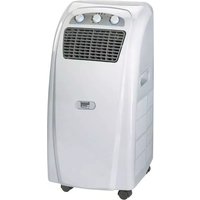
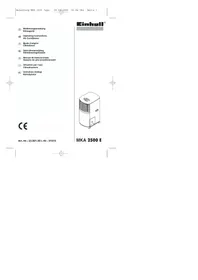
MKA 3502E - Air conditioner EINHELL - Free user manual and instructions
Find the device manual for free MKA 3502E EINHELL in PDF.
| Product type | Mobile air conditioner |
| Brand | Einhell |
| Model | MKA 3502E |
| Refrigerant | R410A |
| Refrigerant quantity | 540 g |
| Cooling capacity | 2740 W |
| Mains voltage | 230 V ~ 50 Hz |
| Power input | 1030 W |
| Energy efficiency class | C (EER 2.57) |
| Max. air flow | 350 m³/h |
| Max. room size | 80 m³ |
| Max. dehumidification capacity | 64 l/day (30°C / 80% RH) |
| Fan speed levels | 2 (Low/High) |
| Operating ambient temperature | 18 - 32°C |
| Sound pressure level | ≤ 58 dB(A) |
| Dimensions (W x D x H) | 40 x 38 x 75 cm |
| Net weight | 32 kg |
| Main functions | Cooling, ventilation, dehumidification, timer (1-12h), remote control, auto mode |
| Maintenance and cleaning | Clean the filter regularly, empty the condensation water tank, use a soft cloth and mild products |
| Safety | Do not use in a bathroom, do not block air inlets/outlets, unplug before cleaning, do not use an extension cord |
| Supplied accessories | Exhaust air hose, pass-through ring, window/wall adapter, condensation water tank, remote control, activated carbon filter |
| Warranty | 2 years (conditions according to manual) |
Frequently Asked Questions - MKA 3502E EINHELL
User questions about MKA 3502E EINHELL
0 question about this device. Answer the ones you know or ask your own.
Ask a new question about this device
Download the instructions for your Air conditioner in PDF format for free! Find your manual MKA 3502E - EINHELL and take your electronic device back in hand. On this page are published all the documents necessary for the use of your device. MKA 3502E by EINHELL.
USER MANUAL MKA 3502E EINHELL
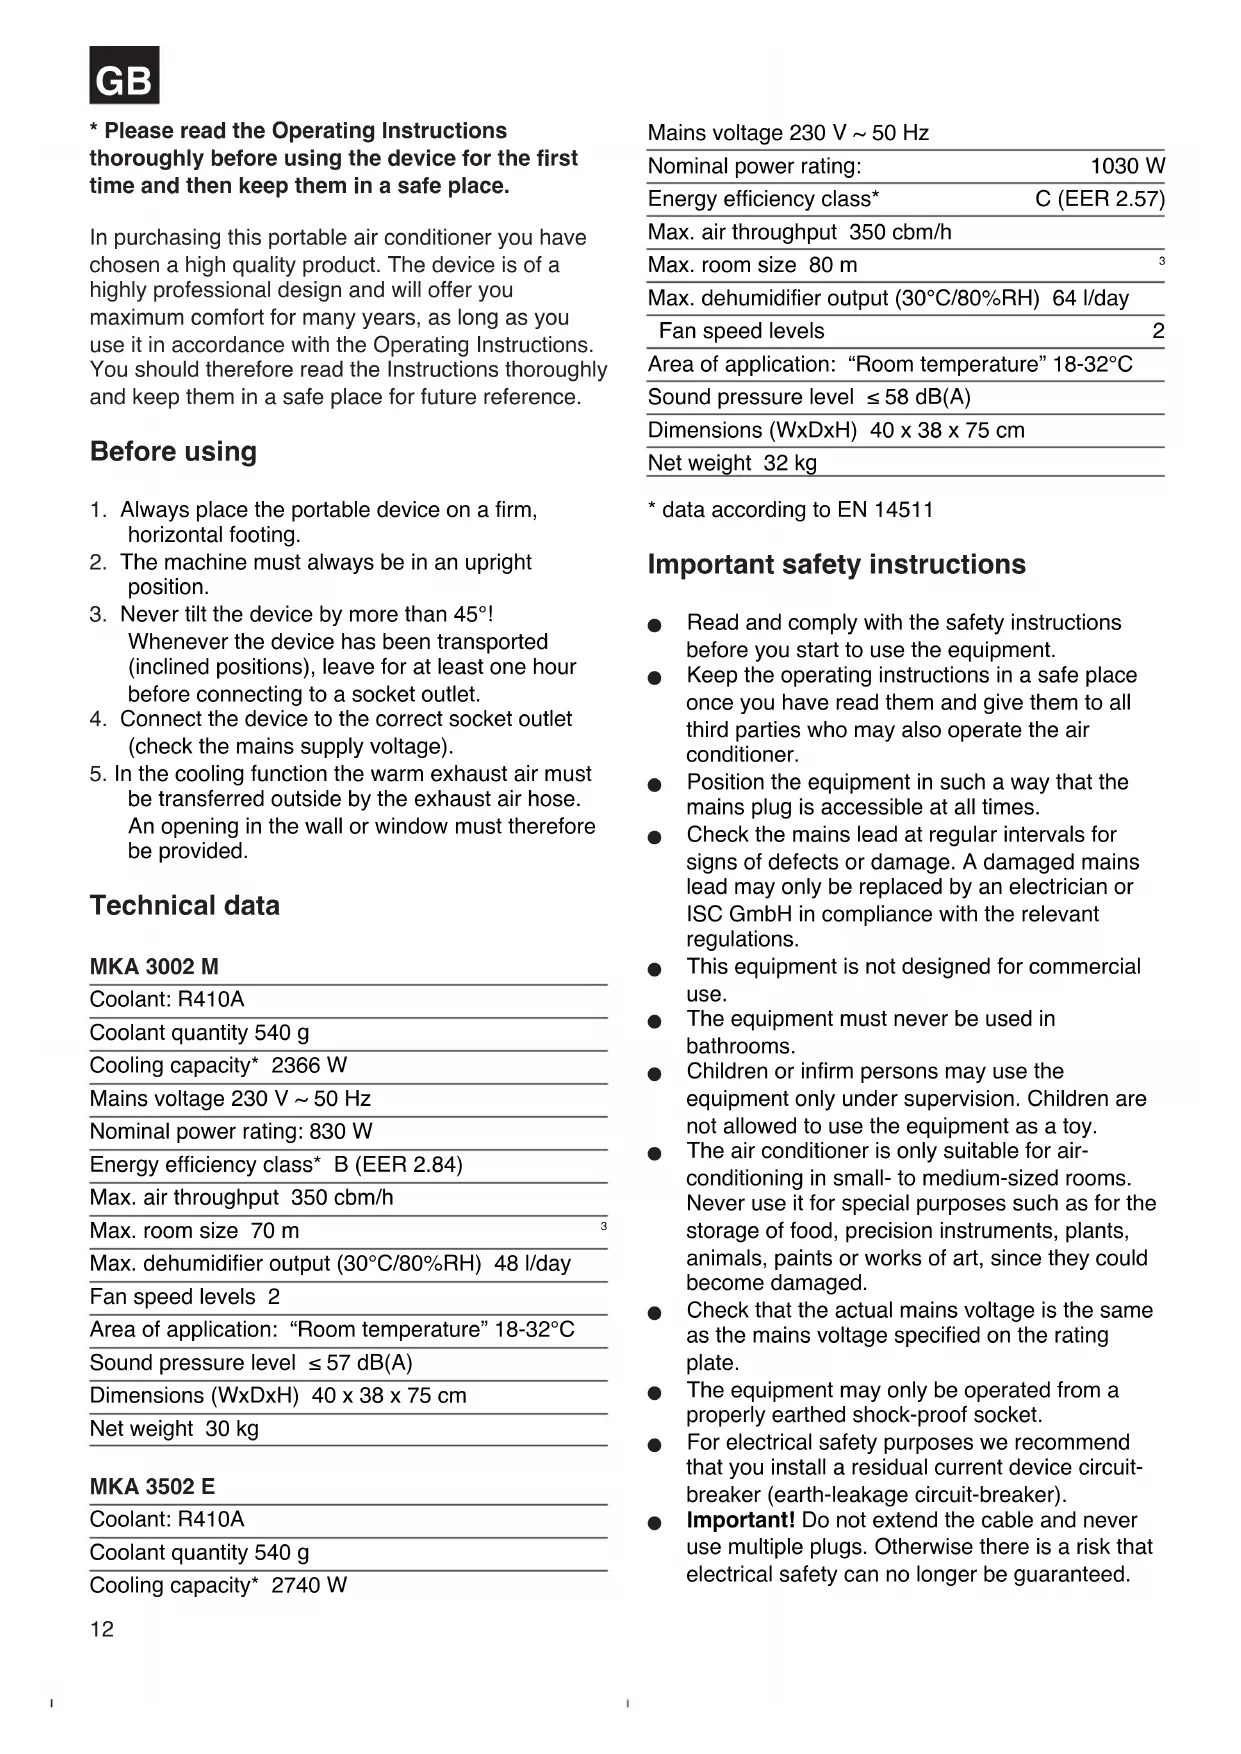
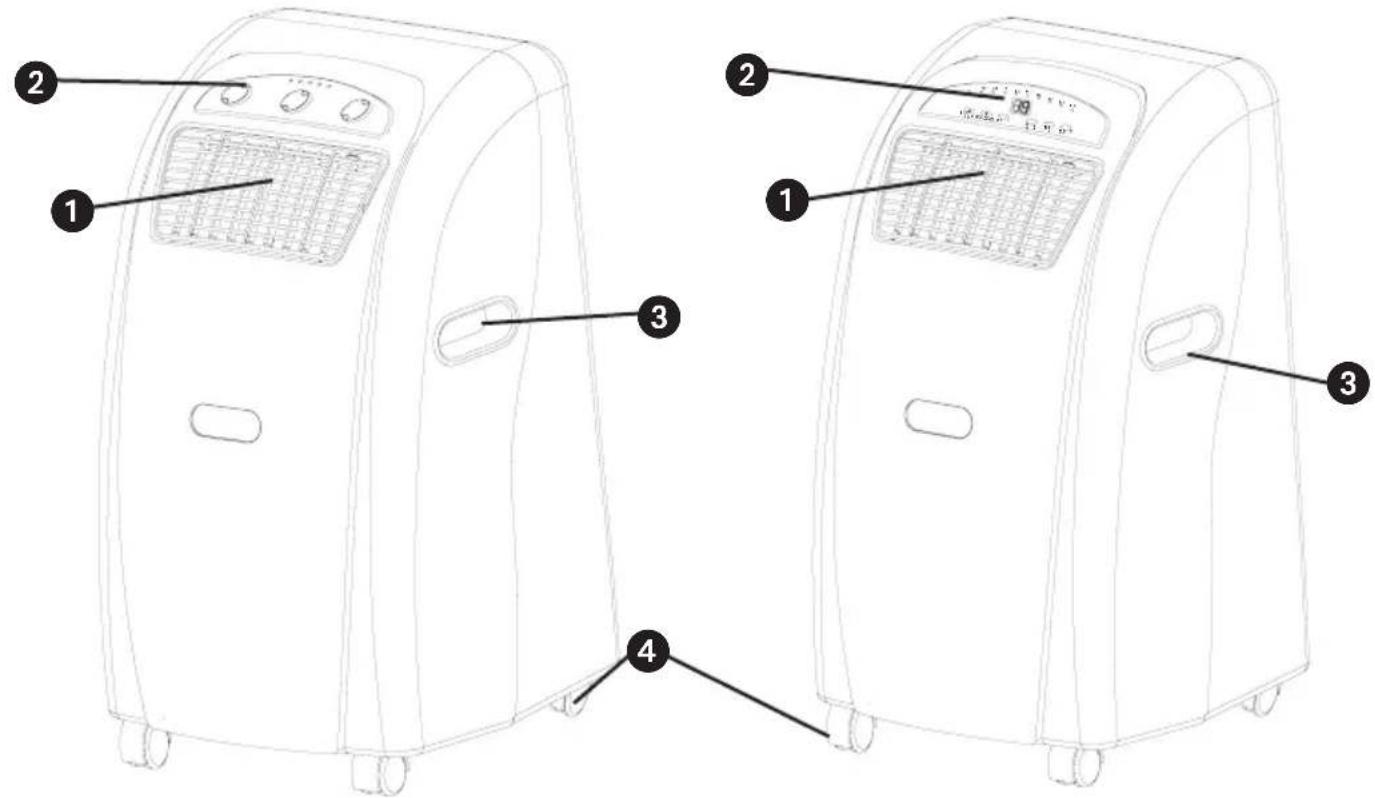
Description of device
MKA 3002M
1 Air outlet grille
2 Control device
3 Handle
4 Castors
5 Air inlet filter
6 Air inlet
7 Opening for connection fittings for the exhaust air hose
8 Mains cable wraparound brackets
9 Rubber bung for condensation water drain (in the device)
GB
- Please read the Operating Instructions thoroughly before using the device for the first time and then keep them in a safe place.
In purchasing this portable air conditioner you have chosen a high quality product. The device is of a highly professional design and will offer you maximum comfort for many years, as long as you use it in accordance with the Operating Instructions. You should therefore read the Instructions thoroughly and keep them in a safe place for future reference.
Before using
- Always place the portable device on a firm, horizontal footing.
- The machine must always be in an upright position.
- Never tilt the device by more than 45^ Whenever the device has been transported (inclined positions), leave for at least one hour before connecting to a socket outlet.
- Connect the device to the correct socket outlet (check the mains supply voltage).
- In the cooling function the warm exhaust air must be transferred outside by the exhaust air hose. An opening in the wall or window must therefore be provided.
Technical data
MKA 3002 M
| Coolant: R410A |
| Coolant quantity 540 g |
| Cooling capacity* 2366 W |
| Mains voltage 230 V ~ 50 Hz |
| Nominal power rating: 830 W |
| Energy efficiency class* B (EER 2.84) |
| Max. air throughput 350 cbm/h |
| Max. room size 70 m |
| Max. dehumidifier output (30°C/80%RH) 48 l/day |
| Fan speed levels 2 |
| Area of application: “Room temperature” 18-32°C |
| Sound pressure level ≤ 57 dB(A) |
| Dimensions (WxDxH) 40 x 38 x 75 cm |
| Net weight 30 kg |
MKA 3502 E
| Coolant: R410A |
| Coolant quantity 540 g |
| Cooling capacity* 2740 W |
| Mains voltage 230 V ~ 50 Hz | |
| Nominal power rating: | 1030 W |
| Energy efficiency class* | C (EER 2.57) |
| Max. air throughput 350 cbm/h | |
| Max. room size 80 m | 3 |
| Max. dehumidifier output (30°C/80%RH) 64 l/day | |
| Fan speed levels | 2 |
| Area of application: “Room temperature” 18-32°C | |
| Sound pressure level ≤ 58 dB(A) | |
| Dimensions (WxDxH) 40 x 38 x 75 cm | |
| Net weight 32 kg | |
- data according to EN 14511
Important safety instructions
- Read and comply with the safety instructions before you start to use the equipment.
- Keep the operating instructions in a safe place once you have read them and give them to all third parties who may also operate the air conditioner.
- Position the equipment in such a way that the mains plug is accessible at all times.
- Check the mains lead at regular intervals for signs of defects or damage. A damaged mains lead may only be replaced by an electrician or ISC GmbH in compliance with the relevant regulations.
This equipment is not designed for commercial use.
The equipment must never be used in bathrooms.
Children or infirm persons may use the equipment only under supervision. Children are not allowed to use the equipment as a toy.
The air conditioner is only suitable for air-conditioning in small- to medium-sized rooms. Never use it for special purposes such as for the storage of food, precision instruments, plants, animals, paints or works of art, since they could become damaged. - Check that the actual mains voltage is the same as the mains voltage specified on the rating plate.
The equipment may only be operated from a properly earthed shock-proof socket. - For electrical safety purposes we recommend that you install a residual current device circuit-breaker (earth-leakage circuit-breaker).
-
Important! Do not extend the cable and never use multiple plugs. Otherwise there is a risk that electrical safety can no longer be guaranteed.
-
Never pull the mains plug out of the socket while the equipment is running.
In the event of any abnormalities in the operation of the equipment (e.g. smell of burning), immediately switch off the equipment and pull the plug. There is a risk of electric shock or fire damage if the equipment is allowed to continue running with possible defects. - Never pull the plug out of the socket by pulling the cable. Hold the mains plug firmly to pull it out of the socket. Otherwise there is a risk of damaging the cable.
- Never actuate any switches with wet hands. Otherwise there is a danger of an electric shock.
- Never allow the cool air to blow directly at you and do not allow the air in the room to become too cold. This may lead to discomfort and may also be harmful to health.
- Never place and plants or animals directly in the path of the flow of cool air. Plants or animals may suffer under the effect of the flow of cool air.
- Never poke fingers or objects in the air outlet vents. The rotating fan can cause injuries.
- Never attempt to repair the air conditioner yourself. Improper repair and maintenance work can result in damage to the equipment and cause fires or damage from condensation water.
Always switch off the equipment and pull the plug before you start to clean it (risk of injury). - Never clean the air conditioner with water. This could result in an electric shock or fire.
- Do not use any inflammable agents for cleaning purposes as they could cause a fire or deformation.
- Never touch any metal parts on the inside of the equipment when removing the air filter. You may injure yourself.
If the air conditioner is not used for a lengthy period of time the room has to be ventilated every now and then, otherwise there is a risk of lack of oxygen. - Never install the equipment in a room in which combustible gases can be emitted. Emitted gases may collect and cause an explosion.
- Never hold any burning objects close to the equipment if they could be directly affected by the emitted air. This may result in their not being completely burnt.
Pull the mains plug out of the socket if the equipment is not going to be used for some time.
Always switch off the equipment and pull out the power plug during a storm. Electrical parts may get damaged as a result of overvoltage. - If the coolant circuit should develop a leak, switch off the equipment immediately and contact your service partner.
There is a risk of harmful gas being generated if any of the coolant escapes and comes into contact with a flame. Switch off the equipment immediately.
- To avoid electromagnetic interference the device should be kept away from televisions and radios.
Packaging:
The unit is supplied in packaging to prevent it from being damaged in transit. Retain the packaging for later storage (e.g. in winter) of the device. If you should nevertheless wish to dispose of the packaging, remember that it is raw material and can therefore be reused or can be returned to the raw material system.
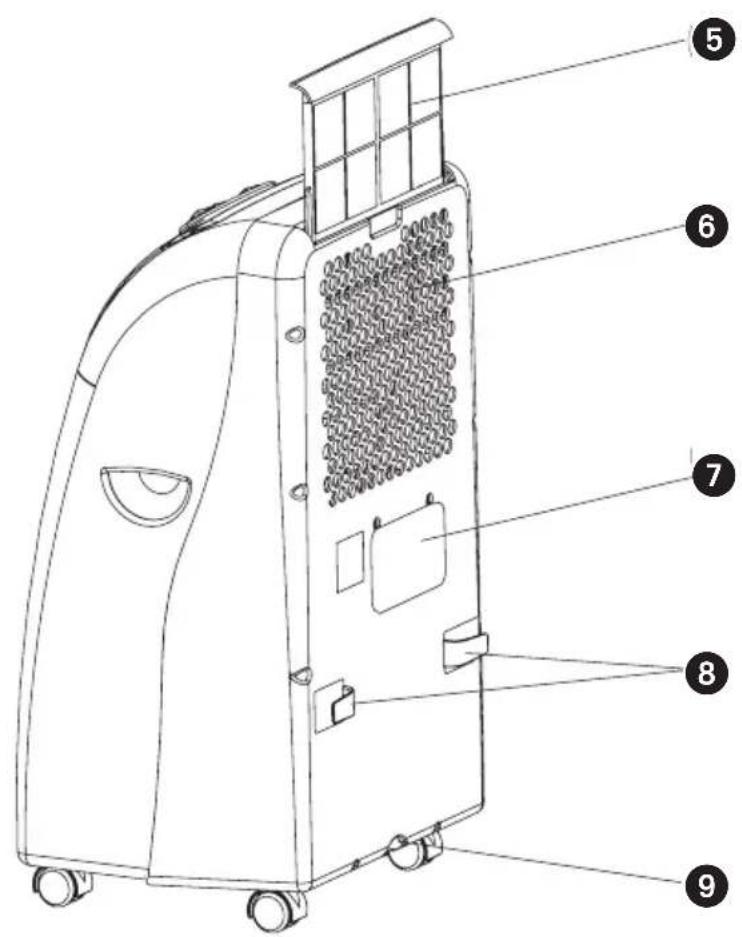
Accessories
11 Exhaust air connection fittings
12 Bushing ring
13 Exhaust air hose
14 Foam material (Used for exhaust air outlet through the window.)
15 Foam material (Used for exhaust air outlet through the open window and placed in the open section of the window. As far as possible, no additional warm air should come into the room from outside.)
16 Cap for the hole in the window/wall
17 Collection tank for the condensation water
18 Drainage water hose
19 Remote control (MKA 3502 E)
20 Activated carbon filter
GB
Description of the control elements
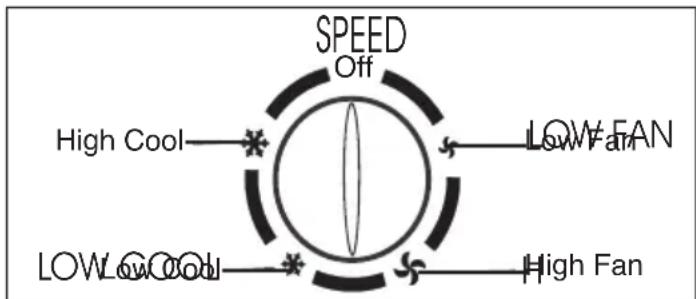
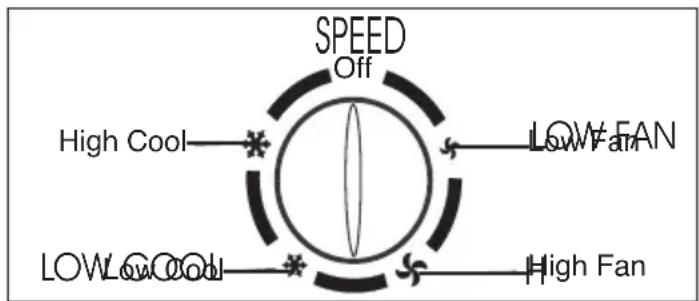
MKA 3002 M
- Voltage display
- Fan status indicator
- Cooling status indicator
- Condensation water tank "Full" indicator
- Thermostat (+18^ to +32^)
- Cooling and fan switch Low Fan; High Fan; Low Cool; High Cool and Off function
- Timer controller 1 - 8 hours can be set. The timer controller can be used to switch the system on/off.
Off = System switched off
Low Fan = Fan runs at slow speed
High Fan = Fan runs at high speed
Low Cool = Low cooling
High Cool = High cooling
Using the device for the first time
MAINS PLUG Plug the mains plug into the mains socket outlet.
START Set the timer controller to ON. The device starts up automatically. The device keeps running until it is switched off.
SWITCHING OFF Turn the timer controller to "OFF" and the device switches off immediately.
Setting the temperature
Set the thermostat according to your requirements. Turning in a clockwise direction reduces the set-point temperature.
Setting the timer
Set the timer according to your requirements (1 - 8 hours). The device switches off automatically once the set time has elapsed.
Description of the control elements
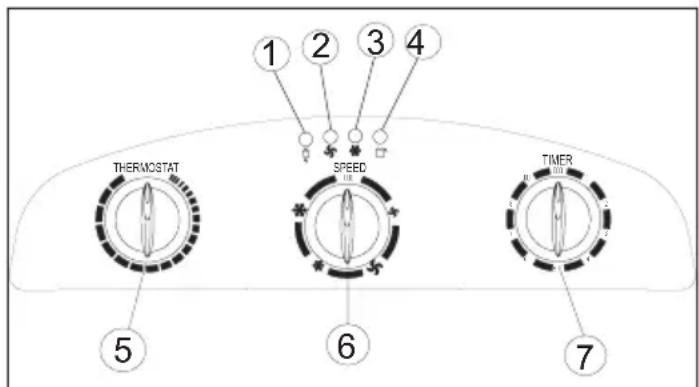
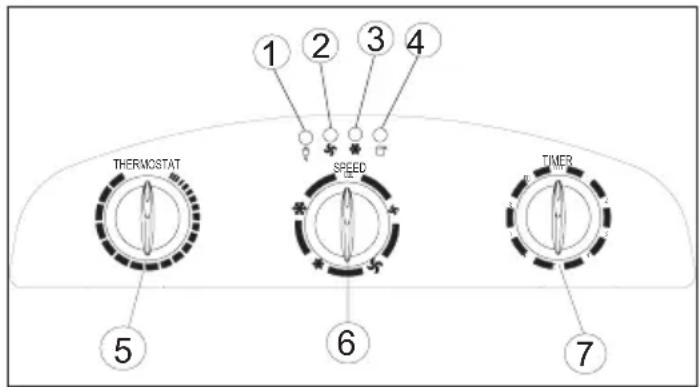
MKA 3502 E
- LED "Set temperature"
- LED "Room temperature"
- LED "Fan: Slow"
- LED "Fan: Fast"
- LED "Automatic mode set"
- LED "Cool mode set"
- LED "Fan mode set"
- Not assigned
- LED "Timer actuated"
- LED "Compressor on"
- "Warmer" selector
- "Cooler" selector
- "Fan speed" selector
- "Mode" selector
- "Timer" switch
- On/off switch
- LED indicator panel
Switching the device on and off
Press the On/Off switch. The device starts up automatically. If the ambient temperature:
is higher than 23^ the device will run in cooling mode;
- if it is between 20^ and 23^ the device will run in fan mode.
The status of the device, or mode in which it is running, will be shown by the corresponding LEDs (see indicator panel).
Note: The "Compressor on" LED (COMP) only lights up when the compressor is actually running. The LED indicator panel shows the current room
temperature.
To switch the device off, press the On/Off switch again.
Selecting the mode
Press the "Mode" selector (MODE) in the sequence "Automatic", "Cool", "Fan". The LED for the selected mode lights up (see indicator panel).
Setting the set-point temperature
Press the "Warmer" selector (TEMP. UP) or "Cooler" (TEMP.DOWN) to set your desired set-point temperature. If you press the "Warmer" or "Cooler" selector, the LED indicator panel will show your desired set-point temperature. Otherwise the LED indicator panel always shows the current room temperature. The device's cooling mode is set to 24^ .
Selecting the fan speed
Press the "Fan speed" selector (SPEED) to set the desired fan speed.
The LED for the mode lights up (see indicator panel). If the device is in "Automatic mode" (AUTO) the fan speed will be selected automatically by the device in dependency on the room temperature. The corresponding LED lights up. The "Fan speed" (SPEED) is deactivated.
Setting the timer
Press the switch for the "Timer" (TIMER) to set the desired operating time (1 - 12 h). The "Timer" (TIMER) LED lights up. If the timer is set, the device starts automatically. If you press the "Timer" switch, the time you have set will be shown in the LCD indicator panel. If the timer has not been switched on, the device will run continuously.
If you press the switch for the "Timer" (TIMER) without any of the other modes being switched on you can set the time that the device is to start up. If, for example, the timer shows "2", this means that the device will start up automatically in 2 hours time. All modes and functions can be set using the supplied remote control.
The remote control requires two MICRO (AAA) batteries.
In order to protect the compressor, it only starts up 3 minutes after the device starts up. The same applies when the device is switched off.
The cooling system switches itself off whenever the room temperature is below the value set on the thermostat. The air circulation/ventilation fan continues to run as set. If the room temperature increases again, the cooling system switches on again.
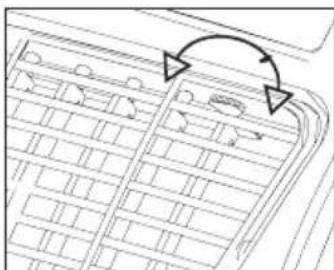
SETTING THE AIR FLOW DIRECTION
1. Adjusting the horizontal ventilation grille:
The horizontal direction of the air flow is determined by the horizontal ventilation grille. It has to be adjusted by hand.
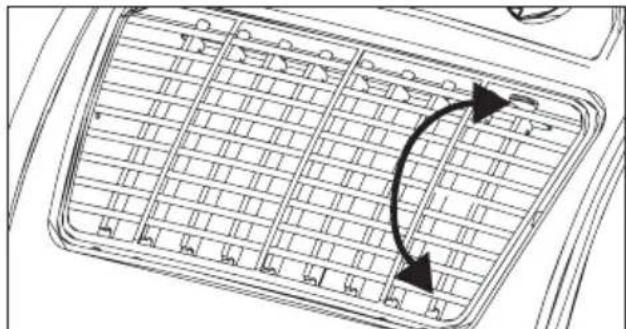
2. Adjusting the vertical ventilation grille:
The vertical direction of the air flow is determined by the vertical ventilation grille. It has to be adjusted by hand.
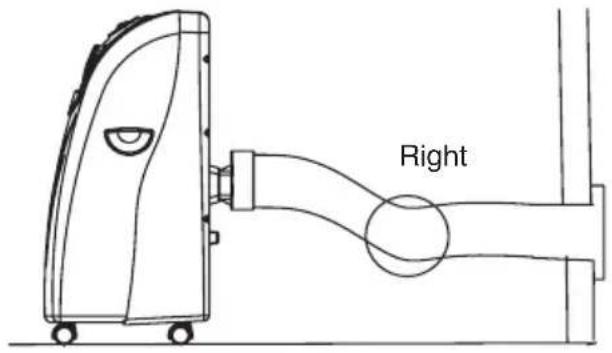
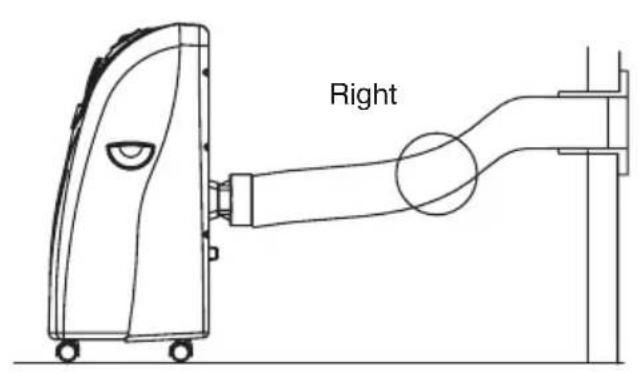
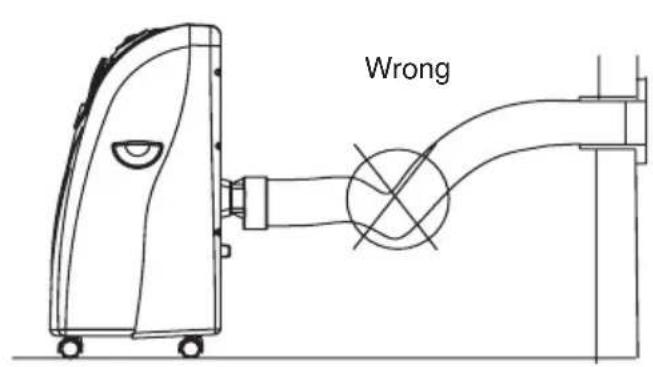
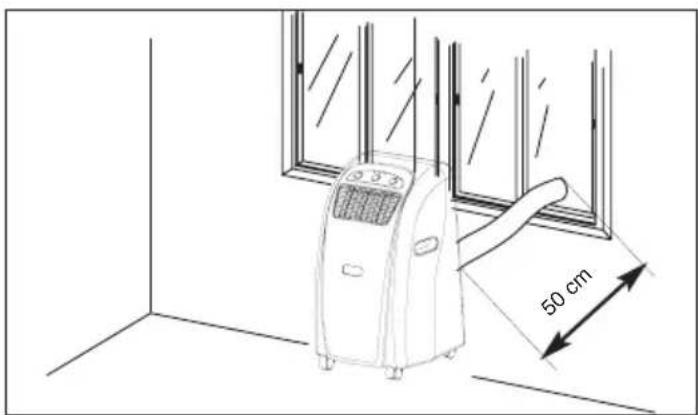
INSTALLING THE EXHAUST AIR HOSE
Use only the supplied exhaust air hose. The length of the exhaust air hose can be varied from between 300 mm to 1500 mm. For the most effective cooling the hose should be as short as possible. Avoid kinks are excessive bends in the hose so that the exhaust air can be transferred out without hindrance. If you ignore this advice, the device as a whole may overheat and shut down. This could result in damage to the device.
Warning!
The length of the exhaust air hose is matched to the technical specifications of the device. Never extend the hose as this could lead to malfunctions or faults on the device.
A) Installing the exhaust air hose through an open window
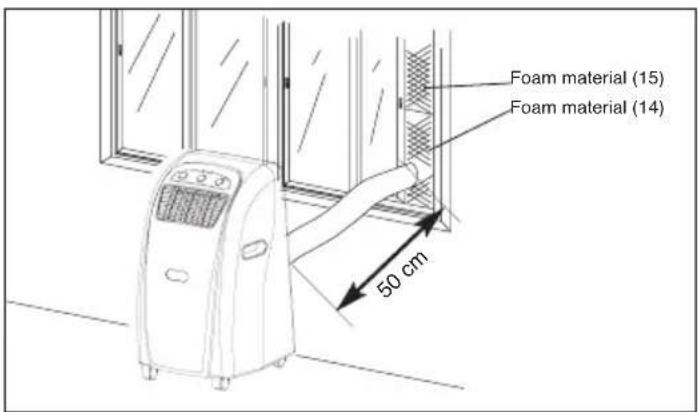
Use the foam parts and shorten them if required. Guide the exhaust air hose through the opening in the foam to the outside. Secure the window so that the foam is kept firmly in place.
Note: Take appropriate precautions to prevent unauthorized entry through the window.
B) Installation of the exhaust air hose through the window pane or the wall

Cut or drill a hole of approx. 130mm diameter though the window pane or the wall.
- Insert the bushing ring from the outside to the inside and fasten.
Feed the exhaust air hose through the bushing ring.
- When the system is not being used, fit the cap on the bushing ring on the outside.
C) Draining off the condensation water with the water tank
ALL OF THE CONDENSATION WATER MUST BE DRAINED OFF BEFORE YOU EVER RELOCATE OR STOP USING THE DEVICE:
Draining off the condensation water with the tank.
Note on MKA 3002 M
When the condensation water tank is full the
"Condensation water tank full" indicator lights up and the compressor switches off automatically. Only the fan motor continues to run. The cooling function stops.
Note on MKA 3502 E
When the condensation water tank is full the compressor and the fan motor shut down. The "COMP" LED flashes.
Empty the tank as described below:
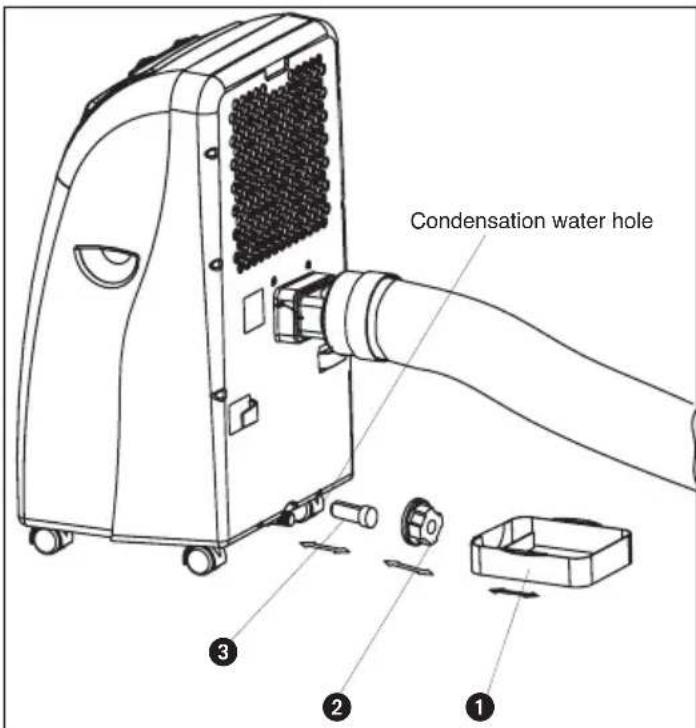
- Pull out the mains plug.
- Slide the tank (1) under the drainage screw (2).
- Unscrew the drainage screw (2).
- Remove the bung (3).
- The condensation water drains out into the drip bowl.
- Once the condensation water has been completely emptied, fit the bung (3) and the drainage screw (2) back on again.
- The device is then ready to be used again.
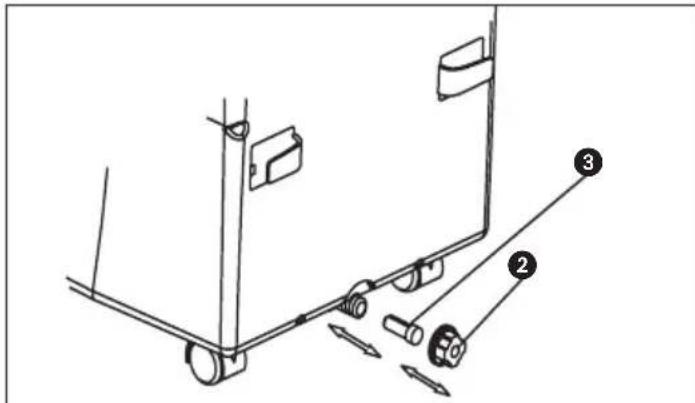
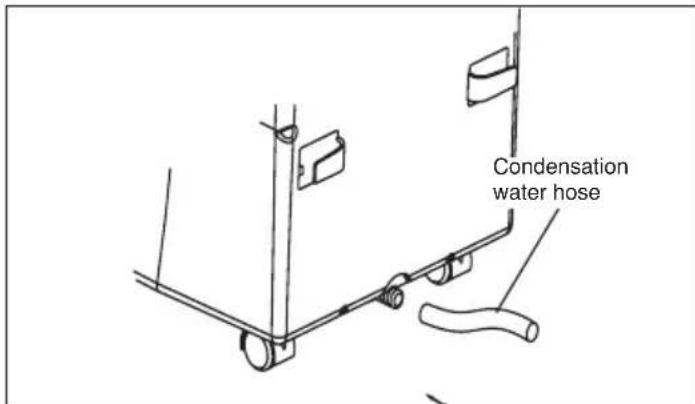
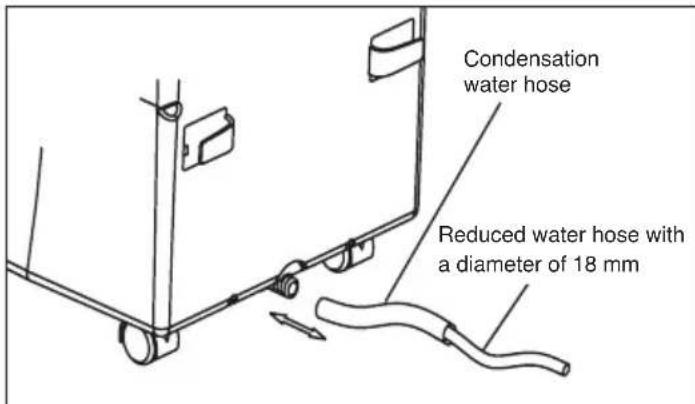
D) Draining off the condensation water with the condensation water hose
- Pull out the mains plug.
- Unscrew the drainage screw (2).
- Remove the bung (3).
- Fit the condensation water hose and secure with the clamp.
- The drainage hose can be extended with a hose with a diameter of 18mm . If you do so, make sure you use a suitable connector.
Note:
The drainage hose must run to the outside with a slight fall.
MKA 3002 M
The "Condensation water tank full" is defective.
MKA 3502 E
The LED "COMP." Does not flash because the tank cannot become full any more.
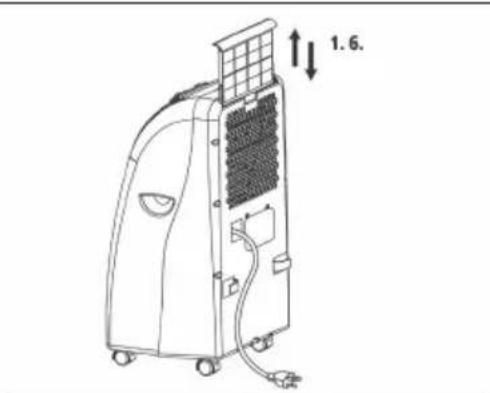
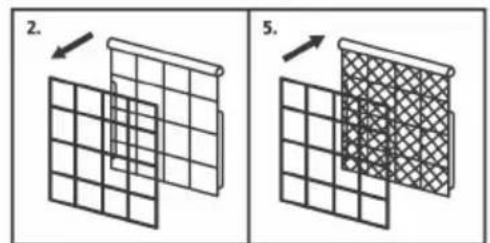
Replacing the carbon filter
- Take out the filter frame
- Remove the filter fastener from the filter frame
- Take the carbon filter out of the bag
- Place the carbon filter in the filter frame
- Fasten the filter with the filter fastener
- Slide in the filter frame

Maintenance
- Always pull out the mains plug first to avoid an electric shock or risk of fire.
- Use only gentle cleaner and a soft cloth to clean the filter and the housing. Never use aggressive media, petrol, alcohol or thinner. Only fit the filter back in place when thoroughly dry.
- At the end of the season, please empty the water tank, roll up the power cable, clean the filter and the housing, then fit the filter back in place when dry, and pack the device back in the original box for storage. Never place any heavy objects on the device.
TROUBLESHOOTING
If the device is operated properly you should experience no problems with malfunctions or faults. In the event of any malfunctions or faults, please check the following before you contact your customer services.
| Problem Possible cause | |
| Device does not work | Is the mains plug properly connected? Isthereavoltagessupplyatthemainsssocketoutlet? Istheroomtemperaturebelowtheset-pointtemperature? Isthecondensationwatertankfull? |
| Thedeviceredoesnotprovide satisfactorycooling | Istheroomexposedtodirectsunlight? Areanydoorsandwindowsopen? Aretherealotofpeopleintheroom? Isadeviceintheroomgeneratingalotofheat? |
| Weak ventilation performance | Is the air hose blocked? Isthefiltersoiied? Is the air inlet or air outlet blocked? |
| The device is too loud | Has the device been set up on an uneven surface/at an angle? |
| Thecompressordoesnetworklsthecor | densationwatertankfull? Is the compressor overheated and the overheating cutout has switched the compressor off? Wait until the compressor cools down. |
Have the device inspected by a specialist firm when you have used it for some time.
OFF = installation hors circuit
Low Cool = minder koeling
High Cool =meer koeling
X 89/336/EWG_93/68/EEC
95/54/EG:
90/396/EWG
97/68/EG:
89/686/EWG
EN 55014-1/A2; EN 55014-2/A1; EN 61000-3-2; EN 61000-3-3/A1; EN 60335-2-40/A12; EN 60335-1/A12; EN 50366/A1
Subject to change without notice
erklart folgende Konformität gemäß EU-Richtlinie und Normen für Artikel
declares conformity with the EU Directive
and standards marked below for the article declare la conformite suivante selon la
directive CE et les normes concernant l'article 14.1, 15.1, 16.1, 17.1, 18.1, 19.1, 20.1, 21.1, 22.1, 23.1, 24.1, 25.1, 26.1, 27.1, 28.1, 29.1, 30.1, 31.1, 32.1, 33.1, 34.1, 35.1, 36.1, 37.1, 38.1, 39.1, 40.1, 41.1, 42.1, 43.1, 44.1, 45.1, 46.1, 47.1, 48.1, 49.1, 50.1, 51.1, 52.1, 53.1, 54.1, 55.1, 56.1, 57.1, 58.1, 59.1, 60.1,
NL Verklaart de volgende conformiteit in overeienstemming met de EU-richtlijn en normen voor het artikel
E clara la asigniente conformidad a tenor de la directiva y normas de la UE para el articulo declara a seguinete conformadde de accordo
P com a directiva CE e nomas para o artigo forklarar foliande overensstammelse enl. EU
⑤ direktiv och standarder for articeln
ilmoittaa seuraavaa Euroopan unionin direktivien ja normien mukaista yhdenmukaisuutta tuotteelle
N erklærhervedfolgende samsvar med EUdirektiv og standarder for artikkel
3aABJETO COOTBCTBNI TOBapa CNeDyUoNIM DnpeKtNBAM HOpMaM EC
izjavljue sljedecu uskladjenost s odredbama i normama EU za artikl.
rodeclare urmatoarea conformitate cu linia directoare CE si normele valabile pentru articolul. urun ile ilgili olarak AB Yonetmelikleri ve
T Normlari geregince asagidaki uygunluk aiklas masini sunar.
δηλωει Νν ακόλουθη σύμφωνι σύμφωνι με
Tην Εθηγία EE και τα πρότυπο γία το προίόν
① dichiara la seguente conformità secondo la direttiva UE e le norme per l'articolo
@ attesterer ffolgende overensstemmelse i henhold til EU-direktiv og standarder for produit
prohlasujne nasledujici shodu podle smernice EU a norem pro vyrobek.
a kovetkez o konformitast jelenti ki a termekek
H re vonatkozo EU-iranyvonalak es normak szerint
kojasnjuje sledeco skladnost po smernici EU in normah za artikel.
deklaruje zgodnosc wymienionego ponizej artykulu z nastepujacymi normami na podstawie dyrektywy WE.
vydáva nasledujúce prehlásenie o zhode podla smernice EU a noriem pre vyrobok.
EeKnapnpa CneHOTcBbETCTBHe CbrNaCHO DnpeKtNBte HOpMTE Ha EC 3a npOykTa.
BnBnnc npo BiNnOBiHicntb 3rIdHO 3 DnpeKtNbOo CC Ta cTaHdaptAmu, uHHm n da Horo TObApy deklareerib vastavuse ijarnevatele EL direktivi
EB dele ja normidele
deklaruoja atitikti pagal ES direktyvas ir normas\
straipsniui
izjavljije sledeci konformitet u skladu s odred bom EZ i normama za articl
Atbilstibas sertifikats appliecina zemak mineto precu
atbilstibu ES direktivam un standartiem
Samræmisyfiríssing staöfestir eftirfarandi samræmi samkvaem reglum Evfropubandalagsins og stöllum fyrir vorur
Mobile Klimaanlage MKA 3502E
98/37/EG
87/404/EWG
73/23/EWG_93/68/EEC
R&TTED 1999/5/EG
97/23/EG
2000/14/EG:
89/336/EWG_93/68/EEC
95/54/EG:
90/396/EWG
97/68/EG:
89/686/EWG
EN 55014-1/A2; EN 55014-2/A1; EN 61000-3-2; EN 61000-3-3/A1; EN 60335-2-40/A12; EN 60335-1/A12; EN 50366/A1
Subject to change without notice
⑥ Technische Änderungen vorbehalten
Technical changes subject to change
Sous réserve de modifications
Technische wijzigingen voorbehonden
Con riserva di apportare modifiche tecniche
Zastrzega sie wpwadzanie zmian technicznych
D
The reprinting or reproduction by any other means, in whole or in part, of documentation and papers accompanying products is permitted only with the express consent of ISC GmbH.
F
Never place any electric tools in your household refuse.
To comply with European Directive 2002/96/EC concerning old electric and electronic equipment and its implementation in national laws, old electric tools have to be separated from other waste and disposed of in an environment-friendly fashion, e.g. by taking to a recycling depot.
Recycling alternative to the demand to return electrical devices:
As an alternative to returning the electrical device, the owner is obliged to cooperate in ensuring that the device is properly recycled if ownership is relinquished. This can also be done by handing over the used device to a returns center, which will dispose of it in accordance with national commercial and industrial waste management legislation. This does not apply to the accessories and auxiliary equipment without any electrical components which are included with the used device.
All of our products undergo strict quality checks to ensure that they reach you in perfect condition. In the unlikely event that your device develops a fault, please contact our service department at the address shown on this guarantee card. Of course, if you would prefer to call us then we are also happy to offer our assistance under the service number printed below. Please note the following terms under which guarantee claims can be made:
- These guarantee terms cover additional guarantee rights and do not affect your statutory warranty rights. We do not charge you for this guarantee.
- Our guarantee only covers problems caused by material or manufacturing defects, and it is restricted to the rectification of these defects or replacement of the device. Please note that our devices have not been designed for use in commercial, trade or industrial applications. Consequently, the guarantee is invalidated if the equipment is used in commercial, trade or industrial applications or for other equivalent activities. The following are also excluded from our guarantee: compensation for transport damage, damage caused by failure to comply with the installation/assembly instructions or damage caused by unprofessional installation, failure to comply with the operating instructions (e.g. connection to the wrong mains voltage or current type), misuse or inappropriate use (such as overloading of the device or use of non-approved tools or accessories), failure to comply with the maintenance and safety regulations, ingress of foreign bodies into the device (e.g. sand, stones or dust), effects of force or external influences (e.g. damage caused by the device being dropped) and normal wear resulting from proper operation of the device.
The guarantee is rendered null and void if any attempt is made to tamper with the device.
- The guarantee is valid for a period of 2 years starting from the purchase date of the device. Guarantee claims should be submitted before the end of the guarantee period within two weeks of the defect being noticed. No guarantee claims will be accepted after the end of the guarantee period. The original guarantee period remains applicable to the device even if repairs are carried out or parts are replaced. In such cases, the work performed or parts fitted will not result in an extension of the guarantee period, and no new guarantee will become active for the work performed or parts fitted. This also applies when an on-site service is used.
- In order to assert your guarantee claim, please send your defective device postage-free to the address shown below. Please enclose either the original or a copy of your sales receipt or another dated proof of purchase. Please keep your sales receipt in a safe place, as it is your proof of purchase. It would help us if you could describe the nature of the problem in as much detail as possible. If the defect is covered by our guarantee then your device will either be repaired immediately and returned to you, or we will send you a new device.
Of course, we are also happy offer a chargeable repair service for any defects which are not covered by the scope of this guarantee or for units which are no longer covered. To take advantage of this service, please send the device to our service address.
F BULLETIN DE GARANTIE
Chère Cliente, Cher Client,


- Description of device
- GB
- Before using
- Technical data
- Important safety instructions
- Packaging:
- Accessories
- Description of the control elements
- MKA 3002 M
- Using the device for the first time
- Setting the temperature
- Setting the timer
- MKA 3502 E
- Switching the device on and off
- Selecting the mode
- Setting the set-point temperature
- Selecting the fan speed
- SETTING THE AIR FLOW DIRECTION
- Adjusting the horizontal ventilation grille:
- Adjusting the vertical ventilation grille:
- INSTALLING THE EXHAUST AIR HOSE
- Warning!
- C) Draining off the condensation water with the water tank
- Note on MKA 3502 E
- D) Draining off the condensation water with the condensation water hose
- Note:
- Replacing the carbon filter
- Maintenance
- TROUBLESHOOTING
- Mobile Klimaanlage MKA 3502E
- D
- F
- F BULLETIN DE GARANTIE
- Chère Cliente, Cher Client,
Brand : EINHELL
Model : MKA 3502E
Category : Air conditioner