USER MANUAL CSV12CTP PANASONIC
Before using your air-conditioner, please read this operating instructions carefully and keep it for future reference.
COOLING MODEL :-
(Refrigerant: R410A)

Indoor CS-V12CTP CS-V18CTP CS-V24CTP
Outdoor CU-V12CTP5 CU-V18CTP5 CU-V24CTP5
HEAT-PUMP MODEL:
(Refrigerant: R22)
Indoor
S-A12CTP
S-A18CTP
S-A24CTP
Outdoor
U-A12CTP5
U-A18CTP5
U-A24CTP5
Panasonic
Room Air Conditioner
OPERATING INSTRUCTIONS

PANASONIC HA AIR-CONDITIONING (M) SDN. BHD.
LOT 2, PERSIARAN TENGKU AMPUAN, SECTION 2
SHAH ALAM NCB TRIAL SITE, 4500 SHA
Outdoor
A12CTP5
A18CTP5
A24CTP5
F567398

Thank you for purchasing our Panasonic Room Air Conditioner.
CONTENTS
Features. 1
Safety Precautions 2
Installation Precautions
Operation Precautions
▶Name of Each Part 3~4
Indoor Unit
Outdoor Unit
■Accessories
Remote Control
Preparation Before Operation 5
Indoor Unit
How to Operate 5-6
Setting the Timer 7
Convenience Operation 7
Sleep Mode Operation
Care and Maintenance 7-8
■Cleaning the Indoor Unit and Remote Control
Cleaning the Air Filter
Pre-season Inspection
When the Air Conditioner is Not Used for an
Extended Period of Time
Recommended Inspection
Helpful information. 8
Energy Saving and Operation Hints 8
Troubleshooting 9
Normal Operation
Abnormal Operation
Call the Dealer Immediately
Note:
Before using your air conditioner, please read this operating instructions carefully and keep it for future reference.

FEATURES
For your convenience to operate in the dark.
(Refer page 4)
Automatic Operation
Sense indoor temperature to select the optimum mode.
Refer page 5
Comfortable Airflow Operation
(Vertical Airflow Direction)
Minute airflow direction control creates a pleasant room environment.
(Refer page 6)
ON/OFF Dual Setting Timer
To program the room air conditioner to turn itself on and to ensure you maximum comfort when sleeping.
(Refer page 7)
Sleep Mode
Prevent the room from getting too hot or too cold while you are sleeping.
Refer page 7
Auto Restart Control
Restart the unit automatically after power failure.
(Refer page 8)
Environmental Friendly
(For Refrigerant: R410A Models)
Zero ozone depleting potential and low global warming potential by using R410A refrigerant.

Warning
1) If the supply cord is damaged or needed to be replaced, it must be replaced by the manufacturer or its service agent or a similarly qualified person in order to avoid a hazard. 2) Remove power plug or disconnect from the main before servicing this appliance. (3) Do not repair by yourself. In case of malfunction of this appliance, do not repair by yourself. Contact the sales dealer or service dealer for a repair. 4) Turn off the power (Isolation from main power supply). Pull off the power plug from the receptacle, or switch off the breaker, or switch off the power disconnecting mean to isolate the equipment from the main power supply in case of an emergency.
Caution
DISCONNECT THE MAIN PLUG FROM THE SUPPLY SOCKET WHEN NOT IN USE, WHERE SUPPLY CONNECTION IS VIA MAIN PLUG.
Airborne noise.
A-weighted sound pressure level of this appliance is less than 70dB (A) under the JIS C 9612 test conditions.
Maximum cooling operation
1 m from the unit
IMPORTANT
Replacement or installation of power plugs shall be performed by authorised/qualified personnel only.
The wires in this main lead are colored in accordance with the following code:
Green and Yellow: Earth
Blue: Neutral
"As the colors of the wires in the main lead of this appliance may not correspond with the colored markings identifying the terminals in your plug, proceed as follows:
The wire which is colored green and yellow must be connected to the terminal in the plug which is marked by the letter E or by the safety earth symbol or colored green or green and yellow.
The wire which is colored blue must be connected to the terminal which is marked with the letter N or colored black.
The wire which is colored brown must be connected to the terminal which is marked with the letter L or colored red."
Note
Please remember to record the following:
Model Number, Serial Number, Dealer's Name, Date Purchased



SAFETY PRECAUTIONS
Before operating, please read the following "Safety Precautions" carefully.
To prevent personal injury, injury to others, and property damage, the following instructions must be followed. Incorrect operation due to failure to follow instructions will cause harm or damage, the seriousness of which is classified as follows:

This sign warns of death or serious injury.

This sign warns of damage to property.
The instructions to be followed are classified by the following symbols:

This symbol (with a white background) denotes an action that is PROHIBITED.

These symbols (with a black background) denote actions that are COMPULSORY.
Installation Precautions

Do not install, remove and reinstall the unit by yourself.
Improper installation will cause leakage, electric shock or fire. Please engage an authorized dealer or specialist for the installation work.
This equipment must be earthed and installed with ELCB.
It may cause electrical shock or fire in case of malfunction.


This room air conditioner must be earthed. Improper grounding could cause electric shock. - Ensure that the drainage piping is connected properly. Otherwise, water will leak out.

Do not install the unit in a potentially explosive atmosphere. Gas leak near the unit could cause fire.
Operation Precautions

This sign warns of death or serious injury.

Do not share outlet. Do not insert plug to operate the unit. Do not pull out plug to stop the unit. Do not operate with wet hands. Do not damage or modify the power cord. Do not insert finger or other objects into the indoor or outdoor units. Do not expose directly to cold air for a long period.

Plug in properly. Use specified power cord.

If abnormal condition (burnt smell, etc.) occurs, switch off and unplug the power supply.


This sign warns of injury

Do not pull the cord to disconnect the plug. Do not wash the unit with water.
Do not use for other purposes such as preservation. Do not use any combustible equipment in the airflow direction. Do not sit or place anything on the indoor or outdoor unit.

- Switch off the power supply before cleaning.
- Ventilate the room regularly. Pay attention as to whether the installation rack is damaged after long period of usage.

- Switch off the power supply if the unit is not used for a long period.


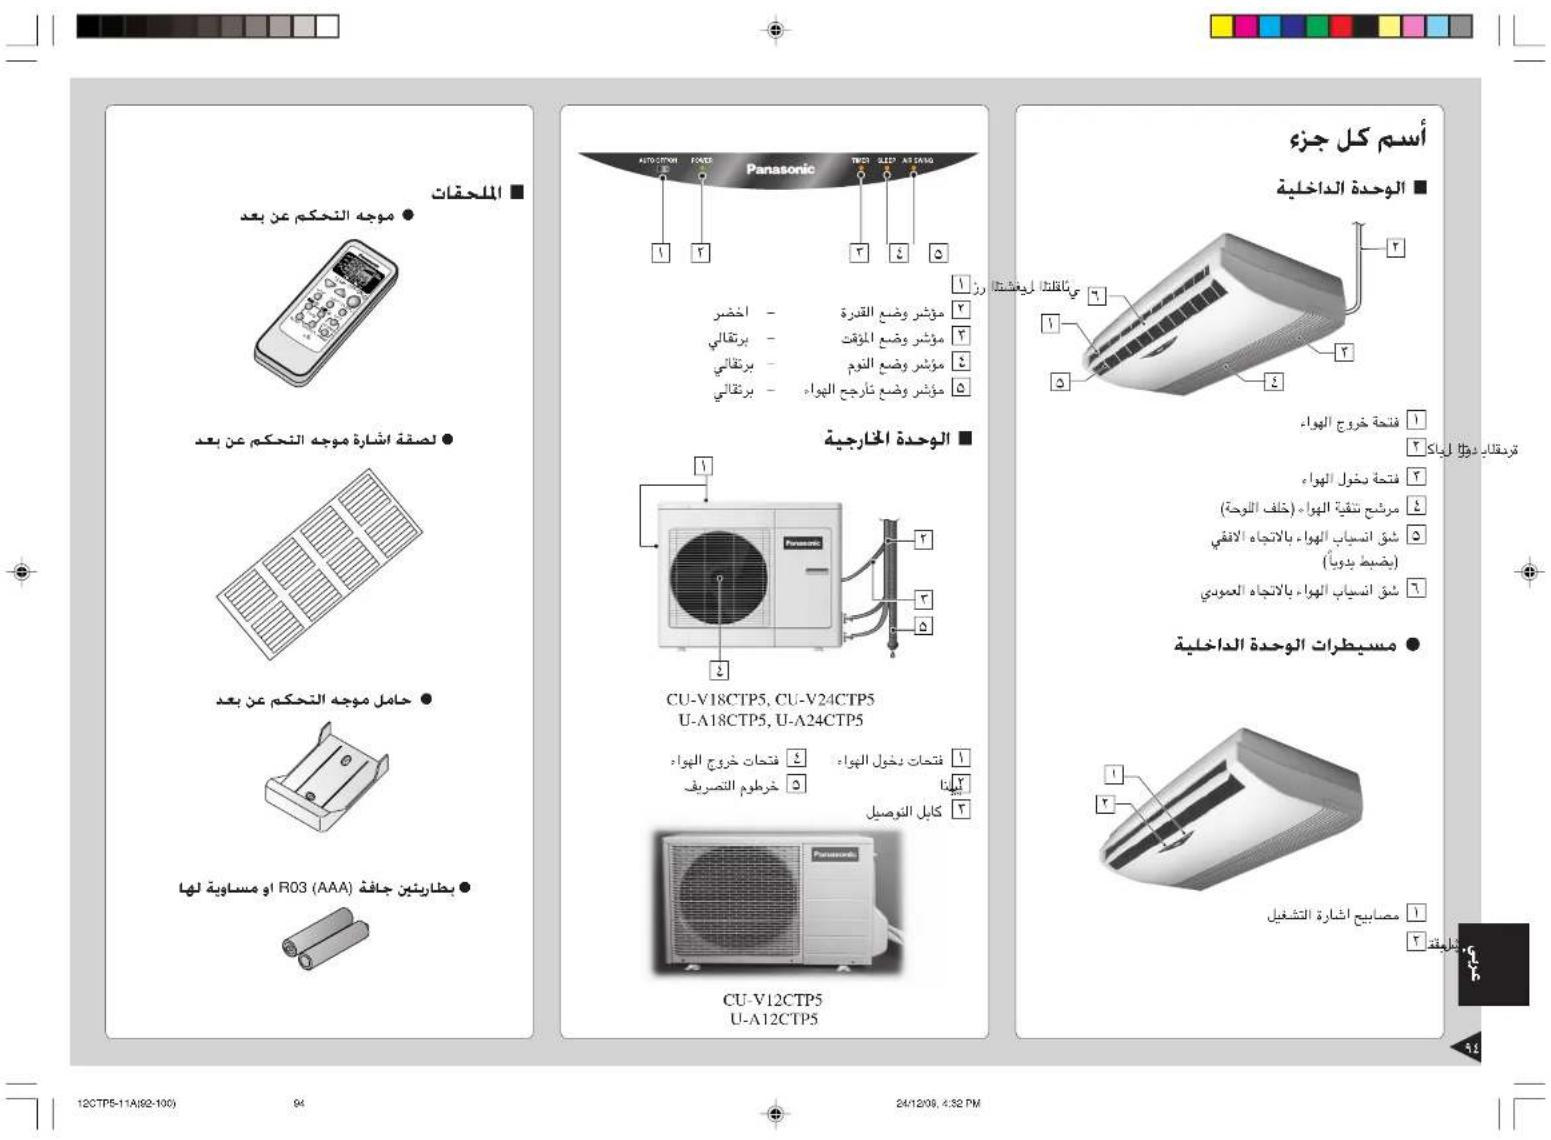
NAME OF EACH PART
Indoor Unit
Air Outlet Vent 2 Power Supply Cord 3 Air Intake Vent 4 Air Filters (behind the panel) 5 Horizontal Airflow Direction Louver (manually adjusted) 6 Vertical Airflow Direction Louver
Indoor Unit Controls
Operation Indication Lamps 2 Signal Receptor

Auto Operation Button 2 Power Mode Indicator - GREEN 3 Timer Mode Indicator - ORANGE 4 Sleep Mode Indicator - ORANGE 5 Air Swing Mode Indicator - ORANGE
Outdoor Unit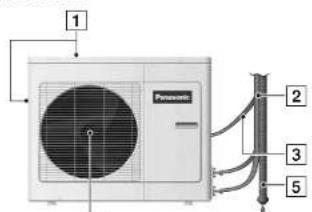

CU-V18CTP5, CU-V24CTPS
U-A18CTPS, U-A24CTPS
[1] Air Intake Vents [2] Piping [3] Connecting Cable
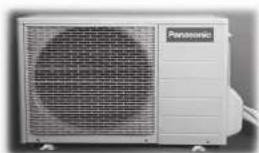
CU-V12CTP5
U-A12CTP5
■ Accessories
Remote Control
Remote Control Indication Sticker, Remote Control Holder
- Two RO3 (AAA) dry-cell batteries or equivalent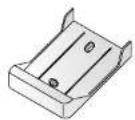




NAME OF EACH PART
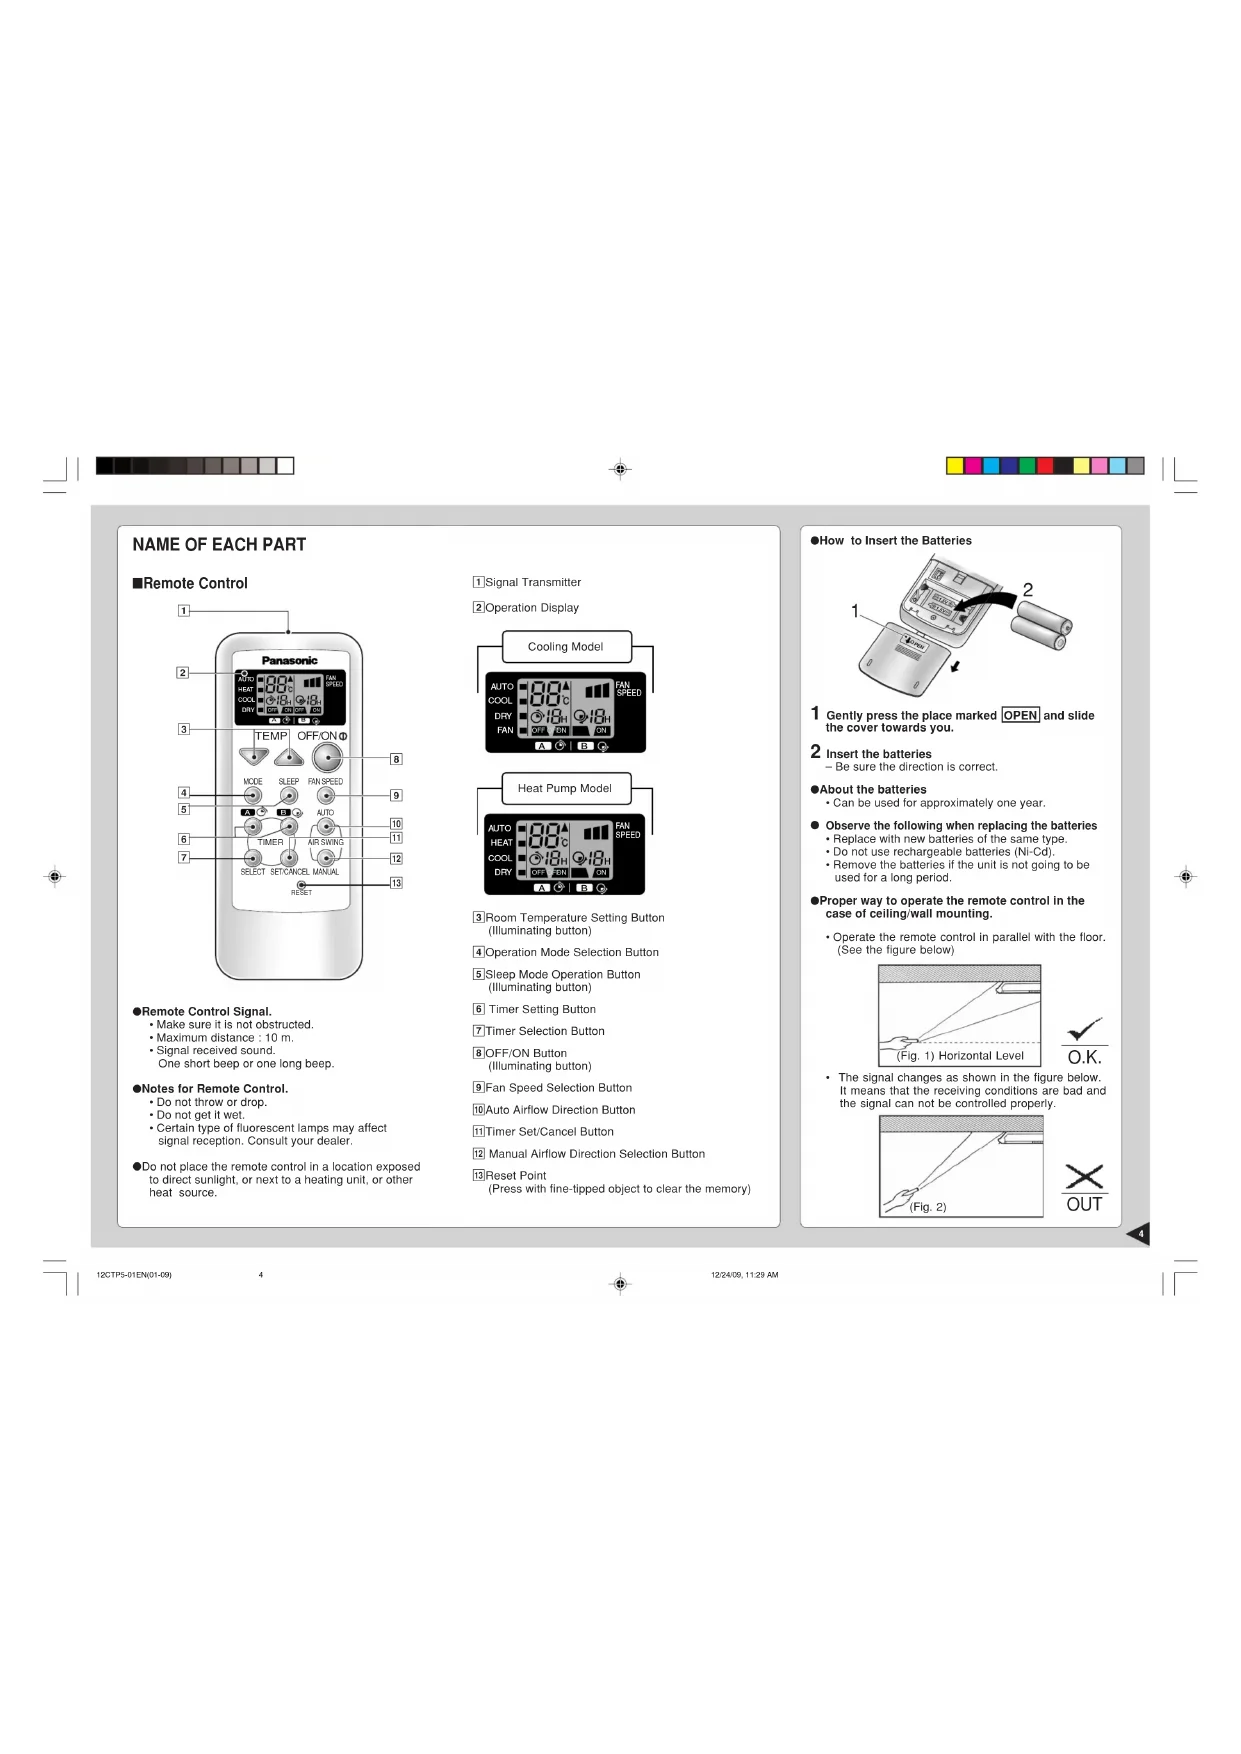
Remote Control
Remote Control Signal.
Make sure it is not obstructed. Maximum distance: 10 m. Signal received sound: One short beep or one long beep.
Notes for Remote Control.
Do not throw or drop. Do not get it wet. Certain types of fluorescent lamps may affect signal reception. Consult your dealer.
Do not place the remote control in a location exposed to direct sunlight, or next to a heating unit, or other heat source.
1 Signal Transmitter Operation Display


3 Room Temperature Setting Button (Illuminating button) 4 Operation Mode Selection Button 5 Sleep Mode Operation Button (Illuminating button) 6 Timer Setting Button 7 Timer Selection Button 8 OFF/ON Button
(Illuminating button)
9 Fan Speed Selection Button 10 Auto Airflow Direction Button 11 Timer Set/Cancel Button 12 Manual Airflow Direction Selection Button 13 Reset Point
(Press with fine-tipped object to clear the memory)
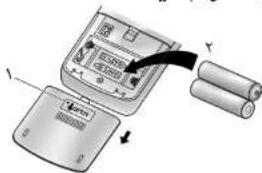
How to Insert the Batteries
1 Gently press the place marked OPEN and slide the cover towards you.
2 Insert the batteries
- Be sure the direction is correct.
About the batteries
Can be used for approximately one year.
- Observe the following when replacing the batteries
- Replace with new batteries of the same type. Do not use rechargeable batteries (Ni-Cd).
- Remove the batteries if the unit is not going to be used for a long period.
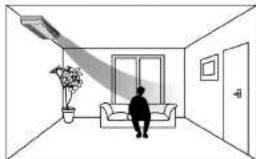
Proper way to operate the remote control in the case of ceiling/wall mounting.
- Operate the remote control in parallel with the floor. (See the figure below)


The signal changes as shown in the figure below, it means that the receiving conditions are bad and the signal cannot be controlled properly.


Indoor Unit 1: Connect the power supply cord to an independent power supply.
HOW TO OPERATE
Setting Mode - Press [2] to select: Cooling Model. To start the operation, press. - POWER indicator (green) on the indoor unit will light up. To stop, press once more.
AUTO - Automatic Operation, COOL - Cooling Operation, DRY - Soft Dry Operation, FAN - Air Circulation Operation
Heat Pump Model
AUTO - Automatic Operation, HEAT - Heating Operation, COOL - Cooling Operation, DRY - Soft Dry Operation
Setting Temperature
- Press [3] to increase or decrease the temperature. The temperature can be set between 16°C and 30°C. Recommended temperature:
During AUTO Operation, press [3] to select:
Operation with 2°C higher than the standard temperature. Operation with the standard temperature.
Operation with 2°C lower than the standard temperature.
Standard Temperature - Once the Automatic Operation is selected, the indoor temperature sensor operates automatically to select the desired operation mode with Cooling or Soft Dry. After the operation mode has been selected, the mode does not change.
At the beginning of the automatic operation, Heating, Cooling, or Soft Dry is automatically selected according to the indoor temperature. After the operation mode has been selected, the mode does not change.
Operation Details
COOL - Cooling Operation
- To set the room temperature at your preference for cooling comfort.
AUTO - Automatic Operation
Senses indoor temperature to select the optimum mode. - Temperature is not displayed on the remote control during AUTO operation.
DRY - Soft Dry Operation
A very gentle Cooling Operation, prior to dehumidification. It does not lower the room temperature. - During Soft Dry operation, the indoor fan operates at Low Fan Speed.
HEAT - Heating Operation
(for Heat Pump Model only) - Heat is obtained from outdoor air to warm up the room. When the outdoor ambient air temperature falls, the heating capacity of the unit might be reduced. Defrosting Operation: Depending on the outdoor temperature, the operation occasionally stops to melt the frost on the outdoor unit.
FAN - Air Circulation Operation
(for Cooling Model only)
- Heated air rises and collects at the top of the room. The air circulation circulates the heated air downward, thus increasing heating effectiveness. When the unit is installed floor mounted, you should set the temperature higher than that of ceiling mounted.
At ceiling mounted
At floor mounted



Setting the Fan Speed
FAN Low Fan Speed
FAN Medium Fan Speed
FAN - 2018 Speed
AUTO
FAN-Automatic Fan Speed
The speed of the indoor fan is adjusted
automatically according to the operation.
The indoor fan stops occasionally during
cooling operation.
Vertical Airflow Direction
Manual Operation
- Press and hold the Manual Airflow Direction
Selection Button [5], then release the button at the desired airflow direction.
Cooling/Soft Dry/
Heating (for Heat-Pump Model only)
The airflow direction can be adjusted as desired by using the remote control. This is effective when you want to cool yourself directly, such as when coming out of the bath. The louver can be adjusted within a range between the horizontal and 25 degrees downward at Cooling and Soft Dry Operation, and between the horizontal and 45 degrees downward at Heating Operation. (for Heat-Pump Model only)


Automatic Operation
Press the Auto Airflow Direction Button 6
Cooling/Soft Dry
The louver will automatically swing up and down to create the feeling of a refreshing breeze.

- Heating (for Heat-Pump Model only)
When the discharge air temperature is low such as at starts of heating operation, the air blows at horizontal level.
As the temperature rises, the hot air blows in a downwards direction.


Setting the Horizontal Airflow Direction

Use this air conditioner under the following conditions:
Cooling Model (Unit in °C)
| DBT: Dry Bulb Temp
WBT: Wet Bulb Temp | Indoor Outdoor |
| DBT | WBT | DBT | WBT |
| Maximum Temperature | 32 | 23 | 43 | 26 |
| Minimum Temperature | 16 | 11 | 16 | 11 |
Heat Pump Model (Unit in °C)
| DBT: Dry Bulb Temp
WBT: Wet Bulb Temp | Indoor | Outdoor |
| DBT | WBT | DBT | WBT |
| Maximum Temperature-Cooling
(Maximum Temperature-Heating) | 32
(30) | 23
(-) | 43
(24) | 26
(18) |
| Minimum Temperature-Cooling
(Minimum Temperature-Heating) | 16
(16) | 11
(-) | 16
(-5) | 11
(-6) |
Notes
- If the unit is not going to be used for an extended period of time, turn off the main power supply. If it is left at the ON position, approximately 2.0 W of electricity will be used even if the indoor unit has been turned off with the remote control.
- If operation is stopped, then restart immediately, the unit will resume operation only after 3 minutes.


SETTING THE TIMER
Press the Timer Selection Button 1. - Timer indicator on the indoor unit will light up.
- Select one of the following five types of operation
- Each time the button is pressed, the operation is shifted in the arrow direction.

- Then press the Timer Setting Button 2 or 3 to the desired number of hours. (Number of hours which can be set: 1 ~ 12)
- Press the Timer Set/Cancel Button 4.
Sleep Mode Operation
To obtain a comfortable room temperature while sleeping:- Press - Sleep mode indicator on the indoor unit will light up.
- To cancel this operation, press once more.
- Sleep Mode Operation Details
- When the room temperature reaches the set temperature, the airflow volume will change to low automatically.
- Sleep Mode Operation time is 8 hours.
- When used together with the timer, the timer has a priority.

Heat Pump Model
CARE AND MAINTENANCE
Cleaning the Indoor Unit and Remote Control
Wipe gently with a soft, dry cloth. Do not use water hotter than 40°C or polishing fluid to clean the unit.
Cleaning the Air Filter
(Recommendation: If the unit is operated in a dusty environment, clean the filters every two weeks. Continuous use of dirty filters will reduce cooling or heating efficiency.)
1. Remove dirt using a vacuum cleaner. 2. Wash the back of the air filter with water. 3. If badly soiled, wash it with soap or a mild household detergent. 4. Let it dry and reinstall it. Be sure the "FRONT" mark is facing you. Damaged air filter: Consult the nearest authorized dealer. Part No.: CWD001088. Do not use benzene, thinner, scouring powder, or clothes soaked in caustic chemical to clean the unit.


Pre-season Inspection
Clean the air filters, re-insert them, and operate the air conditioner. Is the discharged air cold/warm?
Operation is normal if 15 minutes after the start of operation, the difference between the air intake and outlet vents temperature is:
Cooling Model
COOL: 8°C or above
Heat Pump Model
COOL: 8°C or above
HEAT: 14°C or above
- Are the air intake or outlet vents of the indoor or outdoor units obstructed?
Are the remote control batteries weak?
If the remote control display appears weak, replace the batteries.
When the Air Conditioner is Not Used for an Extended Period of Time
1. To dry the internal parts of the indoor unit, operate the unit for 2-3 hours using:
Cooling Model: FAN operation
Heat Pump Model: COOL operation with
30°C set temperature
2. Turn off the power supply and unplug. 3. Remove the remote control batteries.
Recommended Inspection
2 Turn off the power supply and unplug. 3 Remove the remote control batteries.
HELPFUL INFORMATION
- After several seasons of use, the unit will become dirty, which decreases its performance. Depending on the operating conditions, a dirty unit may produce odors and dust may pollute the dehumidification system. Therefore, a seasonal inspection is recommended in addition to regular cleaning. (Consult an authorized dealer.)
AUTO OFF/ON
Press the Auto
Operation Button
AUTO OFF/ON


Automatic Operation
If the remote control fails to function or has been misplaced, press the Auto Operation button to start the Automatic operation. The Automatic operation will be activated immediately once the Auto operation button is pressed. However, temperature cannot be adjusted in this operation. - The power indicator on the indoor unit will blink until the operation mode is selected automatically. To cancel this operation, press once more.
Timer Setting
- When power failure occurs, the timer setting will be cancelled. Once power is resumed, reset the timer.
Thunder and Lightning
This air conditioner is equipped with a built-in surge protective device. However, in order to further protect your air conditioner from being damaged by abnormally strong lightning activity, you may switch off the main power supply and unplug from power socket.
Auto Restart Control
If power is resumed after a power failure, the operation will restart automatically after 3 - 4 minutes. Operation will be restarted automatically under the previous operation mode and airflow direction when power is resumed as the operation is not stopped by the remote control.
Setting the Temperature
Approximately 10% of electricity can be saved. - Set the temperature higher or lower than the desired temperature.
Cooling Model
Cooling Operation: 1°C higher
Heat Pump Model
Cooling Operation: 1°C higher
Heating Operation: 2°C lower
Air Filters
Clean the air filters every 2 weeks. Dirty filters may reduce cooling or heating efficiency.
■Keep All Doors and Windows Closed
- Otherwise, cooling or heating performance will be reduced and electricity cost is wasted.
Outdoor Unit
- Do not block the air outlet vents. Otherwise, it will lower the cooling or heating performance.
Timer and Sleep Mode
- To prevent wastage of electricity, use sleep mode when sleeping or Timer when going out.
Avoid Direct Sunlight
- Keep curtains or drapes closed to avoid direct sunlight during cooling operation.


TROUBLESHOOTING
■Normal Operation
Is it okay?
Air conditioner has been restarted, but does not operate for 3 minutes. - A sound like water flowing can be heard. - It seems that fog is coming out from the air conditioner. The room has a peculiar odour. The outdoor unit emits water or steam. During Automatic Airflow Volume setting, indoor fan stops occasionally. - (For Heat Pump Model only) Operation stops for about 12 minutes during heating (The power indicator blinks).
- (For Heat Pump Model only) During heating operation, Indoor fan may run at on and off conditions.
Abnormal Operation
Is it okay?
The air conditioner does not operate. Air conditioner produces loud noise during operation. - The air conditioner does not cool or warm effectively. Remote control / display doesn't work
This is the answer

- This is to protect the air conditioner. Wait until the air conditioner begins to operate.

- This is the sound of refrigerant flowing inside the air conditioner.

- Condensation occurs when the airflow from the air conditioner cools the room.

- This may be a damp smell emitted by the wall, carpet, furniture or clothing in the room.

- In COOL/DRY operation, moisture in the air condenses into water on the cool surface of outdoor unit piping that causes dripping.

- This is to remove the smell emitted by the surroundings.

- This is to melt the frost which has accumulated on the outdoor unit (defrosting operating). This will take no longer than about 12 minutes. Water drips from the outdoor unit. Wait until this operation ends. (the power indicator will light up). (Frost will accumulate on the outdoor unit when the outdoor temperature is low and humidity is high.)

- This is to prevent undesired cooling effect during heating operation.

Please check

- Has the circuit breaker been tripped?
- Has the power plug been removed from the wall outlet?

Is the timer being used correctly?
- Is the installation work slanted?

- Has the temperature been set incorrectly?
- Are the filters dirty?

- Are the intake or outlet vents of the outdoor unit obstructed?

- Are all windows and doors closed?

- Batteries empty?
- Batteries correctly inserted (+) and (-)?
If the following conditions occur, turn off and unplug the main power supply, and then call the dealer immediately.
Abnormal noise is heard during operation. Water or foreign material gets into the remote control by mistake. Water leaks from the indoor unit. - Switches or buttons do not operate properly. - The circuit breaker switches off frequently. - Power supply cord and plug become unusually warm.


Thank you for purchasing the Panasonic Air Conditioner.
INDEX
▷ Features 10 ▷ Safety Precautions 11
■ Installation Recommendations
2 Installing the batteries
How to Insert the Batteries
External unit

1 Power indicator lamp 2 Power switch

1 Power indicator lamp 2 Operation indicator - OPERATION 3 Timer indicator - TIMER 4 Fan speed indicator - FAN SPEED 5 Operation mode indicator - MODE
External unit
CU-V18CTP5, CU-V24CTP5, CU-V24CTP5, CU-V24CTP5
1 Air inlet 2 Air outlet 3 Drain hose
CU-V12CTP5, CU-V12CTP5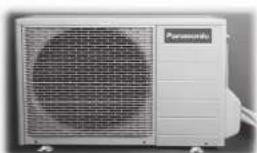
Accessories
Remote controller

Remote controller holder

Batteries (R03 or AAA)
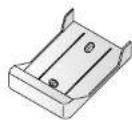
- Two batteries for remote controller (R03 or AAA)


PART NAMES
Electricity
-2mA leakage current.
- There should be no obstacles between the electric heater and the power outlet.
- Distance from the wall: 10 cm. -Sound level of the device
A sound pressure level or a sound power level
Information about the device
COOL operation
Disconnected to a red. 3) No in repair,usted mispro
ambient temperature
ambient temperature
COOL→26°C~28°C
Y→1℃~2℃
below the
ambient temperature
1
AT→20°C ~ 24°C
Sleep Mode Operation
Safety measures during installation
Safety measures during operation
Component names
Air conditioner 75-76
Indoor unit
Outdoor unit
Preparatory operations before
starting operation 77 Indoor unit
How to operate the air conditioner..77~78 Temperature setting 79 Modes providing increased
cooling, changing the direction of the air
flow in the vertical plane, automatic
swing up-down
(see page 79)
Do not interrupt or stop the device during sleep.
of the room during sleep.
(See page 79)
Auto start
Automatic shutdown device in case
causes destruction of the ozone layer and
reduces the risk of creating a thermal effect.

WARNING
1) In case of interruption of the power supply or other
necessary actions, first unplug the device from the electrical outlet.
Place it, then contact a specialist.
2) Before performing technical inspection of the device,
disconnect the power supply or unplug it from the outlet.
3) Do not attempt to repair it yourself.
B CNYAHEHNCBACHOYyCPMDCTEA.HNATNTBCOTPOMTHORAH50CNOCTOHTHONo 100
DPEMAHNA C DEMPOTON, OPAHAI TECK K PONARAV KPN ARHTY DO
00CAYKABAHIO
4)OTKHOHTNEIITAHME(OTCCEDHNTARperATOT3NEKTPOCETN).B
abAPHHON CHYaHb WbApHnTe BnKHy NmHaN HsP03
RANNNNHNNNNNNNNNNNNNNNNNNNNNNNNNNNNNNNNNNNNNNNNNNNNNNNNNNNNNNNNNNNNNNNNNNNNNNNNNNNNNNNNNNNNNNNNNNNNNNNNNNNNNNNNNNN
PAMIMATRANKTHPKTAPKETQENHNOHPOBATb apERAT OT 3NEKTKPOCTEH

PPEDOCTEPEKHEHNE
ECINB DAHHbIMOMENT BbI HE NONb3yET ECbYCTPOIcTBOM
BbDIPENET BNIKY N3 PO3ETK (ECN) FINPT PNDKNIOEH K CETM C DOMOLH HUTTEDEPBHTGTO RASHEMA
Coaaaembywym.
No daHHbIM, noyehbbm B peyntate uCnhtahna 8
COBTBCTBN CO CTANAPTOM JIS C 9612,CPBHHBB38JWBHO CHINCHINA PRINCESS PUBLICATIONS LTD
3497012A 5000000000000000000000000000000000000000000000000000000
MaKcMaHaBHa CnOoCHoCTb cxNaxJaDeHm
1 MOT ARPERATA
BAKHAR INHOPMAUHA
3aMeHy Hn yctAnOBky wTeCenbHbix pa3bEmoB doonKe npOnzOodnt
TINIKO TINIKO XANCOHARE
PpObaa B cTeBcM KaBene HMeHOT pB3NHyHO UeTOByo MapKnporky:
SeBHeH W KEnBH. SeYIO
Korunnehyi:Qa
EcnuB npOBnOB a CTeBOm Kabeene yctpoKCTBa He cObnadaet O MAPPKCOOKO KONTACTOB Baaero pabaema,JeCTByTe cneHoumM PpOoN,ckpaewHbB 3eneHbH JKeTbH pBaTe DOnKHe6b NODCEINHEK KOHTAKY,MapKpObaHOMy BxOBEN,IMHO IMEOUEMY CHENJIHANBEN CHANGJIAXINHEI HAI JINGOKAIPANHOMY B 3910HEN KUNJINHEI N XIEJIYU LUBTB. PpOoB,ckpaWenHbB CmHHn UeB,doJXBeCtB nOcOeMHNK KOHAKY, MapkuppoahHcybckn Nnn okpaehcHcy Bepshn [ber] PpOBD,CKpaewHHB B KOpHHeBBuEaET,doNKeH 6bTb nooceHNHeK KOHAKTY, MapkpoaHHOMy OyKBoL NnN OkpaeeHHOMy B KpachH
TpimMeaHne
He 3abydtbe, noxanynta, aanncaTb cnyuoyu HcnpMaunco Homap MdaJIIN Homeepcpm VIMR dunepa Data npoobpeHn




Mepbippeoctopoxkno npn 3Kcnnyataa
He yctahanaBtte, He demohntpye Hne HnepenHcote YcptnoTbAO camOToTeBHO. HenpaHbHaYcTahOBKa MoKat npWBeCTN KytEKM Bdo, npaHbHaIg3IeTKpCEckHM TOKOM HnBosHHKOBOHIO NoXapapa, DnA YctahOBKa OpaBaHTCbK, KyHOHOCHOEHHOMY PnpCTABTBAHIO HnCNEuHNHCTQmPbMbl
To3 npOyK Tp6ba da 6de 3a3emn I nIcTanipan c ELCB. B cnuy Hn nopeDja moKJa pPeH3BnKa TKoB ydaon nnnoxapar.
PNEIOCTEPEXHEHNE

DAHNNKOMHATNHKOHNIOHOHP DOKJHK 6bIb3a3eMnEH HIXHECTBHHOE 383EIMNEIPOGT 10000000000000000000
Ppablmbo npcoeemnhe dpaehnhke ty6Kn. Huahe boda dyet BuTekatih Nppy

CTaBbte yCtpoAeBO nomeueHnX, rE de CyuecTeByet yrpo3a B3pba. YrKra 4RaB BoNn KOHNHOHEPA MoKeT CTb pnnHnHOxApa.
Mepb npedoctopoxhoctn npn 3Kcnnyataun
N PEPYNPXKDEHNE TOTJHKPNDPEPNKDAETO803MOXHOCTN JELTALHORIOXODIINCEPB3HOITPABMI.
He BKNHOAHIE B PO3EYKBMECTC DpyrMMN npOcPAMI He BKNHOAHIE KOHNMOHOP,BOCTBNNB HPO3Ely. He BUNKOAHIE KOHNMOHOP, BpDfRVAIB BNKY K pO3EYk. He PnPKACAAETCB K pRFOOP MOKpMHy PKAe. He NpBpEKJaAIE H MEHPRTAE CATEB LJIH. He PNOOBHBAIE pyKa NOCOTPHINNE PNDPM BO BYTHENH MBIHNMMDJyKOHNMOHOp HE NOBpERBAIE c6e HENOPCECTBHHOMO BO4EETBHO XOHNHO BTOEYX B TEYEHN IPODOKNTBEHBO BPEHMH

-Пионь Воставы БИКУ B pОБТЕК. -Спсюлбүүгүдүхүлэдүхүлэйнүүрүү.
-Спсюлбүүгүдүхүлэдүхүлэйнүүрүү.
-Спсюлбүүгүдүхүлэдүхүлэйнүүрүү.
-Спсюлбүүгүдүхүлэдүхүлэдүхүлү.
-Спсюлбүүгүдүхүлэдүхүлэдүхү.
-Спсюлбүүгүдүхүлэдүхү.
-Спсюлбүүгүдүхү.
-Спсюлбүүгүдүхү.
-Спсюлбүүгүдүхү.
-Спсюлбүүгүдүхү.
-Спсюлбүүгүдүхү.
-Спсюлбүүгүдүхү.
-Спсюлбүүгүдүх魇
-Спсюлбүүгүд魇
-Спсюлбүүг魇
-СпсюлбГUG
-СпсюлбUG
-СпсюлбUG
-СпсюлбUG
-СпсюлбUG
-СпсюлбUG
-СпсюлбUG
-СпсюлбUG
-СпсюлбUG
-СпсюлбUG
-СпсюлбUG
-СпсюлбUG
-СпсюлбEGU
-СпсюлбEGU
-СпсюлбEGU
-СпсюлбEGU
-СпсюлбEGU
-СпсюлбEGU
-СпсюлбEGU
-СпсюлбEGU
-СпсюлбEGU
-СпсюлбEGU
-СпсюлбEG U
-СпсюлбEGU
-СпсюлбEGU
-СпсюлбEGU
-СпсюлбEGU
-СпсюлбEGU
-СпсюлбEGU
-СпсюлбEGU
-СпсюлбEGU
-СпсюлбEGU
-СпсюлбEG/U
-СпсюлбEG/U
-СпсюлбEG/U
-СпсюлбEG/U
-СпсюлбEG/U
-СпсюлбEG/U
-СпсюлбEG/U
-СпсюлбEG/U
-СпсюлбEG/U
-СпсюлбEGU
-СпсюлбEGU
-СпсюлбEGU
-СпсюлбEGU
-СпсюлбEGU
-СпсюлбEGU
-СпсюлбEGU
-СпсюлбEGU
-СпсюлбEGU
-СпсюлбEGUU
-СпсюлбEGUU
-СпсюлбEGUU
-СпсюлбEGUU

PnnoNnBHeHnnpnBnKOB HnOaNDAOK (3anaXaRapn, nT.N.). BbIKIOHTe KOHMLIOHEp N BbHbTe CteBc0B UHYP 13 p03TK.
NPEDOCTEPEXEHNE
3OT 3Hk npDpynpjdaet O B03MOKHOCTNPOUYHNEYTRAPMbI.
He depaarite 3a HYP, YTOBb BtuaunTb BNKy kno setk. g
He MONTKoHDMIOHE BOOM. He HcnoNtSyte YcPOrCTBO He HnHaHaENHO, HnAPmEINI DnOxPcAHHN PNOyTKOB. He npMaHnRE NpNoBOpbI OTKpBTOrO ropeHN PRoCM C KOHNMOHOPOM. He CaJNTBaH, IN He KnaJIaHTe HnHHe I HApXhKn BnOk.

PepaWKTOKYPOCTBAOTKHOAHTA NTHAMe PerynAPHO npoBETPAHBE NOMEHNE. CnEATAE 3A TEm,TOOHE NOBEPDn MOJTHAKHYPO pamy a peyIbATE dMNTBHO KCNPLAYTACNI.

B CNYae HcNcoJIb30aHnKoHdUHOHepe B TeHHNE IINIeJIbIbIgSpEMHnBkIOHKeT EHyP NtAHReN 10308TK.
P


HANMEHOBAHNE KOMTOHETOB KOHNIOHOPEA
1 Water inlet 2 Power supply 3 Water outlet 4 Air filters (with panel) 5 Control box cover 6 Air supply grille 7 Drain hose
Internal unit controls
1 Mode indicator 2 Back button

1 Automatic mode button 2 Mode indicator: heating - green 3 Temperature indicator - orange 4 "Sleep" mode indicator - orange 5 Fan speed indicator - orange
Air flow indicator - orange
Outdoor unit CU-V18CTP5, CU-V24CTP5 and A18CTP5, A24CTP5
1 Air intake vent 2 Connection cable 3 Drain hose 4 Air outlet vent 5 Piping
CU-V12CTP5 and A12CTP5
Features
Remote control operation

Battery installation and remote control operation
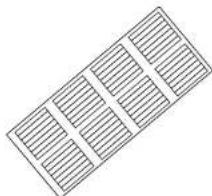
Remote control operation
Power supply elements or similar


Component names of the air conditioner
Remote control signal receiver for the control panel (RC).
- Make sure that the path is not obstructed.
- MAXIMUM DISTANCE: 10 M. Sound confirmation of signal reception: one short beep or one long beep.
Receiver RC
Do not bend. Moisture and some types of dust may interfere with the signal. Clean with a dry cloth.
Do not place the remote control receiver in places with direct sunlight, near heaters, or other heat sources.
1 Transmitter of command signals 2 Control display
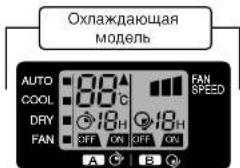

3 Room temperature setting button (button with backlight) 4 Operating mode selection button 5 Automatic mode selection button (button with backlight)
6 Temperature setting button 7 Timer setting button 8 OFF/ON button (button with backlight) 9 Fan speed selection button 10 Automatic air flow direction control 11 Timer delay setting button 12 Manual air flow direction selection button 13 Contact sensor (press with a pointed object to reset)
How to insert batteries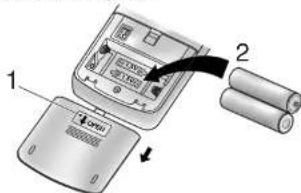
1 Press firmly on the area marked [OPEN] and slide the cover towards you. 2 Insert the batteries.
Observe polarity.
Battery usage
One pair of batteries lasts approximately 1 year.
When replacing batteries, hold on.
- Replace the batteries with new ones of the same type. Do not use rechargeable batteries (Ni-Cd). Before prolonged storage, remove the batteries from the remote control.
Correct use of the remote control when installing the indoor unit and the outdoor unit.
Use the remote control at a distance of no more than 7 meters from the unit. (See figure below).


Aim the remote control at the unit as shown in the figure below. Make sure that the signal is received correctly by the unit.


Preparatory operations before starting operation
Indoor unit 1: Connect the power cable to an independent power source.
How to use the remote control
Setting mode: Press the button to select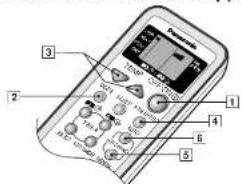
To turn on the unit
Press the button
On the indoor unit, the green POWER indicator will light up. To turn it off, press again.
Cooling
Model
AUTO - Automatic mode, COOL - Cooling mode, DRY - Dehumidification mode, FAN - Fan mode, circulation of air

Temperature setting
Press the button [3] to increase or decrease the temperature. The temperature can be set in the range between 16°C - 30°C.

In summer, it is recommended to set the temperature 10°C higher than the standard. Operation at standard temperature. Operation at a temperature 10°C lower than the standard.
Standard temperature
Setting this mode ensures the climate control operates at the set temperature, under which the mode is maintained; cooling or heating - the mode remains unchanged.

In automatic mode, the device automatically adjusts the cooling or heating based on the room temperature. After the mode is selected, it remains unchanged.
- Detailed description of operations
COOL - Cooling mode
Set the required temperature in the room to ensure comfort and cooling.
AUTO - Automatic mode
The temperature is determined automatically with the option to select the optimal mode. In automatic mode, data on the temperature and humidity are taken into account.
DRY - Dehumidification mode
Dry mode reduces humidity. The temperature in the room does not decrease. In dehumidification mode, the fan installed inside the unit operates at low speed.
HEAT - Heating mode
(Only for "HEATING MODE") The heat exchanger is heated by the fan. In case of insufficient heating capacity of the convector, it is necessary to use additional heating devices. We recommend using additional heating devices. The mode of operation of the convector at the rated temperature is set by the manufacturer.
FAN mode
(Only for models with heating element) The heated air rises to the upper part of the room. By circulating the air, the heating of the air is directed, thereby increasing the heating efficiency. If the air temperature near the floor is insufficient, you should increase the set temperature, or install the device with an air outlet.
Installation near the ceiling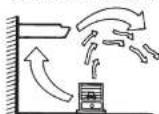
Installation near the floor


INSTALLATION OF THE FAN SPEED
- PRESS THE BUTTON [4] TO SELECT
FAN low speed
FAN medium speed
FAN high speed
AUTO
FAN -
Automatic fan speed
Automatic dependence
operating mode of the unit. In mode
Airflow direction
Vertical plane
Manual control
Press the button to select the parallel airflow mode [5], then release the button for the parallel airflow mode.
- Cooling / Gentle drying /
Heating (heat pump type) The temperature of the parallel airflow can be adjusted according to the climate using the remote control. This is effective when you want to cool the room without direct airflow, for example, in a bedroom or living room. The airflow can be set at an angle from horizontal down to 25 degrees in cooling or gentle drying modes, and from horizontal down to 45 degrees in heating mode.
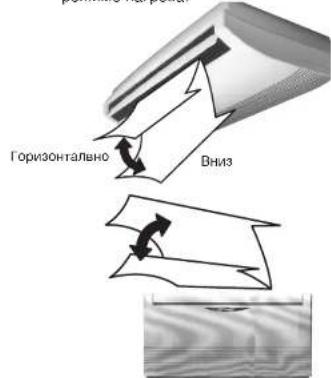
●Automatic operation
Press the button for automatic control
Airflow direction 6
Cooling / Gentle drying
The airflow will automatically move up and down to create a refreshing breeze.


Heating. To set the temperature
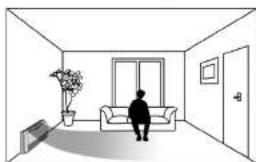

Setting the horizontal airflow direction

Use the conditioner in the following cases:
OxnaXnau MOENB (EdnHua 3 MoeJIb "TeNIOBOI
| DBT: Tarnnepatya no
cxyomy Tepmometpy |
| WBT: Tarnnepatya no
vnaknomy Tepmometpy | IBNTPR C | Hapykk |
| DBT | WBT | DBT | WBT |
| Maksimba na Tarnnepatya | 32 | 23 | 43 | 26 |
| Munimba na Tarnnepatya | 16 | 11 | 16 | 11 |
BEHTNIRTOP (EdnHuaMSN
| DBT: Temnepatypa no
CNYCM TEPOMETPty
WBT: Temnepatypa no
BANJHOMY TEPOMETPty | IBNHTpy C | Hapykn |
| DBT | WBT | DBT | WBT |
| МатематICAL TEPENATya-Catalan-Ⅲ
(Mathematical TEPENATya-Harper) | 32
(30) | 23
(-) | 43
(24) | 26
(18) |
| МатематICAL TEPENATya-Catalan-
(Mathematical TEPENATya-Harper) | 16
(16) | 11
(-) | 16
(-5) | 11
(-6) |
PnmeyAHN
B cnuyaX KOrda KOHdunnoHepy npep
JINTEBILI PPOCTO, BIKIOHaeTc eTeBOB BIKIOHATOB. ECNIOE OCTABN B NOJOeHNON (BKn.)OKO20 2BT AekTOP3oEHPRN 6yETNOTpeBbTaCDAKBEaC,ECN BHYTpEHMNMOybl 6bl ONKIOHO C Npbl TaDCTAHNONORVYIPADBHN.
B Cnyaep Nep33anyckpa3y nocn BbKIOHOHNA KOHNIOHOP HnHET paO TY ToJIbKOpeE3 3 MHTyTbNCNE BKNIOHHN.

YcTaHOBKa TaMepa
Hakmte KhoNky bIbopa TaMepa [1]. - INHIMKaTOp pexKMa TaMepa - 3aropaetCn Babepeite OINH IN CnEpyuXIN XIN PEXKIMOB paobotbl. PnKJxDM HoxaTHN KHONK PEXMK paobotbl MEHETC B HAPNAEBH NCTPNK.

3aTeM HAKATHEMH KOHNK HACTPOK KAIHMePA 2 [NHC NCTYACHOBITE XENAEMOE YNCNO yacOB. (NHC NO CACOB, KOTOPOE MOKET BbBy YCTAHBOHE:1-12) HaxMMTe KONkyCTAHOBKN/OTMeHbTaMepa 4
Kekmbi, oecneuBaHoune
IOBbIeHHoe yD06CTBO NcNoJIb3OBAHnA
HouhopeKmpa6oTbI
Hnntb Kphty Tepepat y knae H aepn - Hapaxnre KhoNky [5]. 3aropntor HnHkKaTOp pexm0xOxuaH, pactonoxeHHbHa yctpcn38, HxocpBcEMCRHHTPNOMeHHA
Bonee noapobno O HouHOM pexnme
Korda temnepaTypeB nomoeHHm DocTHHrHa3HaeeHHoro 3HaehnH, yCTpOcTBO aBtOMaTHueckn Ocnabnt CtpyIO BC3dyxa. -IMTEbHOCTbpeKMa CHa-8yacOB - PnH NcN30aBHH OHOBpEMeHO C TaMEpOM, PnM

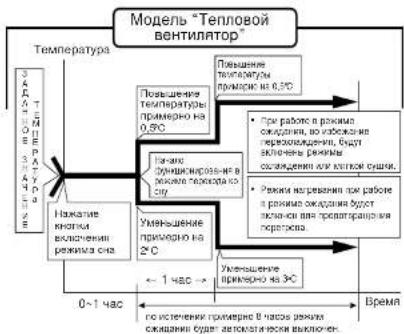
Maintenance and care
Internal module error
Control panel
Accurate maintenance of the device is impossible without using the control panel.
Air filter error
(Recommendation: If the device is not used at rated power, check the filter every two weeks. When used continuously, the filter efficiency decreases.)
1. Remove the filter using the tool. 2. Clean the air filter with water. 3. For stubborn dirt, use a mild detergent. 4. Dry the filter thoroughly before reinstalling. 5. Make sure the filter is properly seated. 6. Consult the maintenance schedule for replacement intervals.
Homepage data: CWD001088. Hembn3pAmpnEBHTBnIyNCTKxYcTPOCTBxa6EH3HN. pactoepatBtBn, hwnPooaBnIbIy nPiOIOWkO HNCIOB308BTBnIyMSTOTG XkBAh, npOnmTAHHyO BJKMMA BEECECTAO



IpoBepKa npeHnauAnOM ce3oHa
OCHNTYEBO3DYHbIeΦINbTpbI,CHOBAyCTAHOBHTeMIXNHCN0B3YIEKOHMOHOHEPOBDO3XyXa. BMyBaMaBn B03xXyOxohmHn Hrnpovny? EcnH KOHNuHIOoHOpNMAHbOaBoTa8 TENHeH 15 MHT NcOe BkHcHAp, BnHcHbTNeMepRtpYHa B03xOz3aOpHnke HbKdoHbTHObTRPCHXoCtAeHnT

PpOBeBpe,he 3aIopoxKHeIbN Bo3yXo36OpHbIe MblYckHbIe OTBepCTnBHTpeHreroM BHeHrero MoDyhen? NpOBeBte,he paoPnIbncs N 6baTapeKn B pynte dactaHouHoro ynpabHeN? IPII cIb6OM I3o6BaKeHN Hn Pytbe dactaHauHOHOr ynpaEnHeN 3aMeHnte bapTaekn.
Korda KOHnHnoHepy npedontdntelhbnipocto
1 TbObHcBvUHTbBHyTHeNtBAACTbBHyTHoHO B6nKa, BKNHOATO KOHNIOHOP HA2-3CACA BPOKMOH:

2 BbIKIOHTe NHTAHNE H BbIDepHHTe WHyp H3 pO3eTm. 10CnAHTBE BATAPEKIN3NyBtANCTAHIOHNOYnpaBBNAH
PekomehdyembInOCMOTp
Power norm
Automatic mode button

Automatic operation
The device is controlled automatically. The automatic mode is activated as soon as the automatic mode button is pressed. The temperature can be adjusted in this mode of operation. The indicator light, located on the device, will remain lit until the device is turned off. To exit this mode, press the button again.
Temperature setting
As soon as the electricity is restored, the temperature setting will be reset. As soon as the electricity is restored, the temperature setting will be reset.
Rose
The heating element is protected by a built-in fuse. If the fuse blows, it can be replaced by a qualified technician.
Power switch
After a power outage, the device will resume operation after 3-4 minutes. When the electricity is restored, the operation will continue in automatic mode (with the set temperature) and with the same air direction. If the operation was interrupted by the remote control, it will not resume.
Tips for operation and energy saving
Temperature setting
You can save up to 10% of electricity. - Set the temperature higher or lower than the room temperature.

Air filters
YCHITME BOZUYHbE CINbTpB KaKbIe DaNEHEN. 3-8pRn3HnnnHbI nHbI pKnaeOxJaAaOuOyU nn HaraepBa0oOnCnOc6OBtCKnOHaMnOHePA
DepKHTe 3aKpbTbIMN Bce OkHa NDbepn
IaHae OXnAaDaaOHaN HArpeBaAouaJ CnCOo6HOCTn CHN3rTCA, TOp nPnBeDeT K B03pACTAHNO 3ATPAT 3NEKTP03eHPrn.
BHeuHmMoUyIb
He3aopaxkBaTe BbIyCNbIe OTBepCTn. HnAeOxNAnKaOuAn HArpeBaIOUan CNcoBHOCTn CHA3RcTn.
Pexmbtaaepa HohHOABOTMAUeCKH
DEXMM Ytobby 3pn He paocdoaba 3neKtpo3peHnIO, B HHOHe BPema Bknoahe pexmOM OMDAHN, a YOxOJa 3moDA-TAInMeP.
He noDBepraTe BO3DeHCTBnIO npMOrO
CONHECHOROCBETA
3aBbAte 3aBBeckn HnHtOpbi, TIO6b BO BpeMa paoTbe pKmO OxNaeHbB KOMHATy He npOHkan nPnMbIe cOnHeHbIe lyu.


IONCK INYCTPAHEHNE HENCINPABHOCTEIN
HOpMaJIbHaN pa6ota
HopmaHbHOIyHKUOHNpyeKOHduuOHeP?
KoHJIaOHIOHO 3aJUeHNbOTOHO,HO H8 KJHNO-ACCTBC TcHAnHH3 MHH. Moket 6bht bHnne38K, noo6hbn TMy, KOtpor 1mnae TaouaRcBQA. KaxetCR.HTOIN3 KOHUN-OHEPA NOAETCR B noMeueHm yBcBryer cneucmbncknn 3ana Hn npyKHOro Ooka BbteKaET BDA iIN bIbXoNDT nap B peximme Aotmatinecko pyrnpnoBaHn BosyluhoTOKOTAK pnpnoKcHKn OTHKcHAcBCTPOEHNBEHNTHTOP (TOLOKDAI MOEN "TANOBH BENTNATOP") Pn oOORpepaOtaPnpepBaTeCn Ha 12 MM (NHINKATOP NINAH MNAET)
(TnBKOJINMOHNTENBOEAEHTNATOP) BpKMMBIOOPOBAAHTPNNHAEHENTNATOPMOKET pabotAB,KORA KOHNDOHPD E NOONKEMKKN,KINBKn
Normal operation
Is the unit functioning normally?
The compressor operates. The operation of the air conditioner is accompanied by a slight noise. This is normal. If the compressor does not start, it may be due to low voltage or incorrect connection. Check the power supply.
This is the answer.

- This is due to the protection of the compressor. Wait until the compressor restarts.

This noise is normal inside the unit.

When the unit cools the room with strong airflow, condensation may form.

The source of this noise is the air flow, which can be caused by the floor, carpet, or furniture.

In normal operation, with cooling or drying, moisture in the air condenses on the cold surfaces of the unit, which may cause dripping. This is normal.

This is due to the temperature difference, which may cause condensation on the surface of the unit.

The unit should be installed on a level surface, away from direct sunlight or heat sources. If the unit is installed in a place with high humidity, it may cause condensation. (The unit should be installed on a level surface, and the air inlet and outlet should be kept clear.)
• This should improve the cooling effect during operation.
Check the following

Is the power cord plugged in? - Check if the plug is properly inserted into the outlet. - Is the filter clean?
Is the unit installed on a level surface?
Check that the temperature setting is not clogged or blocked by any foreign objects from the outside of the intake and exhaust openings of the indoor unit.

Is the cover closed?
- Are the batteries installed correctly with the (+) and (-) terminals?
Signal when urgent specialist call is needed.
In case of any of the above malfunctions, turn off the power supply, unplug the unit from the outlet, and immediately contact a professional.
During operation, if abnormal water or any foreign objects accidentally enter the unit, or if the unit is not controlled properly, the following may occur: - Water leakage from the indoor unit. - The remote control does not work properly. - The automatic circuit breaker trips frequently. Increased power consumption.




Service life (operating time) is set by the manufacturer in accordance with paragraph 2 of Article 5 of the Federal Law of the Russian Federation "On Protection of Consumer Rights" for this product, and the service life is calculated from the date of manufacture, provided that the product is used in accordance with this manual and applicable technical standards.
Operating conditions:
1. Supply voltage: nominal 187-276 V AC, 50 Hz. Do not use generator sets for power supply.
2. Temperature conditions
In cooling mode: indoor temperature 16-32 °C, outdoor temperature 16-43 °C. In heating mode: indoor temperature 16-30 °C, outdoor temperature -5-24 °C.
3. Installation conditions
Follow the installation and placement instructions. Do not install in the following places: Places with high salt content (e.g., near the sea, coastal areas).
- Places with high humidity (e.g., near the sea, coastal areas). Places with possible hydrogen sulfide gas (e.g., near hot springs). Places with strong electromagnetic interference (e.g., near radio stations). Places with strong wind or snow (e.g., near mountains, where protection from snow is needed).
4. Operating conditions
Operating instructions for the device.
5. Condition of the product
Terms of distribution, warranty, and liability for defects and transportation.
6. Warranty terms
The product is not subject to warranty repair in case of damage caused by natural disasters (e.g., as a result of fire).
Model "Heat Fan"
| Möden | KOMHHTHNI
HappyHH | S-A12CTP
U-A12CTPS | S-A18CTP
U-A18CTPS | S-A24CTP
U-A24CTPS |
| МатURITY MITANIN | Од��cadeим,在 220-230 B,50 Tú |
| Ox
a
a
a
a
a
a
a
a
a
a
a
a
a
a
a
a
a
a
a
a
a
a
a
a
a
a
a
a
a
a
a
a
a
a
a
a
a
a
a
a
a
a
a
a
a
a
a
a
a
a
b
a
b
b
b
b
b
b
b
b
b
b
b
b
b
b
b
b
b
b
b
b
b
b
b
b
b
b
b
b
b
b
b
b
b
b
b
b
b
b
b
b
b
b
b
b
b
b
b
b
b
b
a
b
b
b
b
b
b
b
b
b
b
b
b
b
b
b
b
b
b
b
b
b
b
b
b
b
b
b
b
b
b
b
b
b
b
b
b
b
b
b
b
b
b
b
b
b
b
b
a
b
c
d
e
f
g
h
i
j
k
l
m
n
o
p
q
r
s
t
u
v
w
x
y
z
aa
bb
cc
dd
ee
f
g
h
i
j
k
l
m
n
o
p
q
r
s
t
u
v
w
x
y
z
a
b
c
d
e
f
g
h
i
j
k
l
m
n
o
p
q
r
s
t
u
v
w
x
y
z
a
b
c
d
e
f
g
h
i
j
k
l
m
n
o
p
q
r
s
t
u
v
w
x
y
z
a
b
C
d
e
f
g
h
i
j
k
l
m
n
o
p
q
r
s
t
u
v
w
x
y
z
a
b
c
d
e
f
g
h
i
j
k
l
m
n
o
p
q
r
s
t
u
v
w
x
y
z
ab
ac
ad
ae
af
bf
bf
bf
bf
bf
bf
bf
bf
bf
bf
bf
bf
bf
bf
bf
bf
bf
bf
bf
bf
bf
bf
bf
bf
bf
bf
bf
bf
bf
bf
bf
bf
bf
bf
bf
bf
bf
bf
bf
bf
bf
bf
bf
bf
bf
bf
bf
bf
bf
bf
b
c
d
e
f
g
h
i
j
k
l
m
n
o
p
q
r
s
t
u
v
w
x
y
z
a
b
c
d
e
f
g
h
i
j
k
l
m
n
o
p
q
r
s
t
u
v
w
x
Y
Z
A
B
C
D
E
F
G
H
I
J
K
L
M
N
O
P
Q
R
S
T
U
V
W
X
Y
Z |


Thank you for choosing Panasonic air conditioning products.
CONTENTS
(9, A = 2, 0 = 1)
gaii jiaai haoai oao
aai
(99 + 200 - 1) × 200
(R410A
R410A
lll 1j jai kK JJIg
PANASONIC 100
gill
95
Therefore, a3 = (3/2)a2, a4 = (3/2)a3.
i
90 - 93
in dill
47
1
9v - 97
... ... ... ... ... ... ... ...
↓ ↑ ↓
49-9A
1
4.2
... ... ...
1.
1
1








∴ S ΔBCD = S ΔCOD + S ΔBDO - S ΔBOC
C
y
(Ni-Cd)
j 1y j 1
| | | |
| WBT | DBT | WBT | DBT |
| 26 | 43 | 23 | 32 |
| 11 | 16 | 11 | 16 |
a1111111
C
| DBT |
| WBT | DBT | WBT | DBT |
| 26(18) | 43(24) | 23(-) | 32(30) | | |
| 11(-6) | 16(-5) | 11(-) | 16(16) | | |
ygl 100000000000000000000000000000000000000000000000000000000000000000000000
□sall
1 1
j 1


()
yJ 1

FAN
FAN
FAN
AUTO
FAN




Instructions for end-user for air conditioners:

Your air conditioning product is marked with this symbol. This means that electrical and electronic products should not be mixed with general household waste. European Community countries (*) , should have a dedicated collection system for these products. Do not try to dismantle the system yourself as this could have harmful effects on your health and on the environment as a result of incorrect waste handling. The dismantling and disposal of refrigerant, oil and other parts must be done by a qualified installer in accordance with relevant local and national regulations.
Air conditioners must be treated at a specialized treatment facility for re-use, recycling and recovery and should not be disposed of in the municipal waste stream. Please contact your installer.
Penalties may also be applicable for incorrect disposal of waste products, in accordance with national legislation.
*subject to the national law of each member state
Information on Disposal in other Countries outside the European Union
This symbol is only valid in the European Union.
If you wish to discard this product, please contact your installer, dealer or local authority and ask for the correct method of disposal.
Pursuant to at the directive 2004/108/EC, article 9(2)
Panasonic Testing Centre
Panasonic Service Europe, a division of
Panasonic Marketing Europe GmbH
Winsbergring 15, 22525 Hamburg, F.R. Germany
Instructions

This symbol indicates that this product must not be treated as household waste. It must be handed over to the applicable collection point for the recycling of electrical and electronic equipment. Ensure that this product is properly disposed of and do not dispose of it in unsorted municipal waste. By ensuring this product is disposed of correctly, you will help prevent potential negative consequences for the environment and human health, which could otherwise be caused by inappropriate waste handling. For more detailed information about recycling of this product, please contact your local city office, your household waste disposal service, or the shop where you purchased the product.
In accordance with national legislation, penalties may be imposed for the incorrect disposal of this waste. Please contact your installer, dealer, or local authority for the correct method of disposal. Additionally, in case of incorrect disposal of waste, fines may be applied in accordance with national legislation.
Subject to the national law of each member state. This symbol is only valid in the European Union. If you wish to discard this product, please contact your installer, dealer or local authority and ask for the correct method of disposal.
30T CMBON DECTBNTEN TOB K BRPAH ExponePCKORO Co3a. Ecm Bu jenaae BMOPCHTA HANHPONKT, NOKAYAKCTA, OPAPTABE K MOHTAKHHMNY, MUNBY NIMCEBHJN BACTR, YTOBQ yTHBb 0 pOBABHbX CNOCOXBY TYNH3AHU.
Air conditioning equipment

"Instructions for the user": This appliance has been filled with refrigerant in accordance with regulations. This symbol indicates that electronic and electrical products should not be mixed with general household waste. In European Union countries, there should be a separate collection system for this product. If you do not dispose of the waste properly, it may cause dangerous consequences for the environment and health. Therefore, do not dispose of it yourself. The disposal of the appliance, including the refrigerant, oil, and other parts, must be carried out by a qualified technician in accordance with local and national regulations. For air conditioners, reuse, recycling, and
Panasonic Corporation
Website: http://panasonic.net/