DO421K - Machine à café DOMO - Free user manual and instructions
Find the device manual for free DO421K DOMO in PDF.
Download the instructions for your Machine à café in PDF format for free! Find your manual DO421K - DOMO and take your electronic device back in hand. On this page are published all the documents necessary for the use of your device. DO421K by DOMO.
USER MANUAL DO421K DOMO
sind nicht in der Garantie eingeschlossen.
WARRANTY This appliance has a two year warranty period. During this period the manufacturer is
responsible for any failures which are the direct result of construction failure. When these
failures occur the appliance will be repaired or replaced if necessary. The warranty will
not be valid when the damage to the appliance is caused by wrong use, not following the
instructions or repairs executed by a third party. The warranty will only be valid if the
warranty application has been completed by the dealer at the time of purchase. All parts,
which are subject to wear, are excluded from the warranty
Geschäft, in dem Sie das Produkt gekauft haben.
RECYCLING INFORMATION The symbol on the product or on its packaging indicates that this product may not
be treated as household waste. Instead it shall be brought to the applicable collection
point for recycling of electrical and electronic equipment. By ensuring this product is
disposed of correctly, you will help prevent potential negative consequences for the
environment and human health, which could otherwise be caused by inappropriate
waste handling of this product. For more detailed information about recycling of this
product, please contact your local city ofce, your household waste disposal service or
the shop where you purchased the product.DO421K INFORMACE O RECYKLACI ODPADU Symbol na přístroji či na jeho obalu znamená, že s tímto výrobkem není možno
oder einer gleichartig geschulten Person ersetzt werden, um Unglücke zu verhindern.
If the supply cord is damaged, it must be replaced by manufacturer of its service
agent or a similarly qualied person in order to avoid a hazard.
5DO421K Gefeliciteerd met de aankoop van uw DOMO kofezet met kofemolen. De DOMO
Die Entkalkung, falls nötig, wiederholen.
29DO421K Congratulations on your purchase of the DOMO coffee-maker with coffee grinder.
The DOMO coffee-maker will bring you the ultimate coffee-experience. The coffee
beans are ground inside the coffee grinder, just prior to the ltration process. Coffee
simply doesn’t get any fresher than that.
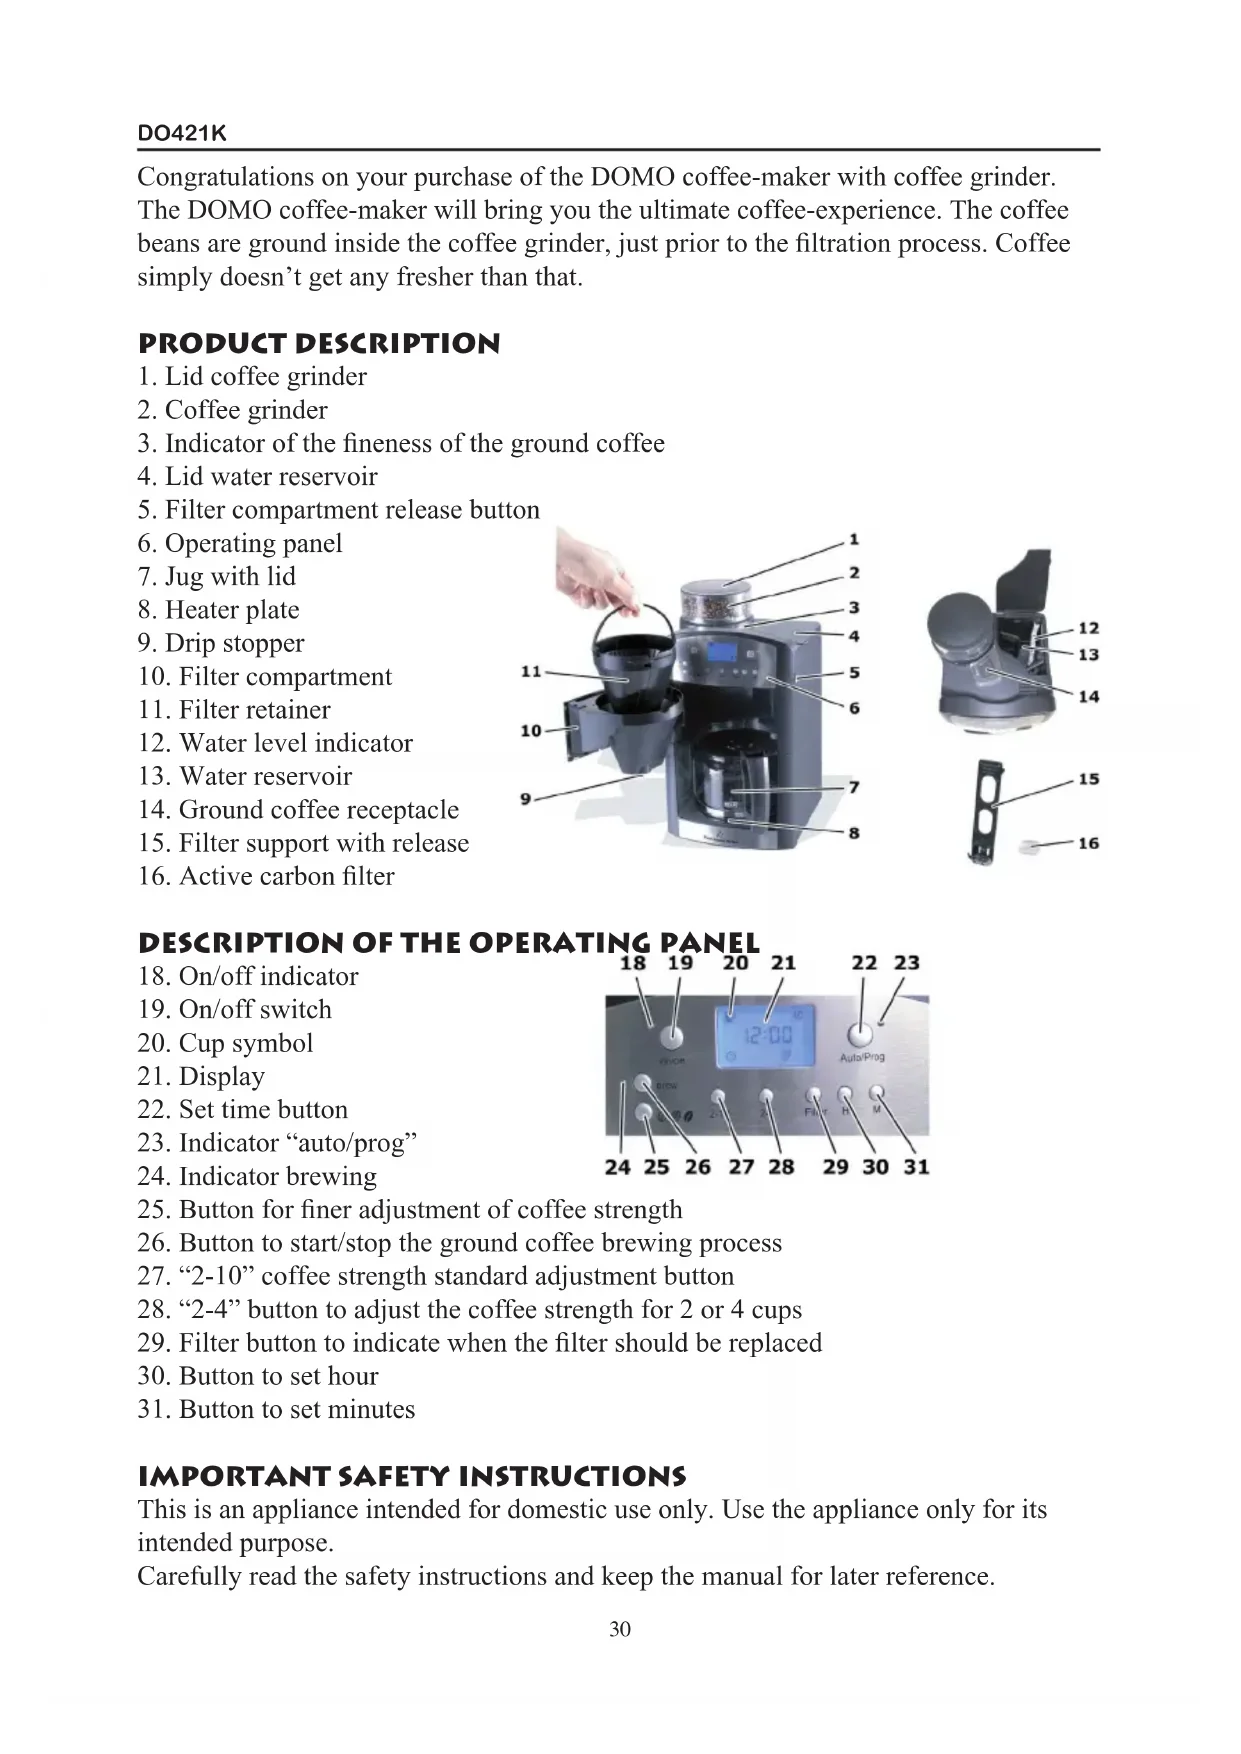
1. Lid coffee grinder
3. Indicator of the neness of the ground coffee
4. Lid water reservoir
5. Filter compartment release button
10. Filter compartment
15. Filter support with release
24. Indicator brewing
25. Button for ner adjustment of coffee strength
26. Button to start/stop the ground coffee brewing process
27. “2-10” coffee strength standard adjustment button
28. “2-4” button to adjust the coffee strength for 2 or 4 cups
29. Filter button to indicate when the lter should be replaced
30. Button to set hour
31. Button to set minutes
IMPORTANT SAFETY INSTRUCTIONS This is an appliance intended for domestic use only. Use the appliance only for its
Carefully read the safety instructions and keep the manual for later reference.
30DO421K Danger for children:
Take extreme care when you operate the appliance around children.
Never leave the appliance unguarded.
The appliance should not be operated by people with physical, sensory or mental
handicaps, nor by people lacking in experience. Do not allow children to use the
appliance, unless a supervisor is present and a person who is responsible for their
safety has clearly described how the appliance works.
Never allow children to play with the appliance.
Keep the appliance out of children’s reach.
Do not allow children to play with the packaging, as there is a risk of suffocation.
Do not use the appliance outside, to avoid the risk on re, electrocution and personal
injuries. Never immerse the appliance in water or another liquid.
Check if the voltage indicated on the identication plate on the appliance corresponds
to the voltage in your home before you plug in the appliance.
Always use earthed sockets to connect the appliance to the mains.
Make sure the lead does not touch sharp edges or hot surfaces.
The plug should always be easily reachable, so that it is possible to pull the plug from
the socket immediately in case of danger.
Shut down the appliance completely before you disconnect it from the mains.
Never pull the plug out of the socket by the lead. Always use the plug itself to do so.
Immediately remove the plug from the socket in the following situations:
Whenever you do not use the appliance
Whenever an error occurs while the appliance is working
Whenever the appliance gets wet while in use
Whenever you clean the appliance.
Never attempt to repair the appliance yourself. Never use the appliance with a
damaged plug or lead, when an error has occurred during operation, or when the
appliance has been damaged. Return the appliance to your distributor or to the
customer support department of the manufacturer for inspection or repair. Any attempt
to repair the appliance yourself completely voids the warranty.
Whenever the plug or the lead are damaged, they should be replaced by the customer
service department of the manufacturer or by a qualied electrician.
Regularly check the lead and the appliance for damage.
Never attempt to disassemble the appliance or parts of the casing yourself.
Never touch the plug when your hands are wet.
Never carry the appliance by the lead.
Warning for burns and re:
Never leave the appliance unattended when it is working.
Never use the appliance when it is leaking or visibly damaged.
Never use the appliance around a hot oven, microwave oven, or other heat source.
31DO421K Also, never place the appliance inside an oven, microwave oven, or similar appliance.
Avoid all contact with the hot steam during the brewing process, during lling, or
when the lid of the coffee-maker is opened.
Do not open the lid of the coffee-maker when it is working. Hot steam will escape!
Only use supplied accessories. The use of different parts can be a cause of injuries or
Make sure the lead does not dangle over edges or corners, you might trip over it.
Caution – material damage:
Place the appliance on a horizontal, at, heat resistant, stable surface, at least 5 cm
removed from the wall.
Do not place the appliance near a gas burner, electric cooker, or other heat source.
External heat can damage the appliance.
Never cover the appliance, this way the heat cannot escape and the appliance will
Place the appliance in such a way that escaping steam cannot damage cupboards or the
Never switch on the appliance when it is empty.
Never leave the coffee jug on the heater plate when it is still turned on. The coffee jug
Do not put the coffee jug in a microwave oven, it is not microwave resistant.
Modern furniture is treated with lots of different sorts of paint and other nishing
products. The possibility exists that these products affect the feet of your coffee-
maker. Therefore we advise to place a heat resistant cloth underneath the coffee-maker
in order to avoid damage to the feet.
Never place the appliance in such a way that it might fall in a sink or a bath.
Warning: the manufacturer renounces all responsibilities for damage that occurs as a
result of misuse of the appliance.
GETTING STARTED Make sure all packaging, including stickers and protective lm, is removed before
using the appliance.
Check if all parts are present, using the parts list in the manual.
Leave the identication plate and all possible warning tags on the appliance.
Caution: Make sure the appliance is not damaged. You may not use the appliance if
parts thereof are damaged. Please contact the customer support department of the
manufacturer, or a qualied electrician.
Clean the appliance with a damp cloth and dry it with a soft cloth.
Clean the glass jug with hot water and a mild detergent or wash it in the dishwasher.
32DO421K Install the active carbon lter in the appliance as explained in the section “Installing
the active carbon lter”.
Connect the appliance to the mains.
Fill the water reservoir with fresh water until the water indicator reaches “10”.
Switch on the coffee-maker by pressing the “brew” button, and let the water run
through the machine without coffee. Dispose of the water.
Clean the jug with hot water.
Note: a little smoke may be generated when you rst use the appliance.
USING THE APPLIANCE Tips and clues:
CAUTION: your coffee-maker always uses the full amount of water that is present in
Whenever the appliance is working, you have to place the jug with lid on the heater
plate. If not, the drip stopper will engage and the coffee will not run.
The set time and coffee strength will be stored in memory until you set a new time
or coffee strength. Or until the plug has been pulled from the mains socket for longer
All settings will be restored to default whenever the appliance is disconnected from
the mains for longer than one minute.
The heater plate can keep your coffee warm for a certain time. It is yet advised to pour
the fresh coffee in a thermos and switch off the coffee-maker.
The drip stopper ensures the coffee doesn’t run when the jug is not placed in the
appliance. Never take the jug out of the coffee-maker for more than 30 seconds during
the brewing process, otherwise the coffee lter will ll up and coffee will overow.
SETTING THE TIME Connect the appliance to the mains. The display text will start blinking. Use the “H”
button to set the hour, and the “M” button to set the minutes.
Note: Hour-count always starts with “0”, minutes-count always starts with “00”.
SETTING THE STANDARD COFFEE STRENGTH Press the “2-10” button to set the desired amount of coffee to be ground. Possible
settings: 2, 4, 6, 8, or 10.
Note: the set amount of coffee to be ground is stored in memory until you set a new
amount, or until the appliance is disconnected from the mains longer than 1 minute.
FINE ADJUSTMENT OF THE COFFEE STRENGTH Press button “ “ to ne tune the desired coffee strength. The following
options can be selected:
: for a normal coffee
: for a strong coffee
Press button “2-4” if you wish to ne tune the strength of your coffee for 2 or 4 cups.
The display will show “2-4”.
Note: the set coffee strength will be stored until you enter a new strength, or until the
appliance is disconnected from the mains longer than 1 minute.
Note: coffee strength also depends on the quality of the beans used.
ADJUSTING THE FINENESS OF THE GROUND COFFEE Why? The neness of the ground beans denes the taste of your coffee. The ner the
beans have been ground, the more bitter the coffee will taste.
Turn the coffee grinder to the left or to the right to adjust the neness of the ground
- to the left: a ner ground coffee
- to the right: coarser ground coffee
You can use the indicator on the coffee grinder to set the desired neness.
MAKING COFFEE USING BEANS CAUTION: Always take the coffee jug out of the appliance rst. Otherwise, the jug
might fall out of the appliance when you open the lter.
Open the lid of the water reservoir and ll it up with the desired amount of water. Take
care not to ll the reservoir above the maximum level.
Close the lid of the water reservoir.
Remove the lid of the coffee grinder and ll up with coffee beans. Again, take care not
to ll the grinder above the maximum level.
Close the lid of the coffee grinder.
Open the lter retainer and install a 1 x 4 size lter in the lter retainer.
Close the lter retainer.
Make all desired adjustments on your coffee-maker.
Press the on/off switch to activate the coffee grinder – the indication light will light
up. The freshly ground coffee will end up in the lter and the coffee will be made
according to your settings.
Note: when the brewing process has been completed, the “cup” symbol on the display
Press the on/off switch again to switch off the appliance - the indicationlight will
switch off. The appliance is now switched off.
34DO421K Note: the appliance will automatically switch off after 2 hours.
MAKING COFFEE USING PRE-GROUND COFFEE BEANS CAUTION: Always take the coffee jug out of the appliance rst. Otherwise, the jug
might fall out of the appliance when you open the lter.
Open the water reservoir and ll it up with the desired amount of water. Make sure not
to ll above the maximum (=10) water level.
Close the lid of the water reservoir.
Open the lter compartment and install a lter in the lter retainer.
Fill up the lter with the desired amount of ground coffee.
Close the lter compartment.
Press the “brew” button to activate the brewing process. The indication light will light
Note: when the brewing process has been completed, the “cup” symbol on the display
Press the “brew” button again to switch off the coffee-maker. The indication light will
MAKING COFFEE USING THE TIMER Note: before you can use the timer, you rst have to set the right time, as described
earlier in this manual.
Press and hold the “auto/prog” button until the display starts to ash.
You can now set the desired starting time for the brewing process using the “H” and
When you are making coffee using freshly ground coffee, rst select the standard
coffee strength and ne tune it. If you are making coffee with pre-ground coffee, press
Wait for a couple of seconds until the indication light switches off. Then press the
“auto/prog” button again. The indication light will light up again. When the set time is
reached, the appliance will switch on automatically.
STOPPING THE BREWING PROCESS To stop the brewing process, press “on/off”.
MAINTENANCE AND CLEANING Warning: danger of burning. Pull the plug from the mains socket and allow the
appliance to cool down completely before cleaning.
Danger: danger of electrocution. Never immerse the appliance in water or another
Caution: danger of damage. Never use aggressive, abrasive or chemical cleaning
Disconnect the appliance from the mains. Allow the appliance to cool down.
Always remove the lter, and dirt that has gathered in the water reservoir after every
Clean the coffee grinder and lid every 2
time you use it. You can clean the lid
of the receptacle for the ground coffee at the same time. To do so, press the release
button with a sharp object. After that, you can also clean the receptacle.
Clean the exterior of the appliance with a damp cloth, then dry it with a soft cloth.
You can put the glass jug in the dishwasher.
REPLACING THE ACTIVE CARBON FILTER Benet: the active carbon lter puries the water. It removes harmful substances, for
instance chlorine, from the water, thereby improving the taste of your coffee.
Replace the active carbon lter each time you have
used the appliance 70 times.
You can set the lter reminder by pressing the
“lter” button. This will make a “ “ symbol appear
on the display. After 70 brewing cycles the symbol will start to ash. This reminder
function will only work if the appliance remains connected to the mains without
Replacing the carbon lter:
Take the new active carbon lter from the packaging and rinse thoroughly with
Remove the lter retainer from the water reservoir and open the lid of the lter
retainer. Remove the old carbon lter.
Install the new lter in the small opening in the lter retainer.
Press the “lter” button to set the lter replacement reminder.
Descale your coffee-maker if you notice the brewing process is taking longer than
usual. Or, depending on the hardness of the water used, at least every 6 weeks.
Use a descaler with citric acid or a vinegar solution (approx. 5 % acid).
We advise to use a descaler that is environmentally friendly, and to proceed with
descaling strictly according to the directions of this manual.
Fill up the water reservoir of your coffee-maker with the descaling solution.
Switch on the coffee-maker by pressing the “brew” button, and let the descaling
solution run through the machine completely.
After the solution has run through completely, dispose of it. Run the coffee-maker
twice using only pure water in order to rinse it, before you start making coffee again.
Repeat the descaling process if necessary.