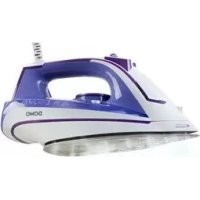
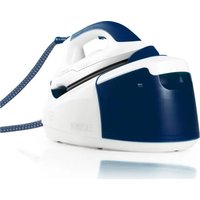
DO7052S - Iron DOMO - Free user manual and instructions
Find the device manual for free DO7052S DOMO in PDF.


User questions about DO7052S DOMO
0 question about this device. Answer the ones you know or ask your own.
Ask a new question about this device
Download the instructions for your Iron in PDF format for free! Find your manual DO7052S - DOMO and take your electronic device back in hand. On this page are published all the documents necessary for the use of your device. DO7052S by DOMO.
USER MANUAL DO7052S DOMO
natural_image
Electric iron with purple and blue body, labeled 'DOMO' (no additional text or symbols visible)GARANTIEVOORWAARDEN
CONDITIONS DE GARANTIE
This appliance has a two year warranty period. During this period the manufacturer is responsible for any failures that are the direct result of construction failure. When these failures occur the appliance will be repaired or replaced if necessary. The warranty will not be valid when the damage to the appliance is caused by wrong use, not following the instructions or repairs executed by a third party. The guarantee is issued with the original till receipt. All parts, which are subject to wear, are excluded from the warranty.
If your device breaks down within the 2-year warranty period, you can return the device together with your receipt to the shop where you purchased it.
CONDICIONES DE GARANTÍA
RECYCLAGE-INFORMATIE
natural_image
Symbol of a trash bin crossed with no text or numbers, representing waste sorting or disposal (no text present)
INFORMATION DE RECYCLAGE
natural_image
Recycling symbol composed of three chasing arrows forming a triangle (no text or labels)RECYCLING INFORMATIONEN
RECYCLING INFORMATION
This symbol on the product or on its packaging indicates that this product may not be treated as household waste. Instead it must be brought to the applicable collection point for recycling of electrical and electronic equipment. By ensuring this product is disposed of correctly, you will help prevent potential negative consequences for the environment and human health, which could otherwise be caused by inappropriate waste handling of this product. For more detailed information about recycling of this product, please contact your local city office, your household waste disposal service or the shop where you purchased the product. The packaging is recyclable. Please treat the packaging ecologically.
natural_image
Symbol of a trash bin crossed with two diagonal lines, representing no waste or discharge (no text or labels)
natural_image
Recycling symbol composed of three chasing arrows forming a triangle (no text or labels)INFORMACE O RECYKLACI ODPADU
From now on, accessories and parts of Domo appliances can also be ordered online from the Domo webshop*:
http://webshop.domo-elektro.be
You can reach the webshop through the Domo website as well: www.domo-elektro.be. The accessories and parts can also still be obtained at the store where you bought the appliance.
CZ
If the power supply cord is damaged, it must be replaced by the manufacturer, its service agent or a similarly qualified person in order to avoid a hazard.
natural_image
Technical line drawing of a mechanical component with a cylindrical part inserted, showing internal structure and no text or symbols.Strijken met stoom

natural_image
Warning symbol depicting steam rising inside a triangle (no text or numbers)AVANT LA PREMIÈRE UTILISATION

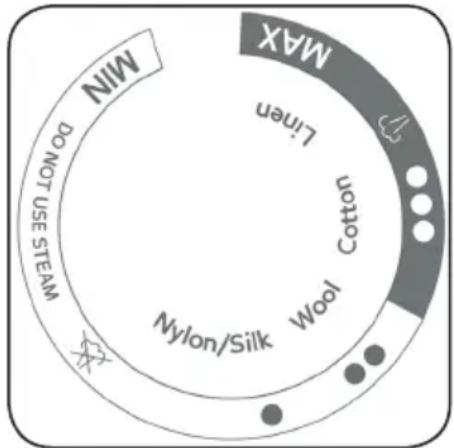
| Nylon/Silk Nylon/Soie | |
| Wool Laine | |
| Cotton Coton | |
| Linen Lin | |
natural_image
Technical line drawing of a mechanical component with a cylindrical part inserted, showing internal structure and no text or symbols.Bügeln mit Dampf

When using electrical appliances, basic safety precautions should always be taken, including the following:
- Read all instructions carefully. Keep this manual for future reference.
- Make sure all packaging materials and promotional stickers have been removed before using the appliance for the first time. Make sure children cannot play with the packaging materials.
- This appliance is intended to be used in household and similar applications such as:
- staff kitchen areas in shops, offices and other working environments;
- farm houses;
- by clients in hotels, motels and other residential type environments;
• bed and breakfast type environments.
- This appliance is not intended for use by persons (including children) with reduced
physical, sensory or mental capabilities, or lack of experience and knowledge, unless they have been given supervision or instruction concerning use of the appliance by a person responsible for their safety.
- Children should be supervised to ensure that they do not play with the appliance.
- This appliance can be used by children aged from 16 years and above and persons with reduced physical, sensory or mental capabilities or lack of experience and knowledge if they have been given supervision or instruction concerning use of the appliance in a safe way and understand the hazards involved. Children shall not play with the appliance. Cleaning and user maintenance shall not be made by children unless they are older than 8 and supervised.
- Keep the appliance and its cord out of reach of children younger than 16 years.
- The appliance must be disconnected from its power source when not in use, during service and when replacing parts. Allow to
cool before putting on or taking off parts, and before cleaning the appliance.
- If the supply cord is damaged, it must be replaced by the manufacturer, its service agent or similarly qualified persons in order to avoid a hazard.
- CAUTION: In order to avoid a hazard this appliance must not be supplied through an external switching device, such as a timer, or connected to a circuit that is regularly switched on and off by the utility.
- The iron must not be left unattended while it is connected to the supply mains.
- The plug must be removed from the socket-outlet before the water reservoir is filled with water.
- The iron must be used and rested on a flat, stable surface and resistant to heat and hot steam.
- The iron is not to be used if it has been dropped, if there are visible signs of damage or if it is leaking. Do not operate this appliance with a damaged cord or plug or in
the event the appliance malfunctions or has been damaged in any manner. Return the appliance to the DOMO Service Department or its service agent for examination, repair, or electrical or mechanical adjustment. Do not try to repair the appliance yourself.
- Keep the iron and its cord out of reach of children less than 16 years of age when it is energized or cooling down.
natural_image
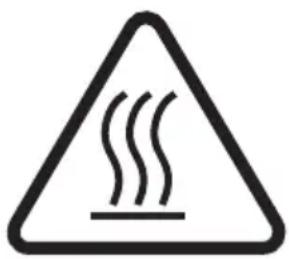
Warning symbol depicting steam rising inside a triangle (no text or numbers)The surface(s) marked with this symbol are liable to get hot during use. It is advised not to touch the surfaces of the appliance other than the handles to avoid burns.
- Do not use or store this appliance outdoors.
- Do not move the iron while in use or when still hot. Allow to cool before moving the iron or before maintenance.
- Do not use this appliance for other than intended use.
- Do not fill the water reservoir with any other liquid than water.
- Do not use the steam function of the iron without water in the reservoir. This might cause damage to the iron.
- Check carefully that the voltage and frequency of the power net match the indications on the rating label of the appliance.
- The plug must be plugged into an appropriate outlet that is installed and grounded in accordance with all local standards and requirements.
- Only use the utensils delivered with the appliance.
-
To protect against electrical shock or burns, do not immerse unit, cord, or plug in water or other liquid.
-
Do not operate the appliance with wet hands.
- Unwrap the cord completely to prevent overheating of the cord.
- Do not let the power supply cord touch hot surfaces.
- Only fill the water reservoir with no other liquid than water.
- Make sure the appliance is correctly assembled, then plug the cord in the wall outlet. To disconnect, turn controls to “OFF” or “0” position, then remove the plug from the wall. Never pull the cord or appliance to remove the plug from the socket.
- Failure to maintain this appliance in a clean condition could adversely affect the life of the appliance and possibly result in a hazardous situation.
- Any injury or damage caused by failure to comply with these rules are at your own risk. Neither the manufacturer, importer, or the supplier may be held liable.
SAVE THESE INSTRUCTIONS FOR FUTURE REFERENCE
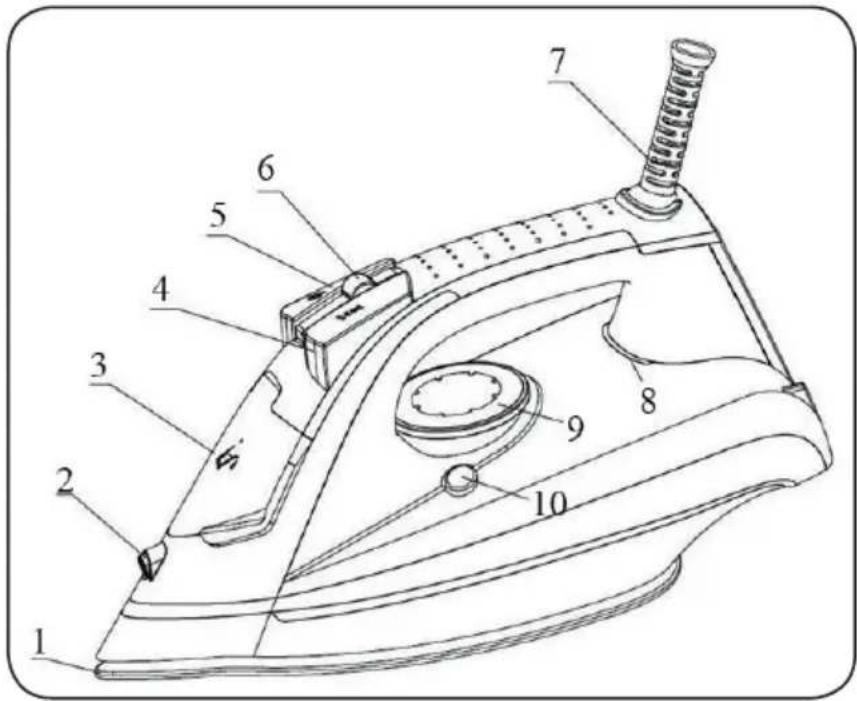
PARTS
- Bottom plate
- Spray opening
- Water reservoir
- Spray button
- Steam boost button
- Steam regulation button
- Cord
- Indication light
- Temperature button
- Self-cleaning button
BEFORE FIRST USE

- The iron must always be at “Min” if you put the plug in or take it out of the outlet.
- Wait until the iron has cooled completely before putting it away.
- Never pull on the cord but on the plug itself.
- Do not use other devices with a high power usage on the same electrical group to prevent possible overloading.
- Remove the plastic protection from the sole of the iron (if present) and clean the sole of the iron with a soft cloth.

- Some parts of the iron have been greased lightly, so the device may emit a slight odour and some smoke with initial use. This is normal and will not happen after initial use.
- Keep the sole of the iron smooth and be careful for scratches. Do not slide with the sole of the iron over metal surfaces, such as the edge of the ironing board, buttons or zippers.
- Fill the water reservoir as indicated in “Filling the water reservoir”.
- Make sure that the steam regulation button is at "0".
- Put the plug of the device in the outlet, the indicator light will light up.
- Turn the temperature button to the MAX position. The indicator light will show that the device is heating up.
- The indicator light will turn off when the device has reached the temperature.
- Slide the steam regulator button to the desired position, from “0” to “4”. Steam will come out of the sole of the iron.
- With initial use, iron an old towel.
- When the water reservoir is empty, no more steam will be produced, and the preparations are completed.
INSTRUCTIONS
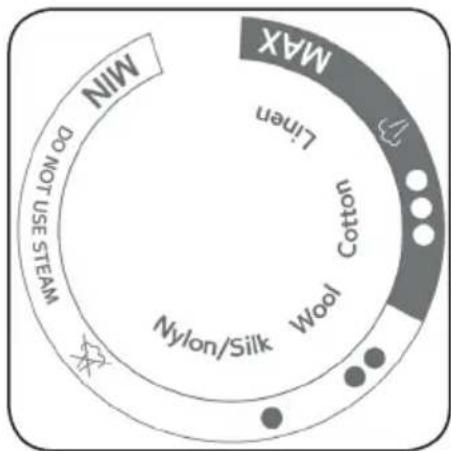
Temperature choice
- Check the ironing instructions on the item of clothing that you wish to iron.
- Materials with a separate shiny layer or other extra finishings should be ironed at the lowest temperature.
- If your item of clothing consists of several fabrics, always follow the indications pertaining to the fabric that has to be ironed at the lowest temperature. An item of clothing of, e.g., 60% polyester and 40% cotton should be ironed at the temperature indicated for polyester without steam.
- Sort your laundry by type of fabric and temperature at which it must be ironed. Begin with the items of clothing for low temperatures and end with the laundry for the highest temperature.
- Wools and other delicate fabrics such as silk, velour, etc., can best be ironed with a pressing cloth to prevent the fabric from being damaged.
| Nylon/Silk Nylon/Silk |
| Wool Wool |
| Cotton Cotton |
| Linen Linnn |
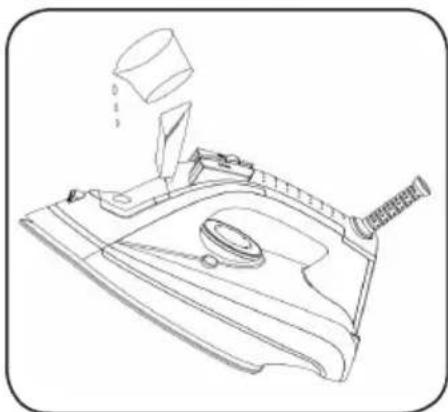
Filling the water reservoir
- Remove the plug from the outlet.
- Position the steam regulator button to iron without steam (position "0").
• Fill the water reservoir through the opening to the MAX level.
- If you live in an area with hard water, it is recommended you use demineralised or distilled water. Do not use chemically modified water or perfumed water.
- Never store the device with a filled water tank.
natural_image
Technical line drawing of a mechanical component with a cylindrical part inserted, showing internal structure and no text or symbols.
Ironing with steam
- Fill the water reservoir as indicated in “Filling the water reservoir”. - Slide the steam regulator button to the “0” position. Turn the temperature regulator to the MAX position. The iron will leak at too low a temperature.
- The indicator light will show that the device is heating up. When the iron is at temperature, the light will turn off. The iron is now ready for use.
- By sliding the steam regulator button, you can determine if you want steam or
not.
- The steam boost button allows you to use extra steam.
- After use, turn the temperature regulator to MIN, slide the steam regulator button to the “0” position and remove the plug from the outlet.
- Remove the water from the water reservoir as indicated under “Emptying the water reservoir”.
Spraying
- This function is always available and will not interfere with the other functions.
- Fill the water reservoir as indicated in “Filling the water reservoir”.
- Direct the spray opening toward the clothing.
- Press on the spray button. With the first use of the spray button, it will need to be pressed several times to activate it.
Steam boost
- You can remove stubborn wrinkles with a steam boost.
- Put the temperature switch at MAX and wait until the indicator light turns off.
- Press on the steam boost button. Wait a few second for the steam to penetrate the fabric before you press again.
- Note: Do not use the steam boost button more than three times in a row in order to maintain optimal steam quality. Using the steam boost several times in a row will cool the iron. For this reason, pay attention to the temperature indicator light before and after you use this function.

Dry ironing
- Put the plug in the mains. The indicator light will turn on. Make sure that the steam regulator button is at “0”.
- Turn the temperature regulator to the desired position, depending on the clothing that you must iron. The indicator light will show that the device is heating up. When the iron is at temperature, the light will turn off.
- The iron is now ready for use. After use, turn the temperature regulator to MIN and remove the plug from the outlet.
- Allow the iron to cool completely and store it in an upright position.
Emptying the water reservoir
- Pull the plug from the outlet. Slide the steam regulator button to the "0" position.
- Open the water reservoir and remove the water. Shake the iron to remove the excess water.

Ironing vertically
- This function allows you to remove stubborn wrinkles from delicate fabrics while hanging, such as curtains.
- Fill the water reservoir as indicated in “Filling the water reservoir”. Turn the
temperature regulator to the MAX position. The indicator light will show that the device is heating up. When the iron is at temperature, the light will turn off.
- Hold the iron between 15 and 30 centimetres from the fabric.
- Press on the steam boost button. The steam will penetrate the fabric and remove the wrinkles. Wait a few seconds before using the steam boost button again.
Automatic Shut-Off
The device will stop heating automatically when the iron has been horizontal (unmoved) for approximately 30 seconds. When you move the device again, it will begin to heat up.
In a vertical position, this will take about 8 minutes.
CLEANING
Self-cleaning
This function removes the lime scale and minerals that build up in the steam chamber. This treatment is best done once a month to keep the iron in optimal working condition. Depending on the hardness of the water, this treatment may have to be done more than once a month.
- Fill the iron as described in “Filling the water reservoir”. Fill the water tank halfway.
- Place the iron straight up on a flat surface.
- Put the plug in the mains.
- Put the device on at the max. temperature. Wait until the device is at temperature.
- Turn the device off.
- Remove the plug from the outlet.
- Hold the iron horizontally above the sink.
- Press the self-cleaning button and hold it down.
- Steam and boiling water will come out of the holes in the sole of the iron, rinsing the lime scale and minerals out.
- Move the iron gently back and forth, until the water tank is empty.
- Release the self-cleaning button when you are finished cleaning.
- Place the iron in a vertical position and allow it to cool completely
- Dry the sole with a cold, damp cloth.
Note: Make sure you do not come into contact with the hot water.
Cleaning the iron
Clean the sole of the iron with a damp, clean cloth. Do not use any sharp object or aggressive cleaning products.
ERROR MESSAGES AND SOLUTIONS
| Problems Possible causes Solutions | ||
| The device leaks water from the holes in the sole | 1. The temperature is set too low2. The iron is not hot enough3. You are using the steam button too often | 1. Put the thermostat at maximum2. Wait until the light turns off3. Wait a few second before pressing the button again |
| Brown liquid comes out of the sole of the iron | 1. You used chemical lime scale-dissolving fluids2. You did not use the right type of water3. There is lint in the sole of the iron and it that has burnt4. You laundry was not rinsed properly or you are using starch | 1. Do not use any lime scale-dissolving fluids2. Clean the device with the self-cleaning button3. Clean the sole with a damp sponge4. Check whether your laundry is rinsed sufficiently |
| The sole of the iron is dirty or brown | 1. You used too high a temperature2. You used starch | 1. Clean the sole of the iron properly with a damp sponge2. Spray the starch on the inside of the clothes |
| Little or no steam comes out of the iron | 1. The water reservoir is empty2. There is lime scale in your device3. You left your iron for too long without power | 1. Fill the reservoir2. Apply the self-cleaning function3. Apply the self-cleaning function |
| The sole of the iron has scratches or is damaged | 1. You placed your iron on a metal plate | 1. Always set the iron up straight |
| The spray does not spray water | 1. There is not enough water in the reservoir | 1. Fill the reservoir |
| The iron does not heat up | 1. The temperature is set too low 1. Turn the thermostat to a higher position | |
natural_image
Technical line drawing of a mechanical component with no visible text or symbols
Planchar con vapor
PŘED PRVNÍM POUŽITÍM

natural_image
Technical line drawing of a mechanical component with a top hat and labeled part (no readable text or symbols)
PRED PRVÝM POUŽITÍM

natural_image
Technical line drawing of a mechanical component with a bucket and base plate (no text or symbols)
natural_image
Two cylindrical white objects with a small white object on top, placed side by side on a plain white background (no text or symbols visible)
natural_image
Three product photos: square tiles, a clear glass coffee maker, and a rectangular baking pan (no text or symbols visible)of scan hier:
ou scannez ici:
oder hier scannen:
or scan here:

- GARANTIEVOORWAARDEN
- CONDITIONS DE GARANTIE
- CONDICIONES DE GARANTÍA
- RECYCLAGE-INFORMATIE
- INFORMATION DE RECYCLAGE
- RECYCLING INFORMATIONEN
- RECYCLING INFORMATION
- INFORMACE O RECYKLACI ODPADU
- CZ
- Strijken met stoom
- AVANT LA PREMIÈRE UTILISATION
- Bügeln mit Dampf
- When using electrical appliances, basic safety precautions should always be taken, including the following:
- PARTS
- BEFORE FIRST USE
- INSTRUCTIONS
- Temperature choice
- Filling the water reservoir
- Ironing with steam
- Spraying
- Steam boost
- Dry ironing
- Emptying the water reservoir
- Ironing vertically
- Automatic Shut-Off
- CLEANING
- Self-cleaning
- Cleaning the iron
- Planchar con vapor
- PŘED PRVNÍM POUŽITÍM
- PRED PRVÝM POUŽITÍM
Brand : DOMO
Model : DO7052S
Category : Iron