
DO230SR - Steam cleaner DOMO - Free user manual and instructions
Find the device manual for free DO230SR DOMO in PDF.
| Product Type | Steam Cleaner |
| Brand | Domo |
| Model | DO230SR |
| Power Supply | 230 V / 50 Hz |
| Tank Capacity | 1,2 L |
| Boiler Material | 18/10 Stainless Steel |
| Heating Time | Approximately 8-10 minutes (cold water) |
| Steam Temperature | 104-115 °C at nozzle |
| Included Accessories | Floor brush, 2 detail brushes, window squeegee, high-pressure nozzle, 2 extension tubes, shoulder strap, angled adapter, filling funnel |
| Recommended Water Type | Tap water or demineralised if very hard |
| Cleaning and Maintenance | Periodic rinsing (10-15 fills), descaling with vinegar if necessary |
| Safety | Safety cap, automatic steam stop if tank empty, do not use unattended |
| Warranty | 2 years (excluding wear parts) |
| Weight | Approximately 3.5 kg (estimated) |
| Dimensions (L x W x H) | Approximately 30 x 25 x 30 cm (estimated) |
Frequently Asked Questions - DO230SR DOMO
User questions about DO230SR DOMO
0 question about this device. Answer the ones you know or ask your own.
Ask a new question about this device
Download the instructions for your Steam cleaner in PDF format for free! Find your manual DO230SR - DOMO and take your electronic device back in hand. On this page are published all the documents necessary for the use of your device. DO230SR by DOMO.
USER MANUAL DO230SR DOMO
PRODUCT OF LINEA 2000
GARANTIEVOORWAARDEN
CONDITIONS DE GARANTIE
This appliance has a two year warranty period. During this period the manufacturer is responsible for any failures which are the direct result of construction failure. When these failures occur the appliance will be repaired or replaced if necessary. The warranty will not be valid when the damage to the appliance is caused by wrong use, not following the instructions or repairs executed by a third party. The warranty will only be valid if the warranty application has been completed by the dealer at the time of purchase. All parts, which are subject to wear, are excluded from the warranty.
Type nr. Apparaa
RECYCLING INFORMATIONEN
RECYCLING INFORMATION
The symbol 豆 on the product or on its packaging indicates that this product may not be treated as household waste. Instead it shall be brought to the applicable collection point for recycling of electrical and electronic equipment. By ensuring this product is disposed of correctly, you will help prevent potential negative consequences for the environment and human health, which could otherwise be caused by inappropriate waste handling of this product. For more detailed information about recycling of this product, please contact your local city offi ce, your household waste disposal service o the shop where you purchased the product.
If the supply cord is damaged, it must be replaced by manufacturer of its service agent or a similarly qualified person in order to avoid a hazard.
BELANGRIJKE VEILIGHEIDSINSTRUCTIES
Puissance:2000 Watts
Capacite:1,2Lt
L'temperature maximale de la vapeur: 116^
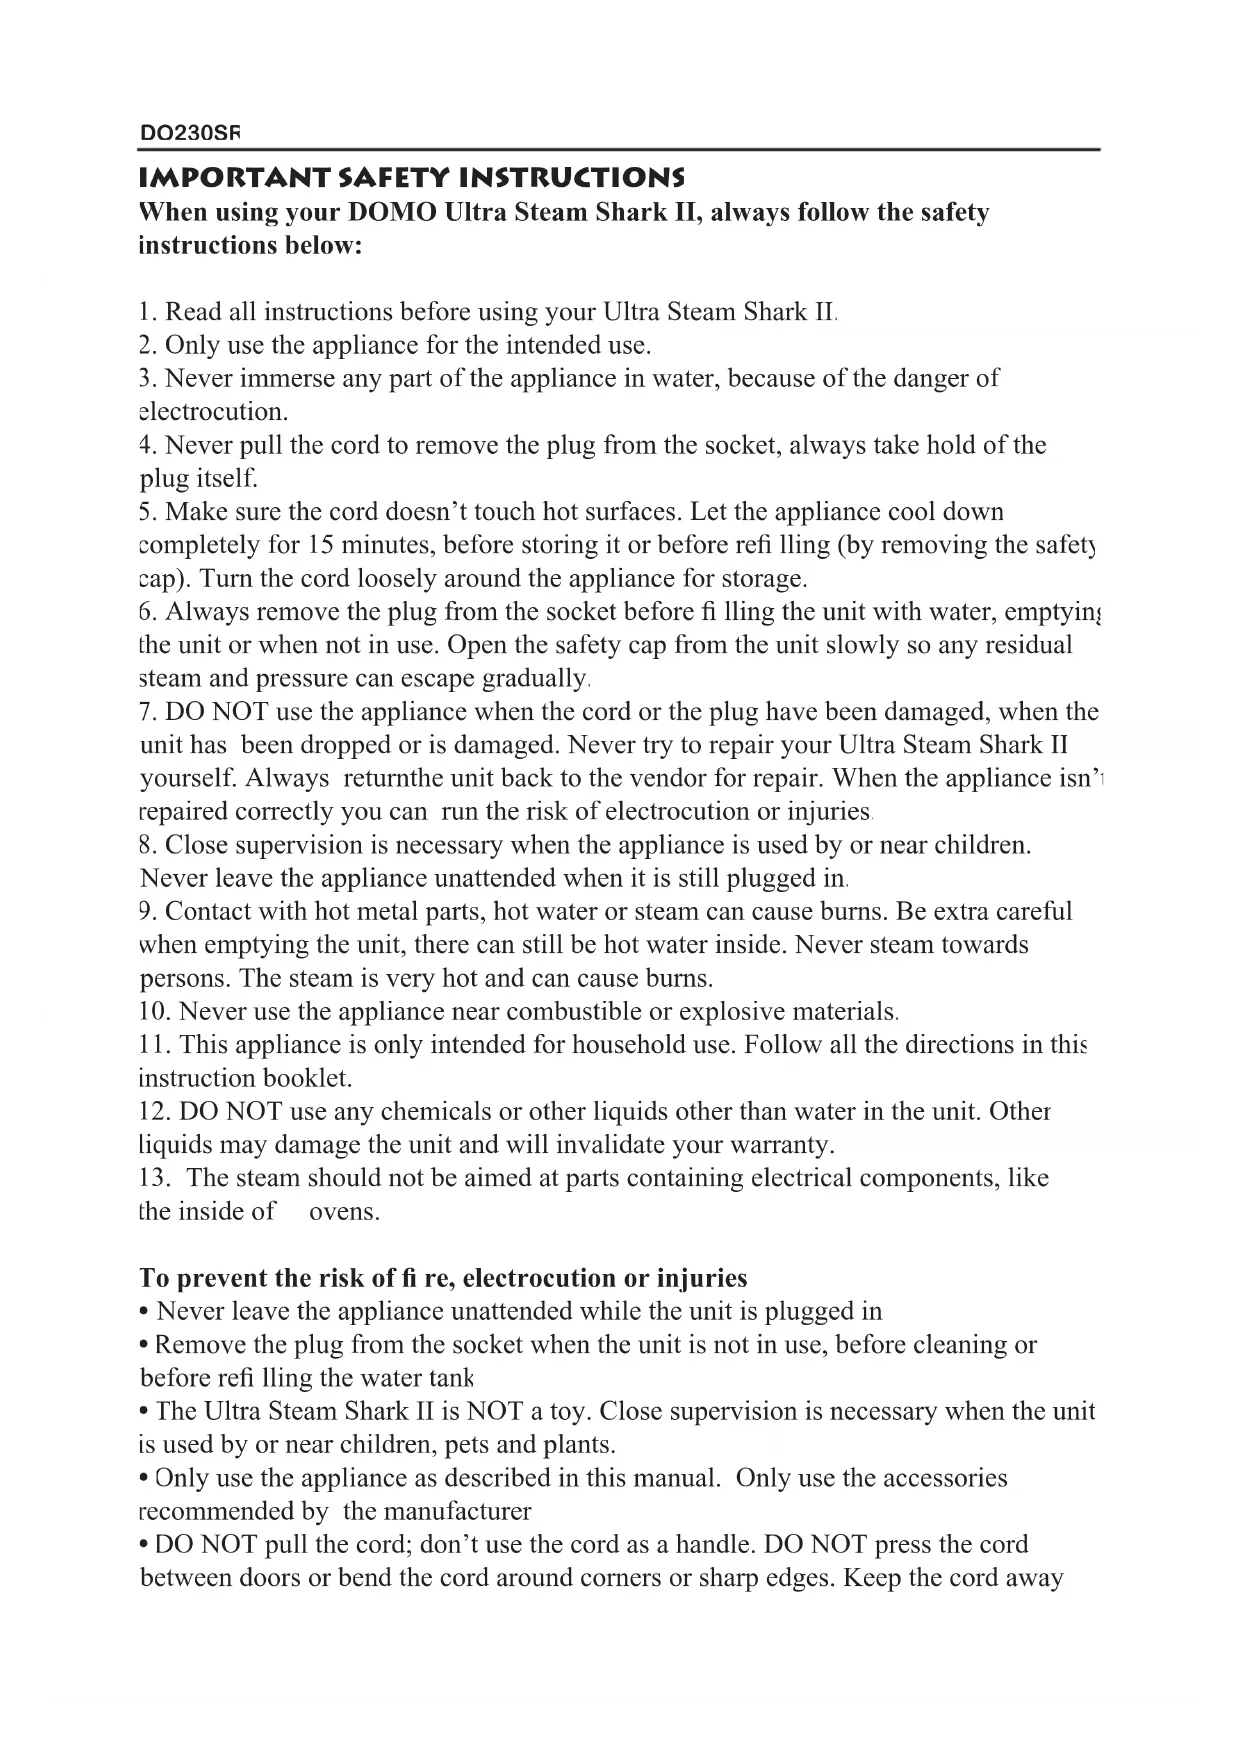
IMPORTANT SAFETY INSTRUCTIONS
When using your DOMO Ultra Steam Shark II, always follow the safety instructions below:
- Read all instructions before using your Ultra Steam Shark II.
- Only use the appliance for the intended use.
- Never immerse any part of the appliance in water, because of the danger of electrocution.
- Never pull the cord to remove the plug from the socket, always take hold of the plug itself.
- Make sure the cord doesn't touch hot surfaces. Let the appliance cool down completely for 15 minutes, before storing it or before refi lling (by removing the safety cap). Turn the cord loosely around the appliance for storage.
- Always remove the plug from the socket before filling the unit with water, emptying the unit or when not in use. Open the safety cap from the unit slowly so any residual steam and pressure can escape gradually.
- DO NOT use the appliance when the cord or the plug have been damaged, when the unit has been dropped or is damaged. Never try to repair your Ultra Steam Shark II yourself. Always return the unit back to the vendor for repair. When the appliance isn't repaired correctly you can run the risk of electrocution or injuries.
- Close supervision is necessary when the appliance is used by or near children. Never leave the appliance unattended when it is still plugged in.
- Contact with hot metal parts, hot water or steam can cause burns. Be extra careful when emptying the unit, there can still be hot water inside. Never steam towards persons. The steam is very hot and can cause burns.
- Never use the appliance near combustible or explosive materials.
- This appliance is only intended for household use. Follow all the directions in this instruction booklet.
- DO NOT use any chemicals or other liquids other than water in the unit. Other liquids may damage the unit and will invalidate your warranty.
- The steam should not be aimed at parts containing electrical components, like the inside of ovens.
To prevent the risk of fire, electrocution or injuries
- Never leave the appliance unattended while the unit is plugged in
- Remove the plug from the socket when the unit is not in use, before cleaning or before refilling the water tank
- The Ultra Steam Shark II is NOT a toy. Close supervision is necessary when the unit is used by or near children, pets and plants.
- Only use the appliance as described in this manual. Only use the accessories recommended by the manufacturer
- DO NOT pull the cord; don't use the cord as a handle. DO NOT press the cord between doors or bend the cord around corners or sharp edges. Keep the cord away
from hot surfaces.
- Only use a plug or extension cord with sufficient capacity
- Never handle the steam cleaner or the plug with wet hands. Never use the appliance without wearing shoes.
- DO NOT put any objects inside the holes of the unit. DO NOT use the appliance when an opening is blocked.
- Store the unit in a dry, cool place.
- Use the unit in a well lit room.
- Don't turn the unit over when it is in use. Don't ever direct steam towards people, animals or plants.
- Don't place the steam cleaner in water or any other liquid. Always remove the plug from the socket when filling the unit
- Don't add detergent, perfumes, oils or other chemicals in the water, this can damaged the unit. Use tap water or distilled water, when the tap water is too hard.
SAVE THIS INSTRUCTION BOOKLET FOR HOUSEHOLD USE ONLY
IMPORTANT SAFETY INSTRUCTIONS
Do not use two appliances on the same plug to prevent overloading.
When an extension cord is necessary, make sure to use one with an earthed socket and suited for min. 15 Amp. Cord of less Amperage can overheat. Make sure no one can trip over the cord.
Never leave the appliance unattended when plugged in.
ATTENTION: Always remove the condensation water from the tubes before use or when the appliance hasn't been used for a long time. The tube can be emptied into a container or into the sink by pressing down the button. When the tube is empty it can be used again. Never direct the tube towards persons, animals or plants.
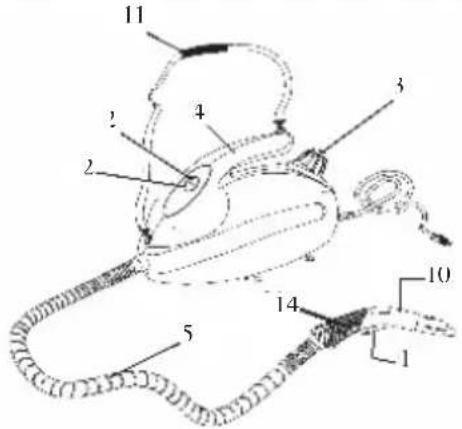
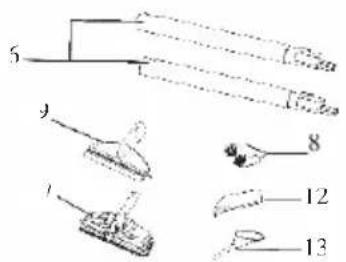
PARTS AND SPECIFICATIONS
- Control button on handle
- Red indicator light/green indicator light
- Safety filler cap
- Handle
- Flexible steam tube
- Extension tubes
- Floor brush
8.2 detail brushes - Squeegee
- Concentrator
- Shoulder strap
- Angle adaptor
- Funnel
- Steam regulation
Technical specification
Voltage:230V50Hz
Wattage:2000 Watts
Water capacity : 1.2 litres
Max. steam temperature: 116^
Steam generator : stainless steel
FEATURES
- No detergent or chemicals anymore. Only add water
- Light weight and portable.
- Steam generator in stainless steel : anti corrosive, 18/10 boiler. Welded construction
- Shock proof.
- Easy to use multi-functional accessories
- For use indoors and outdoors: bathroom, kitchen, living room, animal cages, appliances, car, patio, windows, etc.
COMPONENTS
Red indicator light: will come on as soon as you insert the plug into the socket. It will continue to light up until you remove the plug from the socket.
ATTENTION: Read the instructions for filling the water tank carefully, before removing the safety fill cap. Press the steam switch and keep it down until all pressure/steam has escaped from the boiler.
ATTENTION : Always remove the plug from the socket before fi lling the water tank
IMPORTANT: Don't add any detergent, perfumes, oil or other chemicals to the water. Use tap water or distilled water if tap water is too hard.
FILLING YOUR STEAM CLEANER
IMPORTANT: When there is no more water in the steam cleaner, the steam will stop.
Step 1 Make sure to remove the plug from the socket before filling the steam cleaner.
Step 2 Screw off the safety fi ll cap by turning it anti-clockwise.
Step 3 Place the funnel in the fi lll opening and fi ll the water tank with 1.2 l water. Place the safety fi ll cap back on the unit by turning it clockwise. The heat up time is about 8-10 minutes when you fi ll with cold water. When you fi ll with warm water the heat up time will shorten.
Step 4 Place the plug in an earthed socket of 230V . The red indicator light will light up.
Step 5 Wait approximately 8 - 10 minutes until the steam reaches the correct temperature and pressure.
Step 6 Attach the accessory you want to use to the fl exible tube.
Step 7 In the beginning water will come out of the tube, which is normal. This is unheated water in the tube.
ATTENTION: Always remove condensation water from the tube before use or when the appliance hasn't been used for a long time. The tube can be emptied in a container or in the sink by pressing the button. When the tube is empty it can be used again. Never direct the tube towards persons, animals or plants.
IMPORTANT: Make sure the plug isn't in the socket when fi lling the unit for the first time or when refi lling it
ATTENTION: let the unit cool down for about 15 minutes before refi lling it again When the unit gets fi lled when it is still hot the first drops of water can splash out. B very careful when opening the safety fi ll cap: the cap can get hot during use and the escaping steam can cause burns.
Filling the steam cleaner with water
Step 1 Remove the plug from the socket.
Step 2 Press the steam button and keep it pressed in until all pressure is gone from the boiler.
Step 3 Unscrew the safety fill cap carefully by turning it counter clockwise, so all remaining steam can escape. When all hissing has stopped and the last steam has disappeared you can remove the safety cap. Let the appliance cool down.
ATTENTION: Let the appliance cool down for 15 minutes before refi lling it. Filling the appliance when it is still hot can cause the water to splash out and cause burns. Therefore always be very careful when fi lling the appliance and opening the safety fi cap. The safety fi ll cap can get very hot during use and the escaping steam can cause
burns.
Step 4 Let the steam cleaner cool down for 15 minutes before filling it again.
Step 5 Fill the water tank by using the funnel.
Step 6 Place the safety fill cap bag on the unit by turning it clockwise
Step 7 Place the plug in the socket.
Using the floor brusl
Step 1 Place the extension tubes on the handle of the fl exible tube. To connect the extension tubes to the handle or to each other press the button so it fits into the hole. To disconnect, press the button again and pull the two parts apart
NOTE: Connect the floor brush to the tubes by using the angle adaptor.
Step 2 When the angle adapter isn't attached to the floor brush, keep the brush with the bristles up in your left hand. Turn the angle adaptor downward and place it in the opening at the back of the floor brush. Now turn the angle adaptor 180^
Step 3 Place the plug in the socket. To heat up cold water will take about 8-10 minutes. When using hot water the heat up time will shorten. Attach a cloth to the floor brush. You should use a white terry cloth to absorb dirt and to protect delicate surfaces. This can also be used to clean vertical surfaces.
IMPORTANT: when the cloth is too thin, the bristles may break through the cloth. When you don't have a thick cloth available use two cloths.
ATTACHING THE ACCESSORIES TO THE FLEXIBLE TUBE
Squeeled
Very useful for cleaning large windows, plastic material, ceramics, tiles or marble surfaces. How to use? Place the squeezegee on the handle or use the extension tubes for hard to reach places. Steam abundantly, clean with a soft spong and remove excess water and dirt with the squeezegee.
ATTENTION: prevent sudden temperature changes when cleaning the windows to prevent glass breaking.
Concentrator
Very effcient for cleaning hard to reach places. Ideal for radiators, doorposts, roll down shutters or sanitary fixtures. The concentrator fi ts directly on the handle and ca also be used with the extension tubes
Detail brushes
Place the detail brushes on the concentrator, which can be connected directly on the
handle or on the extension tubes. Can be used to clean seams of tiles, ceramics or marble.
TIPS
Water
- Use tap water.
- When tap water is too hard, use distilled water when you clean steam clean materials with a light colour to prevent stains caused by scale.
IMPORTANT: Don't add detergent, perfumes, oils or other chemicals to the water. Use tap water or distilled water when the tap water is too hard.
Temperature
The temperature of the steam at the end of the concentrator is about 104^ to 116^ . At a distance of 25cm from the end of the concentrator the temperature is about 38^ .
Use of cloths
- Use white clothes of 100% pure cotton terry cloth for the best result.
- Take a white terry cloth: dimensions about 20 cm × 42.5 cm
- Place the floor brush on the cloth and fold the cloth around both smallest sides of the brush. Make sure the long sides of the brush will not be covered by the cloth.
- Attach the cloth under the hooks on top of the brush.
- The use of a cloth is necessary to absorb moisture and dirt. Always use dry cloths. Wash the cloths with a strong detergent and bleach.
- When using a wash softener during washing, the scent of the wash softener will be spread during steaming.
ATTENTION : The cloth around the brush can become very hot and cause burns. Only touch the cloth when it has cooled down.
Working efficiently
- Clean vertical surfaces always from the top down, this way the dirty water cannot soil already cleaned surfaces.
- Avoid moving the brush back and forth during cleaning.
- Use the detail brushes first for cleaning hard to reach places and corners
- Remove dirt as quickly as possible, otherwise it will dry out and get stuck to the surface again.
ADVICE CONCERNING THE USE OF THE STEAM CLEANER
wood, vinyl and marble floors
Use the floor brush with a white cloth. Move the brush as you are mopping. When the cloth is soiled, allow to cool, then turn the cloth over or replace it with a clean cloth.
If you are working on a very dirty area, you can move the brush over the area slowly, several times. If it is a wood floor, move fast to avoid heat or moisture build up in the wood. By cleaning with the cloth over the brush, you will not affect the shine on the floor.
To strip wax
Use floor brush for open areas, detail brush for corners or tight areas – no towel, slow strokes. Work a small area at a time – remove the emulsified wax from the floor. Who all of the wax has been stripped, immediately clean the floor and brushes with water before residue has a chance to harden on them. Go back over the stripped area with the floor brush with a towel to remove any remaining residue before waxing
To clean waxed floor
Wrap clean towel around the floor brush, brush quickly. This will cause the dirt to be removed, but not the wax.
Vinyl floor
Do not allow the heat to build up on any kind of vinyl, since it can soften it enough to affect its texture. Work fast on vinyl
Tile floor
Use the concentrator with the detail brush attached to an extension. Have the floor brush with cloth attached ready as well. Clean the grout between the tiles with the detail brush. Remove the detail brush and attach the floor brush, move the brush across the floor to clean the tile and remove excess moisture and residue. For areas of tile that are very dirty, remove the towel and agitate with the brush. Do not let the area dry before you wipe with a towel.
Spot cleaning (carpets)
Use the concentrator with or without the detail brush. Move slowly over the soiled area, allowing the steam to penetrate. Agitate with detail brush or clean towel. Dab the spot with the towel (do not rub). Repeat as necessary to remove stain. Vacuum only after the carpet has completely dried.
Always test colour fastness of carpet in an inconspicuous area before cleaning. If your Ultra Steam Shark II fails to remove stubborn stains a commercially available carpet shampoo may be required.
Do not add cleaning solutions, scented perfumes, oils or any other chemicals to the water used in this appliance as this may damage the unit or make it unsafe for use.
Upholstery
Use the floor brush attached directly to the hand grip with a clean white terry cloth. Use fast, light strokes to avoid getting the fabric wet. Be patient with stubborn spots. Work on a spot gently for no more than a minute at a time, then wait five minutes for
the area to dry and repeat. Use circular movements or back-and-forth and side-to-side movements to get all sides of the surface fi bres then blot with a towel. Finish by brushing in one direction to will give the fabric a uniform appearance.
Caution : always determine the colour-fastness on any fabric-especially with reds or blues- by taking a clean, moist, hand towel and gently rubbing a small area as far down on the back or other out of the way place on the furniture as possible. If colour comes off on the towel, you may need to have the piece dry cleaned.
Window, glass surfaces and mirrors
Use the dual edge glass and tile squeegee. Work with the vapor jet on using the top to bottom movements. Use the squeegee with the vapor off to clean the water from the glass. To do this without leaving streaks, use lateral movements from the top to the bottom of the surface.
fi berglass or stainless steel surface;
Use the floor brush or detail brush. Slowly move the brush over the surface to be cleaned. The vapor will emulsify the dirt and grease on the surface. Follow behind with a terry cloth towel over the brush to remove excess moisture and residue.
TIF: an old idea for polishing stainless steel is to wipe it down with seltzer soda water after it is cleaned.
Soap scum
Soap scum dissolves almost immediately under a combination of heat and moisture. Rinse the surface with a small amount of water afterwards or go back over it once more with a clean terry cloth towel.
NOTE: soap scum sometimes will develop a hard surface from waterborne minerals. If this is the case, use the floor brush with no towel first to break up this surface – c spray or wipe first with lemon, vinegar or seltzer soda water to soften the minerals
Moving too slowly can dry out the soap scum and cause it to granulate on the surface. The surface will have a gritty feel. If this happens, apply vapor to the surface with the open brush again and re-clean.
Garden furniture
Use any of the brushes depending on the surface area. Work quickly when cleaning resin outdoor furniture. Finish by wiping with a towel.
Blinds
Use the detail brush to clean blinds. Move the brush over the surface, allowing enough time for the vapor to penetrate. Work quickly on PVC blinds. Test for colour fastness on fabric blinds before using. Finish by wiping with a towel.
Bathroom areas
To clean the bathtub or shower area, use the detail brush for grout, shower door tracks, hard to get areas and heavily soiled areas. The dual edge window/tile squeezegee will be the most effcient way to clean the rest of the area. Allow plenty of time for the heat to penetrate the surface. This is especially helpful in the shower area if there is tile or grout. Wipe with towel
Removal of soap scum on tile, grout, and shower doors is also easier with the steam cleaner
To clean sanitary fixtures, use the concentrator with or without detail brush. Use a terry cloth towel or paper towel to wipe up excess moisture and residue.
To clean the sink and faucets, use detail brush then finish by wiping with a towel. Exterior areas
To clean inside your car, use the floor brush with a terry cloth towel attached to clean upholstery and interior areas, just as in the home. You should not expose the bristles to leather – use only the brush with the terry cloth attached. For Detailing the wheels, use the concentrator and the detail brush. Exterior windows are cleaned best by applying the vapor with the concentrator and following with a paper towel.
To clean bicycles, use the detail brush
To clean equipment, use the detail brush, depending on the surface area. Finish by wiping down with a towel.
Artificial plant
Use the concentrator with a brush attached to blow off the dust and dirt.
Clothing
A vapor cleaning system is excellent for removing wrinkles from fabric. Simply "vaporize" the surface from a distance (30-45 cm). The dry vapor removes wrinkles without leaving the fabric wet like ordinary fabric steamers do.
Nicotine and tar
Nicotine and tar dissolves at high temperatures and becomes a light yellow oil that has the consistency of sewing machine oil. When the nicotine/tar fi lm is touched by a hot terry cloth clipped over the floor brush, it immediately dissolves and flows into the towel. You can remove it from flat surfaces as fast as you can move the brush over the surface.
Removing wax, tar, etc.
Many stains are only stuck on the surface of materials and can be easily and quickly removed by "blowing" excess material away from the surface from the side. This is
accomplished by using the concentrator. Hold the terry cloth to the side to catch the loose residue as it is blown by the concentrator.
NOTE : always vacuum any loose residue off the surface before you apply vapor to it.
Refrigerator
Use the concentrator to blow away dirt in the ice machine and on door seals. The vapor will not dry out or crack the seals as chemicals often do. Can openers and other kitchen equipment can be easily cleaned with the detail brush to get into all the nooks and crannies. Mould stains around door gaskets can be removed with the detail brush.
NOTE : when cleaning small electrical appliances always unplug them from outlet before cleaning. To clean counter tops, use the floor brush with a terry cloth attached For heavily soiled areas, use the brush without the terry cloth towel first in order to loosen the debris, then follow with a terry cloth attached to finish
NOTE : Wipe with a towel immediately before the cleaned area dries. When cleaning the oven, use the detail brush to clean around the elements and drip trays. Use the detail brush for cracks, crevices and hard to reach areas.
Hints
The Ultra Steam Shark II has many uses that have not been mentioned. This was meant only to give you a general idea of what can be achieved with the unit. It is most helpful to always have a terry cloth or paper towel ready to use for removal of moisture and residue. 100% white cotton towels work best.
You can clean the brushes with your steam cleaner. To clean the floor brush, hold a one end and use the concentrator to simply blow off dirt into the garbage can. When cleaning the detail brush, use a pair of pliers to hold and blow dirt as above or place in the basket of your dishwasher.
CARE AND MAINTENANCE
If you consistently use demineralized or distilled water, cleaning the tank is unnecessary.
RINSING OUT THE STEAM CLEANER
Normally, a periodic rinse of your Ultra Steam Shark II will free it from deposits. This is recommended every 10 - 15 tankfulls, to free up any scale deposits from the tank. Fill the boiler with water and shake the cleaner vigorously. Tilt the cleaner upside down to empty the boiler of water and any scale deposits.
DESCALING YOUR STEAM CLEANER
DO230SF
If the tap water in your area contains a high level of calcium deposits and you have been using tap water to do your steam cleaning you should descale your unit after 10 - 15 tankfulls.
Step 1 Unplug the steam cleaner from the power source before you descale the boiler. Allow to cool
Step 2 Fill the boiler with 1 part vinegar and 4 parts water and leave overnight or for a period of approximately 8 hours. Do not screw the safety/finer cap onto the steam cleaner while you are descending the boiler. Do not use the steam cleaner while descending solution is inside the boiler
Step 3 After the period of soaking, turn the steam cleaner upside down to empty solution from the boiler. Due to the fact that a small amount of solution will be left in the boiler, it is necessary to rinse the boiler out with clean water 2 or 3 times. Your steam cleaner is now ready for use
ATTACHING THE SHOULDER STRAF
Using the detachable shoulder strap allows for greater freedom of movement when both hands are needed for various cleaning tasks.
To attach the shoulder strap to the steam cleaner, simply snap the shoulder strap hooks onto the connection rings on the unit body.
When using the Ultra Steam Shark II with the shoulder strap, avoid rocking or tilting the unit excessively as this may cause water to enter the hose and be discharged along with the steam.


- GARANTIEVOORWAARDEN
- CONDITIONS DE GARANTIE
- RECYCLING INFORMATIONEN
- RECYCLING INFORMATION
- BELANGRIJKE VEILIGHEIDSINSTRUCTIES
- IMPORTANT SAFETY INSTRUCTIONS
- To prevent the risk of fire, electrocution or injuries
- SAVE THIS INSTRUCTION BOOKLET FOR HOUSEHOLD USE ONLY
- PARTS AND SPECIFICATIONS
- Technical specification
- FEATURES
- COMPONENTS
- FILLING YOUR STEAM CLEANER
- Filling the steam cleaner with water
- Using the floor brusl
- ATTACHING THE ACCESSORIES TO THE FLEXIBLE TUBE
- Squeeled
- Concentrator
- Detail brushes
- TIPS
- Water
- Temperature
- Use of cloths
- Working efficiently
- ADVICE CONCERNING THE USE OF THE STEAM CLEANER
- wood, vinyl and marble floors
- To strip wax
- To clean waxed floor
- Vinyl floor
- Tile floor
- Spot cleaning (carpets)
- Upholstery
- Window, glass surfaces and mirrors
- fi berglass or stainless steel surface;
- Soap scum
- Garden furniture
- Blinds
- Bathroom areas
- To clean bicycles, use the detail brush
- Artificial plant
- Clothing
- Nicotine and tar
- Removing wax, tar, etc.
- Refrigerator
- Hints
- CARE AND MAINTENANCE
- RINSING OUT THE STEAM CLEANER
- DESCALING YOUR STEAM CLEANER
- DO230SF
- ATTACHING THE SHOULDER STRAF
Brand : DOMO
Model : DO230SR
Category : Steam cleaner