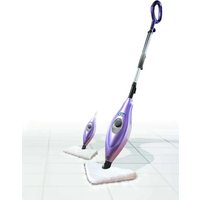
DO240SR - Steam cleaner DOMO - Free user manual and instructions
Find the device manual for free DO240SR DOMO in PDF.


| Brand | DOMO |
| Model | DO240SR |
| Category | Steam cleaner |
| Product type | Steam cleaner for hard floors |
| Main use | Steam cleaning of heat-resistant hard floors |
| Included accessories | Square cloth, triangular cloth, chamois cloth, carpet cloth holder, supports, filling cup |
| Steam production method | Manual pumping of the handle after heating |
| Heating time | About 30 seconds |
| Operating indicator | Blue light |
| Height adjustment | Telescopic tube with clip |
| Tank capacity | Not specified (fill with cup) |
| Power | Not specified (mains power) |
| Cord length | Not specified (with clip storage) |
| Weight | Not specified |
| Body material | Not specified (likely plastic) |
| Safety | Do not use without cloth; do not immerse; do not direct steam at people/animals/plants |
| Appliance maintenance | Clean with dry or damp cloth; do not use solvents |
| Care of cloths | Hand wash with liquid detergent, air dry; do not use fabric softener |
| Compatible floor types | Hard floors (tile, stone, resistant laminate); avoid unprotected wood, unglazed tiles, waxed floors |
| Use on carpets | Yes, for deodorizing and refreshing with special cloth holder |
| Warranty | 2 years (under conditions) |
| Recycling | Electrical appliance to be recycled according to local regulations |
| Intended use | Domestic and similar (staff kitchens, farms, hotels, bed and breakfast) |
| Precautions | Do not use outdoors; do not leave unattended; unplug before filling/maintenance |
Frequently Asked Questions - DO240SR DOMO
User questions about DO240SR DOMO
0 question about this device. Answer the ones you know or ask your own.
Ask a new question about this device
Download the instructions for your Steam cleaner in PDF format for free! Find your manual DO240SR - DOMO and take your electronic device back in hand. On this page are published all the documents necessary for the use of your device. DO240SR by DOMO.
USER MANUAL DO240SR DOMO
natural_image
Black and white photo of a steamer with a white foam roller on a stand (no text or symbols visible)DO240SR
PRODUCT OF LINEA 2000
GARANTIEVOORWAARDEN
CONDITIONS DE GARANTIE
This appliance has a two year warranty period. During this period the manufacturer is responsible for any failures which are the direct result of construction failure. When these failures occur the appliance will be repaired or replaced if necessary. The warranty will not be valid when the damage to the appliance is caused by wrong use, not following the instructions or repairs executed by a third party. The warranty will only be valid if the warranty application has been completed by the dealer at the time of purchase. All parts, which are subject to wear, are excluded from the warranty.
Type nr. Apparaat
RECYCLING INFORMATIONEN
RECYCLING INFORMATION
The symbol ☒ on the product or on its packaging indicates that this product may not be treated as household waste. Instead it shall be brought to the applicable collection point for recycling of electrical and electronic equipment. By ensuring this product is disposed of correctly, you will help prevent potential negative consequences for the environment and human health, which could otherwise be caused by inappropriate waste handling of this product. For more detailed information about recycling of this product, please contact your local city office, your household waste disposal service or the shop where you purchased the product.
If the supply cord is damaged, it must be replaced by manufacturer of its service agent or a similarly qualified person in order to avoid a hazard.
ZÁRUČNÍ LIST
MONTAGE
natural_image
Illustration of hands holding a document with a purple arrow indicating direction (no text or symbols)natural_image
Illustration of a pipette dispensing liquid onto a surface with two purple plates labeled 1 and 2 (no text or symbols on the diagram itself)UW STOOMDOEK IN OPTIMALE CONDITIE TE HOUDEN
MONTAGE
natural_image
Illustration of hands holding a small object with a purple arrow indicating direction (no text or symbols)AVANT LA PREMIÈRE UTILISATION
UTILISATION
natural_image
Line drawing of a person's legs and feet with a curved arrow indicating motion (no text or symbols)natural_image
Illustration of a pipette dispensing liquid onto a rectangular plate (no text or symbols)CONSERVER VOTRE LAVETTE DANS DES CONDITIONS OPTIMALES
MONTAGE
VOR DEM ERSTEN GEBRAUCH
GEBRAUCH
DAMPFTUCHSTÜTZE FÜR TEPPICHBÖDEN
natural_image
Illustration of a pipette dispensing liquid onto a rectangular plate (no text or symbols)PFLEGE
DAS DAMPFTUCH IN OPTIMALER FORM HALTEN
IMPORTANT SAFETY INSTRUCTIONS
Save these instructions. For household use only
When using your shark steam mop, basic safety precautions should always be followed, including the following:
read all instructions before using your steam mop.
danger of scalding. Please use caution when using the steam mop. The steam emitted from the steam mop is very hot.
IMPORTANT: This appliance is not intended for use by persons (including children) with reduced physical, sensory or mental capabilities, or lack of experience and knowledge, unless they have been given supervision or instruction concerning the use of the appliance by a person responsible for their safety.
Use the system only for its intended use.
DO NOT use outdoors.
DO NOT leave the appliance unattended when plugged in. Always unplug the power cord from the electrical outlet when not in use and before servicing.
DO NOT allow the appliance to be used by children. Close attention is necessary when used by or near children, pets or plants.
Use only as described in this manual.
Use only manufacturer's recommended accessories.
DO NOT operate the appliance with a damaged plug or cord, or if the unit has been dropped or damaged. To avoid the risk of electric shock, do not disassemble or attempt to repair the appliance on your own. Incorrect re-assembly or repair can cause a risk of electrical shock or injury to persons when the appliance is used.
To protect against a risk of electric shock, DO NOT immerse the steam mop into water or any other liquids.
DO NOT handle plug or steam mop with wet hands or operate appliance without shoes.
DO NOT pull or carry by power cord, use power cord as handle, close a door on the power cord, or pull the power cord around sharp edges or corners. Keep power cord away from heated surfaces
DO NOT unplug by pulling on power cord. To unplug, grasp the plug not the power cord. Do not use extension cords or outlets with inadequate current carrying capacity.
DO NOT put any objects into openings. Do not use with any opening blocked.
DO NOT put hands or feet under the steam mop. Unit gets very hot.
Use ONLY on flat, horizontal surfaces. Do not use on walls, counters or windows.
DO NOT use on leather, wax polished furniture or floors, synthetic fabrics, velvet or other delicate, steam sensitive materials.
DO NOT add cleaning solutions, scented perfumes, oils or any other chemicals to the water used in this appliance as this may damage the unit or make it unsafe for use. If you live in a hard water area, we recommend using distilled water in your steam mop.
When in use, NEVER turn the appliance over or on its side. NEVER DIRECT STEAM TOWARDS PEOPLE, ANIMALS OR PLANTS.

Never leave the steam mop in one spot on any surface for any period of time when micro-fiber pocket is attached.
Carefully remove the micro-fiber pocket immediately after you have unplugged and allowed the steam mop to cool.
When cleaning the steam mop, unplug the power cord from the electrical outlet and clean with a dry or damp cloth. Do not pour water or use alcohol, benzene or paint thinner on the unit.
Extreme caution should be exercised when using this appliance to clean stairs.
Never use steam mop without micro-fiber pocket attached.
Keep your work area well lit.
Store steam mop indoors in a cool, dry place.
To avoid circuit overload, do not operate another appliance on the same socket (circuit) as the steam cleaner.
If an extension cord is absolutely necessary, an extension cord rated a minimum of 2.5mm2 and 4m in length should be used. Cords rated for less amperage may overheat. Care should be taken to arrange cord so that it cannot be pulled or tripped over.
DO NOT leave your Steam Mop unattended when the system is connected to a power supply /electrical outlet.
`DO NOT store unit with damp or wet micro-fiber cleaning pocket attached. Never leave the steam mop in one spot on any surface for any period of time with a damp or wet micro-fiber cleaning pocket attached as this will damage your floors.
29 Always unplug and allow the steam mop to cool before removing or changing mop heads.
WARNING: Your steam mop is designed to clean hard floor surfaces that will withstand high heat. Do not use on unsealed wood or unglazed ceramic floors. On surfaces that have been treated with wax or some no wax floors, the sheen may be removed by the heat and steam action. It is always recommended to test an isolated area of the surface to be cleaned before proceeding. We also recommend that you check the use and care instructions from the floor manufacturer.
This appliance is only for household use or environments of a similar character such as : - kitchens that are used by personnel of shops, office or other similar professional environments.
- Farms
- Hotel rooms and motel rooms and other similar environments with a residential character.
- Bed and breakfast or similar.
Attention : this appliance may not be used with an external timer or separate remote control.
GETTING STARTED
When assembling your steam mop there may be a little water in or around the water tank. This is because we test all our steam mops 100% before you buy them, so you
get a quality Shark® Steam Pocket Mop.
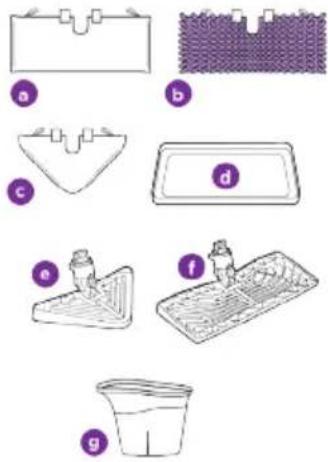
a. 2 Rectangle Cleaning Pads
b. Steam Duster Pad
c. 2 Triangle Cleaning Pads
d. Carpet Glider
e. Triangle Mop Head
f. Rectangle Mop Head
g. Filling Flask
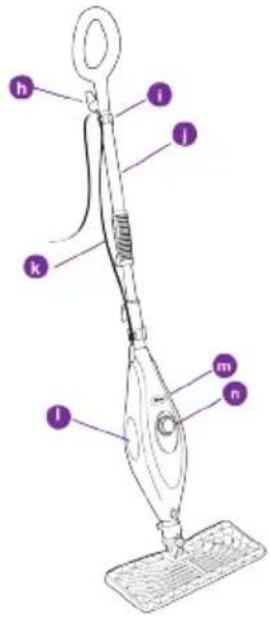
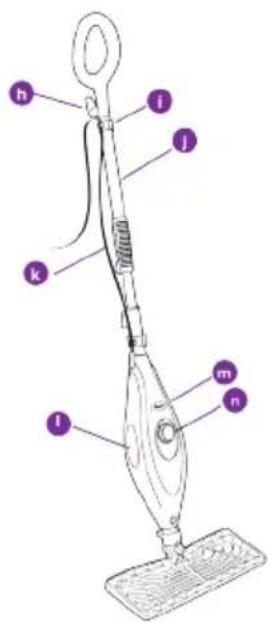
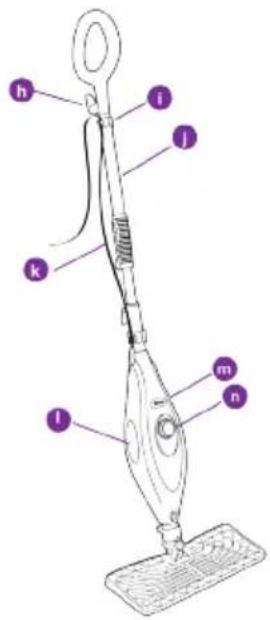
h. Quick Release Swivel Cord Wrap
i. Cord Clips
j. Mop Handle
k. Telescopic Handle Latch
- Water Tank Viewing Window
m. Power-On Blue Light (Lights up when plugged-in)
n. Water Tank Cap
ASSEMBLE
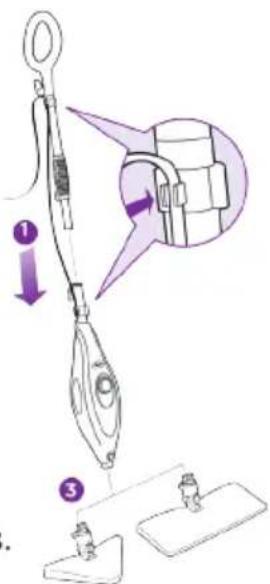
Insert the mop handle into the pump actuator (the tube that leads to the tank). Push the mop handle and pump actuator together in until you hear it click into place.
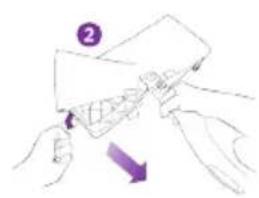
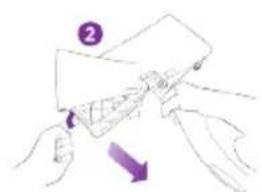
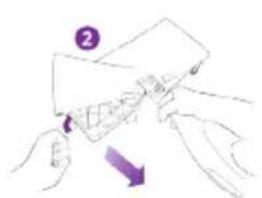
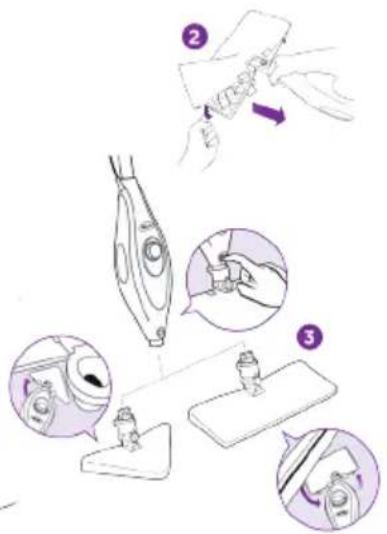
2 Select a mop head and cleaning pad. Fit one side of the pocket onto the head first, then using the lavender loop, pull the pocket over the head. Attach the quick fasteners on the top of the pocket to secure in place.
3 Snap the mop head into the base to secure it. Press the release button to exchange mop heads.
natural_image
Illustration of hands holding a small object with a purple arrow indicating direction (no text or symbols)IMPORTANT: First things first, always make sure the mop is UNPLUGGED from the wall when not in use. Never fill the mop, attach the mop head, change or remove the micro-fiber pocket when the mop is plugged into the wall. If you have hard water you might want to use distilled water to prolong the life of the Shark® Steam Mop. Make sure you only add water to the tank. Chemicals or cleaning solution may damage the appliance and could be unsafe for you and your family.
Turn the water tank cap counter clockwise and remove from the tank.
Use the filling flask and pour water into the tank. Please don't overfill. Replace the cap on the water tank by turning clockwise and tightening.
2 Select a mop head and cleaning pad. Each mop head can be used on your floors. The Triangle Mop Head was specifically designed to reach into those tight corners and spaces, especially those found in the bathroom. The Rectangle Mop Head is completely versatile. Use the lavender loop on the side of the micro-fiber cleaning pocket to place around the mop head. Then attach the quick fasteners on the top of the pocket to secure in place. You can also use the loop to pull the dirty pocket off when you are done mopping after it has cooled.
3 Snap the mop head into the base to secure it.
IMPORTANT: Don't use on unsealed wood or unglazed ceramic floors. On surfaces that have been treated with wax or some no wax floors, the sheen may be removed by the heat and steam action. It is always recommended to test an isolated area of the surface to be cleaned before proceeding. We recommend that you check the use and care instructions from the floor manufacturer.
USING YOUR STEAM MOP
IMPORTANT: Make sure you don't use the mop without attaching a micro-fiber pocket and adding water to the tank first. When you are using the mop for the first time, it might take longer than the normal 30 seconds to start steaming. Just pump the handle a few times in a downward motion to prime the pump and it should be ready
NOTE: Make sure the floors are swept or vacuumed before using the steam mop.
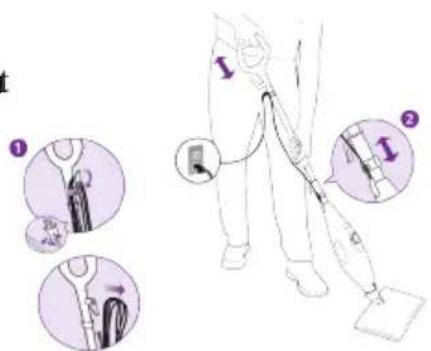
1 Pull and twist the quick release cord holder to unwrap the power cord completely. A great time saver!
Plug into a 220-240-volt electrical outlet. The power "On" light will turn blue, it takes
approximately 30 seconds for the mop to heat up and the steam to be ready.
2 Pump the handle a few times in a downward motion. This pumping action will release steam as you mop and allows you to customize the amount of steam you want. Begin mopping with a forward and backward motion. The natural motion of mopping will produce steam.
3 For your comfort, you can adjust the height of the mop. Just lift the latch on the tube 90 degrees to the open position.
Holding the handle, extend the tube to the height that's right for you and then close latch to locked position.
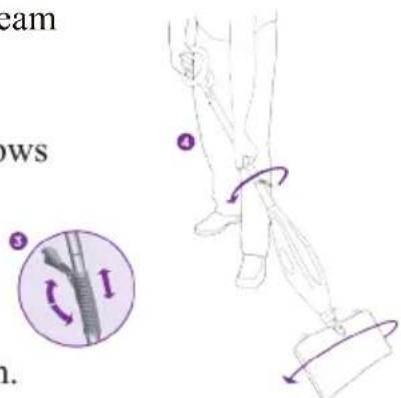
4 When one side of the micro-fiber pocket gets dirty, just flip the mop head and you can quickly start using the other side. Dirt can't hide on either side.
IMPORTANT: Please wait 3-5 minutes for the Steam Mop to cool off before switching the mop head or the micro-fiber pockets.
5 When the water tank is empty, the steam mop will stop producing steam. You can refill the water tank at any time as long as the mop is unplugged from the outlet. Follow the instructions from page 4. This goes for switching the mop heads or micro-fiber pockets as well.
IMPORTANT: Never leave the steam mop with a damp/wet micro-fiber pocket on any floor surface for any amount of time as this may damage the floor.
USING YOUR CARPET GLIDER
The Steam Mop won't clean your carpeting or area rugs. However, it's great for deodorizing and freshening.
THE CARPET GLIDER
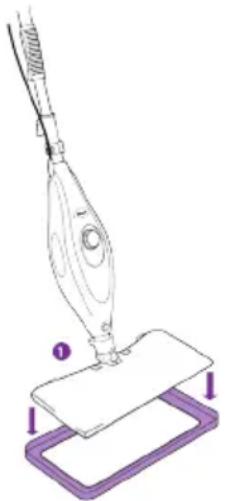
1 The Carpet Glider can be used with the rectangle mop head to lightly steam your carpet and area rugs. Just place the mop head on top of the glider and move back and forth across a section of the carpet. The steam mop won't clean your carpeting or areas rugs, but it's great for deodorizing and freshening.
NOTE: Please note that the Steam Mop rests on top of the carpet glider and it is not a fixed attachment. Do not leave steam mop with carpet glider in one stationary position for any period of time.
natural_image
Illustration of a handheld device dispensing liquid onto a flat surface, with purple components labeled 1 and 2 (no text or symbols on the device itself)CARE OF YOUR STEAM MOP
AFTER USE AND STORAGE
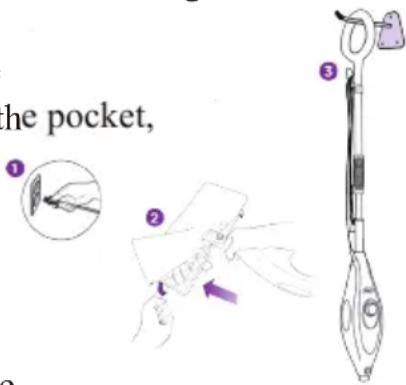
1 When you have finished using the steam mop, and your floors are clean, unplug the cord from the outlet and move it into an upright position. Let the unit cool 2-3 minutes and release steam by pumping the handle several times before removing the micro-fiber cleaning pocket from the mop head.
2 Remove the micro-fiber cleaning pocket by releasing the quick fasteners and using the lavender loop on the side of the pocket,
avoiding contact with the hot pocket or dirt. Then empty the water tank.
IMPORTANT: Be very careful because the cleaning pockets can get very hot from the steam, so use caution when removing them. Let the unit cool 2-3 minutes
3 To store the Shark® Steam Mop hanging up; first remove the head (after it has cooled and the steam has been released) then hang on a large hook.
NOTE: If you want to store it standing upright then make sure it's leaning against a
DO240SR
wall for added support and safety. Always store your Steam Mop with the micro-fiber pocket removed, away from children or high traffic areas.
KEEPING YOUR MICRO-FIBER CLEANING POCKET AS GOOD AS NEW
1 We recommend washing your micro-fiber pockets separately from other fabrics to avoid picking up lint.
Only use liquid detergent. (no powder detergent) Don't use any fabric softeners or bleach.
Line dry. Do not tumble dry
2 If there are loose threads on the pocket carefully cut the thread with scissors. Don't pull on them or cut at the base.
- GARANTIEVOORWAARDEN
- CONDITIONS DE GARANTIE
- RECYCLING INFORMATIONEN
- RECYCLING INFORMATION
- ZÁRUČNÍ LIST
- MONTAGE
- UW STOOMDOEK IN OPTIMALE CONDITIE TE HOUDEN
- AVANT LA PREMIÈRE UTILISATION
- UTILISATION
- CONSERVER VOTRE LAVETTE DANS DES CONDITIONS OPTIMALES
- VOR DEM ERSTEN GEBRAUCH
- GEBRAUCH
- DAMPFTUCHSTÜTZE FÜR TEPPICHBÖDEN
- PFLEGE
- DAS DAMPFTUCH IN OPTIMALER FORM HALTEN
- IMPORTANT SAFETY INSTRUCTIONS
- GETTING STARTED
- ASSEMBLE
- USING YOUR STEAM MOP
- USING YOUR CARPET GLIDER
- THE CARPET GLIDER
- CARE OF YOUR STEAM MOP
- AFTER USE AND STORAGE
- DO240SR
- KEEPING YOUR MICRO-FIBER CLEANING POCKET AS GOOD AS NEW
Brand : DOMO
Model : DO240SR
Category : Steam cleaner