GK695 - Cooker Pelgrim - Free user manual and instructions
Find the device manual for free GK695 Pelgrim in PDF.

User questions about GK695 Pelgrim
0 question about this device. Answer the ones you know or ask your own.
Ask a new question about this device
Download the instructions for your Cooker in PDF format for free! Find your manual GK695 - Pelgrim and take your electronic device back in hand. On this page are published all the documents necessary for the use of your device. GK695 by Pelgrim.
USER MANUAL GK695 Pelgrim
The appliance identification card is located on the bottom of the appliance.
Stick the appliance identification card here.
When contacting the service department,
have the complete type number to hand.
You will find the addresses and phone numbers of the service organisation on the guarantee card.
natural_image
3D rendering of a gas stove with multiple panes and control knobs (no text or symbols visible)Handleiding
Notice d'utilisation - Anleitung - Manual
GK635
GK635W
GK677
GK678
GK695
GKV635
Pelgrim
NL
Handleiding 3-29
FR
Notice dutilisation 31 - 57
DE
Anleitung 59 - 85
GB
Manual 87 - 113
Gebruikte pictogrammen - Pictogrammes utilisés Benutzte Piktogramme - Pictograms used

Belangrijk om te weten - Important à savoir Wissenswertes - Important information

Tip - Conseil - Tipp - Tip
1 Uw gaskookplaat
1.1 Inleiding 4
1.2 Beschrijving 5
natural_image
Close-up of a black metal grate with a circular knob (no text or symbols visible)1.1 Inleiding
natural_image
Close-up of a black metal grate with a circular knob (no text or symbols visible)De vlambeveiliging schakelt in.
Bediening elektronische vlambeveiliging
(GK635ERVS - GK677ERVS - GK695ERVS - GKV635RVS)
natural_image
Close-up of a metal grate with a black knob and a light bulb on top (no text or symbols visible)3.3 Extra eigenschappen elektronische vlambeveiliging
natural_image
Close-up of a black cylindrical object on a grid-patterned surface (no text or symbols visible)natural_image
Black plastic gear or latch component with three curved blades (no text or symbols)5.1 Algemeen
text_image
Technical diagram of a speaker assembly with numbered components for identification5 Onderhoud
5.2 Reinigen
5.2.1 Hardnekkige vlekken op emaille (pandragers, branderdoppen en vangschalen)
natural_image
Close-up of a black metal grate with a circular knob (no text or symbols visible)natural_image
Close-up of a metal grate with a black knob and a glossy surface (no text or symbols visible)natural_image
Close-up of a metal grate with a black knob and grid pattern (no text or symbols visible)
Let op!
natural_image
Close-up of a black metal grate with a circular knob (no text or symbols visible)7.2 Inbouwen
natural_image
Close-up of a black and white mechanical component with grid lines and a circular knob (no visible text or symbols)natural_image
Technical line drawing of a mechanical component with a circular feature and base plate (no text or symbols)natural_image
Technical line drawing of a mechanical clamp or bracket assembly (no text or symbols)Dunne werkbladen
natural_image
Technical line drawing of a mechanical clamp or bracket assembly with a screwdriver inserted (no text or symbols)Dikke werkbladen
natural_image
Isometric line drawing of a rectangular frame with a recessed top and bottom (no text or symbols)natural_image
Close-up of a black metal grate with a circular knob (no text or symbols visible)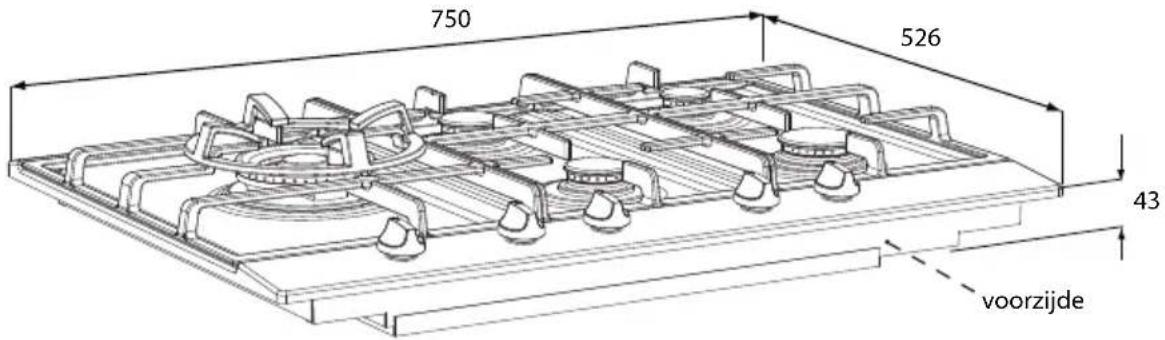
natural_image
Close-up of a black metal grate with a circular knob (no text or symbols visible)natural_image
Close-up of a metal grate with a black knob and a glossy surface (no text or symbols visible)natural_image
Symbol of a trash bin with crossed lines indicating no waste or discharge (no text or numbers present)natural_image
Close-up of a black metal grate with a circular knob, no visible text or symbolsnatural_image
Close-up of a gas stove burner with a black knob and grid pattern (no visible text or symbols)1.2 Description

text_image
GKV635 2 1 3 6 2 5Brûleur à ralenti1.
Brûleur normal2.
Brûleur puissant3.
Brûleur wok4.
Grille de cuisson5.
Coupe6.
text_image
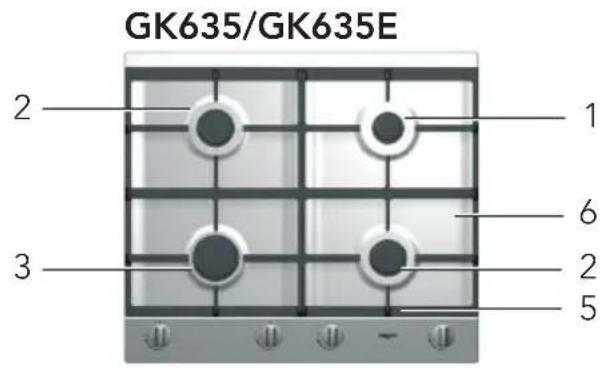
GK635/GK635E 2 1 3 6 2 5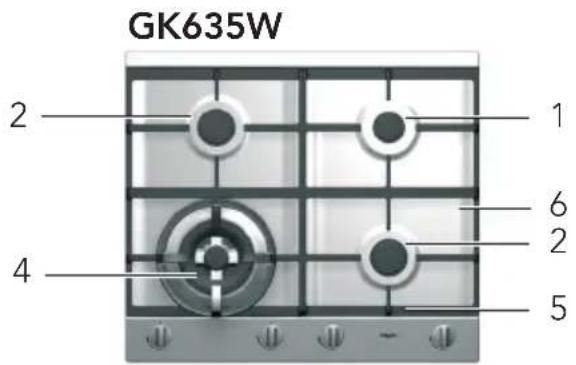
text_image
GK635W 2 1 4 6 2 5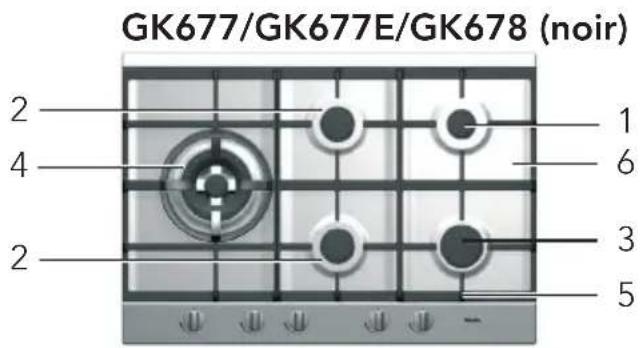
text_image
GK677/GK677E/GK678 (noir) 2 4 2 1 6 3 5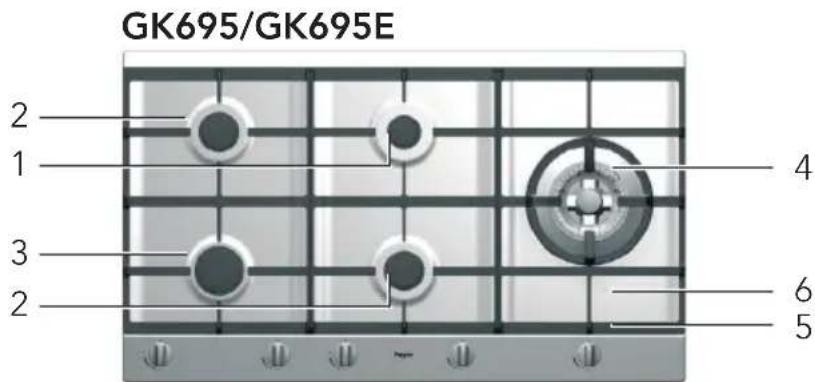
text_image
GK695/GK695E 2 1 3 2 4 6 5
natural_image
Close-up of a metal grate with a black knob and a light bulb on top (no text or symbols visible)text_image
Faux Correct
natural_image
Close-up of a black cylindrical object on a grid-patterned surface (no text or symbols visible)natural_image
Black plastic gear or latch component with three curved blades (no text or symbols)5.1 Généralités
text_image
Technical diagram of a mechanical assembly with numbered components for identification5.2 Nettoyage
natural_image
Close-up of a metal grate with a black knob and a light bulb on top (no text or symbols visible)natural_image
Close-up of a black metal grate with a circular knob (no text or symbols visible)7.1 Généralités
natural_image
Close-up of a black metal grate with a circular knob (no text or symbols visible)
Attention!
natural_image
Close-up of a black metal grate with a circular knob (no text or symbols visible)7.2 Encastrement
natural_image
Close-up of a black and white mechanical component with grid lines and a circular knob (no visible text or symbols)natural_image
Technical line drawing of a mechanical component with a circular feature and base plate (no text or symbols)natural_image
Technical line drawing of a mechanical clamp or bracket assembly (no text or symbols)natural_image
Technical line drawing of a screwdriver inserted into a bracket with a rotating screw (no text or symbols)natural_image
Diagram showing a curved arrow labeled 'A' pointing downward from a shaded region, with no readable text or symbols.
natural_image
Isometric line drawing of a rectangular frame with no text or symbolsnatural_image
Close-up of a mechanical component with a circular knob and grid pattern (no visible text or symbols)Dimensions hors GK635.. - GKV635

text_image
600 526 43 wavzijdenatural_image
Close-up of a black cylindrical object on a grid-patterned surface (no text or symbols visible)Dimensions hors GK677
text_image
750 526 43 avantnatural_image
Close-up of a black metal grate with a circular knob (no text or symbols visible)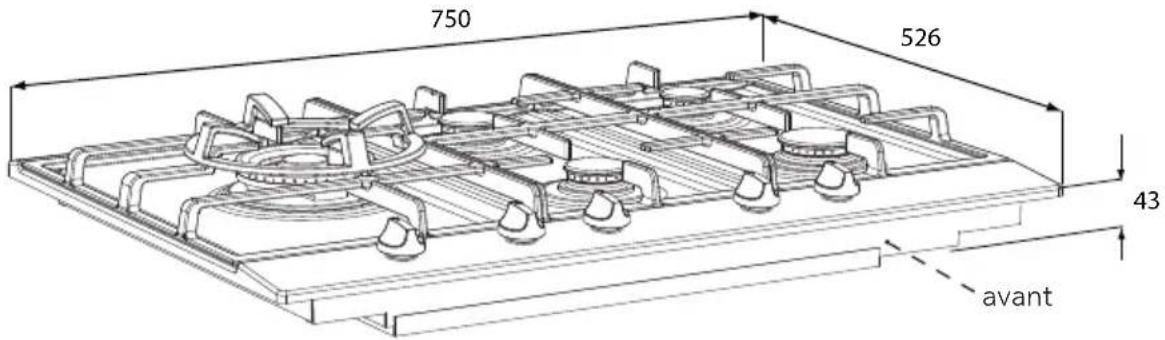
text_image
750 526 43 avantnatural_image
Close-up of a black metal grate with a circular knob (no text or symbols visible)Dimensions hors GK695
text_image
900 526 43 nozzle AVOLTnatural_image
Close-up of a black metal grate with a circular knob (no text or symbols visible)natural_image
Close-up of a metal grate with a black knob and a glossy surface (no text or symbols visible)Données pour le gaz
| G25/25 mbar | G20/20 mbar | G25/20 mbar | G30/29 mbar | G31/29 mbar | G31/36 mbar | G30/50 mbar | G31/50 mbar | G31/67 mbar | |
| Type de brûrleur | (kW) (kW) | (kW) (kW) | (kW / g/h) (kW) | (g/h) (kW / g/h) | (g/h) (kW / g/h) | (kW / g/h) | (kW / g/h) | ||
| à Ralenti | 1.00 1.00 0.90 | 0.90 / 65 | 0.79 / 57 | 0.90 / 65 | 1.00 / 72 | 0.88 / 63 | 1.00 / 72 | ||
| Normal | 2.00 2.00 1.80 | 1.60 / 115 | 1.41 / 101 | 1.60 / 115 | 2.00 / 144 | 1.76 / 127 | 2.00 / 144 | ||
| Puissant | 3.00 3.00 2.70 | 2.30 / 166 | 2.02 / 146 | 2.30 / 166 | 2.70 / 194 | 2.38 / 171 | 2.70 / 194 | ||
| Wok | 4.50 4.50 3.50 | / 252 3.08 | / 222 3.50 | / 252 4.00 | / 288 3.52 | / 253 | 4.00 / 288 |
natural_image
Symbol of a trash bin with crossed x-marks and a blank rectangular base (no text or numbers)natural_image
Close-up of a black metal grate with a circular knob, no visible text or symbols1 Ihre Gaskochmulde
1.1 Einleitung 60
1.2 Beschreibung 61
natural_image
Close-up of a black metal grate with a circular knob (no text or symbols visible)1.1 Einleitung
natural_image
Close-up of a metal grate with a black knob and a light bulb on top (no text or symbols visible)natural_image
Black plastic gear or latch component with three curved arms (no text or symbols visible)5.1 Allgemeines
text_image
Technical diagram of a mechanical assembly with numbered components for identification5.2 Reinigung
natural_image
Close-up of a black metal grate with a circular knob (no text or symbols visible)
Achtung!
natural_image
Close-up of a black metal grate with a circular knob (no text or symbols visible)7.2 Einbauen
natural_image
Close-up of a black metal grate with a circular knob (no text or symbols visible)natural_image
Technical line drawing of a mechanical component with a circular feature and base plate (no text or symbols)natural_image
Technical line drawing of a mechanical clamp or bracket assembly (no text or symbols)natural_image
Technical line drawing of a mechanical clamp or bracket assembly with a screwdriver inserted (no text or symbols)natural_image
Isometric line drawing of a rectangular frame with a recessed inner square (no text or symbols)natural_image
Close-up of a black metal grate with a circular knob (no text or symbols visible)natural_image
Close-up of a black metal grate with a circular knob (no text or symbols visible)Einbaumaße GK635W
natural_image
Close-up of a black metal grate with a circular button on top (no text or symbols visible)Einbaumaße GK677
natural_image
Close-up of a black metal grate with a circular knob (no text or symbols visible)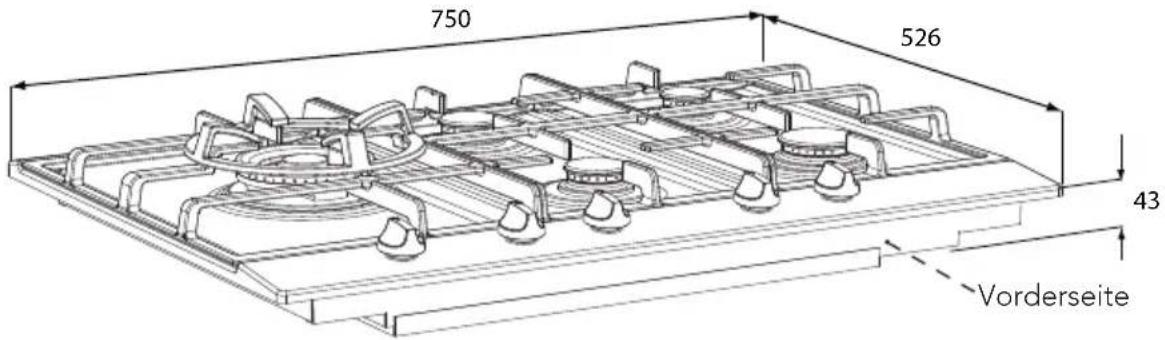
natural_image
Close-up of a black metal grate with a circular knob (no text or symbols visible)Einbaumaße GK695
natural_image
Close-up of a black cylindrical object on a grid-patterned surface (no text or symbols visible)Benötigter Freiraum
natural_image
Close-up of a metal grate with a black knob and a glossy surface (no text or symbols visible)Gastechnische Daten
| G25/25 mbar | G20/20 mbar | G25/20 mbar | G30/29 mbar | G31/29 mbar | G31/36 mbar | G30/50 mbar | G31/50 mbar | G31/67 mbar | |
| Brenner- typ | (kW) (kW) | (kW) (kW) | (kW / g/h) (kW) | (g/h) (kW / g/h) | (g/h) (kW / g/h) | (kW / g/h) | (kW / g/h) | ||
| Gar 1.00 | 1.00 | 0.90 | 0.90 / 65 | 0.79 / 57 | 0.90 / 65 | 1.00 / 72 | 0.88 / 63 | 1.00 / 72 | |
| Normal 2. | 00 | 2.00 | 1.80 | 1.60 / 115 | 1.41 / 101 | 1.60 / 115 | 00 / 144 | 1.76 / 127 | 2.00 / 144 |
| Stark 3.00 | 3.00 | 2.70 | 2.30 / 166 | 2.02 / 146 | 2.30 / 166 | 2.70 / 194 | 2.38 / 194 | 2.70 / 194 | |
| Wok 4.50 | 4.50 | 4.50 | 3.50 / 252 | 3.08 / 222 | 3.50 / 252 | 4.00 / 288 | 3.52 / 253 | 4.00 / 288 |
natural_image
Symbol of a trash bin crossed with no text or numbers, representing waste sorting or disposal (no text present)natural_image
Close-up of a black metal grate with a circular knob, no visible text or symbols1 Your gas hob
1.1 Introduction 88
1.2 Description 89
2 Safety
2.1 What you should pay attention to 90
2.2 Safe use 90 - 91
2.3 Children 91
3 Controls
3.1 Igniting and adjusting 92
3.2 Flame failure device 92
3.3 Extra characteristics electronic flame failure device 93
4 Comfortable cooking
Optimal use of the hob 94 - 95
5 Maintenance
5.1 General 96
5.2 Cleaning 97 - 98
6 Faults
6.1 Error messages with electronic appliances 99
6.2 Faults table 100 - 101
7 Installation instructions
7.1 General 102 - 103
7.2 Building in 104 - 112
8 Appendix
8.1 Disposal of packaging and appliance 113
8.2 Technical data 113
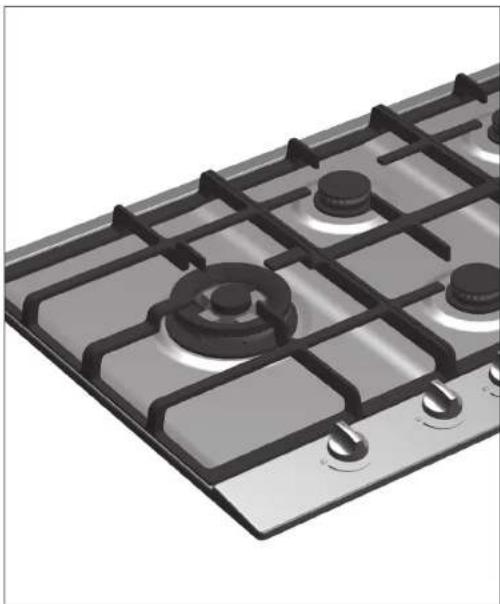
1 Your gas hob
1.1 Introduction
This gas hob has been designed for the true cooking enthusiast. The differences in burner capacity allow you to cook any type of dish. The control buttons have an integrated spark ignition, which means that you need only one hand to ignite and operate the burners. With the GK677 and GK695 models, at least 2 burners remain available for cooking other dishes while cooking food in the wok, thanks to the spacious layout of the wok burners.
KOOKKEUR ^^
This appliance complies with all requirements set by the Cooking Approval quality mark. The gas hob combines high efficiency with a minimum of incompletely burned combustion gases. This gives you an appliance with short heating times, while also providing excellent simmering.
The gas hob is fitted with a flame failure device, which ensures that the gas supply is shut off if the flame goes out during the cooking process.
This manual explains optimum use of the gas hob. In addition to information on operation, you will also find background information that may be useful to you when using this product.
Read the manual thoroughly before using the appliance, and store these instructions in a safe place for future reference.
The manual also serves as reference material for service technicians. Please, therefore, stick the appliance identification card in the space provided, at the back of the manual. The appliance identification card contains all the information that the service technician will need in order to respond appropriately to your needs and questions.
Enjoy your cooking!
1 Your gas hob
1.2 Description
GKV635
text_image
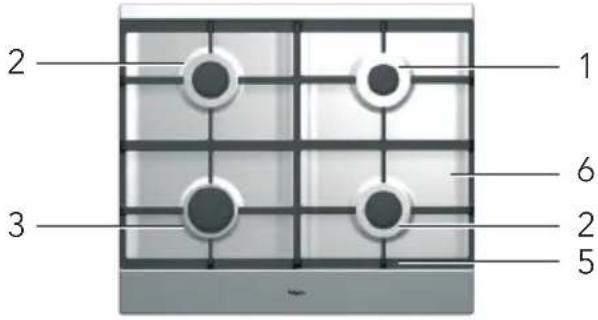
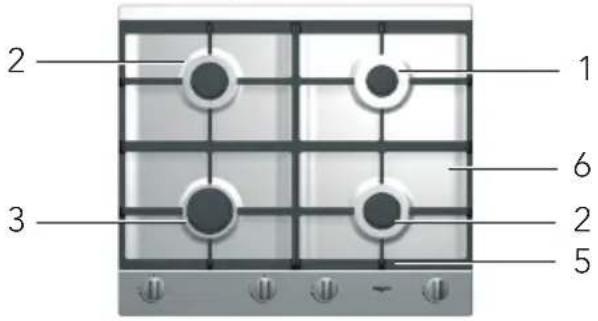
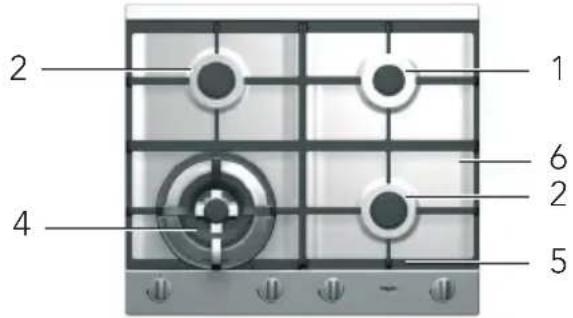
2 1 3 6 2 5Simmer burner1.
Semi-rapid burner2.
Rapid burner3.
Wok burner4.
Pan support5.
Drip tray6.
GK635/GK635E
text_image
2 1 3 6 2 5GK635W
text_image
2 4 1 6 2 5GK677/GK677E/GK678 (black)
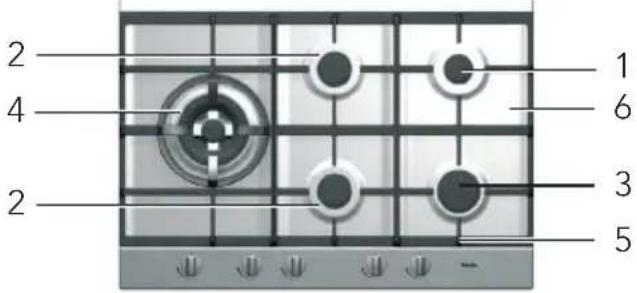
text_image
2 4 2 1 6 3 5GK695/GK695E
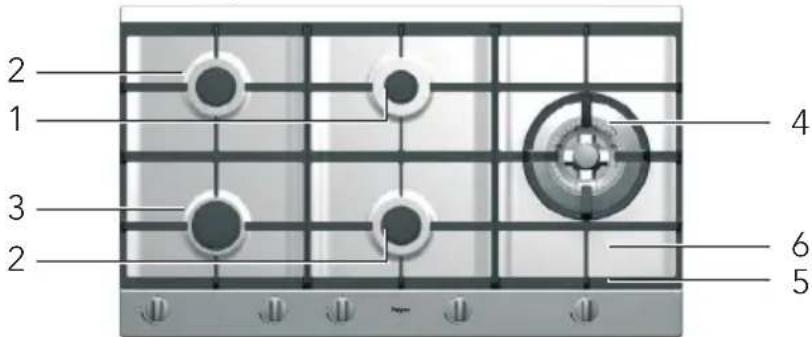
text_image
2 1 3 2 4 6 52 Safety instructions
2.1 What you should pay attention to
Ensure that there is adequate ventilation during use. Keep natural ventilation • openings open.
When using the hob for long periods, extra ventilation is necessary. Open a window • for instance or install a mechanical fan.
Use the hob only for preparing dishes. The appliance is not suitable for space • heating.
Never flambé under an extractor hood. The high flames can cause a fire, even if the fan is switched off.
The burner parts are hot during and immediately after use. Do not touch them, and avoid contact with non-heat-resistant materials.
Never immerse hot burner parts in cold water. The rapid cooling can damage the • enamel.
The distance from the pan to a knob or non-heat-resistant wall should always be greater than two centimetres. In case of smaller distances the high temperature may cause the knobs or wall to discolour and/or distort.
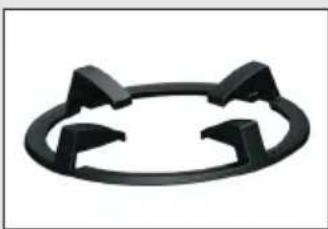
Always use the pan supports and suitable cooking utensils.
Always place the pan on the pan support. Placing the pan directly on the burner • head can result in dangerous situations.
Aluminium trays or foil are not suitable as cooking utensils. They can become burnt • into the burners and pan supports.
The hob can only function effectively if the burner parts have been assembled using the guide ridges.
Ensure that the pan supports lie properly against each other and flat on the drip tray. Only then can the pans be positioned stably.
2.2 Safe use
The device will become hot during use and will remain so for some time after it has been switched off. So please be sure not to touch the device while it is hot.
Always wear oven gloves or use oven cloths when operating the device. Keep oven gloves or oven cloths away from the flame.
- Do not warm closed tins and such like on the hob. There will be a buildup of pressure that will cause tins to explode. You might get injured or scalded.
- The device is not to be positioned nor used outdoors.
2 Safety instructions
Do not use the device as a worktop. The device may be switched on by accident or still be hot, which means objects could melt, become hot or catch fire.
Never cover the device with a cloth or something similar. If the device is still hot or is switched on, there is a risk of fire.
Be extra careful when using oils or fats. Overheated oil or fats may catch fire. Risk of fire!
Under no circumstances should you use water to try and extinguish the flames if the oil or fat were to catch fire! Extinguish the flames with a suitable lid, a damp cloth or some such object.
If there is a drawer underneath the device, without an intermediate bottom, this should not be used to store highly flammable objects/materials.
2.3 Children
- This appliance is not intended for use by persons (including children) with reduced physical, sensory or mental capabilities, or lack of experience and knowledge, unless they have been given supervision or instruction concerning use of the appliance by a person responsible for their safety.
- Never let children play with this device. Children are not to be allowed near the device unsupervised.
The device will become hot during use and will remain hot for some time after it has been switched off.
- Do not keep objects in cupboards above or behind the device that children might find interesting.
- Children may sustain burns when they pull pots or pans off the device. A special frame that stops children from getting close to the device is available from the specialist dealer.
- If the safety instructions and warnings are not heeded, the manufacturer can not be held liable for any consequential damage.
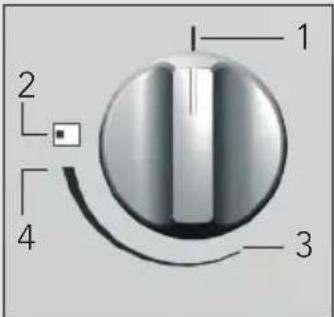
3 Controls
3.1 Igniting and adjusting
The burners can be adjusted continuously between the high and low positions.
text_image
1 2 3 4- 0-setting
- Burner indication
- Low setting
- High setting
3.2 Flame failure device
Your gas hob has a flame failure device. This ensures that the gas supply is shut off if the flame goes out during cooking.
Operating the thermal flame failure device
(GK635MAT/RVS - GK635W - GK677RVS - GK678MAT - GK695MAT/RVS)
Press the control knob and turn it anti-clockwise. Hold the control knob pressed for approximately 3 seconds after the burner has ignited.
The flame failure device switches on.
Operating the electronic flame failure device
(GK635ERVS - GK677ERVS - GK695ERVS - GKV635RVS)
Press the control knob and turn it anti-clockwise. There is no need to keep the knob depressed or to hold it.
The burner ignites immediately. The flame failure device checks to see if there is a flame.
3 Controls

natural_image
Close-up of a black metal grate with a circular knob (no text or symbols visible)3.3 Extra characteristics electronic flame failure device
If your gas hob comes with an electronic flame failure device, you can use the following features:
Re-ignition
If the flame goes out during cooking, the device will automatically attempt to restart the flame.
If no flame is detected within 10 seconds of the attempt to re-ignite the burner, the gas supply to the burner will be cut off.
Cooking time limiter
If a burner has been on for an unusually long time (approximately 6 hours), it will be turned off automatically.
4 Comfortable cooking
Optimal use of the hob
Always ensure that the flames remain below the pan. If flames play around the pan, a lot of energy is lost. In addition, the handles can get too hot. Do not use pans with a base diameter less than 12 cm. Smaller pans will not be stable.

text_image
Wrong Right
When frying, stir-frying, heating through large quantities and deepfrying it is best to use the rapid or wok burner.
Preparing sauces, simmering and boiling can be done best on the simmer burner. On its high setting this burner is large enough for cooking food right through.
Cook with the lid on the pan. This way you save up to 50% energy.
Use pans with a flat, clean, dry base. Pans with a flat base stand stably and pans with a clean base transfer the heat more effectively to the food.
Wokburner (type GK635W - GK677 - GK695)
With the wok burner you can prepare dishes at a very high temperature. For this purpose it is important:

to cut the ingredients into strips, slices or pieces before cooking; •
to use good-quality oil, such as olive, maize, sunflower or peanut oil when stir-
frying. A small quantity is enough. Butter and margarine on the other hand will burn because of the high heat;
to place the dishes with the longest cooking time in the pan first, so that at the end of the cooking time all ingredients are cooked
al dente at the same time.
4 Comfortable cooking

natural_image
Close-up of a black metal grate with a circular knob on top (no text or symbols visible)Use of the wok auxiliary support
The auxiliary support supplied for the wok burner or available as an accessory provides additional stability in case of a wok with a round base.
The auxiliary support for the wok has special recesses so it can be positioned neatly on top of the standard wok pan support.
natural_image
Black plastic gear or latch component with three curved blades (no text or symbols)5 Maintenance
5.1 General
Your appliance has been manufactured from high-grade materials, which are easy for you to clean.
Regular cleaning immediately after use prevents over-cooked food being able to become ingrained and cause stubborn stains that are difficult to remove. Use a mild cleaning agent.
Clean the control knobs, burners and pan supports first and then the stainless steel drip tray. This avoids the stainless steel drip tray getting dirty again during cleaning.
Clean the spark plugs preferably with a cloth. Do this carefully. the spark plug can become defective. The sparkplug will only operate correctly in a dry environment. If the plug is very dirty, you may clean the point with a tiny brush.
Set the pan supports down vertically, without sliding them over the stainless steel • drip tray.
Assemble the burner parts using the guide ridges.
Wok burner
- External burner head
- Internal burner head
- Gas base
- Burner base
- Sparkplug
- Thermocouple
Simmer-, semi-rapid and rapid burner
- Burner head
- Burner base
- Sparkplug
- Thermocouple
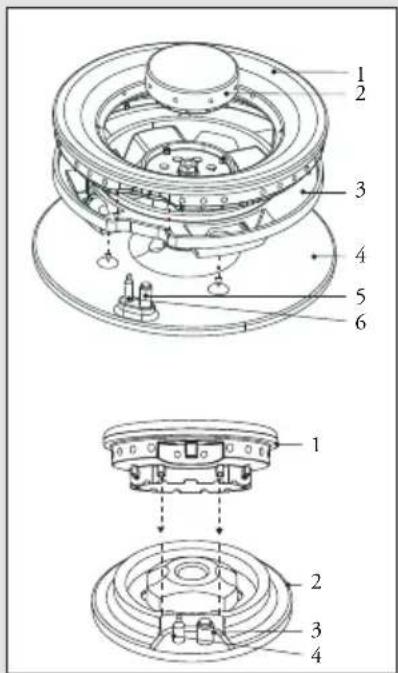
text_image
Technical diagram of a mechanical assembly with numbered components for identification5 Maintenance
5.2 Cleaning
5.2.1 Stubborn stains on enamel (pan supports, burner caps and drip trays)
Remove with a non-abrasive cream. Never use scouring powder, scouring pads, sharp objects or aggressive cleansing agents.
5.2.2 Stubborn stains on stainless steel (drip trays)
If spilled, acid fluids and sugary foodstuffs like red cabbage, beetroot, soy sauce, • applesauce and rhubarb may cause the surface to discolour. Stubborn stains on stainless steel are best removed with a cleaning agent for stainless steel. Always polish in the direction of the steel structure to avoid shine spots (this kind of damage is not covered by the warranty!).
If the above methods do not remove the stains, clean the plate with a special cleaning agent for stainless steel (see our website 'www.pelgrimservice.nl'). Remember to treat the entire drip tray in order to avoid discolouring. Also, as a follow-up treat the drip tray with a polish or maintenance agent for stainless steel. Please note that over the years the surface will slightly discolour.
5.2.3 Cleaning the pan support
The enamel on the pan supports is suitable for cleaning by dishwasher. However, the connection with the rubber feet is not. Therefore do not clean the pan supports in the dishwasher. Moreover, the pan supports might show some discoloration if they were washed in the dishwasher. If the rubber feet are lost, the pan support is likely to damage the drip tray.
5.2.4 Brass wok burner parts
A few parts of the work burner are made from brass. It is normal for the colour of the brass to change as a result of the high temperatures that occur when cooking with a wok.
5 Maintenance
natural_image
Close-up of a black metal grate with a circular knob (no text or symbols visible)5.2.5 Cleaning removable burner components
The removable burner components (including wok) are best cleaned with a mild cleaning product and a soft cloth. In the case of obstinate stains you can soak the parts in hot suds.
Burner parts should not be cleaned in the dishwasher. The parts may be damaged by the dishwasher detergent!
Never use scouring powder, scouring pads, sharp objects or aggressive cleansing agents.
5.2.6 Keradur® burner bases
The burner bases have a unique Keradur® surface coating. The special dirt-repelling lacquer has a ceramic filling which makes cleaning easier and substantially improves the durability of the burners. The burner bases are best cleaned with a mild cleaning product and a soft cloth.
5.2.7 ATAG Shine
Atag Nederland supplies a range of cleaning agents under the name ATAG Shine. These can be obtained at the website at 'www.pelgrimservice.nl', where you will also find various cleaning and operating tips.
6 Faults
natural_image
Close-up of a black metal grate with a circular knob (no text or symbols visible)6.1 Error messages with electronic appliances
| ANNOUNCEMENT POSSIBLE CAUSE SOLUTION | ||
| 2 short tones, 8 seconds long, every minute. | A fault occurred by reigniting a burner. | Check the gas supply to your gas hob and/wether the burner parts are positioned in the right way. Turn every button to the 0-setting and try to ignite the burner again. |
| 6 short tones, 10 seconds long, every 2 minutes. | Your gas hob has become too hot. | Let your gas hob cool down and you can use it again. |
| 2 short tones, 10 seconds long, every minute. | A fault occurred in the electronics of your gas hob. | Contact your service centre. |
6 Faults
6.2 Faults table
If the appliance does not work properly, this does not always mean that it is defective. Try to deal with the problem yourself first by checking the points mentioned below in the table or visit our website ‘www.pelgrimservice.nl’ for more information.
| FAULT CAUSE SOLUTION | ||
| There is a smell of gas in the vicinity of the appliance. | The gas connection of the gas hob is leaking. | Close the main gas tap.Contact your gas fitter. |
| A burner does not ignite. Plug | not in socket.Fuse defective/fuse in meter cabinet switched off.Sparkplug dirty/damp.Burner parts not correctly installed.Burner parts dirty/damp.Main gas tap closed.Fault in the gas network.Gas bottle or tank is empty. | Push the plug into the socket.Fit a new fuse or switch the automatic fuse back on.Clean and dry the sparkplug.Assemble the burner parts using the centring ridges.Clean and dry the burner parts, making sure that the outflow holes are open.Open the main gas tap.Check with your gas supplier.Connect a new gas bottle or have the tank filled. |
6 Faults

natural_image
Close-up of a black metal grate with a circular knob (no text or symbols visible)| FAULT CAUSE SOLUTION | ||
| A burner does not ignite. Wrong type of gas used. Control knob not kept pressed in far enough (only for GK635 - GK677 - GK695 - GKV635 versions). | Check that the gas used is suitable for the appliance. If not, contact your gas fitter. Keep the control knob pressed in far enough between full and low. At first use this can take some more time because of the gas supply. | |
| The burner does not burn evenly. | Burner parts incorrectly installed. Burner parts dirty or damp. Wrong type of gas used. | Assemble the burner parts using the centring ridges. Clean and dry the burner parts, making sure that the outflow holes are open. Check that the gas used is suitable for the appliance. If not, contact your gas fitter. |
| The burner goes out after igniting. | Control knob not kept pressed in far enough (only for GK635 - GK677 - GK695 - GKV635 versions). | Keep the control knob pressed in for at least 5 seconds. |
7 Installation instructions
7.1 General
This appliance should only be connected up by a registered installer!
Caution!
The type of gas and the country for which the appliance has been designed are indicated on the application identification card.
This is a category 3 appliance.
Gas connection
The gas connection must comply with national and local regulations.
We recommend that the hob be connected by means of a fixed pipe. Connection using a specially designed safety hose is also permitted.
Behind an oven use must be made of a pipe made entirely out of metal.
Warning!
A safety hose may not be bent and must not come into contact with moving parts of • kitchen units.
In all cases the connection tap for the appliance must be positioned such that it is • easily accessible.
Before using the appliance for the first time check the connections using water • and washing-up liquid to ensure that there are no gas leaks.
Electrical connection
230V - 50Hz - 1.1 VA (appliances with thermal flame failure device)
230V - 50Hz - 5.1 VA (appliances with electronic flame failure device)
The electrical connection must comply with national and local regulations.
Wall socket and plug must be accessible at all times.
If you want to make a fixed connection, ensure that a multi-pole switch with a distance between contacts of 3 mm is installed in the supply cable.
Do not use an adapter or an extension lead to connect the device to the electrical • mains. Safe use of the device cannot be guaranteed with these accessories.
7 Installation instructions

natural_image
Close-up of a black metal grate with a circular knob (no text or symbols visible)
Warning!
This appliance must be earthed.
Installation, maintenance or repairs should only be carried out by professionals who are authorized by the manufacturer, as failure to do so will void the warranty.
The device should be disconnected from the mains prior to installation, maintenance or repairs. The device is only disconnected from the electric power if:
the main switch of the electrical wiring/installation in the house is switched off, or •
the fuse for the electrical wiring/installation in the house has been completely •
removed, or
the plug has been pulled out of the socket.
Faulty parts may only be replaced by original Pelgrim parts. Only those parts are guaranteed by Pelgrim to meet the safety requirements.
If the connecting cable is damaged, it may only be replaced by the manufacturer, the manufacturer's service organisation or equivalently qualified persons, in order to avoid dangerous situations.
7 Installation instructions
natural_image
Close-up of a black metal grate with a circular knob (no text or symbols visible)7.2 Building in
Preparing the hob
Fit the elbow supplied on the appliance's gas connection.

text_image
1/2" ISO 228 (straight) 1/2" ISO 10226-1 (conical) Sealing ringOnly for France:
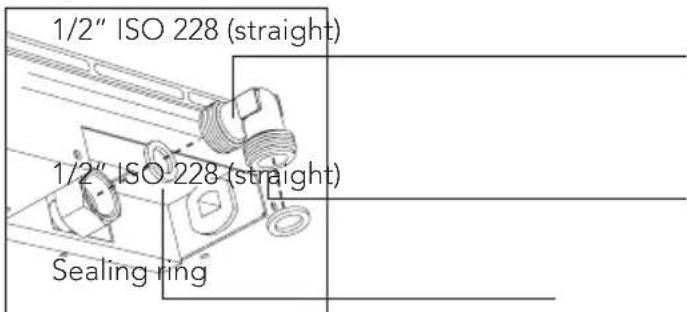
text_image
1/2" ISO 228 (straight) 1/2" ISO 228 (straight) Sealing ringCut opening in worktop
Saw the opening in the worktop. This should be done very accurately (see building in dimensions).
If the woodtop is made of treated wood, then coat the sawn surfaces of the top with sealing varnish, to prevent moisture causing the top to swell.
7 Installation instructions

natural_image
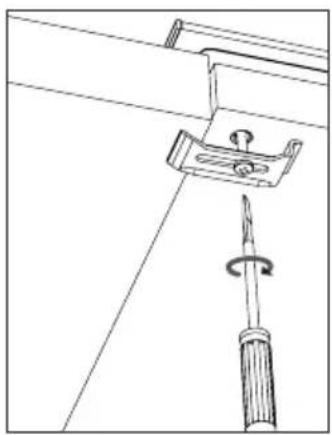
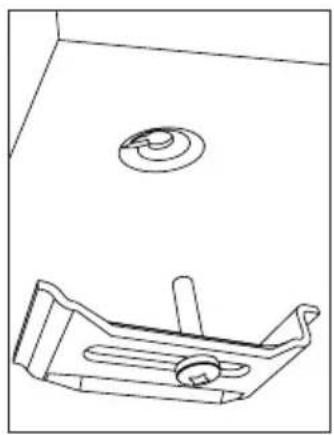
Close-up of a black and white object on a grid-like surface, possibly a stove or kitchen appliance (no visible text or symbols)Attachment points for mounting brackets
See 1* in the illustrations of dimensions for Building in from page 106 onwards for the attachment points for mounting brackets.
natural_image
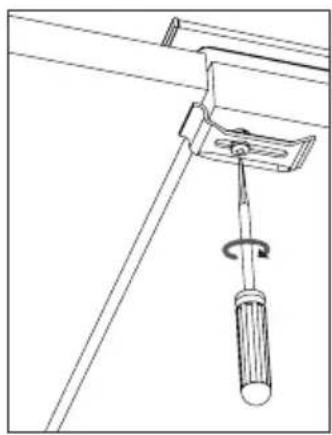
Technical line drawing of a mechanical component with a circular feature and base plate (no text or symbols)Screw hole for mounting bracket
natural_image
Technical line drawing of a mechanical clamp or bracket assembly (no text or symbols)Thin worktops

natural_image
Technical line drawing of a screwdriver inserted into a bracket with a rotating screw (no text or symbols)Thick worktops
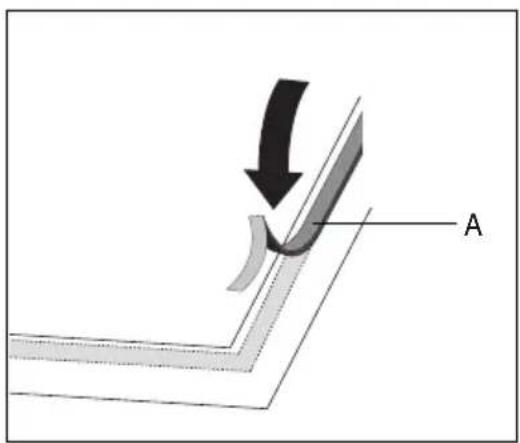
Placing the sealing tape
Remove the protective foil from the sealing tape (A) and apply the tape around the cut-out in the worktop.
natural_image
Diagram showing a curved arrow labeled 'A' pointing downward from a shaded region, with no readable text or symbols.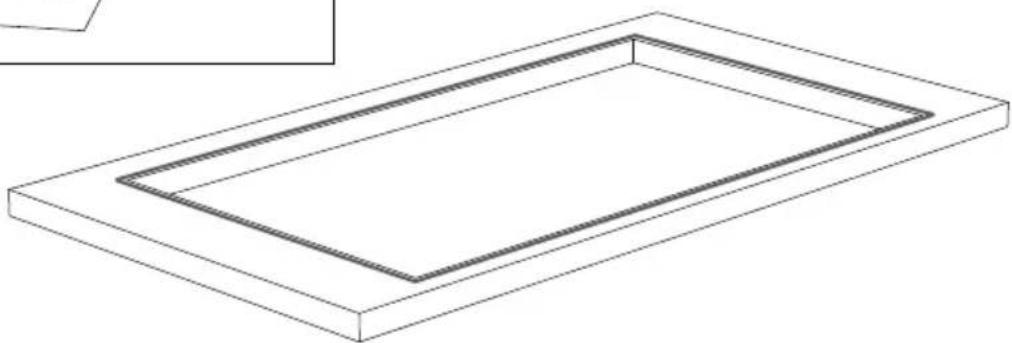
natural_image
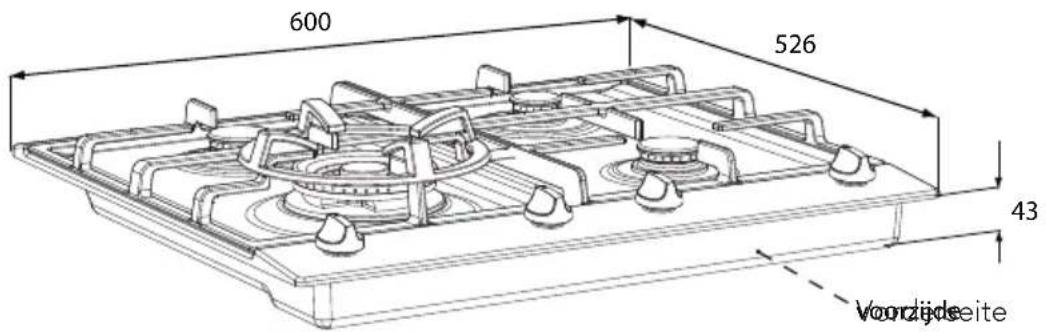
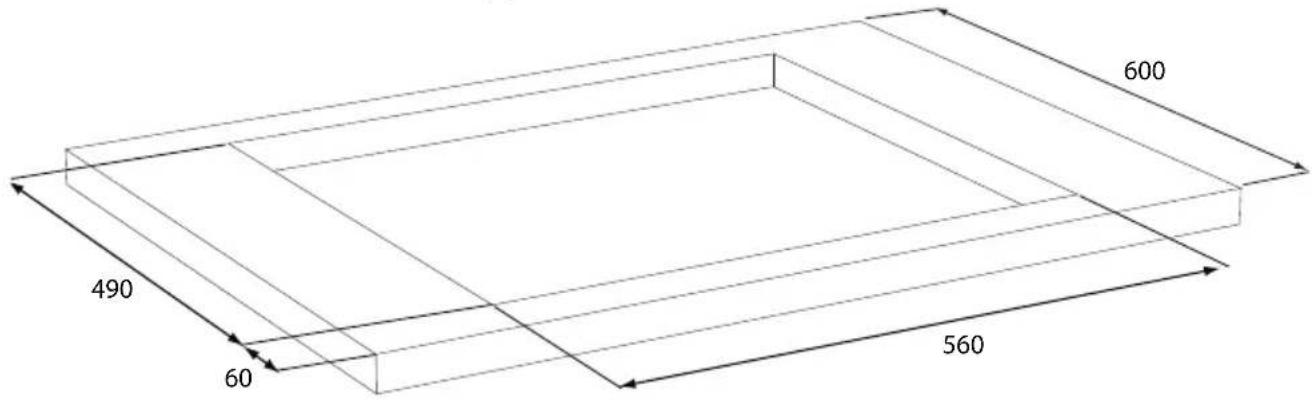
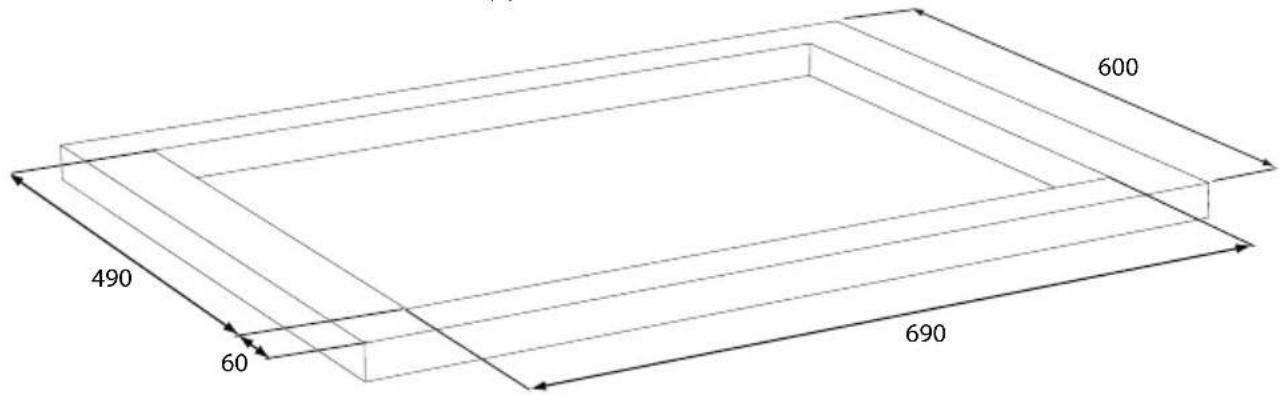
Isometric line drawing of a rectangular frame with a recessed inner square (no text or symbols)Building in dimensions GK635.. - GKV635
minimum distance between rear of appliance and rear wall: 10 mm
text_image
600 490 60 560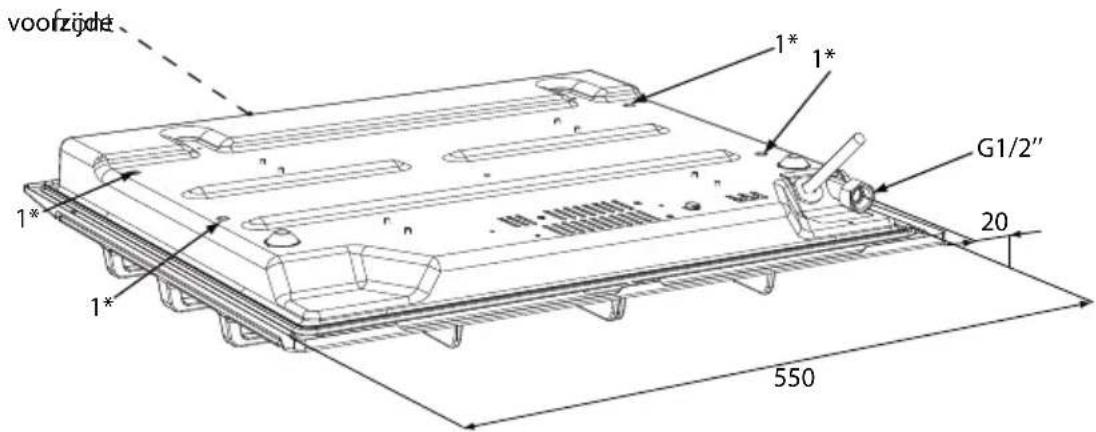
Building in dimensions GK635W
text_image
600 526 43 finanzijdeminimum distance between rear of appliance and rear wall: 10 mm

text_image
490 60 560 600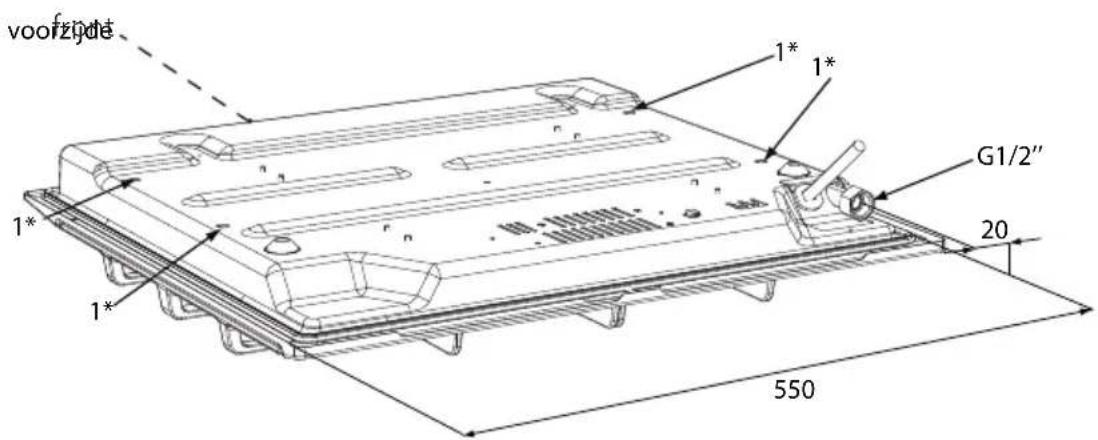
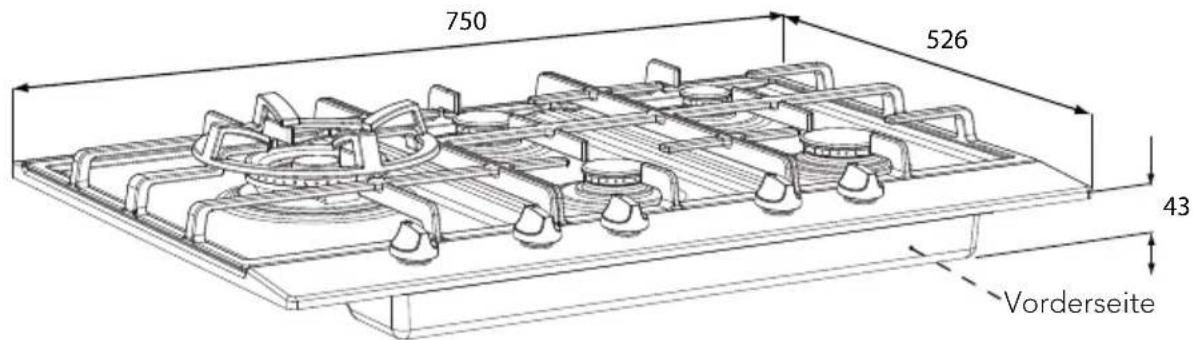
Building in dimensions GK677
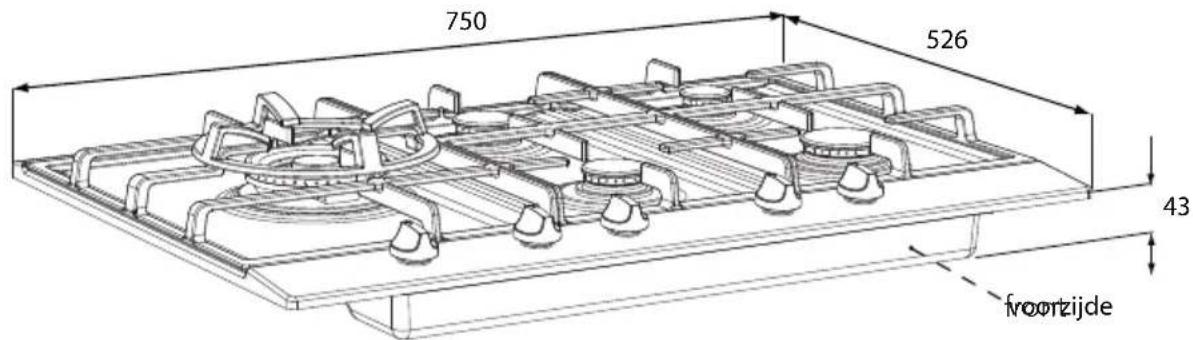
text_image
750 526 43 froortzijdeminimum distance between rear of appliance and rear wall: 10 mm
text_image
600 490 60 560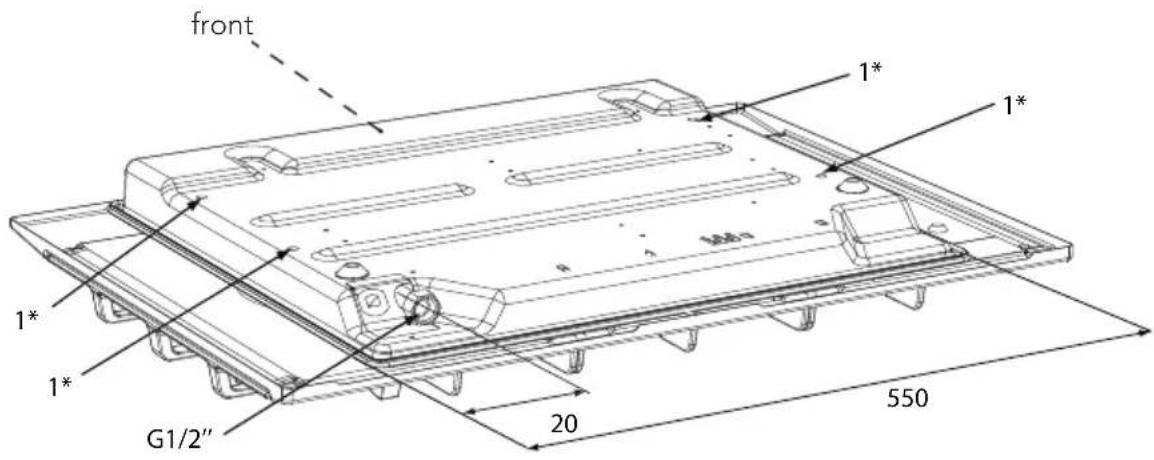
text_image
front 1* 1* 1* 1* G1/2" 20 5507 Installation instructions

natural_image
Close-up of a black metal grate with a circular knob (no text or symbols visible)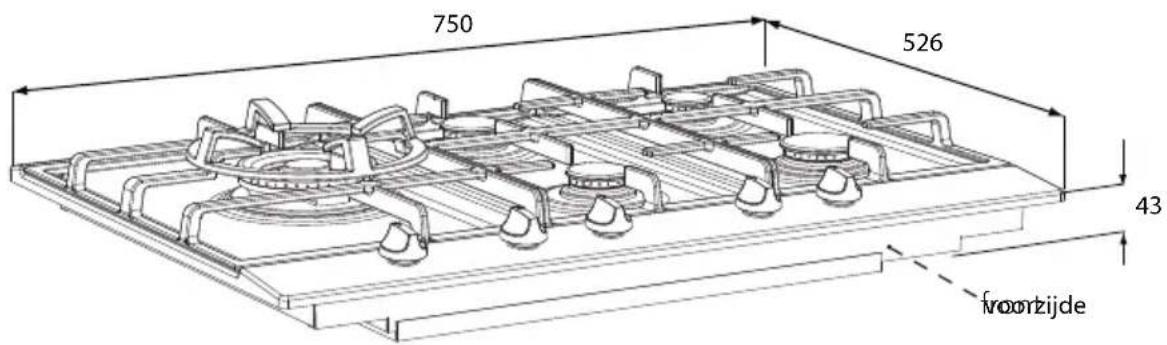
minimum distance between rear of appliance and rear wall: 10 mm
text_image
600 490 60 690
7 Installation instructions

natural_image
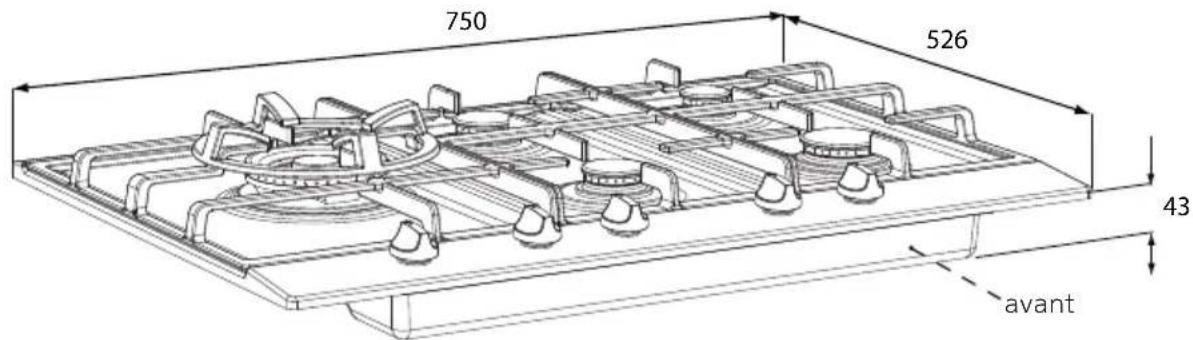
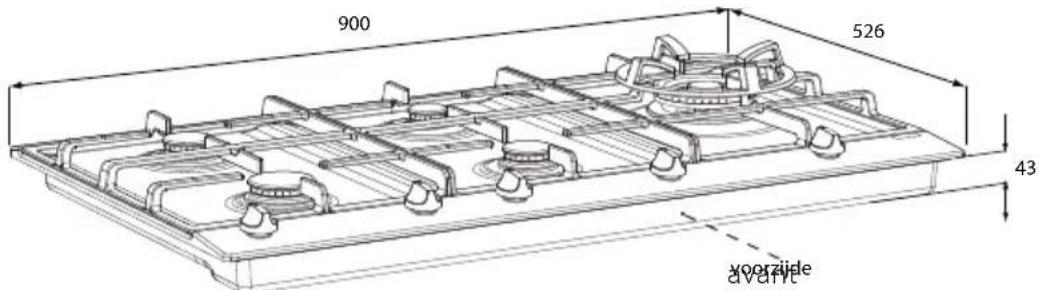
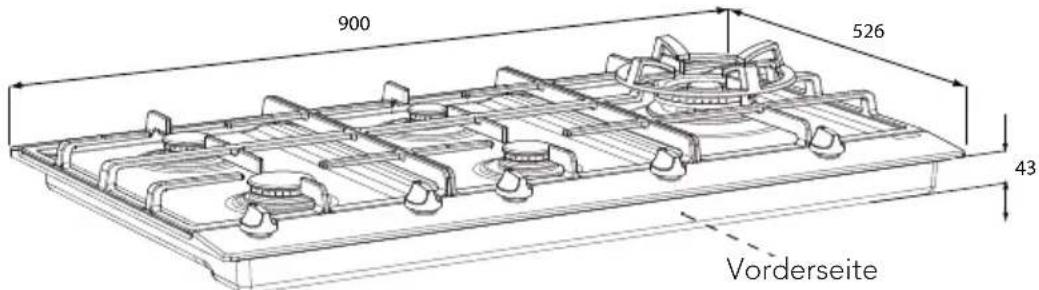
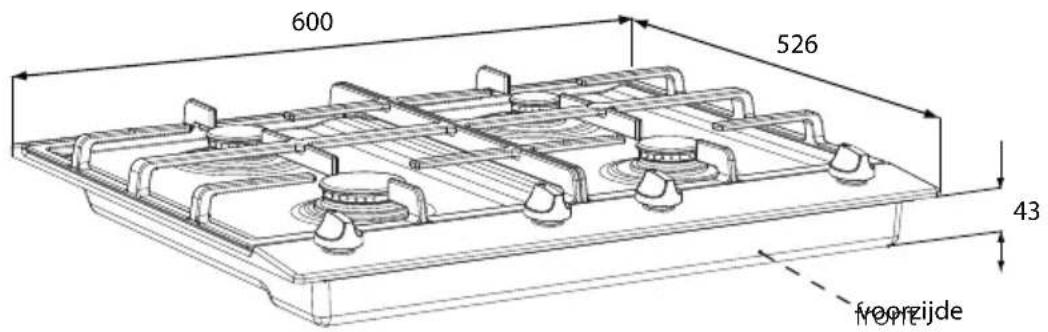
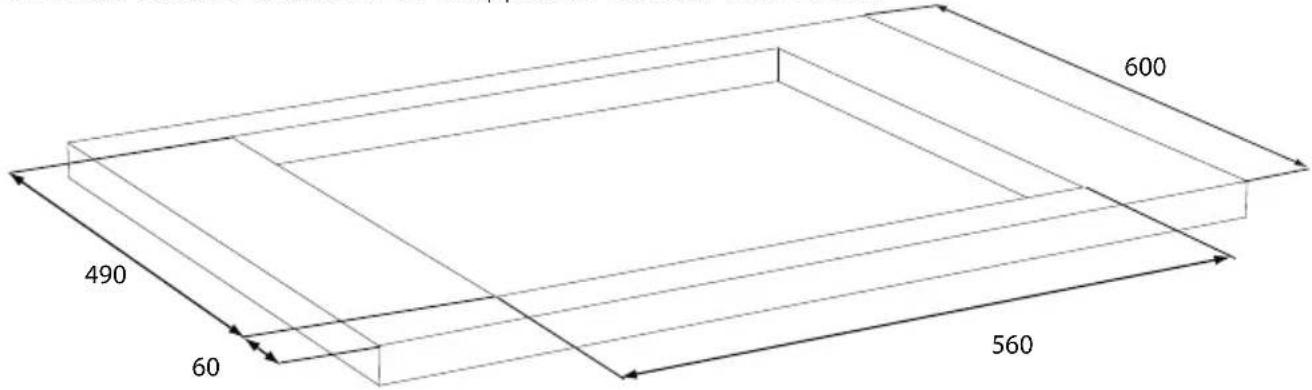
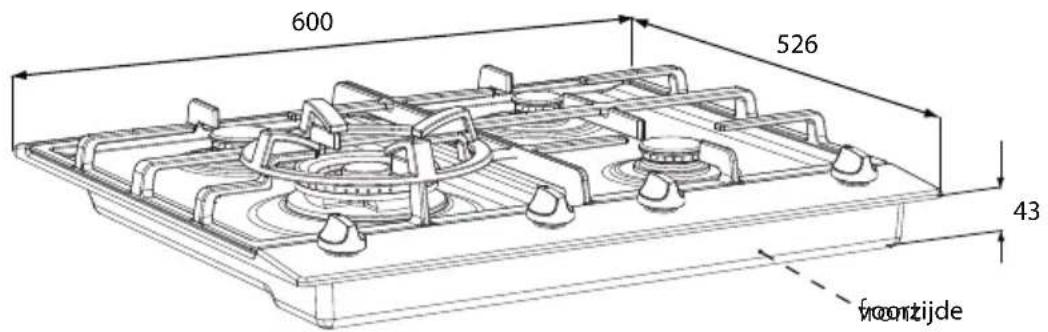
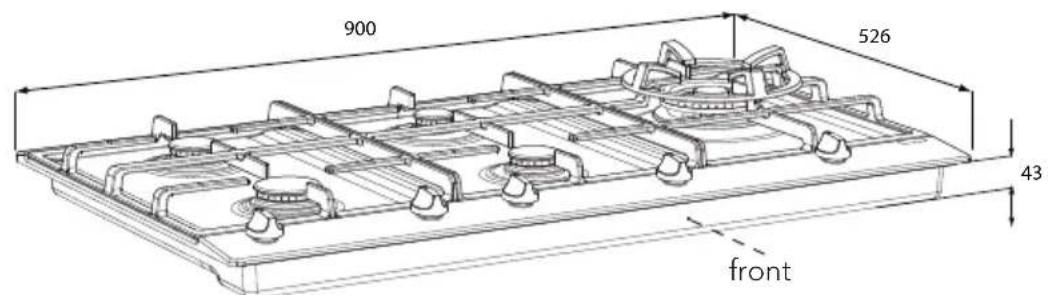
Close-up of a black metal grate with a circular knob (no text or symbols visible)Building in dimensions GK695
text_image
900 526 43 frontminimum distance between rear of appliance and rear wall: 10 mm

text_image
minimum distance between rear of appliance and rear wall: 10 mm 490 60 860 600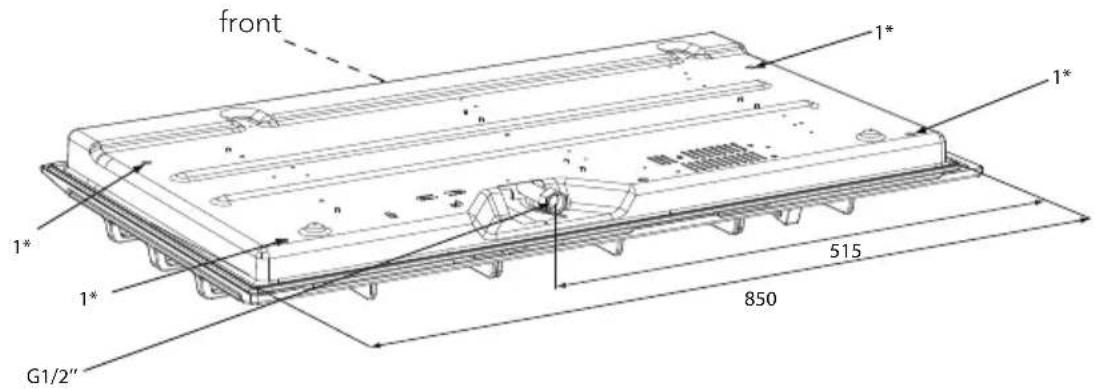
text_image
front 1* 1* 1* 515 850 G1/2"7 Installation instructions
natural_image
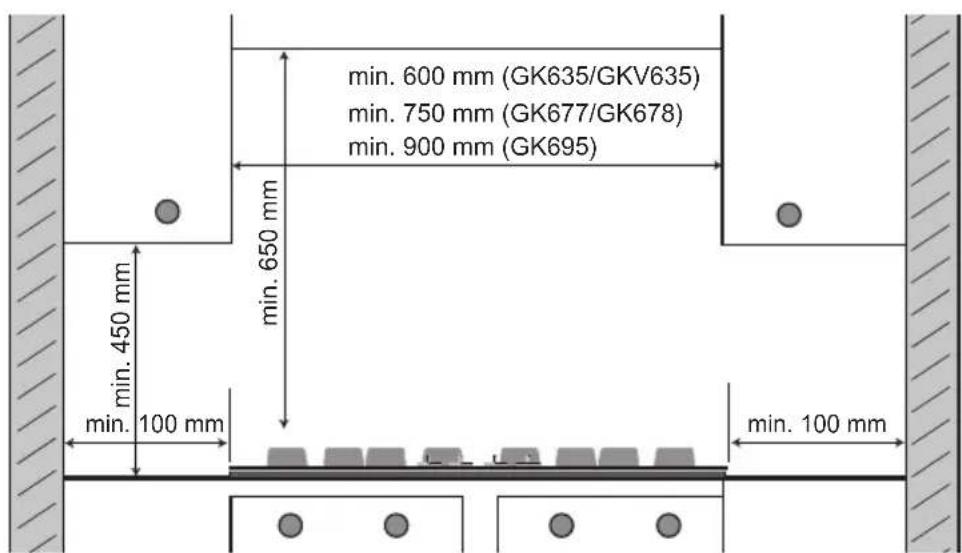
Close-up of a black metal grate with a circular knob (no text or symbols visible)Space to be left free around the appliance
A hob generates heat. Leave a sufficient distance between the appliance and non heat-resistant materials. Take care also with materials that may discolour (such as stainless steel).
text_image
min. 600 mm (GK635/GKV635) min. 750 mm (GK677/GK678) min. 900 mm (GK695) min. 650 mm min. 450 mm min. 100 mm min. 100 mmThe gas hob may only be built in next to one wall.
Caution!
The bottom of the hob becomes hot. Do not place combustible items in a drawer if the drawer is fitted directly below the hob.
Install appliance and make connections
Place the appliance in the worktop and secure it using the mounting brackets and • screws supplied.
Connect to the gas supply.
Check with soap suds that the connection is gastight.
Connect the appliance to mains electricity.
7 Installation instructions
natural_image
Close-up of a metallic grid surface with a black knob and a light source (no text or symbols visible)Gas information
| G25/25 mbar | G20/20 mbar | G25/20 mbar | G30/29 mbar | G31/29 mbar | G31/36 mbar | G30/50 mbar | G31/50 mbar | G31/67 mbar | |
| Burner-type | (kW) (kW) | (kW) (kW) | (g/h) (kW) | (g/h) (kW) | (g/h) (kW / g/h) | (kW / g/h) | (kW / g/h) | ||
| Simmer 1.00 | 1.00 | 0.90 | 0.79 / 57 | 0.90 / 65 | 1.00 | 72 | 0.88 / 63 | 1.00 / 72 | |
| Semi-rapid | 2.00 | 2.00 | 1.80 | 1.41 | 1.01 | 1.60 | 1.76 / 127 | 2.00 / 144 | |
| Rapid 3.00 | 3.00 | 2.70 | 2.30 / 166 | 2.02 / 146 | 2.30 / 166 | 2.70 | 194 | 171 | 2.70 / 194 |
| Wok 4.50 | 4.50 | 4.50 | 3.50 / 252 | 3.08 / 222 | 3.50 / 252 | 4.00 | 288 | 3.52 / 253 | 4.00 / 288 |
8 Appendix
8.1 Disposal of packaging and appliance
In the manufacturing of this appliance durable materials were used. Make sure to dispose of this equipment responsibly at the end of its lifecycle. Ask the authorities for more information regarding this.
The appliance packaging is recyclable. The following may have been used:
cardboard; •
polythene film (PE); •
CFC-free polystyrene (PS hard foam).
Dispose of these materials in a responsible manner and in accordance with government regulations.
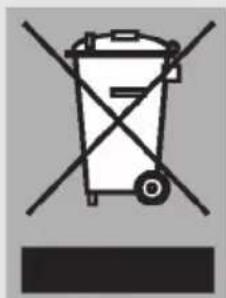
As a reminder of the need to dispose of household appliances separately, the product is marked with the symbol of a crossed-out wheeled dustbin. This means that at the end of its working life, the product must not be disposed of as urban waste. It must be taken to a special local authority differentiated waste collection centre or to a dealer providing this service.
natural_image
Symbol of a trash bin crossed with no text or numbers, representing waste sorting or disposal (no text present)Disposing of a household appliance separately avoids possible negative consequences for the environment and health deriving from inappropriate disposal and enables the constituent materials to be recovered to obtain significant savings in energy and resources.
8.2 Technical data
On the label on the bottom of this equipment, you will find the total wattage, the required voltage and the frequency.