
VP118 - Portable DVD Player SEG - Free user manual and instructions
Find the device manual for free VP118 SEG in PDF.

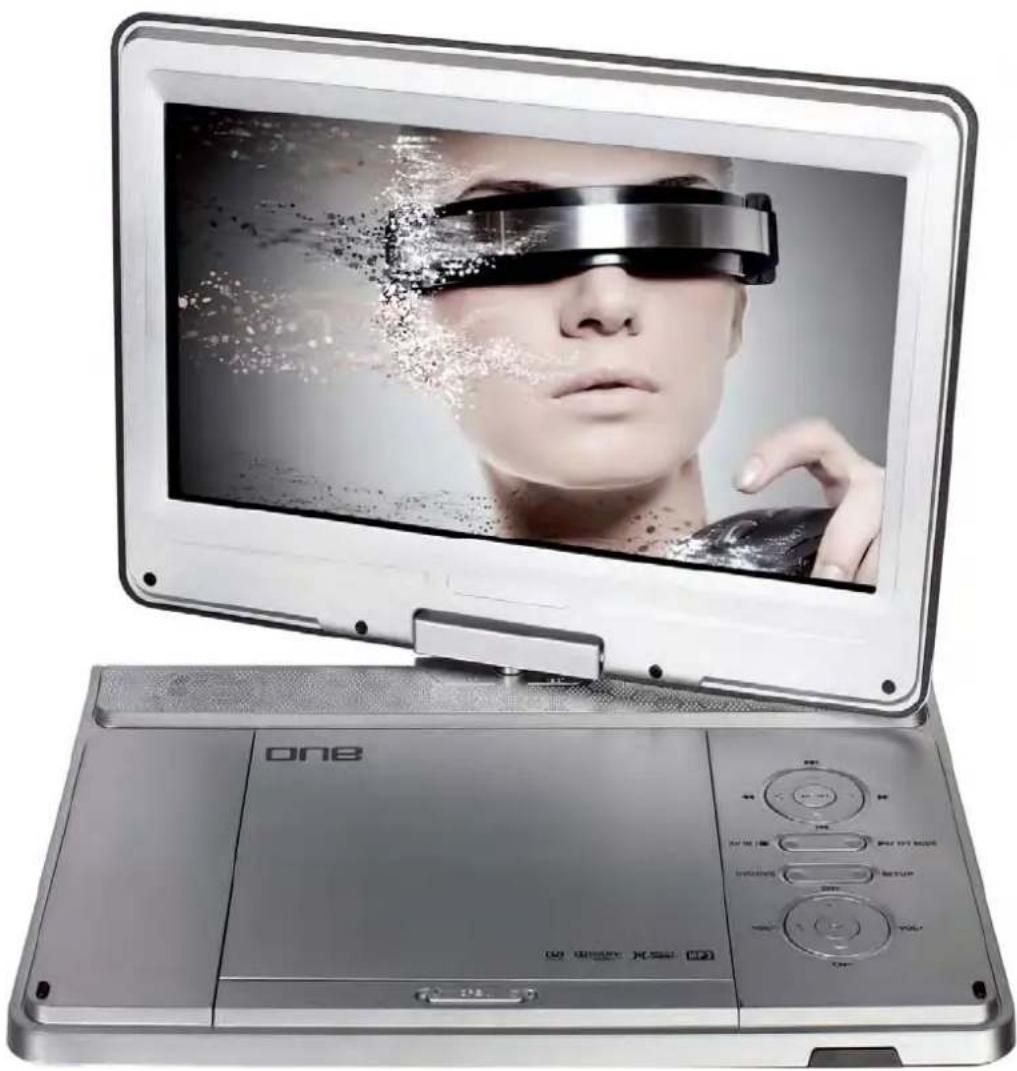
| Product Type | Portable DVD player with integrated LCD screen |
| Brand / Model | SEG / VP118 |
| Power supply | AC adapter 100-240V, 50/60Hz; built-in rechargeable battery |
| Power consumption | 12 W |
| Compatible disc types | DVD, DVD±R/RW, VCD, CD, CD-R/RW, MP3, JPEG |
| Supported video formats | MPEG1, MPEG2, MPEG4, JPEG |
| Display | 7-inch TFT LCD screen (approx.) |
| TV tuner | Built-in DVB-T (DTT), VHF/UHF |
| Inputs | AV IN (composite), USB 2.0, memory card reader (SD/MMC/MS) |
| Outputs | AV OUT (composite), 3.5 mm stereo headphone jack |
| Antenna | DTT antenna with magnetic base and car suction cup included |
| Remote control | Infrared remote control, range ≤5 m, angle ≤30° |
| Main functions | DVD/CD playback, USB/memory card playback, DTT reception, digital radio (DAB+ not specified), zoom, subtitles, multi-angle, A-B repeat, parental control |
| Vehicle connections | Car DTT antenna with suction cup and magnetic base |
| Maintenance and cleaning | Clean with a soft, slightly damp cloth. Do not use chemicals, alcohol or solvents. Avoid moisture inside. |
| Safety | Class 1 laser (do not open). Dangerous voltage inside. Use on a flat, ventilated surface. Do not expose to moisture, excessive heat or magnetic fields. |
| Repairability | All repairs must be carried out by a qualified technician. Unauthorized opening voids the warranty. Contact customer service at 044/5087278 (Switzerland). |
| Package contents | Portable DVD player, remote control, AC adapter, car DTT antenna, AV cable, user manual |
| Warranty | 2 years (valid in Switzerland for personal use) |
Frequently Asked Questions - VP118 SEG
User questions about VP118 SEG
0 question about this device. Answer the ones you know or ask your own.
Ask a new question about this device
Download the instructions for your Portable DVD Player in PDF format for free! Find your manual VP118 - SEG and take your electronic device back in hand. On this page are published all the documents necessary for the use of your device. VP118 by SEG.
USER MANUAL VP118 SEG
4. Teletext (Videotext)
Safety Instructions and Important Information About Intended Use
Please read the following instructions and safety notes thoroughly before starting to use your product!!
Intendible Use: Intendible has been designed for playing back DVD/CD discs and to watch TV. If the product is not used according to the instructions, the user's and other persons' safety is not guaranteed and the warranty will be void.
User Manual:Please read this User Manual thoroughly and keep it for any future reference in a safe place. For your own safety and in order to familiarize yourself with the different functions of the product, please follow the instructions in this manual carefully. When passing this product to other persons, please also hand over this User Manual. Please also read the user manuals of all devices that you are going to connect to this device.
1) Controlling the Power Supply: Clarity using the Power Supply, the power adaptor (Option) or its cables present visible damage. Connect the device only to the voltage indicated on the corresponding label on the product or power adaptor, resp. Never connect the device to a different voltage. Connect the device to grounded power outlets that comply with the corresponding safety standards only. Do not bend or squeeze the cables. WARNING: Inside the device there is dangerous voltage. Never open the housing of the device: there is risk of personal injury by electric shock. In order to completely disconnect the device from the mains, the power plug must be pulled out from the wall outlet. Make sure that you can remove the power plug at any time. Always pull the power cord from the plug and never from the cable itself. Electric storms may damage any electric equipment; therefore disconnect the power plug from the wall outlet during a thunderstorm. It is also recommended to disconnect the device from the mains and to remove a batteries when you are intending not to use the device for a longer time.
1 Objectives:ide the device: object or inthe cien objects or liquids enter the device via the ventilation holes or other openings. There is risk of electric shock, damage to the device and short-circuit. In case of any emergency, immediately pull the power plug and contact a qualified service technician.
Laser product: Laser products employ a laser system (Class 1 Laser). To ensure proper use of this product please read this owner's manual carefully and retain for future reference. There is laser radiation inside the device. Laser radiation can damage your eyes permanently. To prevent direct exposure to the laser beam, do not try to open the enclosure. Never attempt to repair the device. Hazardous laser radiation when open and interlock failed or defeated. DANGER: do not expose yourself to the laser beam!
Instalstation: Pteodai device onto a flat and even surface. Never cover the ventilation holes of the device and make sure that the air can easily flow around the device (keep at least 10cm / 4 inch space on the back and sides). The device has anti-skid rubber feet. Over the long-term, these feet can dissolve due to chemical substances. It is recommended that you place the device on an anti-skid surface. WARNING: do not use this device outdoors!
1 Conterstation:Gnebeatig this device from a cold to a warm environment (e.g. after transportation) moisture can condensate inside the device. In order to protect the device from damage and failure wait at least 2 hours prior to using the device.
Healbiny:atmilyhigh audio volumes can damage your hearing permanently. Therefore carefully adjust the volume, specially if you enjoy sound via headphones or earphones (option). Connect the headphones or earphones to the device (if available - option) prior to powering it on, as connecting it when already powered on can produce high sound levels causing damage to your hearing.
Children allow children to play with electrical devices. Children may not be able to comprehend the presence of potential risks.
[Baaties] Bateries away from children. Always replace all the batteries at the same time (never mix old and new batteries). Do not short-circuit any batteries. Keep batteries away from any heat sources (direct sun radiation, fire etc.). There is risk of explosion when misusing the batteries.
Rechargeable battery: if your device has been designed for mobile use and contains any rechargeable batteries, please note the following instructions: charge the battery before using the device for the first time. If you are planning not to use the device for a longer period of time, recharge the battery every 2 or 3 months. This will improve the battery's lifetime. Do not short-circuit any rechargeable batteries. Keep batteries away from any heat sources (direct sun radiation, fire etc.). There is risk of explosion. Use the rechargeable battery supplied with the product only. If you have to replace the rechargeable battery, contact a qualified service technician or our Service Hotline. Rechargeable batteries are components subject to wearing out and not covered by the manufacturer warranty.
Do Potstpany objects and never apply any pressure onto the housing or the display. Do not place any recipients containing liquids (beverages, vases, etc.) onto or next to the device. Do not place any fire sources (such as candles) onto the device. This could damage the product.
Environmental effects: Keep the device away from any heat sources (heating equipment, ovens, cooking places, candlelight, etc.), direct sun radiation, dirt, dust, vibrations, strong magnetic fields, moisture and rain.
LCDBscrens: If a still image gets displayed over a period longer than 2 hours, it might lead to a permanent visibility of the outlines of the former displayed content on the screen. The same applies with teletext, computer images, logos, video games, an unchanged background or a longer display of a non full screen sized (with black stripes) format. This unit is not suitable for a long term display of still pictures of the above mentioned content. Improper use and the associated consequential damages are not covered by the manufacturer's warranty.
Antenna: If your unit is equipped with a TV or radio receiver, which you want to connect to an antenna installation, please note the following: antenna installations need to be grounded according to regulations, which need to get observed. Note: If the unit will not be used for a longer period of time or during a thunderstorm, please disconnect the power plug, as well as the connection to the antenna.
Cleaging: Cemirge device with a soft, slightly moistened cloth. Do not use any chemicals, alcohol or solvents for cleaning. The finish of the device can be damaged by using these substances. Always make sure that no moisture enters the device.
Servicing: Choosing the device according to the operating instructions, no special service or maintenance is required. In case of any loss of performance or other malfunction, contact a qualified service technician.
Repaired: Repair open the device! Any repairs must be performed by authorized technicians or service personnel. Any unauthorised opening or modification will void the warranty and also the safety of the product may be altered. WARNING: Inside the device there is dangerous voltage. Never open the housing of the device: there is risk of personal injury by electric shock.
EnvironmentEnvironment
Old batteries do not belong in with the domestic waste! Old batteries do not belong in with the domestic waste! Consumers are obliged by law to return any old batteries and rechargeable batteries to the corresponding local and/or public collection centres or to return them to the retail shops. This ensures that batteries will be disposed of respecting the environment. Make sure to return any batteries and rechargeable batteries discharged.
Disposal of old electric and electronic devices: Disposal of old electric and electronic devices:
The icon of a dashed-out waste bin means that a separate disposal of electric/electronic equipment is necessary.
According to the Legislation of the European Union, any electric and electronic devices may not be disposed of with domestic trash but must be returned to a special collection center enabled for the recycling of these devices. The local waste companies should have set up specific collecting centres for this purpose, allowing private consumers to return any old devices for free. Please contact your local authorities or the local waste company for the available disposal possibilities.
Please support us actively by protecting the environment and recycle this product accordingly by returning it to a specific collection centre. This will protect the environment, other people and yourself. Thank you very much!
Disposal of Packaging and Packaging Materials: Disposal of Packaging and Packaging Materials: Packaging and any packaging materials do not belong in with the domestic waste! Your system consists of materials which can be recycled and reused if disassembled by a specialized company. Please observe the local regulations regarding the disposal of packaging materials.
SAFETY INFORMATION
Safety Instructions
Always read the safety instructions carefully.
- Keep this User's Manual for future reference.
- Keep this equipment away from humidity.
- Lay this equipment on a reliable flat surface before setting it up. Do not stand it on soft furnishings.
If any of the following situation arises, get the equipment checked by a service technician:
The equipment has been exposed to moisture.
The equipment has been dropped and damaged.
The equipment has obvious sign of breakage.
The equipment has not been working well or you cannot get it work according to User's Manual.
Laser
This Digital Video Disc Player employs a Laser System of the class 1.
- Make sure the device is shut down prior to opening player lid.
- Do not open the appliance. Do not attempt to dismantle the appliance.
- In order to avoid any danger: Have service work only carried out by the manufacturer or an authorized service workshop.
- Visible laser radiation when open and interlocks defeated.
- Use of controls or adjustments or performance of procedures other than those specified herein may result in hazardous radiation exposure.
Warning
To prevent the risk of electric shock, do not open the cover or the back of the receiver.
- Do not block the ventilation holes of the device. Leave appropriate gap above and around it to allow for adequate ventilation.
- Do not place the device in an unventilated cabinet or on top of a unit which emits heat.
Copyright Statement
No part of this publication may be reproduced in any form by any means without the prior written permission. Other trademarks or brand names mentioned herein are trademarks or registered trademarks of their respective companies.
Disclaimer
Information in this document is subject to change without notice. The manufacturer does not make any representations or warranties (implied or otherwise) regarding the accuracy and completeness of this document and shall in no event be liable for any loss of profit or any commercial damage, including but not limited to special, incidental, consequential, or other damage.
TABLE OF CONTENTS
Safety information. 1
Contents 2
Controls and location of parts. 3
Front panel. 3
Lift & Right panel. 4
Remote control 5
Connect to antenna for car 7
DVD Operation. 8
USB/MEMORY CARD Operation. 12
DVB-T Operation 13
TV MENU 19
Troubleshooting 20
Specifications 21
Controls and location of parts
Front Panel


- LCD DISPLAY
- media play mode, press shortly to skip to the next track
- : In media play mode, press it to activate fast reverse function.
- In media play mode, press it to activate fast forward function.
- MENU: When playing DVD disc, press this button to show ROOT MENU.
- In media play mode, press shortly to skip to the previous track.
- TFT MODE: Press shortly to the (Play/Pause) button, press and hold it to the TFT MODE.
- /AVIN: Press shortly to the Stop button, press and hold it to the Switch mode to AV IN
-
DVD/DVB: Press to select the DVD mode or DVB mode.
-
SETUP: Press to enter the DVD setup menu in DVD mode.
- CHANNEL+/▲: Press to select the previous/next channel. Moves the cursor up in the on-screen menu. Also referred to as Up keys throughout the manual.
- / VOL - : Press shortly to the Moves the cursor left in the on-screen menu. Also referred to as Left keys throughout the manual. In DVB-T mode, Press to enter the favorite channels list. Press and hold it to the adjust sound volume level.
- VOL+: Press shortly to the Moves the cursor right in the on-screen menu. Also referred to as Right keys throughout the manual. In DVB-T mode, Press to enter the favorite channels list. Press and hold it to the adjust sound volume level.
14.0K - CHANNEL-/ : Press to select the previous/next channel. Moves the cursor down in the on-screen menu. Also referred to as Down keys throughout the manual.
- OPEN: Open disc tray.
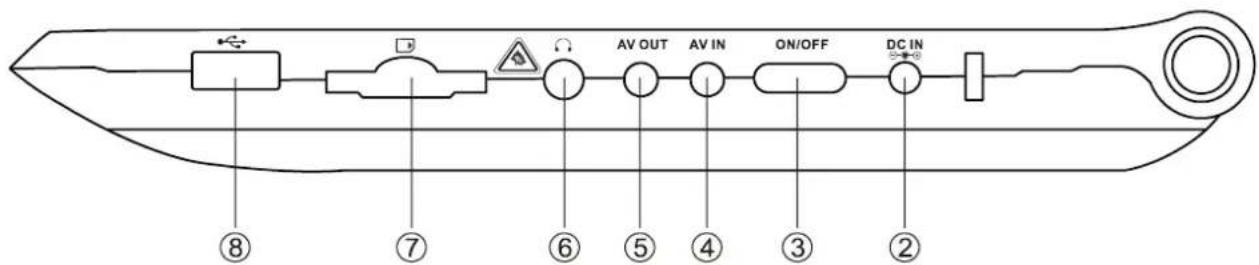
Lift & Right panel
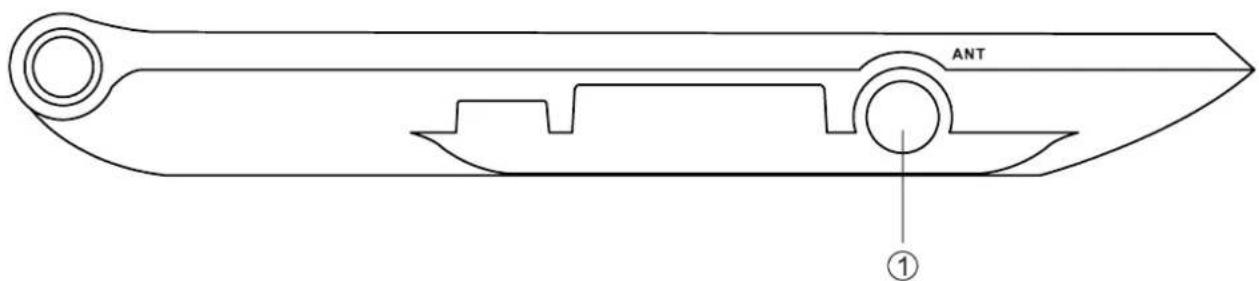
- TV ANT
- AC 100-240 ~50/60Hz Power Supply Interface.
- Powerswitch
-
AVIN
-
AVOUT
-
Earphone jack
- Memory Card
- USB interface
Remote Control
Buttons of the Remote Control:
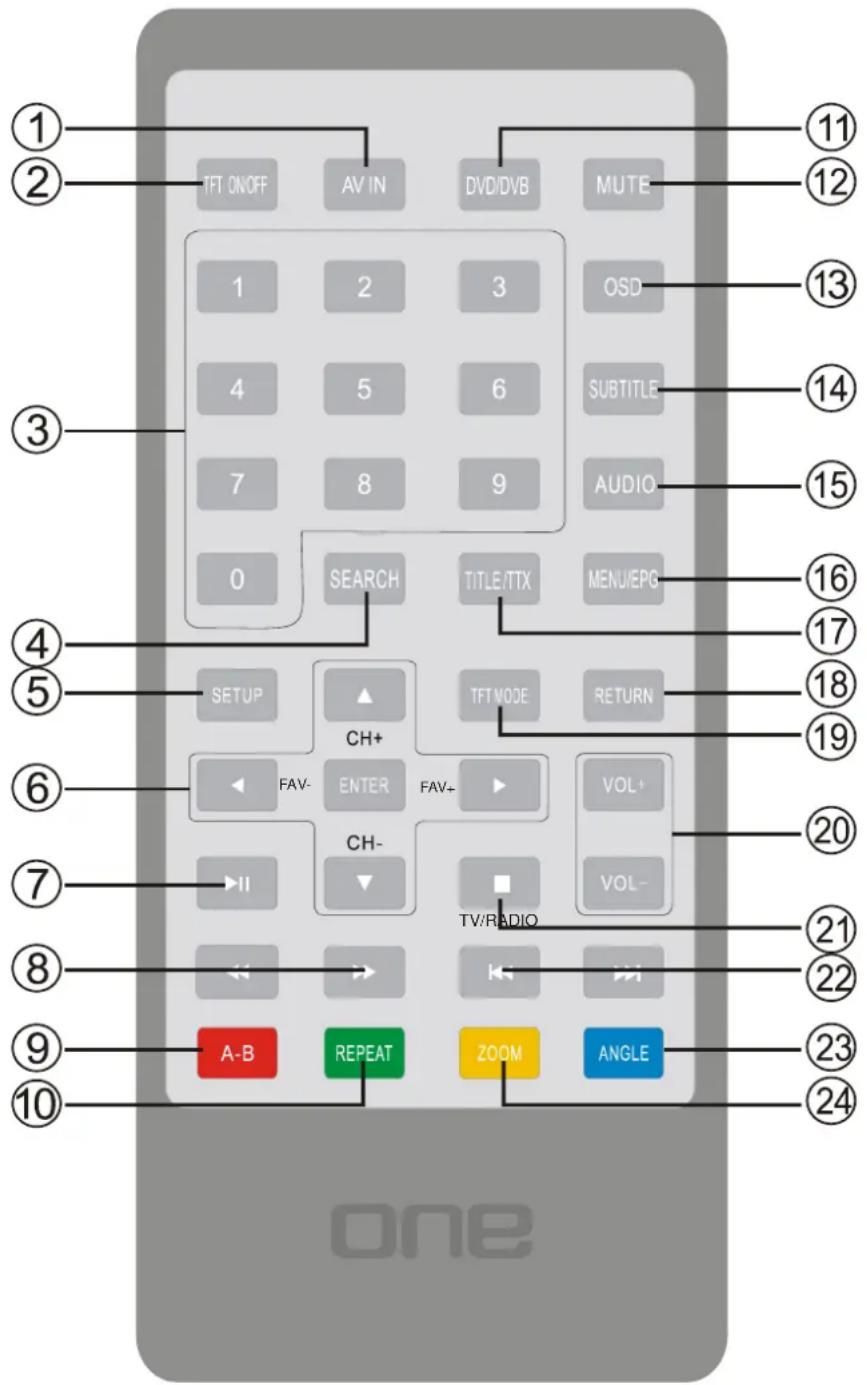
- AV IN: Press to enter AV Input mode, if external AV source is connected with the AV IN jack of this unit.
- TFT ON/OFF button: Press to turn the TFT display on or off.
- Numeric buttons [0-9, 10+]: Press to input number to select the track or channel.
- SEARCH button: Press to search the stations automatically in radio mode.
- SETUP button: Press to enter the DVD setup menu in DVD mode.
- [CH+]/ VH- : Press to select the previous/next channel.
Moves the cursor up/down in the on-screen menu.
Also referred to as Up/Down keys throughout the manual.
(FAV-) (FAV+): Moves the cursor left/right in the on-screen menu.
Also referred to as Left/Right keys throughout the manual.
In DVBT mode, Press to enter the favorite channels list.
-
button: press to play/pause the playback.
-
/ : in media play mode, press it to activate fast reverse/forward function.
-
A-B button: Press to repeat play the part you selected.
-
REPEAT button: Press to switch the repeat modes of the program.
-
DVD/DVB: Press to enter DVD mode or DVB mode.
-
MUTE button: Press to mute/resume the sound.
13.0SD button: In media play mode, press to display OSD (the on-screen display) information.
-
SUBTITLE button: Press to select the subtitle language.
-
AUDIO button: Press to display the audio information of the DVD/VCD disc.
-
MENU/ EPG buttons: Press to display/exit the menu information of the DVD disc, Displays EPG menu (if available).
-
TITLE/TTX button: Press to display the title menu of the DVD disc.
In DVB mode, displays the teletext (if available)
- RETURN button: Press to return to the previous menu.
19.TFT MODE:Press to adjust the video system mode, such as bright, colour, ect.
-
VOL+/- button: press to adjust the volume level
-
button: Press once to enter pre-stop mode, press twice to enter stop mode. In DVBT mode, press to start the record function.
-
In media play mode, press shortly to skip to the previous/next track.
-
ANGLE button: press to change the view angle on multi-angle DVD disc.
-
ZOOM button: press to allow the picture to be increased in size.
Inserting batteries and Operation radius
-
Open the battery compartment cover.
-
Insert the new batteries. Make sure that the positive and negative terminals of the batteries are oriented as indicated.
-
Close the cover.
Using the Remote Control
Point the remote control towards the remote control signal receiver on the player front face.
Stay within 5 meters and angles of 30 degrees or less in each the direction of the front of the remote sensor.
Under normal use the battery will last for one year.
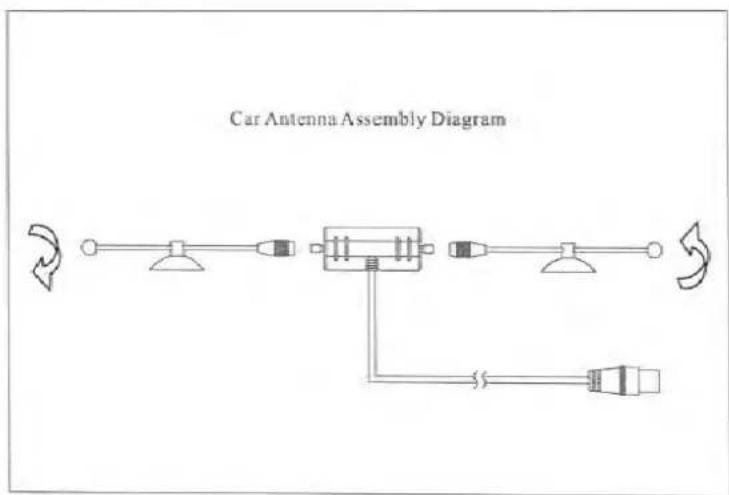
Connect to antenna for car
The unit has integrated a DVB-T TV tuner. To receive the terrestrial broadcast, you need to connect the player with an antenna:
Antenna installation in the car: fix the antennas on the car in the rear (or side) of the glass picture 1.
Notes: "A flawless TV function can't be guaranteed due to connection issues while the vehicle is moving, especially when speed is more than 60km/h ".
notice: A standard antenna with magnetic food and also a antenna for car using with vacuum cup is included in delivery
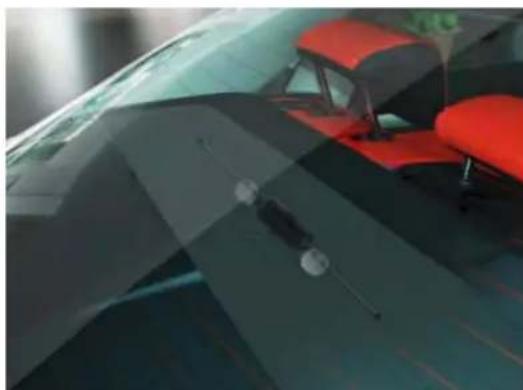
Picture1
Remove battery during storage or when you are not using the DVD player for a long time.
Notes:
- Weak batteries can leak and several damage by the remote control.
- Leaking out battery acid can damage your health.
- Remove the battery from the battery compartment as soon as it is exhausted or if the remote control is not going to be used for a longer period of time.
- In case of skin contact immediately wash the affected area.
- Seek medical advice if battery acid has been swallowed. In case of contact with your eyes wash out the eyes and seek medical advice.
DVD OPERATION
The unit supports disc play, USB play, RADIO and DVB-T function. Press the DVD/DVB button on the remote control to select the DVD mode.
※ LOADING THE DISC
In DVD mode, control to eject the disc tray. When there is no disc in the tray, insert the disc with printed side facing up into the disc slot. Then put the cover down to close the cover. The player will start playback automatically.
DVDVIDEO MENU/TITLE PLAY
When playing a DVD disc in the DVD player:
1] The disc will be played automatically and stop at menu picture.
Use / , cursor buttons on the remote control to move between the highlight bars in the menu. You can also press MENU button on the remote control to start menu play.
2] Press ENTER button on the remote control to confirm the selected item.
3) You can press TITLE button on the remote control to return to the title of the DVD disc.
STOP PLAYBACK
Press button on the remote control to stop the playback completely. Then press on the remote control to start play.
SKIP TO THE PREVIOUS/NEXT TRACK
During playing, press / on the remote control or / buttons on the front panel during playback will skip to the previous/next track.
Note: For some VCD2.0 discs (PBC-playback control), / buttons may be unavailable.
Note you can use the numeric buttons (0-9) and 10+ button on the remote control to select the track directly.
PAUSING PLAY
Press on the remote control during playback will stop playback temporarily. To return to normal playback, press button.
※ RAPID FORWARD/RAPID REVERSE
Press /> on the remote control or press /> on the unit during playback.
Each time the button is pressed, the speed of rapid forward /reverse changes according to the disc.
Press the OSD button on the remote control during playback to display the console information of the current disc on the screen.
For an example [when playing a DVD disc]:
Once you press OSD button on the remote control, you will see the information as the following order.

1) Item: TT
Function: Display the current title number and total title number.
2) Item: CH
Function: Display the current chapter number and total chapter number.
3) Item:
Function: Display the played time of the current chapter.
4) OFF OFF OFF
Display the current disc's language, audio type, subtitle language and play angle. Note: The displayed information is different according to different type of discs.
Repeat play: when you want to repeat playing the whole disc or a track or a chapter in the disc.
- Press REPEAT button on the remote control repeatedly to select different repeat modes.
■ For different kinds of discs, pressing REPEAT button has different effects.
For example:
DVD:
REP:[OFF] REP:[CHAPTER] REP:[TITLE] REP:[REP ALL]
Note: REPEAT feature does not support VCD2.0 (with PBC ON).
Paragraph play: When you want to play a paragraph repeatedly, A-B repeat allows a passage to be repeated continuously.
1) Press A-B button on the remote control first at the start of the required passage: REPEAT A-
2] Press A-B button secondly at the end of the passage: REPEAT A-B
Then the unit will repeat playing the passage you just set from A to B.
3) Pressing A-B button again will exit repeating mode, and "A-B CANCEL" will be displayed on the screen.
※ ZOOM FUNCTION
Allows the picture to be increased in size. Press Z00M button on the remote control to toggle among 2 scale, 3 scale and 4 scale, 1/2 scale, 1/3 scale, 1/4 scale.
When the scale is 1/4 times, press ZOOM button again to cancel the zoom function.
During Zoom mode, press / buttons on the remote control to move pictures up, down, left or right direction.
Multi-subtitle Language Function
Press SUBTITLE on the remote control during playback. The corresponding information will be shown on the screen.
Each time the button is pressed, the subtitle language changes in sequential order. Notes:
The language number is different according to the disc.
Some discs only contain one subtitle language.
Multi-angle Function
Press ANGLE button on the remote control during playback. The corresponding information will be shown on the screen.
Each time the button is pressed, the angle changes in sequential order.
Notes:
- The angle number is different according to the disc.
The function only works for discs having scenes recorded at different angles.
- ※ DVD SETUP
In DVD mode, when the disc is playing or in stop mode, press SETUP on the remote control to enter setup menu.
When the cursor is on the topside, use / , buttons to move between the different pages, such as SYSTEM SETUP, LANGUAGE SETUP, AUDIO SETUP, VIDEO SETUP and DIGITAL SETUP.
- Press button to move the cursor to the setup page below and then you can use ▲/▼buttons to move between the different setup options.
- Press button to display the choice list for each setup option and then use ▲/▼ buttons and ENTER button to change your selection.
1)SYSTEM SETUP
When you open the setup menu, you will see the system setup page at first, see
below:
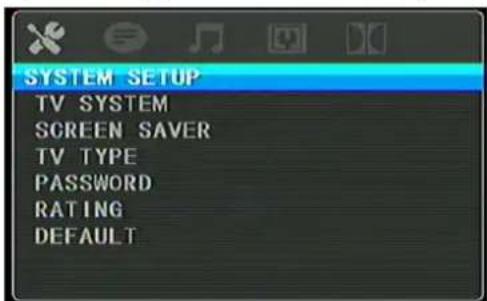
- TV SYSTEM: Change the TV SYSTEM among NTSC, PAL and AUTO.
- SCREEN Saver: Change the SCREEN Saver between ON and OFF.
If the screen saver is on, when your DVD player is in Stop, Open or No Disc state, or there is a frame frozen for more than 60sec, the screen saver will be displayed; this feature can protect the screen from damage.
- TV TYPE: Change the TV TYPE among 4:3 PS, 4:3 LB and 16:9.
[4:3 PS] (Pan&Scan): for standard TV, a full-height screen display with the sides trimmed.
[4:3 LB] (Letter Box): for standard TV, a 'wide-screen' display with black bars on the top and bottom.
[16:9] (Wide Screen): for wide -screen TV (frame ratio 16:9).
- PASSWORD: Change the PASSWORD lock or unlock, the default PASSWORD is "0000".
- RATING: Change the parental RATING among 1G, 2, 3PG, 4PG13, 5, 6R, 7NC-17, 8. The rating feature is a rating limit system, like movie rating. It works with DVD discs that have been assigned a rating. This helps you control the types of DVDs that your family watches.
- DEFAULT: Restore the system setup to the default setup.
2] LANGUAGE SETUP
When you open the language setup menu, you will see the language setup page:
![SEG VP118 - 2] LANGUAGE SETUP - 1](/content/2026/02/369307/images/2ad20700eeedfb28e6237489c4f1c96be0da37c54c313a85bb673985cae7a6b0.jpg)
- You can change the OSD LANGUAGE, AUDIO LANGUAGE, SUBTITLE LANGUAGE, MENU LANGUAGE among different languages.
The language options are different depending on your country or region.
- DIVX [R] VOD: PRESS ENTER TO VIEW REGISTER CODE.
3] AUDIO SETUP
When you open the AUDIO SETUP menu, you will see the following picture:
![SEG VP118 - 3] AUDIO SETUP - 1](/content/2026/02/369307/images/68f0807b84a97009394b2e368e0daa7b224a9e50b632357f4cd96d9ed92cf054.jpg)
- AUDIO OUT: Change among SPDIF/OFF, SPDIF/RAW and SPDIF/PCM.
[SPDIF/OFF]: Disable digital output.
[SPDIF/RAW]: The device supports multi-channel audio formats.
[SPDIF/PCM] (pulse Code Modulation): The device is not capable of decoding multi-channel audio. Audio is downmixed to two-channel sound.
- KEY: Change the tone within a certain range.
4]VIDEO SETUP
When you open the VIDEO SETUP menu, you will see the following picture:
![SEG VP118 - 4]VIDEO SETUP - 1](/content/2026/02/369307/images/c26fa99ee8f93ab785883c52a6ebb0d57d1522843206a482eb62453d07cc0bbe.jpg)
You can use the / buttons on the remote control or on the unit to adjust the value of the brightness, contrast, hue, saturation and sharpness.
5) DIGITAL SETUP
When you open the DIGITAL SETUP menu, you will see the following picture:
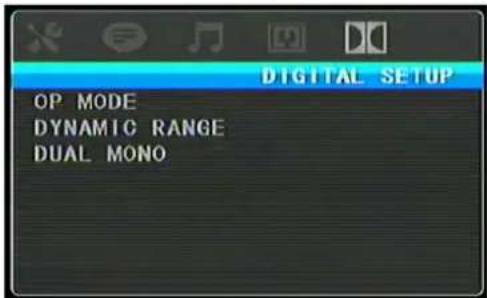
*OP MODE: to set the operating modes for Dolby Digital decoder, there are LINE OUT and RF REMOD to be selected.
- DYNAMIC RANGE: you can adjust the dynamic range between 2/8, 4/8, 6/8, FULL. Choose this setting to adjust the line out ratio and get different effect. If adjusting to FULL, the audio signal peak value will be the minimum, while adjusting to OFF, maximum.
*DUAL MONO: there are STEREO, MONO L, MONO R and MIX MONO to be selected.
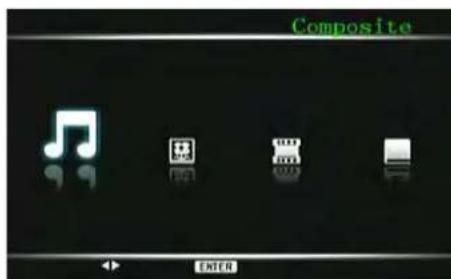
When you select the USB / MEMORY CARD mode, the operation is the same with DVD operation.
For example, when entering into the USB mode, the picture will appear.
You can select the audio/photo/video/E-book item to play.
DVB-T OPERATION
Press DVD/DVB button on the remote control to select DVB-T mode.
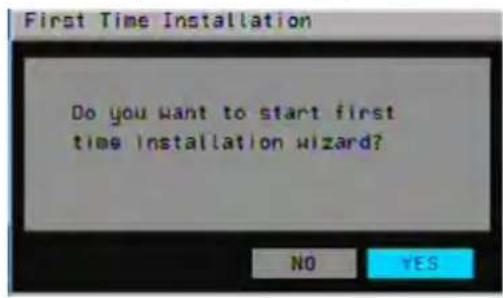
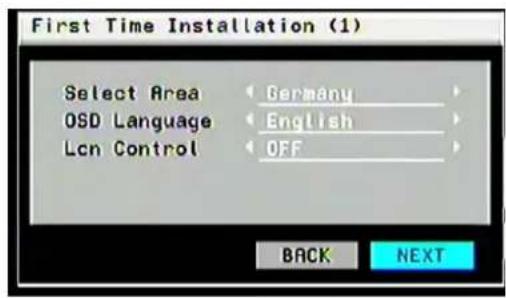
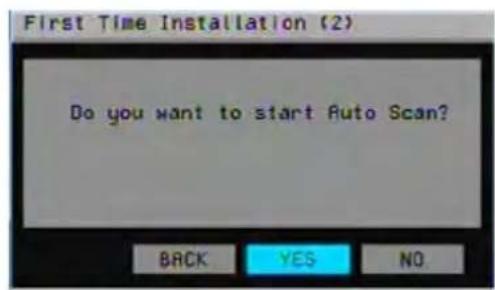
1. First time installation
If you are using the unit for the first time, an Initial Installation menu will be displayed to guide you through the first time installation (Picture 1). After selecting "YES", a new frame appears, shown in Picture 2, requesting the area, OSD language. Use the / cursor buttons to choose the right options. Then select "NEXT" and press ENTER button on the remote control to go the next picture, shown in Picture 3. Then select "YES", it begins to auto searching. Wait to complete the scanning. In case you want to stop the scanning, press the STOP button.
Picture 1
Picture 2
Picture 3
Picture 4
2. The Main Menu
Press the SETUP button to enter the main menu. Press the SETUP button again or press RETURN button to exit the menu. There are Channel Guide, System Config, Installation and Game four items to be selected and set.
2.1 Channel Guide
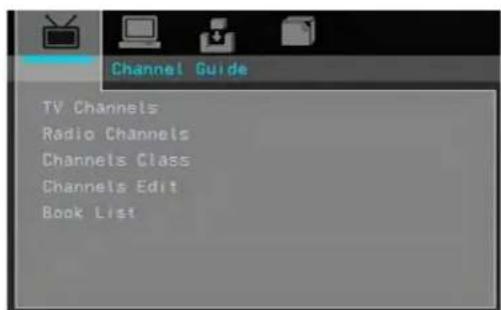
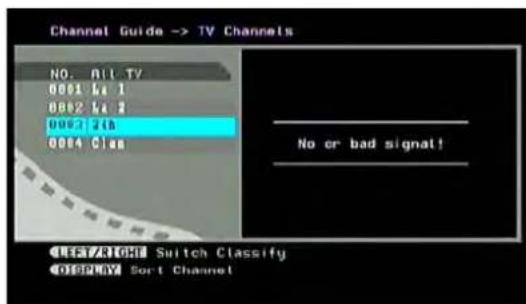
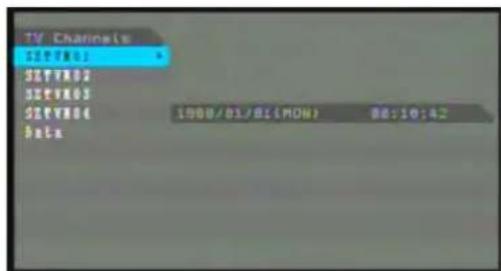
2.1.1 TV Channels
When select TV channels item and press ENTER to enter the menu. The channels appear on the left of the menu and a preview window appears on the right. From here, the channel can be changed by using the / buttons and ENTER to start viewing and /
buttons to change the channel group (if available). The channel groups include news, sports, favorites, etc. press OSD button to classify channels, which can be arranged in alphabetical order [A-Z], inverted alphabetical order, free viewing at the top, coded at the
bottom and by multiplex.
2.1.2 Radio Channels
The Radio Channels Menu is similar to the TV Channels Menu. The channels are listed on the left. The channels can be changed by using the / buttons and the groups can be changed by using / buttons. Press OSD button to classify channels. Note: DVB-T radio broadcasting is only available in some areas, not everywhere!
2.1.3 Channels Class (Favorites)
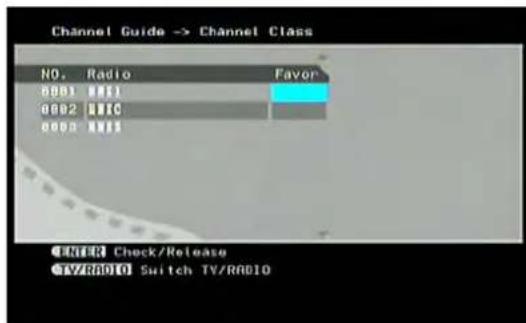
In this interface, each channel can be classified into a group.
Use / , / buttons to let the cursor to the proper position then press ENTER to add the series channels to the column category. Press ENTER again to release the corresponding function.
Press TV/RADIO button to alternate between TV channels and radio channels.
Note: When there are not any channels, the user can not be able to enter the menu. DVB-T radio broadcasting is only available in some areas, not everywhere!
2.1.4 Channels Edit
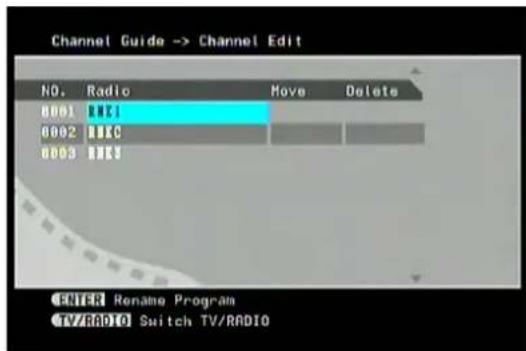
To change the name of a channel, you can select the channel and press ENTER button. Use the / buttons to select a character and / buttons to change a character. Press ENTER to confirm the name you input.
To change the position of a channel, select the Move column and press ENTER Then use
the / buttons to change the number order of the channel and press ENTER to confirm.
To delete a channel, select the Delete column and press ENTER button.
Use the TV/RADIO button to alternate between TV channels and radio channels.
Note: When there are not any channels, the user can not be able to enter the menu.
2.1.5 Book List
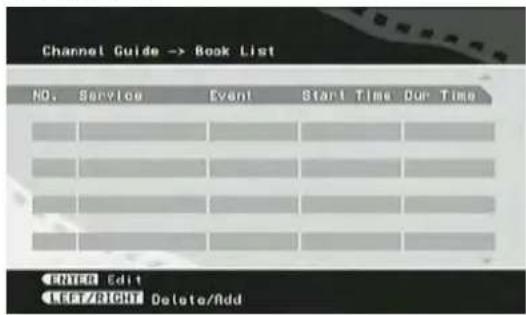
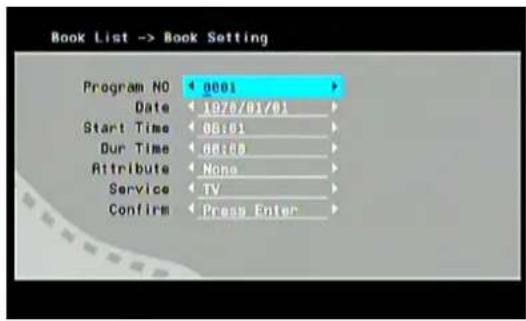
In Book List interface, it will display the notes that appear in the EPG (Electronic Programs Guide) menu and that you have added manually.
Press ENTER to enter the Book Setting menu. Then you can use the / , / buttons to set the items, such as the program NO, Date, Start Time, Dur time and etc. Then press ENTER to confirm.
2.2 System Config
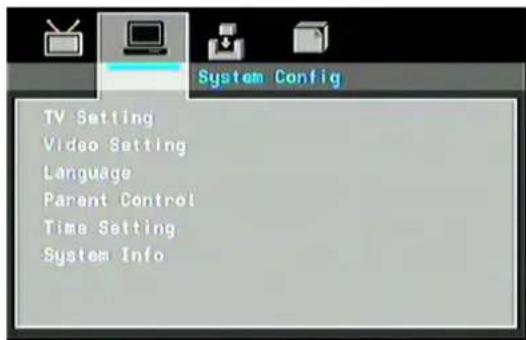
2.2.1 TV Setting

- TV SYSTEM: Change the TV SYSTEM among NTSC, PAL and AUTO.
- TV TYPE: Change the TV TYPE among 4:3 PS, 4:3 LB and 16:9.
2.2.2 Video Setting
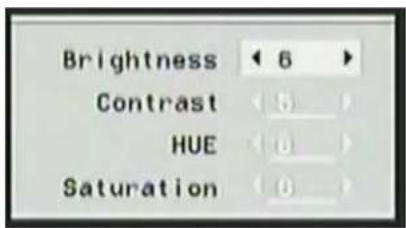
Select the Video Setting item and press ENTER to enter the menu. You can use the / buttons to select the Brightness, Contrast, HUE and Saturation to adjust and use / buttons to change the value then press ENTER to confirm.
2.2.3 Language
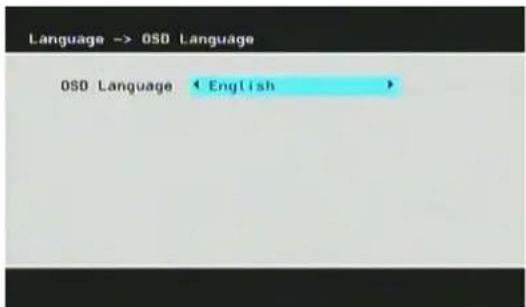
Use / buttons to change the OSD Language and press ENTER to confirm. Such as English, Italian and etc.
2.2.4 Parent Control
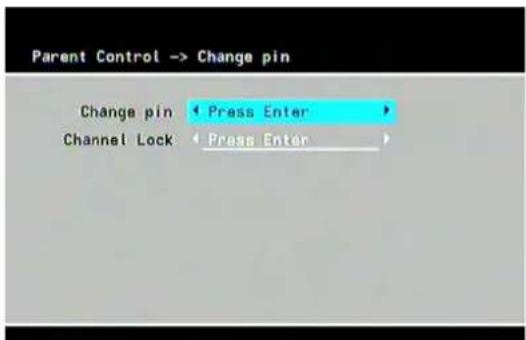
When changing the password the user will be requested to input the old password, the new one and the new one once again.
To change the channel lock, the user will first have to input the correct password to enter the channel lock menu. Then use the / button to select a channel and press ENTER button to lock or unlock a channel. Use the TV/RADIO button to alternate between TV channels and radio channels.
2.2.5 Time Setting
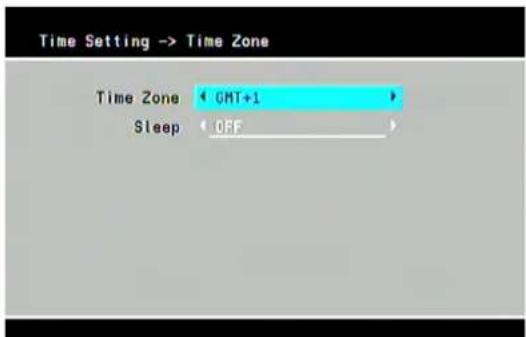
Use the / buttons to select a point and / buttons to change the setting then press ENTER button to confirm.
2.2.3 System Info

The system information shows the update date, tuner information, firmware version and model version. Such as the information displayed on the picture above.
2.3 Installation
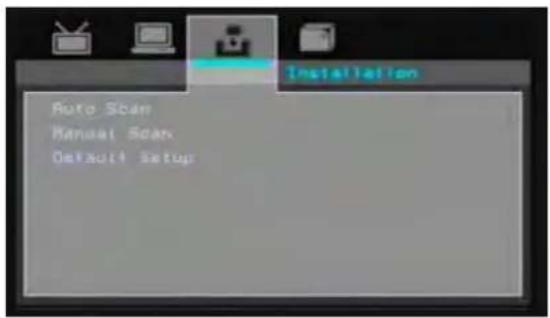
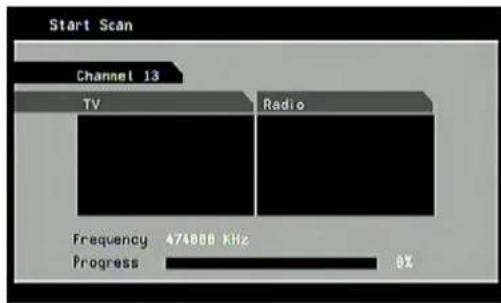
2.3.1 Auto Scan
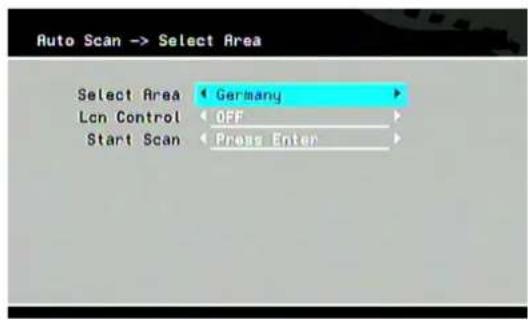
Use the / buttons to change the area then press button to select "Start Scan" and press ENTER button. Scanning will start after choosing "yes".
2.3.2 Manual Scan
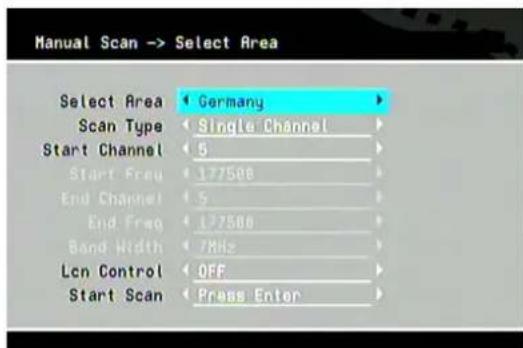
A channel scan or search can be done establishing the following points: Country, type of search, Start with channel, Start with frequency..., Finish with frequency... and Wide band. If the search type is single channel, then the country and start channel can be set. If the search type is range of channels, then the country, start channel and finish channel can be set.
Use the / buttons to select a point and / buttons to change the settings. Once you have done this, select the "Start Scan" and press ENTER button.
2.3.3 Default Setup
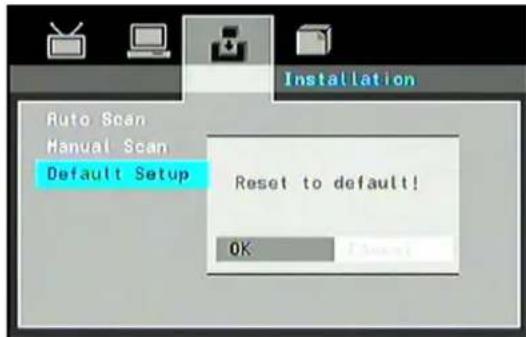
A message frame will appear, as shown on the picture above, asking whether the user wishes to reset the factory settings system. After returning to the factory settings, the installation message will appear. You can refer to the "1. First time installation" section.
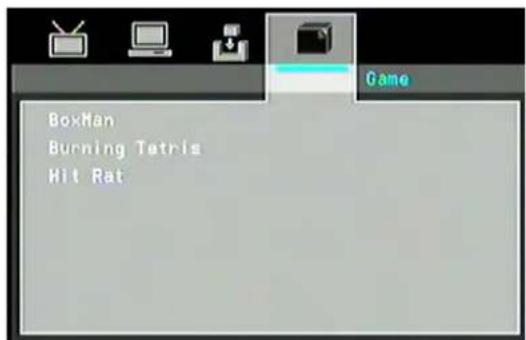
2.4 Game
If you want to have a rest or to relieve yourself after hard working, you can play some games provided with the system.
Press SETUP button to enter the Main Menu. Then you can select Game to enter the Game
menu.
3. Electronic programs guide (EPG)
Press EPG key on the remote controller to enter into the EPG page to know more information about the current channel. As shown in the figure below;
4. Teletext
Press TTX key on the remote control to enter the teletext page.
Some local program providers do not provide services in this area and "No teletext information!"
5. Subtitle/language function
You can select the subtitle or audio language if the program provides subtitle or audio information by using the SUBTITLE button or LANGUAGE button on the remote control.
You can press L/R button to switch between Left, Right and Stereo.
TV MENU
a] PICTURE
Then you can use the up/down buttons to select the item to adjust and left/right buttons to adjust the value of brightness, contrast, colour, sharp. And you can set reset function.
![SEG VP118 - a] PICTURE - 1](/content/2026/02/369307/images/46991cf6bb98e359369afe4b8aa810a3a8dbbee444f6159bff8847f251d6bc17.jpg)
b] VOLUME
![SEG VP118 - b] VOLUME - 1](/content/2026/02/369307/images/2bfbbb77a1ffeba4edd8cb972d3e5ec99839633fbd55fb212c5d3197c0a3ef93.jpg)
c]OPTION
Use the up/down buttons to select the item to adjust and left/right buttons to adjust.
![SEG VP118 - c]OPTION - 1](/content/2026/02/369307/images/250a0aa4d350e17312d909c7468a71feca57ab610bd317e508fe5df48ee17143.jpg)
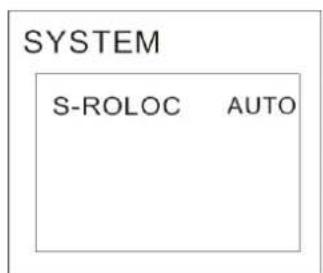
d)SYSTEM
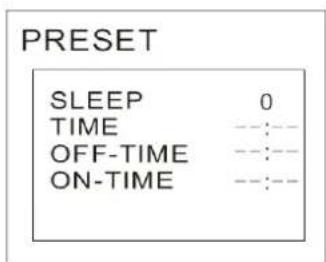
e) PRESET
Use the UP/DOWN buttons to select the item to adjust and LEFT/RIGHT buttons to adjust.
TROUBLESHOOTING
FOR DVD
No power
Check if AC adapter of power is connected securely.
Switch the device On by pressing the power button.
No sound
Ensure that the equipment is connected properly.
Please make sure that the audio track exists on the disc.
Control the volume.
No key operation
Turn the unit off and then back to on.
Disconnect the unit from power and from battery and connect them again.
No playback
The disc may be dirty and require cleaning.
Ensure that the disc is installed with the label side up.
The disc has too many scratches.
Remove the laser pickup protection on the disc tray.
The DVD+/-RW should be finalized.
Wrong region code by the Video-DVD
Cancel the parental lock function or change the parental lock level.
Check TV type is correct: PAL/NTSC
No remote control
Are the polarities of the batteries correct?
Batteries are depleted. Please uses new one.
Point the remote control unit at the Infrared sensor and operate.
Remove the obstacles between the remote control and the inferred sensor.
Operate the remote control unit at a distance of not more than 5 meters from the Infrared sensor.
FOR DVB-T
Any problems
Our custom service will help you. Did you already read the Troubleshooting pages?
No DVB-T Signal
Please check if the unit is in DVB-T mode? If not please switch to this mode.
Bad reception quality
Please, align your antenna optimally. Use an antenna with active amplifier (house antenna or roof antenna). If you have moved the unit, adjust the antenna again or connect an active antenna.
No TV programs
If there are no more programs shown in the Channel list. Please start the automatic search again.
Remote control does not work
Please direct the remote control upon the device. If the problem continues, please change the batteries.
SPECIFICATIONS
| Item Specification | ||
| Demodulation (DVB-T) | Demodulator COFDM | |
| Frequency Range | VHF:177.5MHz to 226.5MHz UHF:474MHz to 858MHz | |
| Input Impedance 75 Ohms unbalanced | ||
| Signal Input Level -78 ~ -25 dBm | ||
| Bandwidth | 7M/8M | |
| OFDM Modulation | QAM16, QAM64 | |
| Packet Carries 2K/8K | ||
| Guard Interval 1/4, 1/8, 1/16, 1/32 | ||
| Video formats MPEG1/2/4,JPEG | ||
| Disc type | Semiconductor | |
| General information | Power supply rating | DC IN 9V 100V - 240V, 50Hz / |
| Operation power consumption 12W | ||
| Composite video output 1.0Vp-p, 75ohm | ||
| Headphone output 2 X 15mW, 32ohm | ||
| USB direct Version 2.0 | ||
| MEMORY CARD SD/MMC/MS | ||
| Main unit (W x H x D) | ||
| Weight | ||
| Connectors | Dc in | |
| Av in | ||
| Av out | ||
| Headphone out | ||
| CARD | ||
| USB | ||
| ANT(DVB-T) | ||
This symbol on the product or in the instructions means that your and electronic equipment should be disposed at the end of life separately from your household waste.
There are separate collection systems for recycling in the EU. For more information, please contact the local authority or your retailer where you purchased the product.

This appliance complies with European Safety and Electrical directives. It fulfills the following EU regulations:
EN60065:2002+A1:2006+A11:2008
EN 55013:2001+A1:2003+A2:2006
EN 55020:2007
EN 61000-3-2:2006
MANUEL D'UTILISATION
LECTEUR DVD / TNT
MODEEVP118
2.1.1 TV Channels (Chaines TV)
TV MENU (Menu TV) a) PICTURE (IMAGE)
a] PICTURE (Imagine)
service@schmid-electronics.de
service@schmid-electronics.de

- Teletext (Videotext)
- Safety Instructions and Important Information About Intended Use
- EnvironmentEnvironment
- SAFETY INFORMATION
- Safety Instructions
- Laser
- Warning
- Copyright Statement
- Disclaimer
- TABLE OF CONTENTS
- Controls and location of parts
- Front Panel
- Lift & Right panel
- Remote Control
- Inserting batteries and Operation radius
- Using the Remote Control
- Connect to antenna for car
- Notes:
- DVD OPERATION
- Multi-subtitle Language Function
- Multi-angle Function
- - ※ DVD SETUP
- 1)SYSTEM SETUP
- 2] LANGUAGE SETUP
- 3] AUDIO SETUP
- 4]VIDEO SETUP
- 5) DIGITAL SETUP
- DVB-T OPERATION
- First time installation
- The Main Menu
- Channel Guide
- TV Channels
- Radio Channels
- Channels Class (Favorites)
- Channels Edit
- Book List
- System Config
- TV Setting
- Video Setting
- Language
- Parent Control
- Time Setting
- System Info
- Installation
- Auto Scan
- Manual Scan
- Default Setup
- Game
- Electronic programs guide (EPG)
- Teletext
- Subtitle/language function
- TV MENU
- a] PICTURE
- b] VOLUME
- c]OPTION
- d)SYSTEM
- e) PRESET
- TROUBLESHOOTING
- FOR DVD
- No sound
- No key operation
- No playback
- No remote control
- FOR DVB-T
- Any problems
- No DVB-T Signal
- Bad reception quality
- No TV programs
- Remote control does not work
- MANUEL D'UTILISATION
- LECTEUR DVD / TNT
- TV Channels (Chaines TV)
- TV MENU (Menu TV) a) PICTURE (IMAGE)
Brand : SEG
Model : VP118
Category : Portable DVD Player