16727 - Remote control Niko - Free user manual and instructions
Find the device manual for free 16727 Niko in PDF.
User questions about 16727 Niko
0 question about this device. Answer the ones you know or ask your own.
Ask a new question about this device
Download the instructions for your Remote control in PDF format for free! Find your manual 16727 - Niko and take your electronic device back in hand. On this page are published all the documents necessary for the use of your device. 16727 by Niko.
USER MANUAL 16727 Niko
Support Belgique: Support France:
+3237789080 +33820206625
site web: http://www.niko.be site web: http://www.niko.fr
e-mail: support@niko.be e-mail: ventes@niko.fr
CoNdITIoNS dE GARANTIE
16-720 MINI-Up-IR-EMpFANGER
produkbeschreibung
General information. 70
16-720 Flush mounting mini IR-receiver 72
Specifications 72
Installation 73
16-721 and 16-722 Surface mounting mini IR-receiver. 74
Specifications 74
Installation 74
16-723 Bookshelf IR-receiver 76
Specifications 76
Installation 76
16-729 4-circuit jack connection print. 78
Specifications 78
16-726/16-727 Mini IR-transmitter with LED. 79
Specifications 79
Installation 80
16-728 IR- radiator 81
Specifications 81
Installation 82
16-724 IR-connection block. 83
Specifications 83
Connections and installation 83
16-725 Power supply 85
Specifications 83
Wiring and installation. 86
Basic installation 86
Configuration of several zones. 87
Control of the Allegretto A44 or A88 via IR. 89
Remarks concerning installation and use 89
Guarantee provisions. 90
EN
67
16-72X
niko
LEGALWARNINGS
- Read the complete manual before attempting installation and activating the system.
- The installation has to be carried out by a qualified person and in compliance with the statutory regulations.
- This user manual has to be handed over to the user. It has to be included in the electrical installation file and has to be passed on to any new owners. Additional copies are available on the Niko website or via the support service.
-
During installation, the following has to be taken into account (not limited to list below):
-
The statutory laws, standards and regulations;
- The state of the art technique at the moment of installation;
- This user manual, which must be read within the scope of each specific installation, only states general regulations;
-
The rules of proper workmanship
-
In case of questions, you can consult Niko's support service or contact a registered control organisation.
Support Belgium: Support UK:
+32 3 778 90 80 +44 1525877707
website : http://www.niko.be http://www.nikouk.com
e-mail: support@niko.be sales@nikouk.com
In case of a defect, you can return your product to a registered Niko wholesaler, together with a clear description of your complaint (Conditions of use, stated defect...).
16-72X
niko
General information
The use of an infrared remote control is normally limited to the room in which the IR-receivers or equipment are set up. If you would like to use your infrared remote control from a different room, for example, to select a different radio station on your tuner, the IR-signal distribution via wiring can be used. A typical installation always consists of one or more infrared receivers, a connection block and a number of mini-infrared transmitters.
This manual contains the following products:
16-720 Flush mounting mini IR-receiver
16-721 Surface mounting mini IR-receiver (white)
16-722 Surface mounting mini IR-receiver (black)
16-723 Bookshelf IR-receiver
16-724 IR-connection block
16-725 Power supply for IR-connection block
16-726 Simple mini IR-transmitter
16-727 Double mini IR-transmitter
16-728 IR-radiator
16-729 4-circuit jack connector print
Standardization
The products comply with the EN55020 and EN55022 standards.
EN
16-72X
niko
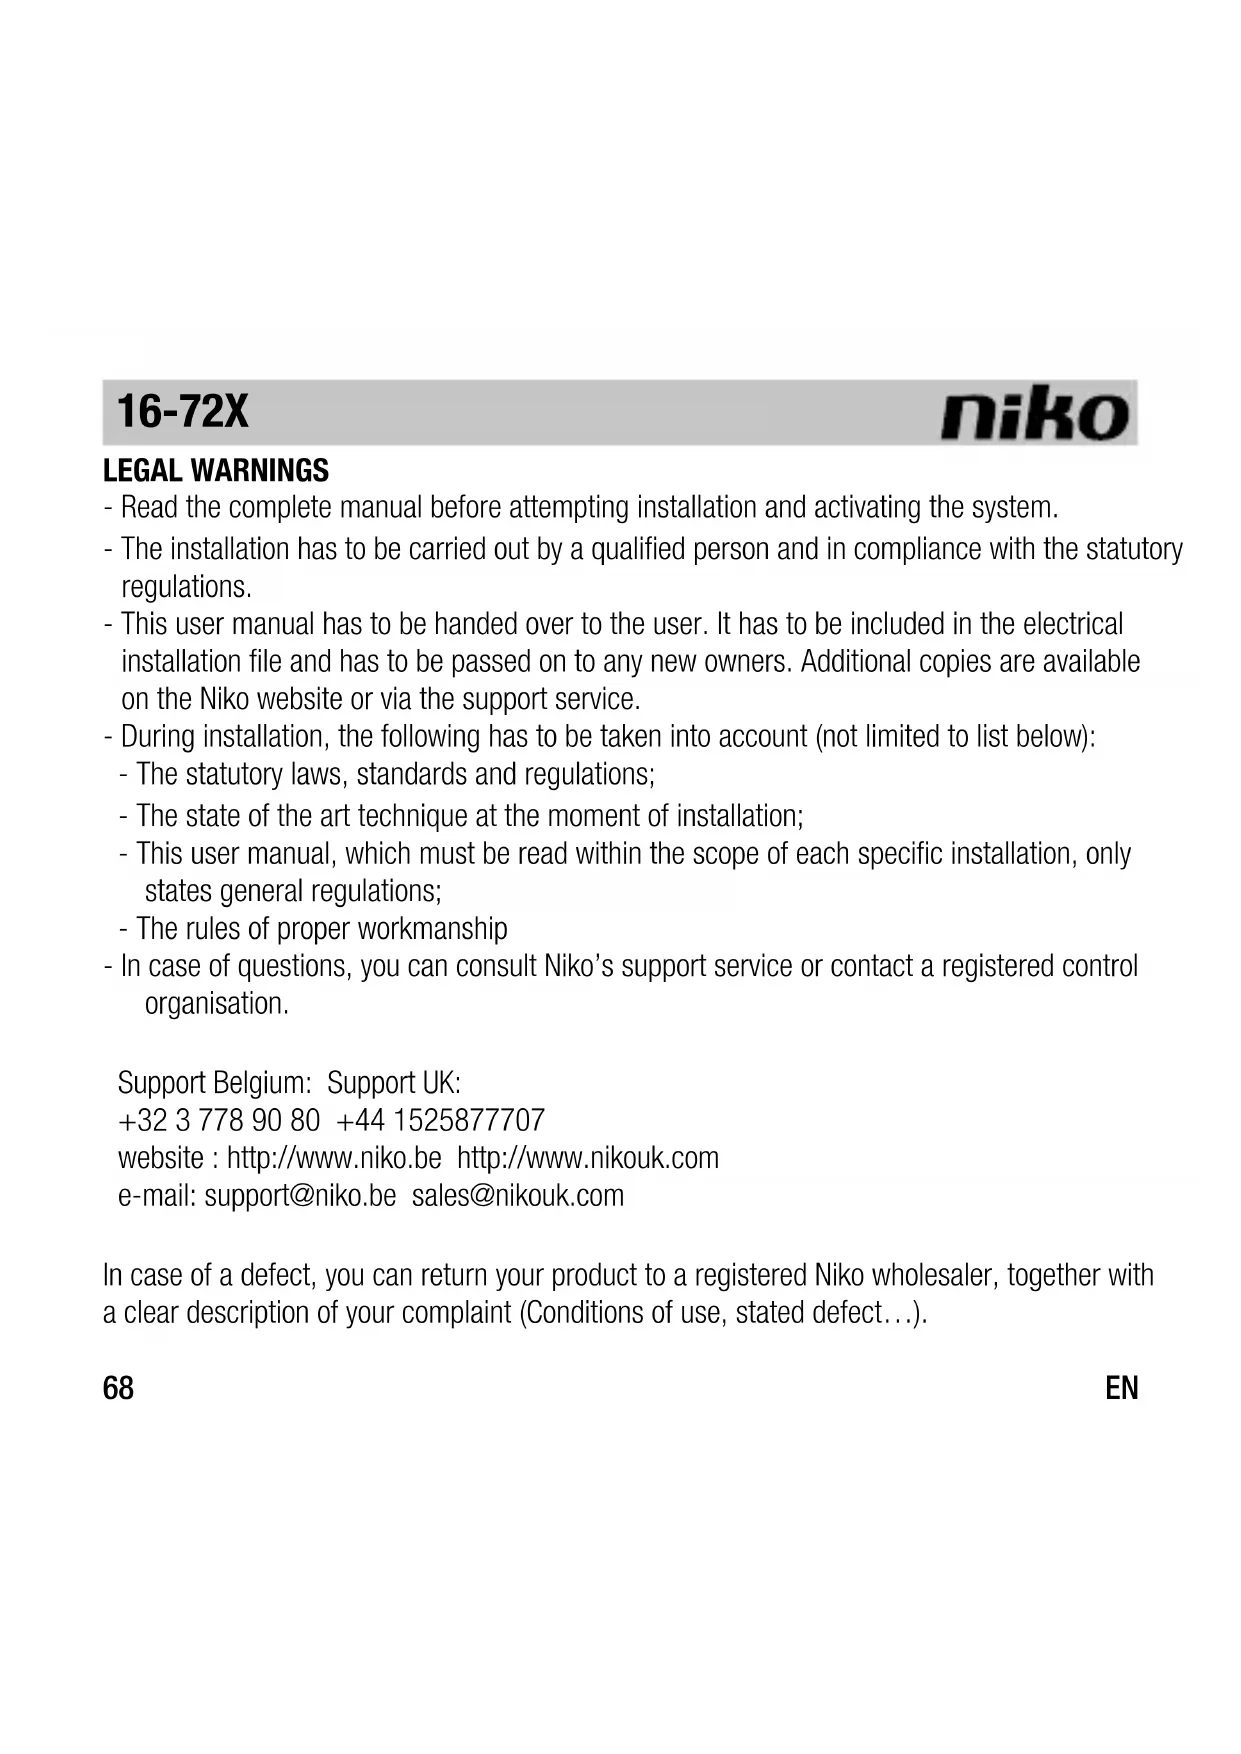
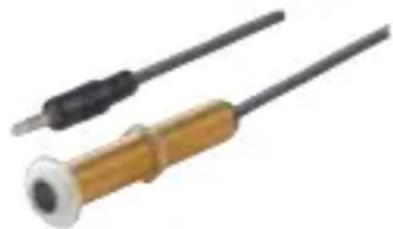
16-720 FLUSH MOUNTING MINI IR-RECEIVER
Specifications
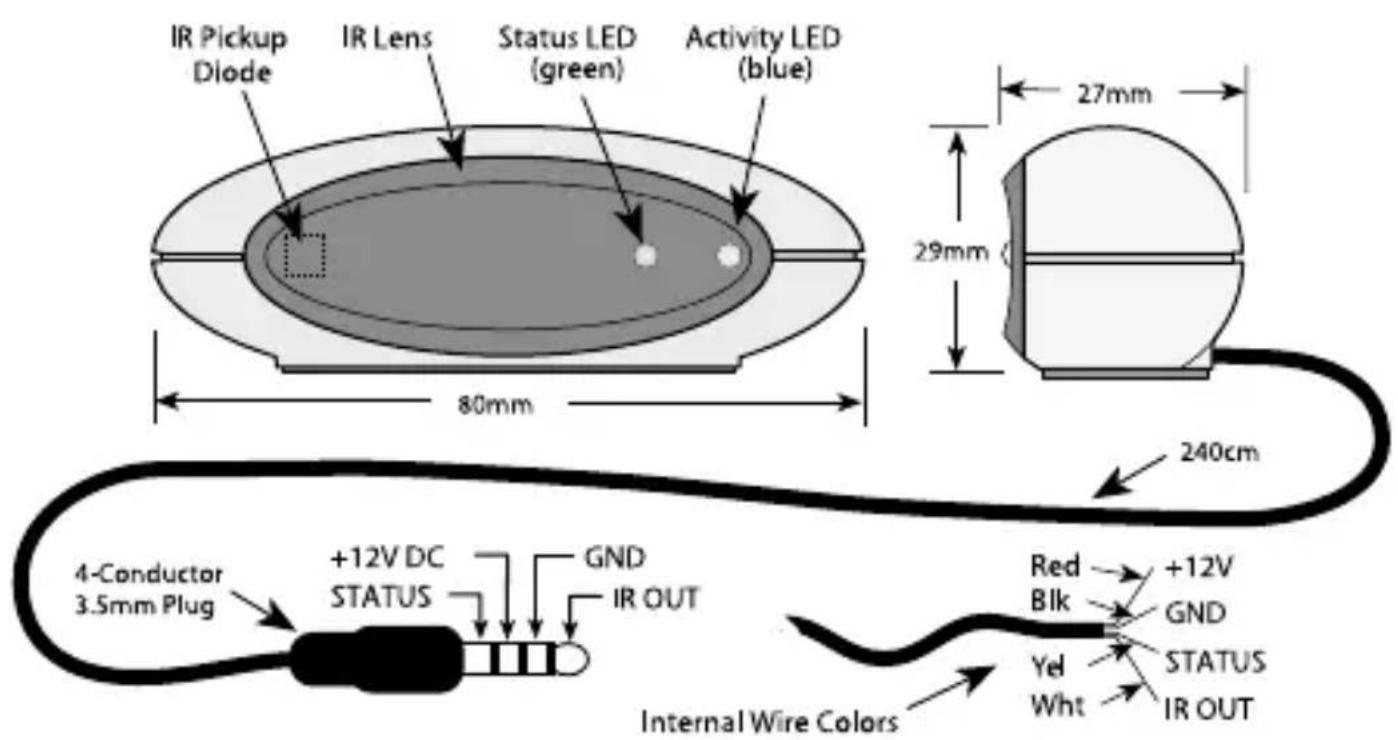
This IR-receiver is ideally suitable for unobtrusive flush mounting in a wooden wall, ceiling... Only the finished border will be visible after installation.
- Tubular cover (12mm diameter) provided with screw thread for installation in hollow walls, ceiling, furniture panels...
- Delivered with washer and nut for the installation.
- The 4-pole, 3.5mm connection jack can be plugged directly into the 16-724 connection block. This connector holds the connections for the +12V , GND, IR-signal and status signal.
- Integrated circuit for the suppression of undesired ambient light.
- Integrated green LED for on/off indication (status signal).
- Integrated blue LED that lights when receiving IR-signals.
- Power supply: 12V/6mA supplied by IR-connection block 16-724
- IR-lens limiting the interference of visible light.
- Carrier frequency of IR-signal: 28 to 90kHz
- Reception range: up to 10m, depending on the ambient light
- Reception range: ± 50m
- Dimensions: H 29mm x W 80mm x D 27mm
- Cord length: 2,40m
- Delivered with white or black finished border that clicks onto the receiver lens. In locations with a lot of sunlight or scattered light (e.g. from fluorescent lamps or plasma screens), finished borders with smaller openings can be used. In this case, however, the reception range will be reduced.
16-72X
niko
Installation
Ensure a flush mounting depth of at least 70mm . The receiver is inserted through a 12mm hole and secured at the rear with the enclosed nut and washer.
The 4-pole mini jack plug can either be plugged directly into the IR-connection block (16-724) or the 4 signals can be accessed through the connector print (16-729) by means of the 4 screw contacts (see 'WIRING AND INSTALLATION' p.86). If the cable of the 16-720 receiver is too long for the installation, it can be shortened. To do this, the individual wires must be stripped. Please make sure that the connections are made as indicated in the figure below.
EN
16-72X
niko
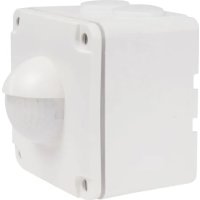
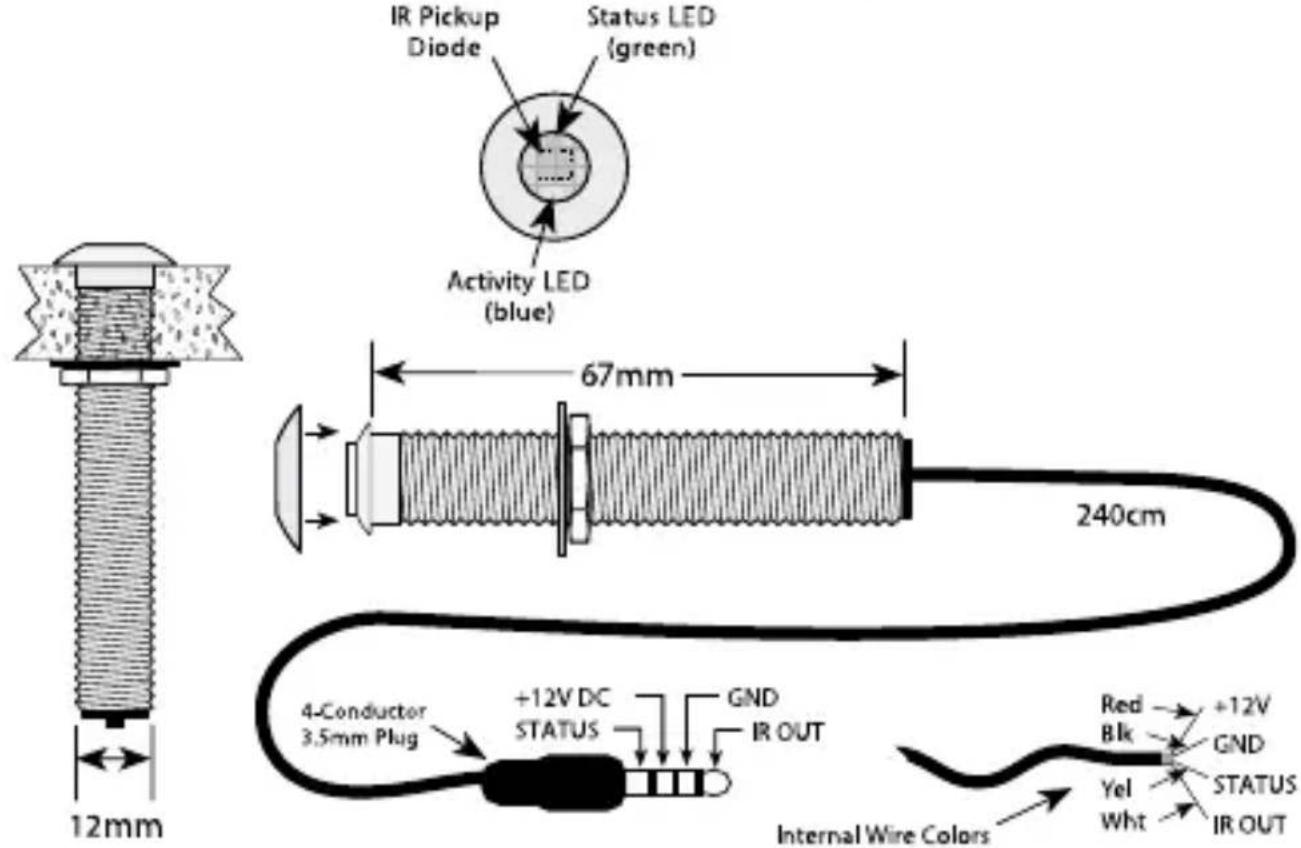
16-721 & 16-722 SURFACE MOUNTING MINI IR-RECEIVER
Specifications
The IR-receivers 16-721 (white) and 16-722 (black) have been designed to be fixed against a wall, ceiling or piece of furniture by means of a self-adhesive strip.
These receivers are therefore suitable for applications where flush mounting is not possible.
- 16-721: white model, 16-722: black model
- Self-adhesive back for simple fixing against a wall.
- The 4-pole 3.5mm connection jack can be plugged directly into the 16-724 connection block. This connector contains the connections for the +12V, GND, IR-signal and status signal.
- Integrated circuit for the suppression of undesired ambient light.
- Integrated green LED for on/off indication (status signal).
- Integrated blue LED that lights when receiving IR-signals.
- Power supply: 12V / 6mA supplied by the IR-connection block (16-724).
- Carrier frequency of the IR-signal: 28 to 90kHz
- Reception range: up to 10m, depending on the ambient light.
- Reception range: ± 50^
- Dimensions: H 14mm x W 66mm x D 14.2mm
- Cord length: 2.40m
16-72X
niko
Installation
These receivers can be fixed onto any level surface thanks to a self-adhesive strip. The 4-pole mini-jack plug can either be plugged directly into the IR-connection block (16-724), or the 4 signals can be accessed through the connector print (16-729) by means of the 4 screw contacts (see 'WIRING AND INSTALLATION' p.86). If the cable of the receiver 16-721(2) is too long for the installation, it can be shortened. To do this, the individual wires must be stripped. Please make sure that the connections are made as indicated in the figure below.


EN
16-72X
niko
16-723 BOOKSHELF IR-RECEIVER
Specifications
The IR-receiver 16-723 can be placed on top of a cupboard or bookshelf; it is used to operate audio and video equipment that is set up within a closed cupboard.
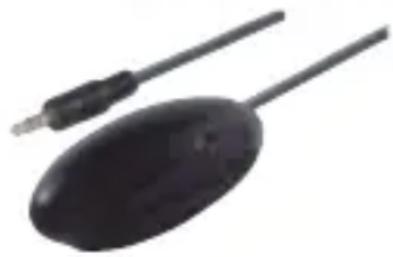
- Attractive cover
- The 4-pole 3.5mm connection jack can be plugged directly into the connection block 16-724. This connector contains the connections for the +12V, GND, IR-signal and status signal.
- Integrated green LED for on/off indication
- Integrated blue LED that lights when receiving IR-signals.
- Can be placed on any level surface. A special strip protects the surface against scratches.
- Power supply: 12V/6mA supplied by IR-connection block 16-724
- IR-lens limiting the interference of visible light
- Carrier frequency of the IR-signal: 28 to 90kHz
- Reception range: up to 10m, depending on the ambient light
- Dimensions: H 29mm x W 80mm x D 27mm
- Cord length: 2.40m
Installation
This IR-receiver does not require any special installation. As it is fitted with a scratch-free layer, it can simply be placed on top of a cupboard, bookshelf, .... The 4-pole mini jack can be plugged directly into the IR-connection block (labelled 'IR-RCVR').
EN
16-72X
niko
16-729 4-CIRCUIT JACK CONNECTION PRINT
Specifications
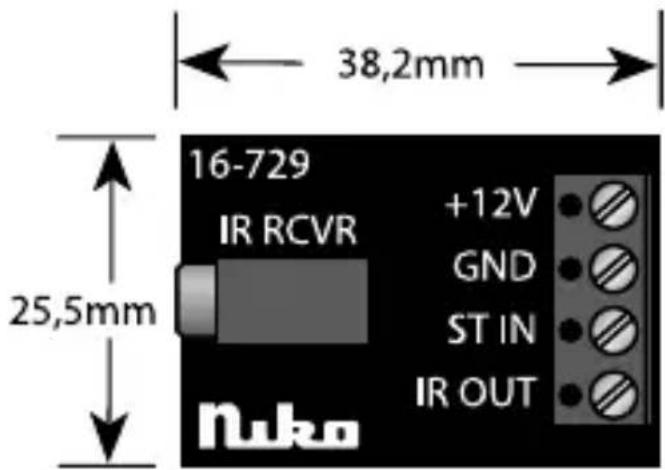
This connection print is used as an interface between the 4-pole mini jack of the IR-receivers and the 4 wires of the infrared circuit (BUS).
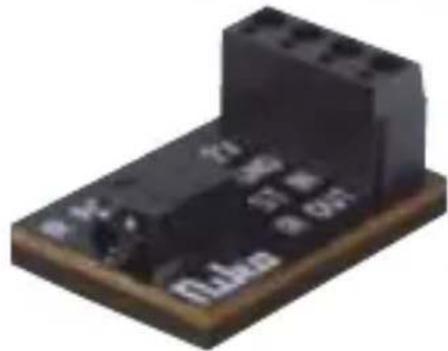
- 4-pole jack for the connection of the 4-pole mini plug of the IR-receivers.
- 4 pole screw connector for the connection of 4 BUS wires (+12V, GND, IR and Status)
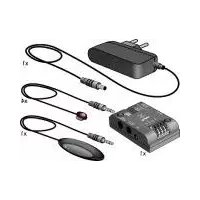
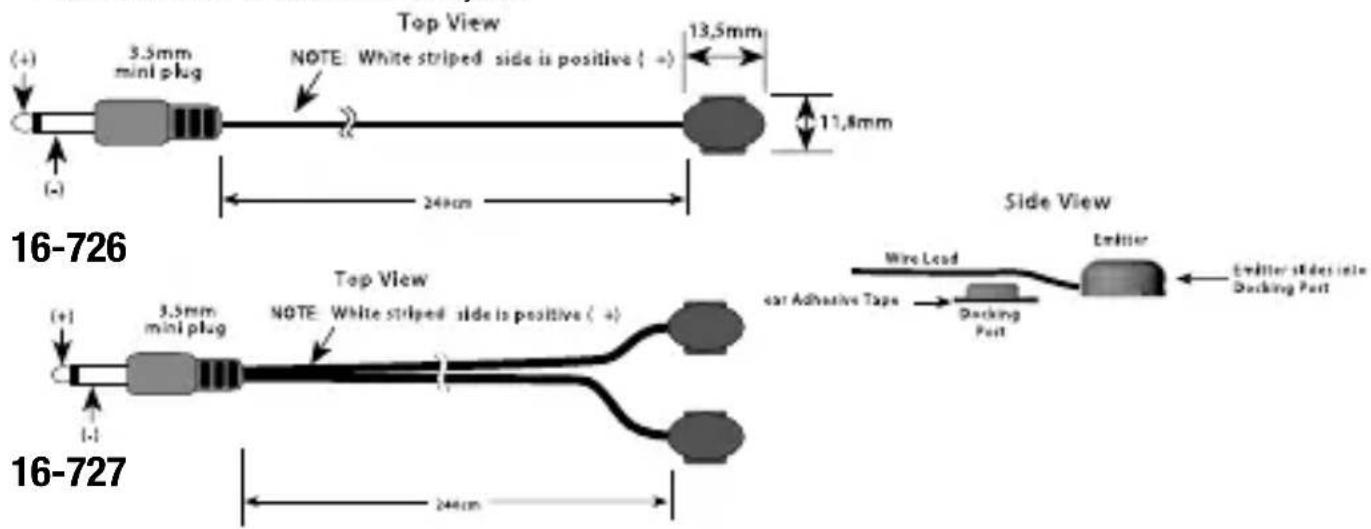
16-726 / 16-727 MINI IR-TRANSMITTER WITH LEDs
Specifications
The simple (16-726) and double (16-727) mini IR-transmitters are fitted with a small IR-LED and a signal LED that light when IR-signals are transmitted. These mini IR-transmitters are integrated in a small, mouse-shaped cover. With its unique, self-adhesive holder, the transmitter is fixed against the IR-receiver of an AV device. If the AV equipment is removed from its cupboard, you only have to slide the mini IR-transmitter out of its cover, without loosening the wiring.
In the 16-727, 2 mini IR-transmitters are provided for a single connection. As a result, 2 AV devices can be controlled.
- The integrated LED blinks when IR-signals are transmitted
- Unique holder to store the mini IR-transmitter safely in its place and to make it easy to remove when necessary.
- Provided with a 3.5mm mini-jack.
EN
16-72X
niko
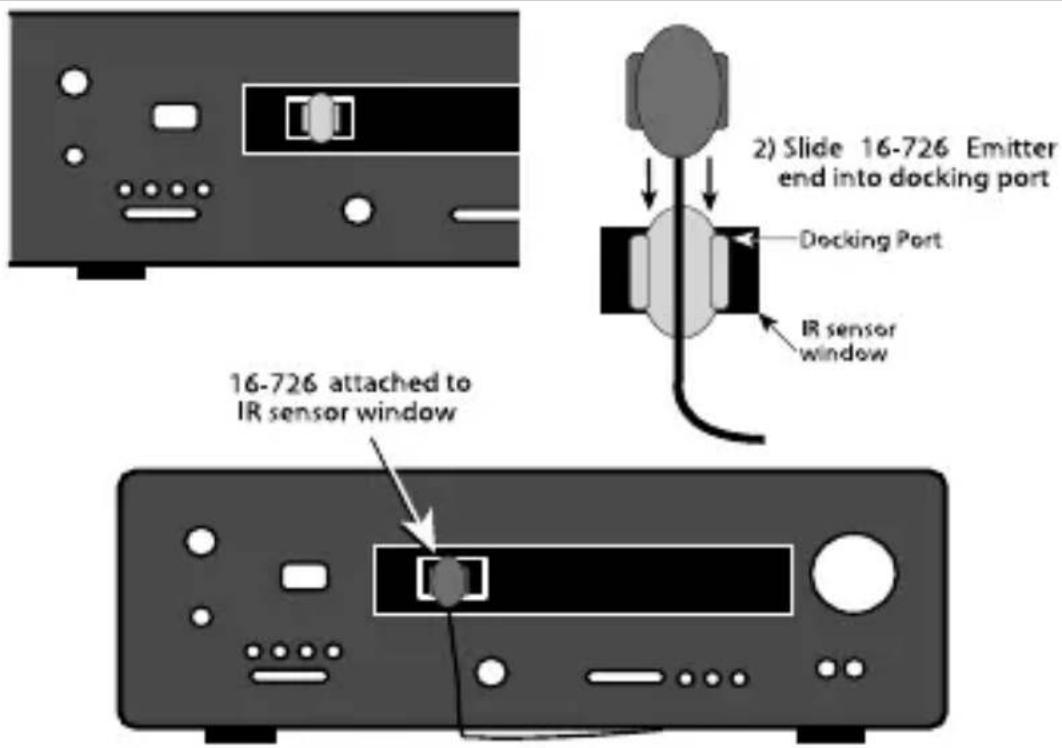
Installation
Locate the IR-receiver of the hi-fi device and clean it if necessary. Remove the strip covering the self-adhesive layer on the bottom of the IR-holder and fix it onto the IR-window of the AV device. Then insert the IR-transmitter into its holder.
The mini-jack plug is plugged into the connection block (16-724) labelled 'EMITTERS'.
Attention: make sure that the dipswitches of the connection block (16-724) are in the 'EM ON' position when the mini IR-transmitter is plugged into the corresponding connection. The 16-726 or 16-727 can be damaged if this jumper is set incorrectly.
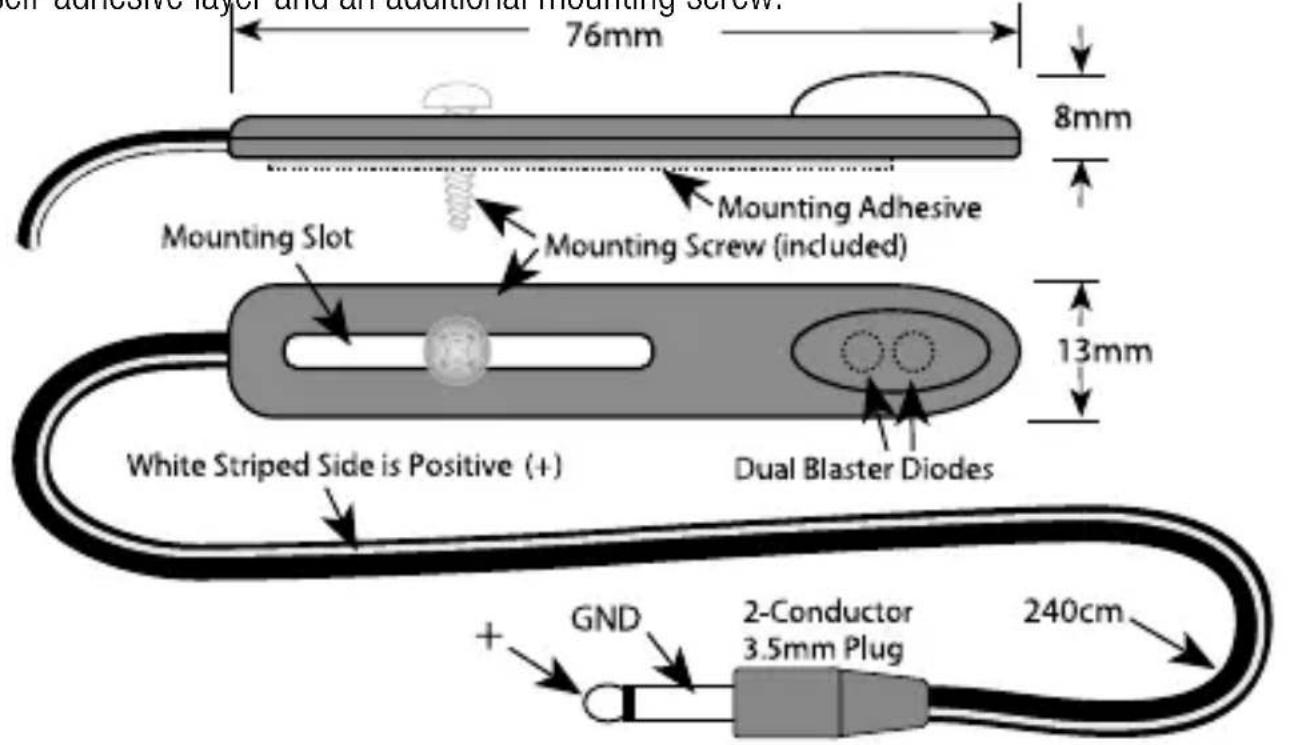
16-728 IR-RADIATOR
Specifications
Unlike the 16-726 and 16-727 mini-IR-transmitters, this IR-radiator is mounted slantingly, either above or below the AV equipment. One IR-radiator can therefore control several AV components. The 16-728 contains 2 powerful IR-diodes, which make it possible to mount it directly in front of the AV components. In this case, it is possible to bridge a distance of up to 10m if the ambient conditions permit this and if there are no obstacles between the IR-radiator and the IR-receivers of the AV equipment. The IR-radiator can be fixed onto a level surface with its self-adhesive layer and an additional mounting screw.
EN
16-72X
niko
Installation
- Mount the AV equipment so that none of the individual components interfere with the IR-reception of the others. Make sure the components are stacked straight and that any shelves on which the equipment is placed stand as far back as possible, so that they do not block the IR-emissions.
- Before permanently mounting the IR-radiator, it is recommended to try out a number of different positions. If necessary, please install a second IR-radiator (see figure p.81).
- Once its optimal position has been selected, the 16-728 can be fixed to a level surface by means of its self-adhesive layer. Where necessary, it can also be secured with an additional screw.
- The 16-728 is plugged into the connection block (16-724) labelled 'Emitters/Blaster',
- The corresponding dipswitch of the connection block (16-724) into which the IR-radiator has been plugged should be set to the 'BL-ON' position.
16-72X
niko
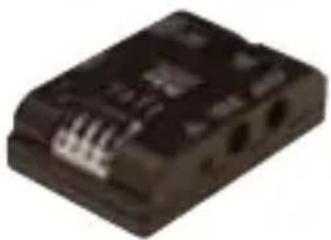
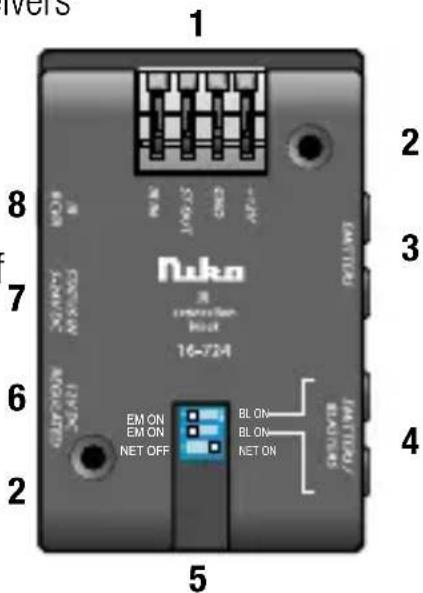
16-724 IR-CONNECTION BLOCK
Specifications
The IR-connection block (16-724) with the power supply block (16-725) supplies the IR-receivers (16-720/16-721/16-722/16-723) with power and distributes the IR-signals to the connected mini IR-transmitters (16-726/16-727).
Connections and installation
-
4-pole plug-in terminal for the connection of the IR-receivers, suitable for wires with diameters between 0,5 and 1,5mm .
-
+12V DC: powers the connected IR-receivers
- GND: common terminal for the power supply, IR-signal and status indication
- ST OUT: output for control of the status LEDs of the IR-receivers
-
IR IN: input for the IR-signal coming from the IR-receivers
-
Fixing holes: This connection block can be fixed to a level surface by means of 2 screws.
-
EMITTERS: Two 3.5mm mini-jacks for the control of the mini IR-transmitter (16-726 and 16-727) at normal power.
-
EMITTERS/BLASTERS: Two 3.5mm mini jacks, for the control of the mini IR-transmitter (16-726 and 16-727) at normal power or the control of the IR-radiator (16-728) at high power.
-
DIPSWITCH (3 positions): The two upper positions of the dip-switch adapt the corresponding mini jack for the connection of an IR-radiator (16-728) or mini IR-transmitter (16-728). The 'BL-ON' position selects the corresponding jack as the connection for the IR-radiator (16-728).
EN
81
16-72X
niko
ATTENTION: The 'BL-ON'-position will set the corresponding outputs to 'high power'. Make sure the dipswitch is in 'EM ON'-position when using the mini IR-transmitter (16-727 or 16-728). Noncompliance with this setting can irreversibly damage the connected mini IR-transmitter.
- 12VDC Regulated: connection for 16-725 12VDC power supply. The pin in the middle is +12V.
- STATUS IN 5-24VDC: 2.1mm DC jack for the connection of 5-24 V DC. Used for the connection of the status LEDs of the IR-receivers (16-720 to 16-723).
- IR RCVR: Connection for the 4-pole mini jack of the IR-receivers (16-720 to 16-723).
The connection block (16-724) with its power supply (16-725) is best installed in the immediate vicinity of the audio and video installation to be controlled. The connection block can be secured with 2 screws, for example, in the piece of furniture or rack where the sound equipment is located.
16-72X
niko
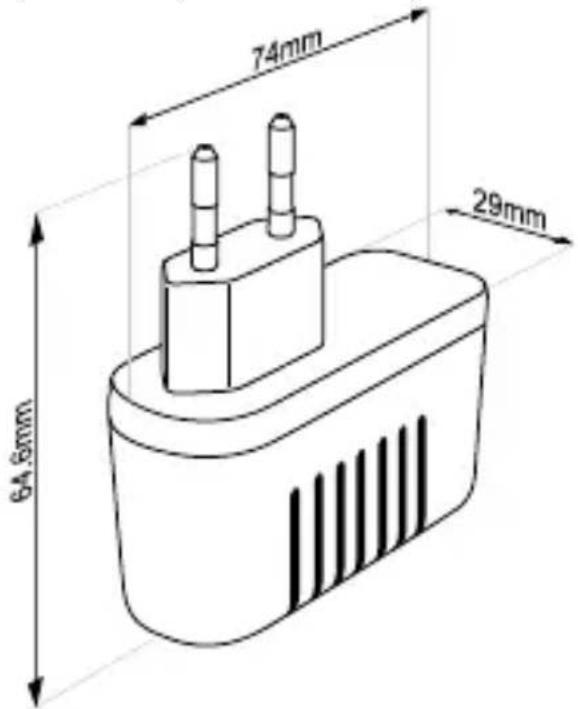
16-725 poWER SUppLy
SpECIFICATIOnS
- 12V stabilised output
- Max. current 700mA
- 2.1mm DC plug
- Input voltage: 100V to 240V
- Frequency: 47 to 63HZ
- Weight: approx. 70g
- Standardisation: EN60950, EN55022, EN61000-4-3, EN1000-4-6
EN
16-72X
niko
WIRING AND INSTALLATION
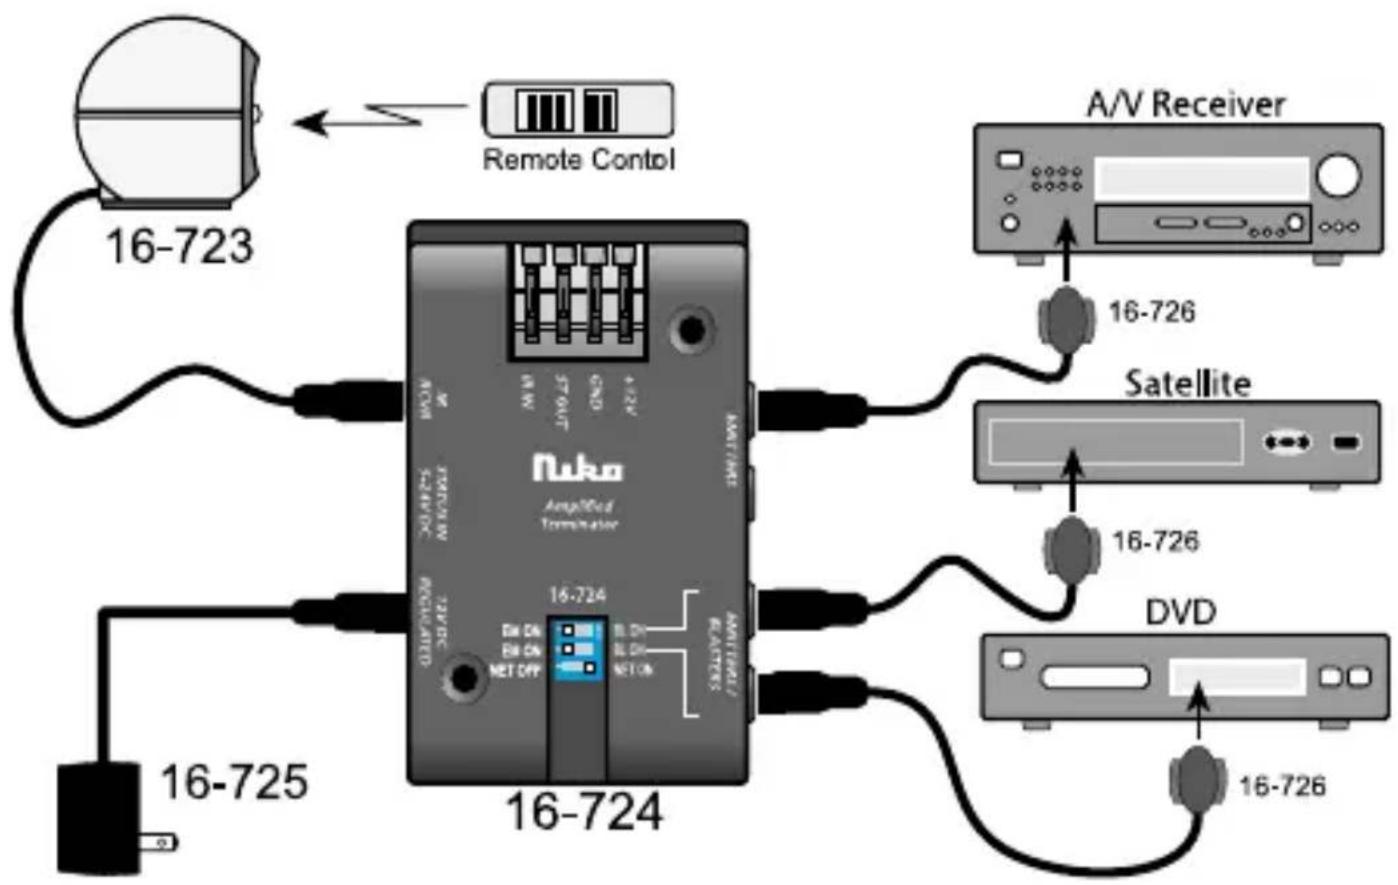
Basic installation
This installation does not require extensive wiring. This set-up is used in situations where the audio and video equipment is installed in a closed cupboard, and IR-operation is desired.
EN
16-72X
niko
- Place the IR-receiver (16-723) in a visible position on the AV rack.
- Plug the mini-jack (16-723) of the IR-receiver into the connection of the IR-connection block (16-724) labelled 'IR RCVR'.
- Plug the mini-jack of the mini IR-transmitters (16-726 or 16-727) into the connections of the 16-724 IR-connection block labelled 'Emitters'.
- Set the dipswitches of the 16-724 IR-connection block to 'EM ON' and 'NET ON' or 'NET OFF'.
- Connect the power supply block (16-725) to the IR-connection block labelled '12V DC'. The system is now ready for use.
Configuration of several zones
If you wish to use the IR-remote control of your audio and video equipment from rooms other than the room in which the audio and video equipment is actually set up, it is possible to make use of the wired solution with several IR-receivers.
- Run a 4-wire BUS cable (min. 0.5mm copper diameter per wire, 0.8mm recommended) to the different locations where the IR-receivers (16-720, 16-721, 16-722, 16-723) are set up. If this cable is of the Cat. 5e type, the total cable length of the installation (i.e., the sum of the lengths of all individual cables) will be limited to 300m .
- Connect the 4-wire connection wire of the IR-receivers to the 4-wire BUS cable. To do this, you can use the optional connector print (16-729). The 4-pole mini-jack of the IR-receiver is plugged in here. The BUS cable can then be connected by means of screw connectors. If the standard connection wire of the IR-receiver is too long, it can be shortened. In this case, the insulation of the individual wires of the IR-receiver must be removed. When doing so, pay attention to the correct connection of +12V , GND, IR and status, and the colors of these wires when connecting them to the BUS cable.
EN
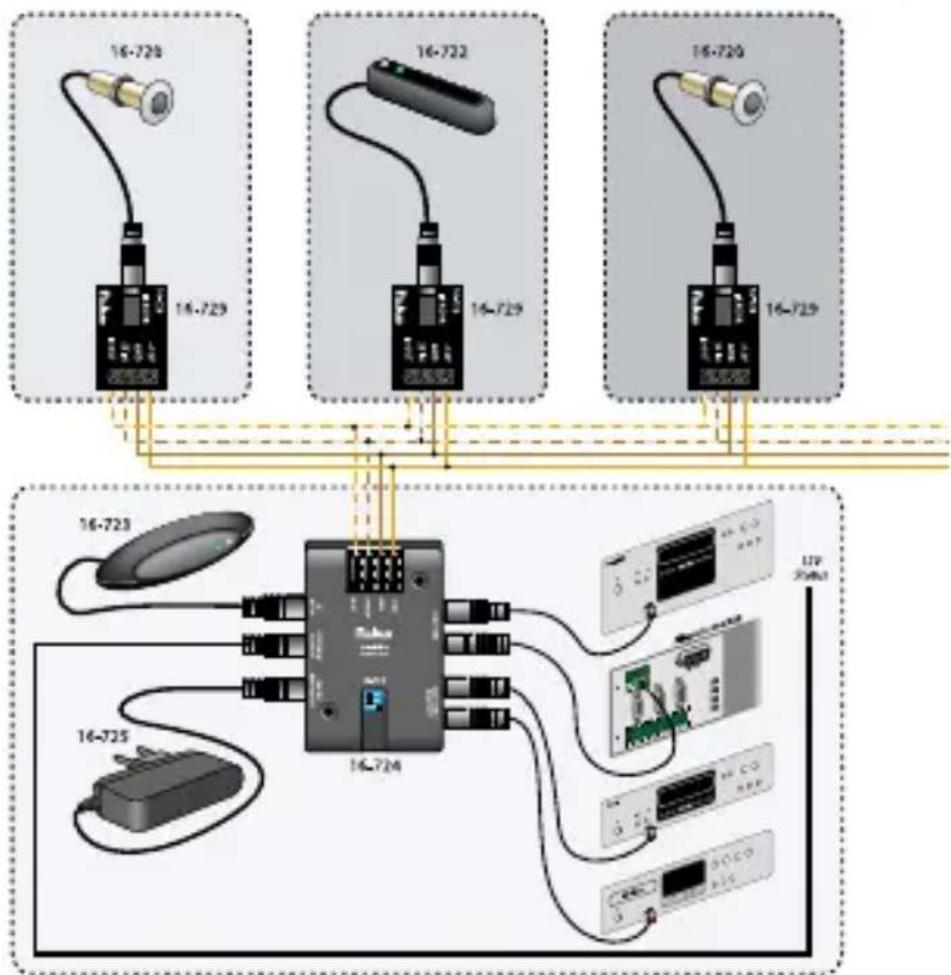
- Connect the 4-wire BUS cable with the IR-connection block, paying attention to the correct connection of the +12V , GND, IR and the status signal.
- Plug the mini jack of the mini IR-transmitters (16-726 or 16-727) into the connections labelled 'Emitters' on the IR-connection block (16-724).
- Set the dipswitches of the IR-connection block (16-724) to 'EM ON' and 'NET ON'.
16-72X
niko
- Plug the mini jack of the IR-receiver (16-720) into the connection on the IR-connection block (16-724) labelled 'IR RCVR'.
- Connect the power supply block (16-725) to the IR-connection block labelled '12V DC'. The system is now ready for use.
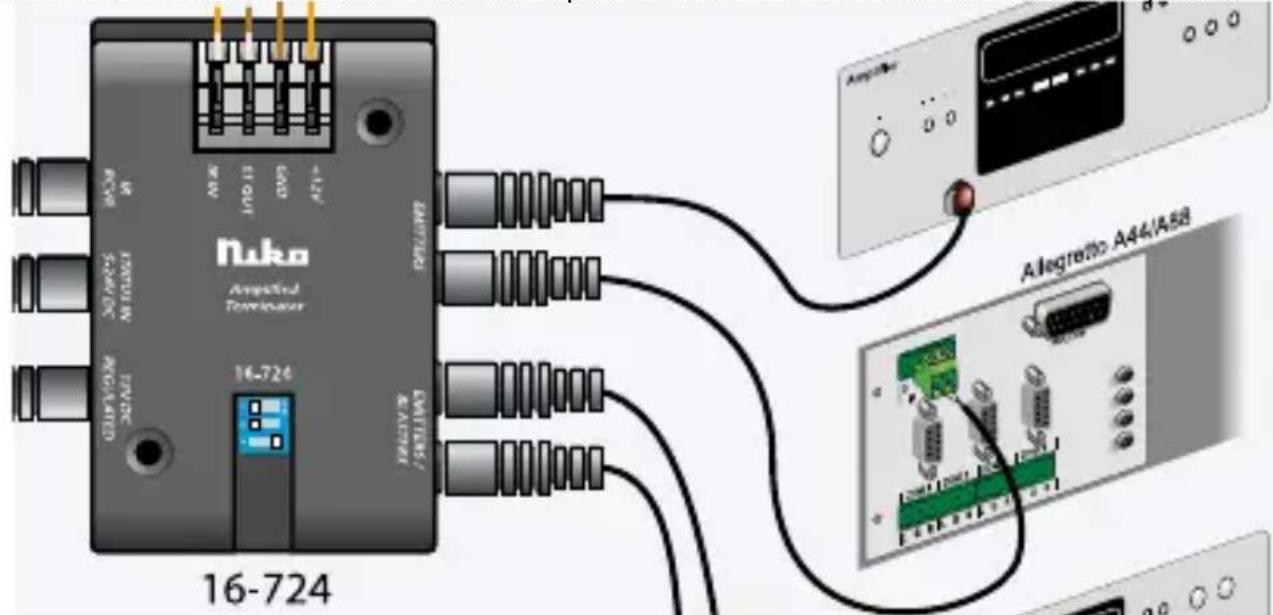
Control of the Niko audio distribution system A44 or A88 via IR
It is also possible to control the Niko audio distribution system A44/A88 via the IR-signal distribution system. To do this, connect one of the outputs of the connection block (16-724) labelled EMITTERS to the 2 terminals of the 'Direct Infrared' input of the A44 or A88 audio distribution system.
Remarks concerning installation and use
- In some cases, plasma screens can emit undesired IR-interference signals. This could disturb the IR-reception of the IR-receivers 16-720 to 16-723. You should therefore carefully consider where you place the IR-receivers.
EN
16-72X
niko
- Two audio or video devices of the same type and brand cannot be used with one single IR-installation, as they will react to the same IR-code.
- Remark regarding power consumption: The standard power supply (16-725) can supply a maximum power of 700mA . Therefore, take into account the following average power consumptions per component:
IR-receivers (16-720 to 16-724): 6mA
Mini IR-transmitter (16-726): 15mA
Mini IR-transmitter (16-727): 30mA
IR-radiator: 150mA
Example of a correct installation:
An installation with 6 IR-receivers, 2 mini IR-transmitters (16-726) and 2 IR-radiators therefore typically requires a power supply of: 6 × 6mA + 2 × 15mA + 2 × 150mA = 366mA .
GUARANTEE pRovIsloNS
- Period of guarantee: 2 years from date of delivery. The delivery date is the invoice date of purchase of the product by the consumer. If there is no invoice, the date of production applies.
- The consumer is obliged to inform Artsound in writing about the defect, within two months after stating the defect.
- In case of a failure to conform, the consumer has the right to a repair or replacement (decided by Artsound) free of charge.
- Artsound cannot be held liable for a defect or damage as a result of an incorrect installation, improper or careless use or wrong usage or transformation of the goods.
- The compulsory regulations of the national legislation concerning the sales of consumer goods and the protection of the consumers in the countries where Artsound sells, directly or via sister or daughter companies, chain stores, distributors, agents or permanent sales representatives, take priority over the rules and regulations mentioned above.
niko
16-720 / 16-721 / 16-722 / 16-723 / 16-724
16-725 / 16-726 / 16-727 / 16-728 / 16-729
16-72X
niko
nv Niko sa
Industriepark West 40, BE-9100 Sint-Niklaas, Belgium
tel.: + 32 3 778 90 00 — fax: + 32 3 777 71 20
e-mail: support@Niko.be — www.niko.be
PM016-72X00R08171