D 20.485.02 - Radio PEHA - Free user manual and instructions
Find the device manual for free D 20.485.02 PEHA in PDF.

User questions about D 20.485.02 PEHA
0 question about this device. Answer the ones you know or ask your own.
Ask a new question about this device
Download the instructions for your Radio in PDF format for free! Find your manual D 20.485.02 - PEHA and take your electronic device back in hand. On this page are published all the documents necessary for the use of your device. D 20.485.02 by PEHA.
USER MANUAL D 20.485.02 PEHA
natural_image
Technical line drawing of a mechanical housing assembly with circular components and mounting holes (no text or symbols)
natural_image
Technical line drawing of a mechanical housing with circular components and mounting holes (no text or symbols)Hinweise:
230V\~/50Hz

Hinweise:
natural_image
Technical line drawing of an open electronic device with internal components and a curved cable (no text or symbols)1.1 Application 26
1.2 Guarantee conditions .....27
1.3 Safety 28
2 Description 29
2.1 Technical specifications .....29
2.2 Layout and symbols 30
2.3 Extension function .....31
2.4 Troubleshooting 32
3 Assembly and installation 33
3.1 Step 1 ....33
3.2 Step 2 34
3.3 Step 3 35
4 Idle state 36
4.1 Radio OFF 36
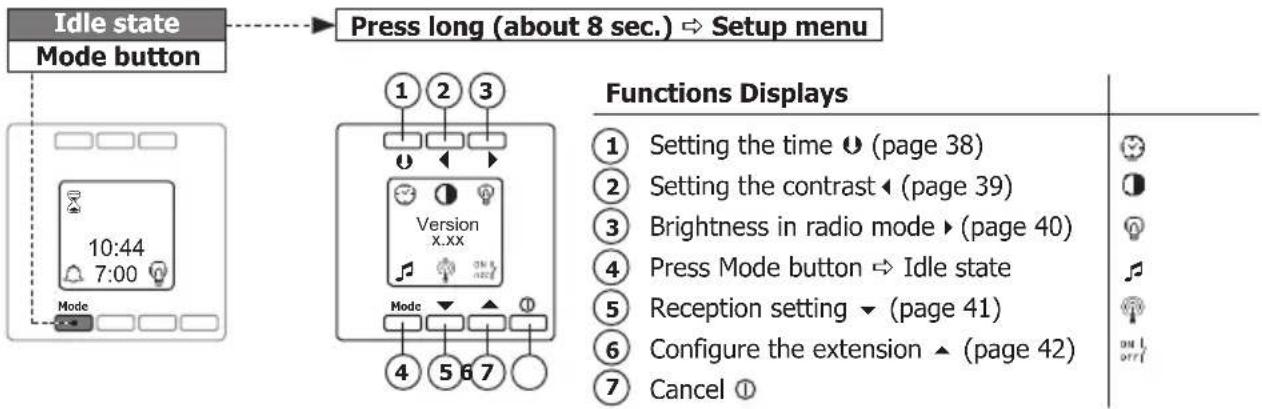
4.2 Setup menu 37
4.2.1 Setting the time....38
4.2.2 Setting the contrast....39
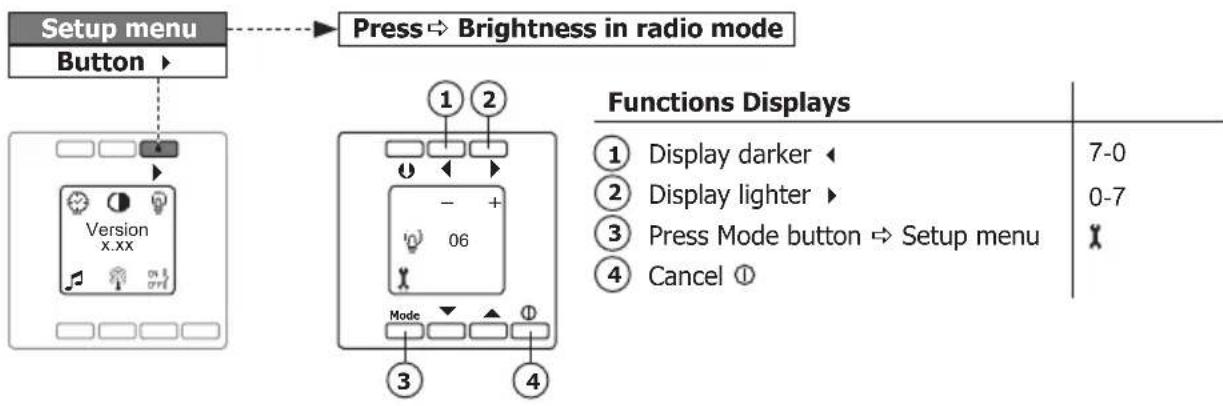
4.2.3 Brightness in radio mode....40
4.2.4 Reception setting....41
4.2.5 Configuring the extension....42
4.3 Sleep timer 43
4.3.1 Operating....44
5 Radio mode 45
5.1 Radio ON 45
5.2 Station memory 46
5.3 Setting the alarm 47
5.4 Alarm mode 48
General
GB
1.1 Application
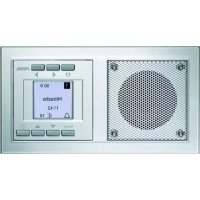
The radio is used for example in private rooms (bathroom, kitchen, bedroom) or as a fixture in a hotel room. All functions of the radio can be easily set by pressing buttons. Settings and current information are shown in the lit display (e.g. time, radio functions and alarm function).
- FM-RDS radio (87.5 to 108.0 MHz) • Extension function
- Station memory (6 stations) • Vertical or horizontal installation with rotatable display unit
- Time display
- 2 flush boxes necessary
- Alarm function
- 230 V\~/50 Hz connection necessary
- Sleep timer
- Special glass and stone frames available as accessories
Available in Aura basis design in the colours pure white, aluminium, anthracite:
Pure white 20.485.02 RADIO
Anthracite 20.485.64 RADIO
Aluminium 20.485.70 RADIO

General
1.2 Guarantee conditions
These operating instructions are an integral part of both the device and our terms of warranty. They must be furnished to the user. The technical design of the appliance is subject to change without prior notification. PEHA products are manufactured and quality-checked with the latest technology according to applicable national and international regulations. Nevertheless, if a product should exhibit a defect, PEHA warrants to make remedy as follows (regardless of any claims against the dealer to which the end-user may be entitled as a result of the sales transaction):
In the event of a justified and properly-established claim, PEHA shall exercise its prerogative to either repair or replace the defective device. Further claims or liability for consequential damages are explicitly excluded. A justifiable deficiency is one in which the device exhibits a structural, manufacturing, or material defect that makes it unusable or substantially impairs its utility at the time it is turned over to the end-user. The warranty does not apply to natural wear, unintended usage, incorrect connection, device tampering or the effects of external influences. The warranty period is for 24 months from the date of purchase by the end-user from a dealer and ends not later than 36 months after the device's date of manufacture. German law is applicable for the settlement of warranty claims.
General
GB
1.3 Safety
This device is only intended to be used for its stated application. Unauthorised conversions or changes are forbidden! Disposal of the device must be done in compliance with the laws and standards of the country in which the device is operated!

CAUTION! Danger of electrical shock! Current-carrying components are present inside the housing. Contact can lead to personal injury! All work on the mains network and the device may only be done by an authorised electrician.
- Remove power from the device.
-
Secure the device against being powered on again.
-
Check that the device is powered off.
- Close the housing securely before applying power.
The following must be observed:
• Prevailing statutes, standards and regulations.
• State of the art technology at the time of installation.
- The device needs to be protected from water drips and spray.
- The device's operating instructions.
- Operating instructions can only cite general stipulations. These are to be viewed in the context of a specific system.
GB
Description
2.1 Technical specifications
Reception frequency 87.5 - 108.0 MHz
Power supply 230V\~ / 50 Hz
Own consumption 1.5 W (standby)
Temperature range 0-50 °C
Test specifications EN 55020, EN 55013
Approvals CE
Protection class IP 20
Dimensions in mm 155 x 83 x 45
Description
GB
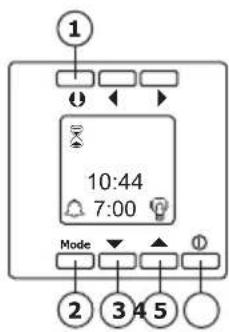
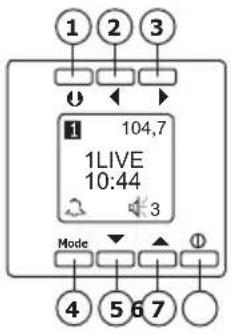
2.2 Layout and symbols
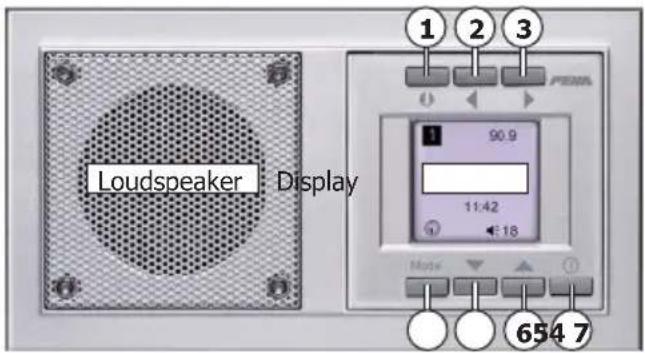
① - ⑥ Function buttons
⑦ ON/OFF button
Function Symbol
| Sleep timer | |
| Radio mode | |
| Alarm ON | |
| Alarm OFF | |
| Alarm ON with alarm time | 7:00 |
| Setting the alarm | |
| Setup menu | |
| Setting the time | |
| Setting the contrast | |
| Setting the brightness | |
| Reception setting | |
| Configuring the extension |
GB
Description
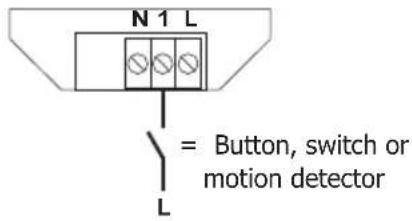
2.3 Extension function
The radio can be switched on and off by an extension. An extension can be a button, a switch or a motion detector. The extension is connected to terminal 1 at the back of the display unit.
| Extension Function | |
| Button Press button | Turn radio on/off |
| Switch Switch ON | Turn radio onSwitch OFF Turn radio off |
| Motion detector | On signal Turn radio onOff signal Turn radio off |
Notes: - The extension is preconfigured as a switch (configuration on page 42).
- A motion detector has to be configured as a switch!
Description
GB
2.4 Troubleshooting
- The radio reception can be impaired by devices that emit high-frequency signals (e.g. network adapter and computer). Keep at least a 0.5 metre distance.
- Check the surroundings of the radio for devices that may emit interferences.
- Check circuit breaker and power supply (only electrician).
- Check connection lines (only electrician).
• Install the radio at a location where the radio reception is better (only electrician).
Contact
Telephone: .....+49 (0)2351 185-0
Fax: ....+49 (0)2351 27666
Note: Before installation, check whether there is a good radio reception at the installation site!
GB
Assembly and installation
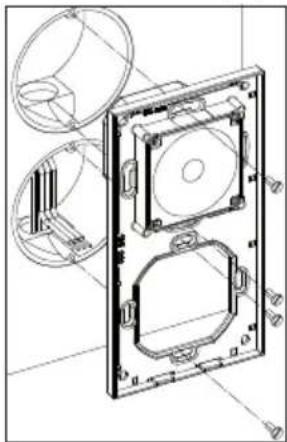
3.1 Step 1
The radio has to be mounted permanently (e.g. in a wall). It is suitable for vertical or horizontal installation because of the rotatable display unit. Two in-wall installation electrical outlets are needed with 60 mm ∅.
natural_image
Technical line drawing of a mechanical housing assembly with circular components and mounting holes (no text or symbols)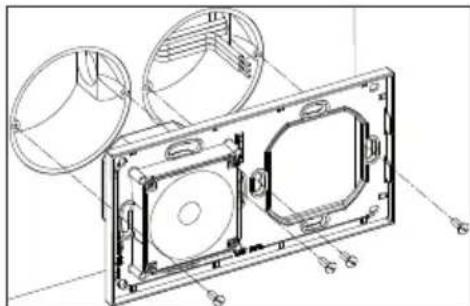
natural_image
Technical line drawing of a mechanical housing assembly with circular components and mounting holes (no text or symbols)Notes:
- The safety instructions (page 28) must be observed at installation.
- Before installation, check whether there is a good radio reception at the installation site!
- Install in-wall installation electrical outlets at the suitable location vertically or horizontally.
- Insert base with loudspeaker into the electrical outlet and screw tight.
Assembly and installation
GB
3.2 Step 2
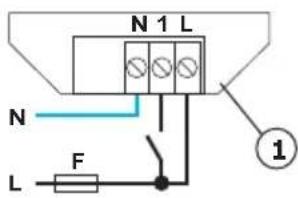
230 V\~/50 Hz

Notes:
- During the installation to the mains (230 V/50 Hz\~) the electrical system has to be without voltage.
- Secure the power line (230 V\~/50 Hz) with a circuit breaker (max. 16 A).
-
Please note! Ensure phase balance of the extension!
-
Attach the supply line to terminal L, N on the back of the display unit (1).
If desired an extension (button, switch or motion detector) can be attached to terminal 1. - Insert loudspeaker line side-wise into the socket of the display unit (2).
- Snap display unit into the base (3).
• To disassemble the display unit, snap out the display unit by pressing lightly and take out.
GB
Assembly and installation
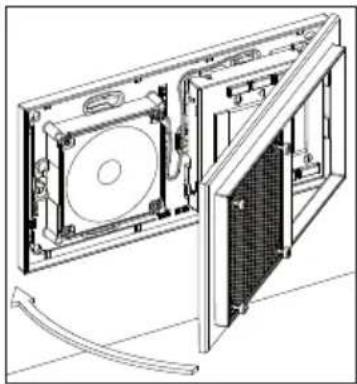
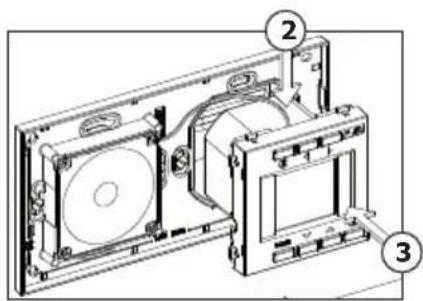
3.3 Step 3
natural_image
Technical line drawing of an open electronic device with internal components and a curved cable (no text or symbols)- Snap the frame with the loudspeaker cover into the base on the side. - Screw the frame to the base with the enclosed hexagon socket screw key (2 mm) (aligned with the loudspeaker cover).
The radio is available in the frame colours pure white, aluminium and anthracite in AURADesign. Special glass and stone frames are also available as accessories.
Colour Art. no.
Pure white 20.485.02 RADIO
Anthracite 20.485.64 RADIO
Aluminium 20.485.70 RADIO
Idle state
GB
4.1 Radio OFF (Idle state)
In idle state, a RDS channel search takes place for an automatic setting of the clock and summer/winter time. The updating of the time by RDS signal may take various minutes. When the RDS signal is low or the radio station lies in another time zone, set the clock manually (page 38).
Functions Displays
① Activate sleep timer ⬆ (Page 43)
② Press Mode button briefly (about 1 sec.) Alarm OFF/ON with alarm time Press Mode button longer (about 8 sec.) Setup menu (Page 37)
③ Brightness of the display during idle state darker ▼
④ Brightness of the display during idle state lighter ▲
⑤ Radio ON/OFF ①
GB
Idle state
4.2 Setup menu
To use this function the radio needs to be turned off (idle state) Without any activity the radio switches into idle state automatically after about 10 seconds.
Idle state
GB
4.2.1 Setting the time (setup menu)
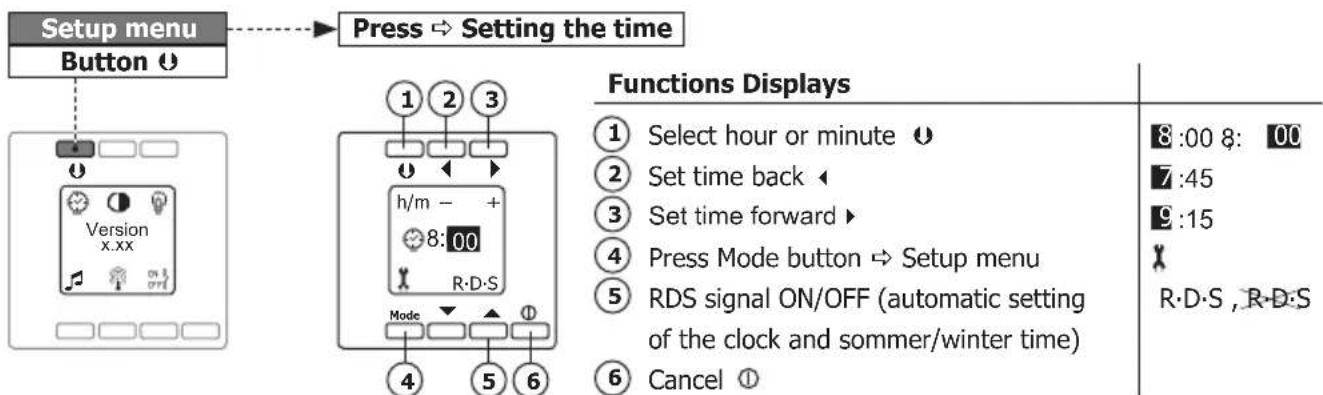
Notes:
- When the RDS signal is low or the radio station lies in another time zone, set the time manually.
- Without any activity the radio switches into idle state automatically after about 10 seconds.

4.2.2 Setting the contrast (setup menu)
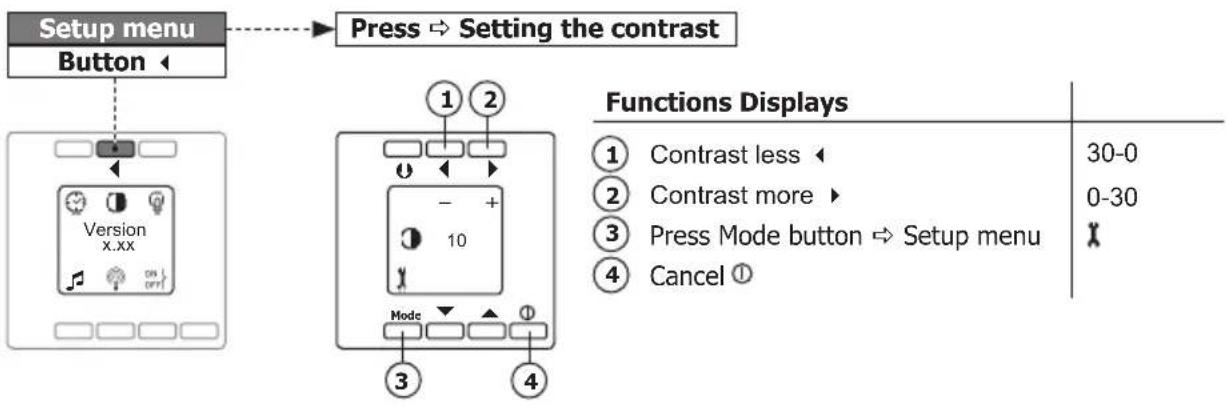
flowchart
graph TD
    A["Setup menu"] --> B["Button"]
    B --> C["1"]
    B --> D["2"]
    C --> E["3"]
    D --> F["4"]
    E --> G["Mode"]
    F --> H["Mode"]
    G --> I["10"]
    H --> J["10"]
    style A fill:#f9f,stroke:#333
    style B fill:#ccf,stroke:#333
    style C fill:#cfc,stroke:#333
    style D fill:#fcc,stroke:#333
    style E fill:#ffc,stroke:#333
    style F fill:#fcc,stroke:#333
    style G fill:#cff,stroke:#333
    style H fill:#ffc,stroke:#333
    style I fill:#cfc,stroke:#333
Note: Without any activity the radio switches into idle state automatically after about 10 seconds.
Idle state
GB
4.2.3 Brightness in radio mode (setup menu)
flowchart
graph TD
    A["Setup menu"] --> B["Button"]
    B --> C["Version x.xx"]
    C --> D["Press ⇒ Brightness in radio mode"]
    D --> E["1 2"]
    E --> F["Mode"]
    F --> G["3"]
    F --> H["4"]
    I["Functions Displays"] --> J["1 Display darker ◀ 7-0"]
    I --> K["2 Display lighter ▶ 0-7"]
    I --> L["3 Press Mode button ⇒ Setup menu ✗"]
    I --> M["4 Cancel Ⓑ"]
Notes: - The ◀ and ▶ buttons (1, 2) are used to set the brightness of the display during idle state.
- Without any activity the radio switches into idle state automatically after about 10 seconds.

4.2.4 Reception setting (setup menu)
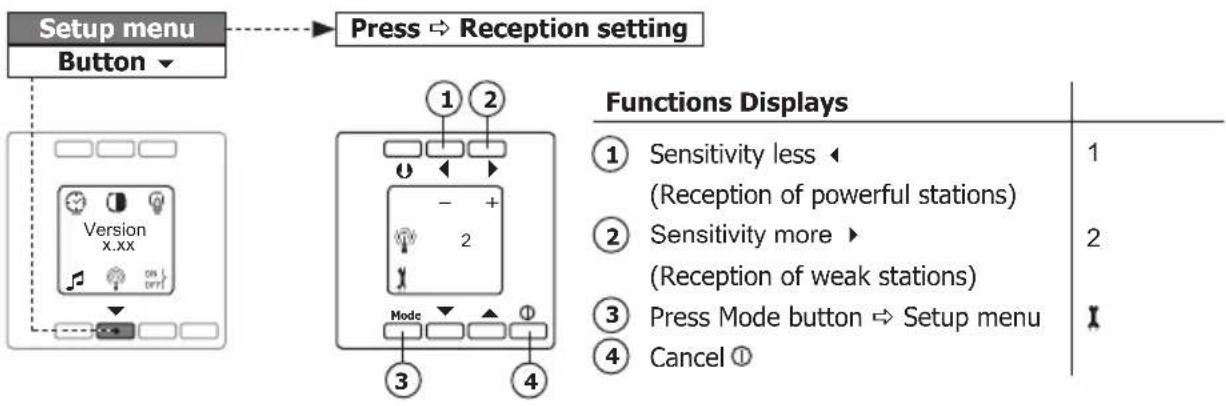
flowchart
graph TD
    A["Setup menu"] --> B["Button"]
    B --> C["Press → Reception setting"]
    C --> D["1 2"]
    D --> E["Mode"]
    E --> F["3"]
    F --> G["4"]
    G --> H["Functions Displays"]
    H --> I["1 Sensitivity less ← (Reception of powerful stations)"]
    H --> J["2 Sensitivity more ► (Reception of weak stations)"]
    H --> K["3 Press Mode button ⇒ Setup menu"]
    H --> L["4 Cancel ①"]
Note: Without any activity the radio switches into idle state automatically after about 10 seconds.
Idle state
GB
4.2.5 Configuring the extension (setup menu)
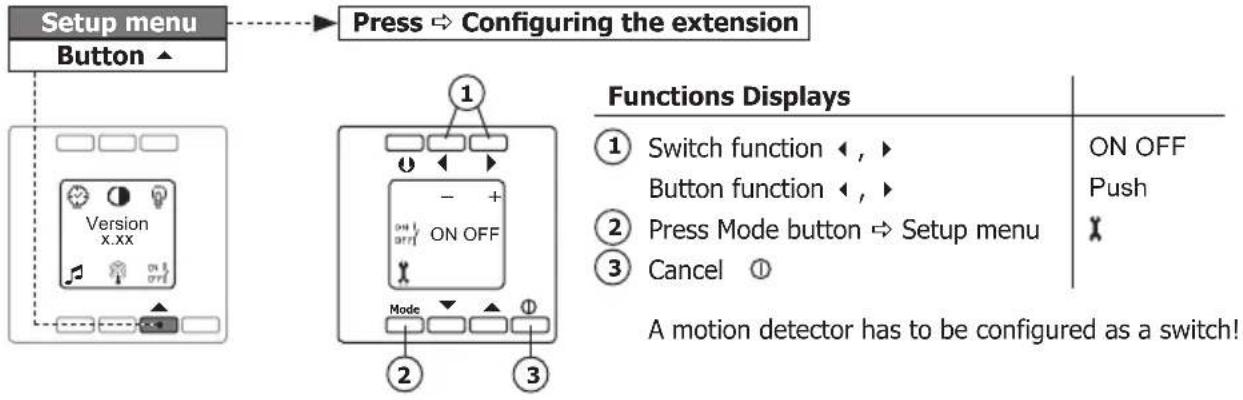
flowchart
graph TD
    A["Setup menu"] --> B["Button"]
    B --> C["Configuration: Press → Configuring the extension"]
    C --> D["Functions Displays"]
    D --> E["Switch function ←, ►"]
    D --> F["Button function ←, ►"]
    D --> G["Press Mode button → Setup menu"]
    D --> H["Cancel ①"]
    H --> I["A motion detector has to be configured as a switch!"]
Notes: - Observe the description and function of the extension (page 31)!!
- Without any activity the radio switches into idle state automatically after about 10 seconds.
GB
Idle state
4.3 Sleep timer
To use this function the radio needs to be turned off (idle state). The radio is switched on for the duration of the sleep time. Without any activity the radio switches into idle state automatically after about 10 seconds.
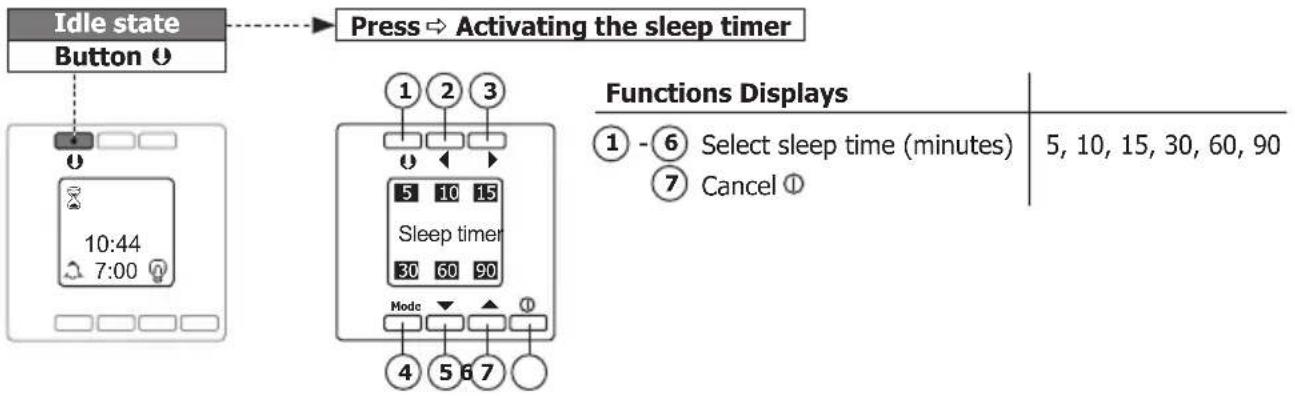
flowchart
graph TD
    A["Idle state Button"] --> B["Press → Activating the sleep timer"]
    C["Clock Display 10:44 7:00"] --> D["1 2 3 Sleep timer 30 60 90 Mode 4 5 6 7"]
    E["Functions Displays 1-6 Select sleep time (minutes) 5, 10, 15, 30, 60, 90"] --> F["Cancel"]
Idle state
GB
4.3.1 Operating (sleep timer)
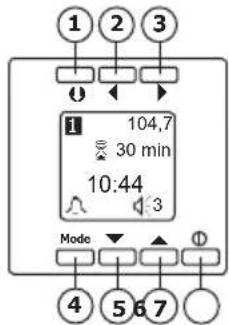
Functions Displays
① Press ⬆ button briefly (about 1 sec.) → Activate memory (page 46)
Press ⬆ button longer (about 8 sec.) → Allocate memory (page 46)
② Search downwards for radio station
③ Search upwards for radio station ▶
④ Press Mode button → Setting the alarm (page 47)
⑤ Volume quieter ▼
⑥ Volume louder ▲
⑦ Sleep timer OFF ①
1 - 6
108.0 - 87.5 MHz
87.5 - 108.0 MHz
[NO TEXT]
30-1
1-30
Note: After the end of the sleep time the radio turns itself off.
GB
Radio mode
5.1 Radio ON (Radio mode)
The display shows the radio station's name (or the frequency) and the time. If the transmitter signal is weak, the display of the station's name (RDS signal) can be slightly delayed or fail to appear. 5.2 Station memory
Functions Displays
① Press ⬆ button briefly (about 1 sec.) → Activate memory (page 46)
Press ⬆ button longer (about 8 sec.) → Allocate memory (page 46)
② Search downwards for radio station
③ Search upwards for radio station ▶
④ Press Mode button → Setting the alarm (page 47)
⑤ Volume quieter ▼
⑥ Volume louder ▲
⑦ Radio OFF/ON ①
1 - 6
108.0 - 87.5 MHz 87.5 - 108.0 MHz

30-1 1-30
Radio mode
GB
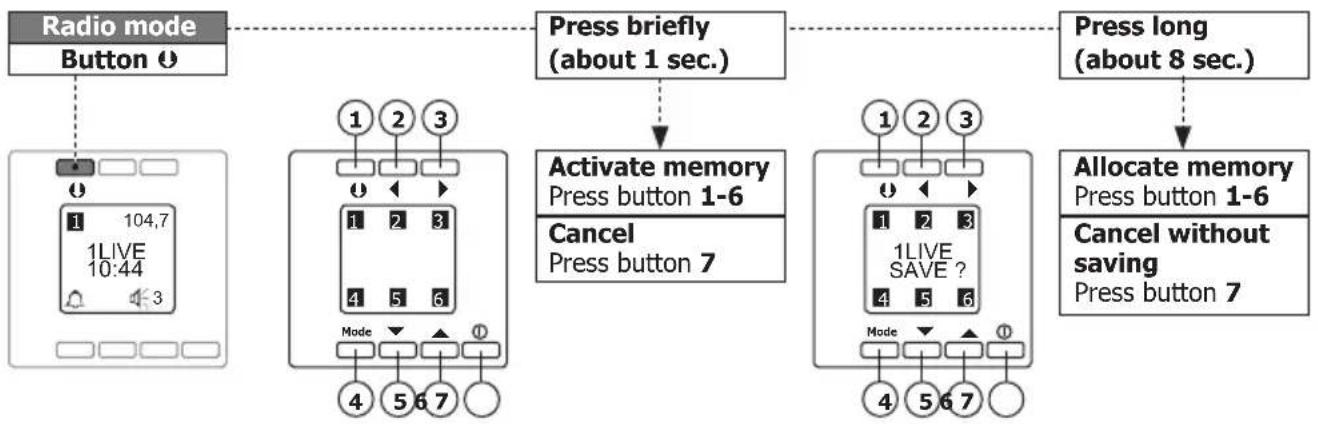
5.2 Station memory
To use this function the radio needs to be turned on (radio mode). Without any activity the radio switches into radio mode automatically after about 10 seconds.
flowchart
graph TD
    A["Radio mode Button"] --> B["Press briefly (about 1 sec.)"]
    B --> C["Activate memory Press button 1-6"]
    B --> D["Cancel Press button 7"]
    C --> E["Press long (about 8 sec.)"]
    D --> F["Allocate memory Press button 1-6"]
    F --> G["Cancel without saving Press button 7"]
GB
Radio mode
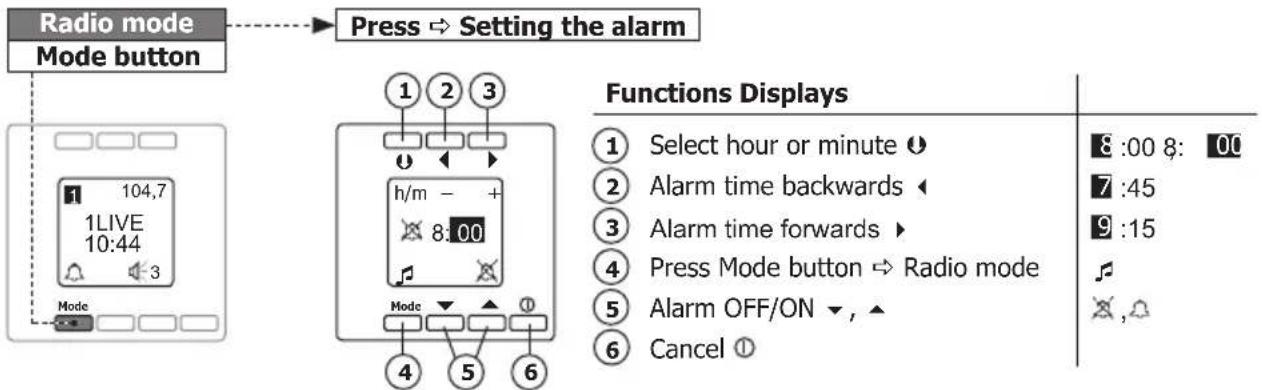
5.3 Setting the alarm
To use this function the radio needs to be turned on (radio mode). Without any activity the radio switches into radio mode automatically after about 10 seconds.
Radio mode
GB
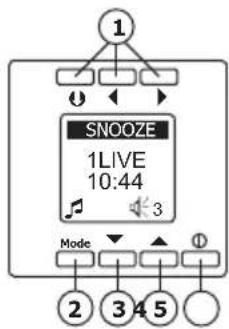
5.4 Alarm mode
The alarm mode last 1 hour. If the snooze function is activated, the alarm mode is switched off for 10 minutes. After that the alarm mode is switched on again.
flowchart
graph TD
    A["1"] --> B["Mode"]
    B --> C["2"]
    B --> D["3"]
    B --> E["4"]
    B --> F["5"]
    B --> G["6"]
    C --> H["SNOOZE 1LIVE 10:44"]
    D --> H
    E --> H
    F --> H
    G --> H
Functions Displays
① Activate snooze function (10 Min.) ⏻, ◀, ▶
② Press Mode button → Radio ON and alarm mode OFF
③ Volume quieter ▼
④ Volume louder ▲
⑤ Radio OFF and alarm mode ON ①
SNOOZE
F
30-1
1-30
Note: Press the ▼ button and ▲ button (3, 4) to set the volume of the radios for the alarm mode.
NL
Inhoudsopgave
1 Algemeen 50
1.1 Toepassing ....50
1.2 Garantiebepalingen ....51
1.3 Veiligheid 52
2 Beschrijving 53
natural_image
Technical line drawing of a mechanical housing assembly with circular components and mounting holes (no text or symbols)
natural_image
Technical line drawing of a mechanical housing assembly with circular components and mounting holes (no text or symbols)230V\~/50Hz
TIP:
natural_image
Technical line drawing of an open electronic device with internal components and a curved cable (no text or symbols)• Mémoire de stations (6 stations)
natural_image
Technical line drawing of a mechanical housing assembly with circular components and mounting holes (no text or symbols)
natural_image
Technical line drawing of a mechanical housing assembly with circular components and mounting holes (no text or symbols)Remarques :
230 V\~/50 Hz

Remarques :
natural_image
Technical line drawing of an open electronic device with internal components and a curved cable (no text or symbols)5.2 Mémoire de stations
natural_image
Technical line drawing of a mechanical housing assembly with circular components and mounting holes (no text or symbols)
natural_image
Technical line drawing of a mechanical housing assembly with circular components and mounting holes (no text or symbols)Obs!
23 0V\~/50 Hz