
HearPlus 333cl - Alarm clock radio DORO - Free user manual and instructions
Find the device manual for free HearPlus 333cl DORO in PDF.

| Product type | Radio alarm clock with digital and analog display |
| Brand | Doro |
| Model | HearPlus 333cl |
| Dimensions | 114 mm x 127 mm x 94 mm |
| Weight | 567 g (with batteries) |
| Mains power supply | Mains power adapter (included) |
| Backup power supply | 4 AA alkaline batteries 1.5 V (not included) |
| Battery life | Approximately 1 year (display and backlight off) |
| Time setting | Automatic via radio signal RCC, manual optional |
| Time zones | GMT, GMT+1, GMT+2, disabled |
| Alarm types | Audible, flashing, vibrator (if connected), external |
| Snooze function | Yes, repeat every 9 minutes |
| Phone alarm | Triggered by incoming call (if connected to telephone line) |
| Alarm volume | Low, normal, high, progressive |
| Connectivity | Phone jack, line jack, vibrator jack, external alarm jack |
| Compatible accessories | Doro HearPlus 55v pillow vibrator, Doro CarePlus/SeePlus 314ci external alarm |
| Warranty | 24 months from date of purchase |
| Care | Clean with a dry cloth, avoid humidity, dust, and extreme temperatures |
Frequently Asked Questions - HearPlus 333cl DORO
User questions about HearPlus 333cl DORO
0 question about this device. Answer the ones you know or ask your own.
Ask a new question about this device
Download the instructions for your Alarm clock radio in PDF format for free! Find your manual HearPlus 333cl - DORO and take your electronic device back in hand. On this page are published all the documents necessary for the use of your device. HearPlus 333cl by DORO.
USER MANUAL HearPlus 333cl DORO
natural_image
White digital alarm clock with green hand and black buttons, showing 12 o'clock (no text or symbols beyond clock face)HearPlus
333cl
text_image
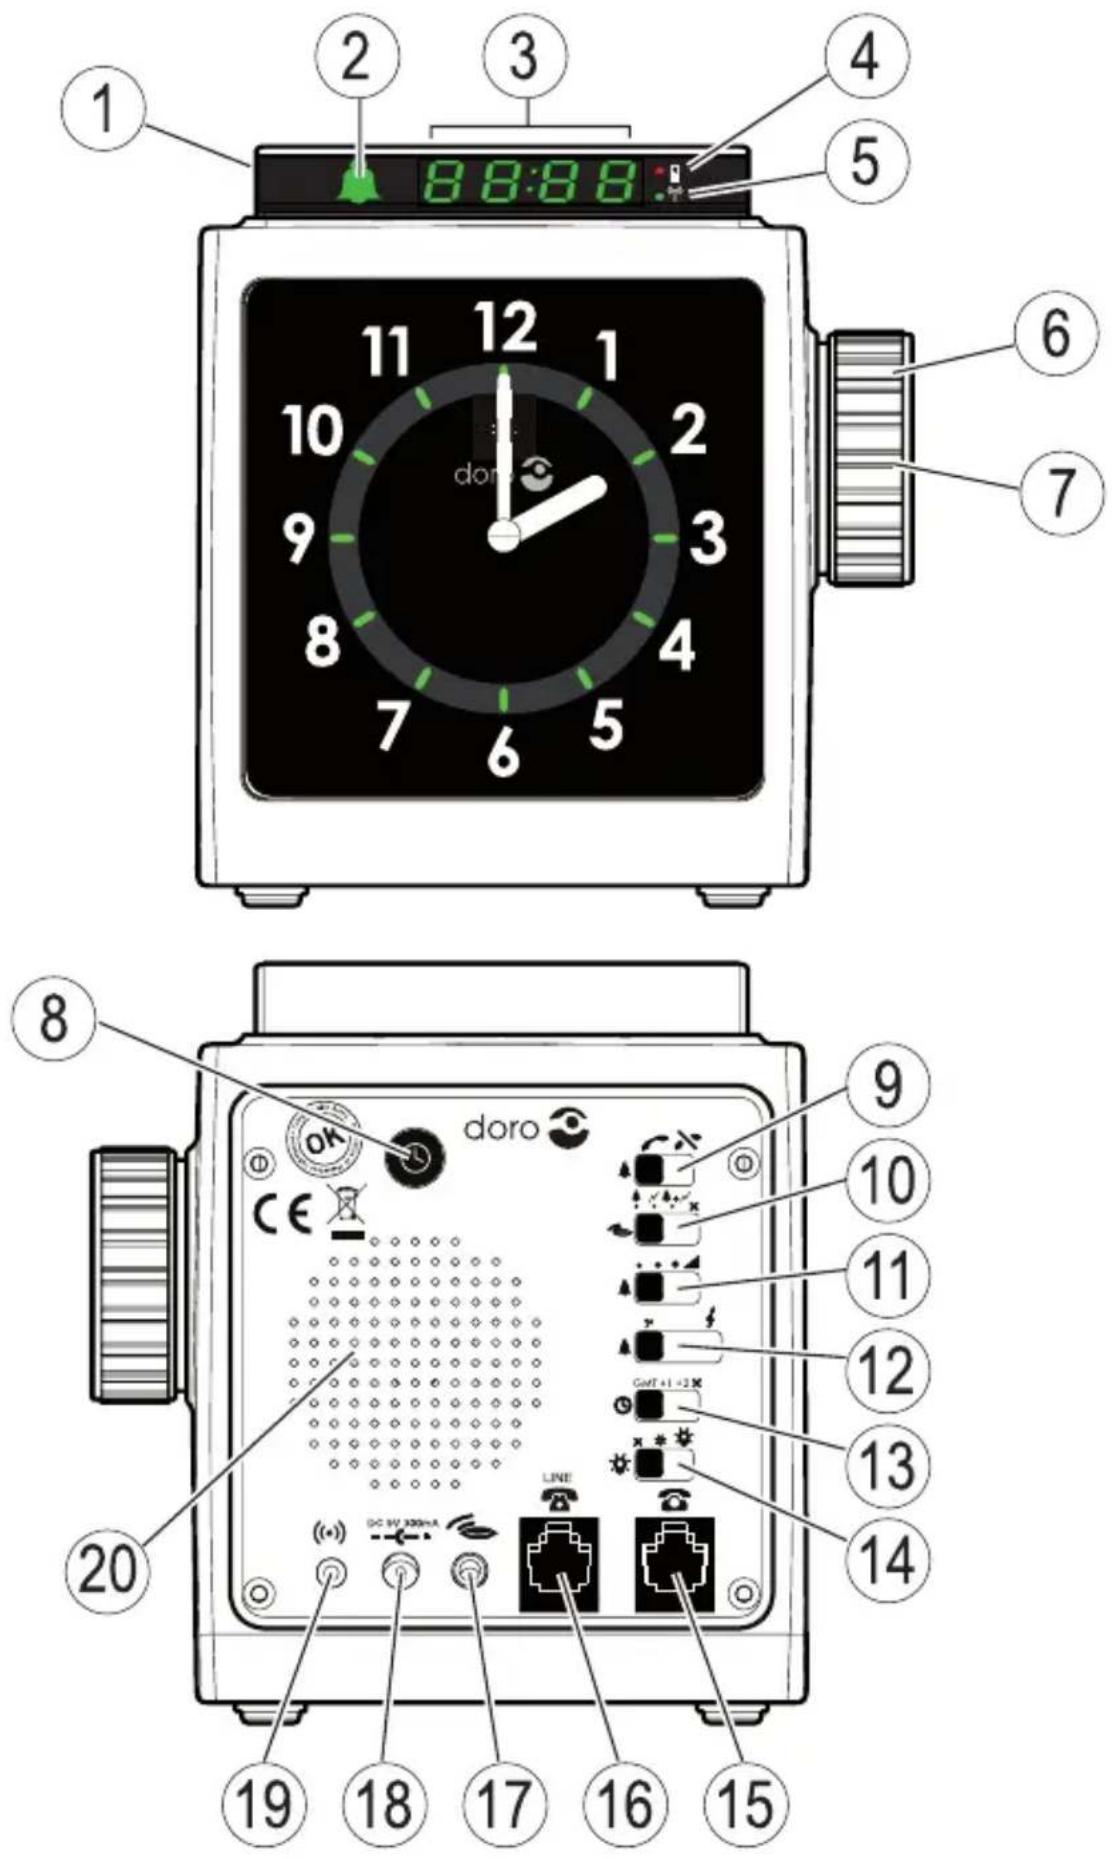
1 2 3 4 5 8:8:8 11 12 1 10 2 dor 9 3 8 4 7 6 5 6 7 ⑥ ⑦ ⑧ doro ⑨ 10 ⑩ ⑪ ⑫ ⑬ ⑭ ⑮ ⑯ ⑰ ⑱ ⑲ ⑳ ㉑ ㉒ ㉓ ㉔ ㉕ ㉖ ㉗ ㉘ ㉙ ㉚ ㉛ ㉜ ㉝ ㉞ ㉟ ㉳ ㉟ ㉟a ㉟b ㉟c ㉟d ㉟e ㉟f ㉟g ㉟h ㉟i ㉟j ㉟k ㉟l ㉟m ㉟n ㉟o ㉟p ㉟q ㉟r ㉟s ㉟t ㉟u ㉟v ㉟w ㉟x ㉟y ㉟z ㉟c ㉟d ㉟eEnglish
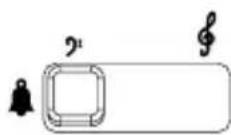
- Alarm switch (display)
- Alarm indicator
- Alarm time
- Battery indicator
- Radio signal indicator
- Jog wheel
- Jog wheel button
- Time set
- Phone alarm on/off
- Alarm type
- Alarm volume
-
Alarm tone
-
Time zone
- Brightness
- Phone socket
- Line socket
- Shaker socket
- Mains adapter socket
- External alarm socket
- Loudspeaker
Svenska
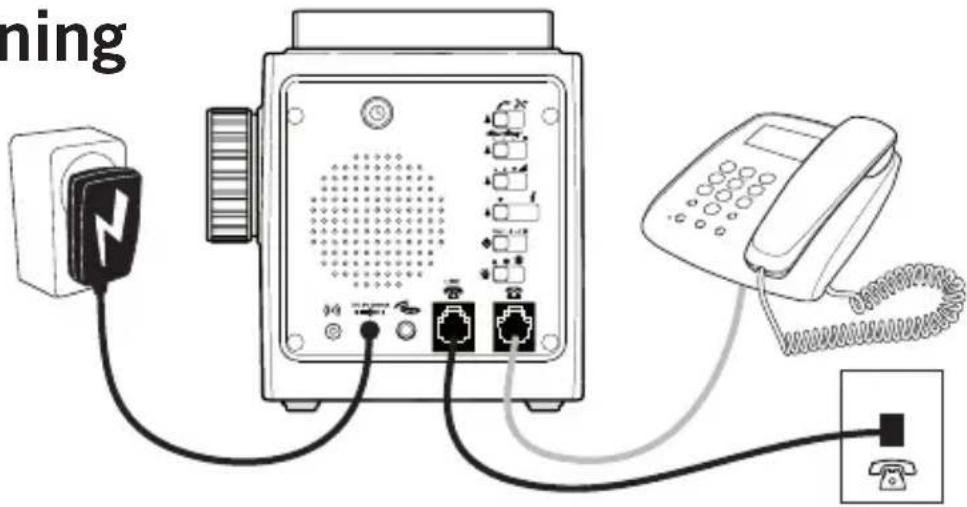
Set the time zone according to Settings/Timezone before connecting the power.
Connect the mains adapter and, if applicable, phone line cords. A plug kit (not included) may be needed.
Batteries
Remove the cover on the underside and install 4 AA 1.5V Alkaline batteries (not included) in accordance with the markings. The batteries are used for backup in case of power failure.
The clock can continue to operate for approximately 1 year on batteries. Backlight and display will automatically turn off when the clock is running on batteries only.
Note!
The pillow shaker and flash will not work during power failu
English
Operation
Setting the time
After connecting the power, the time is adjusted automatically by an RCC signal. The indicator will light up on the display. If no RCC signal has been received within 20 minutes, the time should be set manually. The clock will retry automatic time adjustment at night when there is less radio interference.
The automatic time setting can be adjusted for the different time zones in Europe, see Settings/Time zone.
Note!
Automatic time adjustment may not be available at all locations due to obstructions of the radio signal. Place the unit at least 2 meters away from a TV, computer, air conditioner or other household electrical appliances.
The optimal location is near a window, preferably facing Frankfurt/Germany.
Automatic time setting
- Press and hold 📊 until is displayed to update the automatic time adjustment.
Manual time setting
It is not possible to set the time manually while the clock is searching for an RCC signal, please wait until the “” indicator is off.
- Press ⓊThe display will light up and the hours will blink on the display.on the display..
- Turn the jog wheel to set the hours and press the jog wheel button to confirm. The minutes will blink on the display.
- Turn the jog wheel to set the minutes and press the jog wheel button to confirm.
Note!
The adjustment of the analog clock can take up to 30 minutes to complete. During the adjustment, the analog clock will not show the correct time. Do not disconnect the power during adjustment since this could damage the clock.
Setting the alarm time
- Press the jog wheel button. The display will light up and the hours and the symbol will blink.
- Turn the jog wheel to set the hours and press the jog wheel button to confirm. The minutes will blink.
- Turn the jog wheel to set the minutes and press the jog wheel button to confirm.
Turning on the alarm
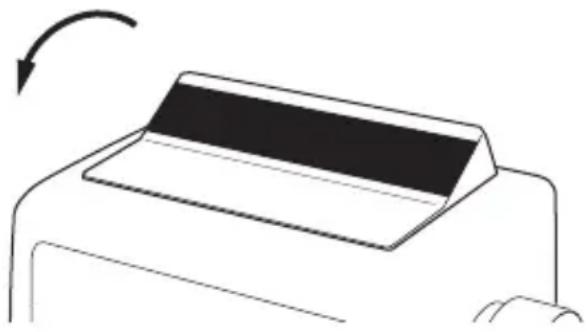
Toggle the alarm switch forward to turn on the alarm. The 📁 symbol and the display will light up.
natural_image
Simple line drawing of a printer or printer with a curved arrow indicating rotation (no text or symbols)Note!
The display will time out after 10 seconds after disconnecting the mains adapter. Press the alarm switch to turn the display on again. The alarm time will not show while the clock is searching for an RCC signal.
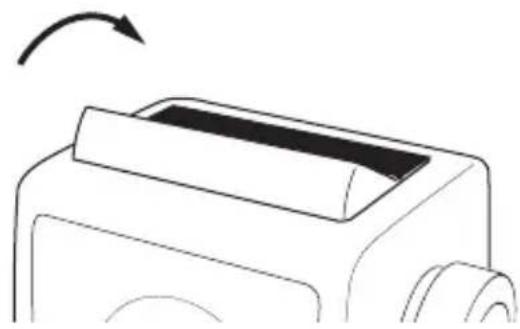
Turning off the alarm
To turn off the alarm, toggle the alarm switch backward.
natural_image
Line drawing of a printer with an arrow indicating rotation (no text or symbols)Note!
The alarm turns off automatically after 9 minutes.
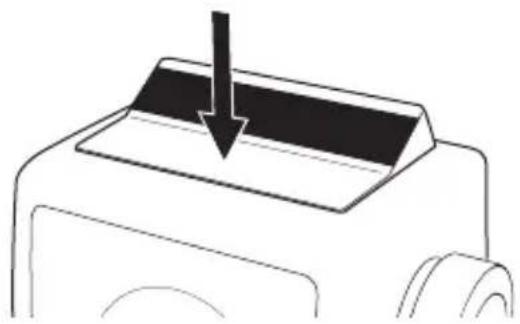
Snooze
When the alarm is heard, press the alarm switch. The alarm will be repeated every 9 minutes until the alarm is turned off.
natural_image
Simple line drawing of a printer with a downward arrow indicating compression or disassembly (no text or symbols)English
Additional functions
External alarm
An external alarm device such as Doro CarePlus or Doro SeePlus 314ci can be connected to the ( ) socket.
If the alarm is not turned off or snoozed within 9 minutes, the external alarm will be triggered.
Pillow shaker
A pillow shaker such as Doro HearPlus 55v can be connected to the socket. See Settings/Alarm mode on how to enable/disable the shaker.
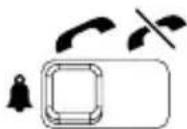
Phone alarm
If the clock is connected to the phone line, incoming calls will trigger the alarm. See Settings/Phone alarm on how to enable/disable the phone alarm function. The sound and flash signals are determined by the Alarm mode setting when the phone alarm is ON.
English
Settings
Phone alarm
 | Phone alarm ON |
 | Phone alarm OFF |
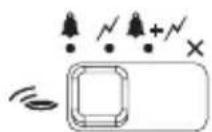
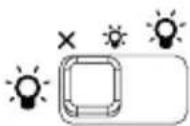
Alarm mode
| × | Shaker only (if connected) | |
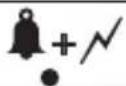 | Sound + Flash (+ Shaker if connected) | |
 | Flash (+ Shaker if connected) | |
| [ASCH] | Sound (+ Shaker if connected) | |
Alarm volume
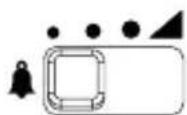
 | Low |
| [BXHC] | High |
 | Very High |
 | Gradually increasing alarm volume. |
Alarm tone
| ? | Low frequency |
| ∮ | High frequency |
Time zone
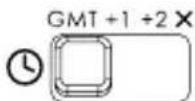
The radio controlled time setting (RCC) can be adjusted for time zone differences.
| GMT | GMT (London, Dublin...) |
| +1 | GMT + 1 hour (Stockholm, Berlin, Paris...) |
| +2 | GMT + 2 hours (Helsinki, Athens...) |
| X | Automatic time adjustment disabled. Time must be set manually. |
Note!
The automatic adjustment (RCC) can take up to 30 minutes to complete. During the adjustment, the analog clock will not show the correct time.
Backlighting
The backlighting brightness setting also affects the LED display.
 | No backlighting. Pressing the alarm switch will turn on the backlighting for 10 seconds. |
 | Dimmed backlighting.Pressing the alarm switch will change to bright backlighting for 10 seconds. |
 | Bright backlighting. |
If the mains adapter is disconnected, backlighting is automatically turned off to save battery power. Press the alarm switch to turn on the lights for 10 seconds.
English
Care and maintenance
Your unit is a technically advanced product and should be treated with the greatest care. Negligence may void the warranty.
- Protect the unit from moisture. Rain/snowfall, moisture and all types of liquid can contain substances that corrode the electronic circuits. If the unit gets wet, you should remove the mains power and the batteries and allow the unit to dry completely before you replace it.
- Do not use or keep the unit in dusty, dirty environments. The unit's moving parts and electronic components can be damaged.
- Do not keep the unit in warm places. High temperatures can reduce the lifespan for electronic equipment, damage batteries and distort or melt certain plastics.
- Do not keep the unit in cold places. When the unit warms up to normal temperature, condensation can form on the inside which can damage the electronic circuits.
- Do not try to open the unit in any other way than that which is indicated here.
- Do not drop the unit. Do not knock or shake it either. If it is treated roughly the circuits and precision mechanics can be broken.
- Do not use strong chemicals to clean the unit.
The advice above applies to the unit, battery, mains adapter and other accessories. If the unit is not working as it should, please contact the place of purchase for service. Don't forget the receipt or a copy of the invoice.
English
Troubleshooting
If the digital and analog clock becomes un-synchronized by accident, follow the steps below to restore the synchronization:
- Press and hold 📊nd the alarm switch (snooze) for 5 seconds. The display will light up and the hours will blink on the display.
- Turn the jog wheel to set the hours so that they match the analog clock and press the jog wheel button to confirm. The minutes will blink on the display.
- Turn the jog wheel to set the minutes so that they match the analog clock and press the jog wheel button to confirm.
- The clock is now prepared for either automatic or manual time setting.
English
Warranty and technical data
This product is guaranteed for a period of 24 months from the date of purchase. In the unlikely event of a fault occurring during this period, please contact the place of purchase. Proof of purchase is required for any service or support needed during the guarantee period.
This guarantee will not apply to a fault caused by an accident or a similar incident or damage, liquid ingress, negligence, abnormal usage, non-maintenance or any other circumstances on the user's part. Furthermore, this guarantee will not apply to any fault caused by a thunderstorm or any other voltage fluctuations. As a matter of precaution, we recommend disconnecting the device during a thunderstorm.
Batteries are consumables and are not included in any guarantee.
Use only AA Alkaline batteries of good quality.
Specifications
Size: 114 mm x 127 mm x 94 mm
Weight: 567 g (including batteries)
Battery: 4 x 1.5 V AA Alkaline batteries
Declaration of Conformity
Doro hereby declares that Doro HearPlus 333cl conforms to the essential requirements and other relevant regulations contained in the Directives 1999/5/EC (R&TTE) and 2002/95/EC (RoHS).
A copy of the Declaration of Conformity is available at www.doro.com/dofc
Svenska
Installation
Anslutning
text_image
ningObs!
natural_image
Simple line drawing of a printer with a scroll wheel and an arrow indicating rotation (no text or symbols)Obs!
natural_image
Line drawing of a printer with an arrow indicating rotation (no text or symbols)Obs!
natural_image
Simple line drawing of a printer with a downward arrow indicating compression or disassembly (no text or symbols)Övriga funktioner
Externt alarm
natural_image
Simple line drawing of a printer or printer with a curved arrow indicating rotation (no text or symbols)Merk!
natural_image
Line drawing of a printer with an arrow indicating rotation (no text or symbols)Merk!
natural_image
Diagram of a printer with a downward arrow indicating compression or disassembly (no text or symbols present)Norsk
Tilleggsfunksjoner
Ekstern alarm
En ekstern alarmenhet, for eksempel Doro CarePlus eller Doro SeePlus 314ci kan kobles til kontakten ( )