
Mono X26 - TV Odys - Free user manual and instructions
Find the device manual for free Mono X26 Odys in PDF.
| Product type | 26-inch LED TV with built-in DVD player |
| Brand | Odys |
| Model | Mono X26 |
| Screen size | 26 inches (66 cm) |
| Resolution | 1920 x 1080 pixels (Full HD) |
| Picture format | 16:9 |
| TV reception | DVB-T (Terrestrial), analog TV PAL/SECAM |
| Audio power | 2 x 3 W |
| Connectivity | 2 x HDMI, 1 x VGA, 1 x USB, 1 x SCART, 1 x YPbPr, composite input, PC audio input |
| Disc player | DVD, DVD±R/RW, VCD, CD, MP3, JPEG - Built-in player |
| Dimensions with stand | 572 x 414 x 145 mm (W x H x D) |
| Dimensions without stand | 572 x 373 x 38 mm (W x H x D) |
| Net weight | 4.3 kg |
| Gross weight | 5.5 kg |
| Power supply | 100-240 V, 50/60 Hz |
| Standby consumption | < 0.5 W |
| Wall mounting | VESA compatible (screws not supplied) |
| Main functions | EPG guide, parental control, teletext, USB recording, timer |
| Maintenance | Unplug before cleaning; use a soft dry cloth; no solvents |
| Safety | Do not expose to moisture; do not block ventilation slots; voltage compliant |
| Remote control batteries | 2 x AAA 1.5 V |
Frequently Asked Questions - Mono X26 Odys
User questions about Mono X26 Odys
0 question about this device. Answer the ones you know or ask your own.
Ask a new question about this device
Download the instructions for your TV in PDF format for free! Find your manual Mono X26 - Odys and take your electronic device back in hand. On this page are published all the documents necessary for the use of your device. Mono X26 by Odys.
USER MANUAL Mono X26 Odys
47877 Willich, Germany
T+1:49.1013151-23.21.2
14902154-8836100
108+49(0)2734= 1 Email: info@exing.de
www. axdic.de | www. odys.de
Inhaltsverzeichnis
Installation and Wand
8.3 Einstufung (Rating)
1 Important Safety Instructions 3
2 Front and Rear Panel Illustration 7
2.1 Front panel and Keyborad 7
2.2 Remote Key Function: 8
3 Teletext Function Keys 10
4 System Connections 11
4.1 Connecting to External AV Signal Source 11
4.2 Connecting to External AV Signal Source (Y/PB/PR) 12
4.3 Connecting to External AV Signal Source (SCART) 12
4.4 Connecting to External AV Signal Source (HDMI) 13
4.5 Connecting a USB Devices 13
4.6 Connecting to PC 15
4.7 Connecting to TV-Signal Input 16
5 Input Source Selection 17
6 TV operation and System Setup. 18
6.1 Installation Guide (DVB-T, ATV) 18
6.2 OSD Settings (Main Operations) 18
6.2.1 Channel Menu 18
6.2.2 Picture Menu 21
6.2.3 Sound Menu 21
6.2.4 Time Menu 21
6.2.5 Option Menu 22
6.2.6 Lock Menu 22
6.2.7 EPG Menu (Electronic Program Guide). 23
7 DVD Operation 24
7.1 Compatible disc formats 25
7.2Playback operation 27
7.2.1 Getting started 27
7.2.2 DVD playback 27
7.2.3 CD playback (Audio, VCD, SVCD) 28
7.3 Image CD/DVD-Playback 30
7.3.1 Video Files, MP3-Playback 32
7.4 Settings during file playback 34
7.5 System settings 34
7.5.1 LANGUAGE SETUP 35
7.5.2VIDEO SETUP 35
7.5.3 RATING SETUP 36
7.5.4 MISC SETUP 36
ODYS MONO X
8 DVDTrouble shooting. 38
9 General Trouble shooting 39
10 Specifications 40
11 Warranty condition 41
1 Important Safety Instructions
Warning: To reduce the risk of electric shock, do not remove the cover or back. There are no user-serviceable parts inside. Refer servicing to qualified personnel.
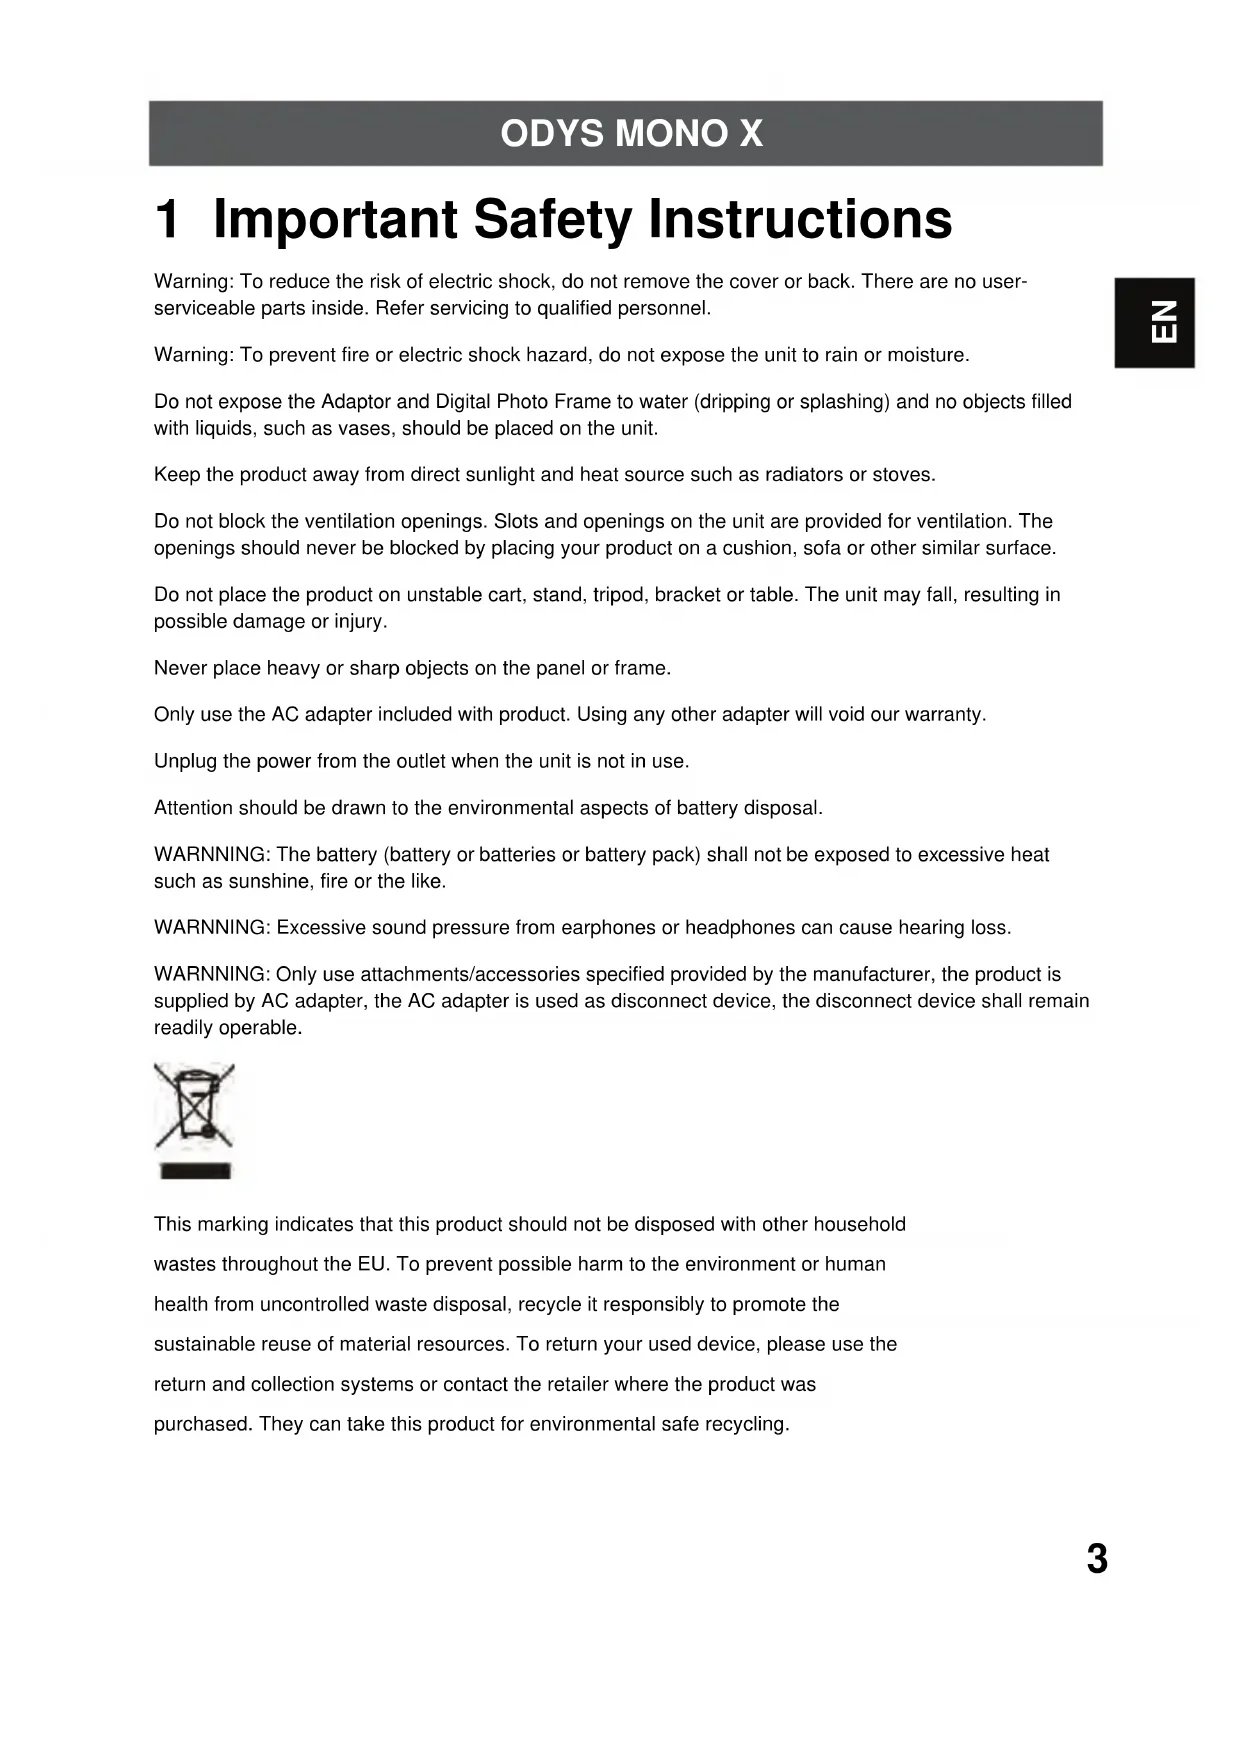
Warning: To prevent fire or electric shock hazard, do not expose the unit to rain or moisture.
Do not expose the Adaptor and Digital Photo Frame to water (dripping or splashing) and no objects filled with liquids, such as vases, should be placed on the unit.
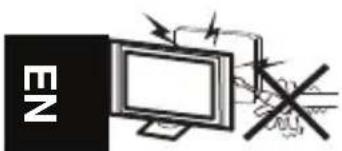
Keep the product away from direct sunlight and heat source such as radiators or stoves.
Do not block the ventilation openings. Slots and openings on the unit are provided for ventilation. The openings should never be blocked by placing your product on a cushion, sofa or other similar surface.
Do not place the product on unstable cart, stand, tripod, bracket or table. The unit may fall, resulting in possible damage or injury.
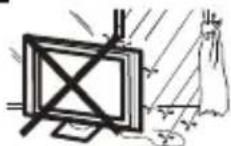
Never place heavy or sharp objects on the panel or frame.
Only use the AC adapter included with product. Using any other adapter will void our warranty.
Unplug the power from the outlet when the unit is not in use.
Attention should be drawn to the environmental aspects of battery disposal.
WARNING: The battery (battery or batteries or battery pack) shall not be exposed to excessive heat such as sunshine, fire or the like.
WARNING: Excessive sound pressure from earphones or headphones can cause hearing loss.
WARNING: Only use attachments/accessories specified provided by the manufacturer, the product is supplied by AC adapter, the AC adapter is used as disconnect device, the disconnect device shall remain readily operable.

This marking indicates that this product should not be disposed with other household wastes throughout the EU. To prevent possible harm to the environment or human health from uncontrolled waste disposal, recycle it responsibly to promote the sustainable reuse of material resources. To return your used device, please use the return and collection systems or contact the retailer where the product was purchased. They can take this product for environmental safe recycling.
ODYS MONO X
Warning
High voltages are used in the operation of this television receiver. Do not remove the cabinet back from your set. Refer servicing to qualified service personnel.
To prevent fire or electrical shock hazard, do not expose the television receiver to rain or moisture
Do not drop or push objects into the television cabinet slots or openings. Never spill any kind of liquid on the television receiver.

Do not block the ventilation holes in the back cover. Adequate ventilation is essential to prevent failure of electrical components.
Caution
Donot trap the power supply cord under the television receiver.

Never stand on, lean on, or suddenly push the television or its stand. You should pay special attention to children. Serious injury may result if it should fall.

Do not place your television on an unstable cart, stand, shelf or table. Serious injury to an individual, and damage to the television, may result if it should fall.

When the television receiver is not used for an extended period of time, it is advisable to disconnect the AC power cord from the AC outlet.
ODYS MONO X

If the television is to be built into a compartment or similar enclosure, the minimum distances must be maintained. Heat build-up can reduce the service life of your television, and can also be dangerous.

Tips regarding environmental protection
At the end of its operating life, this product may not be disposed of by way of your normal household waste. Instead it must be delivered to a collection point for recycling electrical and electronic equipment. The icon on the product, in the operating instructions or on the packaging, indicates this.
The materials used in manufacturing this product are recyclable, depending on their identifying markings. By recycling this equipment, by recycling its components, or through other procedures of re-using outdated equipment, you are making an important contribution to protection our environment. Please ask you local municipal administration for the location of the corresponding recycling point.

Battery Recycling
In order to ensure the environmentally friendly disposal of batteries, please do NOT dispose of used batteries through normal household waste. Please take the batteries to your local retail or community collection point for recycling.
The following may be an indication of a discharged battery: The device cannot be switched on. The device switches off automatically and "Battery Empty" is shown in the display. The device and or battery do not function properly.
Support
URL: http://www.odys.de
See our website for the latest information on this engine, on other products by our company and on our company itself. If you have questions or problems, please read the FAQs on our website or contact our customer support service support@odys.de.
Appropriate use
The device is designed for receiving and watching unencrypted DVB-T and analogue Cable TV channels (free-to-air) for private use. It is exclusively meant for this purpose and must only be used for the same. This also includes paying attention to all information contained in this operating manual, especially in the safety instructions. Any other usage is considered to be improper and may lead to material damages and even personal injuries. Moreover, it will result in the immediate loss of guarantee. The manufacturer does not bear any liability for damages caused due to improper use.
ODYS MONO X
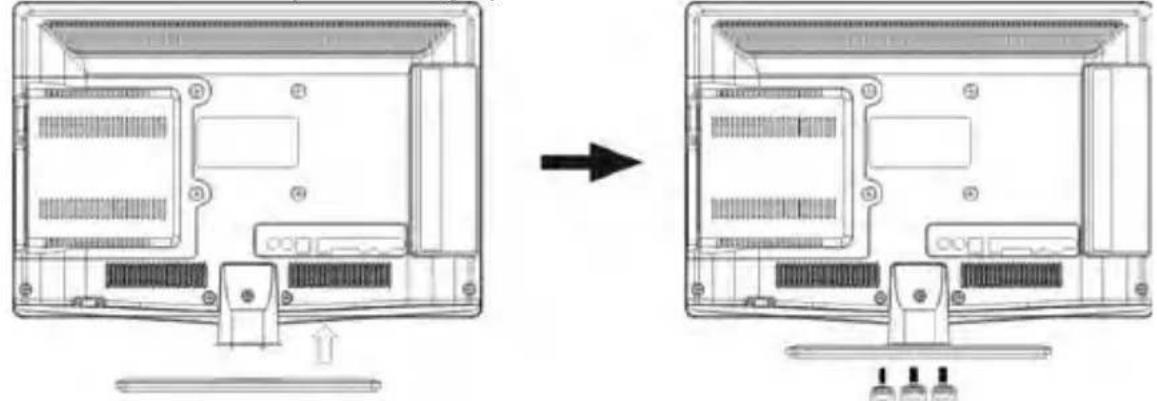
Base Stand Assembly Instruction
- Place the TV with the display side down on a flat surface. Use a cloth to protect. Locate the bottom at the stand.
- Fix the bottom with turning the screw tightly on the stand.
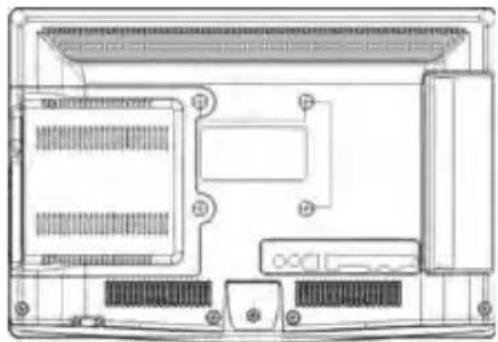
WALL MOUNTING INSTALLATION GUIDELINES
For wall mounting with the optional bracket, please read the following instruction and the bracket instruction. Make sure qualified service personnel perform the operation.
AWA bears no responsibility for improper mounting that results in accident or injury.
This television can be wall mounted as follows:
- Place the LED LCD Television onto a solid surface. Please place some soft material over the front of the screen to protect it from any damage.
- Remove the screws from the lower part of the television, where the base joins to the TV, and take away the stand (put the stand somewhere safe for future use).
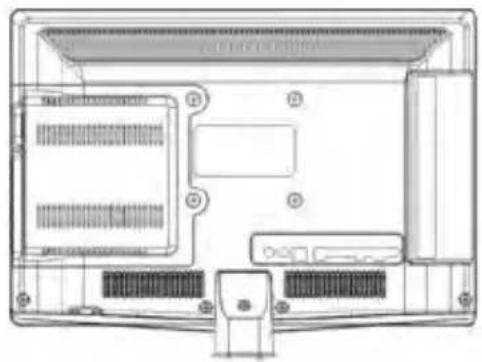

- Use the four screws provided to fix the TV onto a wall mounting bracket (not included) via the four VESA standard holes on the back of the television.
2 Front and Rear Panel Illustration
2.1 Front panel and Keyborad
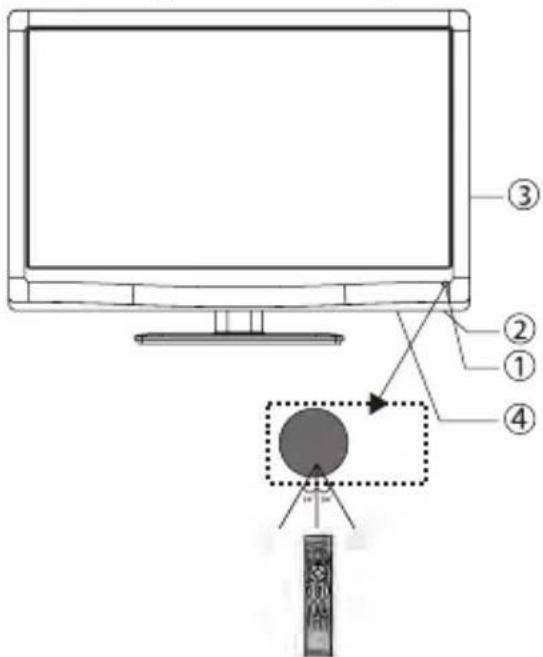
1: Remote control sensor.
2: Indicator LED: BLUE POWER ON. RED ST AND BY.
3: Side buttons
4: POWER SOCKET

- SOURCE: Display the input source menu.In MENU mode,press"SOURCE"to confirm the selected item.
- MENU: Display main MENU.
- CH + /CH- In TV mode, press"CH+"or"CH-" to change the channel up and down. In MENU mode, press "CH+" or "CH-"to select items.
- VOL+/VOL- Adjust sound level. In MENU mode, press"VOL+"or VOL-"to adjust the item that you selected.
- STANDBY
Press this button to turn the unit ON from STANDBY mode.
Press it again to turn the set back to STANDBY.


All the terminals are(from left to right):
- YPbPr
- AV/YPbPr / AV AUDIO
-
SOCKET for SCART adaptor
-
USB
5.HDMI2
6.HDMI1 - HEADPHONE
- PC AUDIO
9.VGA - ANALOG TV / DVB-T ANTENNENANSCHLUSS

- AV and YPbPr share one audio channel.
- When HDMI2 port get DVI signal, the audio signal receives from the YPbPr/AV Audio channel
- When HDMI1 port get DVI signal, the audio signal receives from the PC Audio channel
ODYS MONO X
2.2 Remote Key Function:

25:Sound: To switch sound mode.
26:CH+/-: Used to changing the channels in normal play.
27:ASPECT: To change picture aspect ratio
28:TEXT: Used to open teletext OSD display if teletext available in the broadcasted stream.
29:INFO: Used to display information about the channel being viewed or further information about the program when in DVT mode.
32-33. / to skip to the previous/next file in USB mode
34. SUBTITLE: Used to switch among different subtitles that are broadcasted in DTV mode.
35. STOP: Stop the media player in USB mode.
36. FREEZE; to freeze the picture.
Index/Subpage/Size/Reveal: Teletext functions
1:POWER:To set the TV to standby or power on.
2:NUMERIC KEY:For direct access to channels.
3:TV MENU:To display TV menu.
4:CURSOR:To move within the menu.
5: DVD Menu: Open the menu in DVD mode.
6:VOL+:/:To adjust sound level.
7:PIC:To switch picture mode.
8:SLEEP:Set timer to turn off the TV.
9: TV/RADIO: In DVB mode, it is used to switch between digital TV channels and radio stations. Display/remove the program information.
In DVD mode, it's used to switch repeat mode.
10:EPG: To display information about the program being viewed and what's on next in DTV mode.
In DVD mode, in pause state or stop state, press the button, the player will be in playing state, in play state, press the button, the player will be in pause state.
11:FAV : Used to access your favorite channels.
In DVD mode, press the button once and the player will be in memory stop state, Continuously press this button twice and the player will be in complete stop state.
14:Fast rewind for USB ,DVD file playback
15:Fast forward for USB,DVD file playback
16:Play the media player in USB mode.
17:Pause the media player in USB mode.
18:TELETEXT KEYS.
19:MUTE: To disable or enable the sound output.
20:TV/AUDIO: To select the available audio language of TV programs
DVD:Eject DVD
21:RECALL/GOTO: Used to switch between the last two viewed channels.
22:SOURCE: To select input source.
23:OK: Used to confirm a selection within a menu.
24:EXIT: Used to return to the previous screen or menu.
Insert Batteries Into the Remote Control


- Remove the battery cover.
- Inserting the 2 AAA 1.5V batteries making sure the polarity (+ or -) of the batteries matches the polarity marks inside the unit.
- Mount the battery cover. Replace with new batteries when the TV set begins to show the following symptoms: Operation is unsteady or erratic. Sometimes the TV set does not function with Remote Control Unit.
Remark:
1) Alkaline Battery Recommended.
2) Remove batteries when they are exhausted or if the remote control is not to be used for Long time.
3 Teletext Function Keys

Teletext is an information system broadcast by certain channels which can be consulted like a newspaper. It also offers access to subtitles for viewers with hearing problems or who are not familiar with the transmission language(cable networks, satellite channels, etc.)
| Press: | You will obtain: |
| TTX | This is used to call or exit teletext modes. The summary appears with a list of items that can be accessed. Each item has a corresponding 3 digit page number. If the channel selected does not broadcast teletext, the indication 100 will be displayed and the screen will remain blank (in this case, exit teletext and select another channel). |
| SELECTING A | Enter the number of the page required using the 0 to 9 up/down. Example: page 120,enter 120. The numberis displayedtop left,the counterturns and then thepage is displayed. Repeat this operation to view another page.If the counter continues tosearch, this means thatthe page is not transmitted. Select another number. |
| DIRECT ACCESS TO THE ITEMS | Coloured are as are displayedat the bottomof the screen.The 4 coloured keysare used toaccessthe itemsor corresponding pages. The coloured areas flashwhenthe item or thepage is not yet available. |
| INDEX | This returnsto the contentspage (usuallypage 100). |
| SUB PAGE | Certain pages co ntainsub-pages which are automatically displayed successively. This keyis used tostop or resume sub- page acquisition. The indication appears topleft. |
| HOLD | Tofreeze thepage. |
| REVEAL | Todisp lay or hide the concealed information (gamesolutions). |
| LIST | The use r can setfour favorite pagesto bedirectly linkedto thef our cobr keys. While list mod e isacivated, it is not possibility to useTOP orFLOF navigation withthe colorkeys. The favorite page numbers should be stored and restored to/from nonvolatile memary for reach channelby thesystem software. |
4 System Connections
Do not connect the power cord until all other connections have been made.
Ensure that you observe the color cord when connecting audio and video cables.
4.1 Connecting to External AV Signal Source
Use the audio and video cable to connect the input jacks on the right panel of the unit to the external AV signal source.
Ensure that you observe the color cord when connecting audio and video cables.
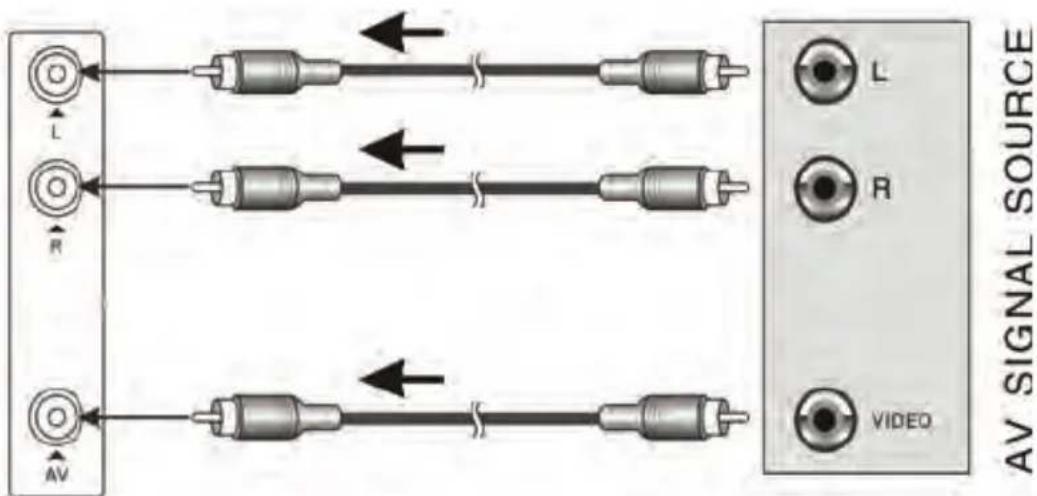
After connection, turn on the power of the unit and the external AV signal source. Press SOURCE then direction buttons to select Composite, and then press the OK button to confirm.
The L/R audio input jacks can be used in the both Composite and YPbPr modes.
ODYS MONO X
4.2 Connecting to External AV Signal Source (Y/PB/PR)
Use the audio and video cables to connect the Y/PB/PR input jacks on the rear panel of the unit to the external AV signal source.

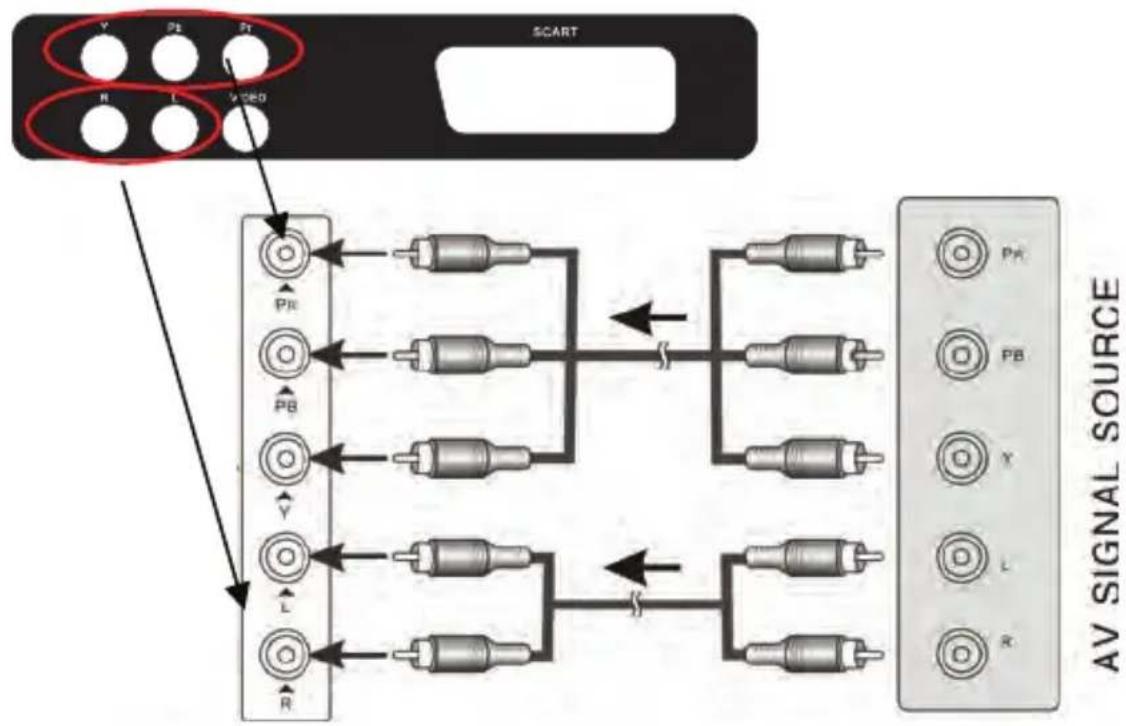
After connection, turn on the power of the unit and the external AV signal source. Press SOURCE then direction buttons to select Component mode, and then press the OK button to confirm.
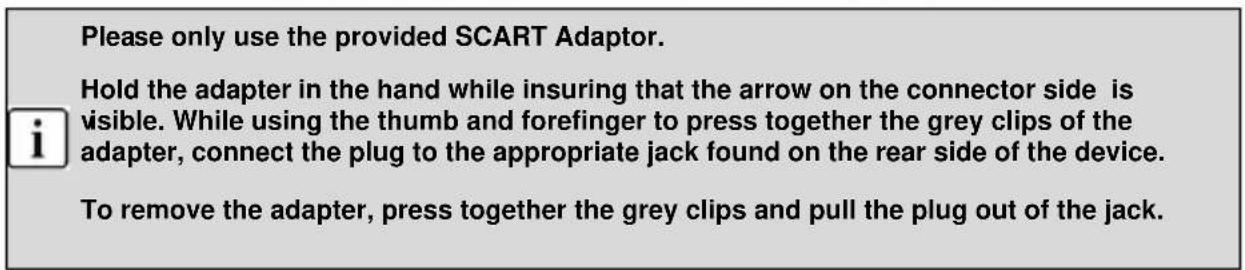
4.3 Connecting to External AV Signal Source (SCART)
Use the SCART cables to connect the SCART input Jacks on the rear panel of the unit to the external AV signal source.
After connection, turn on the power of the unit and the external AV signal source. Press SOURCE then direction buttons to select SCART mode, and then press the OK button to confirm.

ODYS MONO X
4.4 Connecting to External AV Signal Source (HDMI)
Follow the figure below to connect an HDMI signal source to the HDMI jack on the rear panel of the unit.


After connection, turn on the power of the unit and the external AV signal source and use the SOURCE and the direction buttons to select HDMI mode, and then press the OK button to confirm.

HDMI provides both audio and video signals and typically provides superior image quality to component, S-Video or composite.
4.5 Connecting a USB Devices
This unit is designed with a USB port, can be connected to the USB device, see the figure below:

Please only connect compatible devices with playable content.
The device supports USB devices with FAT or FAT32 disk system up to 500GB.
Please only use harddisks with separate power supply.


If possible, please connect USB devices directly to the Devices USB interface. If this is not possible, use only USB extension cables not exceeding 25cm
ODYS MONO X
Press SOURCE then direction buttons to select MediaPlayer mode, then press the OK button to confirm.


Please make sure that the USB device have plugged in the slot. There are three type media item can be selected, such as photo, music and Movie. Select the type media item by pressing , press OK button to enter the disk selection menu.
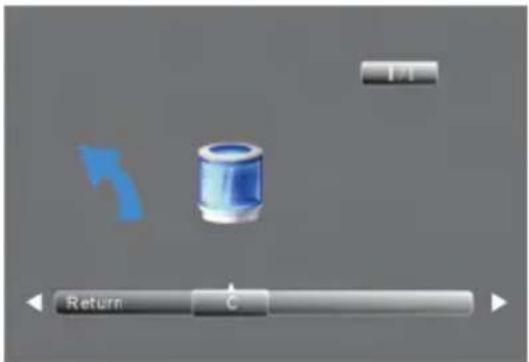
Press the to select the right disk and press OK to display media files and folder list or choose Return to back to the media type selection menu.
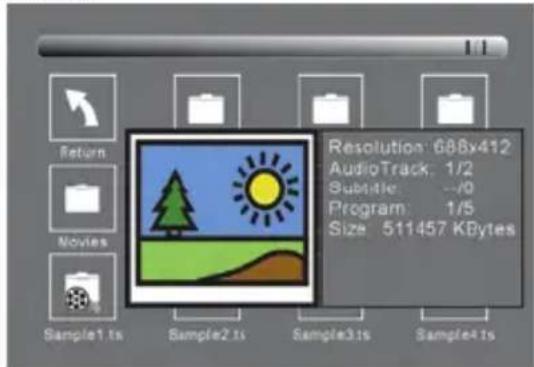
Select the media file by pressing or , then the preview frame will pop up. Press the button (play) to play the media file in full screen. When the media file (photo, music, Movie) is playing, press the OK or Info button can display the control bar.

Press to select the function icon, press OK button to confirm the function. Press or EXIT button to exit the control bar.
ODYS MONO X

You can adjust the audio track, or program in the Info menu while Playing the video file. Choose the Info icon and press OK can display the Info MENU.

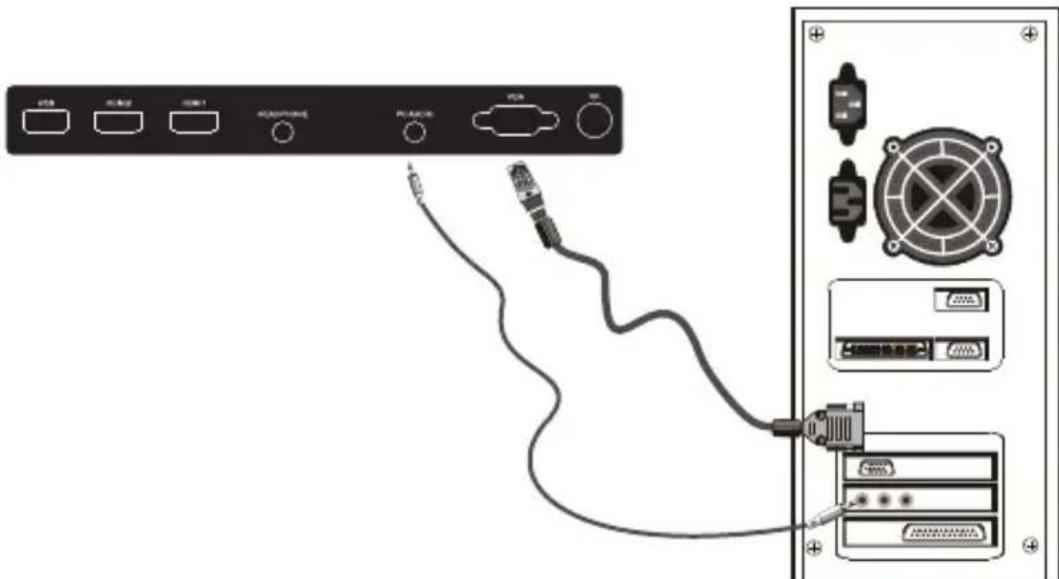
4.6 Connecting to PC
The unit can be connected to PC (personal computer) via the VGA cable.
Follow the figure below to connect:
- Connect one end of the VGA cable to the VGA input jack on the rear panel of the unit and connect the other end to the PC.
- Connect one end of the audio cable to the PC audio input jack on the rear panel of the unit and connect the other end to the PC audio output jack.
- Connect the power cord.
- Power on the TV set and switch to PC mode (VGA) using the SOURCE key.
- Power on the PC.
- Set the PC video resolution to match that of the television.

NOTE: It is very important to follow this steps exactly!
ODYS MONO X
4.7 Connecting to TV-Signal Input
Connect the TV signal cable (the antenna cable, for example) to the Antenna Input Jack on the back of the unit so that you can receive television programmes.

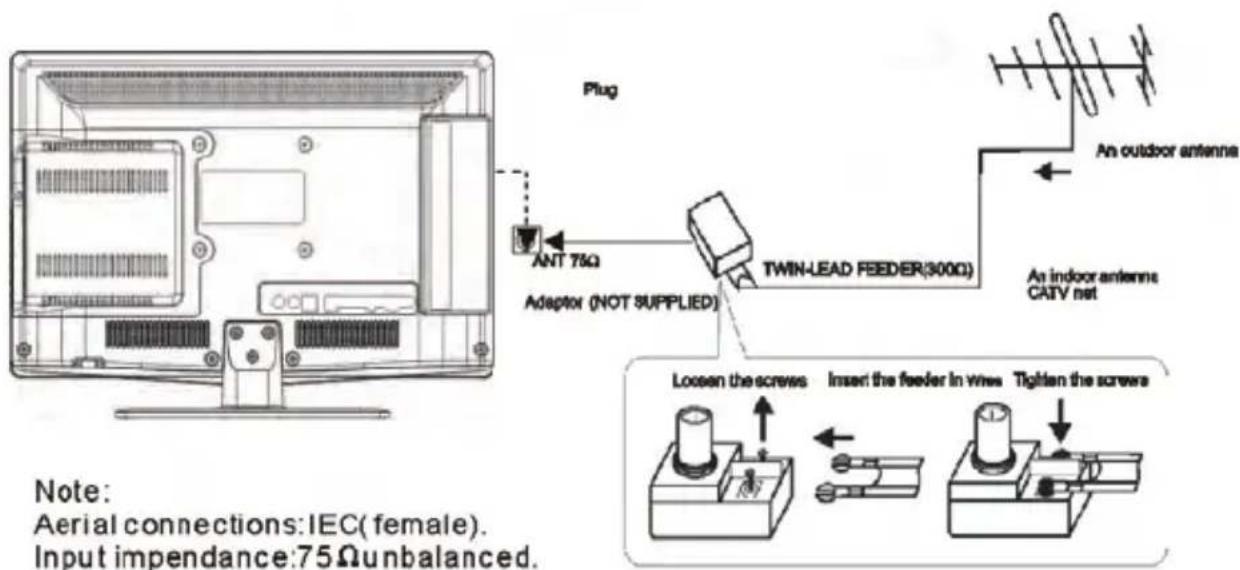
After connection, turn on the power of the unit. Then press the SOURCE button to select TV or DTV mode and conduct program selection.
5 Input Source Selection
The unit incorporates multiple video modes which can be selected via the Input button on the television or remote.
Press the SOURCE button to enter Input menu. The screen will display as shown below:

Use the direction buttons and OK button
On the input menu, press the direction button to select the desired video mode, and press the OK button to enter the selected mode.
Use the SOURCE button and OK button
On the input menu, press the SOURCE button to select the desired video mode,
6 TV operation and System Setup
6.1 Installation Guide (DVB-T, ATV)
This screen only appear when the TV first time turn on or reset to factory et. energy-saving mode and country, auto tuning programs. And after tuning ,the screen will skip to the first DTV program.

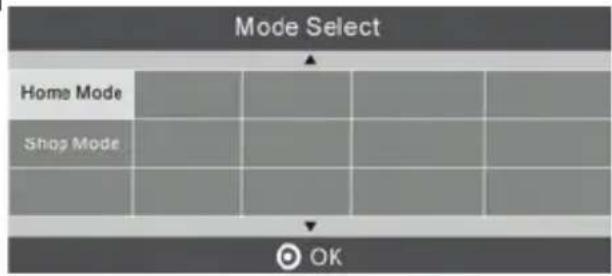
Select Mode
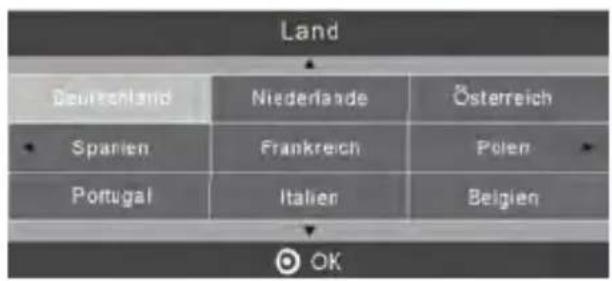
Select the country for DTV and ATV reception.
- Switch Home/Shop Mode freely by yourself.

- Select the country for DTV and ATV reception and press OK to confirm.
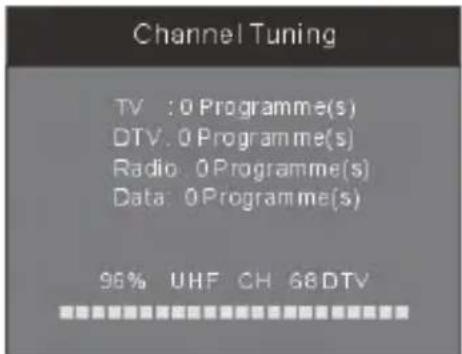
The channel search starts now with ATV channel search.
- Press "Exit" to exit the channel search. Press -key to exit or -key to proceed searching.
- Press "TV menu" to skip the analogue TV (ATV) channel search.
Press -key to skip or -key to proceed searching.
If you skip ATV search the engine will proceed with DTV channel search.
6.2 OSD Settings (Main Operations)
Press "TV menu" to open the settings.
Press / to select the page. Press / to select the setting.
6.2.1 Channel Menu
The first item of the MENU is channel menu( for TV or DTV source only).
ODYS MONO X

You can search channels and edit programs here.
1).Auto tuning:
Search all the channels automatically(you can select ATV and DTV)

Pls press to select country at first, then press OK button to start auto tuning. Press "TV MENU" to cancel ATV channel search and Press to confirm. Press to continue with ATV channel search. The engine will proceed with the DTV channel search.
NOTE:
All the channels including ATV, DTV and DTV Radio can be tuning by one time, if the Tune Type is DTV+ATV.
All the stored channels will be deleted and overwritten after auto tuning .
After auto tuning, the channel will skip to the first DTV channel.
2).DTV Manual tuning:
You can select a DTV channel then find the programs in this channel.
PIs press to select the channel, then press OK to search the programs.

Bad - Normal - Good means signal intensity.

ODYS MONO X


3).ATV Manual tuning :
You can change the sound system to search the analog TV channels and fine tune the channels, then store the channels you selected to a desired Number.
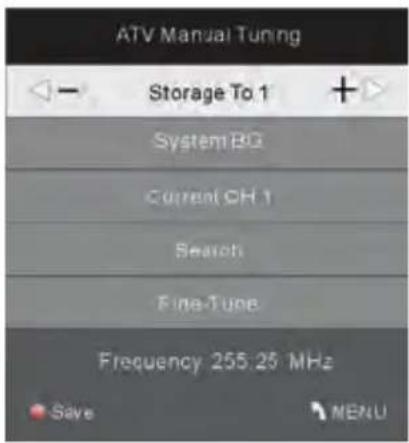

Press teletext red button to storage to channels after manual tuning.
4). Program edit:
You can Delete ,Rename ,Move, Skip , FAV any programs.
| Red Key Delete | Press teletext red button, the program in cursor will delete. |
| Green Key Rename: | Only can rename ATV programs .Move the cursor to the program, press teletext green button to rename the program. Press ▲▼ to choose the character. Press ←▶ to move the cursor. Press MENU button to exit edit, Press EXIT to exit the menu. Note: ATV programs name only can be 5 character. |
| Yellow Key Move | Move the cursor to the program,press yellow button,then you can use ▲▼ to move the program. |
| Blue Key Skip | Press ▲▼ to choose the program, press teletext blue button to skip this program, The ⊙ will show on the right side of the program. Choose the skipped program, press blue button again, you can cancel the skip, The ⊙ will disappear. |
| FAV Key Favourite | Press ▲▼ to choose the program, press FAV button, it will show ⊙ on the right side of the program. Choose the FAV program, press FAV button again, you can cancel the FAV ⊙, the will disappear. |
ODYS MONO X
6.2.2 Picture Menu
The second item of the MENU is PICTURE MENU. You can adjust picture effect here, such as contrast, brightness, etc.
Press to select the setting, press OK to adjust, press to change the setting.
Press TV MENU to step back to the previous menu.


6.2.3 Sound Menu
The third item of the MENU is the SOUND MENU.
You can adjust the sound effect here such as treble, bass, balance etc.
Press to select the setting, press OK to adjust, press to change the setting.
Press TV MENU to step back to the previous menu.

6.2.4 Time Menu
The forth item of the menu is the TIME MENU You can adjust the clock, power on/off time, sleep time etc. Press to select the setting, press OK to adjust, press to select the value to change, press to change the setting. Press TV MENU to step back to the previous menu.


ODYS MONO X
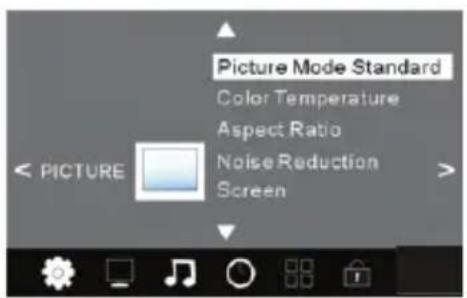
6.2.5 Option Menu
The fifth item of the MENU is the OPTION MENU. You can adjust the Menu language, Audio language, Subtitle language etc.

Press to select the setting, press OK to adjust, press to select the value to change, press to change the setting.
Press TV MENU to step back to the previous menu.
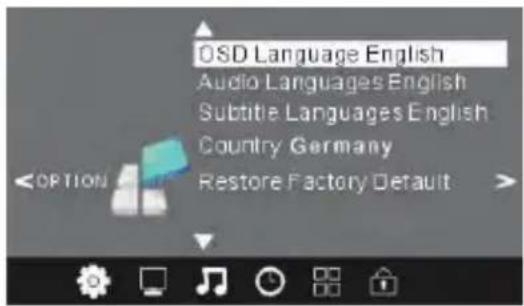

NOTE: Restore factory default will clear all the programs and password.
6.2.6 Lock Menu
The sixth item of the menu is the LOCK MENU You can lock system, set password, block program and set parental guidance Once you set the lock system on you can not search the channels or change any programs.
Press to select the setting, press OK to adjust, press to select the value to change, press to change the setting.
Press TV MENU to step back to the previous menu.

NOTE: The default pass word is 6666.Block program: Press ▲▼ to choose the program,press teletext green button to block the program. If you want unblock the program, pls enter the main menu , input the password, then press green button again. Parental guidance: Press ▲▶ to choose level.
This Option is available in DVB-T and ATV Mode only!
ODYS MONO X
6.2.7 EPG Menu (Electronic Program Guide).
The EPG menu is used to look at what is being broadcasted on DTV or Radio channel in the day. To access the EPG menu, press the EPG button, the following menu will be displayed:


| Green Key /INFO Key | Use to choose the programs,Press INFO key,you can display the highlight program's information. |
| Yellow KeySchedule | Press the teletext yellow key,It can list all the reminder schedule,press▲▼tochoose the list,press red key to delete the schedule list,Press EPG to return toEPG menu.Schedule List 04:55 28thApr DeleteTime Date Programme Title Channel Name |
| Blue KeyRemind | Press the blue key to choose one program and set up one reminder time,the TV screen will skip to the chosen program in the reminder time automatically.RemINDER setting802 SZTVM03+08 Minute05 HourApr Month28 DateOnce ModeOK BACK |
7 DVD Operation

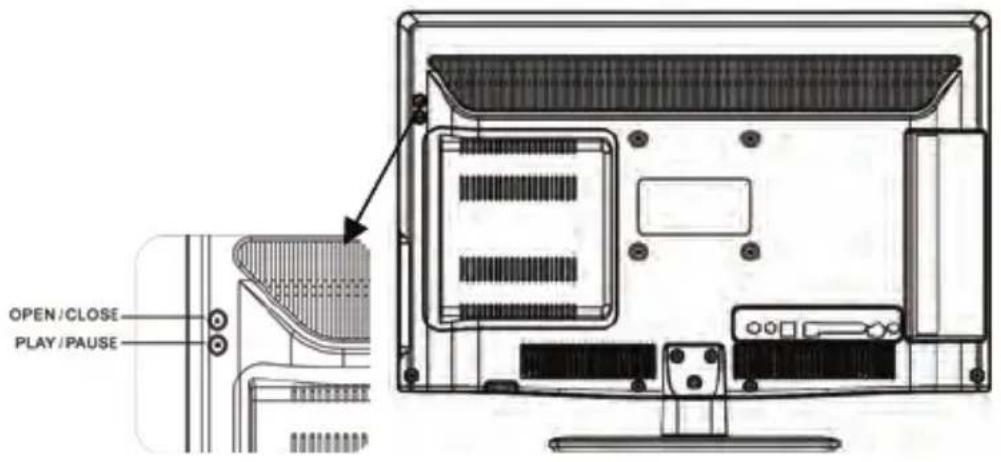
DVD DISE PANEL
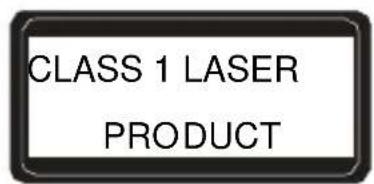

Caution
This DVD Player has a Class 1 laser which maybe harmful to your eyes. Do not attempt to disassemble the cabinet or make.
Features
Disc formats supported by this player:

MPEG 4 files on discs

Dobly digital

Subtitle choices

Kodak picture DVD

Audio Choices

MP3 files on CD-R/CD-RW
TV aspect ration modes

DVD video
Parental Lock
This product incorporates copy right protection technology that is protected by method claims of certain U.S. patents and other intellectual property rights owned by Macro vision Corporation and other rights owners. Use of this copyright protection technology must be authorized by Macro vision Corporation, and is intended for home and other limited viewing uses only. Unless otherwise authorized by Macro vision Corporation. Reverse engineering or disassembly is prohibited.
The product complies with the KODAK Picture CD format and will display KODAK Picture CDs. The "KODAK Picture CD Compatible" logo is a trademark of Eastman Kodak Company and is used with permission.
Manufactured under license from Dolby Laboratories."Dolby" and the double-D symbol are trademarks of Dolby Laboratories. Confidential Unpublished Works. C 1992-1997 Dolby Laboratories, Inc. All rights reserved.
MENU OPERATION
Press the DVD setup button on the remote control, the SETUP MENU will be displayed. After accessing the setup menu, press the direction buttons for up and down movement to select an item desired, and press RIGHT direction button to select the lower item. Then press the OK button to confirm. Press LEFT direction button return to the menu of upper level. To exit the setup, press the DVD setup button again. In the SETUP MENU, you may choose any of the following options as you like.
7.1 Compatible disc formats(delete this part)
Discs Compatibility: MPEG4,DVD,DVD+/-R/RW,VCD, CD-R, CD-RW
The discs' mode of operation depends on the manufacturer. Observe the corresponding notes for the respective disc.
ODYS MONO X
Using discs
Handling

When inserting or removing a disc, do not touch the surface (see illustration). Do not affix paper or labels on the disc.

Cleaning
Fingerprints and other contaminations can reduce the quality of the sound and the video. Use a soft, clean cloth for cleaning that can be moistened with a neutral, diluted cleaning agent if the disc is very contaminated.
Do not wipe in circular motion (risk of static noises); instead, always wipe from the centre of the disc toward the outer edge (see illustration).


Note on storage
Do not expose the discs to direct sunlight or high temperatures.

CAREFULLY READ THE FOLLOWING INSTRUCTIONS BEFORE TURNING ON THE DVD PLAYER FOR THE FIRST TIME.
7.2 Playback operation
7.2.1 DVD playback
Start playback Insert a disc. The DVD player automatically starts with the playback. In the initial menu, select the desired option using the buttons. Then press OK on the remote control.
PLAY/PAUSE Press this button once (during playback) to pause playback.
Press this button a second time to resume playback.
Press this button once (during playback) to stop playback; to resume from the same position, press /PLAY. Press this button a second time to end playing back the disc altogether. Continue at the start of the disc using
DVD menu Press this button (during playback) to display the menu on the screen. In menu mode, select the desired option using the / / / buttons. Then press OK.
button Press this button to jump to the beginning of the previous track or chapter.
button Fast rewind. Pressing this button repeatedly will increase the rewind speed successively to 2x, 4x, 8x, 16x Continue playback at normal speed using
button To jump to the beginning of the next track or chapter.
button Fast forward
Pressing this button repeatedly will increase the forward speed successively to 2x, 4x, 8x, 16X.
Continue playback at normal speed using
Display button Press this button once to display detailed information about the disc in the player. (Pressing this button repeatedly).
AUDIO button During playback the available audio streams are enabled successively (DVDs can contain up to eight audio streams; e.g., for multiple languages.
ODYS MONO X
SUBTITLE button
During playback, allows you to select a language for subtitles or to turn subtitles on/off. DVDs can contain up to 32 subtitle tracks. By pressing this button repeatedly, you call up the following settings:
SUBTITLE 1/N: Subtitle 1 is displayed.
SUBTITLE 2/N: Subtitle 2 is displayed.
SUBTITLE */N: Subtitle * is displayed.
SUBTITLE OFF: No subtitles.
N represents the total number of subtitle tracks included.
This function is only available for DVDs that contain multiple subtitle tracks.
TV/ Radio Pres the key to repeat a chapter or a title.
GOTO button Enables you to select a position (time, track or title) at which to start playback. Use the / buttons to select the desired option. Use the 0-9 number keys to enter the time directly and then confirm using OK.
Press the GOTO button again to resume normal playback.
ANGLE button Pressing this button for approx 2 Sec. cycles through the camera perspectives available for the particular scene (see illustration).

This function is only available for DVDs that contain recordings of multiple camera perspectives.
TITLE button The content of a DVD is often divided into several titles that contain multiple menus.
If you press the TITLE button during playback, the title menu is displayed. Using the buttons or the numerical buttons (0-9) on the remote control, you can select the desired title or the desired option. Confirm with OK.
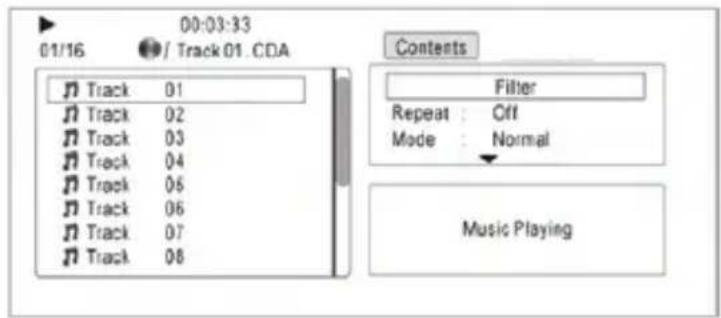
7.2.2 CD playback (Audio, VCD, SVCD)
When you insert a CD in the DVD player while the power is on, the tracks are played in the preset order. Use the or button to play a specific track.
ODYS MONO X
PLAY/PAUSE Press this button once (during playback) to pause playback.
Press this button a second time to resume playback.
STOP/
Press this button once (during playback) to stop playback; to resume from the same position, press / PLAY.
Press this button a second time to end playing back the disc altogether.
button To jump to the beginning of the next track or chapter.
button Fast-forward. fast-forward
button Press this button once to jump to the beginning of the current track or chapter.
Pressing this button repeatedly will increase the forward speed successively to 2x, 4x, 8x, 16x. Continue playback at normal speed using
Press this button a second time to jump to the beginning of the previous track or chapter.
button Fast rewind. fast rewind
Pressing this button repeatedly will increase the rewind speed successively to 2x, 4x, 8x, 16x. Continue playback at normal speed using
TV/ Radio Repeats one track or folder in succession or switches the repeat function off again.
GOTO button Enables you to select a position (time or track) at which to start playback. During CD playback the following options are displayed successively by pressing the / keys:
Track Time Disc Time
You can select the desired option directly using the buttons 0-9 on the remote control.
DISPLAY Displays the detailed information on the inserted disc and
ODYS MONO X
button switches the information display off again.

AUDIO button To cycle through the following sound effects:
Mono Left Mono Right Mix Stereo
Hold down the button for about 2 s to close the display window.
7.3 Image CD/DVD-Playback

Insert a CD/DVD
2 The root folder and various sub folders are displayed. Select a folder using the buttons on the remote control. Confirm your selection using one of the OK button.
3 The screen switches to display the selected subfolder. Select a file using the buttons on the remote control. Confirm your selection using OK.
4 You can move the light yellow bar to the icon to return to the previous folder. Confirm your selection using OK.
PLAY/PAUSE Press this button once (during playback) to pause playback.
Press this button a second time to resume playback.
STOP/
During playback: To go to the root folder.
To resume normal playback, press the PLAY/▶ button.
ODYS MONO X

Note
While using the remote control please press the STOP key for approx. 2 Seconds to use this function.
button To jump to the previous file
button To jump to the next file
DISPLAY button Press this button once to display detailed information about the disc in the player.
Press this button a second time to close the display window..
This function is only available in folder mode.
Repeat button Press this button once to play back the content of a file/folder in loop mode.
Press this button repeatedly to cycle through the following options:
Repeat single Repeat folder Repeat Off
Repeat Single: Plays back the current file repeatedly.
Repeat Folder: Plays back all files of the current folder.
Repeat Off: Exits the repeat mode.
Rotating pictures
Your can rotate a picture that is being displayed by using the direction buttons (▲ ▲▼).
Press the button to rotate the current picture clockwise as shown below.
ODYS MONO X


Press the button to rotate the current picture anti-clockwise as shown below.

7.3.1 Video Files, MP3-Playback
Insert a CD/DVD
2 The root folder is displayed. Select a folder using the buttons on the remote control.
3 Start of playback:
Confirm your selection using OK.
PLAY/PAUSE
Press this button once (during playback) to pause playback.
Press this button a second time to resume playback.
button To jump to the next file
button Press to activate fast forward
Pressing this button repeatedly to increase the forward speed successively to 2x, 4x, 8x, 16X. Continue playback at normal speed using
button To jump to the previous file
button Press activate fast rewind.
Press this button repeatedly to increase the rewind speed successively to 2x, 4x, 8x, 16X. Continue playback at normal speed using
STOP / ■
Press this button once (during playback) to stop playback; to resume from the same position, press / PLAY.
Press this button a second time to end playing back the disc altogether.
DVD MENU During playback: Press for. to go to the current folder.
Continue playback at normal speed using
Reapt button Press this button once to play back the content of a file/folder in loop mode.
Press this button repeatedly to cycle through the following options: Repeat single Repeat Folderr Repeat Off
GOTO button Direct selection using the time index of the files.
DISPLAY button Displays the detailed information on the inserted disc and switches the information display off again.
SUBT button To select a language for subtitles (if available on disc) or
ODYS MONO X
turn off the subtitles
芸

Not all discs support the functions for subtitles, camera perspectives or audio effects.
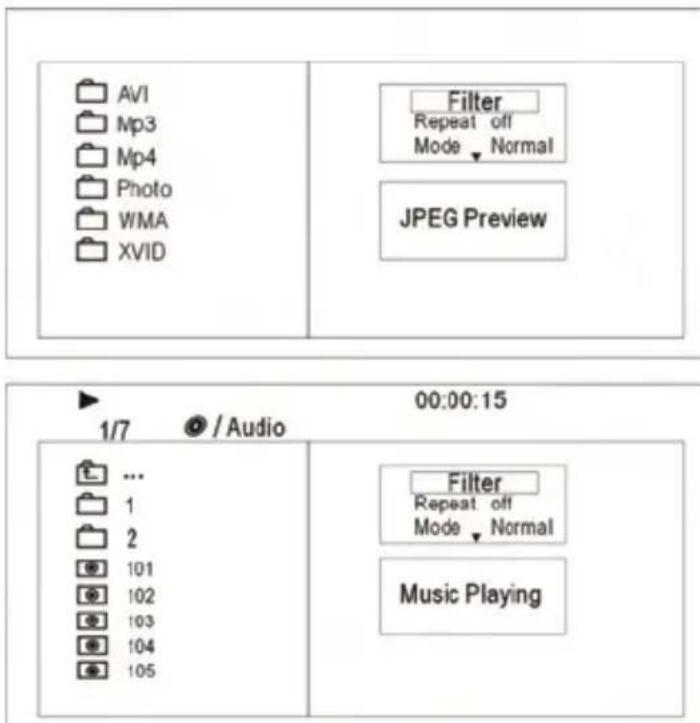
7.4 Settings during file playback
| Filter | Allows selecting the categories of files displayed in the browser list. | |
| Repeat | To switch different repeat playing mode. | |
| Mode | Select different playing mode as follows: | |
| Normal | Shuffle mode is cancelled. | |
| Shuffle: | Shuffle mode enabled. When playback reaches the end of the current chapter/track, playback jumps to a random chapter/track. As the end of each chapter/track is reached, another random chapter/track will be played until all tracks/chapters have been played or the Shuffle mode is cancelled by toggling to a different Mode Option. | |

All functions in this chapter are optional and may vary.
7.5 System settings
In this section, you will learn how to customize the default settings of the system according to your needs.
To change your system settings, proceed as follows:
Press the DVD setup button on the remote control.
ODYS MONO X
2 The Setup menu is displayed. In this menu, you can define general settings, loudspeaker settings, Digital settings as well as other default settings. You can leave the Setup menu at any time by pressing the SETUP button again.
3 Use the / / / buttons on the remote control to select the desired submenu.
4 Use the / / / buttons on the remote control to select the desired option within the submenu.
5 Press OK to open the settings. Use and keys to change the value and confirm with OK.
7.5.1 LANGUAGE SETUP
Select Language in the setup menu, and display the Language submenu:

| OSD Use this item to | select the language of the setup menu and screen display. |
| Subtitle This option | provides the preset subtitle language. |
| MPEG4 Subtitle (optional) | Select different MPEG4 subtitle encoding option. Note: Not all players support this item. |
| Audio Select the buit | t-in disc dubbing language options. |
| DVD Menu | This option provides the film's menu language options. |
7.5.2VIDEO SETUP
Select Video in the setup menu, and display the Video submenu:
ODYS MONO X

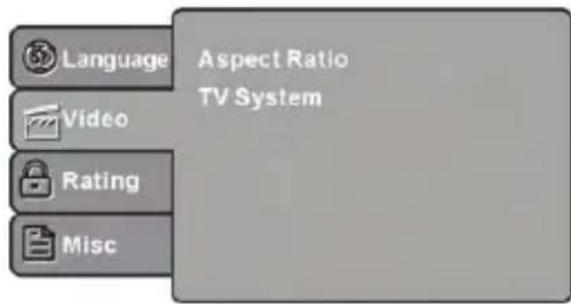
| Aspect Ratio | Select the aspect ratio. Notes: The image display ratio is related to the recorded disc format. Some disc can not display images in the aspect ratio you choose. If you play a disc recorded in 4:3 format on a wide screen TV, black bars will appear on the left and right side of the screen. You must adjust the screen setting depending on the type of the television you have. |
| TV System | Select the different TV system. Note:The DVD player setting should be matched to your TV set. For more information of output format, refer to the instructions of your TV set. |
7.5.3 RATING SETUP
Select Rating in the setup menu, and display the Rating submenu:
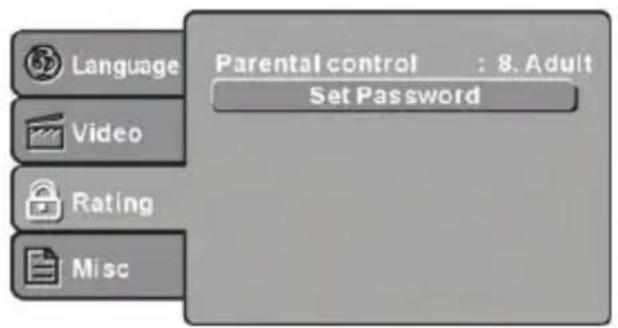
| Parental Control | Set the parental control feature of the player Note: Password is needed before setting Parental Control. |
| Set Password | Input four digits (password), then press OK to confirm. Note: If you forget your password, please use the universal password 6666 to unlock. |
7.5.4 MISC SETUP
Select MISC in the setup menu, and display the submenu:
ODYS MONO X

E
Use Default Settings
Reset setup data to factory default value.
8 DVD Trouble shooting
If you have any questions, please consult the troubleshooting guide below:
NO PICTURE OR SOUND
Ensure the power button is on
Ensure the power outlet is operational.
Ensure the power cord is not damaged.
Ensure the power plug is connected firmly to the outlet.
PICTURE BUT NO SOUND
Ensure the audio is not set to mute
Ensure you have set the player AUDIO settings correctly.
POOR PICTURE OR SOUND
Ensure the disc is not scratched or stained.
BAD DISC DISPLAYED
Ensure the disc is not wrapped. Damaged or deformed.
Ensure the disc is not badly stained or damaged.
Ensure the disc fromat is compatible with the player.
Please check whether you have tried to play a software CD. If so, please restart the player.
REMOTE NOT WORKING
Make sure the Main units POWER button is on
Ensure the remote batteries are working.
Point the remote control directly at the players IRsensor.
Remove any obstacles between the remote and theIR sensor.
UNIT NOT WORKING
Turn off the power, and then turn it on again.
NO DISC DISPLAYED
Ensure you have put the disc on the tray
Ensure the disc is not upside down.
Ensure the disc is not distorted, stained or scratched
9 General Trouble shooting
| Trouble phenomenon Symptom | Inspection Check | ||
| Picture | Audio | ||
| Snow | Noise | antenna position, direction or connection | |
| Ghost | Normal audio | antenna position, direction or connection | |
| Interference | Noise | electronic equipment,car/motorcycle,fluorescent light | |
| Normal Picture | Mute | Volume(check if mute is activated or if the audio system connections are not correct) | |
| ? No picture | Mute | Power cord is not inserted Power switch is not opened Contrast and brightness/volume | |
| No colour | Normal audio | Colour control | |
10 Specifications

| Item | Specification | |
| ATV/DTV Tune Frequency Range | VHF: 174MHz to 230 MHz | UHF: 470MHz to 862 MHz |
| DVB-T Demodulation Demodulator | OFDM | |
| OFDM Modulation | 2K, 8K FFT, SFN and MFN | |
| Packet Carries | 2K/8K | |
| Guard Interval | 1/4,1/8, 1/16, 1/32 | |
| Connections | RF IN | IEC169-2 female connector |
| RF Loopthough | IEC165-2 male connector | |
| TV SCART | Composite Video, Audio L/R | |
| Power | Consumption | 100-240V 50/60Hz |
| Display | Decoder Module | PAL, NTSC |
| Aspect Rate | 4:3 (Letterbox, Pan & Scan),16:9 | |
| Decoding | Video | MPEG2 Transport MP@ML |
| Audio | MPEG2 AudioLayer | |
| Others | Compliance | ETSIEN 300 744 DVB-T Compliance |
| Sound Mode | Right, Left, Stereo |
- Specifications are subject to change without further notice.

This symbol on the product or in the instructions means that your electrical and electronic equipment should be disposed at the end of life separately from your household waste. There are separate collection systems for recycling in the EU. For more information, please contact the local authority or your retailer where you purchased the product.
11 Warranty condition
The following conditions comprise the requirements and scope of our warranty conditions and do not affect our legal and contractual warranty obligations.
We offer a warranty on our products in accordance with the following conditions:
- ODYS products are covered by a 24 month warranty. We will resolve damages or defects on ODYS products free of charge within 12 months of the purchase date under the following warranty conditions. For any damage or defect determined later than 12 months after the purchase date, proof of a manufacturing fault must be submitted for repair under warranty.
The warranty does not cover batteries and other parts, which are considered consumables, parts that break easily such as glass or plastic or defects based on normal wear and tear. There is no warranty obligation in the event of marginal differences compared to the target appearance and workmanship provided these have a negligible effect on the product's fitness for use, in the event of damage caused by chemical or electrochemical effects, by water or generally from abnormal conditions. - The warranty will be performed in such a way that we shall decide whether to repair the defective parts or to replace them with working parts free of charge. AXDIA reserves the right to exchange the product for a replacement product of equal value if the product that is sent in cannot be repaired within a reasonable time or at reasonable cost. The product can also be exchanged for a different model of the same value. Requests cannot be made for repairs to be carried out on site. Parts that have been replaced or exchanged become our property.
- The warranty claim does not apply if repairs or other work is carried out by unauthorized persons or if our products are equipped with additional parts or accessories that are not approved for our products.
- Warranties that have been activated do not cause the warranty period to be extended, nor do they trigger a new warranty period. The warranty period for any replacement parts installed ends with the warranty period for the entire product.
- Any other or further claims are excluded, especially those for replacement due to damage caused outside of the product, provided there is no obligatory legal liability. We therefore accept no liability for accidental, indirect or other consequential damage of any kind, which leads to usage restrictions, data loss, loss of earnings or interruption to business.
Asserting a warranty claim
- To make use of the warranty service, you must contact the AXDIA Service Center by e-mail, fax or phone (see below for contact details). You can also use the service form on our website or on the back of the warranty conditions.
- AXDIA Service Center will try to diagnose and solve your problem. If it is determined that a warranty claim exists, you will be given an RMA number (Return Material Authorization) and you will be asked to send the product to AXDIA.
IMPORTANT: AXDIA will only accept parcels that have an RMA number.

Please observe the following when sending the product:
- Send the product suitably packaged with carriage and insurance paid. Do not enclose any accessories with the products (no cables, CD's, memory cards, manuals, etc.), unless the AXDIA Service Centre specifies otherwise.
- Mark the RMA number on the outside of the package in such a way that it is visible and clearly legible.
- You must enclose a copy of the sales slip as proof of purchase.
- Once AXDIA has received the product, it will meet its warranty obligations in accordance with the warranty conditions and will return the product to the sender with carriage and insurance paid.
Service outside of warranty
AXDIA can refuse any service claim made that is not covered by the warranty. If AXDIA agrees to provide a service outside the warranty, the customer will be invoiced for all repair and transport costs.
AXDIA will not accept any packages that have not first been approved by AXDIA by means of an RMA (Return Material Authorization).
ODYS MONO X
INDEX
Precaution
et
sécurities
Instruction
et
assemblage
du
pied
INSTALLATION
Support Murale (Non Fourni)
Configuration d'OPTIONS (Menu OPTION)
3
EPG (Electronic Program Guide).
1.1 Lecture d/images CD/DVD


Press this button a second time to end playing back the disc altogether.

Remarque
EPG ( Electronic Program Guide)
Reproducción DVD
Ajustes de planta
8. EPG (Electronic Program Guide).
If at any time in the future you should need to dispose of this product, please noted that: Waste electrical products should not be disposed of with household waste. Please recycle where facilities exist. Check with your local Authority or retailer for recycling advice. (Waste Electrical and Electronic Equipment Directive).