Stick Mixer 221203 - Blender PRINCESS - Free user manual and instructions
Find the device manual for free Stick Mixer 221203 PRINCESS in PDF.
User questions about Stick Mixer 221203 PRINCESS
0 question about this device. Answer the ones you know or ask your own.
Ask a new question about this device
Download the instructions for your Blender in PDF format for free! Find your manual Stick Mixer 221203 - PRINCESS and take your electronic device back in hand. On this page are published all the documents necessary for the use of your device. Stick Mixer 221203 by PRINCESS.
USER MANUAL Stick Mixer 221203 PRINCESS
natural_image
Line drawing of a handheld electric shaver with a vertical shaft and base (no text or symbols)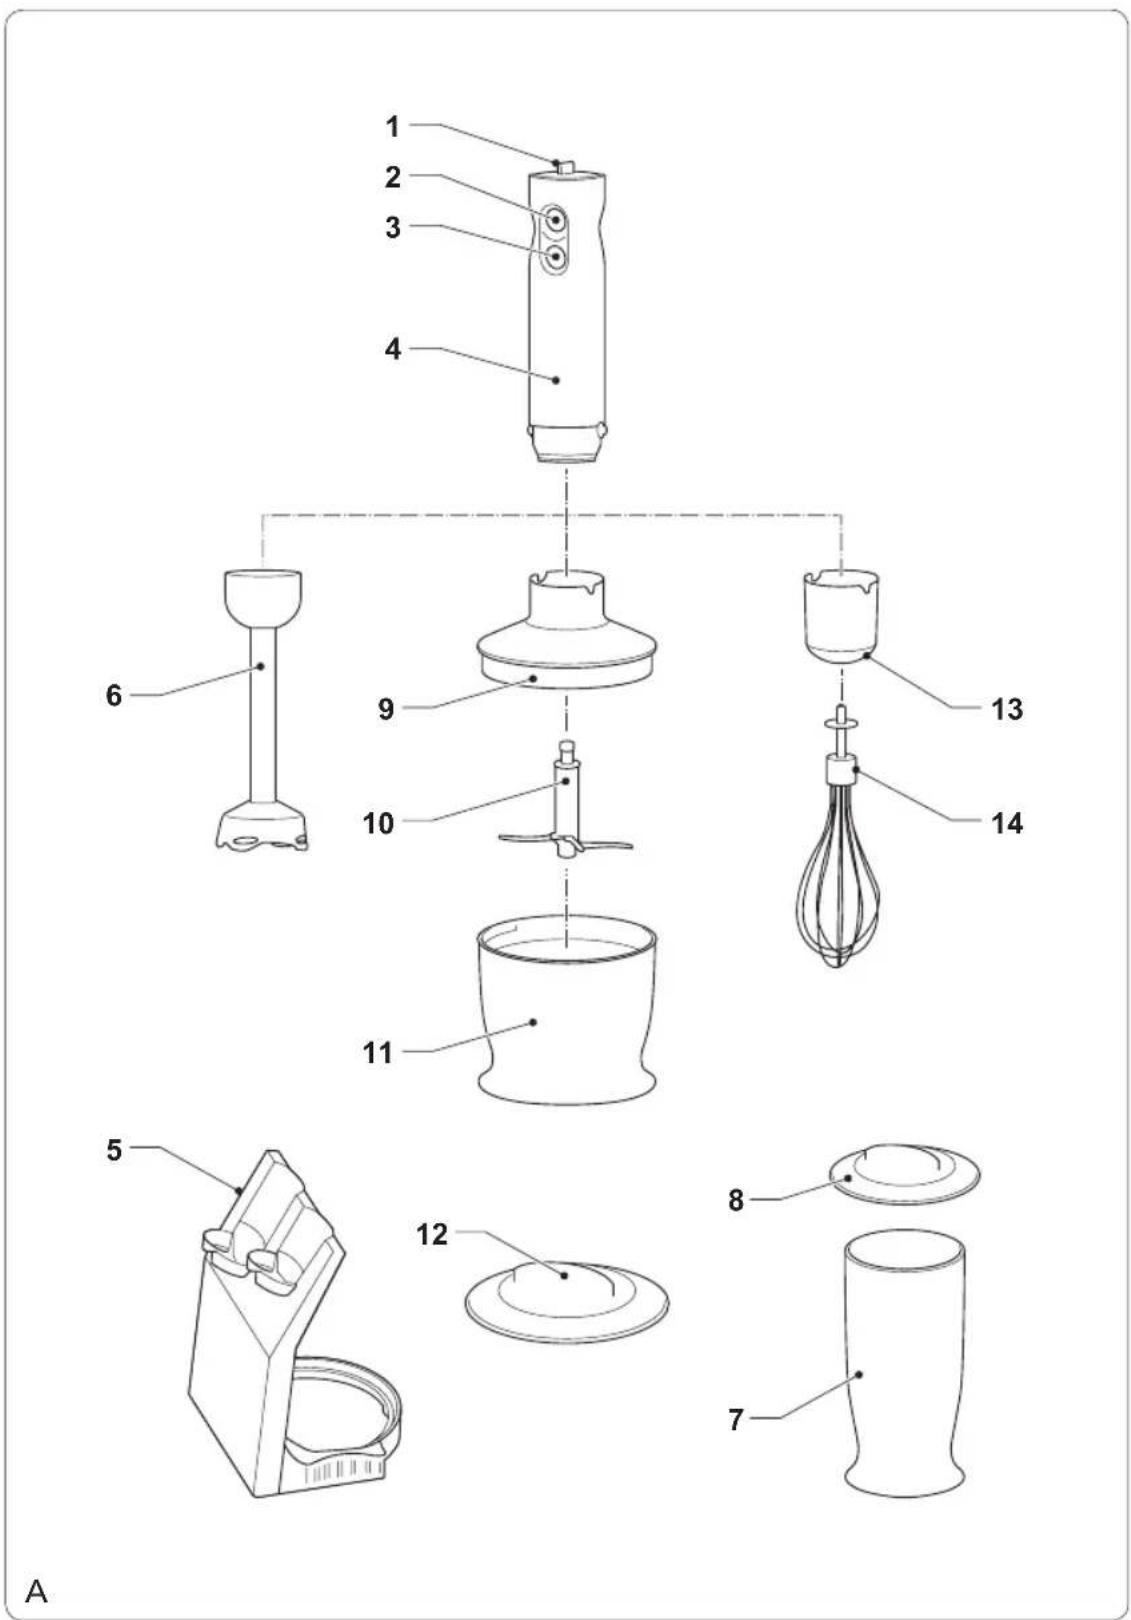
text_image
1 2 3 4 6 9 10 11 13 14 5 12 8 7 A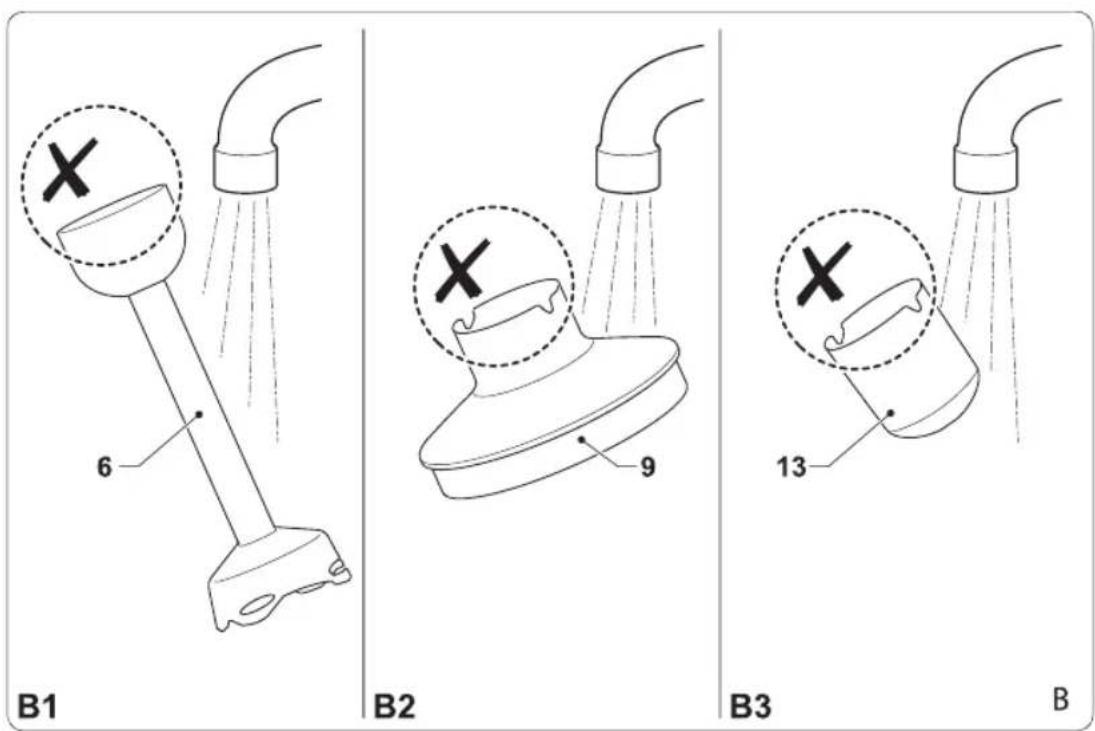
Read the manual carefully • before use. Keep the manual for future reference.
Only use the appliance and • the accessories for their intended purposes. Do not use the appliance and the accessories for other purposes than described in the manual.
Do not use the appliance if any part or any accessory is damaged or defective.
If a part or an accessory is damaged or defective, it must be replaced by the manufacturer or an authorised Electrical safety repair agent. Before use, al
The appliance is not intended for use by persons (including children) with reduced physical, sensory or mental capabilities, or lack of experience and knowledge, unless they have been given supervision or instruction concerning use of the appliance by a person responsible for their safety.
Children should be supervised to ensure that they do not play with the appliance. Do not use the appliance near bathtubs, showers, basins or other vessels containing water.
Do not immerse the • appliance in water or other liquids. If the appliance is immersed in water or other liquids, do not remove the appliance with your hands.
Immediately remove the mains plug from the wall socket.
If the appliance is immersed in water or other liquids, do not use the appliance again.
Clean the appliance and the • accessories. Refer to the section "Cleaning and maintenance".
Electrical safety
Before use, always check that the mains voltage is the same as the voltage on the rating plate of the appliance.
The appliance is not intended to be operated by means of an external timer or separate remote-control system.
Connect the appliance to an earthed wall socket. If necessary, use an earthed extension cable of a suitable diameter (at least 3 x 1 mm ^4 ).
For additional protection, • install a residual current
device (RCD) with a rated residual operating current that does not exceed 30 mA.
Make sure that water cannot • enter the contact plugs of the mains cable and the extension cable.
Always fully unwind the mains cable and the extension cable.
Make sure that the mains • cable does not hang over the edge of a worktop and cannot be caught accidentally or tripped over.
Keep the mains cable away • from heat, oil and sharp edges.
Do not use the appliance if the mains cable or the mains plug is damaged or defective. If the mains cable or the mains plug is damaged or defective, it must be replaced by the manufacturer or an authorised repair agent.
Do not pull the mains cable • to disconnect the mains plug from the mains.
Disconnect the mains plug from the mains when the appliance is not in use, before assembly or disassembly and before cleaning and maintenance.
Safety instructions for stick blenders
The appliance is suitable for • domestic use only.
Do not use the appliance • outdoors.
Do not use the appliance in • humid surroundings.
Keep the appliance away • from heat sources. Do not place the appliance on hot surfaces or near open flames.
Make sure that your hands • are dry before touching the appliance.
Do not touch moving parts. • Keep your hands away from the moving parts during use and during cleaning and maintenance.
Beware of sharp parts. Keep your hands away from the sharp parts. The appliance uses sharp blades in the blending attachment and the chopping attachment.
Beware of hot parts. Wait • until the appliance has cooled down before touching the housing and the parts of the appliance. The appliance becomes hot during use.
Be extra careful during • cleaning and maintenance.
Be extra careful when emptying the blending mug or the chopping container. Be extra careful when handling the sharp blade. Do not leave the appliance unattended during use.
Cleaning and maintenance (fig. A & B)
The appliance must be cleaned after each use.
Warning!
- Before cleaning or maintenance, switch off the appliance, remove the mains plug from the wall socket and wait until the appliance has cooled down.
- Do not immerse the appliance in water or other liquids.
Caution!
- Do not use aggressive or abrasive cleaning agents to clean the appliance.
- Do not use sharp objects to clean the appliance.
- Do not clean the motor unit, the blending attachment, the chopping attachment and the whisking attachment in the dishwasher.
Regularly check the appliance for possible damage.
Clean the motor unit (4) with a soft, damp cloth. Thoroughly dry the motor unit (4) with a clean, dry cloth.
Clean the accessories: •
- Blending applications: Clean the blending attachment (6) under running water (fig. B1). Clean the blending mug (7) and the lid (8) in soapy water or in the dishwasher. Rinse the blending mug (7) and the lid (8) under running water.
- Chopping applications: Clean the chopping attachment (9) under running water (fig. B2). Clean the chopping blade (10), the chopping container (11) and the lid (12) in soapy water or in the dishwasher.
Rinse the chopping blade (10), the chopping container (11) and the lid (12) under running water.
- Whisking applications: Clean the whisking attachment (13) under running water (fig. B3). Clean the whisk (14) in soapy water or in the dishwasher. Rinse the whisk (14) under running water.
- Thoroughly dry the accessories with a clean, dry cloth.
Description (fig. A)
Your 221203 Princess stick blender has been designed for blending, chopping and whisking applications. The appliance is suitable for indoor use only. The appliance is suitable for domestic use only.
- Inching switch
- On/off button (low speed)
- On/off button (high speed)
- Motor unit
- Accessory holder
Blending applications
- Blending attachment
- Blending mug
- Lid (blending mug)
Chopping applications
- Chopping attachment
- Chopping blade
- Chopping container
- Lid (chopping container)
Whisking applications
- Whisking attachment
- Whisk
Use (fig. A)
Warning!
- Before assembly or disassembly, switch off the appliance, remove the mains plug from the wall socket and wait until the appliance has cooled down.
Blending applications
The blending attachment (6) can be used for the following applications: preparing smoothies, shakes and juices; preparing cold soups; preparing dressings, dips and sauces.
Warning!
- Do not leave the appliance switched on continuously for more than one minute.
- Do not switch on the appliance when the blending mug (7) is empty.
- Make sure that the motor unit (4) and the blending attachment (6) do not come into contact with water or other liquids.
- The blending mug (7) and the lid (8) are not suitable for use in the microwave.
Mount the blending attachment (6) to the motor unit (4) by turning it counterclockwise until it clicks into place.
Put the ingredients into the blending mug · (7).
Insert the mains plug into the wall socket.
Place the blending mug (7) onto the lid (8) on a stable and flat surface.
Place the blending attachment (6) into the • blending mug (7). Make sure that the accessory is located in the ingredients.
Use the inching switch (1) to test whether the appliance blends the ingredients properly.
To switch on the appliance, keep the on/off button (2/3) pressed.
Move through the ingredients with a gentle up-and-down movement. The appliance blends the ingredients in a few seconds.
The longer the appliance is switched on, the finer the ingredients will be blended.
To switch off the appliance, release the • on/off button (2/3).
Remove the mains plug from the wall socket. Allow the appliance to cool down completely.
Remove the blending attachment (6) from the blending mug (7).
Remove the blending attachment (6) from the motor unit (4) by turning it clockwise.
Place the lid (8) onto the blending mug (7) • until you use the ingredients for further food processing.
Chopping applications
The chopping attachment (9) can be used for chopping meat (raw and cooked), vegetables, fruits (fresh and dried), nuts, herbs, spices, etc.
Warning!
- Do not leave the appliance switched on continuously for more than 10 seconds.
- Do not switch on the appliance when the chopping container (11) is empty.
- Make sure that the motor unit (4) and the chopping attachment (9) do not come into contact with water or other liquids.
- The chopping container (11) and the lid (12) are not suitable for use in the microwave.
Mount the chopping attachment (9) to the motor unit (4) by turning it counterclockwise until it clicks into place.
Place the chopping container (11) onto the lid (12) on a stable and flat surface.
Place the chopping blade (10) into the • chopping container (11).
Cut the food into pieces. Make sure that the • pieces of food fit in the chopping container (11).
Put the ingredients into the chopping • container (11).
Insert the mains plug into the wall socket. Place the chopping attachment (9) onto the chopping container (11).
Use the inching switch (1) to test whether the appliance chops the ingredients properly.
To switch on the appliance, keep the on/off button (2/3) pressed.
Firmly hold the appliance during the process. • The appliance chops the ingredients in a few seconds. The longer the appliance is switched on, the finer the ingredients will be chopped.
To switch off the appliance, release the on/off button (2/3).
Remove the mains plug from the wall socket. Allow the appliance to cool down completely.
Remove the chopping attachment (9) from the chopping container (11).
- Remove the chopping blade (10) from the chopping container (11).
Remove the chopping attachment (9) from the motor unit (4) by turning it clockwise. - Place the lid (12) onto the chopping container (11) until you use the ingredients for further food processing.
Whisking applications
The whisking attachment (13) can be used for beating eggs, whipping cream and frothing milk.
Warning!
- Do not leave the appliance switched on continuously for more than two minutes.
- Do not switch on the appliance when the mixing bowl is empty.
- Make sure that the motor unit (4) and the whisking attachment (13) do not come into contact with water or other liquids.
Insert the whisk (14) into the whisking · attachment (13).
Mount the whisking attachment (13) to the motor unit (4) by turning it counterclockwise until it clicks into place.
Place a mixing bowl on a stable and flat surface.
Put the ingredients into the mixing bowl. Insert the mains plug into the wall socket.
Place the whisk (14) into the mixing bowl.
Make sure that the accessory is located in the ingredients.
Use the inching switch (1) to test whether the appliance whisks the ingredients properly. To switch on the appliance, keep the on/off button (2/3) pressed.
Move the appliance clockwise during the process.
To switch off the appliance, release the on/ off button (2/3).
Remove the mains plug from the wall socket.
Allow the appliance to cool down • completely.
Remove the whisk (14) from the mixing bowl. Remove the whisking attachment (13) from the motor unit (4) by turning it clockwise.
Remove the whisk (14) from the whisking attachment (13).