
Sense CM461 - Coffee machine Caple - Free user manual and instructions
Find the device manual for free Sense CM461 Caple in PDF.


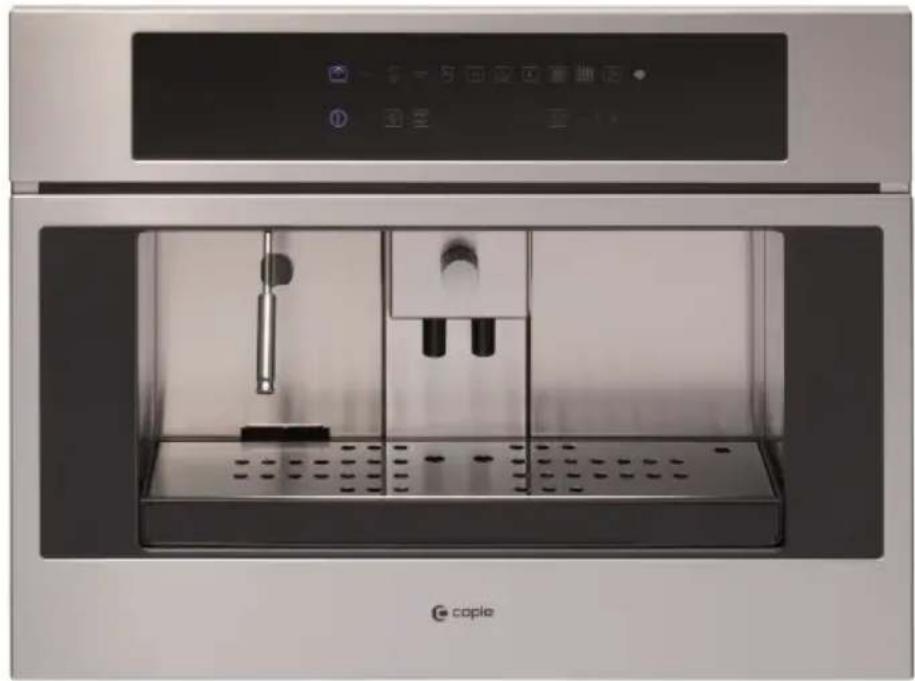
| Product Type | Built-in Coffee Machine |
| Brand | Caple |
| Model | Sense CM461 |
| Dimensions (W x D x H) | 594 x 475 x 445 mm |
| Net Weight | 26 kg |
| Power Supply | 230 V, 2000 W |
| Pressure | 12 bars |
| Water Tank Capacity | 2.5 L |
| Bean Hopper Capacity | Approx. 200 g |
| Coffee Types | Espresso, long coffee, double coffee |
| Functions | Coffee, diluted coffee, hot water, steam |
| Integrated Grinder | Yes, adjustable |
| Descaling Filter | Yes, included |
| Compartment Lighting | Yes, LED |
| Water Shortage Alarm | Yes |
| Coffee Grounds Alarm | Yes |
| Automatic Wash Function | Yes |
| Programming | Quantity of ground coffee and water |
| Standby Mode | After 45 minutes of inactivity |
| Maintenance | Drip tray and water tank dishwasher safe |
| Installation | Built-in, height 460 mm, width 560-568 mm |
| Replacement Parts | Available from authorized service centers |
Frequently Asked Questions - Sense CM461 Caple
User questions about Sense CM461 Caple
0 question about this device. Answer the ones you know or ask your own.
Ask a new question about this device
Download the instructions for your Coffee machine in PDF format for free! Find your manual Sense CM461 - Caple and take your electronic device back in hand. On this page are published all the documents necessary for the use of your device. Sense CM461 by Caple.
USER MANUAL Sense CM461 Caple
Instruction: structural for built-in-lake office in a coffee machine
Model code: CM461 CM471SS / WH
natural_image
Exterior view of a modern stainless steel appliance with digital display and control panel (no visible text or symbols)Caro Cliente,
natural_image
Simple line drawing of a laboratory apparatus with a tray, beaker, and control panel (no text or labels)1. PER LA VOSTRA SICUREZZA
Apparecchiature in disuso
natural_image
Isometric line drawing of a mechanical assembly with a base plate and support frame (no text or symbols)natural_image
Technical line drawing of two mechanical assembly components with mounting brackets and fasteners (no text or symbols)natural_image
Technical line drawing of a mechanical assembly inside a transparent housing (no text or symbols)natural_image
Technical line drawing of a cabinet or enclosure with internal components and mounting brackets (no text or symbols)natural_image
Isometric line drawing of a cabinet or storage unit with internal compartments and a door (no text or symbols)natural_image
Pure electrical circuit lines without any symbolsnatural_image
Technical line drawing of a cabinet or enclosure with ventilation slots and a mounted device (no text or symbols)natural_image
Pure electrical circuit lines without any symbolsnatural_image
Isometric line drawing of a modular device with a power cord and control panel, no text or symbols present4. DESCRIZIONE DELLA MACCHINA DA CAFFE'
Pannello comandi
natural_image
Line drawing of a monitor displaying a small screen with icons, next to a keyboard and directional arrow (no text or symbols)natural_image
Line drawing of a room interior with furniture and fixtures (no text or symbols)natural_image
Technical line drawing of a cabinet or enclosure with internal components and directional arrows (no text or symbols)natural_image
Technical line drawing of a mechanical assembly with internal components (no text or symbols)
natural_image
Technical line drawing of a mechanical assembly or enclosure with no visible text or symbolsnatural_image
Technical line drawing of a mechanical device with internal components and mounting bracket (no text or symbols)natural_image
Technical line drawing of a machine with a circular component and granular material being processed (no text or symbols)natural_image
Technical line drawing of a cabinet or enclosure with internal components and mounting brackets (no text or symbols)natural_image
Technical line drawing of a device with an attached cable and a close-up inset showing a component (no text or symbols)natural_image
Technical line drawing of a mechanical assembly with rotating components and a central shaft (no text or symbols)

SOLO PER UTENTI ESPERTI:
Beccuccio vapore
natural_image
Two technical line drawings of a cabinet or rack with internal compartments and mounting holes (no text or symbols)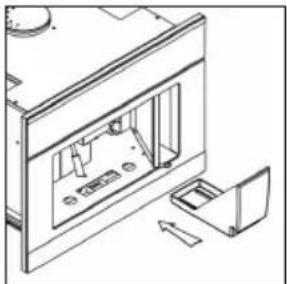
natural_image
Line drawing of an open refrigerator with internal compartments and a door handle (no text or symbols)we would like to thank you and congratulate you on your choice.
This new product has been carefully designed and built using top quality materials, and meticulously tested to ensure that it meets all your culinary requirements.
Please read and observe these simple instructions, which will enable you to achieve excellent results from the very first time you use it. This state-of-the-art appliance comes to you with our very best wishes.
Caple

Italiano

English


Français

Deutsch

Español

Português
THIS PRODUCT IS DESIGNED FOR DOMESTIC USE. THE MANUFACTURER DECLINES ALL RESPONSIBILITY FOR DAMAGES TO THINGS OR PEOPLE DERIVING FROM INCORRECT INSTALLATION OR IMPROPER, ERRONEOUS OR UNSUITABLE USE.
THE APPLIANCE MUST NOT BE USED BY PEOPLE (INCLUDING CHILDREN) WITH PHYSICAL, SENSORIAL OR MENTAL IMPAIRMENTS, OR BY PEOPLE WITHOUT THE NECESSARY EXPERIENCE OR KNOWLEDGE, UNLESS THEY ARE SUPERVISED OR INSTRUCTED IN THE USE OF THE APPLIANCE BY A PERSON RESPONSIBLE FOR THEIR SAFETY.
CHILDREN MUST BE SUPERVISED TO ENSURE THAT THEY DO NOT PLAY WITH THE APPLIANCE.
CONTENTS
1. FOR YOUR SAFETY
- During use
- For installation and maintenance
2. RECOMMENDATIONS FOR THE PROTECTION OF THE ENVIRONMENT
- Packing
- Obsolete equipment
3. INSTALLATION
• Installation in modular furniture
- Components for the installation of the machine
• Installation of the machine
• Electrical connection
4. DESCRIPTION OF THE COFFEEMAKER
5. TECHNICAL CHARACTERISTICS
- Fuses
6. DESCRIPTION OF THE CONTROL PANEL TOUCH BUTTONS
7. FIRST USE
- Fill the water tank
- Fill the container with coffee beans
- Turning on the machine in standby mode
• Regulation of the ground coffee - Wash function
8. DISPENSING COFFEE
9. DISPENSING HOT WATER
SYMBOLS
While reading this manual you will come across the following symbols:

ATTENTION: important instructions for the safe and correct use of the coffee machine

information useful for the optimal use of the equipment.
10. DISPENSING STEAM
11. PROGRAMMING THE QUANTITY OF GROUND COFFEE
12. PROGRAMMING THE QUANTITY OF HOT WATER
- Restoring the factory settings
13. ILLUMINATION OF THE DISPENSING COMPARTMENT
14. WARNINGS AND ALARMS
- No water warning
- Replace filter warning
• Coffee grounds warning
• Coffee probe broken warning - Generic alarm warning
15. RECIPES
- Italian Cappuccino
• Viennese Cappuccino
• Cold Espresso Chilled in a Shaker - Irish coffee
- Mexican Coffee
• Cappuccino Ice Cream
16. CLEANING AND MAINTENANCE
- External parts
- Steam nozzle
- Drip basin
• Emptying used coffee grounds - Water tank
17. TROUBLESHOOTING
18. SERVICE, REPLACEMENT PARTS AND WARRANTY
natural_image
Pure technical line drawing of a mechanical or electrical component layout without any text, numbers, or symbols1. FOR YOUR SAFETY
Although the machine is simple to use, it that you read the entire booklet before installing or using the machine for the first time. By doing so, you will achieve the best performance, avoid mistakes, use the machine in absolute safety and protect the environment.
During use
- This machine must only be used by adults. Other-abled persons can use the machine only if there is a person responsible for their safety that will supervise and instruct them in the use of the machine.
- Make sure that children do not touch the controls or play with the machine.
- This machine is intended for home use; another use is considered improper and therefore, dangerous.
• Always keep the machine clean. - It is dangerous to modify, or attempt to characteristics of this product.
- The exposed parts of this machine get hot during operation and remain hot for a certain period of time after it is turned off. Keep children away until the machine has cooled.
- Do not touch the hot surfaces during use but use the knobs or handles.
- Make sure the machine is disconnected electric mains before any maintenance or cleaning.
- If the machine breaks, do not try and repair it yourself. Repairs made by unqualified persons can cause damage and accidents. Consult the contents of this booklet. If you don't find the information you need, contact the nearest service centre. This machine must be serviced by an authorised Service Centre. Always request the use of original replacement parts.
For installation and maintenance
- Afterunpackingthemachine, check that the product has not been damaged and that the power cord is in perfect condition. If not, contact the retailer before operating the machine.
- The packing materials (plastic bags, styrofoam, etc.) must not be left within the reach of children because they are potentially dangerous.
- Before use, check that the voltage and power listed on the machine's nameplate match the line to which it will be connected. Also make sure that the building has an efficient earth line and a suitable circuit breaker.
- Any service must be performed by speci personnel.
- The manufacturer will not be liable if these rules are not followed.
2. RECOMMENDATIONS FOR THE PROTECTION OF THE ENVIRONMENT Important
Packing
All packing materials used are safe for the environment and recyclable. Please make your contribution to protecting the environment by disposing of the packing in the appropriate recycling bins.
Obsolete equipment
- Machines that are obsolete or no longer used should not be thrown away in the general rubbish. Through ecological disposal, the various materials used in the production of your machine can be recovered.
- Ask your specialised reseller or your local council about disposal options.
- Before scrapping the machine, cut the power cord to make it unusable.
It is very important to keep this instruction booklet for modify the consultation. If the machine is sold or given to another person, make sure to give the booklet to the new user so that they will be informed about the operation of the machine and the relative warnings.

This symbol on the product or packaging means that the product must not be thrown away in household waste but must be taken to a collection point for recycling electrical and electronic equipment. By disposing of this product properly, you will avoid potential damage to the environment and health caused by the incorrect disposal of the product. For more detailed information about recycling this product, contact your city administration, local waste disposal service or the store where you purchased it.
3. INSTALLATION OF THE MACHINE
"BUILT-IN" INSTALLATION IN MODULAR FURNITURE
For the good operation of the machine when built-in to modular furniture, the latter must have suitable characteristics.
In conformity with safety standards, protection against contact with electrical parts and parts protected with just functional insulation must be provided through the correct housing of the machine.
All the parts that provide protection, including any covering panel (for example, if the machine is positioned at the end or beginning of the modules), must be fastened in such a way that they cannot be removed with the aid of a tool.
It is also a good idea to install the machine at a certain distance from refrigerators or freezers because the heat it emits could affect their operation.
Components for the installation of the machine
The machine must be installed in compartments that are 460 mm high and between 560 and 568 mm wide. The following installation components are supplied with the machine.
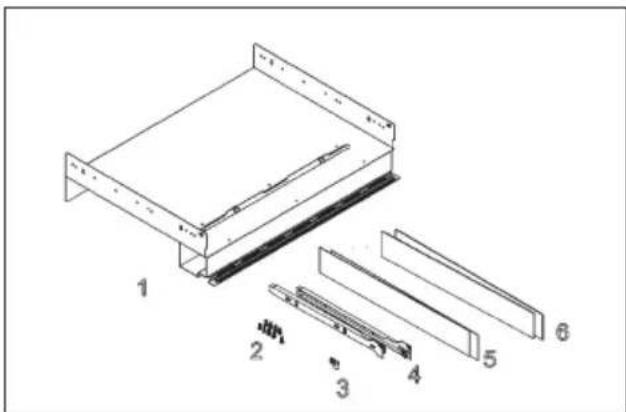
- Fixed support of the machine.
- N°13 self-threading screws 3.9X19
- N°1 fixed power cord
- N°2 lateral guides
- N°2 lateral 1-mm plates
- N°2 lateral 2-mm plates
Installation of the machine
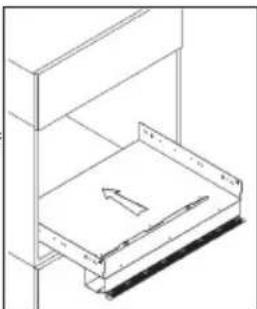
Position the fixed part provided by resting it on the surface of the furniture
natural_image
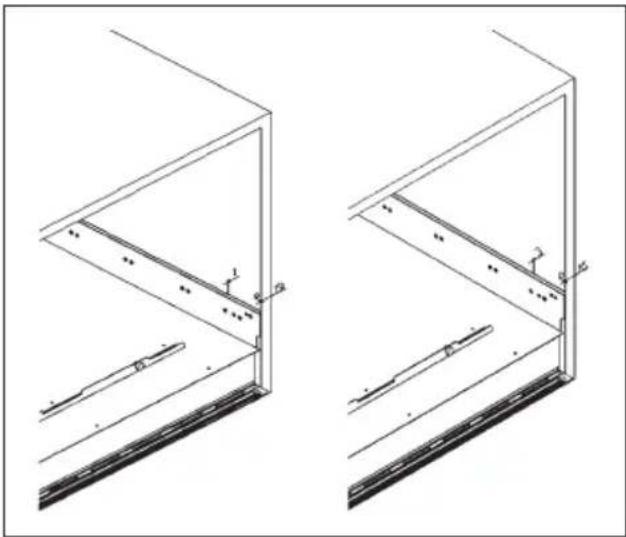
Technical line drawing of a mechanical assembly with a base plate and support frame (no text or symbols)Insert the side plates needed to compensate for any empty spaces. The width of the compartment that houses the machine is determined by the thickness of the sides of the furniture. Four plates are supplied to compensate for the different measures obtainable, two that are 2 mm thick and two that are 1 mm thick. They are used to compensate for the internal width of the compartment to obtain an measurement of 562-560 mm.
natural_image
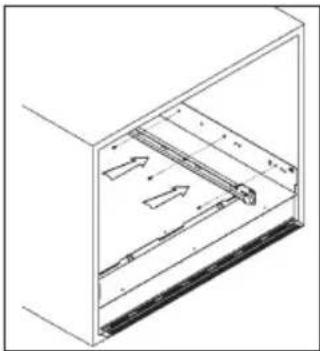
Technical line drawing of two structural frame components with mounting brackets and support beams (no text or symbols)Then mount the 2 guides using the remaining 8 self-threading screws.
natural_image
Technical line drawing of a mechanical assembly inside a transparent enclosure, showing internal components and motion arrows (no text or symbols)Insert the machine by matching up the guides with the supports already mounted in the compartment.

natural_image
Technical line drawing of a cabinet or enclosure with mounting brackets and internal compartments (no text or symbols)Slide it all the way in until the safety stops click.
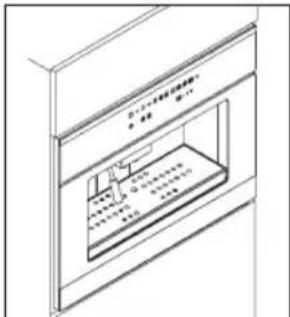
natural_image
Isometric line drawing of a cabinet or storage unit with internal compartments and doorways (no text or symbols)Electrical connection
Fasten the power to the left side of the compartment using one of the self-threading wood screws provided and the fixed cord as indicated in the figure.
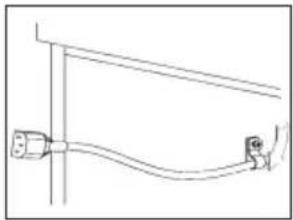
natural_image
Pure electrical circuit lines without any symbolsLoosen the fixed cord mounted on the machine.
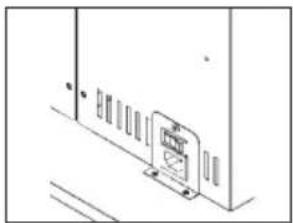
natural_image
Simple line drawing of a cabinet or enclosure with ventilation slots and a door (no text or symbols)Tighten the power cord on the machine, as shown in the figure.
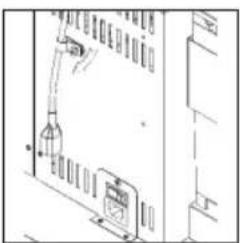
natural_image
Pure technical line drawing of a mechanical assembly without any text, numbers, or symbolsConnect the power cord as shown in the figure.
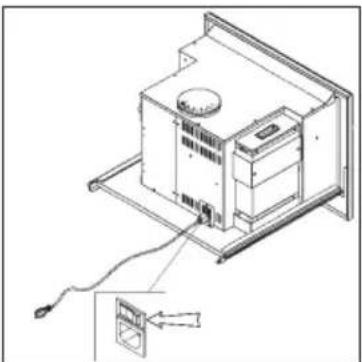
natural_image
Isometric line drawing of a modular device with a cable and power outlet, no text or symbols present4. DESCRIPTION OF THE COFFEEMAKER
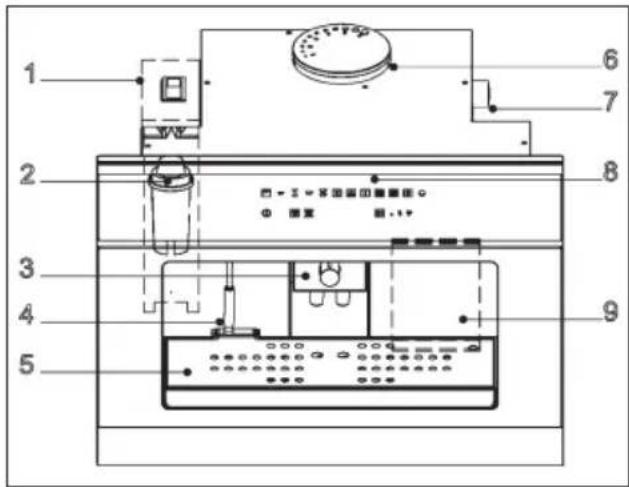
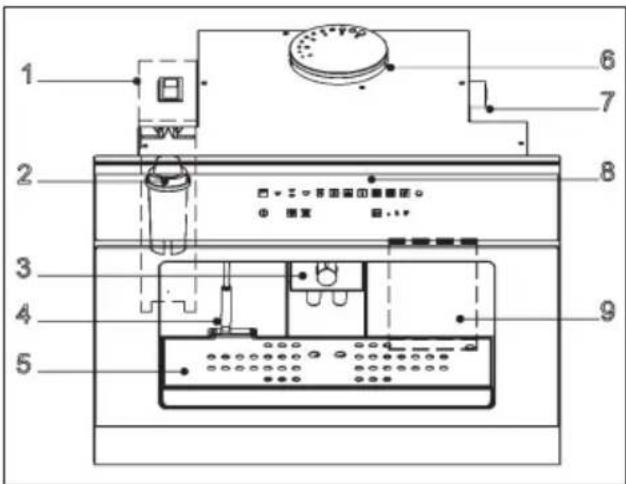
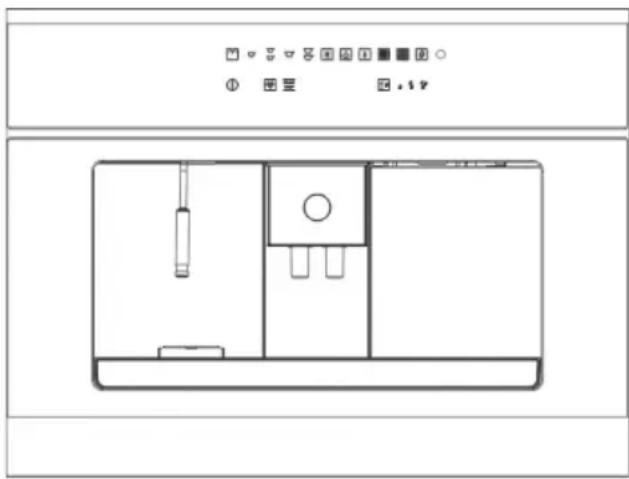
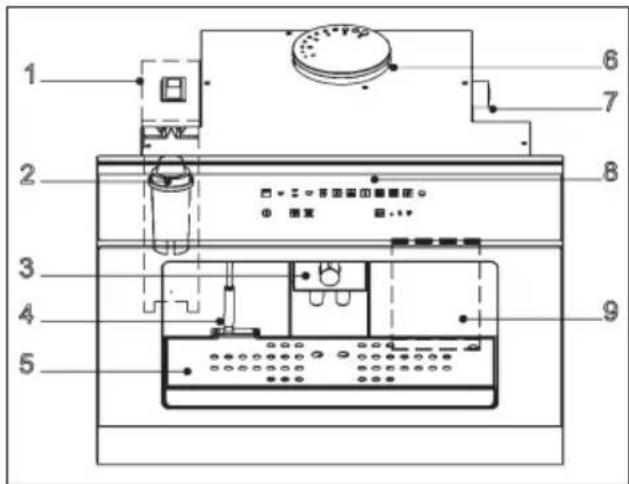
- Water tank
- Decalcifying filter
- Dispenser
- Water/steam dispensing nozzle
- Drip basin
- Coffee container
- Grind regulation knob
- Control panel
- Door/tray for emptying the coffee grounds
5. TECHNICAL CHARACTERISTICS
| Width 594 mm | |
| Depth 475 mm | |
| Height 445 mm | |
| Tank capacity 2.5 l | |
| Net weight 26 kg | |
| Gross weight 31 kg | |
| Power supply voltage | 230 V |
| Rated power | 2000 W |
| Power absorbed by the heating elements | 1700 W |
| Power absorbed by the pump | 50 W |
| Operating pressure | 12 bar |
6. DESCRIPTION OF THE CONTROL PANEL: TOUCH BUTTONS
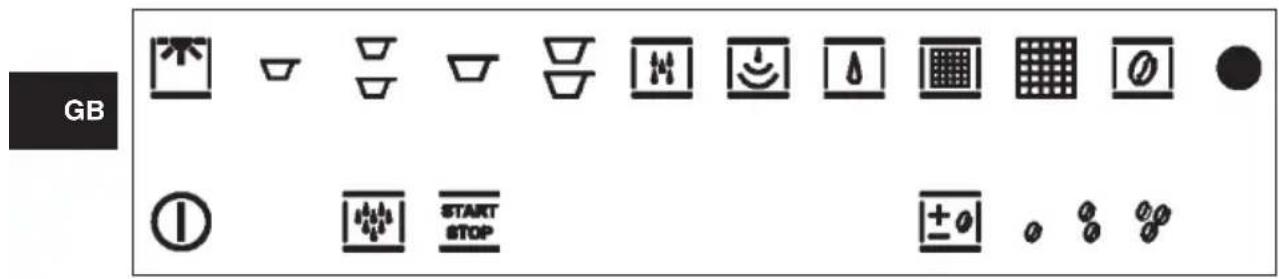
Control panel
Description of the buttons and indicator lights on the control panel.
 | ON/OFF button |
 | START/STOP button |
 | COFFEE button |
 | STRETCHED COFFEE button |
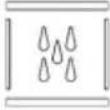 | WATER button |
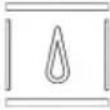 | NO WATER alarm |
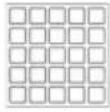 | GROUNDS PRESENT alarm |
 | GENERIC ALARM |
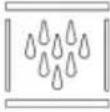 | WASH button |
 | LIGHT button |
 | DOUBLE COFFEE button |
 | DOUBLE STRETCHED COFFEE button |
 | STEAM button |
 | REPLACE FILTER alarm |
 | COFFEE probe broken alarm |
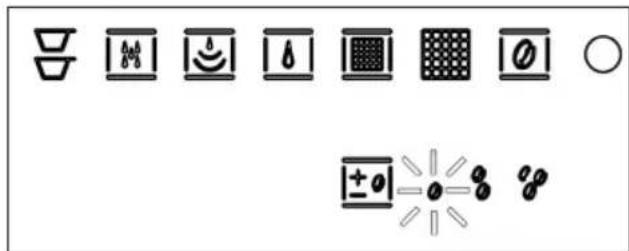
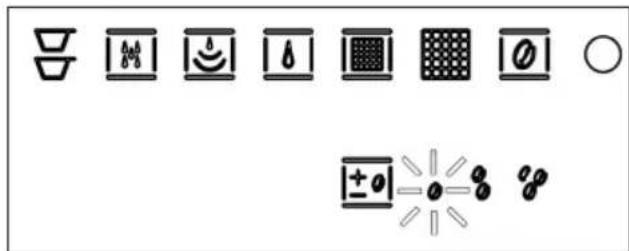
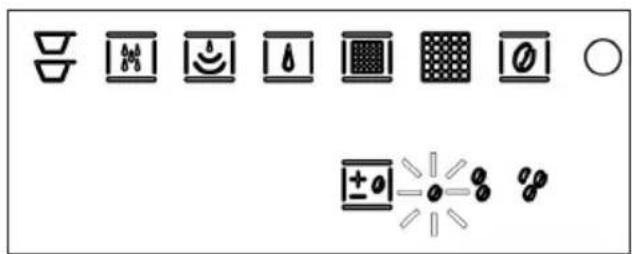
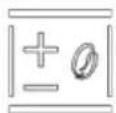 | COFFEE regulation |
 | LIGHT COFFEE |
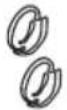 | MEDIUM COFFEE |
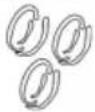 | STRONG COFFEE |

The exclusive feature of this model is the use of touch-control technology. Just touch the area of the symbol and the machine will perform the corresponding function. However, you will notice that you must exert slight pressure to activate the controls, just like a normal button; this is to avoid accidental commands.
7. FIRST USE
Fill the water tank
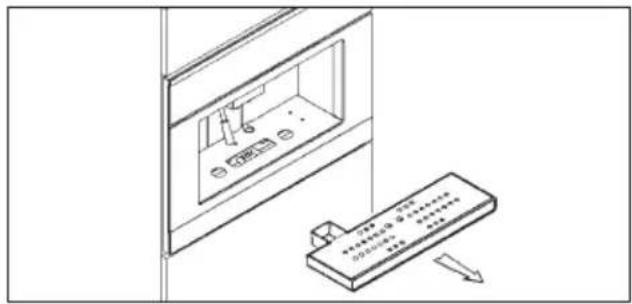
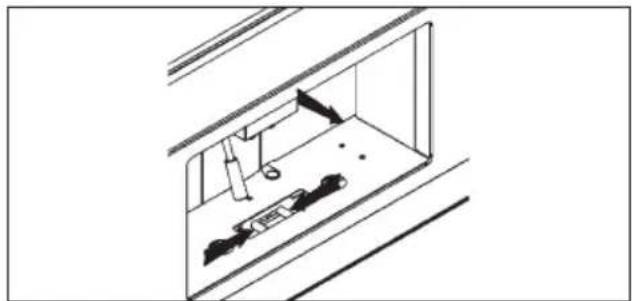
Fig. 7.1 Remove the drip basin from its seat
natural_image
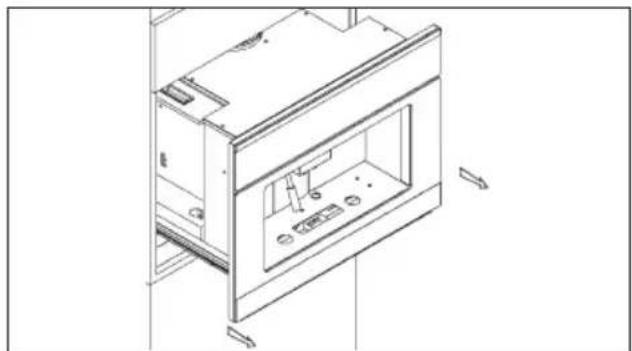
Technical line drawing of a mechanical assembly inside a housing (no text or symbols)Fig. 7.2 Press the unlocking lever under the drip basin and pull the machine towards you as shown in the figure.
natural_image
Technical line drawing of a mechanical device with internal components and mounting brackets (no text or symbols)Fig. 7.3 Pull the coffeemaker out of the furniture by sliding it on its guides.
natural_image
Technical line drawing of a mechanical assembly with internal components (no text or symbols)GB
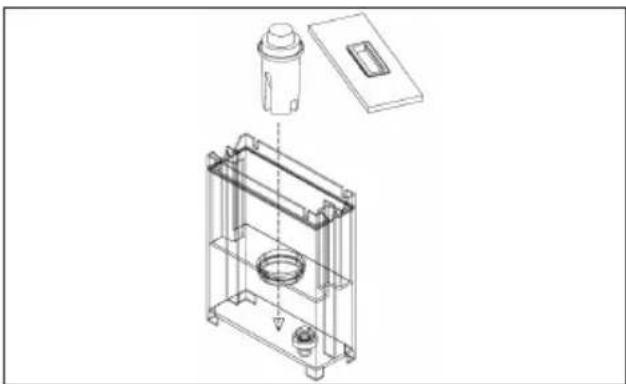
Fig.7.4 Insert the decalcifying filter in its seat. Before filling the water tank, make sure that the decalcifying filter was soaked in cold water for at least 20 minutes (in any case, follow the instructions on the filter package). After soaking, insert it in its seat inside the tank, as shown in the figure, until you hear a click. If the machine has not been used in a long time, we recommend changing the water in the tank.
The filter can be purchased at an appliance store, our Service Centres or at authorised replacement parts stores.
natural_image
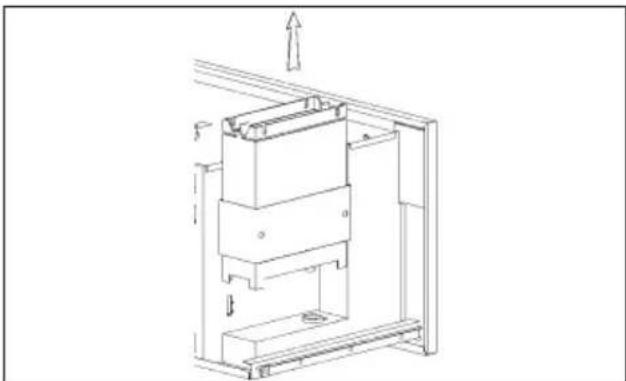
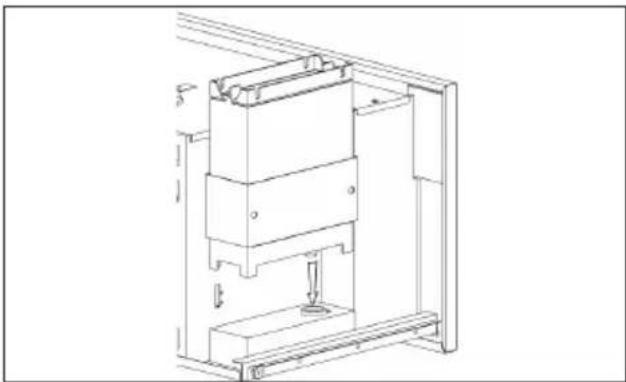
Technical line drawing of a mechanical assembly with no visible text or symbolsFig. 7.5 Remove the water tank as shown in the figure and fill it with drinking water (about 2.5 litres).
natural_image
Technical line drawing of a mechanical device with internal components and mounting bracket (no text or symbols)Fig. 7.6 Put the tank back in its seat, taking care to match up the two connections on the bottom.

Fill the container with coffee beans
natural_image
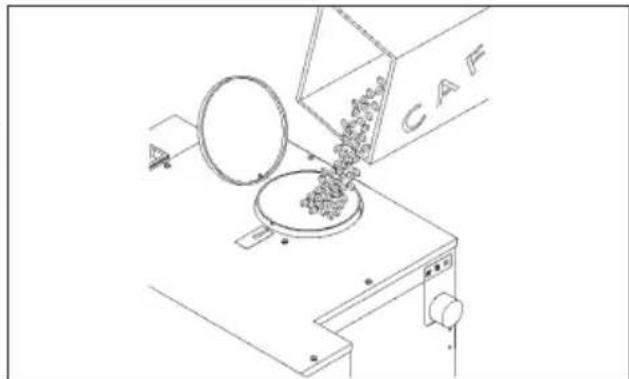
Technical line drawing of a machine with a circular component and granular material inside, labeled 'CAF' (no text or symbols beyond label)Fig. 7.7 Pour about 200 g of coffee beans in the coffee container.
natural_image
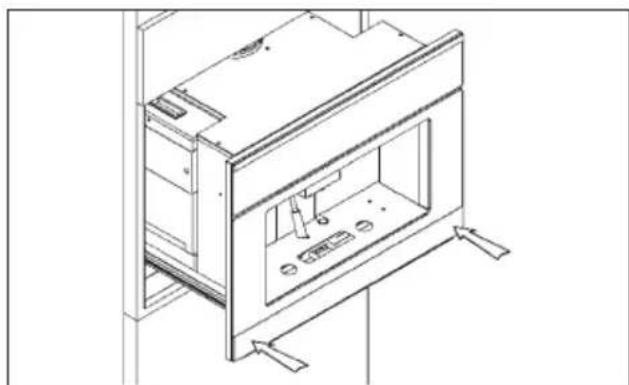
Technical line drawing of a cabinet or enclosure with internal components and mounting brackets (no text or symbols)Fig. 7.8 Push the machine back into the compartment until you hear a "CLICK!", which means it's locked into place.

ATTENTION: before pouring beans into the grinder, make sure that there are no foreign bodies in the coffee.
Turning on the machine in standby mode
natural_image
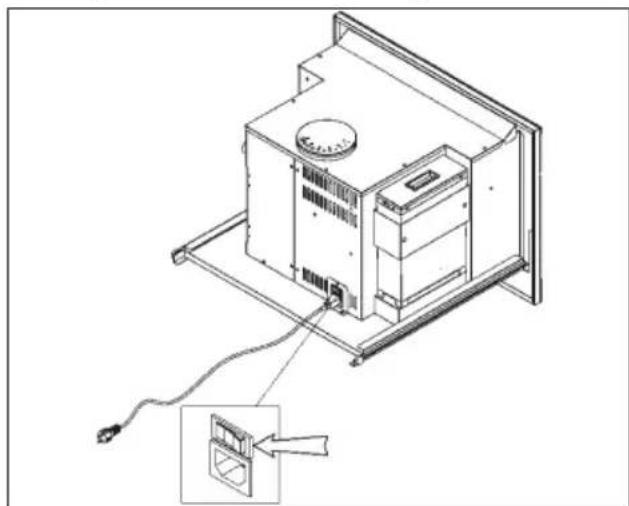
Technical line drawing of an electrical enclosure with a cable and a close-up inset showing a component (no text or symbols)Fig. 7.9 Pull out the machine.
Turn the main switch, located on the back of the machine, to position "1".
After you push the machine back into the furniture, it is ready to use.
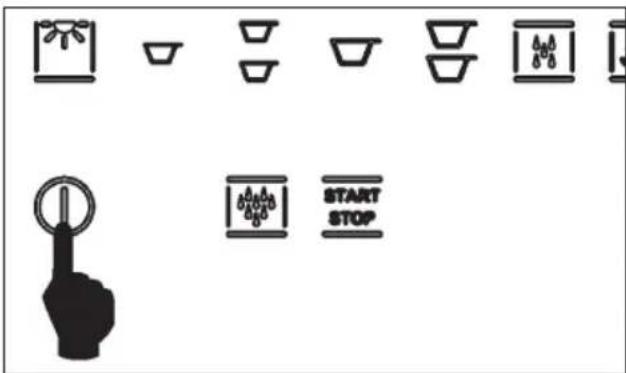
Fig. 7.10
To exit standby mode, you must press the on/off button, as shown in Fig. 8.10. The LED will begin to flash until the machine is "ready". At this point, all the LEDs for the various services will be lit.
NOTE: If the machine is not used for 45 minutes, it returns to standby mode.
REGULATION OF THE GROUND COFFEE

ATTENTION: The fineness of the coffee grind is calibrated at the factory.
This fineness has a strong influence on producing good coffee. Too “coarse” a grind produces coffee that flows quickly without creaminess and body. On the other hand, too fine a grind produces coffee that “drips” with a very intense taste and a “burned” smell. Keep in mind that producing a cup of espresso coffee takes from 20 to 30 seconds.
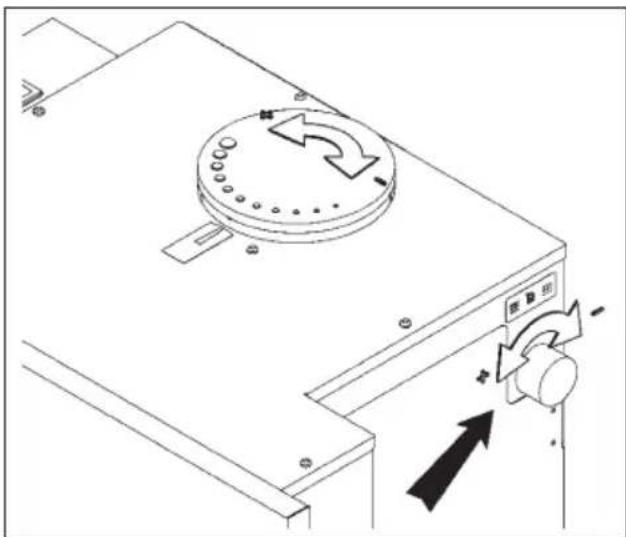
To regulate the grind, you must pull out the machine as shown in figures 8.1 to 8.3. Turn the regulation knob on the right side, as shown in Fig. 8.11.
natural_image
Technical line drawing of a mechanical device with a circular knob and directional arrows indicating motion (no text or symbols)Turning the knob clockwise produces a finer grind and stronger coffee. Turning the knob counter-clockwise produces a coarser grind and lighter coffee. The grinding fineness can be read on the cover of the container.
Wash function on first start-up
The wash function is only mandatory when the machine is powered up for the first time. The wash key illuminates. By pressing the START button, the machine performs a wash cycle. It is now ready to be used
For subsequent start-ups see below
8. DISPENSING COFFEE
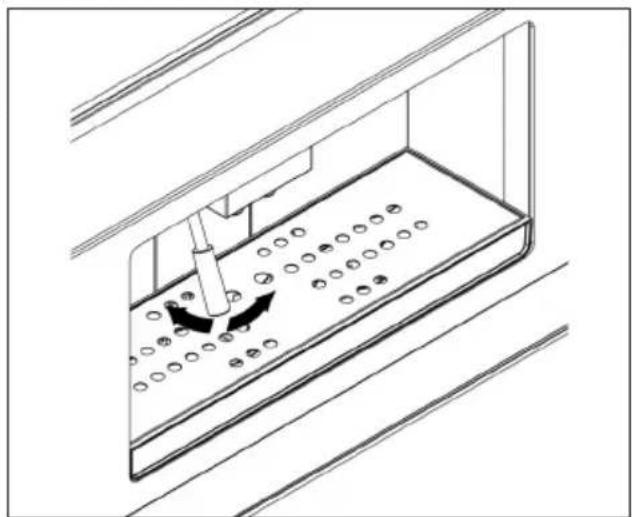
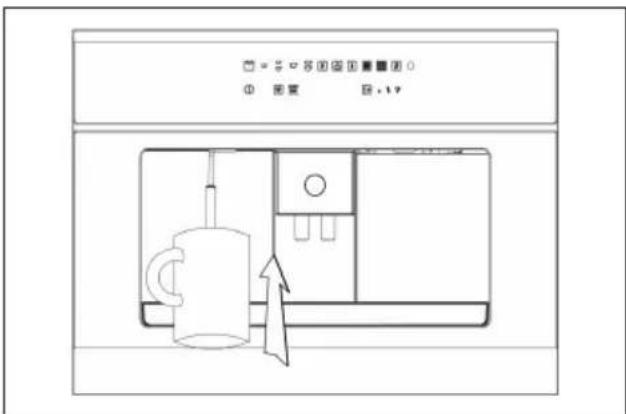
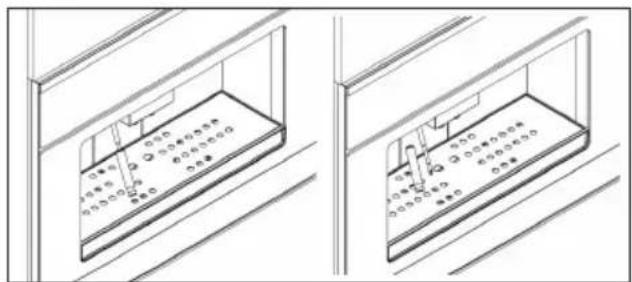
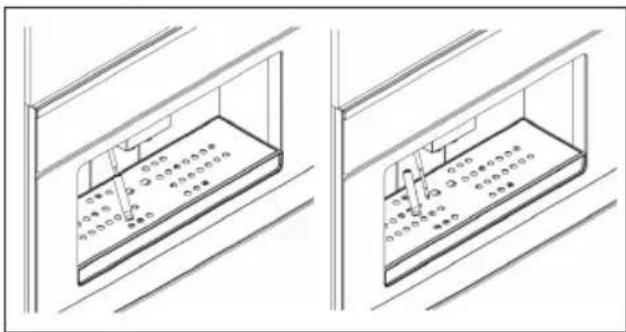
Place a cup under the dispenser, adjust the height of the dispenser nozzle with the handle: turning it raises or lowers the nozzles, as shown in Fig. 9.1.
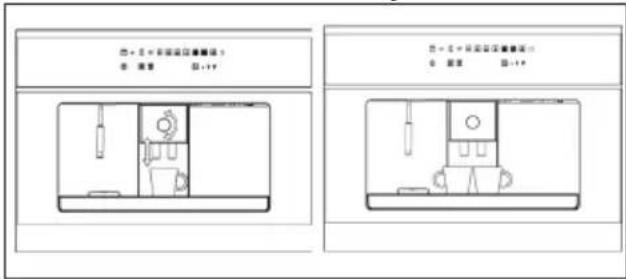
When you want a double coffee, you can place two cups under the dispenser at the same time.
The rest of the paragraph explains how to dispense one coffee. The procedure is similar for double coffee, stretched coffee and two stretched coffees.

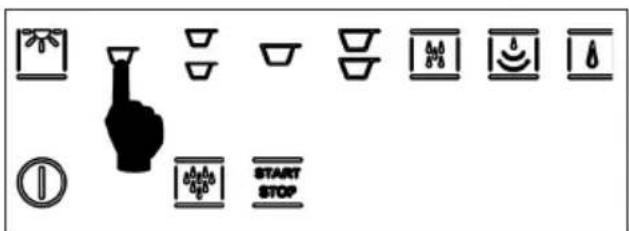
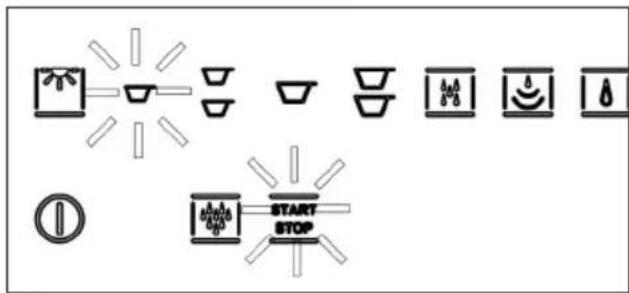
Press the button for the selection you want (in Fig. 7.1 it is espresso coffee).
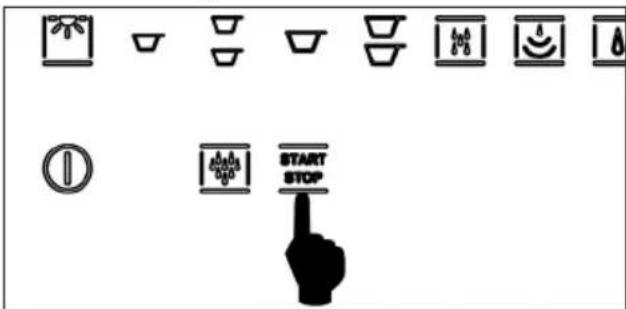
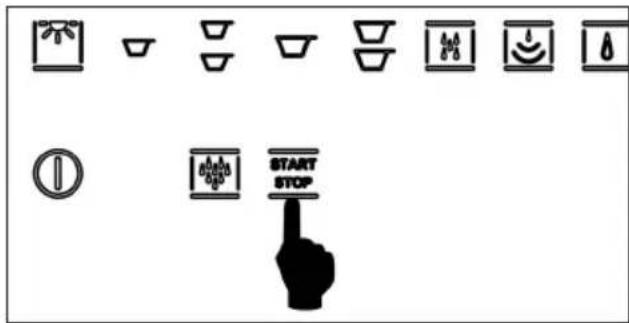
Press the START/STOP button within 10 seconds of your selection and wait for the coffee to be dispensed. Dispensing ends automatically when the quantity of coffee for the selection has been reached. This quantity is preset in the machine but can be changed, see paragraph 13.
You can stop dispensing at any time by pressing the START/STOP button.

ATTENTION: if the START button is not pressed within 10 seconds, the function is disabled. If you wish to dispense a beverage, you will have to repeat the procedure.

USEFUL TIPS FOR PREPARING AN EXCELLENT ESPRESSO
- The dispensing time for an excellent espresso is about 15-25 seconds. The factors that influence the dispensing time are the fineness of the grind and the quantity of ground coffee. If necessary, the fineness of the grind and dose of ground coffee can be changed. (See chapter 8, First use). - Coffee is a hygroscopic substance, which means that its characteristics are closely linked to the climate (humidity). So, remembertogrind the coffee earser when the air is very humid and finer when the air is drier.
NOTE: Fresh coffee beans have a limited life and should not be left in the machine for long periods of time. Older beans become soft and can clog the grinder mechanism. Once opened, coffee beans should be stored in a air tight container out of direct light. For best results, always use fresh coffee beans
9. DISPENSING HOT WATER
To dispense hot water, suitably position the water/steam nozzles, see Fig. 10.1

natural_image
Technical line drawing of a mechanical assembly with circular holes and directional arrows (no text or symbols)- Position a container below the water/steam nozzle.
- Press the hot water button.
- Press the START button with 10 seconds from making your selection. The water will be dispensed as long as the button is pressed; to stop dispensing, release the button.

ATTENTION: if the start button is not pressed within 10 seconds, the function is disabled. If you wish to dispense a beverage, you will have to repeat the procedure.

We recommend that you do not dispense hot water immediately after dispensing steam.
10. DISPENSING STEAM
To dispense steam, press the steam button. The corresponding indicator light will flash for 15 seconds. As soon as the indicator light stops flashing and remains steady on, the machine is ready to dispense steam.
- Place the container with the liquid to be heated below the steam nozzle.
- Completely immerse the nozzle in the liquid to be heated.
- Press the START button within 10 seconds from making your selection and wait for the steam to come out.
ATTENTION: if the start button is not pressed within 10 seconds, the function is disabled. If you wish to dispense a beverage, you will have to repeat the procedure.
The steam will continue to flow until you release the START button.

If you are preparing milk for a cappuccino, we suggest that you agitate the milk container for better results.
11. PROGRAMMING THE QUANTITY OF GROUND COFFEE
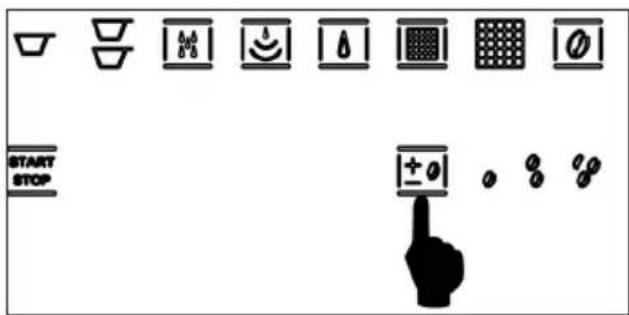
You can choose from three strengths of coffee:
• light;
- medium;
• strong.
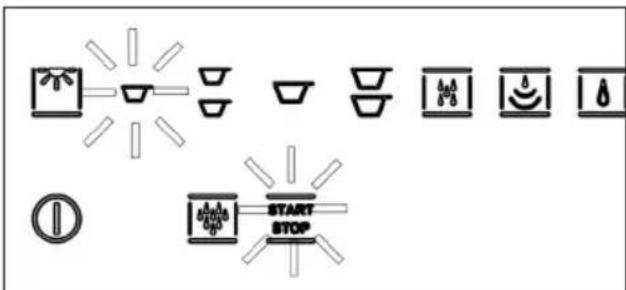
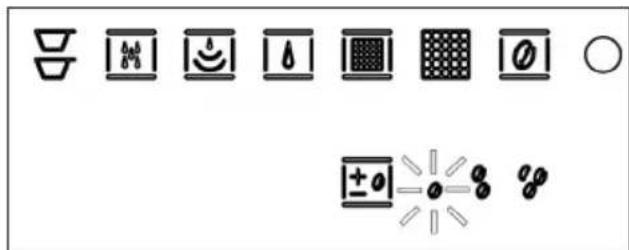
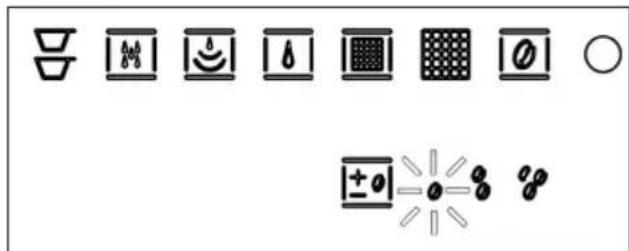
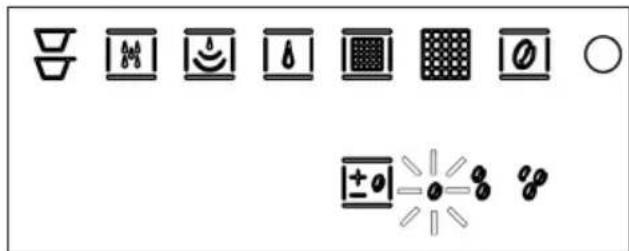
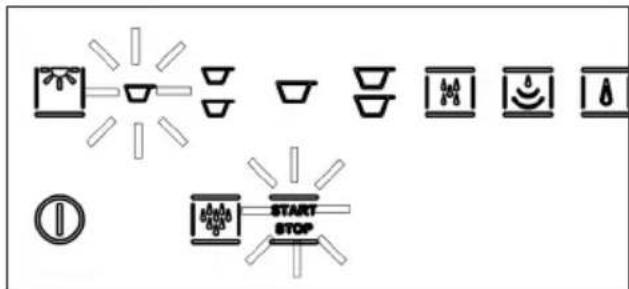
To change from one type of coffee to the other, just press the button as shown in Fig. 12.1. The LED for the selected coffee will light (in Fig. 12.2, light coffee).

FOR EXPERT USERS ONLY:
PROGRAMMING THE GRINDING TIME
The grinding time for strong coffee is programmable and medium and light coffee are calibrated accordingly.
To enter programming mode, when the machine is in standby mode:
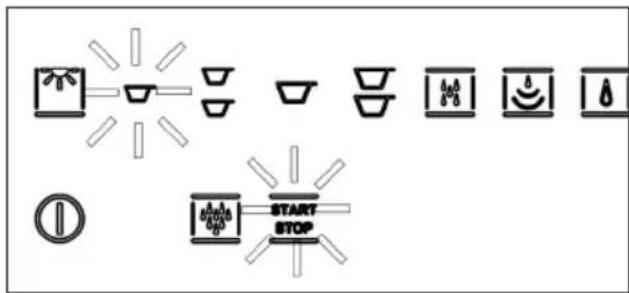
- press the START/STOP button for 5 seconds; the LED s on the upper left line light up to indicate the grinding time;
- to increase the time, press the coffee regulation button and to, decrease it, the START/STOP button. At the end of the operation, just press the on/off button to exit and confirm the changes.
NOTE If the quantity of coffee has been incorrectly adjusted preventing dispensing, the coffee machine will perform checks until the correct dispensing is achieved. The machine will begin grinding the coffee and the general alarm symbol will illuminate. This procedure terminates then the coffee is dispensed and new coffee parameters are then stored. You may be asked to perform a cleaning operation, if so please proceed with this (see chapter 7). If the problem persists please contact Caple Service.
12. PROGRAMMING THE QUANTITY OF COFFEE IN THE CUP
All the cycles have a preset quantity, except for water and steam.
The machine is already calibrated at the factory to dispense the ideal quantity of coffee for an espresso cup.
While dispensing the beverage, you can stop dispensing before the preset time by pressing the START/STOP button.
The procedure for programming the quantity of coffee, and other beverages, in the cup is as follows:
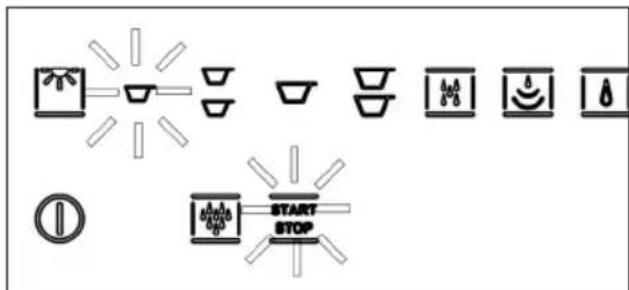
• press the coffee key for 5 seconds until the LED flashes.
- press the START/STOP key to start dispensing. The two LEDs flash for its duration.
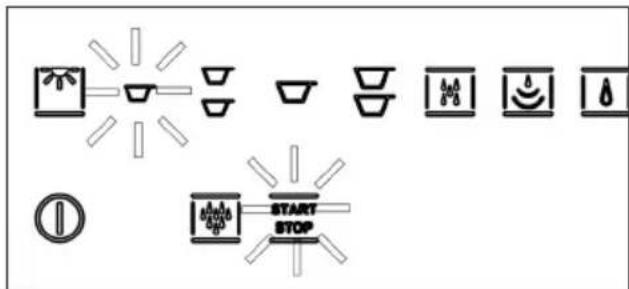
- press the START/STOP button again when the desired quantity is reached.
Restoring the factory settings
When it leaves the factory, the machine is calibrated for Italian-style espresso coffee and German-style stretched coffee.
- If you need to restore these standard values, you must place the machine in standby and press the coffee regulation button for 6 seconds.
- You will see all the LEDs, except on/off, flash for 5 seconds; after that time, the board has stored the default values.
- Press the on button and the selections will now use the factory values.

The standard values are only relative to the quantity of water necessary for each single dose.
13. ILLUMINATION OF THE DISPENSING COMPARTMENT
The machine has LEDs for illuminating the dispensing compartment. To activate this function, just press the light button as shown in Fig. 13.1.
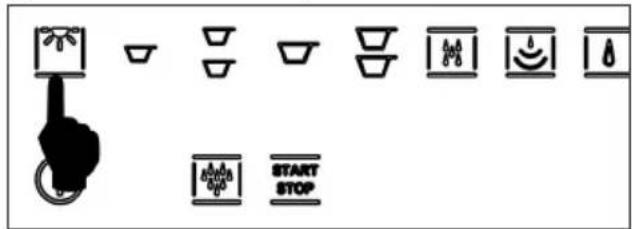
The light function is only available when the machine is on and not during standby mode.
RISK GROUP 2
CAUTION: do not stare at the lamp while it is on. It could damage your eyesight
14. SIGNALLING AND ALARMS
No water warning
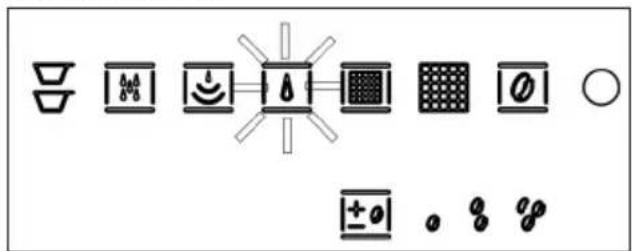
The machine has a sensor that checks for water in the tank. If there is no water, the machine turns on the indicator light and will not work until the tank is filled.
Replace filter warning
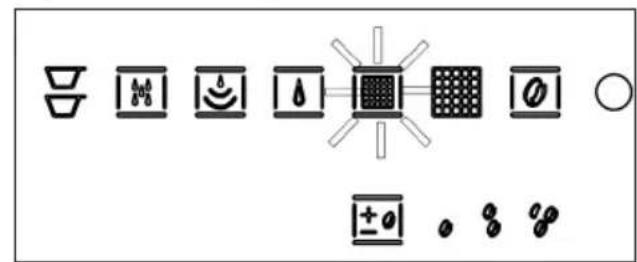
After the machine has dispensed 80 litres of water, the LED for the filter symbol begins to flash (pre-alarm), Fig. 14.2.
If the quantity of dispensed water reaches 100 litres, the LED will turn steady-on (alarm).

The replacement of the filter is recommended within 3 months from when the LED remains steady-on.
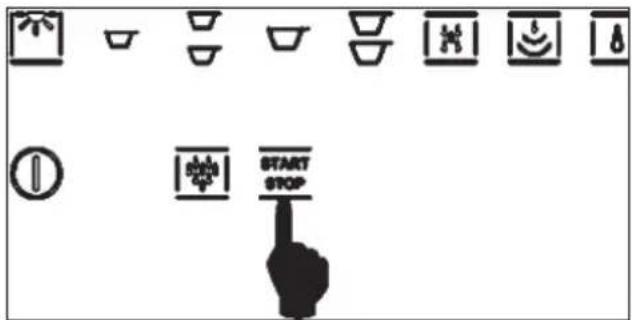
To switch-off the alarm (or the pre-alarm), put the appliance in stand-by condition, hold the START/STOP button for 5 seconds; the alarm led will switch-off and the counter of dispensed water will reset.
Mandatory washing and presence of coffee grounds
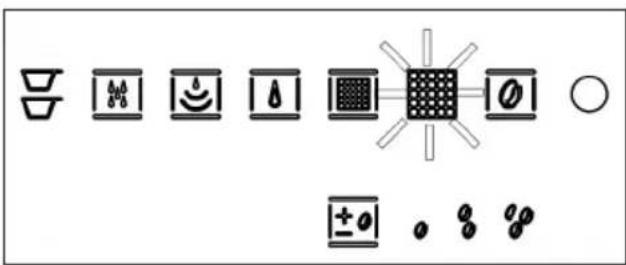
After dispensing 10 cups of coffee, the wash light turns on steady red, while the grounds drawer LED flashes with a red light. This condition persists even when the machine is turned off and on. To reuse the machine, you must wash the coffee unit following the below steps:
1 - Press START
2 - Wait for the wash icon to go off
3 - Open the door and empty the coffee grind waste
4 - Wait for the grounds icon to go off
5 - Re install the coffee grounds holder
6 - Close the door
Now the machine is ready to make 10 more cups of coffee.
For emptying the tray of "used" coffee grounds see Chapter 16 "CLEANING".
Coffee probe broken warning
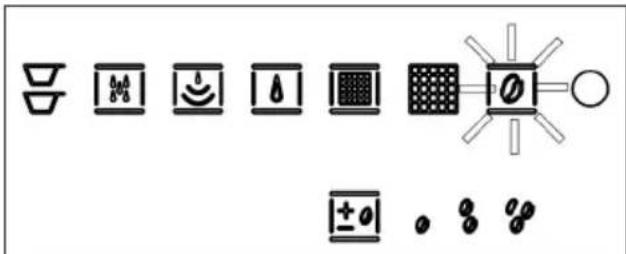
The machine has a function that warns you when the coffee unit probe is broken.
When the coffee probe is not working correctly, the relative LED flashes.
Try to turn the machine off and on.

ATTENTION: if the alarm persists, contact the Caple service centre.
Generic alarm warning
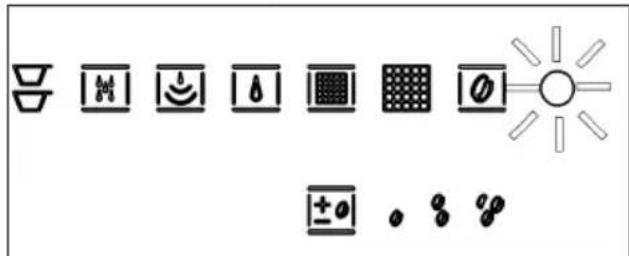
The generic alarm indicator lights up (Fig. 15.5) for a variety of possible reasons:
- The automatic coffee dispensing unit is blocked;
- The movement of the automatic coffee dispensing unit did not occur correctly;
• The door for removing the coffee grounds is open; - The volumetric counter did not detect the passage of water;
- The temperature probe is not working correctly. If the generic alarm light turns on:
- Check that the grounds emptying door is closed.
- Check that there is water in the tank.
Turn the machine off and on. If the problem persists, contact service.
15. RECIPES
Italian cappuccino
This is a normal espresso with the addition of milk heated by steam, which softens the taste of the coffee and creates a consistent and pleasant surface foam. It is served in a large cup. Place the cold milk in a tall pitcher and use the steam jet, if available. Add just the foam to the espresso coffee by tilting and shaking the pitcher or use a spoon. You can dust the top of the foam with cocoa.
Viennese cappuccino
This variant is the product of the age-old Austrian tradition. Prepare a stretched espresso (extracted for 30-35 seconds), add warm milk and put whipped cream on top. It is served in a cup of intermediate size between an espresso cup and a cappuccino cup.
Garnish with chocolate flakes.
Cold espresso chilled in a shaker
Frothy and very refreshing, its a real pleasure on hot days. Prepareanespresso, addsugar, immediatelypouritin ashakerwithlargecubesoficeandshakeforseveral seconds. It is served in a tumbler orfl ute glass.
Irish coffee
An energising pick-me-up. In a tall, heated glass, mix eight parts hot coffee, one part of whiskey and cane sugar.
Add freshly whipped cream by sliding it on the lower part of a spoon: this creates a light layer of cool cream on top of the hot coffee.
Mexican coffee
Intense and exotic.
In a small cup, mix one dose of double cream, a teaspoon of cinnamon, a pinch of nutmeg, sugar and whip.
Pour a teaspoon of chocolate syrup in a medium cup, add a little more cinnamon and the coffee and mix well.
Garnish with a teaspoon of vanilla-flavoured cream.
Cappuccino ice cream
In a pan, heat two cups of espresso, 34 cup of whipping cream and 12 cup of sugar; bring to a boil.
When the compound is lukewarm, place it in the refrigerator for 4-5 hours.
Put two or three scoops in a bowl and garnish to toasted coffee beans.
Let cool in the refrigerator for 12 hour before serving.
16. CLEANING

ATTENTION: do not immerse the machine in water for cleaning.
External parts
The external parts of the machine must be cleaned with a soft cloth and without the use of aggressive detergents. Do not clean steel parts of scouring pads or abrasive sponges. Dry well with a soft cloth
natural_image
Line drawing of a door with an open drawer containing a grid and a flag (no text or symbols)Steam nozzle
natural_image
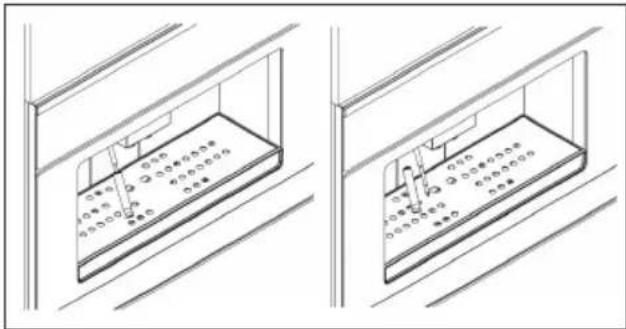
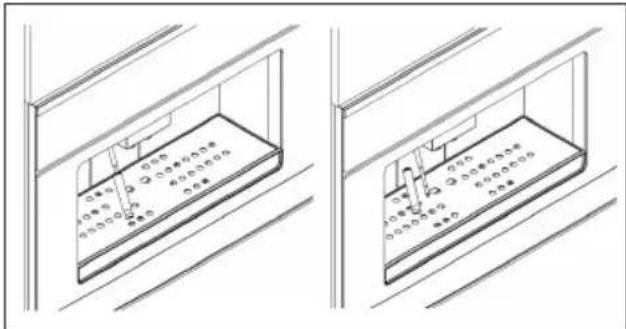
Two technical line drawings of a cabinet or rack with internal compartments and mounting holes (no text or symbols)In addition, periodically clean the steam nozzle, which can get dirty inside when you warm milk for cappuccino.
To do this, just disassemble it as shown in the figure and wash it together with its hood with a sponge and hot water.

ATTENTION: when cleaning the nozzle, always turn off the machine and remember to wait at least 20 minutes before using it to allow it to cool, avoiding possible burns.
Drip basin
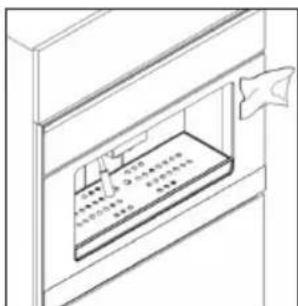
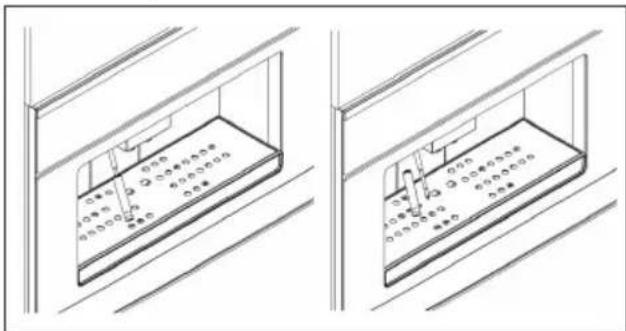
Remove the drip basin from the machine as shown in the following figures.
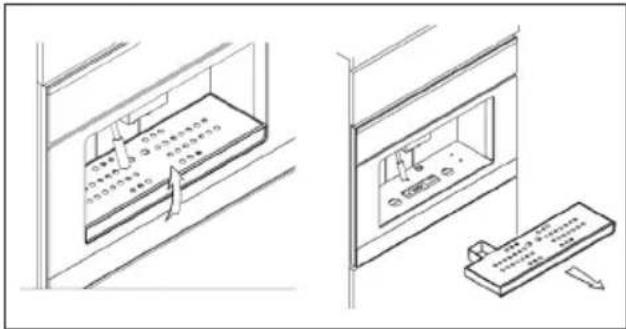
Make sure to periodically empty the basin to avoid liquid spills that could dirty and ruin the furniture below. The basin and relative metal grill can be washed in the dishwasher.
Emptying used coffee grounds
To open the door of the compartment with the tray, you must first remove the drip basin as described in Figures 16.4 and 16.5.
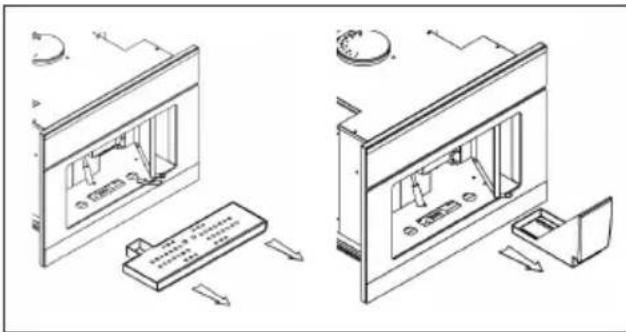
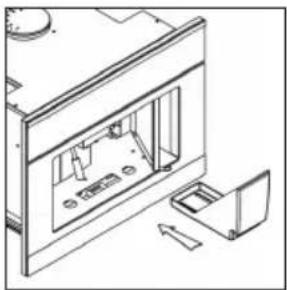
natural_image
Line drawing of a kitchen appliance with a door, front panel, and side panel (no text or symbols)Remove the tray, empty the coffee grounds and wash it with hot water or in the dishwasher.
Put the "used" coffee ground tray back in its compartment.

ATTENTION: avoid emptying the grounds collection tray with the machine on to avoid accidental contact with hot parts.
Water tank
- If the machine has not been used in a long time, we recommend changing the water in the tank
• Periodically clean the water tank of any lime encrustations.
• The tank can be washed in the dishwasher. - If using the Brita decalcifying filter, we recommend replacing the filter every 2000 espresso coffees or at least every three - six months.
17. TROUBLESHOOTING
The operator should make sure that the problem is not caused by:
- No electricity
- No water in the tank
- No coffee in the machine
- Incorrect closure of the access door to the coffee ground tray.
For any other causes, have the machine checked by Caple Service, tel 0844 800 3830 or email
service@caple.co.uk.
Cher Client,
1. POUR VOTRE SÉCURITÉ
natural_image
Technical line drawing of a mechanical assembly with a base platform and support structure (no text or symbols)natural_image
Technical line drawing of two 3D architectural or mechanical components with no visible text, numbers, or symbols.natural_image
Technical line drawing of a mechanical assembly inside a transparent housing (no text or symbols)natural_image
Technical line drawing of a mechanical enclosure or enclosure with internal components and mounting brackets (no text or symbols)natural_image
Isometric line drawing of a cabinet or storage unit with internal compartments and a door (no text or symbols)natural_image
Pure electrical circuit lines without any symbolsnatural_image
Technical line drawing of a mechanical or electrical component with no visible text or symbolsnatural_image
Pure technical line drawing of a mechanical assembly without any text, numbers, or symbolsnatural_image
Isometric line drawing of a modular device with a cable and power outlet, no text or symbols present4. DESCRIPTION DE LA MACHINE À CAFÉ
Bandeau de commande
natural_image
Isometric line drawing of a monitor displaying a small electronic device, with a keyboard and pencil nearby (no text or symbols)natural_image
Technical line drawing of a mechanical assembly inside a housing (no text or symbols)natural_image
Technical line drawing of a cabinet or enclosure with internal components and mounting brackets (no text or symbols)natural_image
Technical line drawing of a mechanical assembly with internal components (no text or symbols)natural_image
Technical line drawing of a mechanical assembly with no visible text or symbolsnatural_image
Technical line drawing of a mechanical device with internal components and mounting bracket (no text or symbols)natural_image
Technical line drawing of a machine with a circular component and granular material being processed (no text or symbols)natural_image
Technical line drawing of a cabinet or enclosure with internal components and mounting brackets (no text or symbols)natural_image
Technical line drawing of an open microwave oven with a cable inserted, showing internal components and wiring (no text or symbols)natural_image
Technical line drawing of a mechanical assembly with rotating components and a central shaft (no text or symbols)
UNIQUEMENT POUR LES UTILISATEURS CHEVRONNES : PROGRAMMATION DU TEMPS DE MOUTURE
Bec de la vapeur
natural_image
Two technical line drawings of a storage or rack system with no visible text or symbolsnatural_image
Technical line drawing showing two views of a control panel with a keyboard and a device, no text or symbols present.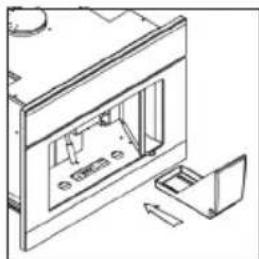
natural_image
Technical line drawing of a mechanical assembly with internal components and a separate component (no text or symbols)natural_image
Pure technical line drawing of a mechanical or electrical component layout without any text, numbers, or symbolsnatural_image
Isometric line drawing of a mechanical assembly with a base plate and support frame (no text or symbols)natural_image
Technical line drawing of two mechanical assembly components with no visible text or symbolsDanach die beiden
Halterungen der
Führungen mit
den restlichen 8
selbstschneidenden
natural_image
Technical line drawing of a mechanical assembly inside a transparent housing (no text or symbols)Die Führungen
auf den bereits im
natural_image
Technical line drawing of a cabinet or enclosure with internal components and mounting brackets (no text or symbols)natural_image
Isometric line drawing of a cabinet or storage unit with internal compartments and a door (no text or symbols)natural_image
Pure electrical circuit lines without any symbolsnatural_image
Technical line drawing of a cabinet or enclosure with ventilation slots and a mounted device (no text or symbols)natural_image
Pure technical line drawing of a mechanical assembly without any text, numbers, or symbolsnatural_image
Isometric line drawing of a server rack with a mounted device and connected to a digital meter (no text or symbols)Bedienfeld
natural_image
Line drawing of a room interior with furniture and fixtures (no text or symbols)natural_image
Technical line drawing of a cabinet or enclosure with internal components and directional arrows (no text or symbols)natural_image
Technical line drawing of a mechanical assembly with internal components (no text or symbols)natural_image
Technical line drawing of a mechanical assembly with no visible text or symbolsnatural_image
Technical line drawing of a mechanical assembly with no visible text or symbols
natural_image
Technical line drawing of a machine with granular material being poured into a circular opening (no text or symbols)natural_image
Technical line drawing of a cabinet or enclosure with internal components and mounting brackets (no text or symbols)natural_image
Technical line drawing of an open microwave oven with a cable inserted, showing internal components and wiring (no text or symbols)Abb. 7.10
natural_image
Technical line drawing of a mechanical device with a circular knob and directional arrows indicating motion (no text or symbols)natural_image
Technical line drawing of a mechanical assembly with rotating components and a central shaft (no text or symbols)

NUR FÜR ERFAHRENE BENUTZER:
PROGRAMMIERUNG DER
natural_image
Pure electrical circuit lines without any symbolsnatural_image
Isometric line drawing of a door with an open shelf and a star symbol (no text or labels)DE
Dampflanze
natural_image
Two technical line drawings of a cabinet or rack with internal compartments and labeled parts (no text or symbols present)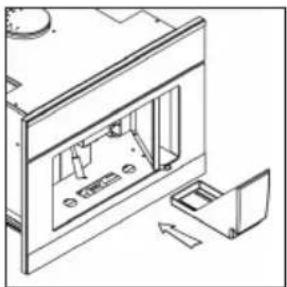
natural_image
Isometric line drawing of a kitchen appliance with a door, drawer, and front panel (no text or symbols)natural_image
Pure technical line drawing of a room layout with no text, numbers, or symbolsnatural_image
Technical line drawing of a mechanical assembly with a base platform and support structure (no text or symbols)natural_image
Technical line drawing of two 3D architectural or mechanical components with no visible text, numbers, or symbols.natural_image
Technical line drawing of a mechanical assembly inside a transparent housing (no text or symbols)natural_image
Technical line drawing of a mechanical enclosure or enclosure with mounting brackets and internal components (no text or symbols)natural_image
Isometric line drawing of a cabinet or storage unit with internal compartments and a door (no text or symbols)Conexión eléctrica
natural_image
Pure electrical circuit lines without any symbolsnatural_image
Technical line drawing of a mechanical component with no visible text or symbolsnatural_image
Pure technical line drawing of a mechanical assembly without any text, numbers, or symbolsnatural_image
Technical line drawing of a modular device with a cable and power outlet, no text or symbols presentPanel de comandos
natural_image
Isometric line drawing of a room interior with a monitor and a keyboard, no text or symbols presentnatural_image
Technical line drawing of a mechanical assembly inside a housing (no text or symbols)natural_image
Technical line drawing of a cabinet or enclosure with internal components and mounting brackets (no text or symbols)natural_image
Technical line drawing of a mechanical assembly with internal components (no text or symbols)natural_image
Technical line drawing of a mechanical assembly with no visible text or symbolsnatural_image
Technical line drawing of a mechanical assembly with no visible text or symbolsnatural_image
Technical line drawing of a machine with a circular component and a funnel, no visible text or symbolsnatural_image
Technical line drawing of a cabinet or enclosure with internal compartments and mounting brackets (no text or symbols)natural_image
Technical line drawing of a computer monitor with an attached cable, showing internal components and a close-up inset (no text or symbols)natural_image
Technical line drawing of a mechanical assembly with circular holes and directional arrows (no text or symbols)

SÓLO PARA USUARIOS EXPERTOS:
natural_image
Pure electrical circuit lines without any symbolsnatural_image
Two technical line drawings of a 3D panel or enclosure with internal components, no text or symbols present.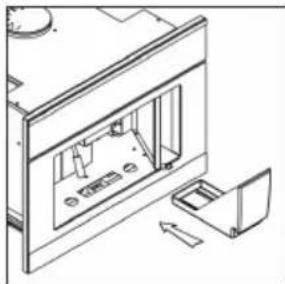
natural_image
Line drawing of a kitchen appliance interior with a door and door panel, showing no text or symbolsnatural_image
Pure technical line drawing of a mechanical or electrical component layout without any text, numbers, or symbols1. PARA A SUA SEGURANÇA
- Suporto fixo da máquina
- N°1 Fixa-cabo
- N°2 guias laterais
- N°2 placas laterais de 1 mm
-
N°2 placas laterais de 2 mm
-
N°13 parafusos auto-roscantes 3.9X19
natural_image
Isometric line drawing of a mechanical assembly with a base and support frame (no text or symbols)natural_image
Technical line drawing of two structural panels with mounting brackets and internal components (no text or symbols)natural_image
Technical line drawing of a mechanical assembly inside a transparent housing (no text or symbols)natural_image
Technical line drawing of a cabinet or enclosure with internal components and mounting brackets (no text or symbols)natural_image
Isometric line drawing of a cabinet or storage unit with internal compartments and a door (no text or symbols)Ligação eléctrica
natural_image
Pure electrical circuit lines without any symbolsnatural_image
Technical line drawing of a cabinet or enclosure with ventilation slots and a mounted component (no text or symbols)natural_image
Technical line drawing of a mechanical assembly with no visible text or symbolsnatural_image
Isometric line drawing of a modular device with a power cord and control panel, no text or symbols presentPainel de comandos
natural_image
Isometric line drawing of a room interior with a monitor and a keyboard, no text or symbols presentnatural_image
Line drawing of a room interior with furniture and fixtures (no text or symbols)natural_image
Technical line drawing of a door frame with internal compartments and mounting points (no text or symbols)natural_image
Technical line drawing of a mechanical assembly with internal components (no text or symbols)natural_image
Technical line drawing of a mechanical assembly with no visible text or symbolsnatural_image
Technical line drawing of a mechanical device with internal components and mounting bracket (no text or symbols)natural_image
Technical line drawing of a machine with a circular component and granular material being processed (no text or symbols)natural_image
Technical line drawing of a cabinet or enclosure with internal components and mounting brackets (no text or symbols)natural_image
Technical line drawing of a device with an attached cable and a close-up inset showing a component (no text or symbols)natural_image
Technical line drawing of a mechanical assembly with a rotating component and circular holes (no text or symbols)

SÓ PARA UTILIZADORES EXPERIENTES:
natural_image
Isometric line drawing of a cabinet or storage unit with an open panel and a star-shaped arrow pointing to it (no text or symbols)Bico de vapor
natural_image
Two technical line drawings of a cabinet or rack with circular components, shown from different angles (no text or symbols present)natural_image
Technical line drawing showing two views of a device with internal components and directional arrows (no text or symbols)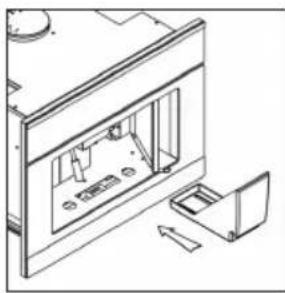
natural_image
Technical line drawing of a kitchen appliance with internal compartments and a door (no text or symbols)- Instruction: structural for built-in-lake office in a coffee machine
- Caro Cliente,
- PER LA VOSTRA SICUREZZA
- Apparecchiature in disuso
- DESCRIZIONE DELLA MACCHINA DA CAFFE'
- SOLO PER UTENTI ESPERTI:
- CONTENTS
- FOR YOUR SAFETY
- RECOMMENDATIONS FOR THE PROTECTION OF THE ENVIRONMENT
- INSTALLATION
- DESCRIPTION OF THE COFFEEMAKER
- TECHNICAL CHARACTERISTICS
- DESCRIPTION OF THE CONTROL PANEL TOUCH BUTTONS
- FIRST USE
- DISPENSING COFFEE
- DISPENSING HOT WATER
- SYMBOLS
- DISPENSING STEAM
- PROGRAMMING THE QUANTITY OF GROUND COFFEE
- PROGRAMMING THE QUANTITY OF HOT WATER
- ILLUMINATION OF THE DISPENSING COMPARTMENT
- WARNINGS AND ALARMS
- RECIPES
- CLEANING AND MAINTENANCE
- TROUBLESHOOTING
- SERVICE, REPLACEMENT PARTS AND WARRANTY
- During use
- For installation and maintenance
- RECOMMENDATIONS FOR THE PROTECTION OF THE ENVIRONMENT Important
- Packing
- Obsolete equipment
- INSTALLATION OF THE MACHINE
- "BUILT-IN" INSTALLATION IN MODULAR FURNITURE
- Components for the installation of the machine
- Installation of the machine
- Electrical connection
- DESCRIPTION OF THE CONTROL PANEL: TOUCH BUTTONS
- Control panel
- REGULATION OF THE GROUND COFFEE
- Wash function on first start-up
- FOR EXPERT USERS ONLY:
- PROGRAMMING THE QUANTITY OF COFFEE IN THE CUP
- Restoring the factory settings
- RISK GROUP 2
- SIGNALLING AND ALARMS
- Coffee probe broken warning
- Generic alarm warning
- Italian cappuccino
- Viennese cappuccino
- Cold espresso chilled in a shaker
- Irish coffee
- Mexican coffee
- Cappuccino ice cream
- CLEANING
- External parts
- Steam nozzle
- Drip basin
- Emptying used coffee grounds
- Water tank
- Cher Client,
- POUR VOTRE SÉCURITÉ
- DESCRIPTION DE LA MACHINE À CAFÉ
- Bec de la vapeur
- NUR FÜR ERFAHRENE BENUTZER:
- Dampflanze
- Conexión eléctrica
- SÓLO PARA USUARIOS EXPERTOS:
- PARA A SUA SEGURANÇA
- Ligação eléctrica
- SÓ PARA UTILIZADORES EXPERIENTES:
Brand : Caple
Model : Sense CM461
Category : Coffee machine