
Mini Tab Q - Tablet Trevi - Free user manual and instructions
Find the device manual for free Mini Tab Q Trevi in PDF.
| Product type | Touchscreen tablet |
| Brand | Trevi |
| Model | Mini Tab Q |
| Display | 7.85-inch HD IPS LCD capacitive display, resolution 1024x768 |
| Processor | Quad Core MTK MT8389 at 1.5 GHz |
| RAM | 1 GB |
| Internal storage | 8 GB |
| Operating system | Android 4.2 |
| Mobile network | 3G, GSM (850/900/1800/1900), WCDMA (850/2100) |
| Connectivity | Wi-Fi 802.11 b/g/n, Bluetooth |
| Supported audio formats | MP3, WMA, FLAC, APE, AAC |
| Supported video formats | AVI, 3GP, MP4, FLV, MKV |
| Supported image formats | JPEG, BMP, PNG, JPG |
| Power supply | Rechargeable Li-ion battery, charging via micro USB port, initial charging time 6-8 hours |
| Weight (estimated) | Approximately 350 g |
| Dimensions (estimated) | Approximately 200 x 135 x 9 mm |
| Main functions | Calls, messaging, GPS, FM radio, camera, audio recording, media player, web browser |
| Maintenance and cleaning | Clean with a soft dry cloth, avoid contact with liquids |
| Security | Screen lock via pattern or password, unknown sources option for applications |
| Repairability | Built-in battery not user-replaceable, servicing by qualified personnel only |
Frequently Asked Questions - Mini Tab Q Trevi
User questions about Mini Tab Q Trevi
0 question about this device. Answer the ones you know or ask your own.
Ask a new question about this device
Download the instructions for your Tablet in PDF format for free! Find your manual Mini Tab Q - Trevi and take your electronic device back in hand. On this page are published all the documents necessary for the use of your device. Mini Tab Q by Trevi.
USER MANUAL Mini Tab Q Trevi
TO SET YOUR LANGUAGE DEVICE
- Swicth on the appliance
- Go to the page with all applications
- Select the "IMPOSTAZIONI" icon
- Scroll through the list and select the icon A - LINGUA
-
Select "LINGUA" and find their own language from those available.
-
For information and updates of this product: www.trevi.it
POUR CONFIGURER LANGUAGE DE VOTRE APPAREIL:
DISPLAY. 7,85-inch HD, IPS, LCD, Capacitive
RESOLUTION 1024X768
CPU QUAD CORE MTK MT8389, 1.5GHz
RAM 1GB
SISTEMA OPERativo Android 4.2
MEMORIA INTERNA 8 GB
WIRELESS NETWORK. Wi-Fi (802.11 b/g/n)
3G, GSM. GSM: 850/900/1800/1900; WCDMA:850/2100
FORMATI AUDIO MP3, WMA, FLAC, APE, AAC
FORMATIVIDEO AVI,3GP,MP4,MP4,FLV,MKV
FOMATI FOTO . JPEG, BMP, PNG, JPG
WELCOME
Thank you for purchasing this tablet.
It brings you much convenience for your business (supports Word, Excel, send & receive e-mails...) and entertainment (supports game, chatting, movie playback, eBooks....).
Running on Android 4.2, with a 1.5GHz processor and highly responsive capacitive touch screen, it brings you wonderful user experience.
Before beginning, please refer to this user manual carefully.
IMPORTANTNOTICES
1 ) Keep this device away from strong magnetic field to avoid any damages
2) Do not rub this device with any hard objects and never clean this device with any chemicals or detergents or acids or it could cause damages on surfaces.
3 ) Humidity or liquid may enter this device and causes permanent damages to the hardware inside. Do not place this device in any humid environment or under the rain.
4) It is recommended that volume level of the earphones should be adjusted to an appropriate level to avoid damages to your hearings due to high volume.
5) Do not cut off the power abruptly during software update, software download, or during this device is under any kind of operation or it may cause data lost and system error.
6) Over-voltage, power cable strain, bending or squeezing by heavy objects must be avoided to prevent this device from overheating or fire disaster.
7) To eliminate the risk of electric shock, do not connect the power plug with wet hands.
8) Some movies, music and pictures are under protections of copyrights, any unauthorized usages are deemed as infringements to the laws of copyrights.
9) The performance of the WIFI reception of this device could be influenced by the wireless equipments and networks in the surrounding areas.
10) Any wireless equipment will influence the flight of an airplane, please consult the airline company if you want to use this device on the airplane.
11) Do not use this device anywhere near any blasting operations.
12 ) Only qualified maintenance personnel is allowed to dismantle this device.
13 ) Please comply with any related restrictions and rules when using this device.
14) Only use this device with its original accessories and battery.
15) Do not use any incompatible accessories on this device.
16) This device is not waterproof, please keep it dry all the time.
17 ) For the sake of data safety, please back up the important data anytime on a timely basis.
18) When connecting this device with other equipments, please follow instructions on this user's manual.
19) Never connect this device with any incompatible equipment.
20 ) Please consult the after-sales service in your area for any technical problems.
GETTING READY TO USE THE DEVICE
What's inside box
In the package are
- Tablet PC
AC/DC adaptor - USB cable for PC and recharge connection
- User manual

PRODUCT APPEARANCE
- Volume+: Increase volume
- Volume -: Decrease volume
- Speaker
- POWER: Short press this button to enter sleeping/wake up mode, long press the "power"for 3-5 seconds prompt switch machine,press 8-12 seconds switch Reset machine.
- TF card Slot.
-
SIM Card slot
-
Rear Camera.
- Micro USB Port: connect the unit to PC and recharge the unit.
- Stereo Earphone Jack.
- Extraction slot for plastic cover.
- Front Camera.
- Receiver.
- Display.
- Plastic cover.
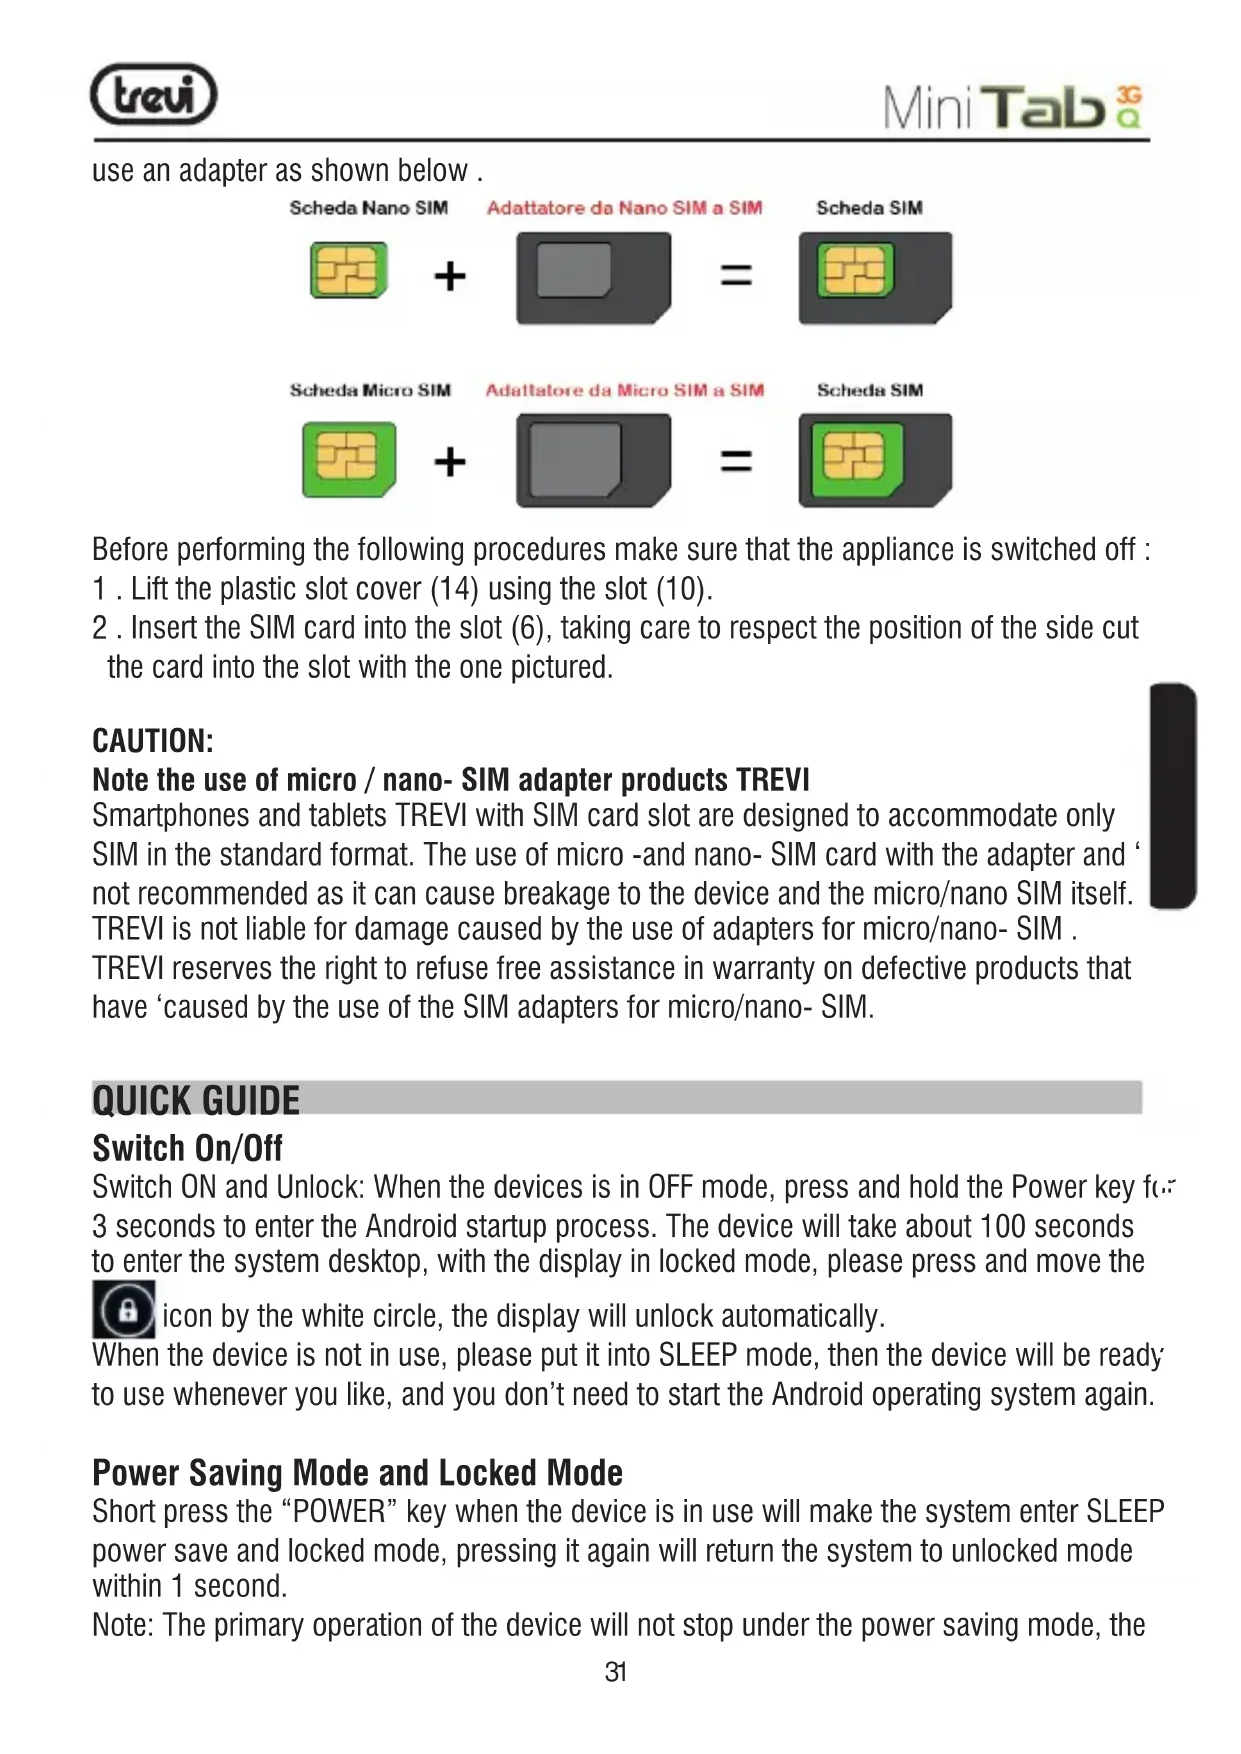
INSERTING A MICRO SIM CARD
To be able to navigate with the 3G network or use the device to send or receive voice calls, you must insert a SIM card into the slot. If you have a NANO SIM or micro-SIM, please
use an adapter as shown below.
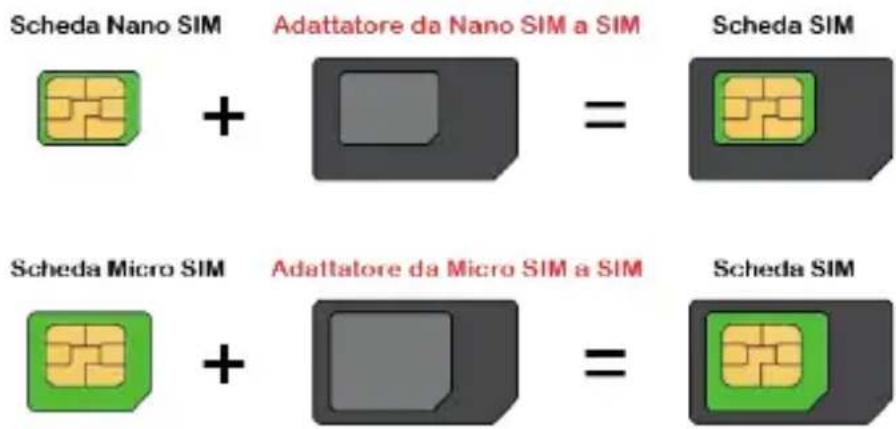
Before performing the following procedures make sure that the appliance is switched off :
- Lift the plastic slot cover (14) using the slot (10).
- Insert the SIM card into the slot (6), taking care to respect the position of the side cut the card into the slot with the one pictured.
CAUTION:
Note the use of micro / nano- SIM adapter products TREVI
Smartphones and tablets TREVI with SIM card slot are designed to accommodate only SIM in the standard format. The use of micro -and nano- SIM card with the adapter and not recommended as it can cause breakage to the device and the micro/nano SIM itself. TREVI is not liable for damage caused by the use of adapters for micro/nano- SIM .
TREVI reserves the right to refuse free assistance in warranty on defective products that have 'caused by the use of the SIM adapters for micro/nano- SIM.
QUICK GUIDE
Switch On/Off
Switch ON and Unlock: When the devices is in OFF mode, press and hold the Power key f.3 seconds to enter the Android startup process. The device will take about 100 seconds to enter the system desktop, with the display in locked mode, please press and move the

icon by the white circle, the display will unlock automatically.
When the device is not in use, please put it into SLEEP mode, then the device will be ready to use whenever you like, and you don't need to start the Android operating system again.
Power Saving Mode and Locked Mode
Short press the "POWER" key when the device is in use will make the system enter SLEEP power save and locked mode, pressing it again will return the system to unlocked mode within 1 second.
Note: The primary operation of the device will not stop under the power saving mode, the
display is just turned off and showing a black screen. This means that music play, movies play etc. will still continue to run.
Switch OFF
When the device is in use, press and hold the POWER key for 3 seconds, the screen will display the power off interface, choose the power off option to confirm your selection and the system will shut down automatically.
Note: When the device is running low on battery power, it will sound an alarm and then shut down automatically if it isn't plugged into a power source to start charging. If the device cannot start up please check if the battery power is too low by charging the device.
Battery Management and Charging
Charge the battery about 6-8 hours to make sure the battery is fully charged for the first time.
+
Insert the micro port of the battery adaptor into the DC slot on the device, and connect the other side with the power socket. Then the Power indicating lamp of the device will be high lighted blue, the desktop icon of the battery keeps rolling to show it is charging, please wait until the battery is fully charged, don't disconnect the power when charging. Once the battery is fully charged, the indicating lamp will change into dark blue, the Icon on the desktop will stop rolling. When the battery is exhausted completely, please charge at least one minute before starting it up.
Note: In order to keep the battery working to its full potential, please pay attention to the following advice:
1) Don't charge the power in excessively high temperatures.
2) There is no need to run down the power for this Li-ion battery, you can charge the battery even when there is still power left in the battery without it affecting the lifespan of the battery.
3) In order to keep the battery in good condition, Make sure you charge it at least once every two weeks if the device hasn't been used for a long time.
Systems 1: Operation Details Music
Enter into the music player: In the application menu or on the desktop, tap the icon to enter into the main interface of the Music Player,

- If there are no music files in the audio player playlist, the system will automatically load any music files from the micro SD card to the audio player playlist after the audio player is launched. The device supports the following audio file formats: mp3, wav, midi and
wma.
- If there are many songs in the Music playlist area, slide up/down using the touch screen
- Click on the track you want to play from the list.
- Drag the playback progress bar to adjust audio playback progress.
Video
- In the application menu or on the desktop, tap the icon to enter into the video player interface.
- When there are no video files in the video player playlist, the system will automatically load any video files from the micro SD card to the video player playlist after the video player has been launched.
- If there are many videos available, slide up/down the list using the touch screen or use the trackball.
- To play video files, click the desired file in the list to play it.
The device supports the following video file formats: mp4, 3gp, MPEG4, H.263, H.264, RMVB (720P), AVI, and MOV
Drag the playback progress bar to adjust video playback progress.
Picture
- In the application menu or on the desktop, tap the icon to enter the picture browser.
- If there are no files in the photo list, the system will automatically load the image files from the micro SD card to the photo browsing list after the photo browser has launched
- The device supports the following video picture formats: JPG, PNG, BMP, GIF, TIF.
- lo view a picture, navigate to the image you would like to view and select it.
- Tap the menu icon to select Slideshow, edit, print, rotate left, rotate right, crop, set picture as, details.
Recording
- In the application menu or on the desktop, tap the icon to enter into the sound recorder.
- Tap the record icon to start recording, tap the icon to stop recording.
- Once you finish the recording, you will be asked if you want to "Discard" or "Save" the recording.
- Recording playback: To playback a recording, use Explorer to find the Record folder on
the Internal Memory storage, select the recording to playback by clicking on it.
File Manager

- In the application menu or on the desktop, tap the icon to enter the Management Interface, tap phone storage or SD Card to open their root directory folders to open the root directory of the appropriate storage. To navigate around the file system, you can tap on the folders name or use the "Back" and "Next" functions.
Systems 2
Phone
Tap the the desktop to open the phone.

Messaging
Tap the on the desktop to open the Messaging.
GPS Test
Tap the on the desktop to open the GPS Test.
Web Browser
Note: For the Web Browser to view web sites, this device must be connected to a Wireless or 3G Network.
In the applications menu or on the desktop, click the icon to enter to the Web Browser interface; click the address bar and input the website address for the website you would like to view. Use the popup keyboards to enter the address and then click "Go".
System 3
Calculator
In the applications menu or on the desktop, tap the Calculator icon to open the calculator.

Clock
In the applications menu or on the desktop, tap the Alarm Clock icon to enter the
settings interface,
You can tap the to set clocks.
Camera Function
Tap the App Menu icon to enter into the app menu list, tap ” to enter into the camera function interface.
FM Radio

Note: please inset earphones before you turn on radio.
There is a TF (Micro SD) card slot in this device. It can read files on TF (Micro SD). Insert card into the card slot the correct way, and follow these instructions when using the card slot:
1) Insert the memory card into the card slot on the right side.
2) Don't pull out the card when it is in use (reading, copying), otherwise, it may cause data errors.
3) Don't use the memory card in high temperature conditions.
4) Keep the memory card away from the liquid and erosive materials.
5) To remove the card, just push the card towards the slot, and this will automatically release the card.
NOTE: There will be some keys which do not work; the keyboard code will need to be changed according to the Android system definition. Using the factory standard USB keyboard is recommended.
Settings
Wi-Fi
Turn on Wi-Fi: Tap the App Menu icon to enter into the app menu list, tap enter into the setting interface, tap Turn on Wi-Fi

The device will find the Wi-Fi networks automatically. It has found several Wi-Fi network names:
NOTE: The IP address assignment is dependant on the settings of the Wi-Fi Router.
If the IP address is assigned automatically, after selecting the network you would like to connect to, the device will connect to the Wi-Fi network directly. If the network is secured and requires a security key to connect, the system will pop up a connection window where you can input the correct security code and then press "Connect".
The system will show a Status of "Connected" once the device connects to the Wi-Fi network
successfully. You can see the network connection status by pressing the network name There will be a Wi-Fi connecting icon at the top of the interface.
Bluetooth
Turn on Bluetooth: Tap the App Menu icon to enter into the app menu list, tap to enter into the setting interface, tap Turn on Bluetooth.
The device will find the nearby device automatically when you Tap the SEARCH FOR DEVICES Please touch the device name to pair. The follow window will pop up: Please press "Pair" to pairing.
Tap the menu icon to select rename tablet, visibility timeout and show received files.
F57
Date usage
1) Tap the icon to check the data usage of the network.
2) Tap "more" to select Airplane mode, VPN, Tethering & portable hotspot.
Audio profiles
Tap the icon to enter the setting interface.
Display
Tap the icon to enter the display setting interface as below. In the display setting interface, you could set the Lock screen notifications, Scenes, Theme, Wallpaper, Brightness, Daydream, Font Size, Sleep and Wireless display as you need.
ScreenshotSetting
Tap the icon to enter the screenshotsetting interface.
Storage
Tap the icon to check the storage using status of the internal and external memory.
Battery
Tap the icon to check the battery using status.
Apps
Tab the icon enter the Application setting interface.
Tap the "RUNNING" to check and control the running apps.
Location services
Tap the icon to let the Access to my location, GPS satellites and Wi-Fi & mobile network location.
Security
Tap the icon to enter the security settings interface.
Screen Unlock: Tap "screen lock" to select screen unlocked with none, slide, pattern, or password.
Unlock screen by a pattern: Draw the unlock pattern with a minimum of 4 points, tap "Continue" to compete the setting.
Unlock screen by a password: Input a password with 4 characters, tap "OK" to compete the setting. The device will prompt you to input the correct password when unlocking.
Device Administrator: Check the box next to the "Unknown sources", the system will allow installation of non-Market applications:
Language & input
Tap the icon A to enter the language and input method settings interface
Language: The device supports multi-languages. You can select an operation interface of different languages according to your needs. Select a language option, tap to confirm and go back.
Keyboard & input method: Set the keyboard and input methods as you need:
Backup & reset
Backup & restore
Check the box next to the "back up my data" to back up application data, Wi-Fi passwords, and other settings to Google servers.
Check the box next to the "Automatic restore", the system will restore backed up settings or other data if it reinstalls an application.
Personal data
Tap the "Factory data reset" to erases all data on the device.
NOTE: Please back up all your data of the internal memory before reset the device, or you will lose all the data.
Add account
Tap the icon + enter the Add account interface.
Date and time
Tap the icon enter the date and time setting interface:
Automatic: Select "Automatic" to set the date and time automatically by using network-provided values. Uncheck the box next to the "Automatic" to modify the Date, Time Zone & Time by manual.
Set date: Tap to select Day, Month and Year, and tap the ico Done to finish the setting.
Select time zone: Tap to select the time zone that you are in.
Set time: Tap to select hours and minutes, and tap the icon Done to finish the setting.
Use 24-hour format: Tap to set the system time showed by 24-hour format.
Choose date format: Tap to select the date format.
Accessibility
Tap the icon to set the Large text, Power button ends call, Auto-rotate screen, Speak passwords, Accessibility shortcut, Text-to-speech output, Touch & hold delay and Enhance web accessibility.
About Phone
Tap to check System updates, Status and Legal information.
Add, Move, or Delete Desktop Icon
Tap the icon on the desktop to enter the app menu list. Tap and drag the application icon to copy to the current desktop i.e. set the shortcut on the desktop.
Long press the application icon on the desktop to enter into the editing mode and you can move the icon and set its location.
When you drag the icon to × × × , it turns into the delete function, release the icon to delete it.
Troubleshooting
Can not turn on the device?
- You may not be able to turn on the device when the battery is below the critical level. Recharge the battery for a few minutes and try to turn it on again.
- Check if the power charger is connected properly and firmly.
The battery working time is too short?
- The duration of the lithium battery varies with environmental temperature changes and the service conditions. If the environment temperature is too low or too high, the duration of the battery will be affected. It is recommended to use this device at normal temperatu
- Battery consumption varies depending on if the brightness and on time of the screen, the volume level of the loudspeaker as well as the operation status of the central processor (CPU). To save battery, please refer to Power saving mode section of this menu.
No sound from earphone?
- Check if the volume setting is adjusted to 0.
- Check whether the audio file is damaged and try to play other audio files to confirm. In the case if the audio file is damaged, it may cause severe noise or staccato.
Can not copy files?
- Check if the device is connected to the computer properly.
- Check if the USB cable is working.
- Check whether the memory capacity available is enough for storage of the copying files.
The device is dead?
- Please try to reset the device by following procedure: Long press the Reset button until the player power off, then you can turn on the player again.
Information Note on the Removal and Disposal of Batteries
Warning: Only high-qualified personnel should perform this operation!
Battery Removal
Caution: This operation is restricted to qualified personnel! The rechargeable battery incorporated in this product is not user replaceable.
- Lift the plastic slot cover (14) using the slot (10).
- Remove the three screws that secure the metal case back.
- Remove the rear of the unit by moving lever up between the front and rear.
- Locate the battery.
- Unplug it and remove it.

Important information for correct disposal of the product.
The symbol on the equipment indicates that the waste must be subject to "separate collection" so the product must not be disposed of as urban waste.
The user should return the product to special "collection centers" provided by local government, or deliver it to the retailer against the purchase of a new product.
Separate collection of waste and subsequent processing operations, recovery and disposal will help the production of equipment with recycled materials and reduce the negative effects on the environment and health caused by improper handling of waste.
Improper disposal of the product involves the application of administrative penalties.
TREVI pursues a policy of continuous research and development, the products may show characteristics different from those described.
TECHNICAL SPECIFICATIONS
DISPLAY 7.85 -inch HD IPS LCD Capacitive
RESOLUTION 1024X768
CPU QUAD CORE MTK MT8389, 1.5GHz
RAM 1GB
Separate collection of waste and subsequent processing operations, recovery and disposal will help the production of equipment with recycled materials and reduce the negative effects on the environment and health caused by improper handling of waste.
SE PREPARER À UTILISER LE DISPOSITIF
AJOUTER, DEPLACER OU SUPPRIMER DESKTOP ICON
Wireless-Network. Wi-Fi (802.11 b/g/n)
3G, GSM GSM: 850/900/1800/1900, WCDMA: 850/2100
Audio-Formate MP3, WMA, FLAC, APE, AAC
VIDEO Formate AVI, 3GP, MP4, MP4, FLV, MKV
Precautions for correct disposal of the product.
The symbol shown on the equipment indicates that waste must be disposed of in "separate collection" and so the product must not be disposed of together with urban waste.
The user must take the product to special "separate waste collection centres" provided by local government, or deliver it to the retailer against the purchase of a new product.
Separate collection of waste and subsequent treatment, recycling and disposal operations promotes the production of equipment with recycled materials and limits negative effects on the environment and on health caused by improper handling of waste.
illegal disposal of the product leads to the enforcement of administrative penalties.


- TO SET YOUR LANGUAGE DEVICE
- POUR CONFIGURER LANGUAGE DE VOTRE APPAREIL:
- WELCOME
- IMPORTANTNOTICES
- GETTING READY TO USE THE DEVICE
- What's inside box
- INSERTING A MICRO SIM CARD
- CAUTION:
- Note the use of micro / nano- SIM adapter products TREVI
- QUICK GUIDE
- Switch On/Off
- Power Saving Mode and Locked Mode
- Switch OFF
- Battery Management and Charging
- +
- Systems 1: Operation Details Music
- wma.
- Video
- Picture
- Recording
- File Manager
- Systems 2
- Phone
- Messaging
- GPS Test
- Web Browser
- System 3
- Calculator
- Clock
- Camera Function
- FM Radio
- Settings
- Wi-Fi
- Bluetooth
- F57
- Date usage
- Audio profiles
- Display
- ScreenshotSetting
- Storage
- Battery
- Apps
- Location services
- Security
- Language & input
- Backup & reset
- Personal data
- Add account
- Date and time
- Accessibility
- About Phone
- Add, Move, or Delete Desktop Icon
- Troubleshooting
- Information Note on the Removal and Disposal of Batteries
- Battery Removal
- Important information for correct disposal of the product.
- TECHNICAL SPECIFICATIONS
- SE PREPARER À UTILISER LE DISPOSITIF
- AJOUTER, DEPLACER OU SUPPRIMER DESKTOP ICON
- Precautions for correct disposal of the product.
Brand : Trevi
Model : Mini Tab Q
Category : Tablet