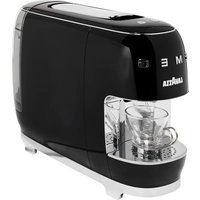
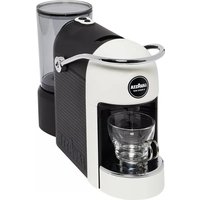
Amodo Mio - Coffee machine Lavazza - Free user manual and instructions
Find the device manual for free Amodo Mio Lavazza in PDF.
User questions about Amodo Mio Lavazza
0 question about this device. Answer the ones you know or ask your own.
Ask a new question about this device
Download the instructions for your Coffee machine in PDF format for free! Find your manual Amodo Mio - Lavazza and take your electronic device back in hand. On this page are published all the documents necessary for the use of your device. Amodo Mio by Lavazza.
USER MANUAL Amodo Mio Lavazza
Dear Customer thank you for purchasing the Lavazza A MODO MIO espresso coffee machine and for your confidence in our company. Before operating the machine, we recommend carefully reading the operating instructions that explain how to use, clean and maintain it in perfect working order. We hope you enjoy brewing excellent coffee, thanks to Lavazza!
Felicitations!
Intended Use of the Machine:
The coffee machine is intended for domestic use only. It is prohibited to make any technical changes to the machine. Do not use the machine for unauthorized purposes since this would create serious hazards! This device can be used by children, typically 8 years of age and older, if watched closely or properly trained on using the device safely and provided that they are aware of the connected dangers. Cleaning and maintenance operations should not be carried out by children unless older than 8 years of age and supervised.
Keep the device and the relevant power cord out of reach of children under 8 years of age.
This device can be used by persons with impaired physical, sensory or mental capacities, or persons with no practice or skill, if watched closely or properly trained on using the device safely and provided that they are aware of the connected dangers. Do not let children play with the device.
Installation site:
Place the coffee machine in a safe place, where nobody may overturn it or be injured by it. Do not keep the machine at a temperature below 4^ (39,2^) as freezing may damage it. Do not use the coffee machine outdoors. Do not place the machine on very hot surfaces or close to flames.
Power Supply:
Only connect the coffee machine to a suitable socket. The voltage must correspond to that indicated on the machine's label.
Power Cord:
Do not use the coffee machine if the power cord is defective. If the power cord is damaged, it must be replaced by the manufacturer or his technical assistance service or in any case by a person with a similar qualification. Do not pass the power cord around corners, over sharp edges or over hot objects and keep it away from oil. Do not use the power cord to carry or pull the coffee machine. Do not pull out the plug by pulling on the power cord or touch it with wet hands. Do not let the power cord hang freely from tables or shelves.
Danger of Electrocution:
Never allow water to come into contact with any of the electrical parts of the machine.
Protection for Other People:
Prevent children from playing with the machine. Children are not aware of the risks related to electric household appliances. Do not leave the machine packaging materials within the reach of children.
Danger of Burns:
Do not touch the hot parts (capsule-holder, etc.) just after using the machine. Be careful of hot liquid spurting while the coffee is issuing from the spout.
Cleaning:
Before cleaning, unplug the machine and let it cool down. Do not immerse the machine in water! It is strictly forbidden to tamper with the internal parts of the machine. Replace water in the tank after a few days of non-use.
Storing the Machine:
If the machine is to remain inactive for a long time, unplug it and store it in a dry place out of reach of any children. Keep it protected from dust and dirt.
Servicing / Maintenance:
In case of failure, problems or a suspected fault resulting from the falling of the machine, immediately remove the plug from the socket. Do not attempt to operate a faulty machine. Servicing and repairs may only be carried out by authorized service centers. All liability for damages resulting from work not carried out by professionals is declined.
Water tank:
Fill the tank only with fresh, non-sparkling, drinking water. Do not operate the machine if there is not enough water in the tank.
Capsule compartment:
Put only compatible capsules in the capsule compartment; do not stick fingers or other objects into it. Capsules shall only be used once.
Machine disposal at the end of its operational life:
INFORMATION FOR THE USER: Implementation of Directives 2002/95/EC, 2002/96/EC and 2003/108/EC, on the restriction of the use of certain hazardous substances in electrical and electronic equipment, and on the disposal of e-wastes, and later amendments. The symbol of the crossed-out wheeled bin on the appliance or its packaging indicates that the product must be disposed of separately from other waste at the end of its operational life. The user must therefore take the appliance to be disposed of to an appropriate separate collection centre for electronic and electrotechnical equipment or take it to the dealer when buying a new appliance of the equivalent kind (one by one). Appropriate separate collection for the dismantled appliance being subsequently sent out for recycling, treatment and for environmentally friendly disposal, contribute to the prevention of possible negative effects on the environment and on human health, and encourage recycling of the materials the appliance is made of. Specific administrative sanctions provided for by current regulations will be applied for illicit disposal of the product by the user.
EN
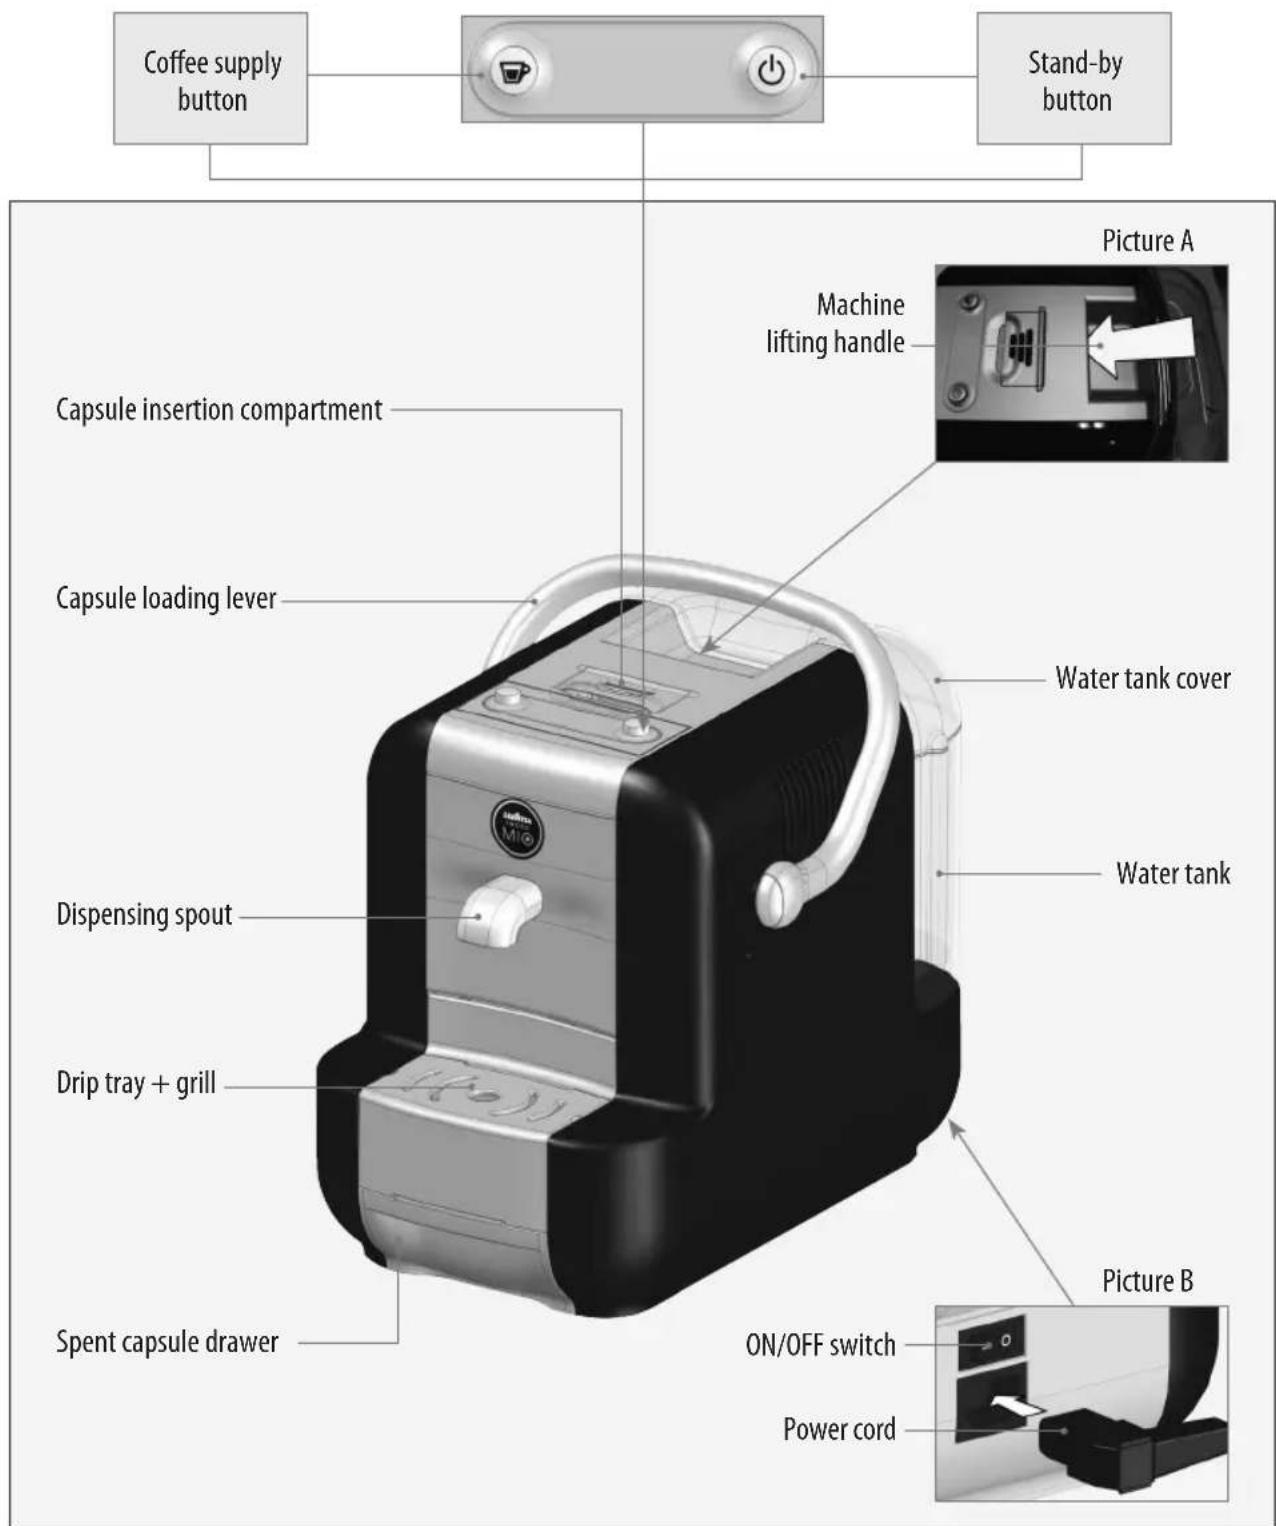
MACHINE COMPONENTS
"Simple" coffee machine
power cord
12 assorted Lavazza A Modo Mio capsules
user manual
warranty sheet
Lavazza A Modo Mio product booklet
- capsule buy-contacts booklet
A PACKAGE CONTAINS

No liability is held for damage caused by:
incorrect use not in accordance with the intended purposes;
- repairs not carried out by authorized service centres;
tampering with the power cord;
tampering with any parts of the machine;
use of non-original spare parts and accessories;
- failure to descale;
storage at temperatures below 4^ (39,2^)
use at temperatures below 10^ or above 40^ ;
use at a relative humidity above 95%
using non-compatible capsules.
In these cases, the warranty is not valid.
STARTING THE MACHINE

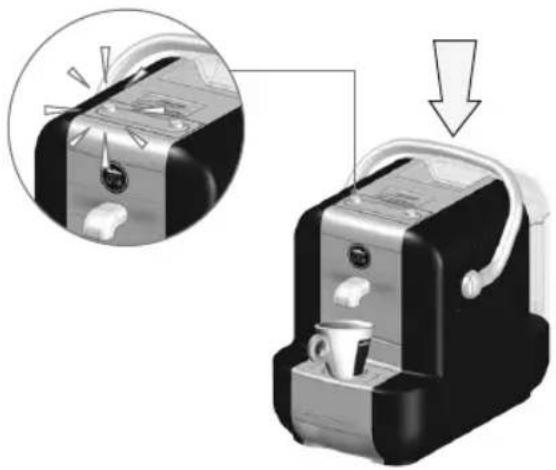
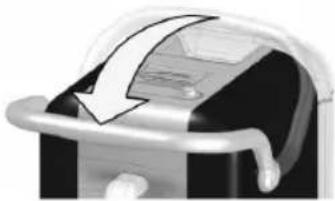
Place the machine on a flat and stable surface, away from water and heat sources. Disconnect the power if connected. Lift the machine only by using the appropriate lifting handle provided on the upper part. (See MACHINE COMPONENTS - Picture A). Damages to the machine resulting from the failure to follow these instructions will not be covered by the warranty.

High electromagnetic interferences could affect the regular operation of the machine. If need be, power the machine OFF via the main switch, then power it ON again to restore operation. If the problem persists use the machine in a place not affected by electromagnetic interferences.

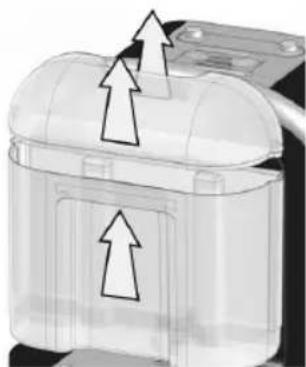
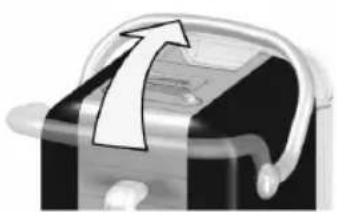
Lift and remove the cover, then take the water tank out.

Rinse the tank.

Fill the water tank up to the MAX level indicated, using only fresh, non-sparkling, drinking water

Hot water and other liquids may damage the tank and the coffee machine. Never start the machine with no water in the tank: make sure the water level is over the MIN level marked.
Using a water filter extends the life of your machine, protects it from limescale and enhances the quality of water. We recommend BRITA FILTER "AquaAroma Crema" (optional attachment). Follow the instruction sheet attached to the filter to install it.

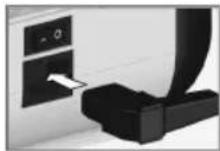
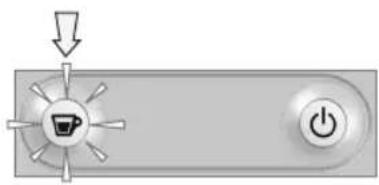
Connect the power cord, press the main switch to position I. stand-by button comes ON.

Press the stand-by button to power the machine ON.

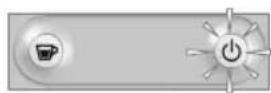
The machine starts the heating cycle. The coffee supply button starts blinking whereas the stand-by button comes OFF.
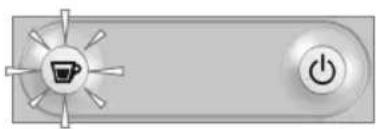

The machine is ready for use when the coffee supply button is ON with steady light and a double sound is heard.
STAND-BY FUNCTION

In order to guarantee energy saving, after 10 minutes of non-use the machine will automatically enter the stand-by mode which is pointed out by the lighting up of the button. The machine can be set in stand-by mode manually by pressing the relevant button.
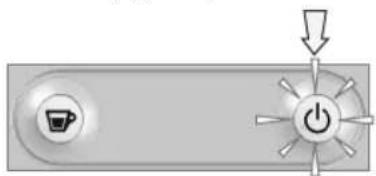
Press the button again to restart the machine.
EN
PREPARING THE COFFEE
COFFEE SUPPLY PROCEDURE

Make sure the coffee supply button is ON with steady light and the capsule loading lever is at rest position.

If the coffee supply button is pressed during the heating cycle then, the machine will give three sounds and will supply no coffee.

Put only compatible capsules in the capsule compartment.

Single-dose capsules are preset for supplying only one coffee/ product. DO NOT reuse capsules after their first use. Fitting 2 or several capsules simultaneously will cause machine malfunctioning.

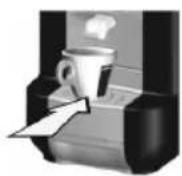
To have your coffee at the ideal temperature, warm-up the cup with hot water. Position the cup under the spout without fitting the capsule. Pull the loading lever to stop limit and then press the coffee supply button to pour hot water enough for warming up the cup.

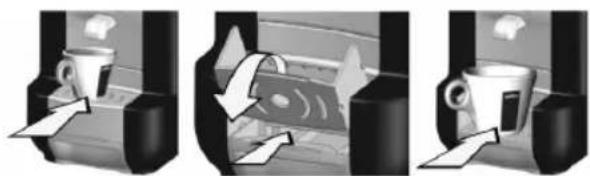
Place the mug/small cup under the dispensing spout

Lift the capsule compartment lid, insert a capsule and then reclose it.
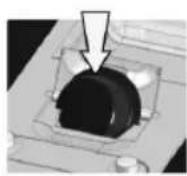

Pull the loading lever forwards until it stops.

Press the coffee supply button and wait until obtaining the desired amount in the cup. Press the button again to stop supply.

Do not move the lever to the off position while coffee is brewed.

Bring the lever back to rest position to eject the spent capsule to the used capsule drawer. The machine is ready for a new supply.

The cup grill can rotate up to 180^ to allow the use of mugs, small cups and containers of various sizes.
MAINTENANCE AND CLEANING
EN
Never use solvents, alcohol, harsh substances to dry the machine components, and never place them in an oven. Wash the components (except the electrical ones) with cold/lukewarm water and non-abrasive cloths/sponges. Do not use dishwasher for washing the machine components. Rinse the tank every day. Do not leave water in the circuit for over 4 days or, should this happen, then run a water supply (without capsule) before starting a coffee supply.
CLEANING THE BREW GROUP
To clean the spout, carry out the COFFEE SUPPLY PROCEDURE once a week without fitting the capsule.
CLEANING THE SPENT CAPSULE DRAWER
Empty and clean the spent capsule drawer after 10 coffees or every two/three days.
Check routinely that the spent capsule drawer is not filled so as to avoid malfunctioning and damages to the machine.
Take the spent capsule drawer out and the cup grill.
2 Remove the upper drawer for removing the spent capsules and to drain the drip tray. Clean and dry both parts before putting them back.
DESCALING
Limescale build up is a normal consequence when using the machine over time; the machine needs descending every 3-4 months and/or whenever a reduction in water flow is noticed.
In case of conflict, priority must be given to what is indicated in the operation and maintenance manual over the instructions provided on separately sold accessories and materials.
0 Decalcification can be done using a decalcification product for coffeemakers of the non-toxic harmless type commonly found on the market.
Never drink the descending solution or any products dispensed until the cycle has been carried out to the end. Never use vinegar as a descending solution.
1 Remove the water tank and empty it out.
2 Fill the tank with a solution of descending cleaner and water as specified on the descending cleaner package. Refit the tank.
3 Power the machine ON and put a container under the spout.
Press the coffee supply button and pour two cups of water (about 150 ml each).
5 Power the machine OFF.
6 Let the descending solution sit for about 15-20 minutes with the machine off.
7 Power the machine ON by pressing the main switch and the stand-by button and carry out the operations described at steps 4 and 5. Press again the main switch to power OFF the machine for 3 minutes.
Repeat the operations described in step 7 until the water tank is completely empty.
9 Remove the tank, rinse it with fresh, drinking water. Fill the tank fully.
Press again the main switch and power the machine ON. Put a proper container under the spout. Press the coffee button and let the liquid contained in the tank pour out completely.
When water is finished, fill the tank again and repeat the operations described in step 10. Once finished, the descending cycle is complete.
EN
TROUBLESHOOTING
| Problems Causes Solutions | ||
| The machine does not switch on.Pilot light OFF after pressing the main switch. | » The machine is not connected to the power source. | » Connect the machine to the power source.» Contact customer service. |
| The machine requires a lot of time to heat up. | » Machine affected by limescale deposits. | » Descale the machine. |
| The pump is very noisy. | » There is no water in the tank. | » Fill-up with fresh drinking water. |
| The loading lever doesn't reach the brewing position. | » Spent capsule drawer filled.» Capsule fitted incorrectly. | » Empty the spent capsule drawer.» Repeat the sequence, lever in the off position, lever in the brewing position; if this is not enough, operate manually to remove the capsule from the duct with the machine disconnected from power mains. |
| The coffee is brewed too fast, the brewed coffee is not creamy. | » Spent capsule.» | Bring the lever back to rest position and load a new capsule. |
| Coffee not supplied and steam coming out of the capsule compartment. | » The loading lever was not set to the brewing position. | » Set the loading lever to the brewing position. |
| Coffee is not brewed or brewed in drips only. | » Dispensing spout is clogged. | » Clean the dispensing spout. |
TECHNICAL SPECIFICATIONS
Nominal Voltage - Power Rating - Power Supply: See the plate placed on the machine
Dimensions: Height Width Depth 12^ (305mm) 9.25" (235 mm) 13" (330 mm)
Weight: about 11 lbs. (5 kg)
Water tank: 30,5 oz. (0.9 litres) - Removable type
Housing Material: ABS-Thermoplastic
Power Cord Length: 47^ (1.2m)
Control Panel: Top of machine
Thermal fuse
Aluminium flash boiler with temperature probe
Utilisation prévue:
The manufacturer reserves the right to make changes without prior notice.