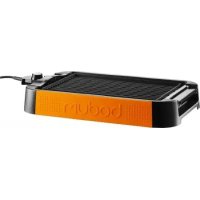
Fyrkat 11450P - Barbecue BODUM - Free user manual and instructions
Find the device manual for free Fyrkat 11450P BODUM in PDF.
User questions about Fyrkat 11450P BODUM
0 question about this device. Answer the ones you know or ask your own.
Ask a new question about this device
Download the instructions for your Barbecue in PDF format for free! Find your manual Fyrkat 11450P - BODUM and take your electronic device back in hand. On this page are published all the documents necessary for the use of your device. Fyrkat 11450P by BODUM.
USER MANUAL Fyrkat 11450P BODUM
A very warm welcome outside!
What do we associate more with spring and summer than eating outside? And what is more perfect than the pleasure of a really first-class barbecue? Whatever you like best – a hearty steak, a juicy sausage or grilled veggies – with the BODUM® Picnic Gas BBQ «FYRKAT» you have made the right choice for a sociable summer. A barbecue is probably the only culinary event at which the proverb «Too many cooks spoil the broth» does not apply: When barbecuing, many cooks are at work. If you are not too easily seduced by rich sauces, barbecued food is not only extremely tasty but also healthy and light, especially if you use lean meat, fish and vegetables.
All we would like to do now is to ask you to read these instructions carefully as they contain important safety and hazard warnings as well as useful barbecuing tips, and – of course – to wish you a wonderful summer.
With best wishes from the BODUM® Design Team
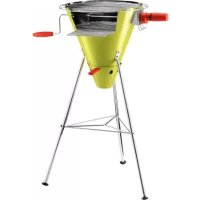
ASSEMBLY INSTRUCTIONS
GRILL SET UP
1 Handle
2 Lid
3 Grilling grate
4 M4 screw (3 units)
5 Flame tamer
6 Grilling bowl
7 Locking clip
8 Regulator
9 Burner
10 Support leg (3 units)
11 Grease tray fastening (3 units)
12 Grease tray
13 Air opening
14 Connection between burner & regulator
15 Connection between gas canister & regulator
FIGURE A
Place the grilling bowl (6) carefully upside down on a level surface and attach each of the three support legs (10) to the grilling bowl (6). Use a pre-fitted M6 screw for each support leg and screw in the support leg (10) until securely fastened. Tighten all of the grill screws, so that all parts are secure.
FIGURE B
Place the grease tray (12) upside down in the centre of the three support legs (10). Fit the three grease tray fastenings (11) onto the support legs (10). The grease tray fastenings (11) can be slid over the support legs (10) with ease by pressing the two eyelets together. The grease tray (12) is now clamped in place by the support leg (10) and the grease tray fastening (11). Ensure that the grease tray (12) is positioned at a distance of approx. 6 cm from the grilling bowl (6).
FIGURE C
After attaching the support legs (10) & grease tray (12) to your BODUM® Picnic Gas BBQ, position the BBQ grill on a firm, level surface. Place the flame tamer (5) on the three support plates intended for this purpose, and mount these on the stays using the M4 screws (4) provided. Tighten all of the grill screws sufficiently, so that the flame tamer (5) is secure.
Mount the regulator (8) on the burner (9) with the M6 nut. Tighten the nut of the regulator (8) sufficiently, so that the regulator (8) is secure on the burner (9).
Once assembly is complete, place the grilling grate (4) on the grilling bowl (6).
In order to transport your BODUM® Picnic Gas BBQ, place the lid (3) on the grilling bowl (6) and clamp it firmly in place using the three locking clips (7). Carry the BBQ by the handle (1). The BBQ must never be transported whilst hot. Always leave it to cool off completely. Always switch the regulator (8) to OFF prior to transportation.
HAZARDS & SAFETY INFORMATION
Failure to observe these safety instructions and precautions can result in serious damage and injury or even death.
- N Do not use the grill indoors! The BODUMPicnic Gas BBQ is designed for outdoor use only. Toxic gases can form if used inside.
- Place your BODUM® Picnic Gas BBQ on a secure base before using it. The gas grill must never be positioned on an incline or tilted!
- Warning! Never use spirit, petrol or similar liquids to light or relight! Only use firelighters complying with EN1860-3!
• Children and pets are not allowed to stay unattended near a hot grill.
- Grill and flammable materials should be kept at least 1.5 m away from each other.
- Do not place the grill on a flammable surface or on glass.
- Never store any spare or open gas canisters underneath or in close proximity to the grill.
- Incorrect assembly can result in danger. Always keep the assembly instructions provided in these instructions close at hand.
- After the picnic gas BBQ has been in storage or out of use for an extended period always check for gas leaks and blockages of the burner (9) prior to use. You can find the instructions for this under "Checking for a gas leak"
- Do not wear clothes with long, wide sleeves when you are grilling.
- If the flame at the burner (9) should extinguish during use, switch the regulator (8) to OFF and open the lid.
- Never use charcoal, briquettes or lava stones in your picnic gas BBQ.
- If fat starts to burn, switch the regulator (8) to OFF and wait until the fire has extinguished.
- To move the grill, lift it by the handle (1) and position it at the desired location. Never try to move the grill when it is hot! Wait until the grill has cooled down before moving or lifting it.
- The BODUM® Picnic Gas BBQ must not be used as a heater.
- The BODUM® Picnic Gas BBQ is not intended for installation or use in caravans, campers or on boats.
- When cleaning the regulator (8) or the burner (9) ensure that the nozzles and connections are not damaged.
- Butane/propane are not crude gas. Any modification of the grill for use with crude gas and any attempt to use this butane/propane grill with crude gas is dangerous and will result in the warranty being voided.
- A dented or rusty gas canister can be hazardous and should be checked by your gas supplier. Never use gas canisters with a damaged valve.
- Gas may still be present inside gas canisters that appear completely empty. Gas canisters are to be transported and stored with this in mind.
- Never, under any circumstances, attempt to detach the regulator (8) or any other parts of the gas line when using the grill.
- When grilling always remove the lid to the side - never lift up and off - otherwise suction may be generated.
- Only use the regulator (8) supplied together with the picnic gas BBQ.
- Do not grill when it is windy.
- Outdoor use only.
- CAUTION: The gas canister must never be used above head height.
- Use disposable butane/propane canisters with a minimum full weight of 430g and a maximum full weight of 460g . The canisters must be fitted with a valve with thread complying with EN417.
- Never search for a gas leak with the aid of a naked flame. Prior to hunting for a leak, ensure that no sparks or naked flames are close by. Sparks and flames may trigger an explosion, which could cause severe or even fatal injuries and lead to material damage.
- Only tighten the canister connection by hand. The use of excessive force could damage the regulator connection and the canister valve.
This may in turn lead to a leak or prevent gas from flowing.
- Remove the lid when lighting and keep the grill uncovered as it starts to burn.
- Never touch the grill or grate to determine whether it is hot.
• Always wear barbecuing mitts or use an oven cloth when grilling in order to protect your hands.
- Use grill utensils with long, heat-resistant handles.
- Please keep electric cables away from hot surfaces.
- Do not line your grill with aluminum foil as this can hinder the flow of air.
- Do not use sharp objects and abrasive cleaners to clean the grilling grate and grill as these may damage the surface.
USEFUL TIPS
- When igniting the gas grill use the BISTRO lighter from Bodum. Never ignite the grill from the top but instead only through the ventilation holes or the ignition holes as shown in Figure D.
- N Use a spatula (BODUM FYRKAT barbecue spatula) or tongs ((BODUM® FYRKAT barbecue nipper) to turn the barbecue food. Avoid using sharp objects to pierce the meat as this can cause meat juices and flavor to escape.
- Ideally, turn the barbecue food once only. Follow the tips in your recipe.
GAS CONNECTION
- Use disposable butane/propane canisters with a minimum full weight of 430 g and a maximum full weight of 460 g. The canisters must be fitted with a valve with thread complying with EN417.
CAUTION: Only use gas canisters labeled to indicate that they contain a propane/butane mix.
- Push the disposable liquid gas canister into the regulator and turn the canister in a clockwise direction as shown in Figure C, until it is firmly seated.
NOTE: Only tighten the canister connection by hand. The application of excessive force could lead to the regulator (8) and the valve on the canister being damaged. This may in turn lead to a leak or prevent gas from flowing.
CHECKING FOR A GAS LEAK:
YOU NEED THE FOLLOWING:
Disposable liquid gas canister, soap solution and a cloth or brush to apply the solution.
It is necessary to check the following connections for a gas leak. The connection between the burner and regulator (14) and the connection between the gas canister and regulator (15) FIGURE D.
1) Attach the gas canister at the regulator (8) as shown in FIGURE C.
2) Mix soap with water.
3) Moisten the connections listed above with the soap solution.
4) Turn the gas regulator in a counter clockwise direction, to ON.
5) Check for any leaks. If bubbles form or if a bubble starts to become larger, a leak is present. If a leak is present, turn the regulator (8) to OFF and tighten the canister connection more firmly. Turn the regulator (8) back to ON and check once again using the soap solution. If a leak is still present then turn the regulator (8) to OFF again and remove the gas canister. Try with a second gas canister. If the leak is still present then contact your dealer. DO NOT USE THE BARBECUE.
6) Switch the regulator (8) to OFF once the leak test is complete, and clean the connection between the burner and regulator (14) and the connection between the gas canister and regulator (15) using a damp cloth. FIGURE D
MANUAL IGNITION
1) Always open the lid prior to ignition. The gas BBQ must never be ignited whilst the lid is closed.
2) Check that the regulator (8) is in the OFF position.
3) When igniting the grill use the BISTRO lighter from Bodum. Ignite the lighter and hold the flame in one of the two ignition openings beneath the burner as shown in Figure D.
NOTE: Do not bend over the open grill. Keep your face and body a minimum 30 cm away from the ignition opening whilst igniting the grill.
4) Turn the regulator (8) for the burner (9) into the ON position.
5) Check that the burner (9) is on by looking through the grilling grate. A blue flame must be visible.
CAUTION: If you do not open the lid during the ignition process, or fail to adhere to the 5 minute waiting time to allow the gases to dissipate in case the grill does not light, there is a risk that an explosive burst of flames may form, which can cause severe physical or even fatal injuries.
CLEANING
1) The reductor must be switched to the OFF position and the picnic gas grill must be cold.
2) Open the lid (2).
3) Remove the grilling grate (3).
4) Unscrew the three M4 screws (4) on the flame reflector (5). Remove the M4 screws (4) and the flame reflector (5).
5) Remove any remaining food from the grilling bowl (6) and clean the grilling bowl (6) and the flame reflector (5) using a mild detergent and water.
6) The grilling grate does not need to be cleaned after each use. Just loosen any left-over food with a brass wire brush or crumpled up aluminum foil and then wipe clean with kitchen paper.
7) Attach the flame reflector (5) after cleaning in accordance with the «ASSEMBLY INSTRUCTIONS»
STORAGE
- If the picnic gas BBQ is not in use it is essential that the gas canister be stored in a well-ventilated place, outdoors.
- The gas grill must be checked for gas leaks and blockages of the burner (9) prior to use.
- Check the air openings (13) for damage. FIGURE D
GRILLING TIPS
Please read all instructions carefully before you start to grill. The lid is an important part of the BODUM® Picnic Gas BBQ and should be kept closed at all times when barbecuing foods. You save up to one third of cooking time compared with a conventional oven, because hot air is constantly flowing around the food during grilling. The barbecue food must be turned once, halfway through grilling.
HERE ARE THE REASONS FOR GRILLING WITH A CLOSED LID:
- No flames flaring: When the lid is closed flames cannot flare up.
- Fast barbecuing: The BODUM® Picnic Gas BBQ is optimally designed for heat retention. The heat is reflected by all surfaces (above all by the lid) back onto the barbecue food, so that the grilling time is considerably reduced.
YOU CAN EXTEND THE USEFUL LIFE OF YOUR BODUM® PICNIC GAS BBQ BY SEVERAL YEARS IF YOU CLEAN IT THOROUGHLY ONCE EACH YEAR. JUST FOLLOW THESE SIMPLE STEPS:
- Ensure that the grill has cooled down.
- Ensure that the regulator (8) is switched to OFF.
- Remove the grilling grate.
- Wipe out the grilling bowl (6) with a cloth. All BBQ remnants can be wiped into the grease tray (12).
- Remove the BBQ remnants and grease from the grease tray.
- Wipe the outside of the grill using a damp cloth.
- The grilling grate does not need to be cleaned every time it is used. Just loosen any left-over food with a brass wire brush or with crumpled up aluminum foil and then wipe clean with kitchen paper.
TECHNICAL DATA
| Rated output N2.9 kW (210 g/h) |
| Gastype NButane/Propane |
| Approval marks CE |
CE
Galerie, Bondi Junction (NSW)
Il Mondo, Townsville (QLD)
Kitchenware-Plus, Loganholme/
Brisbane (QLD)
Moda Aroma, Cairns (QLD)
Peters of Kensington (NSW)
Your Habitat, Hobart (TAS)
Your Habitat, Canberra (ACT)
Your Habitat, Launceston (TAS)
Dallimores (WA)
Inside Out (NSW)
Roost (VIC)
Cucina Cucina (NSW)
MYER (NSW)
MYER (QLD)
MYER (SA)
MYER (VIC)
David Jones (NSW)
David Jones (QLD)
AUSTRIA
BODUM® STORE
Marc Aurel Strasse 2 b
A-1010 Wien
T +43 1 925 7999
F +43 1 925 7999
shop.wien@bodum.com
SHOP-IN-SHOP
Cusinarium, Singerstrasse 14,
1010 Wien
shop.maasmechelen@bodum.com
SHOP-IN-SHOP
INNO, Antwerp
176 Yonge Street, Toronto, ON,
M5C 2L7
THE BAY (MONTREAL),
Montreal, QC, H3B 3Y5
THE BAY (YORKDALE), 3401 Dufferin
St., Toronto, ON, M6A 2T9
THE BAY (BAYSHORE), 100 Bayshore
Dr., Nepean, ON, K2B 8Cl
THE BAY (SOUTHCENTER), 100
Anderson Rd. Southeast, Calgary, AB,
T2J 3VI
THE BAY (SOUTHGATE), 111 St. & 51
Ave., Edmonton, AB, T6H 4M7
THE BAY (MISSISSAUGA), 100
City Court Drive, Hwy10 and
Burnhamthorpe Road West,
Mississauga, ON, L5B 2C9
BOUTIQUE 1101 LAURIER,
1101 Avenue Laurier Outermont,
Montreal, QC, H2V 2L3
HOMEWERX, 1053 Davie Street,
Vancouver, BC, V6E 1M5
CALL THE KETTLE BLACK, 2294 W. 4th
Avenue, Vancouver, BC, V6K 1N8
BRADSHAW'S, 129 Ontario St.,
Stratford, ON, N5A 3H1
JILL'S TABLE, 115 King St., London, ON,
N6A 1C3
Street West, Hamilton, ON, L8S 1L6
TEA DESIRE, 1232-Barnet Highway,
Coquitlam, BC, V3B 5R5
LE CHEF COMPLET, 447 Brant Street,
Burlington, ON, L7R 2G3
CHINA
SHOP-IN-SHOP
Sogo Department Store, 7/F, Nanjing
West Rd., Shanghai
CitySuper, IFC, B2, LG2, 8,
Century avenue Pudong new district,
Shanghai
ST Plaza, B1, 22 Jianguamenwai
Avenue, Beijing
Shin Kong Place, 5/F, No. 87, Jianguo
Road, Chaoyang District, Beijing
Emily Coffee, No. 0158A, Zone C
Chaowai SOHO, 6B, Chaowai Daijie,
Beijing
Music Coffee, 4# New Hope Rd,
CHengdu, Sichuan
Wangfujing Department Store, No.99,
Qinxian North Street, Taiyuan
Parkson Department Store, No. 189,
Qinxian North Street, Taiyuan
Chicago Coffee, 36 Times Avenue,
Think UK Apartment Complex, 88 Jiao
Ling Road, Kunming
Charter Department Store, 6/F, No.1255
Chongqing road, Chang Chun, Jilin
Ouya Commercial Capital, 6/F, No.
1128, Gong Nong Da Lu, Chang Chun, Jilin
Nenlu Tea Lounge, 10/F, Hongyadong,
No.88 Jiabin Road, Yuzhong District,
Chongqing
DENMARK
SHOP-IN-SHOP
Inspiration Aarhus, Aarhus
shop.opera@bodum.com
BODUM ^3 OUTLET
La Vallée Shopping Village
shop.serris@bodum.com
SHOP-IN-SHOP
Paris
105 51, Athinas 48, Kotzia Square
HONG KONG
SHOP-IN-SHOP
Allure Living Central, 109B Caine Road, Mid-Level
Citysuper Harbour City Store, Level 3, Harbour City, Tsim Sha Tsui
Franc Franc, Shop S01-03 & S08-12, 2/F., Hang Lung Center, 2-20 Paterson St., Causeway Bay
GOD Causeway Bay, Leighton Centre, Sharp Street East Entrance, Causeway Bay
GOD Central, 48 Hollywood Road, Central
GOD Tsimshatsui, Shop B02, Basement, Silvercord, 30 Canton Road, Tsim Sha Tsui
Gourmet, Basement, Lee Gardens, Causeway Bay
Great Food Hall, Basement, Two Pacific Place, Queensway
Lane Crawford (Pacific Place), 88
Queensway, Admiralty
Lane Crawford (Times Square), 1
Matheson Street, Times Square, Causeway Bay
Lane Crawford (Tsim Sha Tsui), 3
Canton Road, Tsim Sha Tsui
Marc James Design, 16/F Horizon Plaza, Ap Lei Chau
Sogo Hong Kong Co., Ltd., 555
Hennessy Road, Causeway Bay
Today's Living Service Centre, 1/F., 20
Pak Sha Road, Causeway Bay
Towngas Avenue, G/F 59-65 Paterson
St., Fashion Walk, Causeway Bay
Towngas Cooking Centre, Basement,
Leighton Centre, 77 Leighton Road,
Causeway Bay
Wing On (Main Store), Wing On
Centre, 211 Des Voeux Road Central,
Sheung Wan
Wing On (Taikoo Shing Store),
Cityplaza, Units 074 & 144, 18 Taikoo
Shing Road, Taikoo Shing
Wing On Plus (Nathan Road), Wing On
Kowloon Center, 345 Nathan Road, Yau Ma Tei
Yata, Phase III, New Town Plaza, 2-8
Shatin Centre Street, Shatin
INDONESIA
SHOP-IN-SHOP
shop.rinku@bodum.com
BODUM® OUTLET
Gotemba Premium Outlet
Section 550
1312 Fukasawa, Gotemba-shi
412-0023 Shizuoka
T +81 550 81 3118
F +81 550 81 3118
shop.gotemba@bodum.com
SHOP-IN-SHOP
Illums Nihonbashi
Illums Umeda
Illums Koriyama
Illums Sapporo
Seibu Department Store Ikebukuro
ONLINE SHOP JAPAN
www.bodum.com
KOREA
Shinsegae Main, 9 F,
52-5 chungmuro Joong-Gu Seoul
Timesquare, 5F, 434-5 Youngdeungpo
4-ga Youngdeungpo- Gu Seoul
Shinsegae Busan Centerm City, 7F,
1495 Woo-dong Haewundae-gu Busan
Lotte Main, 7F, 1 Joong-gu Sogong-
dong Seoul
Lotte Kangnam, 7 F, 937 Daechi-dong
Kangnam-Gu Seoul
AK Plaza Bundang, 5F, 263 Seohyun-
dong, Bungdang-gu Seongnam City,
Kyunggi-do
Hyundai Cheonho, 10 F, 455-8
Cheonho-dong Kangdong-gu Seoul
Shinsegae Yeongdeungpo, 6F, Building
B, 434-5 Yeongdeungpo-dong 4ga,
Yeongdeungpo-gu, Seoul
Shinsegae Incheon, 5F, 15 Gwangyo-
dong, Nam-gu, Incheon
MALAYSIA
SHOP-IN-SHOP
"LIVE IT UP!" Homestore, LG306,
One Utama Shopping Centre (New
Wing)
Isetan Departmental Store, 3rd floor
Kuala Lumpur City Centre
Robinsons Departmental Store, 2nd
floor
The Gardens Midvalley
Parkson Pavilion, 6th floor, Pavilion
Kuala Lumpur
NETHERLANDS
SHOP-IN-SHOP
DE BIJENKORF, Amsterdam
DE BIJENKORF, Arnhem
DE BIJENKORF, Den Haag
DE BIJENKORF, Eindhoven
DE BIJENKORF, Rotterdam
DE BIJENKORF, Utrecht
RUSSIA
SHOP-IN-SHOP
Bolshoy Gostiny Dvor, St. Petersburg
Studio Detali, Fortuna Grand, Irkutsk
Studio Detali, Irkutsk
Dom nemetskoy posudi, Magnitogorsk
Dom nemetskoy posudi, Gostiny Dvor,
Magnitogorsk
Dom nemetskoy posudi, Magnit,
Chelyabinsk
Dom nemetskoy posudi, Tyumen
SINGAPORE
SHOP-IN-SHOP
Tangs, Basement 1, Orchard Road
Robinson Centrepoint, Level 5, Orchard
Road
Robinsons Raffles City, Level 4, City
Hall
Isetan Scotts, Level 4, Orchard Road
Isetan Katong, Level 2, Marine Parade
Road
Isetan Nex Mall, Level 3, Serangoon
SPAIN
BODUM® OUTLET
Las Rozas Village - loc. 46
shop.madrid@bodum.com
SHOP-IN-SHOP
ISOLEE, Claudio Coello 55, Madrid
shop.zurich@bodum.com
BODUM® SHOPS & SHOP-IN-SHOP
SHOP-IN-SHOP
GLOBUS: Basel, Luzern
HUBACHER AG: Rössliweg 43, 4852
Rothrist
LOEB AG: Spitalgasse 47-51, 3001 Bern
COOP CITY WARENHÄUSER: Baden,
Centre commercial, Signy
Tekoe, 1997 Haute-Nedaz
8F, Sogo Department Store, Chung
Hsiao
8F, Shin Kong Mitsukoshi Department
Store Taichung
10F, Far East Department Store,
Banciao
THAILAND
SHOP-IN-SHOP
Isetan 5 Fl., Central world
CDC (Crystal Design Center) B Building
Emporium
Siam Paragon
Central Chidlom
Robinson Changmai
Central Pattaya
Central Chaengwattana
UNITED KINGDOM
BODUM® OUTLET
Unit 6A
Pingle Drive
Bicester Village
Bicester
Oxfordshire
OX26 6WD
T +44 1869 321 209
F +44 1869 321 209
shop.bicester@bodum.com
ONLINE SHOP UK
www.bodum.com
USA
SHOP-IN-SHOP
BED, BATH & BEYOND, 555 9th St, San
Francisco, CA, 94103
BED, BATH & BEYOND, 620 6th Ave,
New York, NY, 10011
BROADWAY PANHANDLER, 65 East 8th
St., New York, NY, 10003
KITCHEN COLLAGE, 430 E. Locust
Street, Des Moines, IA, 50309
KIM'S HOME CENTER, 2940 W Olympic
Blvd., Los Angeles, CA 90006
ONLINE SHOP USA
www.bodumusa.com
BODUM® SALES OFFICES
AUSTRALIA
Bodum (Australia) Pty Ltd
Suite 39, 26-32 Pirrama Road
Pyrmont NSW 2009
Australia
T +61 2 9692 0582
F +61 2 9692 0586
office.australia@bodum.com
AUSTRIA
Peter BODUM® GmbH
Roseggerstrasse 35
DE 21079 Hamburg
T +49 4191 99830
F +49 4191 2969
office.austria@bodum.com
BENELUX
C/O BODUM® AG
Kantonsstrasse 100
Postfach 463
CH-6234 Triengen
Agent Belgium/Luxemburg
Rombouts BVBA
Brialmontlei 10
BE-2018 Antwerpen
T +32 3 213 16 13
F +32 3 213 16 05
distribution.belux@bodum.com
Agent The Netherlands
Bonkers B.V.
Molenweg 19A
NL-3738 DC Maartensdijk
T +31 346 21 40 23
F +31 346 21 24 30
distribution.netherlands@bodum.com
CHINA
BODUM® Hong Kong Ltd
Shanghai Representative Office
Unit 15A04, Wang Jiao Plaza
No.175, Yan'An Road (E)
Shanghai 200002
T +86 21 6326 5870
F +86 21 6326 5873
office.china@bodum.com
Distribution China
BODUM® Hong Kong Ltd
Shanghai Representative Office
Unit 15A04, Wang Jiao Plaza
No.175, Yan'An Road (E)
Shanghai 200002
T +86 21 6326 5870
F +86 21 6326 5873
office.china@bodum.com
FRANCE
BODUM® France S.A.S
office.germany@bodum.com
GREECE
Distribution Greece
YALCO
9, A Metaxa St. Kifissia
GR 145 64 Athens
T +30 210 629 99 66
HONG KONG
BODUM® Hong Kong Ltd
BODUM ^® Asia Ltd
Unit 2503, 25/F K. Wah Centre
191 Java Road, North Point
Hong Kong
T +852 25 43 45 55
F +852 25 43 33 23
office.hongkong@bodum.com
Distribution Hong Kong
Carsac Limited
1128, Block B, Sea View Estate
2-8 Watson Road, North Point
Hong Kong
T +852 2968 1088
F +852 2968 5048
distribution.hongkong@bodum.com
ITALY
C/O BODUM® AG
Kantonsstrasse 100
Postfach 463
CH-6234 Triengen
T 199 30 77 78
F 199 30 77 79
office.italy@bodum.com
JAPAN
BODUM ^® Japan Co., Ltd
3-25-12 Jingumae
Shibuya-ku
150-0001 Tokyo
T +81 3 5775 0681
F +81 3 5775 0701
office.japan@bodum.com
KOREA
Distribution Korea
Sun Woo Ind. Co., Ltd
465-070
251-6 Hang-Dong
Hanam-City, Kyungki-Do
Korea
T +82 31 793 1172
F +82 31 793 1176
distribution.korea@bodum.com
NEW ZEALAND
Distribution New Zealand
Michael Joyce
19 Westmoreland Street West
Grey Lynn Auckland 1141
T+6493766667
F +64 9 378 1122
sales@michaeljoyce.co.nz
PORTUGAL
office.denmark@bodum.com
NORWAY
T+4766910472
F +47 22 51 36 36
YEO TECK SENG (S) PTE. Ltd
59 Jalan Pemimpin
# 03-00 L&Y Building
Singapore 577218
T +65 6254 1511
F +65 6251 5415
distribution.singapore@bodum.com
SPAIN
C/O BODUM ^® AG
Kantonsstrasse 100
Postfach 463
CH-6234 Triengen
T 902 995 604
F 902 996 138
office.spain@bodum.com
Agent Spain
MIM S.I.
distribution.spain@bodum.com
SWITZERLAND
BODUM® (Schweiz) AG
Kantonsstrasse 100
Postfach 463
6234 Triengen
T+41 41 935 45 00
F +41 41 935 45 80
office.switzerland@bodum.com
TAIWAN
BODUM® Taiwan
7th Floor
5 Kwo Kang Road
205 Keelung City
T +886 2 24 58 38 48
F +886 2 24 58 38 36
distribution.taiwan@bodum.com
THAILAND
Distribution Thailand
CAC Pacific Ltd
89 Chalermprakiart Soi 34
Nongbon, Pravet
Bangkok 10250
Thailand
T+662 328 1984
F +662 328 1985
distribution.thailand@bodum.com
UNITED KINGDOM
BODUM® (UK) Ltd
Hill House
1 Little New Street
London
EC4A 3TR
T 0845 40 17778
office.uk@bodum.com
USA (CANADA, SOUTH AMERICA)
BODUM® USA, Inc
601 West 26th St.
Suite 1250
New York, NY 10001
T +1 212 367 8844
F +1 212 367 8855
info@bodumusa.com
Proof of purchase
Firmenstempel
Cachet du revendeur
Firmastempel
Sello de la empresa