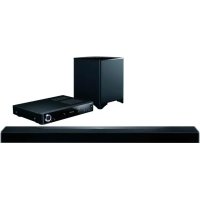
SBT200 - Soundbar ONKYO - Free user manual and instructions
Find the device manual for free SBT200 ONKYO in PDF.
| Product Type | Soundbar |
| Brand | Onkyo |
| Model | SBT-200 |
| Dimensions (L × H × D) | 940 mm × 73 mm × 83 mm |
| Weight | 2.4 kg |
| Power Supply | 100-240 V AC, 50/60 Hz (17 V DC, 2.8 A adapter) |
| Power Consumption | 11 W (on), 0.4 W (Bluetooth standby) |
| Output Power | 2 × 20 W (6 Ω, 1 kHz) |
| Frequency Response | 80 Hz - 15 kHz (±3 dB) |
| Signal-to-Noise Ratio | 103 dB (AUDIO IN, IHF-A) |
| Audio Inputs | 1 × digital optical (Dolby Digital/PCM), 1 × analog (AUDIO IN) |
| Bluetooth | Version 2.1 + EDR, profiles A2DP and AVRCP |
| NFC | Yes (simple pairing) |
| Sound Modes | Cinema, Music, News, Direct |
| Surround Function | Enable/disable |
| Included Accessories | Remote control (CR2025 battery), power adapter, optical cable, wall mounts, drilling template, double-sided adhesive tape |
| Safety | Protection circuit, auto shut-off after 15 min without signal |
| Maintenance and Cleaning | Dry cloth only |
| Wall Mounting | Possible (screws not provided) |
| Spare Parts and Repairability | No user-serviceable parts, contact an Onkyo dealer |
Frequently Asked Questions - SBT200 ONKYO
User questions about SBT200 ONKYO
0 question about this device. Answer the ones you know or ask your own.
Ask a new question about this device
Download the instructions for your Soundbar in PDF format for free! Find your manual SBT200 - ONKYO and take your electronic device back in hand. On this page are published all the documents necessary for the use of your device. SBT200 by ONKYO.
USER MANUAL SBT200 ONKYO
SAFETY PRECAUTIONS 2
Accessories 5
Indicators 5
Controls and indicators. 6
System preparation 9
Placing the sound bar. 10
Sound bar connections to TVs. 12
Basic operations 14
Listening to Bluetooth enabled devices 17
Troubleshooting 20
Specifications 22
Thank you for purchasing an Onkyo product. Please read this manual thoroughly before making connections and plugging in your new Onkyo product.
Following the instructions in this manual will enable you to obtain optimum performance and listening enjoyment from your new product.
Please retain this manual for future reference.
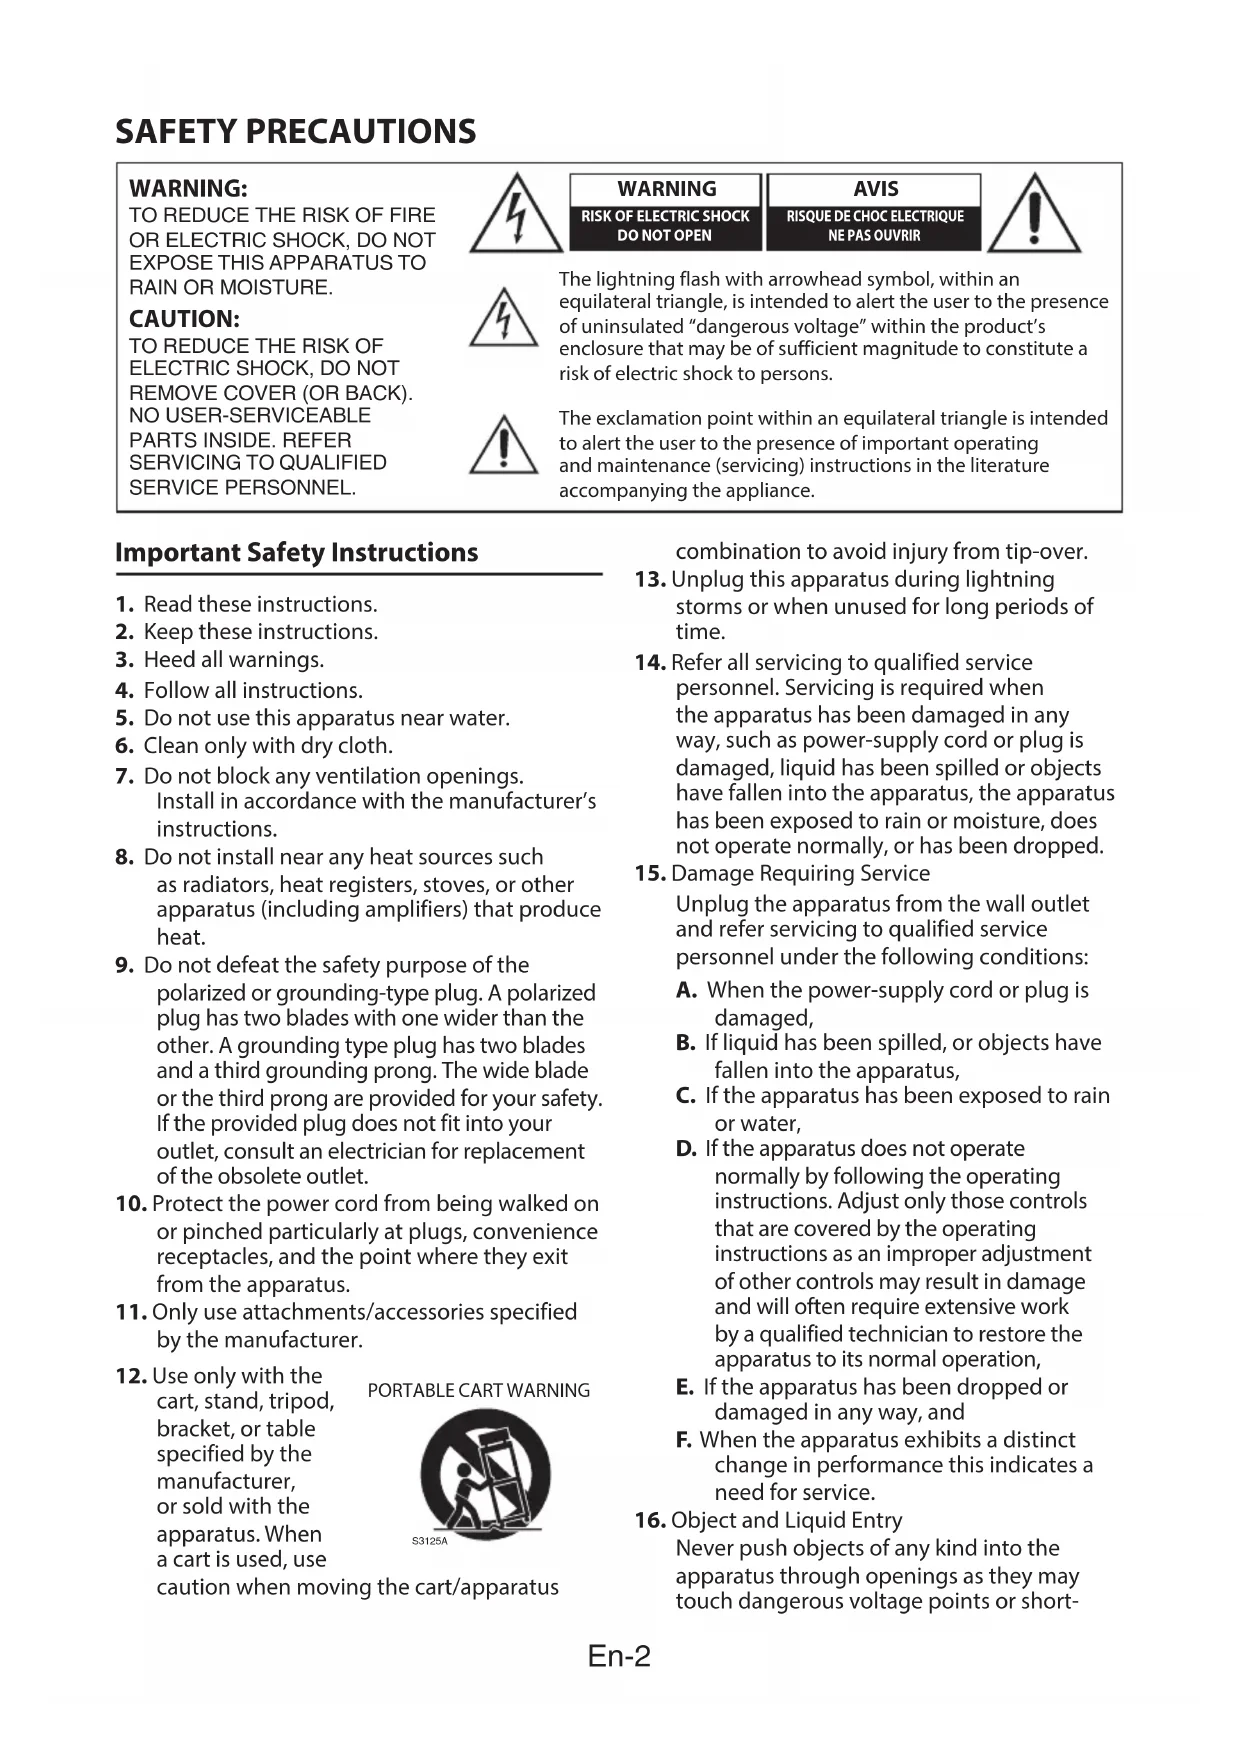
SAFETY PRECAUTIONS
WARNING:
TO REDUCE THE RISK OF FIRE OR ELECTRIC SHOCK, DO NOT EXPOSE THIS APPARATUS TO RAIN OR MOISTURE.
CAUTION:
TO REDUCE THE RISK OF ELECTRIC SHOCK, DO NOT REMOVE COVER (OR BACK). NO USER-SERVICEABLE PARTS INSIDE. REFER SERVICING TO QUALIFIED SERVICE PERSONNEL.
WARNING OF ELECTRIC SH DO NOT OPEN

AVIS RISQUE DE CHOC ELECTRIQUE NE PAS OUVRIR
The lightning flash with arrowhead symbol, within an equilateral triangle, is intended to alert the user to the presence of uninsulated "dangerous voltage" within the product's enclosure that may be of sufficient magnitude to constitute a risk of electric shock to persons.

The exclamation point within an equilateral triangle is intended to alert the user to the presence of important operating and maintenance (servicing) instructions in the literature accompanying the appliance.
Important Safety Instructions
-
Read these instructions.
-
Keep these instructions.
-
Heed all warnings.
-
Follow all instructions.
-
Do not use this apparatus near water.
-
Clean only with dry cloth.
-
Do not block any ventilation openings. Install in accordance with the manufacturer's instructions.
-
Do not install near any heat sources such as radiators, heat registers, stoves, or other apparatus (including amplifiers) that produce heat.
-
Do not defeat the safety purpose of the polarized or grounding-type plug. A polarized plug has two blades with one wider than the other. A grounding type plug has two blades and a third grounding prong. The wide blade or the third prong are provided for your safety. If the provided plug does not fit into your outlet, consult an electrician for replacement of the obsolete outlet.
-
Protect the power cord from being walked on or pinched particularly at plugs, convenience receptacles, and the point where they exit from the apparatus.
-
Only use attachments/accessories specified by the manufacturer.
-
Use only with the cart, stand, tripod, bracket, or table specified by the manufacturer, or sold with the apparatus. When a cart is used, use caution when mov

PORTABLE CART WARNING
combination to avoid injury from tip-over.
-
Unplug this apparatus during lightning storms or when unused for long periods of time.
-
Refer all servicing to qualified service personnel. Servicing is required when the apparatus has been damaged in any way, such as power-supply cord or plug is damaged, liquid has been spilled or objects have fallen into the apparatus, the apparatus has been exposed to rain or moisture, does not operate normally, or has been dropped.
-
Damage Requiring Service Unplug the apparatus from the wall outlet and refer servicing to qualified service personnel under the following conditions:
A. When the power-supply cord or plug is damaged,
B. If liquid has been spilled, or objects have fallen into the apparatus,
C. If the apparatus has been exposed to rain or water,
D. If the apparatus does not operate normally by following the operating instructions. Adjust only those controls that are covered by the operating instructions as an improper adjustment of other controls may result in damage and will often require extensive work by a qualified technician to restore the apparatus to its normal operation,
E. If the apparatus has been dropped or damaged in any way, and
F. When the apparatus exhibits a distinct change in performance this indicates a need for service.
- Object and Liquid Entry Never push objects of any kind into the apparatus through openings as they may touch dangerous voltage points or short
out parts that could result in a fire or electric shock. The apparatus shall not be exposed to dripping or splashing and no objects filled with liquids, such as vases shall be placed on the apparatus. Don't put candles or other burning objects on top of this unit.
17. Batteries
Always consider the environmental issues and follow local regulations when disposing of batteries.
18. If you install the apparatus in a built-in installation, such as a bookcase or rack, ensure that there is adequate ventilation. Leave 20cm (8^ ) of free space at the top and sides and 10cm (4^ ) at the rear. The rear edge of the shelf or board above the apparatus shall be set 10cm (4^ ) away from the rear panel or wall, creating a flue-like gap for warm air to escape.
Precautions
General
- Please ensure that the equipment is positioned in a well-ventilated area and ensure that there is at least 10cm of free space along the sides and top of the equipment.

- Use the unit on a firm, level surface free from vibration.
- Keep the unit away from direct sunlight, strong magnetic fields, excessive dust, humidity and electronic/electrical equipment (home computers, facsimiles, etc.) which generate electrical noise.
- Do not place anything on top of the unit.
- Do not expose the unit to moisture, to temperatures higher than 60^ or to extremely low temperatures.
If your system does not work properly, disconnect the AC power cord from the AC outlet and replug. - In case of an electrical storm, unplug the unit for safety.
- Hold the AC power plug by the head when removing it from the AC outlet, as pulling the cord can damage internal wires.
-
The AC power plug is used as a disconnect device and shall always remain readily operable.
-
Do not remove the outer cover, as this may result in electric shock. Refer internal service to your Onkyo dealer.
This unit should only be used within the range of 5^ - 35^ - Onkyo is not responsible for damage due to improper use. Refer all servicing to a Onkyo dealer.
Warning:
- The supplied AC/DC adaptor contains no user serviceable parts. Never remove covers unless qualified to do so. It contains dangerous voltages, always remove mains plug from the main outlet socket before any service operation or when not in use for a long period.
- The AC/DC adaptor supplied with the SBT-200 must not be used with other equipment.
- Never use an AC/DC adaptor other than the one specified. Otherwise, problem or serious hazards may be created.
- The voltage used must be the same as that specified on this unit. Using this product with a higher voltage other than that which is specified is dangerous and may result in a fire or other type of accident causing damage. Onkyo will not be held responsible for any damage resulting from use of this unit with a voltage other than that which is specified.
Volume control
The sound level at a given volume setting depends on speaker efficiency, location and various other factors. It is advisable to avoid exposure to high volume levels, which occurs while turning the unit on with the volume control setting up high, or while continually listening at high volumes.
For British models
Replacement and mounting of an AC plug on the power supply cord of this unit should be performed only by qualified service personnel.
IMPORTANT
The wires in the mains lead are coloured in accordance with the following code:
Blue: Neutral
Brown:Live
As the colours of the wires in the mains lead of this apparatus may not correspond with the
coloured markings identifying the terminals in your plug, proceed as follows:
The wire which is coloured blue must be connected to the terminal which is marked with the letter N or coloured black.
The wire which is coloured brown must be connected to the terminal which is marked with the letter L or coloured red.
IMPORTANT
The plug is fitted with an appropriate fuse. If the fuse needs to be replaced, the replacement fuse must approved by ASTA or BSI to BS1362 and have the same ampere rating as that indicated on the plug. Check for the ASTA mark or the BSI mark on the body of the fuse.
If the power cord's plug is not suitable for your socket outlets, cut it off and fit a suitable plug. Fit a suitable fuse in the plug.
For European Models
Declaration of Conformity
We declare, under our sole responsibility, that this product complies with the standards:
-Safety
-Limits and methods of measurement of radio disturbance characteristics
-Limits for harmonic current emissions
-Limitation of voltage changes, voltage fluctuations and flicker
-RoHS Directive, 2011/65/EU
-Hereby, Onkyo Corporation, declares that this SBT-200 is in compliance with the essential requirements and other relevant provisions of Directive 1999/5/EC.

WEEE
http://www.onkyo.com/manual/weewe/weee.pdf
Accessories
The following accessories are included.
Remote controller (1)

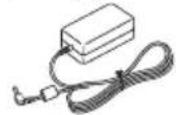
- AC adapter (1)
Power cord (1)

Optical digital audio cable (1)
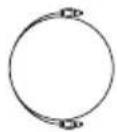
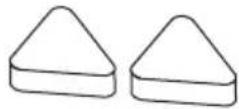
- Stand (2)
Double-faced Tape (1)

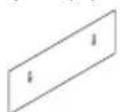
- Pattern paper (1)
The remote controller contains a lithium battery (CR2025).
In catalogs and on packaging, the letter at the end of the product name indicates the color. Specifications and operations are the same regardless of color.
We recommend that you use the sound bar for flat-screen televisions (LED, LCD or PLASMA).
Indicators
/INPUT
Bluetooth SURROUND
AUDIO FORMAT
[ /INPUT]
The input indicator lights when the sound bar is turned on. The color changes depending on the input source.
OPTICAL IN: Light blue
- Bluetooth : Blue
- AUDIO IN:Green
[Bluetooth]
The Bluetooth indicator lights in blue when the Bluetooth enabled device is connected to the sound bar and Bluetooth function is selected.
- The Bluetooth indicator flashes when the Bluetooth enabled device is not connected to the sound bar.
- The Bluetooth indicator flashes quickly when the sound bar is in pairing mode.
[ SURROUND ]
The SURROUND indicator lights in orange when the SURROUND function is on.
- The SURROUND indicator flashes when the volume of the sound bar is maximum, minimum or muted.
- The SURROUND indicator flashes once when SOUND MODE is selected.
[AUDIO FORMAT]
The AUDIO FORMAT indicator lights depending on the type of audio when OPTICAL IN is selected.
- DolbyDigital : Blue
PCM:Off
No signal : Flashing
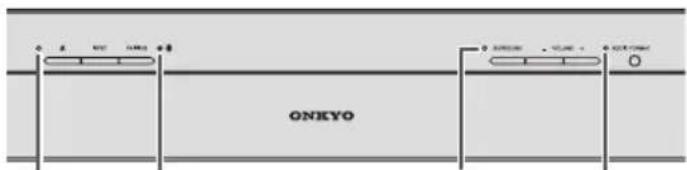
Controls and indicators
Front panel
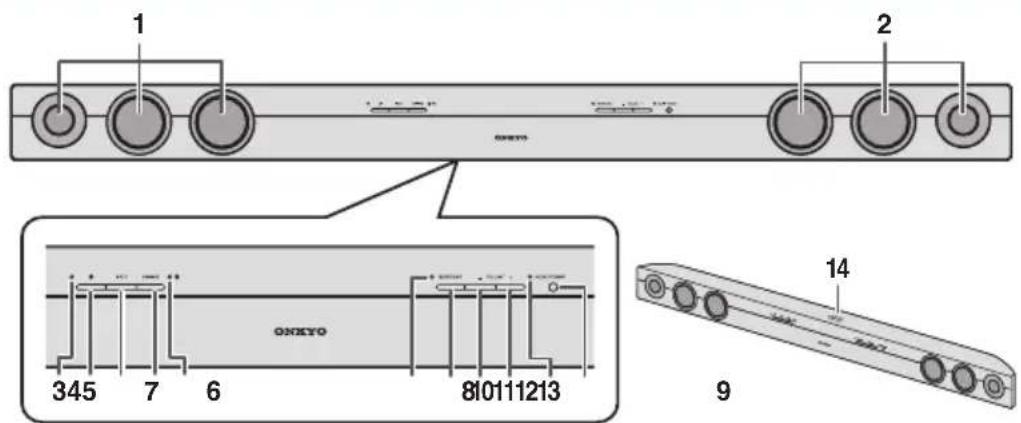
1.Left channel speaker
2. Right channel speaker
- indicator
This indicator lights when the sound bar is turned on.
INPUT indicator
The color changes depending on the input source as follows.
OPTICAL IN:Light blue
Bluetooth: Blue
AUDIO IN:Green
- button
This button sets the power to "On" or "Standby".
- INPUT button
This button switches an input source among OPTICAL IN, Bluetooth, and AUDIO IN.
- PAIRING button
This button pairs the sound bar with Bluetooth enabled devices.
- Bluetooth indicator
This indicator lights or flashes during a Bluetooth connection.
- SURROUND indicator
This indicator lights/goes off when the SURROUND function is on/off.
- SURROUND button
This button enables the surround sound function.
- VOLUME - button
This button turns down the volume.
- VOLUME + button
This button turns up the volume.
- AUDIO FORMAT indicator
The color changes depending on the digital signal (Dolby Digital/PCM).
-
Remote control sensor
-
NFC pairing mark
Rear panel
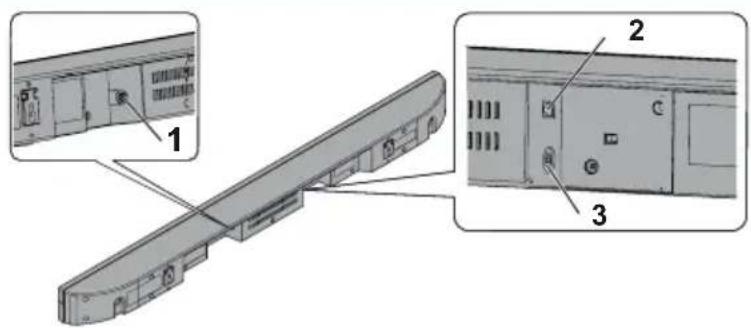
- DC IN jack
Connect the supplied AC adaptor to this jack.
- OPTICAL IN (DIGITAL) jack
Connect the supplied optical digital audio cable to this jack.
- AUDIO IN (ANALOG) jack
Connect the analog audio cable (not supplied) to this jack.
Remote controller
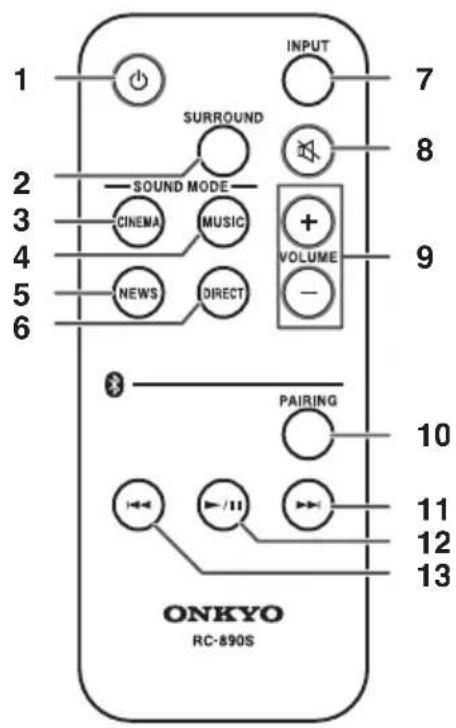
- Button
This button sets the sound bar power to "On" or "Standby".
- SURROUND button
This button enables the surround sound function.
- CINEMA (SOUND MODE) button
This mode is suitable for movie viewing.
This mode is suitable for music.
- NEWS (SOUND MODE) button
This mode is suitable for news programs.
- DIRECT (SOUND MODE) button
This mode provides sound with no processings.
- INPUT button
This button switches an input source among OPTICAL IN, Bluetooth, and AUDIO IN.
- button
This button mutes the volume temporarily. Press it again to restore the volume.
- VOLUME +/- buttons
These buttons increase and decrease volume.
- Bluetooth PAIRING button
This button pairs the sound bar with Bluetooth enabled devices.
- Bluetooth Skip Up button
This button selects the next song. Hold down it to fast-forward.
- Bluetooth-Play/Pause button
Press this button to play or pause Bluetooth enabled devices.
- Bluetooth 8kip Down button
This button selects the beginning of the current song. Hold down it to fast-reverse.
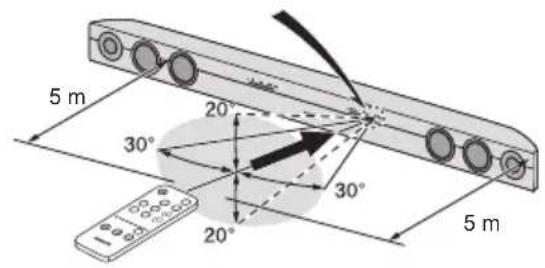
Aiming the remote controller
Before using the remote controller, please remove a plastic shield at battery holder.
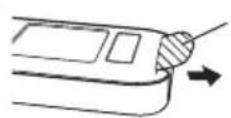
Plastic shield
To use the remote controller, point it at the sound bar's remote control sensor, as shown below.
Battery installation
This product contains a CR coin lithium battery.
1 While pushing the locking tab towards the center of the remote controller, slide out the battery holder.

Back of remote controller
Locking tab
2 Remove the old battery from the battery holder, insert the new battery and then slide the battery holder back into the remote controller.
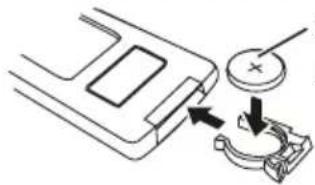
Positive (+) side
up
Precautions for battery use
Remove the battery if the sound bar will not be used for a long period of time. This will prevent potential damage due to battery leakage such as fire, injury or contamination of a surrounding environment.
- Do not use rechargeable battery (nickel-cadmium battery, etc.).
- Danger of explosion if battery is incorrectly replaced.
- Use only specified batteries.
- Batteries (battery pack or batteries installed) shall not be exposed to excessive heat such as
sunshine, fire or the like.
- Installing the battery incorrectly may cause the sound bar to malfunction.
Note
- Replace the battery if the operating distance is reduced or if the operation becomes erratic. Purchase "CR2025", coin lithium battery.
Periodically clean the transmitter on the remote controller and the sensor on the sound bar with a soft cloth. - Exposing the sensor on the sound bar to strong light may interfere with operation. Change the lighting or the direction of the sound bar if this occurs.
- Keep the remote controller away from moisture, heat, shock and vibrations.
System preparation
To mount the sound bar on the wall
Caution:
- Be very careful to prevent the sound bar (2.4kg) from falling when mounting on the wall.
- Before mounting, check the wall strength. (Do not put on the veneer plaster or whitewashed wall. The sound bar may fall.) If unsure, consult a qualified service technician.
- Mounting screws are not supplied. Use appropriate ones.
- Check all wall mount angle screws for looseness.
- Select a good location. If not, accidents may occur or the sound bar may get damaged.
- Onkyo is not responsible for accidents resulting from improper installation.
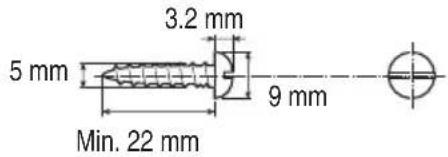
Driving screws
Onkyo designed the sound bar so you may hang it on the wall. Use proper screws (not supplied). See below for size and type.
■ Installing the sound bar
Fix the pattern paper to the wall in horizontal position as below.
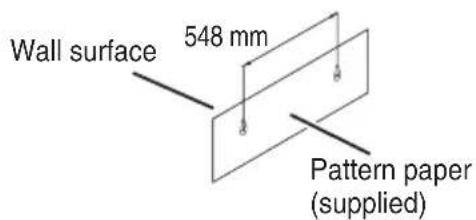
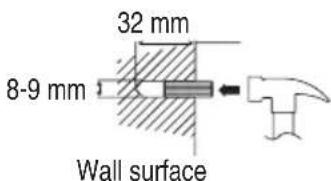
2 Make a hole on the wall following the screw point marks on the pattern paper by using a drill.
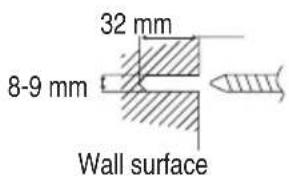
3 Fix a wall mount plug into the hole using a hammer, until it is flush with the wall surface.
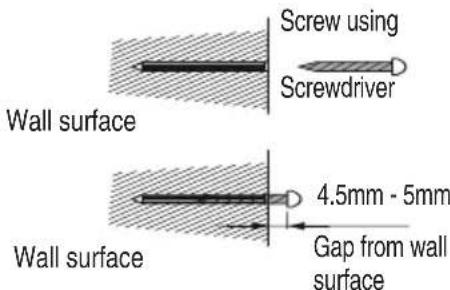
4 Fasten the screws to the wall as shown below. (Total screw is 2 pieces.)
5 Hang the sound bar onto the screws.
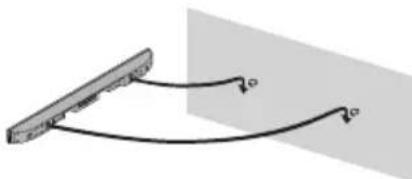
Note Refer to "When mounting on the wall" in "Falling Prevention" (P.11).
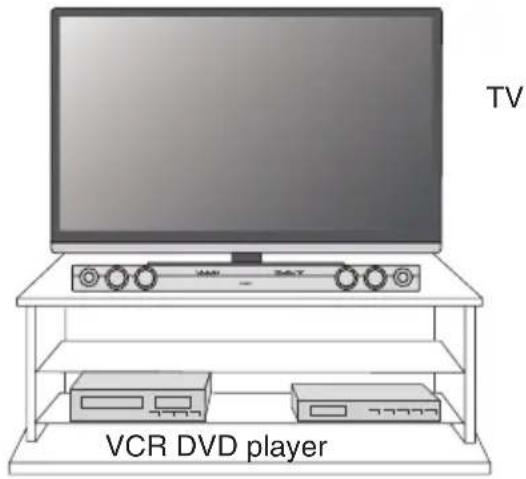
Placing the sound bar
Placing the sound bar on the TV rack
Note
- Remove the protective film covering the sound bar before turning on the system.
- The front panel of the sound bar is not removable.
- Do not change the installation direction when the sound bar is turned on.
- Do not stand or sit on the sound bar as you may be injured.
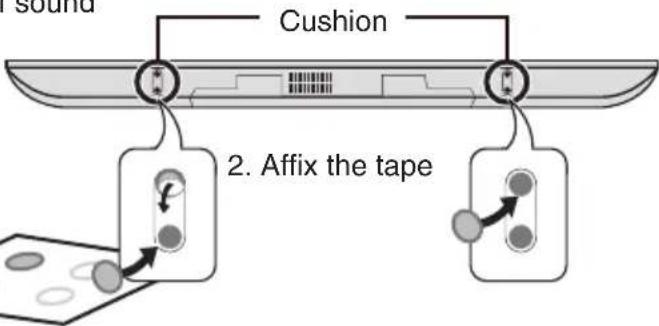
Using the supplied stand
Use the supplied stand when the TV stand becomes an obstacle to place the sound bar on the TV rack. This supplied stand allows the sound bar to be placed astride over the TV stand.
1 Affix the supplied doublefaced tapes to 2 positions on the right and left.
Bottom of sound bar
- Peel off the transparent tape from the mount
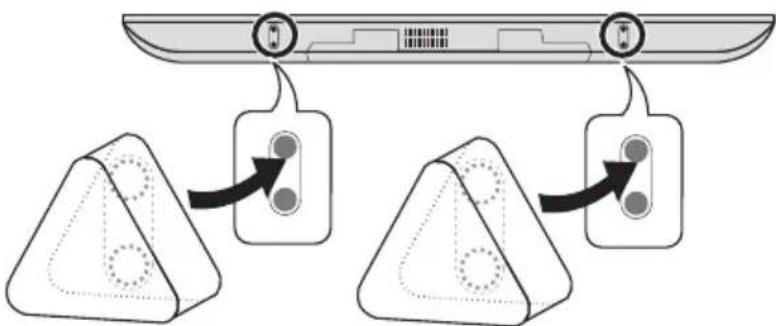
2 Confirm the position of the tapes, and press the stand to the tapes so that the tapes come to the center of each stand.
- Stands should be located at the rear of the sound bar.
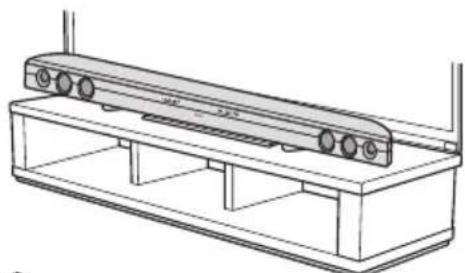
3 Place the sound bar on the TV rack.
Align the front line of the sound bar and the TV stand.
En-10
Note
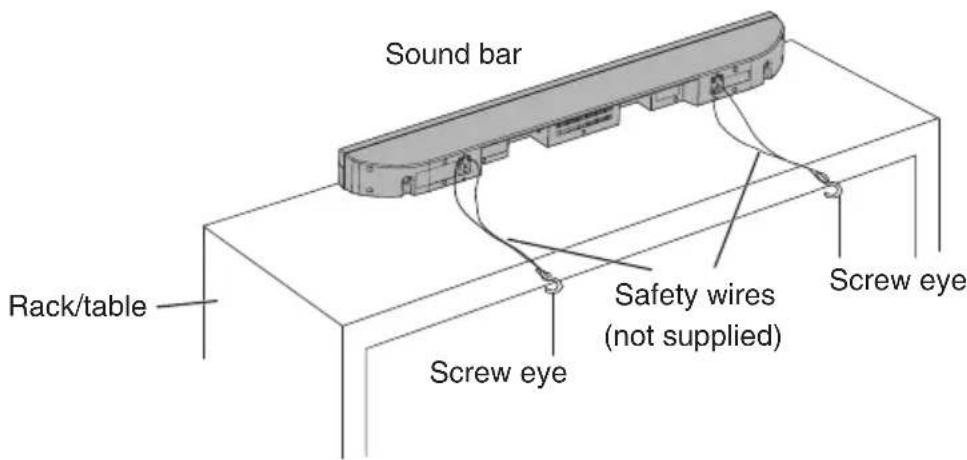
- Make sure the sound bar is not wobbling.
Fix the sound bar to the TV rack, etc. by using wires (not supplied) to prevent it from falling. - When moving the TV rack, move the sound bar to a safety place beforehand.
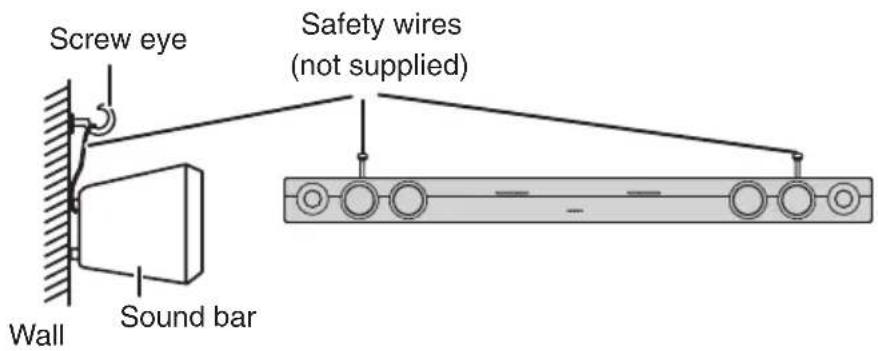
Falling Prevention
Use screw eyes or safety wires to prevent the sound bar from falling.
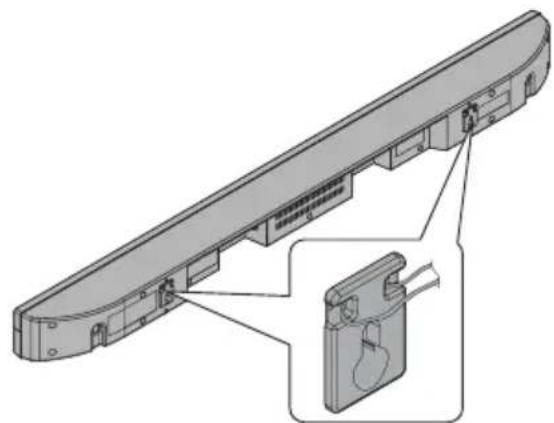
When placing on the rack/table
When mounting on the wall
Sound bar connections to TVs
Unplug all other equipment before making any connections.
Note
- To connect to TV, use OPTICAL IN (DIGITAL) jack or AUDIO IN (ANALOG) jack located at the rear of the sound bar.
Refer to the instruction manual of the equipment to be connected. - Fully insert the plugs to avoid fuzzy noises.
- When you use the RCA audio output terminal connection from a TV/DVD/Blu-ray Disc player, in some cases, a small background noises may emit from the sound bar depending on the brand, model or age of the equipment, and it is not a quality matter from the sound bar.
- If the volume is continuously at low level, the sound bar will be automatically turned off.
Connecting a TV, or DVD player, etc.
If the TV/monitor has an audio output, connect it to the OPTICAL IN (DIGITAL) jack or the AUDIO IN (ANALOG) jack at the rear of the sound bar.
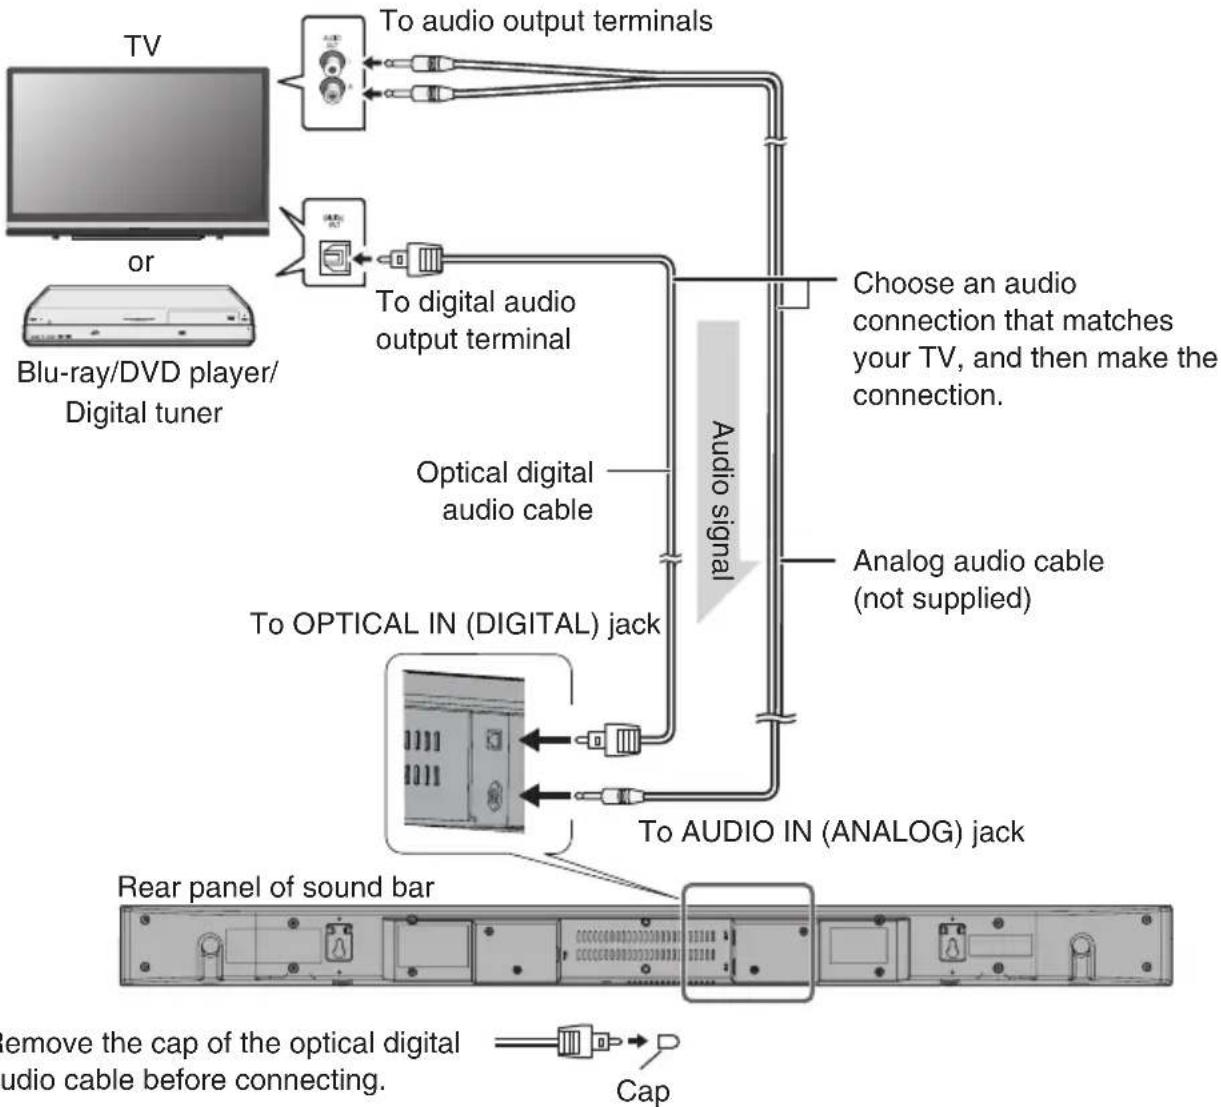
OPTICAL IN jack
The sound bar's OPTICAL IN (DIGITAL) jack has shutter-type covers that open when an optical plug is inserted and close when it's removed. Push plugs in all the way.
Note
To prevent shutter damage, hold the optical plug straight when inserting and removing.
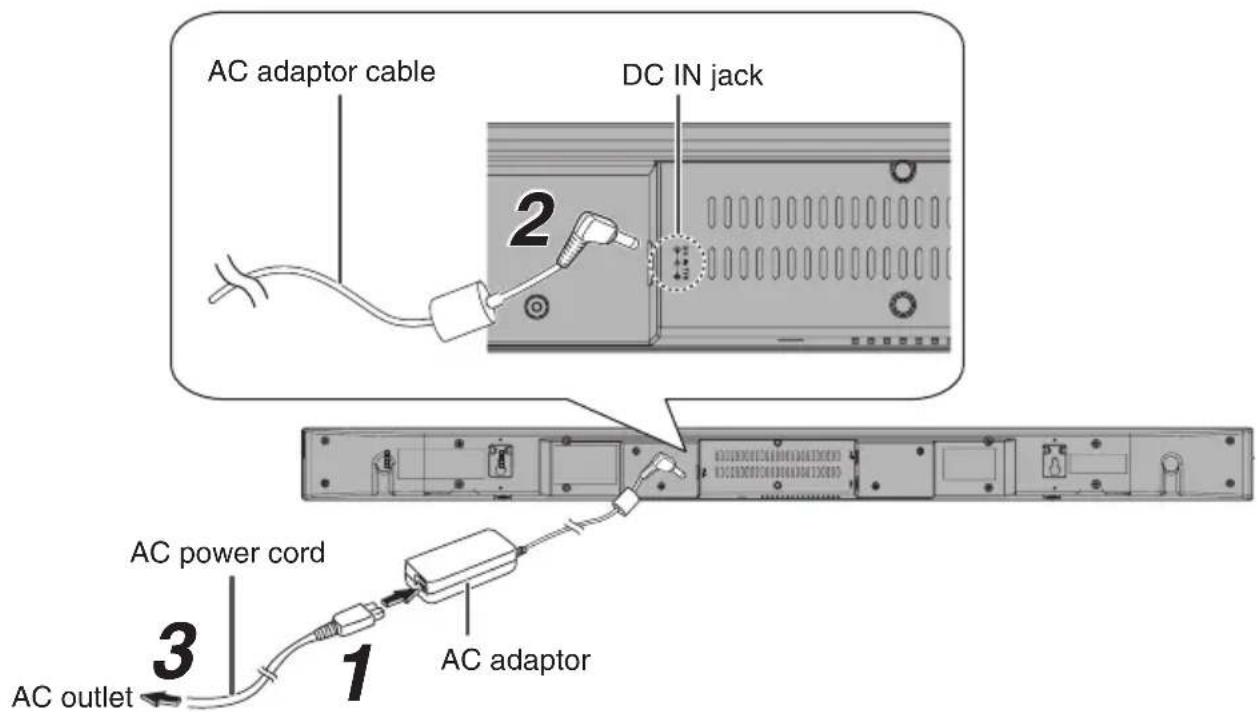
Using with the AC adaptor
After checking all the connection have been made correctly, connect the AC adaptor to the DC IN jack, then to the AC outlet.
Plug the AC power cord into the AC adaptor.
2 Plug the AC adaptor cable into the DC IN jack on the sound bar.
3 Plug the AC power cord into an AC outlet.
Note
- Use only the supplied AC adaptor. Using other AC adaptor may cause a malfunction of SBT-200, an electric shock or fire. The supplied AC adaptor and AC power cord are designed exclusively for use with the sound bar. Do not connect the supplied AC adaptor and AC power cord to other equipment.
- Place the sound bar near an AC outlet to plug in/out the AC power cord easily.
- During power standby, the indicator goes off. If the button is pressed, the indicator lights depending on the input source. (OPTICAL IN: Light blue/Bluetooth: Blue/AUDIO IN: Green)
- Unplug the AC power cord from the AC outlet if the sound bar will not be used for a long period of time.
Make sure to unplug the AC power cord before making any connections.
Basic operations
Turning the power on
Press the button
or
press the button on the remote controller.
The indicator lights depending on the input source.
Note
If the power does not turn on, check whether the power cord is plugged in properly.
Setting the sound bar to standby mode (Bluetooth standby)
Press the button again.
- The indicator goes off.
Note
Auto power on function (P.16) is always activated in standby mode.
Volume auto fade-in
If the sound bar enters standby mode with the volume at higher level and is turned on again, the volume will start at lower level and gradually increase to the last set level.
If the volume is set at relatively low level, Volume auto fade-in won't work.
Volume control
To increase and decrease the volume,
press the VOLUME+VOLUME- button on the sound bar
or
press the VOLUME+VOLUME- button on the remote controller.
Note
- Every time the VOLUME+/VOLUME- button on the remote controller is pressed, the SURROUND indicator flashes once.
- When the volume is maximum or minimum, the SURROUND indicator flashes.
Muting
Pressing the button on the remote controller.
- The volume is muted temporarily. Press the button again to restore the volume.
- When the volume is muted temporarily, the SURROUND indicator flashes.
Surround
Press the SURROUND button on the sound bar
or
press the SURROUND button on the remote controller.
- The surround sound is on. (The SURROUND indicator lights in orange.)
Sound mode
Press the desired SOUND MODE button on the remote controller.
- The SURROUND indicator flashes once.
| CINEMA Suitable for movie viewing | |
| MUSIC Suitable for music | |
| NEWS For news | |
| DIRECT No sound processings | |
Selecting input source
Press the INPUT button on the sound bar
or
press the INPUT button on the remote controller.
The input source will be changed.
| Input INPUT indicator PAIRING indicator |
| OPTICAL IN Lights in light blue Off |
| Bluetooth Lights in blue Lights or flashes in blue |
| AUDIO IN Lights in green Off |
Note
The backup function will protect the memorized function mode for a few hours in case of a power failure or a disconnection of the AC power cord.
- Connecting the digital input source
Connect the sound bar to the digital input source with the supplied optical digital audio cable, and press the INPUT button on the sound bar or remote controller to select Digital.
The types of input source and audio format are as follows:
| Input Source Audio Format AUDIO FORMAT | indicator | |
| OPTICAL IN No input Flashes | ||
| Bluetooth Off | ||
| AUDIO IN Off | ||
Note
If the digital audio output setting is set to PCM on the TV or DVD/Blu-ray Disc player, you cannot obtain sound field effect of Dolby Digital.
Auto standby/Auto power on
Auto standby
- The sound bar will automatically enter standby mode (the indicator goes off) if no audio signal is detected within 15 minutes.
Note
Auto power on function is always activated in standby mode.
Auto power on
- When the indicator is off, the sound bar will automatically power on if it detects audio signal from Bluetooth enabled devices.
Listening to Bluetooth enabled devices
About Bluetooth technology
Bluetooth wireless technology is a short-range wireless technology that enables wireless data communication between digital devices. Bluetooth wireless technology operates within a range of about 10 meters. You do not need to use a cable for connection, nor is it necessary for the devices to face one another, such as the case with infrared technology.
Communication System and Bluetooth Profile of the sound bar
There are many available Bluetooth Profiles describing the basic communication methods, specific functions and uses, to enable communication between devices.
| Communication System | Bluetooth Specification version 2.1 Bluetooth+Enhanced Data Rate(EDR) |
| Profile | • A2DP 1.2(Advanced Audio Distribution Profile) • AVRCP 1.0(Audio Video Remote Control Profile) |
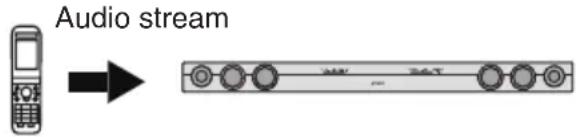
- A2DP enables audio streaming from an A2DP equipped Bluetooth enabled devices (eg mobile phone) to the sound bar. By converting wireless stereo audio signal to analogue audio signal, you can enjoy listening to the sound through this speaker system.
AVRCP (Audio/Video Remote Control Profile) is a technology that allows a single remote control to control all Bluetooth enabled audio video equipment to which a user has access.
Notes when using the sound bar with a mobile phone
- The sound bar cannot be used to talk over the telephone even when there is a Bluetooth connection made to a mobile phone.
- Please refer to the instruction manual of the mobile phone for details on operation of your mobile phone while transmitting the sound using a Bluetooth connection.
Bluetooth mobile phone or other Bluetooth enabled devices
Pairing Bluetooth enabled devices
Bluetooth enabled devices need to be initially paired first before they can exchange data. Once paired, it is not necessary to pair them again unless:
PAIRING indicator (Blue)
- pairing is made with more than 8 devices. (Pairing can only be made one device at a time. The sound bar can be paired to a maximum of 8 devices. If subsequent device is paired, the oldest device connected, will be deleted and replaced with the new one.)
- this sound bar is reset.
- (All pairing information is deleted when sound bar is reset.)
- pairing information is deleted while repairing, etc.
Unconnected Flashes
Pairing mode Flashes quickly
Connected Lights up
Near Field Communication (NFC)
Near Field Communication (NFC) is a short-range wireless connectivity technology that enables two-way interactions between electronic devices such as smart phones or IC tags only by holding the device over (or touching) NFC-mark or the like. The sound bar supports Bluetooth pairing using NFC.
Pairing with Bluetooth enabled devices

1 Press the button to turn the power on.
2 Press the INPUT button to select Bluetooth function.
3 Press the PAIRING button.
- The PAIRING indicator flashes. The sound bar is now in pairing mode and is ready to be paired with other Bluetooth source device.
- Pairing can be made regardless of the current input source.
4 Perform pairing procedure on the source device to detect the sound bar.
Refer to the instruction manual of the source device for details.
- "Onkyo SBT-200" will appear in the detected devices list (if available) in the source device.
- Place the devices to be paired within 1 meter of each other when pairing.
- Some source devices are unable to display lists of detected devices. To pair this sound bar with the source device, refer to the instruction manual of the source device for details.
5 Select "Onkyo SBT-200" from the source list. If passcode* is required, enter "0000".
- Pairing indicator (blue) on the sound bar will stop flashing once the sound bar is successfully paired with the source device. Pairing information is now memorized in the sound bar.
- Passcode may be called PIN Code, Passkey, PIN number or Password.
6 Start the Bluetooth connection from the source device.
- Some audio source devices may connect with the sound bar automatically, otherwise follow the instructions in the instruction manual of the source device to start connection.
Note
- If the sound bar or the source device is turned off before Bluetooth connection is completed, pairing will not be completed and the pairing information will not be memorized. Repeat step 1 to start pairing again.
- To pair with other devices, repeat steps 1 - 5 for each device.
- Once a device is ousted or deleted from the pairing list, the pairing information for the device is also deleted. To listen to the sound from the device again, it needs to be re-paired. Perform steps 1 - 5 to pair the device again.
- Passcode of this sound bar is fixed to "0000" and can only be paired with Bluetooth source device whose passcode is also "0000".
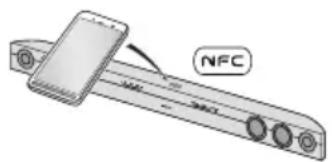
Pairing with Bluetooth enabled devices using NFC
- On an NFC enabled device, Bluetooth pairing can be made only by holding the device over the sound bar.
- Check that the NFC function on the device is "ON".
1 Turn on the sound bar and the device.
2 Start an app for reading NFC on the device.
3 Press the PAIRING button on the sound bar.
4 Hold the device over the NFC mark on the upper surface center of the sound bar.
- The Bluetooth indicator on the sound bar is changed from flashing to lighting, indicating that the pairing is complete.
- Some types of devices do not require step 2.
- Some devices such as smartphones sound alarms when they recognize NFC enabled devices. If the device is moved at this timing, connection or disconnection may not be performed. Do not move the device until a message "Connection is completed" or "Disconnection is completed" is displayed on it.
Listening to the sound
Check that:
- Bluetooth function of the source device is on.
- Pairing of the sound bar and the source device is completed.
1 Press the INPUT button to select Bluetooth function.
2 Start the Bluetooth connection from the Bluetooth enabled device.
3 Start playing on the Bluetooth enabled device.
- If the source device has an extra bass function or equalizer function, set them to off. If these functions are on, sound may be distorted.
Note
-
You need to make the Bluetooth connection again if:
-
the sound bar is not turned on.
- the source device is not turned on, or its Bluetooth function is off or is in sleep mode.
To finish listening
Perform any of the followings.
- Terminate the Bluetooth connection on the audio source device. (Refer to the instruction manual of the source device.)
- Turn off the Bluetooth enabled devices.
- Turn off the sound bar.
Note
- Some Bluetooth enabled devices cannot be operated with the remote controller.
- The volume of the sound bar may not be controlled as intended depending on the connected device.
| Bluetooth operation buttons (remote controller only) | |
| Press the button to play or pause. | |
| Press the button to skip up. Hold down it to fast-forward. | |
| Press the button to skip down. Hold down it to fast-reverse. | |
Troubleshooting
If something is wrong with this product, check the following before contacting your Onkyo dealer.
Restoring Default (Reset)
First remove all cables connected to the sound bar, and then unplug the AC power code from the AC outlet.
While holding down the button and the PAIRING button, plug the AC adaptor cable into the DC IN jack on the sound bar. Then press button.
Note
Note that resetting the sound bar will delete all data stored in the memory.
General
| Symptom Possible | cause | Page |
| No sound is heard. | ·Is the input signal (selection) set properly? DTS and AAC signals are not supported.·Is the volume level set to "Min(0)" ?·Is muting activated?·Are the connections made correctly? P.12·Is the sound bar too far from the Bluetooth enabled devices?·Is the sound bar paired with the Bluetooth enabled devices? | P.16P.14P.14P.17P.18 |
| Noise is heard during playback. | ·Move the sound bar away from any computers or mobile phones.·Is audio cable connected to the input jack of the sound bar correctly?·Deterioration over time may cause noise. Confirm a model year of the TV, DVD/Blu-ray Disc player. | P.12 |
| When the sound bar is afflicted with noise from an external source (shock, excessive static electricity, or abnormality of power supply voltage due to lightning). When the sound bar is operated incorrectly. | ·This may cause a malfunction.→ Set the sound bar to the standby mode and then turn it back on. If the sound bar still malfunctions, turn it off and unplug the AC power cord from the AC outlet. Plug the cord into the AC outlet and turn on the sound bar again. | P.21 |
| Sound is distorted. | ·Reduce the TV volume or sound bar volume. - | |
| When a button is pressed, the sound bar does not respond. | ·Set the sound bar to the standby mode and then turn it back on.·If the sound bar still malfunctions, reset it. Above | P.21 |
| The power is not turned on. | ·Is the AC power cord of the sound bar plugged in? P.13·The protection circuit may be activated. Unplug and plug in the AC power cord again after 5 minutes or more. | P.21 |
| Bluetooth sound is interrupted or distorted. | ·Is the sound bar too near to a device that generates electromagnetic radiation?·Is there any obstacle between the sound bar and the Bluetooth enabled device? | P.18 |
Remote controller
| Symptom Possible | Cause | Page |
| The remote controller does not operate properly. | ·Is the battery polarity correct? ·Is the battery dead? ·Is the distance or angle correct? ·Is there any obstacle in front of the sound bar? ·Is there a strong light (inverter-type fluorescent lights or direct sunshine) shining on the remote sensor? ·Is the remote controller for another equipment used simultaneously? | P.8 |
| The sound bar cannot be turned on with the remote controller. | ·Is the AC power cord of the sound bar plugged in? P.13 ·Is the battery inserted? | P.8 |
Error indicators and warnings
When you fail to perform operations properly, NPUT indicator flashes in green.
| Display Meaning | |
| /INPUT indicator (Flashes in green) | The protection circuit is activated. |
When the same message appears even if the sound bar is unplugged and plugged in or is set to the standby mode and on again, contact your local dealer where you purchased the sound bar.
Trademarks and Licensing

DOLBY. DIGITAL
Manufactured under license from Dolby Laboratories.
Dolby and the double-D symbol are trademarks of Dolby Laboratories.

Bluetooth
The Bluetooth® word mark and logos are registered trademarks owned by Bluetooth SIG, Inc. and any use of such marks by Onkyo is under license. Other trademarks and trade names are those of their respective owners.
Specifications
Amplifier Section
Rated Output Power 2 ch x 20 W at 6 ohms, 1 kHz, 2 ch Driven (IEC)
THD + N (Total Harmonic 0.2% 1 kHz, 1 W)
Distortion+N)
Damping Factor 31 (6
Input Sensitivity and 1000 mV/47 kΩ (AUDIO IN)
Impedance (Unbalance)
Frequency Response 80Hz - 15kHz / + 3 dB, -3 dB
(AUDIO IN, SOUND MODE: DIRECT)
Signal to Noise Ratio 103 dB (AUDIO IN IHF-A)
Bluetooth Section
Communication System Bluetooth Version 2.1 +EDR
Maximum 10 m*1
communication range
Frequency band 2.4 GHz - 2.48 GHz
Modulation method FHSS (Freq Hopping Spread Spectrum)
Compatible Bluetooth A2DP 1.2
profiles AVRCP 1.0
Supported Codec SBC
*1 The actual range will vary depending on factors such as obstacles between devices, magnetic fields around a microwave oven, static electricity, cordless phone, reception sensitivity, antenna's performance, operating system, software application, etc.
General
Power Supply AC 100 - 240 V, 50/60 Hz
(Power supply inputs of the sound bar: DC input 17 V, 2.8 A)
Power Consumption 11 W
5 W (No-sound)
0.4 W (Network Standby [Bluetooth Standby])
*Auto power on function is always activated in standby mode. This function cannot be disabled.
Dimensions 940 mm (W) x 73 mm (H) x 83 mm (D)
Weight 2.4kg
Speaker 2-way Speaker System
5.7 cm (Woofer) x 4
2.5 cm (Soft dome tweeter) x 2
Audio inputs
Digital OPTICAL IN (DIGITAL): 1
*Specifications and features are subject to change without notice.
Memo
ONKYO
Systema-Soundbar
SBT-200
- Prise OPTICAL IN (DIGITAL)
- Bluetooth-Bouton lecture/pause
Near Field Communication (NFC)
Modulation FHSS (Freq Hopping Spread Spectrum)
Profiles Bluetooth A2DP 1.2 compatibles AVRCP 1.0
Near Field Communication (NFC)
Digital OPTICAL IN (DIGITAL): 1
Analógica AUDIO IN (ANALOG): 1 toma estéreo mini Ø 3,5 mm
Otros
Entradas digitales Dolby Digital/PCM
- Jack OPTICAL IN (DIGITAL)
Near Field Communication (NFC)
- Buchse OPTICAL IN (DIGITAL)
Near Field Communication (NFC)
(AUDIO IN, SOUND MODE: DIRECT)
Signal-/Rauschabstand 103 dB (AUDIO IN IHF-A)
Bluetooth-Bereich
Modulationsmethode FHSS (Freq Hopping Spread Spectrum)
Ko mpatible Bluetooth- A2DP 1.2
Profile AVRCP 1.0
Digital OPTICAL IN (DIGITAL): 1
Analog AUDIO IN (ANALOG): 1 Stereo-Miniklinkenbuchse 3,5 mm
■ Sonstiges
18 Park Way, Upper Saddle River, N.J. 07458, U.S.A.
For Dealer, Service, Order and all other Business Inquiries:
Tel: 201-785-2600 Fax: 201-785-2650
http://www.us.onkyo.com/
For Product Support Team Only:
1-800-229-1687
Europe
Onkyo Europe Electronics GmbH
Liegitzerstrasse 6, 82194 Groebenzell, GERMANY
Tel: +49-8142-4401-0 Fax: +49-8142-4208-213
http://www.eu.onkyo.com/
Onkyo Europe Electronics GmbH (UK Branch)
Meridien House, Ground floor, 69 - 71 Clarendon Road, Watford, Hertfordshire,
WD17 1DS, United Kingdom
Tel: +44 (0)8712-00-19-96 Fax: +44 (0)8712-00-19-95
China
Onkyo China Limited (Hong Kong)
Unit 1033, 10/F, Star House, No 3, Salisbury Road,
Tsim Sha Tsui Kowloon, Hong Kong.
Tel: 852-2429-3118 Fax: 852-2428-9039
http://www.hk.onkyo.com/
Onkyo China PRC (Mainland)
1301, 555 Tower, No.555 West NanJing Road, Jing'an District,
Shanghai, China 200041
Tel: 86-21-52131366 Fax: 86-21-52130396
http://www.cn.onkyo.com/
Asia, Oceania, Middle East, Africa
Please contact an Onkyo distributor referring to Onkyo SUPPORT site.
http://www.intl.onkyo.com/support/
The above-mentioned information is subject to change without prior notice.
Visit the Onkyo web site for the latest update.

- 29401821*
SN 29401821
(C) Copyright 2014 Onkyo Corporation Japan. All rights reserved.