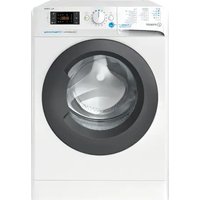
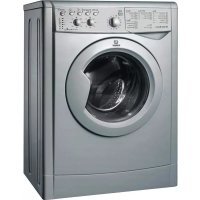
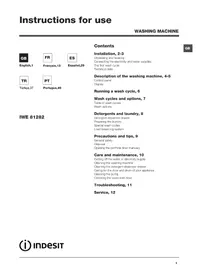
IWC 71283 C ECO EU - Washing machine INDESIT - Free user manual and instructions
Find the device manual for free IWC 71283 C ECO EU INDESIT in PDF.

| Product type | Washing machine |
| Brand | Indesit |
| Model | IWC 71283 C ECO EU |
| Dimensions (WxHxD) | 59.5 x 85 x 53.5 cm |
| Washing capacity | 1 to 7 kg |
| Maximum spin speed | 1200 rpm |
| Energy class | A+++ |
| Annual energy consumption | 174 kWh |
| Annual water consumption | 10 840 liters |
| Spin efficiency class | B |
| Residual moisture content | 53% |
| Wash noise level | 54 dB(A) |
| Spin noise level | 77 dB(A) |
| Programs | Cotton, Synthetics, Mix, Wool, Silk, Jeans, Sport, 20' Fresh, Rinse, Spin+Drain |
| Special functions | EcoTime, Energy Saver, Super Rinse, Delayed start (up to 12h) |
| Water pressure | 0.05 MPa (min) - 1 MPa (max) |
| Drum capacity | 52 liters |
| Power supply | 220-240 V, 50 Hz |
| Safety | Automatic door lock, protection against accidental openings |
| Maintenance | Self-cleaning pump, cleaning of detergent drawer, drum and water inlet hose |
Frequently Asked Questions - IWC 71283 C ECO EU INDESIT
User questions about IWC 71283 C ECO EU INDESIT
0 question about this device. Answer the ones you know or ask your own.
Ask a new question about this device
Download the instructions for your Washing machine in PDF format for free! Find your manual IWC 71283 C ECO EU - INDESIT and take your electronic device back in hand. On this page are published all the documents necessary for the use of your device. IWC 71283 C ECO EU by INDESIT.
USER MANUAL IWC 71283 C ECO EU INDESIT
Unpacking and levelling
Connecting the electricity and water supplies
The first wash cycle
Technical data
Care and maintenance, 4
Cutting off the water or electricity supply
Cleaning the washing machine
Cleaning the detergent dispenser drawer
Caring for the door and drum of your appliance
Cleaning the pump
Checking the water inlet hose
Precautions and tips, 5
General safety
Disposal
Description of the washing machine and starting a wash cycle, 6-7
Control panel
Indicator lights
Starting a wash cycle
Wash cycles, 8
Table of wash cycles
Personalisation, 9
Setting the temperature
Setting the spin speed
Functions
Detergents and laundry, 10
Detergent dispenser drawer
Preparing the laundry
Garments requiring special care
Load balancing system
Troubleshooting, 11
Service, 12

INDESIT
! This instruction manual should be kept in a safe place for future reference. If the washing machine is sold, transferred or moved, make sure that the instruction manual remains with the machine so that the new owner is able to familiarise himself/ herself with its operation and features.
! Read these instructions carefully: they contain vital information relating to the safe installation and operation of the appliance.
Unpacking and levelling
Unpacking
- Remove the washing machine from its packaging.
- Make sure that the washing machine has not been damaged during the transportation process. If it has been damaged, contact the retailer and do not proceed any further with the installation process.
-
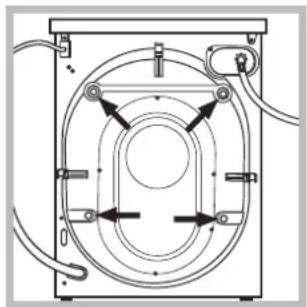
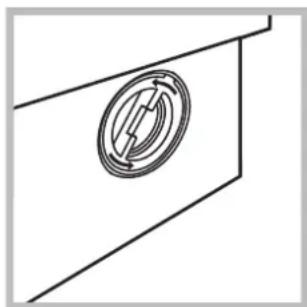
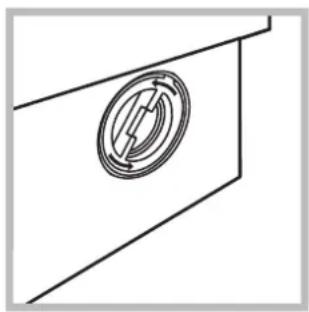
Remove the protective screws (used during transportation) and the rubber washer with the corresponding spacer, located on the rear part of the appliance (see figure).
-
Close off the holes using the plastic plugs provided.
-
Keep all the parts in a safe place: you will need them again if the washing machine needs to be moved to another location.
! Packaging materials should not be used as toys for children.
Levelling
- Install the washing machine on a flat sturdy floor, without resting it up against walls, furniture cabinets or anything else.
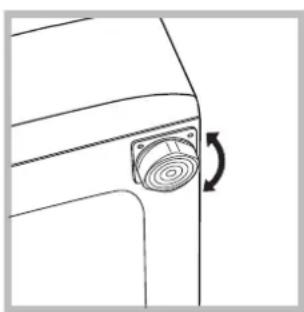
- If the floor is not perfectly level, compensate for any unevenness by tightening or loosening the adjustable front feet (see figure); the angle of inclination, measured in relation to the worktop, must not exceed 2^ .
Levelling the machine correctly will provide it with stability, help to avoid vibrations and excessive noise and prevent it from shifting while it is operating. If it is placed on carpet or a rug, adjust the feet in such a way as to allow a sufficient ventilation space underneath the washing machine.
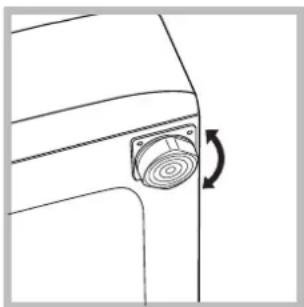
Connecting the electricity and water supplies
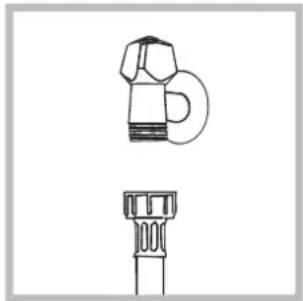
Connecting the water inlet hose
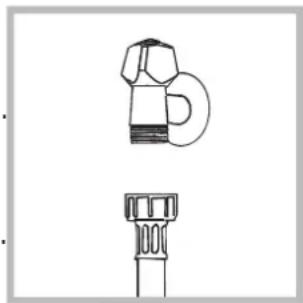
- Connect the supply pipe by screwing it to a cold water tap using a 3 / 4 gas threaded connection (see figure). Before performing the connection, allow the water to run freely until it is perfectly clear.

-
Connect the inlet hose to the washing machine by screwing it onto the corresponding water inlet of the appliance, which is situated on the top right-hand side of the rear part of the appliance (see figure).
-
Make sure that the hose is not folded over or bent.
! The water pressure at the tap must fall within the values indicated in the Technical details table (see next page).
If the inlet hose is not long enough, contact a specialised shop or an authorised technician.
! Never use second-hand hoses.
! Use the ones supplied with the machine.
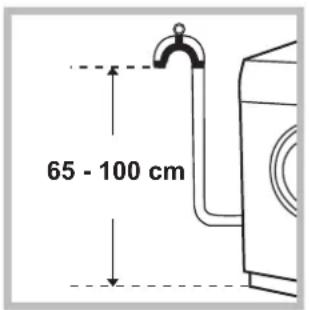
Connecting the drain hose
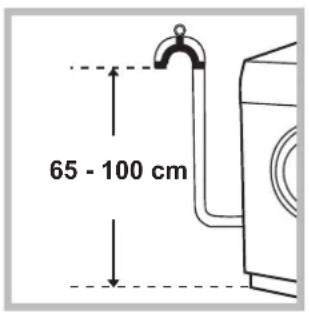
Connect the drain hose, without bending it, to a drainage duct or a wall drain located at a height between 65 and 100cm from the floor;
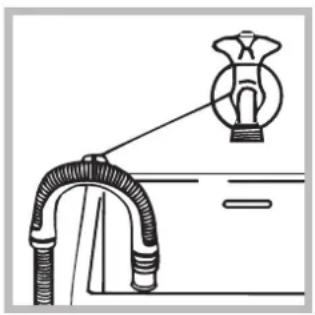
alternatively, rest it on the side of a washbasin or bathtub, fastening the duct supplied to the tap (see figure). The free end of the hose should not be underwater.
! We advise against the use of hose extensions; if it is absolutely necessary, the extension must have the same diameter as the original hose and must not exceed 150 cm in length.
Electrical connections
Before plugging the appliance into the electricity socket, make sure that:
- the socket is earthed and complies with all applicable laws;
- the socket is able to withstand the maximum power load of the appliance as indicated in the Technical data table (see opposite);
- the power supply voltage falls within the values indicated in the Technical data table (see opposite)
- the socket is compatible with the plug of the washing machine. If this is not the case, replace the socket or the plug.
The washing machine must not be installed outdoors, even in covered areas. It is extremely dangerous to leave the appliance exposed to rain, storms and other weather conditions.
! When the washing machine has been installed, the electricity socket must be within easy reach.
! Do not use extension cords or multiple sockets.
The cable should not be bent or compressed.
! The power supply cable must only be replaced by authorised technicians.
Warning! The company shall not be held responsible in the event that these regulations are not respected.
The first wash cycle
Once the appliance has been installed, and before you use it for the first time, run a wash cycle with detergent and no laundry, using the wash cycle 2.
| Technical data | |
| Model | IWC 71283 |
| Dimensions | width 59.5 cm height 85 cm depth 53,5 cm |
| Capacity | from 1 to 7 kg |
| Electrical connections | please refer to the technical data plate fixed to the machine |
| Water connection | maximum pressure 1 MPa (10 bar) minimum pressure 0.05 MPa (0.5 bar) drum capacity 52 litres |
| Spin speed | up to 1200 rotations per minute |
| Test wash cycles in accordance with directives 1061/2010 and 1015/2010 | Programme 2: Cotton standard 60°C. Programme 3: Cotton standard 40°C. |
| CE | This appliance conforms to the following EC Directives: - 2004/108/EC dated 03/05/89 (Electromagnetic Compatibility) - 2012/19/EU - 2006/95/EC Low Voltage) |
Care and maintenance
GB
Cutting off the water and electricity supplies
- Turn off the water tap after every wash cycle. This will limit wear on the hydraulic system inside the washing machine and help to prevent leaks.
- Unplug the washing machine when cleaning it and during all maintenance work.
Cleaning the washing machine
The outer parts and rubber components of the appliance can be cleaned using a soft cloth soaked in lukewarm soapy water. Do not use solvents or abrasives.
Cleaning the detergent dispenser drawer
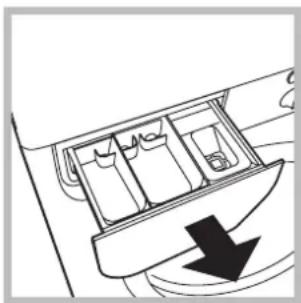
Remove the dispenser by raising it and pulling it out (see figure). Wash it under running water; this operation should be repeated frequently.
Caring for the door and drum of your appliance
- Always leave the porthole door ajar in order to prevent unpleasant odours from forming.
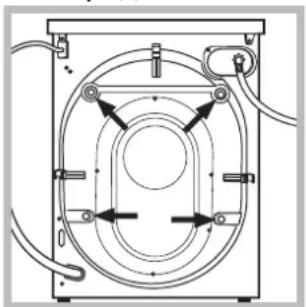
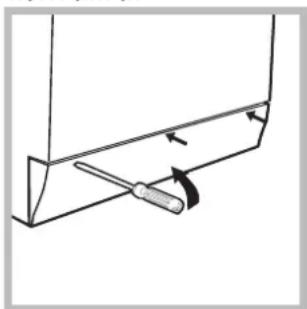
Cleaning the pump
The washing machine is fitted with a self-cleaning pump which does not require any maintenance. Sometimes, small items (such as coins or buttons) may fall into the pre-chamber which protects the pump, situated in its bottom part.
! Make sure the wash cycle has finished and unplug the appliance.
To access the pre-chamber:
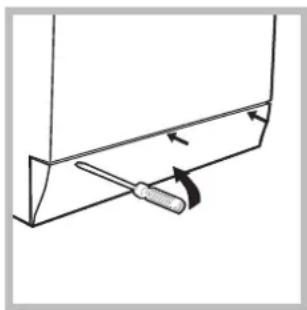
- using a screwdriver, remove the cover panel on the lower front part of the washing machine (see figure);
-
unscrew the lid by rotating it anticlockwise (see figure): a little water may trickle out. This is perfectly normal;
-
clean the inside thoroughly;
- screw the lid back on;
- reposition the panel, making sure the hooks are securely in place before you push it onto the appliance.
Checking the water inlet hose
Check the inlet hose at least once a year. If there are any cracks, it should be replaced immediately: during the wash cycles, water pressure is very strong and a cracked hose could easily split open.
! Never use second-hand hoses.
This washing machine was designed and constructed in accordance with international safety regulations. The following information is provided for safety reasons and must therefore be read carefully.
General safety
- This appliance was designed for domestic use only.
- This appliance can be used by children aged from 8 years and above and persons with reduced physical, sensory or mental capabilities or lack of experience and knowledge if they have been given supervision or instruction concerning use of the appliance in a safe way and understand the hazards involved. Children shall not play with the appliance. Cleaning and user maintenance shall not be made by children without supervision.
- The washing machine must only be used by adults, in accordance with the instructions provided in this manual.
- Do not touch the machine when barefoot or with wet or damp hands or feet.
- Do not pull on the power supply cable when unplugging the appliance from the electricity socket. Hold the plug and pull.
- Do not open the detergent dispenser drawer while the machine is in operation.
- Do not touch the drained water as it may reach extremely high temperatures.
- Never force the porthole door. This could damage the safety lock mechanism designed to prevent accidental opening.
- If the appliance breaks down, do not under any circumstances access the internal mechanisms in an attempt to repair it yourself.
- Always keep children well away from the appliance while it is operating.
- The door can become quite hot during the wash cycle.
- If the appliance has to be moved, work in a group of two or three people and handle it with the utmost care. Never try to do this alone, because the appliance is very heavy.
Before loading laundry into the washing machine, make sure the drum is empty.
Disposal
- Disposing of the packaging materials: observe local regulations so that the packaging may be re-used.
- The European Directive 2012/19/EU on Waste Electrical and Electronic Equipment, requires that old household electrical appliances must not be disposed of in the normal unsorted municipal waste stream. Old appliances must be collected separately in order to optimise the recovery and recycling of the materials they contain and reduce the impact on human health and the environment.
The crossed out "wheeled bin" symbol on the product reminds you of your obligation, that when you dispose of the appliance it must be separately collected. Consumers should contact their local authority or retailer for information concerning the correct disposal of their old appliance.
Description of the washing machine and starting a wash cycle
GB
Control panel
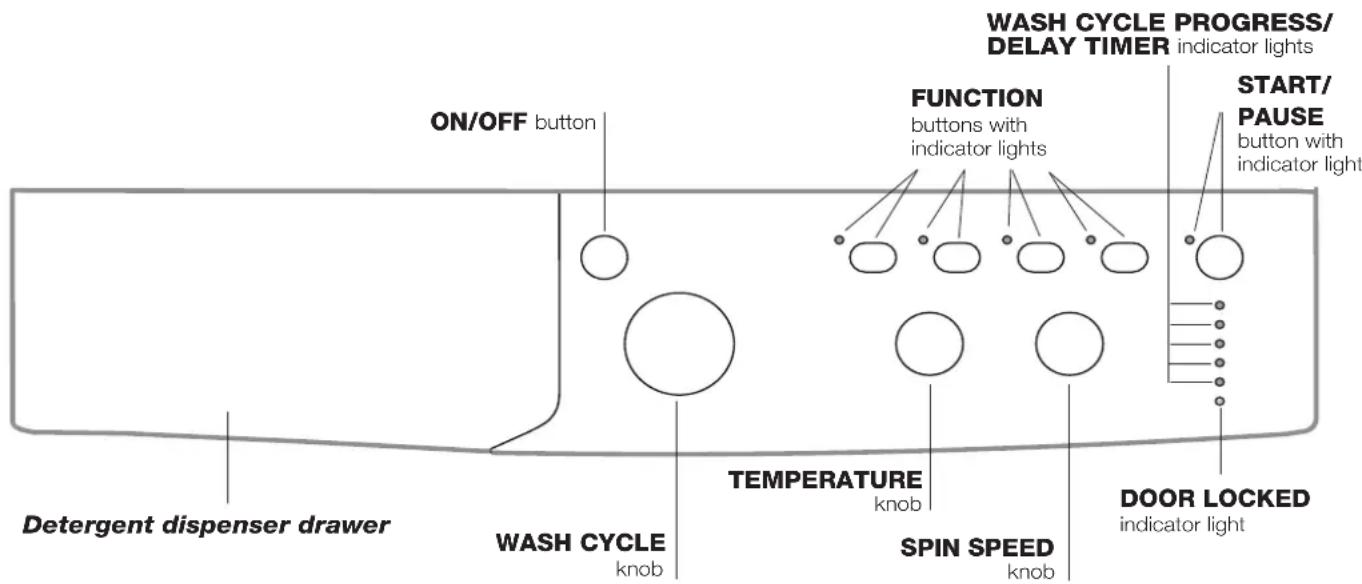
Detergent dispenser drawer: used to dispense detergents and washing additives (see "Detergents and laundry").
ON/OFF button: switches the washing machine on and off.
WASH CYCLE knob: programmes the wash cycles. During the wash cycle, the knob does not move.
FUNCTION buttons with indicator light: used to select the available functions. The indicator light corresponding to the selected function will remain lit.
TEMPERATURE knob: sets the temperature or the cold wash cycle (see "Personalisation").
SPIN SPEED knob: sets the spin speed or exclude the spin cycle completely (see "Personalisation").
WASH CYCLE PROGRESS/DELAY TIMERindicator lights: used to monitor the progress of the wash cycle.
The illuminated indicator light shows which phase is in progress.
If the Delay Timer function has been set, the time remaining until the wash cycle starts will be indicated (see next page).
DOOR LOCKED indicator light: indicates whether the door may be opened or not (see next page).
START/PAUSE button with indicator light: starts or temporarily interrupts the wash cycles.
N.B. To pause the wash cycle in progress, press this button; the corresponding indicator light will flash orange, while the indicator light for the current wash cycle phase will remain lit in a fixed manner. If the DOOR LOCKED indicator light is switched off, the door may be opened (wait approximately 3 minutes).
To start the wash cycle from the point at which it was interrupted, press this button again.
Standby mode
This washing machine, in compliance with new energy saving regulations, is fitted with an automatic standby system which is enabled after about 30 minutes if no activity is detected.
Press the ON-OFF button briefly and wait for the machine to start up again.
Indicator lights
The indicator lights provide important information.
This is what they can tell you:
Delayed start
If the DELAY TIMER function has been activated (see "Personalisation"), after the wash cycle has been started the indicator light corresponding to the selected delay period will begin to flash:
3h 0
6h 0
9h o
12h-
As time passes, the remaining delay will be displayed and the corresponding indicator light will flash:
3h-
6h 0
9h o
12h 0
The set programme will start once the selected time delay has expired.
Wash cycle phase indicator lights
Once the desired wash cycle has been selected and has begun, the indicator lights switch on one by one to indicate which phase of the cycle is currently in progress.
Wash

Rinse

Spin

Drain

End of wash cycle
END
Function buttons and corresponding indicator lights
When a function is selected, the corresponding indicator light will illuminate.
If the selected function is not compatible with the programmed wash cycle, the corresponding indicator light will flash and the function will not be activated.
If the selected function is not compatible with another function which has been selected previously, the indicator light corresponding to the first function selected will flash and only the second function will be activated; the indicator light corresponding to the enabled option will remain lit.

Door locked indicator light
When the indicator light is on, the porthole door is locked to prevent it from being opened; make sure the indicator light is off before opening the door (wait approximately 3 minutes). To open the door during a running wash cycle, press the START/PAUSE button; the door may be opened once the DOOR LOCKED indicator light turns off.
Starting a wash cycle
-
Switch the washing machine on by pressing the ON/OFF button. All indicator lights will switch on for a few seconds, then they will switch off and the START/PAUSE indicator light will pulse.
-
Load the laundry and close the door.
-
Set the WASH CYCLE knob to the desired programme.
-
Set the washing temperature (see "Personalisation").
-
Set the spin speed (see "Personalisation").
-
Measure out the detergent and washing additives (see "Detergents and laundry").
-
Select the desired functions.
-
Start the wash cycle by pressing the START/PAUSE button and the corresponding indicator light will remain lit in a fixed manner, in green.
To cancel the set wash cycle, pause the machine by pressing the START/PAUSE button and select a new cycle.
- At the end of the wash cycle the END indicator light will switch on. The door can be opened once the DOOR LOCKED indicator light turns off (wait approximately 3 minutes). Take out your laundry and leave the appliance door ajar to make sure the drum dries completely. Switch the washing machine off by pressing the ON/OFF button.
Table of wash cycles
| Wash cycles | Description of the wash cycle | Max.temp. (°C) | Max.speed(rpm) | Detergents | Max LOAD(kg) | Residual dampness % | Energyconsumption kWh | Total water ht | Cycleduration | ||
| Pre-wash | Wash | Fabricsoftener | |||||||||
| Daily | |||||||||||
| 1 | Cotton with prewash: extremely soiled whites. | 90° 1200 | ● | ● | 7 53 | 2,21 | 78 170 | ||||
| 2 | Cotton Standard 60° (1): heavily soiled whites and resistant colours. | 60°(Max. 90°) | 1200 - | ● | ● | 7 53 | 0,94 | 52,5 160' | |||
| 3 | Cotton Standard 40° (2): lightly soiled whites and delicate colours. | 40° 1200 - | ● | ● | 7 53 | 0,93 | 77 140 | ||||
| 4 | Synthetics: heavily soiled resistant colours. | 60° 800 - | ● | ● | 3,5 | 44 0,93 | 47 115' | ||||
| 4 | Synthetics (3): lightly soiled resistant colours. | 40° 800 - | ● | ● | 3,5 | 44 0,57 | 46 100' | ||||
| 5 | Mix Colored: lightly soiled whites and delicate colours. | 40° 1200 - | ● | ● | 7 53 | 0,66 | 54 90' | ||||
| 20° Zone | |||||||||||
| 6 | Cotton Standard 20°: lightly soiled whites and delicate colours. | 20° 1200 - | ● | ● | 7 | -- | - | 170' | |||
| 7 | Mix Light | 20° 800 - | ● | ● | 7 | -- | - | 120' | |||
| 8 | 20' Refresh | 20° 800 - | ● | ● | 1,5 | -- | - 20' | ||||
| Special | |||||||||||
| 9 | Silk/Curtains: for garments in silk and viscose, lingerie. | 30° | 0 | - | ● | ● | 1 | -- | - 55' | ||
| 10 | Wool: for wool, cashmere, etc. | 40° 800 - | ● | ● | 1,5 | -- | - 70' | ||||
| 11 | Jeans | 40° 800 - | ● | ● | 3,5 | -- | - 75' | ||||
| Sport | |||||||||||
| 12 | Sport Intensive | 30° 600 - | ● | ● | 2,5 | -- | - 85' | ||||
| 13 | Sport Light | 30° 600 - | ● | ● | 2,5 | -- | - 60' | ||||
| 14 | Sport Shoes | 30° | 600 | - | ● | ● | Max. 2Pairs | -- | - 60' | ||
| Partial wash cycles | |||||||||||
| Rinse | - | 1200 - | ● | 7 | -- | - 36' | |||||
| Spin + Drain | - | 1200 - | 7 | -- | - 16' | ||||||
The length of cycle shown on the dispay or In this booklet is an estimation only and is calculated assuming standard working conditions. The actual duration can vary according to factors such as water temperature and pressure, the amount of detergent used, the amount and type of load inserted, load balancing and any wash options selected.
1) Test wash cycle in compliance with directive 1061/2010: set wash cycle 2 with a temperature of 60^ .
This cycle is designed for cotton loads with a normal soil level and is the most efficient in terms of both electricity and water consumption; it should be used for garments which can be washed at 60^ . The actual washing temperature may differ from the indicated value.
2) Test wash cycle in compliance with directive 1061/2010: set wash cycle 3 with a temperature of 40^ .
This cycle is designed for cotton loads with a normal soil level and is the most efficient in terms of both electricity and water consumption; it should be used for garments which can be washed at 40^ . The actual washing temperature may differ from the indicated value.
For all Test Institutes:
2) Long wash cycle for cottons: set wash cycle 3 with a temperature of 40^ .
3) Synthetic program along: set wash cycle 4 with a temperature of 40^ .
Sport Intensive (wash cycle 12) is for washing heavily soiled sports clothing fabrics (tracksuits, shorts, etc.); for best results, we recommend not exceeding the maximum load indicated in the "Table of wash cycles".
Sport Light (wash cycle 13) is for washing lightly soiled sports clothing fabrics (tracksuits, shorts, etc.); for best results, we recommend not exceeding the maximum load indicated in the "Table of wash cycles". We recommend using a liquid detergent and dosage suitable for a half-load.
Sport Shoes (wash cycle 14) is for washing sports shoes; for best results, do not wash more than 2 pairs simultaneously.
The 20^ wash cycles (20° Zone) offer effective washing performance at low temperatures, reducing electricity usage and expenditure while benefitting the environment. The 20° wash cycles meet all requirements:
Cotton Standard 20^ (programme 6) ideal for lightly soiled cotton loads. The effective performance levels achieved at cold temperatures, which are comparable to washing at 40^ , are guaranteed by a mechanical action which operates at varying speed, with repeated and frequent peaks.
Mix Light (programme 7) ideal for mixed loads (cotton and synthetics) with a normal soil level. The effective performance levels achieved at cold temperatures are guaranteed by a mechanical action which operates at varying speed, across set average intervals.
20' Refresh (programme 8) ideal for refreshing and washing lightly soiled garments in a few minutes. It lasts just 20 minutes and therefore saves both time and energy. It can be used to wash different types of fabrics together (except for wool and silk), with a maximum load of 1.5kg .
Setting the temperature
Tum the TEMPERATURE knob to set the wash temperature (see Table of wash cycles).
The temperature may be lowered, or even set to a cold wash.
The washing machine will automatically prevent you from selecting a temperature which is higher than the maximum value set for each wash cycle.
!Exception: if the 2 programme is selected, the temperature can be increased up to a value of 90^
Setting the spin speed
Turn the SPIN SPEED knob to set the spin speed for the selected wash cycle.
The maximum spin speeds available for each wash cycle are as follows:
Wash cycles Maximum spin speed
Cottons 1200 rpm
Synthetics 800 rpm
Wool 800 rpm
Silk drain only
The spin speed may be lowered, or the spin cycle can be excluded altogether by selecting the symbol
The washing machine will automatically prevent you from selecting a spin speed which is higher than the maximum speed set for each wash cycle.
Functions
The various wash functions available with this washing machine will help to achieve the desired results, every time.
To activate the functions:
- Press the button corresponding to the desired function;
- the function is enabled when the corresponding indicator light is illuminated.
Note: If the indicator light flashes rapidly, this signals that this particular function may not be selected in conjunction with the selected wash cycle.
EcoTime
Selecting this option enables you to suitably adjust drum rotation, temperature and water to a reduced load of lightly soiled cotton and synthetic fabrics (refer to the "Table of wash cycles"). "Ecofactors you to wash in less time thereby saving water and electricity. We suggest using a liquid detergent suitably measured out to the load quantity.
This function may not be used in conjunction with wash cycles 1, 2 (>60^) , 6, 7, 8, 9, 10, 11, 12, 13, 14,
Energy Saver
The Energy Saver function saves energy by not heating the water used to wash your laundry - an advantage both to the environment and to your energy bill. Instead, intensified wash action and water optimisation ensure great wash results in the same average time of a standard cycle.
For the best washing results we recommend the usage of a liquid detergent.
This function may not be used in conjunction with wash cycles 1, 6, 7, 8, 9, 10, 12, 13, 14,
Extra rinse
By selecting this option, the efficiency of the rinse is increased and optimal detergent removal is guaranteed. It is particularly useful for sensitive skin.
This function may not be used in conjunction with wash cycles 8,
Delay timer
This timer delays the start time of the wash cycle by up to 12 hours.
Press the button repeatedly until the indicator light corresponding to the desired delay time switches on. The fifth time the button is pressed, the function will be disabled.
N.B. Once the START/PAUSE button has been pressed, the delay time can only be modified by decreasing it until launching the set programme.
This option is enabled with all programmes.
Detergents and laundry
GB
Detergent dispenser drawer
Good washing results also depend on the correct dose of detergent: adding too much detergent will not necessarily result in a more efficient wash, and may in fact cause build up on the inside of your appliance and contribute to environmental pollution.
! Do not use hand washing detergents because these create too much foam.
! Use powder detergent for white cotton garments, for prewashing, and for washing at temperatures over 60^
! Follow the instructions given on the detergent packaging.
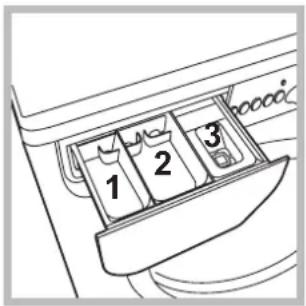
Open the detergent dispenser drawer and pour in the detergent or washing additive, as follows.
compartment 1: pre-wash detergent (powder) compartment 2: setergent for the wash cycle (powder or liquid)
Liquid detergent should only be poured in immediately prior to the start of the wash cycle.
compartment 3: additives (fabric softeners, etc.)
The fabric softener should not overflow the grid.
Preparing the laundry
- Divide the laundry according to:
- the type of fabric/the symbol on the label
- the colours: separate coloured garments from whites.
- Empty all garment pockets and check the buttons.
- Do not exceed the values listed in the "Table of wash cycles", which refer to the weight of the laundry when dry.
How much does your laundry weigh?
1 sheet 400-500 g
1 pillow case 150-200 g
1 tablecloth 400-500 g
1 bathrobe 900-1200 g
1 towel 150-250 g
Garments requiring special care
Silk: use special wash cycle 9 to wash all silk garments. We recommend the use of special detergent which has been designed to wash delicate clothes.
Curtains: fold curtains and place them in a pillow case or mesh bag. Use wash cycle 9.
Wool: all wool garments can be washed using programme 10, even those carrying the "hand-wash only" label. For best results, use special detergents and do not exceed 1,5kg of laundry.
Jeans: Turn garments inside-out before washing and use a liquid detergent. Use programme 11.
Load balancing system
Before every spin cycle, to avoid excessive vibrations and to distribute the load in a uniform manner, the drum rotates continuously at a speed which is slightly greater than the washing rotation speed. If, after several attempts, the load is not balanced correctly, the machine spins at a reduced spin speed. If the load is excessively unbalanced, the washing machine performs the distribution process instead of spinning. To encourage improved load distribution and balance, we recommend small and large garments are mixed in the load.
Your washing machine could fail to work. Before contacting the Technical Assistance Centre (see "Assistance"), make sure that the problem cannot be not solved easily using the following list.
Problem:
The washing machine does not switch on.
The wash cycle does not start.
The washing machine does not take in water (the indicator light for the first wash cycle stage flashes rapidly).
The washing machine continuously takes in and drains water.
The washing machine does not drain or spin.
The washing machine vibrates a lot during the spin cycle.
The washing machine leaks.
The "Functions" indicator lights and the "start/pause" indicator light flash, while one of the "phase in progress" indicator lights and the "door locked" indicator light will remain lit in a fixed manner.
There is too much foam.
Possible causes / Solutions:
-
The appliance is not plugged into the socket fully, or is not making contact.
There is no power in the house. -
The washing machine door is not closed properly.
- The ON/OFF button has not been pressed.
- The START/PAUSE button has not been pressed.
The water tap has not been opened. -
A delayed start has been set (see "Personalisation").
-
The water inlet hose is not connected to the tap.
The hose is bent.
The water tap has not been opened. - There is no water supply in the house.
The pressure is too low. - The START/PAUSE button has not been pressed.
The drain hose is not fitted at a height between 65 and 100cm from the floor (see "Installation").
- The free end of the hose is under water (see "Installation").
- The wall drainage system is not fitted with a breather pipe.
If the problem persists even after these checks, turn off the water tap, switch the appliance off and contact the Assistance Service. If the dwelling is on one of the upper floors of a building, there may be problems relating to water drainage, causing the washing machine to fill with water and drain continuously. Special anti-draining valves are available in shops and help to avoid this inconvenience.
-
The wash cycle does not include draining: some wash cycles require the drain phase to be started manually.
-
The drain hose is bent (see "Installation").
-
The drainage duct is clogged.
-
The drum was not unlocked correctly during installation (see "Installation").
- The washing machine is not level (see "Installation").
-
The washing machine is trapped between cabinets and walls (see "Installation").
-
The water inlet hose is not screwed on properly (see "Installation").
-
The detergent dispenser drawer is blocked (for cleaning instructions, see "Care and maintenance").
-
The drain hose is not fixed properly (see "Installation").
-
Switch off the machine and unplug it, wait for approximately 1 minute and then switch it back on again.
If the problem persists, contact the Technical Assistance Service.
Before calling for Assistance:
- Check whether you can solve the problem alone (see "Troubleshooting");
- Restart the programme to check whether the problem has been solved;
- If this is not the case, contact an authorised Technical Assistance Centre using the telephone number provided on the guarantee certificate.
! Always request the assistance of authorised technicians.
Have the following information to hand:
the type of problem;
the appliance model (Mod.);
the serial number (S/N).
This information can be found on the data plate applied to the rear of the washing machine, and can also be found on the front of the appliance by opening the door.
COMMISSION DELEGATED REGULATION (EU) No 1061/2010
| Brand | INDESIT |
| Model | IWC 71283 C ECO EU |
| Rated capacity in kg of cotton | 7.0 |
| Energy efficiency class on a scale from A+++ (low consumption) to G (high consumption) | A+++ |
| Energy consumption per year in kWh 1) | 174.0 |
| Energy consumption of the standard 60 °C cotton programme at full load in kWh 2) | 0.94 |
| Energy consumption of the standard 60 °C cotton programme at partial load in kWh 2) | 0.635 |
| Energy consumption of the standard 40 °C cotton programme at partial load in kWh 2) | 0.585 |
| Power consumption of the off-mode in W | 0.5 |
| Power consumption of the left-on mode in W | 8.0 |
| Water consumption per year in litres 3) | 10840 |
| Spin-drying efficacy class on a scale from G (minimum efficacy) to A (maximum efficacy) | B |
| Maximum spin speed attained 4) | 1200 |
| Remaining moisture content 5) | 53% |
| Programme time of the "standard 60 °C cotton" at full load in minutes | 160 |
| Programme time of the "standard 60 °C cotton" at partial load in minutes | 140 |
| Programme time of the "standard 40°C cotton" at partial load in minutes | 130 |
| Duration of the left-on mode in minutes | 30 |
| Noise in dB(A) re 1 pW washing 6) | 54 |
| Noise in dB(A) re 1 pW spinning 6) | 77 |
1) The "standard 60^ cotton" at full and partial load and the "standard 40^ cotton" at partial load are the standard washing programmes to which the information in the label and the fiche relates. Standard 60^ cotton and standard 40^ cotton are suitable to clean normally soiled cotton laundry and are the most efficient programmes in terms of combined energy and water consumption. Partial load is half the rated load.
2) Based on 220 standard washing cycles for cotton programmes at 60^ and 40^ at full and partial load, and the consumption of the low-power modes. Actual energy consumption will depend on how the appliance is used.
3) Based on 220 standard washing cycles for cotton programmes at 60^ and 40^ at full and partial load. Actual water consumption will depend on how the appliance is used.
4) For the standard 60^ at full and partial load or the 40^ at partial whichever is lower.
5) Attained for 60^ cotton at full and partial load or the 40^ at partial whichever is higher.
6) Based on washing and spinning phases for the standard 60^ cotton programme at full load.
Summario

Italiano,1
Coton 1200 tours/minute
Causes / Solutions possibles:
CBeTJIHHH INHdNKaTOPN
BkIIOUbaHe Ha nporpama
Pporpamn, 44
Ta6nua c nporpa mnte
PepcoHaJIu3npaHnA,45
3aabaheHa temepatypata
3aabaheHa zentpoyraTa
Функл
IepnH npenapatn npex 3a npaHe, 46
YeKeMeJxKe 3a nepuHnHTe npenapatn
IoproTbHe Ha npaHTo
CneunuHno npaHe
Cnctema 3a n3MepBaHe Ha TOBapa
PpO6JIeMn mepKn 3a OTcTpaHЯBaHeTo nM,47
CepBn3Ho 06cnyXBaHe,48

INDESIT
!BaxHo e Da cxbxpaHbAte HNCTpyKuNTe, 3a Da MoKeTe Da npaBnTe DonbHNHTeHNcnpaBKn NO BcKaKO BpeMe. B cnUay aYe nepaHaTa MaunHa ce npOdaJe, npeOTcTbnn nn npemeCTn, Tp6Ba Da ce norgnxitEnHCTpyKuNTe BuHa r Da a npuDpykabat, 3a Da ce npedocTabn INΦopMaucna Ha HOBnrc6CTBeHnK 3a pa6oTata u CbOTBeTHnTe npedynpexdHnra.
!PpOyTeTe BnMaTeHNO INCTpyKcHNTe: 3aUOTO CbDbpxKat BaXHa INΦOpMaunr 3a MOHTaxa, N3NoJ3BaHeTo n 6e3OnaChocCTTa.
Pa3oNaKOBaHe n HnBeJInpaHe
Pa3onakobaHe
- Pa3oNaKoBaIe nepaJIHaTa MaIINHa.
2.Поверете дади nepaHaTa MaunHa He e NOBpeDeHa npi TpaHcNoptnpaHeto.Ako e NOBpeDeHa, Heя CBbp3BaITe, a ce obbpHeTe KbM pOdaBaaya.
3.CBaIeTe Te BnHTa 3a IpeIpa3BaHe Ipr TpaHcnpT I rMnUkTa CbC CboTBeTHaTa BtJka,IOCTaBeHr OT 3aHaTa CtpaHa (Bux Noka3aHomo Ha fueypama).
- 3aTbOpTe OTbOpTe C npEdoCTaBeHnte PnactMacOBn KaNaUKN.
- CbxpaHete BCnKu qactn: 3a da ce MOHTnpaT OTHOBn Pn Heo6xoDMOC TepaHaTa MaunHa da 6bde TpaHCnOpTuPapaHa.
!ОпakOBьчнгМATEPиан He eДeТСКИrgpaЧka.
HnBvIipaHe
- MoNTnpaIte nepaHaTa MaunHa Ha paBEN I TBbpI NOi, 6e3 DaЯ Onnpate B CTeHn, Me6eNn np.
2.AKO NOIbT He e INeaJIHo XOpN3OHTaJIeH, KOMnEHCnpaIte HepaBHOCTnte, KaTO OTBnTe NIN 3aBnTe npEnHtE KpaYeTa (BuX quypama); TbNbT Ha NaKIOHa, n3MepeH Bbpx y pa6oTHata
NOBbpxHOCT, He Tp6Ba Da HaBnUba 2°.
ToHOTo HnBeJInpaHe N03BOJRA MaUNHaTa Da 6bDe cTaNHa N Da Ce N36yRbAT Bn6paunTe, WymbT IN PpeMeCTBaHeTo N NO BpeMe Ha paBoTa. Korato HactnKaTa e MOKET nIN KInIM, peYJnpaIe Taka KpaueTaTa, Ye NOD nepaHATA MaUNHa da OCTaHe DOCTaTBUHO MRCTO 3a BEHTnJaCyr.
XnDpaBnUHn n eJeKTpNueckn Bpb3KN
Cbbp3BaHe Ha Mapkya KbM BOOpOBoHaTa Mpeka
- CbpxkTe 3axpaHbAun Mapkyu, KaTO rO 3aBnTe KbM KpaHa 3a CTydeHaTa BODa C HApHnK C ra3oBa pe36a 3/4 (BuX queypama). IpeDn Da ro CBpXeTe, n3ToUeTe BOdAta, DOKaTO ce n36ncTpN.

-
CbpxkTe
Mapkyua 3a
CTyHeHaTa BOda KbM
NepaHnTa MaunHa,
KaTO rO 3aBnTe
KbM CneuHaHnra
Uyep, pa3noJoxeH
OT 3aHATA cTpHa,
rope BnCHO (6ux
quypama). -
Bhimaba Te Mapkya da He ce nperebva n npitncka.
!HaIraHHeTo NO BODOpOBoHaTa MpeKa Tp6Ba Da 6bJe B rpaHnUte, yKa3aHn B Ta6nUcaTAt,TexHnueckn DaHHN" (6x. cIeDeBaUama cmpaHuza).
!AkoDbJxHnHaTa Ha 3axpaHbuaMapkyu He e DoCTaTbUHa, ce ObbpHeTeKbM CneunaN3npaH MaRa3IN NJI KbMOtopn3npaH TexHk.
!Hukora He n3noi3BaIte Beue ynoTpe6raBamapkyu.
!N3noJI3BaIte Te3n,KoETO ca doCTaBeHc nepaHaTa MaunHa.
Cbbp3BaHe Ha Mapkyu 3a Mpbchata Boda
CbpxKeTe Mapkyua 3a Mpbchata Boda,6e3 da ro npeYBaTe,KbM KaHaIN3aUHOHHata Tpb6a Nn KbM Tp6bata 3a OTBeXdaHe B CteHata, pa3noJoxEHN Ha BInCOuHa MeKdy 65
n 100 cm ot noja, nnn ro nooppe Te ha pb6a Ha MNBkata nn BaHaTa,

CBbp3BaIKN
DOCTaBeHnA
BOdau KbM KpaHa (6x. fUzypama).
CBo6oHNrT Kpa
Ha Mapkya 3a
MpbcHaTa BOda
He Tp8Ba Da
6bJe NOTOpEN BBB
BOdata.
! He ce npenopbUba n3noJ3BaHeTo Ha yIbJXnTeJIHm MapKyu. Ako e Heo6xOIMo, yIbJXnTeJIaT Tp8Ba Da IMa CbIuIa DnAmEtbp KaTO opRHaJIHnI a Da He HaNDbNtBaa 150 cm.
Cbbp3BaHe KbmeIeKtpnueckaTa MpeKa
IpeN da CbpxKeTe uencela B KOHTaKTa, npOBepeTe dann:
- KOHTaKTbTe 3a3EmeH CbTnacHO DeIcTBaUNTe CTaHApTN;
- KOHTaKTbT MoXe Da NoEme MaKcImMaHnHaTa MOUHOC T Ha HATOBaHe Ha MaUnHaTa, Yka3aHa B Ta6IuCaTc TexHuecknTe daHHN (Bux CneDeaama cmpaHuca);
3axpaHbAaTO HAnpeXeHne e B rpaHnCnTe Ha yKa3aHOTo B Ta6nCata C TexHnYeCKnTe daHHn (Bux cneDbaUama cmpaHuua); - KOHTaKbT OTROBapra Ha ⅢeNceHa HnepaHata MaunHa. B npOTuBEN cnyaJ 3ameHeTe ⅢeNceHa IIN KOHTaKaT.
!IepaHnHaMaHnHaHe Ce MoHTnpa Ha OTKpHTo, DOpN POn HABec, 3aUcOTe MHOrO ONaCHO Da Ce OCTaBn Ha BInraHneTO Ha aTMocpehnte ycNoBn.
! 3a MoHTnpaHaTa nepaHMaunHa eNEkTpueeCKnT KOHTaKT TpR6Ba Da 6bDe IecHO DoCTbNeH.
!He n3noJI3BaIte yIbJIxHTeJIu nn pa3KnOHTeJI.
!Ka6eIbT He Tp8Ba Da 6bJe O8bHaT NJIcNpeckaH.
!3axpaHbauT Ka6e Tp6Ba Da ce
IoMDMeHa cMo OT OToPn3nPaHn TexHnCn.
BHHMaHHe! NpMaTa OTXbPJIa BcKaKBa
OTROBOPHOCT B CnyaHTe, B KOnTO Te3N
HOpMn He Ce Cna3BaT.
Pbpo npaHe
Cnei nHCTaIIpaHe n npEIn ynoTpe6a BKNIOUeTe eINH cIKbI Ha n3npaHe C nepuIeH npenapat, Ho 6e3 dpexn, 3aDaBaKn npoRpama 2.
| TexhneyeCKn ДaHн | |
| Mоden IWC 71283 | |
| Раэмери | ширINA 59,5 cm ВисочINA 85 cm ДылбочINA 53,5 cm |
| Вмостимоct OT 1 до 7 кг. | |
| Еleекрическо Зхранвае | Виж tabелкова с харазкетерICTКITE, поставена на машина |
| Зхранвае с вoda | Мakсимално наляганe 1 MPa (10 bar) Минимално наляганe 0,05 MPa (0,5 bar) обem на kaizaHA 52 лintpa |
| Сkopост на центroфугата | do 1200 оборотa/MиHyta |
| Пэррами за поверka | пэррама 2; |
| сьгласно | стадерта на рограма за |
| PerlamenteN № 1061/2010 | памук пri 60°C. |
| и № | пэррама 3; |
| 1015/2010 на Комисята | стадерта на рограма зa памук пri 40°C. |
| CE | пэралнata машинa сьотBetCTBa на следни: ЕврONEСКИ ДИPEKTINВ: - 2004/108/CE (3a eilektropomarHTHa сьВмecтимоct) - 2006/95/CE (3a Н stock нарожени) - 2012/19/EU |
CnnpaHe Ha BOdaTa N 3KJIIOUvBaHe Ha eJekTpO3aXpaHBAHeTo
- 3aTbapayTe KpaHa 3a B0da CneD BC8KO n3nnpaHe. ITo To3n HauHc Ce OpranuHaBa n3HOCbaHeTO Ha XndpaBnHata IHCTaJaHr Ha nepaHaTa MaUNHa N ce OpranuHaBa OnaCHOCTTa OT TeOBe.
-ИЗКЛЮЧВайтse Урсеса OT eNEKТРУСЕСКОТ 3axpaHBAHe, KOrATO NOUHCTBaTe NepaHHaTamaшинa И NO Врeme Ha pa6OTn NO NOДдрьЖКаТa.
OCTaBnTe JIOKa BnHaRn OTKpExHaT 3a N36raBe O6pa3yBaHeto Ha He npiaTHMnPn3MN.
NouchBaHe Ha nomnata
IepaHnHaMaunHa e OKOMnJIeKTOBaHa CbC camOnOuNCTBaUa ce NOMNa, KOrTO HrMa hyXda OT noDpBxKa. Bb3MoJHo e o6aYe MaJKN ppeMTe (MOHeT, KOnHeTa) Da nonaHnat BvB cHJTbpa, KOHTo npeDnA3Ba NOMnata N CE Hamnpa B DOHnAta N acT. !YBepeTe ce, ye zukblbT Ha npahe e 3aBbPUn, IN N3KlUoyTe UeNCeLa OT KOHTaKA.
3a doctbn do ФИNTbpa:
- cBaIeTe nHaHeJa B npEHaTa YaCT Ha nepaHata MaUNHa C NOMOuTa Ha OTBepTKa (xJ. quya);
-
OTBnTe KaNaUkTa, KaTo Ra 3aBbPTnTe B Nocoka, ObaPaTHa Ha YacOBHnKOBaTa CTpeNka (BuX quaypa): HopMaJIHo e Da n3Teue MaJko BOda;
-
NOUHCTeTe BHNMaTeHNOOTBbTpe;
- 3aBnIte OTHOBO KanaKkata;
- 3aTbOpTe OTHOBO nHaHeJa, KaTo, npeDi Da rO n36yTaTe KbM nepaJIHrTa, ce yBepNTe, Ye cTe NOCTabNnnpaBnH0 3akpeNBauNtE KyKn B CneuNaHnTE BODaHn.
IpoBepka Ha Mapkya 3a cTydeHaTa BOda
IpoBepaTe Mapkya 3a cTydeHaTa Boda IOnHe BeHbK rOAnuHo. Da ce 3aMeHN, aKO e HanyKaH n HauepeH, 3aIoTO n O Bpeme Ha n3nnpaHe rOJaMTo HaJraHe MoKe da npEiN3BnKa BHe3aAnHO cnYkBaHe.
!Hnkora He n3noJ3BaITe Beue ynoTpe6raBan Mapkyu.
!NepaHaTaMaunHae npoeKtnpaHa n npo3BeDeHa B CbOTBeTCTBnE C MekdyHapOHDHe HOpMn 3a 6e30nacHOCT. PpeDynpexdEHHra Tk Ca npoNKTyBaHn NO npuHHn 3a 6e30nacHOCT N Tp8Ba Da ce YeTaT BHIMATEJHo.
06u npedeoxpaHnteHn MepKn
To3n ypeE npedHa3HaueH n3KIOHTeINHO 3a DOMaUHa ynoTpe6a.
To3n ypeJ moKe da 6bJe n3NoJ3BaH OT Deua HAD 8 rOAnHH nIuCa C OrpaHueHn fN3nueckn, cETNBn IIN YMCTBeHN cNOcO6HOCTn, INn C HeIOCTaTbUeH ONIT n N03HaHnA, AKO Te Ca Ha6JIoDaBaHn IIN HNCTpyKTIpaHn OTHOCHO n3NoJ3BaHeTO Ha ypeJa OT JInCe, OTROBOPHO 3a TExHaTa 6e3OnacHOCT n pa3bUpaT OnACHOCTte, CBbp3aHn C yNtpe6bata Ha ypeJa. Deqata He Tp46Ba Da cN irpaT C ypeJa. POpdpbXkata N NOuNCBAHeTo He Tp46Ba Da ce n3BbPWBat OT Deca 6e3 HAd3Op.
- IepaJIHaTa MaunHa Tpr6Ba Da ce n3noJ3Ba cAmO OT Bb3pacTHN Xopa CbIaCHO INHCTpyKUnTe, npedocTabeHN B Ta3n KHHKKa.
HeDOKocBaIteMaunHaTa,Korato cTe 6oCn nn C MOKpn nBn BnaJHn pbue nn Kpaka.
-ИЗкlioчавиTe OT KOHTaKta, KaTo XBaUaTe 3a UeNceJa, a He KaTo ДьрпаTe Ka6eJa.
He OTBapaIte YeKMeJKeTo C nepuJIHnTe npenapaTn, DOKaTO nepaIIHaTa MaunHa pa6OtN.
HeDOKocBaIteMapkya3aMpchataBoa,3aIoTo MOKe DaIOCTnHReBUCOKTeMmpepatyn.
- Hikora He OTbaprIte Ioka cbc cnna, 3aIoTO MoKe Ja ce NOBpeN MexaHn3Ma 3a 6e3oNaCHOCT, KOIT OpeDn3Ba OT cnYauHo OTbaprHe.
BcnyaHa nobpea no HkaKbB NOBOd He doCTnraTe DO BbTpueHNTE MexAHH3Mn B ONHTa peMOHT.
BunharoKoHTpOJIpaIte DeIaTa Da He Ce Do6nkaBaTdo pa6oTeaTa MaUNHa.
- Ito Bpeme Ha n3nnpaHTo JIOKbT ce HarpraBa.
-П配电TbaHTo Da ce N3BbPbBa BHMaTeJHO OT Dbama INI Tpima dyuN. HNKora OT cam YOBek, 3aUTO nepaHaTa MaunHa TeKn MHoro.
- Празддзарддмшнота,проверетдддбарбаньт e паэн.
PeunknapaHe
- YHnOxKaBaHe Ha onaKOBbUHM MaTePnaJI: cna3BaTEmeCTHnTE HOpMn - NO To3n Haun HOnaKOBbUHNrMaTePnaJ MoKe Da ce peuNKnPa.
- EByPoneNcKaTa DnpeKTHBa 2012/19/EU 3a otNaIbCInTe OT eNeKTPnuecko N eNeKTPoHNo O6OpyDbaHe npeBnKDa DOMaKinHcKInTe eNeKTPoypEdu Da He Ce n3XBbPnT 3aeHOn C o6nuaHnTe TBbpDn rpaDckN OTnaDbuN. N3BaDeHnTe OT yNtpeBa ypeDu TpRbBA Da 6bDat cBbpaHn OTdEnHO C ceJ da 6bDe yBeJIuYe H deJbT Ha nOndeKaunTe Ha
NOBTOpHa yIOTpe6a n peuKnnpaHe mATEpnaHn, OT KOnTo Ca HnpaBeHn, KaT0 n Da 6bDaT n36BerHaTHeBEHTyAHH BpeHn 3a 3dpabeto n OKoJHATA cpeHa. CmBONbT "3auePKHaTO KoUe" e NOCTaBeH BbpXy BCNUKN pOdyKTn, 3a Da HAnOMHra 3a 3aBnKNTeHOTO paZdENo HCbIPaHc. 3a DonbHNTeHn HaΦopMaun OTHOC NoPABUNHO T3BaXdahe OT yNOtpe6a Ha DOMAKHNCKNTe eNEKTOpyPeHn INTEpecyBaunTe ce MOrat Da ce 06bpHnat KbM cnyx6bata 3a cb6bPapHe Ha OTNaDbuN NIN KbM dNCTPNbYTopnte.
Описане на пералина та машина и рунсанeto на заideна поррама
CBeTnnHHn HndnKaTopn
CneIaHTe CBeTJIHHH INHINKaTOPn DaBaT BaXHa HOpMaun.
ETO KAKBO Ka3BaT:
OTnOKeH cTapT
Ako e akTbUpaHa cyHKnraTa 3a6abeHo BKJIIOuBaHe (ex. "TepcoHaJU3upaHua", cIe nYcKaHe Ha nporpaMaTa ue CBET He HndkaTopbT 3a N36paHOTo 3a6abAHe:
3h 0
6h 0
9h o
12h-
B TeueHne Ha BpeMeTo Ie Ce BN3yaJn3npa OCTabaUOTo 3a6abAByHe Upe3 MmraHe Ha CbOTBeTHnCBeTnHeH HnDnKaTOp:
3h 0-
6h 0
9h o
12h 0
CneI KaTo I3Teue 3aJaDeHTo BpeMe 3a OTnaraHe Ha cTapTa, I36paHaTa nporpama ue Ce BKInoun.
CBeTnnHHn HndkaTopo 3a TekyuTe a3n
CneI KaTo e n36paH n CTapTnpaH KeNaHnT CnkBn Ha npaH, CBETINHHte INHdkaTopn Ue CBeBT eINH CneDpyr, 3a Da yKa3BaT XoDa Hau NKbJa:
Ppae

N3nJaKaBaHe

LcHtpopyra

ИЗTOУBAнеHa BOДаТa

KpaHn npaHTo

BtoHn 3a cyHKun n CbOTBeTHn CBETJINHHN HdkaTopn
Pn n360pHa fynKuNcCBOTBeTHNrT CBeTnHEn HnDnKaTOp
Ie CBETHe.AKO n36paHatafynHKUHe e CbBMecTIma
Cbc 3aadaeHATA nporpaMa,CbOTBeTHNrT CBeTnHEn
HNdkaTOp Ie Mna IyHKUraTa Hma Da Ce AKTNBpuA.
AKo n36paHatafynKUHe e CbBMecTIma Cdpya
PpeBaPntTeHNO 3aadaeHa,CBeTnHHNrT INDnKaTOp,
CbOTBeCTBaH Ha NpBbTA n36paHa fynKUraMnra
INCe AKTNBpuCa mo BTOpata,KATO INDnKaTOPbT Ha
AKTNBpuHaHt fynKUra CBEBa.
CBETJINHEHINHUNKaTOP6NOKnpaHJIOK
CBeTeuHT CBeToHnDnKAtOp nKa3Ba, Ye NIOKbT e 6NOKnpaH, 3a Da ce Bb3PpeTCTBa OTBapReHo My; 3a Da OTBopnte NIOKA u3yakaiTe CBeToHnDnKAtOp a Da yrache; (u3yakaiTe OKoJIo 3 MInHyTu).3a OTBapReHe Ha NIOKa no Bpeme Ha npahe Ce HATnCKa 6yToH START/PAUSE; MoKe Da OTBopnte NIOKa, Ako CBeToHnDnKAtOpbT BLOKnPAH NIOK e yraChan.
BkIIOUbaHe Ha nporpaMa
- BkHouTe nepaHrTa, kaTo HATncHeTe 6yToHa ON/OFF. BcNcKn INHdkaTopu Nc Ce BKHooat N cE CBETB npOdbLnKeHne Ha HAKoJIKO cekHydn, CneI KoEt Oe yraChat N cCBetn CpyncpaUca CBetTInHa INHdkaTopbT START/ PAUSE.
- 3apeTe npexnte 3a npaH e 3aTbopeTe IIOka.
- 3aaiTe XeJHaHaT nporpama c KInoya PPOPAMN.
- 3aaiTe Temnepaypata Ha npane (exk. "PepcoHanusupanu).
5.3aaiTe ckopocTt Ha ueHTpoDpynape (ek. "PepcoHauu3upaHua). - NocTabeTe nepunen H npenapat n do6aBkn 8K. "NepunHu npenapamu u dpexu 3a npaHe".
7.ИЗбupaHe Ha XeNaHInTeФункUIN. - Bkniuyete nporpamata, kato haTnche 6yToHa START/PAUSE, cboTBTHnT CBeTnHeH INdkaTop ue CBETn NOCTOHHoB 3eJIeH nBJr. 3a da OTMeHnTe 3aJaDeHnra LKbJ, NoCTabeTe MaunHaT B nay3a, KaTO HATNCHE 6yToHa START/PAUSE, m36epTe HOBn rKbl.
- Korato nporpaMaTa CBpU, ue CBeThe HndkaTopbTEND. Korato CBeToHdkaTopbT BLOKIPAH JIOKByracHe, MoKe da OTBOpHTe IOKa (N3uKaaiTe OKoJIo 3 MHyTu). N3BaTe npaHTo n OCTaBeTe IOKa npntBopeH, 3a da N3cbXHe 6apabHbT. N3KJIouTe nepaJIHra, KaTO HaNTcHete 6yToHa ON/OFF.
Ta6JIuca c npoRpaMnte
3a BCnUKN Test Institutes:
2)Дылга nporpama 3a namyк;Задант eporpaMa 3 c TemnepaTypa 40^
3)Дьлга nporpama 3a CnHTeTnHy; 3aДайтnporpama 4 c Tempepatypa 40^
Sport Intensive (nporpama 12) pa3pa6oTeHa e 3a npaHe Ha TBkaHn Ha CnIHNO 3aMbpeHn CNOpTHn dpexn (aHcy3n, NaHTaJHOH, np.); 3a NoCTrAHe Ha no-dO6pn pe3yIITaTn Ce npenopbYBa da He ce HaADBuaBA MaKcImaJIHOTo HATOBapBaHe, yKa3aHO B TaBNIucaTa, TaBNUca c npoapamume".
Sport Light (nporpama 13) pa3pa6oTeHa e 3a npaHe Ha TBkaHn Ha JeKo 3ambpeHo cnopTHO obKeKn (aHcy3n, naHTaONH, np.); 3a noCTnraHe Ha NO-dobpn pe3yIaTn Ce npenopbUba Da He CE HAdbuBa MaKcMmaHTo HATOBapBaHe, yKa3aHO B, TaBnuca c npoapumme". PpenopbUba ce da ce n3non3Ba Teueh nepinien HPenapat Bdo3a, pOnxOJa 3a noNobH 3apeJdaHe.
Sport Shoes (nporpama 14) pa3pa6oTeHa e 3a npaHe Ha cnopTHn obyBkn; 3a noctnraHe Ha no-dobpn pe3yIITaN da He ce nepat nobuee ot 2 uΦTa.
Iporpamnte 3a 20^ (20^) npednaraTdo6bppe3yntatOTn3npaHTo npn Hncka TemnepaTpy, nO3BOJBAKn noHnCKO notpe6JIeHHe Ha eJeKtpoeHeprna, kato C TOBa DOnpHacrt 3a ONa3BaHeto Ha OKoJIHaTa cpea NIKOHOMUeCKaTa efeKTNBHOCT. Iporpamnte 3a 20^ OTROBAPRT HA BCNUKNI3NCKBaHn:
CtAnapTha nporpama 3a namyK npn 20^ (nporpama 6) e ndeanHa 3a 3ambpceHo npaHe ot namyHa TBkaH. Dobpnte pe3yTTATN BKNIOHTeINHO npn IN3nnpaHe cbc CTyDEHa BOda, B cpabHeHne C Te3n CJeI npaHe npn 40^ , ca rapaHTnpaHn OT MExAHNUHOTO DeiCTBNE C pPOMRA HA CKOPoCTTa, MHOROKpaTHO N YecTO DOCTURA IO DNKOBN CToHOCTN.
Light Mix (nporpama 7) e nideaHa 3a cpeHNo 3ambpceHo CmecHo npaHe (namyk u cnHTeTka). Do6pnte pe3yntaTn, BKNIOHTeJIHO npu IN3Nipane CbC CTyDHa BOda, Ca rapaHTnpaHn OT MExAHNHTO DeIcTBne C npOMraHa Ha CKOPoCTTa Ha ONpeJeHn INTEPBAHn C He rONMa pNOBjNKHTeHOCt.
20' Refresh (nporpama 8) e ndeanha nporpaama 3a ocBexkabahe n n3nnpahe Ha Jeko 3ambpeHo npahe 3a KpaTko BpeMe. ToT pae camo 20 MNHTu n no To3n HauH nceTn eHepn u BpeMe. MoXeTe da nepete eHOBpeMeHHO TBkaHn OT pa3nueH BnD (c N3KIOUeHne Ha BbNHa N KONpHa) c MaKcIMaJIHO terNo do 1,5 kr.
3aandaBaHe Ha TeMnepaTypaTa
3aBbptaiKn KIOUa TEMNEPATyPA, ce 3aDaBa temnepatypata Ha npahe (ek. Tabnua Ha npoapamume).
TemnepaTypata MoKe Da ce noHKn Do npaHe cbc CtyeHa Boda
IepaHraTbAToMaTuHo 1e nonpeuHa da ce 3aJaTe TMnepaTypa, KOrTO e no-BucOka OT MaKcImaHaTa TMnepaTypa, npedBndeHa 3a Bcra Kporpama.
!N3KIOUeHHe: c N36bupaHe Ha nporpaMa 2 TemnepaTypaTa MoKe da ce nobuun do 90^
3aDaBaHe Ha ueHTpOpyrata
3aBbptaiKn KIOUa LEEHTPOΦYΓA, ce 3aIaBA CKOpocTt Ha ΚeHTpOΦyInpaH e 3a I3paHaTa nporpaMa.
MaKcHMaJIHnTe IpeBnIeHn cKOpOCTn 3a npOrpaMnte ca:
Поррам Мakсимална ckopoct
PamyuHn 1200 o6oPoTa B MInHyTa
CHTeTnHn TBkAHN 800obopotaBMHyTa
BbHa 800 o6oPoTa B MuHyTa
KoPnHa, cMo n3TOuBaHe
CkopocTtHa ncthtpofoynpaHe moKe da ce HamaHn nn da ce N3KJIOHn, KaTo ce n36pe CmBOJbT
IepaHraT a bTOMaTHUHO 1e nonpeu da ce entpofoynpa cbc ckopocT, no-BncoKa OT MaKcImaJIHO npeBndeHaTa 3a BcKa nporpama.
Функции
IOnbHnTe cyHKcun 3a npaHe, npeBnDcHn B nepaHata MaunHa, daBaT b3MOxHOCT 3a NOCTnraHe Ha JeNaHOTo 6yNo nYnTo npaHe:
3aakTNBnpaHeHaBb3MOHnTeФyHKnN;
- Hatnchete 6yToHa, cBtBcTcBaH Ha XeJaHaTa yHKn;
2.CBETBaHETO HA CbOTBeTHNIMHNKATOP NOKa3Ba,yeyHKnraTa e m3paHa.
Белека: БьрзOTOMiracheHa Индикатopa noka3Ba, Ye cboTBetHaTaФунцЯТa He можеда 6бдe n3бpaHa 3a 3adaHeHATA nporpama.
Eco Time
C n36bnpaHTo Ha Ta3n OOnu MExAHNHTe DmXKeHn, TeMnepaTpyaTa n B0daTa ca ONTMn3npaHn 3a npaHe C HamaJeHO 3apeKdaHe Ha Jeko 3ambpcEH nAmyHn i CNHTeTuHn dpexn (Buk ,Tabuua c npoepaumc).C "EcoTime" Moke da ce nepe 3a no-KpATko BpeMe, C HamaJIeH pa3xOJ Ha BOa n EhePnI. IpenopbUba Ce da ce n3non3Ba Do3a TeueH nepiInen npenapat, NOxOJa7a KONHecTBOTo Ha 3apeDeHn TOBap.
!He moxe da ce akTbBnpa c npoPamTe 1,2 (>60^) ,6,7,8,9,10,11,12,13,14,
Energy Saver
ФункцяТа Energy Saver Дорпнась 3a orpaHnUbaHe pa3xOda Ha eNeKtpoeHepnry, KaTo He noDrpBa BODaTa, nIIOJI3BaHa 3a nIIMBaHae ha bapa6bHa - npedmCTBO 3a OKoJNaTa cpea n 3a cmTeKaTa 3a eNeKtpoeHepnry. Ha npakTnka noOp6peHaTa pa60ta n ONtMn3npaHnT pa3XoD Ha BOda rapaHTupat OTnUHn pe3yNTaTn 3a cbuata cpeHa npOdbJnxTeJIHOCT Ha CTaNapTHnI ZKbJn Ha nIINpAhe. 3a noctrnaHe Ha no-Do6pn pe3yNTaTn nIOn3BaIte TeueH nepiIne npenapat.
He moxe da ce aKTbBnpa c nporpaMn 1,6,7,8,9,10,12,13,14,
90 DonbHHTeJHO n3nnaKBaHe
C n36opa Ha Ta3n ΦyHKUaCe yBcHuaBa eKacHOCTTa Ha 3nPbKaBaHeTo n Ce rapaHTnpa MaKcMaJIHO OTcPaHBAHeHa nepuHnna npenapat. IooXoJaue a 3a oOc6eHo yvBCTBntEnHa Koxa.
!He moKe da ce akTnBnpa c nporpaMnte 8,
OTNoJKeH CTeApT
3a6abnyyckaHeToHaMaunHatao12aca.
HaTnchete MHorokpatHO 6yToHa, DOKaTO CBeTHE HINdkaTopbT, CbOTBeTcTBaU Ha XeJaHaTa CToHocT 3a BpeMe Ha 3a6abAHe. Pnp nEto HATnCKaHe Ha 6yToHa fYHKuYrTa HrMa Da e AKTNBHa.
3a6eEka: CJIeI KaTo BeHbX e HATnCHat 6yToHa START/PAUSE, BpeMeTo 3a OTnaraHe Ha CTapTa MoKe da Ce npomeHcama O hAmalraBe, Kato Ce CTnHe Do NyckaHe Ha N36paHata nporpama.
!BannHa c BCnK nIporpaMn.
Bb3MOxHn npuHH / Mepkn 3a OTCpaHbAheTo m:
IepaHaTa MaunHa He ce BKIOUBa.
- IlencntbT He e BkIIOueH KbM eNEKtpuYeCKn KOHTaKT uIN He e Do6peBkIOUeH, 3a da npabN KOHTaKT.
Harnate TOK Bkbu.
UKbIbT Ha n3nnpaHe He 3anOyBa.
JIIOKbT He e 3aTBopeHdo6pe.
- Bytohbt ON/OFF He e 6n HaTncHaT.
- ByToHbT START/PAUSE He e 6nHaTncHaT.
- KpaHbT 3a BODa He e OTBOpEH.
3aanaeHO e 3ababAne, KOeTo ce e HacnoKnIO Bbpxy BpeMeTo 3a NycKaHe (6K. "TepcoHaIu3upaHua").
IepaHaTa MaunHa He ce nBnHc BOda (6bp30 Mura CBeTnnHHnHT HndkaTop 3a PpBaTa faaHa Ha npaHe).
MapkybT 3a CtydeHaTa B0Da He e Cbbp3aH KbM KpaHa.
MapkybTe nperebHaT.
KpaHbT 3a BOda He e OTBopeH.
- Hama Boda no BOdo npoBODHaTa Mpeka.
HaIraHTo e HeoctaTbUHO.
- ByToHbT START/PAUSE He e 6nHaTncHaT.
IepaHraTa HenpeKbCaTo ce nblnnn H3TOyBa.
MapkybT 3a mpbchata Boda He e MOHTipaH MeKdy 65 n 100 cm ot 3emrTa (ex. "MoHmupaHe").
KpaTHa Mapkya 3a Mpbchata B0da e NtOtneH BbB B0da (ek. "MoHmupahe").
KaHaJIIN3aUHOHHaTApb6aBCTeHaTaHMAOTdyuHNIK.
Ako cne Te3n npoBepKn npo6nembT He ce peu, 3aTbopeTe KpaHa 3a BOData, n3KnHcTe nepaHaTa MaunHa nNo3BbHeTe B cepBu3a. Ako KnniueTo BN Ce HAMnpa Ha NocJeHNte eTaXn Ha CrpaDaTa, HAnraHeTo HA CTydeHaTA B0a MoKe Da e HNCKO, nopadn Koeto nepaHaTa MaunHa HEnpeKbCHato Ce NbLnHn IN3TOUba. 3a N36raBaHe Ha TOBa HeyDo6CTBO BV TbproBckata Mpeka Ce npednarat NoDxOJaUN Bb3BpaTHn KnaanH.
IepaHata He ce n3ToyBa nn He ceHTpoDpyrnpa.
- Iporpamata He npedBnKda n3ToUbaHe: C HAKO nporpaMn Tpr6Ba da ce n3BbPbBA pbH0.
MapkybT 3a Mpbchata B0da e npntchat (ek. "MoHmupahe").
KaHn3aunOHnTa Tpb6a e 3anyuHa.
IepaHaTa Bn6pnpa Mhoro no BpeMe Ha ueHtpofoynpahe.
-Пи мотраха баааньпе e bи OTблоран павлно (БК. "Мошupahe").
- Пекалната малина He e HnBeHnPapa (6K. "MOnmPapae").
- Пералната машина e ппуншата мекду мбени и стега (ж. "Монмupahe").
IepaHaTa mMa Teu.
MapkybT 3a CtydeHaTa BOda He e Do6pe CBbp3aH (8K. "MoHmupaHe").
- YekmejkeTo 3a nepunHnTe npenapatn e 3anyuHo (3a nouchBaHeTo My EK. "IodpBkka u noucmeahe").
MapkybT 3a mpbchata B0da He e pKcpan do6pe (Bk. MoHmuane).
CBETINHHNTe INHdkaTOPn Ha "ONCINTe" INCBETINHHNRT INHdkaTOPHa“START/
N3KIOUeTe MaunHata N 3BaTe Te cena OT KOHTa, 3yakaiTe OKO10 1 MHyTa n BKNIOte OTHOB.
PAUSE" Mrrat n eHn OT CBeTNIHHNTE HndkaTopn Ha "TeKyua 0a3a OT nporpaMata" n Ha "6nokpan JIOK" CBETT NOCTOHNHO.
Ako Heu3npaBHOCTTa He MoKe Da Ce OTCpaHn, NOTppe Ye cIyIte Ha CepBu3a.
06pa3yBa ce TBbpde MHoro nHa.
- Перлнгийnpenapat He e 3a abTomatuHa nepaHa (TpraBa da Ima HaIIMc "3a abTomatuHa nepaHa", "3a npaHe Ha pbKa n 3a abTomatuHa nepaHa" nII noIObEn HaIIMc).
-Дозиран electo6nIO TBbpIe roJIAmo.
CepBn3Ho 06cIpyXBaHe
BG
Ipeu da ce CbpxkTe c TexHueckn cepBn3:
- IpoBepTe daJIN MoKeTe da peuHnte camn np6bneMa (Eck. "PpO6bNeMu u Mepku 3a omcmpaHaeaHemo um);
BknHcyTe OTHOBOporpamata, 3a da npOBepte daJI HEn3npaBHOCTTa e OTcPaHeHa;
B npntbe cnuya Ce o6bphTe KbM OTOpn3npaHna TexHueckn cepBu3 Ha TepeOHnHn Homep, yka3aH ha rapaHNoHHata KapTa.
!Hnkora He non3BaIte ycJyInte Ha HeOTOp3IpaHn TexHnI.
Cbo6eTe:
TunaHa npo6nema;
- MoDena Ha MaunHata (Mod.);
- cepinHnH Homep (S/N).
T3n INHOpMaunCe HAMnpa Ha 7pa6pnuHaTa Ta6eNka, pa3noJIOKeHa Ha 3aHaTa CtpaHa Ha nepaHaTa MaHHa N B npedHata Yact, cJe KaTO ce OTBOPn IIOKbT.
DEJENPAH PERJAMEHT (EC) No 1061/2010 HA KOMUCYTA
| Mapka | INDESIT |
| Mодел | IWC 71283 C ECO EU |
| КалачтET Ha Namуно пане в Кг | 7.0 |
| Енegrпен Клас OT A+++ (Инска Консусяя) до G (Висoka Консусяя) | A+++ |
| Гошина Консусяя Ha eнegrпя (kWh) 1) | 174.0 |
| Консусяя Ha eнegrья рpr.stандар'tha nporpama namuk 60°C рpr nbлно зapекданes b kWh 2) | 0.94 |
| Консусяя Ha eнegrья рpr.stan'dap'tha nporpama namuk 60°C рpr чastynchno зapекданes b kWh 2) | 0.635 |
| Консусяя Ha eнegrья рpr.stan'dap'tha nporpama namuk 40°C рpr чastynchno зapекданes b kWh 2) | 0.585 |
| Консусяя Ha мошноct (W) рpr ржим в rotobnoct | 0.5 |
| Консусяя Ha мошноct (W) рpr ржим на pajobа | 8.0 |
| Гошина Консусяя Ha вoda в лintри 3) | 10840 |
| Клас Ha ИзCUшаваhe ot G (Инска eфektivnoct) do A (Висoka eфektivnoct) | B |
| Мakсмални обороти Ha цentrophyrata 4) | 1200 |
| Сыдържание Ha OCTaTbUHa Blnaxnoct 5) | 53% |
| Проблжittелноct в Минуtn Ha сhan'dap'tha nporpama namuk 60°C рpr nbлно зapекданe | 160 |
| Проблжittelnoct в Минуtn Ha сhan'dap'tha nporpama namuk 60°C рpr чastynchno зapекданe | 140 |
| Проблжittelnoct в Минуtn Ha сhan'dap'tha nporpama namuk 40°C рpr чastynchno зapекданe | 130 |
| Проблжittelnoct в Минуtn рpr пеминаваhe ot paBOTEN ржим в ржим на ИЗЧAKBAne | 30 |
| Сыдържание Ha OCTaTbUHa Blnaxnoct 6) | 54 |
| Ниму на уим в dB(A) re 1 pW рpr цentrophутуранe 6) | 77 |
1) INHΦOPMaJIHTa Ha eHepnHINr CTINKep H onncAHHeTo Ha npOyKaTc ce OTHAc 3a CTAHdAPTha npOrpama NaMyk 60°C npn BnHO nactHNO sapeJaHa cTaNdAPTha npOrpama NaMyk 40°C npn CAACTNHO sapeJaHa. CTAHdAPTHe npOrpamn NaMyk 60°C n 40°C ca npOnxoRaun 3a npAne Ha HOpMaHNo SAmbpcEHn NaMyuHn TBKaHH u Ca HAI-efEeKTHBn no OTHoWeHHe KOHCyMaJIHTa Ha eHepn H Boda. qACTHNO t sapeJaHa e nonOBIHATA OT MAKCIMAMHNA KanaUHTet Ha npAne.
2) Ba3npaHO Ha 220 cTnDAPTHN uKbNa Ha npaH e naMnyuH TbKaH np60°C n40°C npn NpHaactuH O sapeXdaHe n npn KOHCyMaia HA HICbK peKIM Ha MoUHocT. PeAnHaTa KOHCyMauiHa eHepnra 3aBcH oT ToBa KaCe Hsnon3Ba ypeA.
3) Basipaho Ha 220 cTanhaptni kbnha Ha npahe Ha namyuHn TbKaHn npn 60°C H 40°C npn nbHo uactnHo sapekdahe. PeanHaTa KOHCyMaui HA BOda 3abHCH OT TOBa KaK ce Hsnon3Ba ypeDa.
4)No-HNCKATA CTOHIOCT MEKdy CTaHApTHn nporpAMn 60°C npn nbHo u cactuHNO sapeKaDaHe mnn 40°C npn qactuHNo sapeKaDaHe.
5)No-BincoKaTa CToHocT nonyeHa npn nporpaMn namyK 60°C npn nbHo nnu cactuHno sapeXdaHe nn 40°C npn uactuHno sapeXdaHe.
6) Ba3npaHO Ha phaHTe Ha npaHe H cHTpofoyHnpaHa 3a cTaNapTaH nporpama namky60°C npn nnho sapeKdaHe.

Espanol
Sumario
Instalación, 50-51
Italy www.Indesit.com