
MXCE2254 - Coffee machine Mx Onda - Free user manual and instructions
Find the device manual for free MXCE2254 Mx Onda in PDF.

| Product type | Electric percolator with clock and timer |
| Brand | Mx Onda |
| Model | MXCE2254 |
| Power | 480 W |
| Power supply | 220-240 V ~ 50 Hz |
| Capacity | 0.3 L (3 to 6 cups) |
| Dimensions (with base) | 146 x 186 x 274 mm |
| Weight (with base) | 1.2 kg |
| Display | LED with 24-hour digital clock |
| Functions | Clock, programmable timer, auto shut-off, auto lock, LED indicators, acoustic signal |
| Carafes and filters | Transparent carafe, permanent filter, divider for 3 cups |
| Rotating base | 360° rotation |
| Safety | Safety valve, thermal protection, auto shut-off after 30 min |
| Memory battery | CR2032 3V (for clock/timer backup) |
| Care and cleaning | Clean removable parts with soapy water; body and base with a damp cloth; do not immerse |
| Repairability | Do not open; contact an MX ONDA authorized service center in case of failure |
| Included accessories | Carafe, permanent filter, filter divider, measuring spoon (not mentioned but likely) |
| General information | Household use, complies with European directives (EMC, LVD), RoHS |
Frequently Asked Questions - MXCE2254 Mx Onda
User questions about MXCE2254 Mx Onda
0 question about this device. Answer the ones you know or ask your own.
Ask a new question about this device
Download the instructions for your Coffee machine in PDF format for free! Find your manual MXCE2254 - Mx Onda and take your electronic device back in hand. On this page are published all the documents necessary for the use of your device. MXCE2254 by Mx Onda.
USER MANUAL MXCE2254 Mx Onda
natural_image
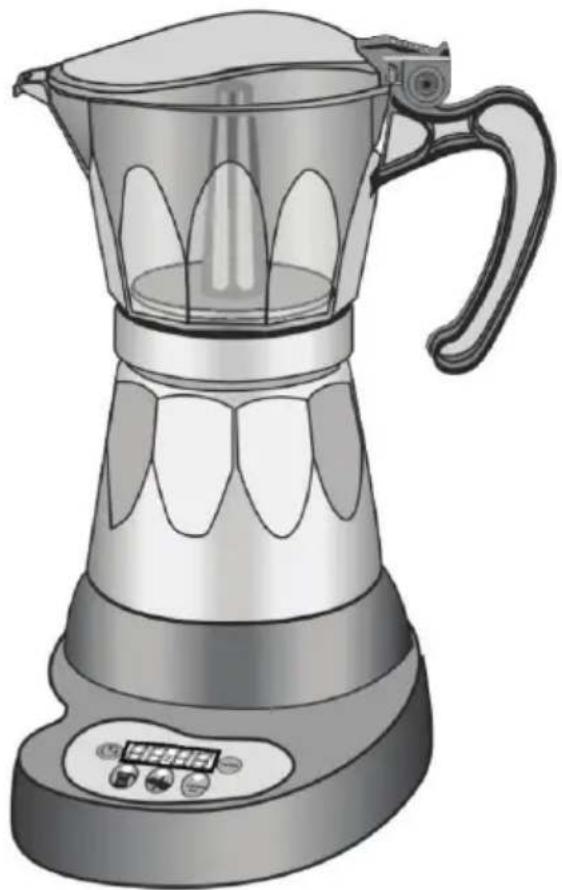
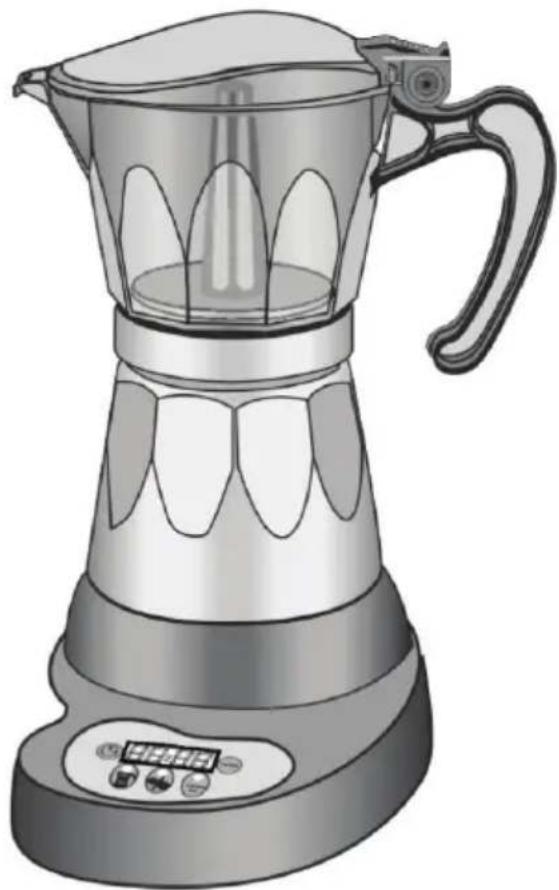
Illustration of a modern blender with a handle and control panel (no text or symbols)CE
ANTES DE SU USO LEA ATENTAMENTE ESTE MANUAL
ATENCIÓN
natural_image
Illustration of a hand using a tool to press down a component, no text or symbols presentFig 1
natural_image
Hand holding a small object with a downward arrow, no visible text or symbolsFig. 2
natural_image
Hand holding a small electronic device with a knob and control knob (no text or symbols visible)Fig. 3
natural_image
Hand turning a button on an electrical switch (no text or symbols visible)Fig. 4
Notas:
PROBLEMAS Y POSIBLES CAUSAS
MANUAL DE INSTRUÇÕES
Mx Onda
CAFETEIRA ELÉTRICA PARA FAZER CAFÉ COM TEMPORIZADOR
MODELO: MX-CE2254
natural_image
Illustration of a blender with a handle and control panel (no text or symbols)CE
ANTES DE SEU USO LEIA ATENTAMENTE ESTE MANUAL
ATENÇÃO
PROTETOR TÉRMICO INTERNO
natural_image
Illustration of a hand using a power tool to press down a surface, no text or symbols presentFig 1
natural_image
Hand holding a tool with a downward arrow, no visible text or symbolsFig. 2
natural_image
Hand holding a small electronic device with a button and indicator lights (no text or symbols visible)Fig. 3
natural_image
Hand turning a button on a machine (no text or symbols visible)Fig. 4
Notas:
natural_image
Illustration of a modern blender with a handle and control panel (no text or symbols)C €
PLEASE READ THIS MANUAL BEFORE OPERATION
WARNING
This unit operates with a voltage of 230 V, to avoid a possible electrical shock not try to open it. This equipment does not have part some that could be repaired by your, in the event of a wrong operation not manipulate it, and attend to an Official Technical Service MX ONDA.
Waste electrical products must not be disposed of with household waste.
This equipment should be taken to your local recycling centre for safe treatment.
Before disposing of the product remove the battery from it.

This product complies with European Directives RoHS (2011/65/UE), on the restriction of use of certain dangerous substances in electrical and electronic appliances, transposed to the Spanish legislation by means of Real Decree 208/2005.


VERY IMPORTANT!
This signal indicates that the area where it is located acquires high temperatures to prevent burns take the pot by the handle and take care not to touch or clean this surface until it is completely cold.
INTRODUCTION
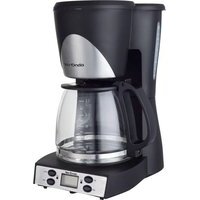
The Coffee Maker MX ONDA MX-CE2254 incorporates a clock and a timer which you can have fresh coffee when you have previously scheduled. Among others, it includes the following features:
• Power consumption: 480 W
• Capacity: 0.3 liters (3/6 cups)
- LED display
• Digital clock with 24h time format
- Timer
• Automatic keylock
• LEDs operation, block and timer
• Acoustic indication function
- Auto power off
- Cool touch handle
- 360^ on the base unit
- Safety valve and thermal protection
BEFORE CONNECTING COFEE MAKER
When using electrical appliances, should always be a basic safety precautions to reduce the risk of fire, electric shock and / or injury. These measures includes the following:
- Read these instructions and save them for later use carefully.
- Check that the voltage of your power outlet is 220 - 240 V \~ 50 Hz and is equipped with grounding.
- The electrical safety of this appliance is only guaranteed if it is connected to an efficient earth, as defined in the applicable safety standards. The manufacturer disclaims any liability for damages resulting from the lack of grounding installation. If in doubt, consult a qualified electrician.
- If you need to use an extension, use only one that is in good condition, fitted with plug grounded and is suitable for power apparatus.
- The extension must be placed so that it does not hang off the counter or table so that children can be pulled or that can trip over it by mistake.
- To protect against risk of electric shock and personal injury, do not immerse cord, plug, the base of the coffee maker or the main body of the appliance in water or other liquid.
- After removing the packaging, check that the appliance is not damaged. If in doubt do not use it, contact the technical support staff.
- To reduce the risk of fire or electric shock, do not open or the base or main body of the apparatus.
- Packaging materials like plastic bags, polystyrene foam, etc., Must not be left within reach of children, as they are a potential source of danger.
- Before using the appliance for the first time, you must perform an initial cleaning. Refer to the appropriate device.
- Only use ground coffee for this specific type of coffee, the use of another type of coffee or other substances such as tea, can cause clogging of filters and affect normal operation of the appliance.
- The manufacturer declines any responsibility for damage caused by improper, incorrect or negligent use of the apparatus.
SAFETY NOTES
- This device can not be used by children or persons with or without experience and knowledge reduced physical, sensory or mental capabilities, unless they have received proper instructions on using the equipment and be supervised by an adult or responsible person.
-
Failure to follow safety warnings and instructions could result as a result burns or serious injuries.
-
This appliance is intended for household use only and not professional. MX ONDA accept no responsibility and the guarantee will not apply in case of misuse or failure to follow instructions.
- The coffee maker incorporates a low power cord length to reduce the risk of injury that can occur from entanglement or tripping over long cables.
- This device operates at high temperatures, which, during handling DO NOT touch hot surfaces. Hold the coffee maker by the handle.
- While the appliance is switched on or is still hot, do not neglect their vigilance and keep it out of reach of children.
• Always place the appliance on a dry, stable surface, do not use outdoors. - To disconnect the unit from the mains, pull the power plug. Do never pull on the cable.
- Unplug the coffee maker when a power outage occurs, "skip" a fuse or circuit and before cleaning.
- Ensure that the cable does not hang over the edge of the table top or counter, or touch hot surfaces this.
- Do not place the appliance on or near gas burners, hot plates or hot ovens.
- When in operation, it could cause a fire if the coffee comes into contact with any flammable materials or items such as curtains, drapes, etc.
- The use of attachments not recommended by the appliance manufacturer may cause fire, electric shock or personal injury. Only use this coffee maker with the jar supplied.
- Cool coffee pitcher prior to cleaning.
- Do not use the appliance outdoors.
- Never use the appliance with an empty tank, permanent damage may occur on the same.
- In case of failure, abnormalities, the appliance itself is dropped, the plug or other parts are considered impaired, or the cable is damaged, do not plug the appliance and do not attempt to repair it yourself. Contact our Customer Service MX ONDA nearest.
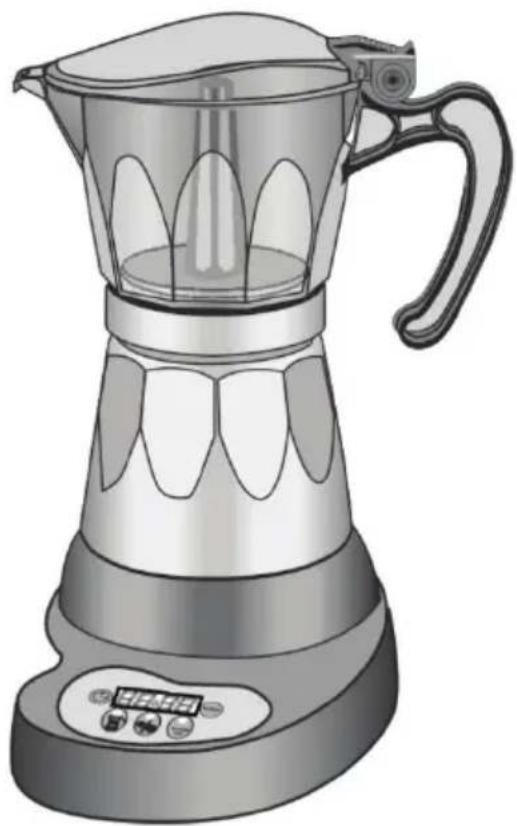
CONTROLS AND FUNCTIONS
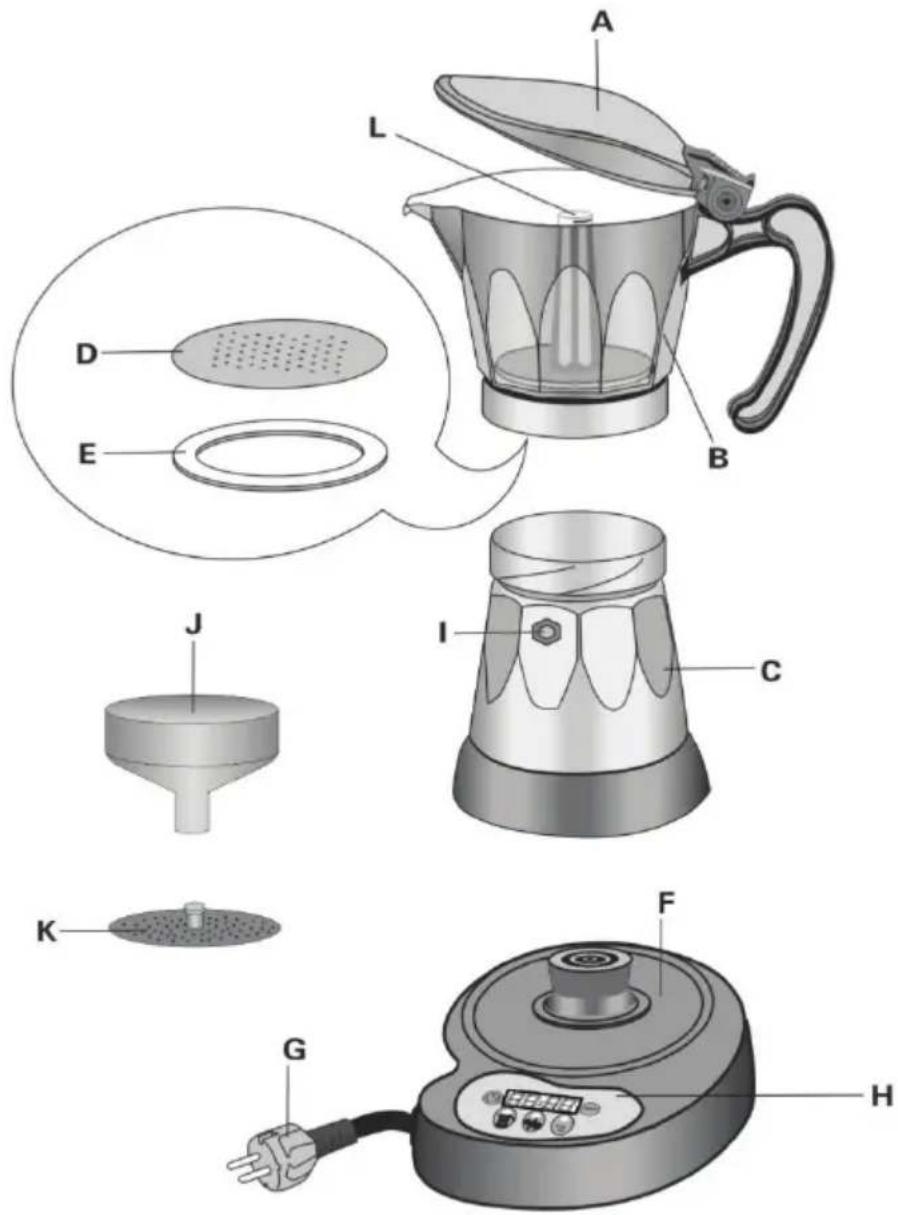
A. Pitcher lid
B. Pitcher
C. Boiler
D. Disk filter
E. Gasket
F. Support base
G. Power cable
H. Control panel
I. Safety valve
J. Funnel filter
K. 3 cup adapter
L. Tube
CONTROL PANEL
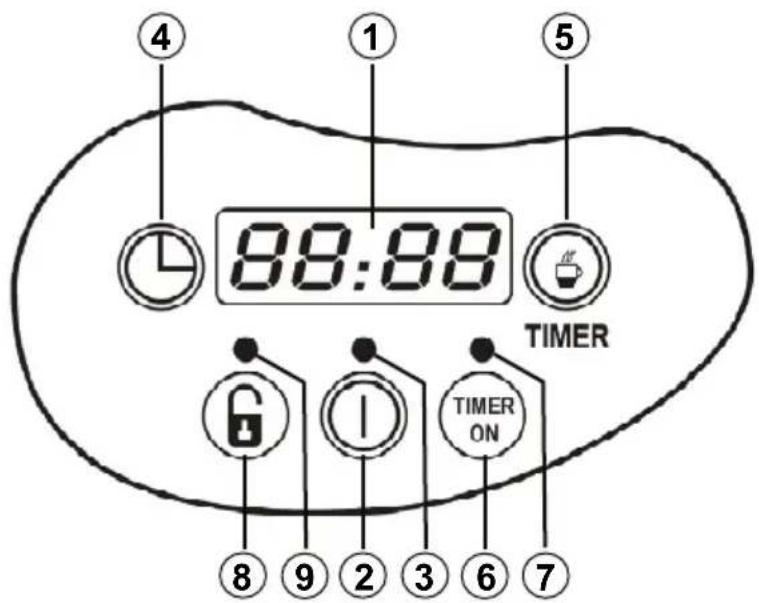
- LED display (digital clock)
- On / off button
- Power LED
- Setting the clock
- Setting the timer
- On / off timer
- LED indicator ON timer
- Unlocking the keypad
- LED keypad locked
INTERNAL THERMAL PROTECTOR
The MX-CE2254 coffee machine is equipped with a thermal protection in case of overheating can become activated, which will motivate the automatic disconnection of the same. If this happens, unplug the appliance and wait a few minutes before re-connecting, or until it is cool.
INITIAL CLEANING
Before using the appliance for the first time or when not been used for a long time, we recommend that you run the coffee maker with water only (no add coffee) in order to clean dust or small particles that may have inside.
Caution: It is possible that the first time you use the coffee while it is heated, it produces a slight odor. This is normal and occurs because the unit is new, it will disappear soon after use.
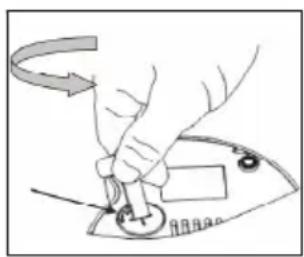
INSTALLATION OR REPLACEMENT BATTERY
To keep the current time and the timer (in case of failure of the power supply), the coffee maker needs a 3 V battery type CR 2032. To install or replace the battery, follow these steps:
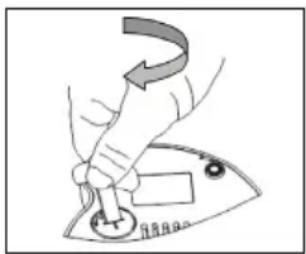
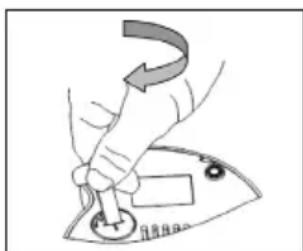
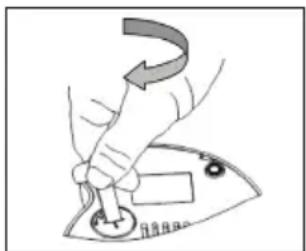
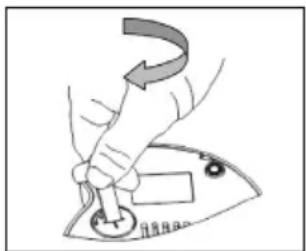
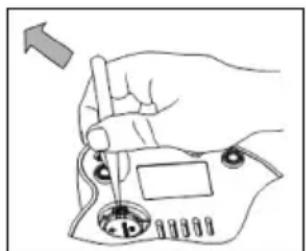
- Using a flathead screwdriver or similar object (round tip of a knife for bread, for example), turn counterclockwise to clockwise the battery cover which is located on the back of the support base, Figure 1.
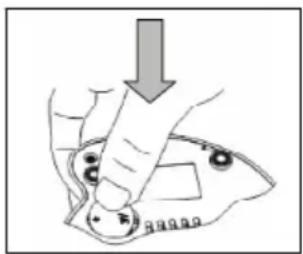
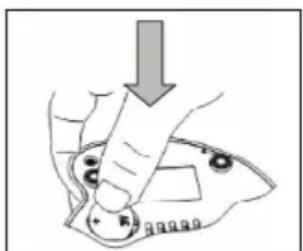
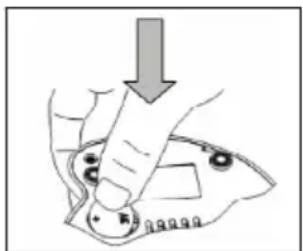
- To place the battery so that the positive terminal (+) is facing up, then snap the edge of the plastic tabs in and push until it is retained, Figure 2.
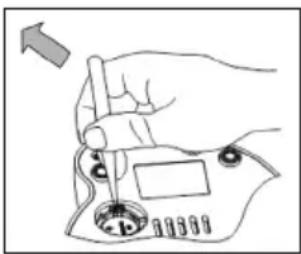
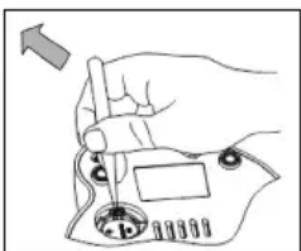
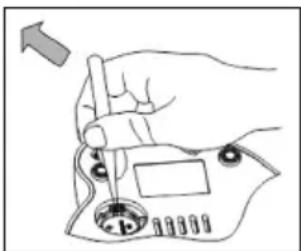
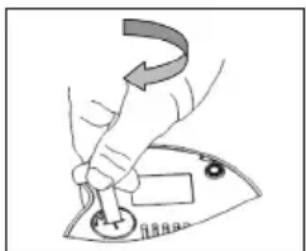
- To remove the battery slide the metal tab outwards (you can use a sharp object), and the battery will eject, figure 3.
- Replace the battery cover and turn it clockwise clock, make sure the cap is properly retained, Figure 4.
natural_image
Hand holding a small circular component with a curved arrow indicating rotation (no text or symbols)Fig 1
natural_image
Illustration of a hand using a tool to adjust or install a component, with no visible text or symbols.Fig. 2
natural_image
Hand holding a small electronic device with a knob and adjustment knob (no text or symbols visible)Fig. 3
natural_image
Hand turning a button into a machine (no text or symbols visible)Fig. 4
Notes:
- If the battery is not placed, both the current time and the timer will be cleared immediately after disconnecting the power cord from the power supply.
- The battery used in this coffee maker contains polluting materials to the environment, therefore, after exhausting life of it NOT throw away, drop it in the right places for recycling.
POWER SAVING MODE
The coffee maker incorporates a power saving system which consists of the automatic screen off after 2 minutes.
When the screen is off (power saving mode) to turn on the coffee maker or the timer, adjust the clock or timer, it is necessary to press the power button 2 (①).
Very important:
When the timer is activated, the screen remains lit to warn of this so that the coffee will automatically connect to the preset time.
SETTING THE CLOCK
This coffeemaker incorporates a 24 hours format clock. To setting the clock, follow these steps:
- After installing the battery, plug the base F of coffee maker to a mains socket, the display will light the digits.
- If the display is off (power saving mode) press the power button 2 (①).
- Press the start button on the clock 4 ( ) to increase the minutes and hours. Pressing and holding this button will take the count up automatically and if pressed and held for more than 7 seconds, the speed will increase the count up to facilitate setting the time.
- After setting the hour and minute stop pressing the 4 button (💡) and the display digits flashing, wait 5 seconds without pressing any button and the time will be stored.
Notes:
- Remember that if the screen is off (power saving mode) before pressing the button will momentarily switch 2.
- The adjustment of hours is done by increasing the times of minutes.
PREPARATION OF COFEE MAKER
Filling the water tank
- Check that the support base is disconnected from the mains socket and the machine is completely cooled.
- Hold the main body C and turn left (counter clockwise) the transparent jar B. When fully unscrewed the jar separate from the main body.
- Remove the filter separator K, pulling up.
- Remove the filter - coffee container J.
- Fill the tank with fresh water, if you want to make coffee for 6 cups level should be up to the safety valve. When you want coffee to 3 cups water level should be 0.8 inches below the safety valve.
The valve can also be seen from inside the water tank of the main body, that will serve as a reference for filling water. - Replace the filter - coffee container for J inside the tank, insert slowly so that the water does not spill again.
Filling coffee
- If you are 6 coffee cups with the help of a measuring spoon deposited within the filter - coffee container J the amount of ground coffee (with or without mixture) according to your taste. Approximately spoon per cup. Not press coffee, distribute evenly and wipe any remaining coffee from the rim of the filter.
- If you want coffee to 3 cups you must insert the crossover K within the filter - container coffee J, then with the help of a measuring spoon deposited within the filter - container coffee J the amount of ground coffee (with or without mixture) according to your taste. About a tablespoon per cup. Not press coffee, distribute evenly and wipe any remaining coffee from the rim of the filter.
- Hold the main body C, place the jar B above the main body and turn clockwise (in the direction of clockwise), make sure the jar is properly threaded to the main body C.
Notes:
- Fill the tank with fresh water only, never use milk, tea, coffee or any other liquid.
- Never exceed the maximum water level described in this manual (safety valve), if it exceeds the limit, the water may spill and I release safety valve pressure steam.
- Once prepared the coffee (water and coffee) place it in the base F, so that it fits on the central axis.
- Momentarily press the power button 2 (①) and the display shows the current time, then press this button again and the LED will light switch 3 and keyboard locked 9.
- The coffee maker is already in operation, and after a few minutes the coffee flow into the jar B.
- Once made coffee, coffee will remain in operation for 30 minutes, holding the hot coffee, after which time it will automatically turn off.
- To turn off the coffee first unlock your keypad by pressing and hold for 2 seconds the button unlocking 8 (6) and the LED keypad locked 9 turns off, then press the power button 2 (1) and the LED will turn off telling you that the machine is turned off.
- Once the process of making coffee, you do want to make more coffee, let the appliance cool down before performing the process described above. For any remaining water in the tank, drain in a sink.
Attention:
- Never open the lid during the brewing process. The appliance generates steam can cause burns.
- Make sure all filters are not blocked, otherwise the maximum pressure will be exceeded and the safety valve I release steam pressure.
The timer mode is that when the clock strikes the hour set on the timer, the appliance shall be operated to make coffee. This function is very useful for those people who want to have hot coffee ready at a specific time and without having to wait. Before setting the timer you must first adjust the current time as indicated in the relevant section.
Setting the timer
- If the display is off (power saving mode) must momentarily press the power button 2 (①) and the display shows the current time.
- Momentarily pressing the button for setting the time of the timer 5 (💡), the display will intermittently when automatic activation.
- Click on the button for setting the time of the timer 5 (💡) to increase the minutes and hours. Pressing and holding this button will take the count up automatically and if pressed and held for more than 7 seconds, the speed will increase the count up to facilitate the start time of the timer.
- After the hour and minute for the automatic activation tight stop pressing the button 5 (💡) and the display digits flashing, wait 5 seconds without pressing any button and the time the timer will be stored.
On/off timer
- After setting the current time and the timer, make sure the coffee maker is prepared (with water and coffee) and coupled to the base F, so that it fits on the central axis.
- If the display is off (power saving mode) must momentarily press the power button 2 (①) and the display shows the current time.
- Press the on / off timer 6 (TIMER ON) and timer activated LEDs 7 and 9 is illuminated keypad locked.
- The display will remain constantly lit to warn you that the timer is activated.
-
When the clock strikes the set time of the timer, the appliance shall be operated and within minutes have the coffee made.
The coffee will remain in operation for 30 minutes, keeping the coffee hot after which time the coffee maker automatically turns off.
The timer is disabled how security measure, as to make new coffee, the coffee must be prepared (with water and coffee). -
To disable the timer first unlock your keypad by pressing and hold for 2 seconds the unlock button 8 (☐) and the LED keypad locked 9 turns off, then press the on / off timer 6 (TIMER ON) and the LED indicator on timer goes off, alerting you that the timer is disabled.
Attention:
For security, the timer turns off every time:
- There is a power outage or power failure.
- After activate automatically, remember to make new coffee, the coffee must be prepared (with water and coffee).
CLEANING
- Unplug the appliance from the mains socket and wait until it is completely cold before cleaning it.
- Separate the pitcher of the base support and place it on a stable, level surface, remember that you must be completely cold.
- As described in paragraph (coffee preparation) separates the boiler C to pitcher B.
- Remove the funnel filter K (in the case of the coffee used to prepare three cups of coffee) and filter - coffee container and pull J coffee deposits which are in the filters.
- Drain any water in the main body C.
- On the inside of the pitcher are located on D filter and rubber gasket E. With the help of a flat object remove the rubber gasket, taking precaution to avoid damage and remove the filter.
- Proceed to cleaning these parts. If the holes are plugged filter D use a pin or similar object to open the holes. Once clean and dry put them back in place.
- To clean these accessories we recommend you use warm soapy water, do not use pads that scratched surfaces solvents or abrasives that might damage the surface.
- The main body and the base can be cleaned with a damp cloth, drying them thoroughly with a dry cloth. Do not soak these parts in water or under a faucet. Do not use abrasive products and brings them into the dishwasher.
- Once all parts are clean and completely dry, proceed to refit the coffee.
TROUBLESHOOTING
| Problem | Cause | Solution |
| No coffee is released | No water in the boiler. | Fill the boiler with fresh water. |
| The coffeetakes a long time to be released | The coffee used is not the right type.The disk filter is blocked.The coffee is too pressed. | Use ground coffee expressly for Moka coffee maker.Clean the disk filter as described in the paragraph “cleaning”.Do not press the coffee. |
| Coffee leaks from the edges of the boiler | The disk filter is blocked.The gasket is burned or torn. | Clean the disk filter as described in the paragraph “cleaning”.Change the gasket. |
TECHNICAL SPECIFICATIONS
Operating voltage 220 - 240 V \~ 50 Hz
Maximum power 480 W
Number of coffee cups 3 or 6 cups
Capacity 0.3 L
Cord length 80 cm
Memory battery 3 V type CR2032
Dimensions with base 146 x 186 x 274 mm (w, d, h)
Weight with base 1.2 Kg
Specifications subject to change without notice.
This product complies with the European Directives 2004/108/EC (EMC – Electromagnetic Compatibility) and the 2006/95/EC (LVD – Low Voltage Directive) relative to Low Tension Security.
"MX, MX ONDA" and its logos are trademarks of MX ONDA, S.A.
MX ONDA, S.A.
Isla de Java, 37
28034 – MADRID (SPAIN)
E-MAIL: mxsat@mxonda.es
http://www.mxonda.es
BENUTZERHANDBUCH
Mx Onda
KAFFEEMASCHINE TIMER
MODELL: MX-CE2254
natural_image
Illustration of a modern blender with a handle and control panel (no text or symbols)CE
VOR GEBRAUCH SORGFÄLTIG LESEN SIE DIESE
ACHTUNG
natural_image
Illustration of hands using a tool to adjust or install a component, no text or symbols presentBild 1

natural_image
Hand holding a tool over a mechanical component, no visible text or symbolsBild 2

natural_image
Hand holding a small electronic device with a knob and adjustment knob (no text or symbols visible)Bild 3
natural_image
Hand using a power switch to press a button (no text or symbols visible)Bild 4
Notizen:
MANUEL D'INSTRUCTIONS
Mx Onda
CAFETIÈRE ÉLECTRIQUE AVEC TEMPORISATEUR
MODÈLE: MX-CE2254
natural_image
Illustration of a modern blender with a handle and control panel (no text or symbols)CE
AVANT D'UTILISER CE MANUEL DE LIRE ATTENTIVEMENT
ATTENTION
natural_image
Illustration of a hand using a tool to press down an electrical component (no text or symbols visible)Figure 1

natural_image
Hand holding a tool over a mechanical component, no visible text or symbolsFigure 2
natural_image
Hand holding a tool interacting with a device component (no text or symbols visible)Figure 3
natural_image
Hand turning a button on a machine (no text or symbols visible)Figure 4
Notes:
ET PROBLÈMES CAUSES POSSIBLES
No. tasses 3 à 6 tasses
Capacité 0,3 litres
natural_image
Illustration of a modern blender with a handle and control panel (no text or symbols)CE
PRIMA DI UTILIZZARE IL MANUALE DI LEGGERE ATTENTAMENTE
ATTENZIONE
natural_image
Hand holding a small object with a downward arrow, no visible text or symbolsFig. 2

natural_image
Hand holding a small electronic device with a knob and control knob (no text or symbols visible)Fig. 3

natural_image
Hand turning a button on an electrical switch (no text or symbols visible)Fig. 4
Note:
natural_image
Icon of a person reading a book inside a circular frame (no text or symbols)E-MAIL: mxsat@mxonda.es http://www.mxonda.es
- ATENCIÓN
- Notas:
- MANUAL DE INSTRUÇÕES
- Mx Onda
- CAFETEIRA ELÉTRICA PARA FAZER CAFÉ COM TEMPORIZADOR
- ATENÇÃO
- PROTETOR TÉRMICO INTERNO
- WARNING
- VERY IMPORTANT!
- INTRODUCTION
- BEFORE CONNECTING COFEE MAKER
- SAFETY NOTES
- CONTROLS AND FUNCTIONS
- CONTROL PANEL
- INTERNAL THERMAL PROTECTOR
- INITIAL CLEANING
- INSTALLATION OR REPLACEMENT BATTERY
- Notes:
- POWER SAVING MODE
- Very important:
- SETTING THE CLOCK
- PREPARATION OF COFEE MAKER
- Filling the water tank
- Filling coffee
- Attention:
- Setting the timer
- On/off timer
- CLEANING
- TECHNICAL SPECIFICATIONS
- BENUTZERHANDBUCH
- KAFFEEMASCHINE TIMER
- ACHTUNG
- Notizen:
- MANUEL D'INSTRUCTIONS
- CAFETIÈRE ÉLECTRIQUE AVEC TEMPORISATEUR
- ATTENTION
- ATTENZIONE
- Note:
Brand : Mx Onda
Model : MXCE2254
Category : Coffee machine