
ME 605 - Oven CATA - Free user manual and instructions
Find the device manual for free ME 605 CATA in PDF.
| Brand | CATA |
| Model | ME 605 |
| Product type | Built-in oven |
| Dimensions (W × D) | 440 × 390 mm |
| Usable volume | 59 litres |
| Rated voltage | 220-240 V ~ 50 Hz |
| Bottom heating element power | 1.30 kW |
| Top heating element power | 0.90 kW |
| Fan heating element power | 2.30 kW |
| Grill heating element power | 1.35 kW |
| Maximum temperature | 250 °C |
| Cooking modes | Convection, top element, bottom element, circular with fan, bottom with fan, convection with fan, grill, maxi-grill, grill with fan, defrost |
| Control type | Rotary knobs + electronic programmer with 6 buttons |
| Timer/Programmer | Electronic with timer, automatic and semi-automatic cooking |
| Interior lighting | Bulb 15-25 W, type E-14 |
| Cleaning system | AquaSmart (200 ml of soapy water at 200 °C) |
| Removable door | Yes, several types of fastenings |
| Insulation class | Class I (earthing mandatory) |
| Power cable | 3 × 1.5 mm² H07RN-F |
| Included accessories | Rack, drip tray, fixing screws |
| Recessed height | To be adjusted according to door thickness (20 or 26 mm) |
| Required ventilation | Rear opening ≥ 80 cm² for tall cabinets |
| Warranty | Subject to conditions, catalytic parts not covered |
Frequently Asked Questions - ME 605 CATA
User questions about ME 605 CATA
0 question about this device. Answer the ones you know or ask your own.
Ask a new question about this device
Download the instructions for your Oven in PDF format for free! Find your manual ME 605 - CATA and take your electronic device back in hand. On this page are published all the documents necessary for the use of your device. ME 605 by CATA.
USER MANUAL ME 605 CATA
Operating and maintenance instructions for built-in ovens
IT
REEMPLACEMENT DE L'AMPOULE DU FOUR
DIMENSIONS INTÉRIÉURES
Hauteur: 340 mm
Thank you for choosing one of our products. We hope this household appliance provides you with the best service. Therefore, we suggest you read the instructions and suggestions contained in this manual carefully in order to use our products correctly.
The specifications plate for this oven is available on this appliance. This plate, visible by opening the door, displays all the necessary identification information for this appliance for ordering replacement parts.
GENERAL INFORMATION
Please read this manual carefully before using the appliance. It is important that all the control functions are understood before beginning to cook with this appliance.
Heed the advice and warnings included under the title "IMPORTANT - Safety advice and instructions".
- This appliance has been designed for private domestic use and can be integrated into standard kitchen furnishings or similar.
In order to use in caravan-type vehicles, indications included in the Installation Instructions should be borne in mind. - Use of this appliance for any other purpose or in any other environment without the manufacturer's express agreement will invalidate any guarantee or liability.
- This new appliance is guaranteed against all mechanical defects, subject to certain exclusions indicated in the Manufacturer's Terms and Conditions of the Guarantee.
The above does not affect your statutory rights.
Ensure that all protective packaging and covering has been removed before using this appliance.
To collaborate in protecting the environment, separate the packaging materials into the different types and dispose of them according to local waste disposal regulations.
The packaging is designed so as not to harm the environment; it can be recovered or recycled as it is an ecological product. By recycling the packaging, you will contribute to saving raw materials and reducing the volume of industrial and domestic waste.
Any additional information on waste disposal may be requested from your local environmental agency.
When used for the first time, a slight smell from the protective covering or damp may be noticeable, which will disappear after a short time.
The symbol on the product or its packaging indicates that this product cannot be treated as normal household waste. This product must be handed over to an electric and electronic equipment collection point for recycling. On ensuring that this product is disposed of correctly, you will help to avoid possible negative consequences for the environment and public health,
which could occur if this product is not handled correctly. To receive more detailed information about recycling this product, contact your local government, domestic waste disposal services or the outlet where the product was bought.
This appliance has been built and distributed in compliance with the essential requirements of the following EEC EUROPEAN LAWS AND DIRECTIVES:
EC Symbol - 93/68 Low voltage - 73/23 CEM-89/336 Safety Rules - EN 60 335-1, EN 60 335 - 2 - 6.
This appliance respects laws of the suppression of r interference.
As the Manufacturer has a policy of continuous product improvement, it reserves the right to adapt and carry out any modification considered necessary without prior warning.
IMPORTANT NOTICE SAFETY INSTRUCTIONS AND WARNING
- This appliance complies with all current European legislation, however, the Manufacturer must emphasise it's a compliance does not prevent the surfaces of the appliance from heating up during use and remaining hot during its operation.
- Therefore, the Manufacturer highly recommends that the appliance is kept out of the reach of babies and small children.
If children cannot be kept out of the kitchen, they must be
ctivatched at all times.
- We also recommend that great care is taken during use and cleaning. Read the cleaning and maintenance sections for this appliance carefully.
- Do not place heavy objects on this oven or lean on the door when opening it, as this may damage the hinges.
- Do not leave hot oil or fats unattended as they may catch light.
- Do not place oven dishes or trays of the lower part of the oven or cover it in aluminium foil.
- Never store flammable objects inside the oven as they may catch light.
- Do not allow the accessories or electric cables to touch the hot parts of the appliance.
- Do not use the appliance for special heating or drying clothes.
- Do not install the appliance near curtains or upholstery furniture.
- Do not try to lift or move kitchen appliances by pulling any door or handle as this may cause damage.
If the oven join is very dirty, the door will not close properly when the oven is working. The fronts of neighbouring furniture may be damaged. Keep the oven join clean. - During operation the appliance will heat up. Care must be taken to avoid touching heating elements inside the oven.
- Open the oven carefully. Steam may escape and burn anyone nearby.
-
Do not pour water inside a very hot oven. The enamel may be damaged.
-
This appliance must be installed correctly by a suitably qualified person, strictly following the manufacturer's instructions.
- The Manufacturer declines all liability for personal or material damage as a result of misuse or incorrect installation of this appliance.
- Heat, vapour and humidity are produced during use, avoid all kinds of personal damage and ensure that the room is suitably ventilated. If used for a prolonged period of time, additional ventilation may be necessary - consult a qualified installer if you have any doubts about the necessary volume.
INSTRUCTIONS
This User Manual must be kept for future reference and use by someone who is not familiar with the appliance.
Before using the oven, carefully clean the inside with a non-abrasive detergent and warm water. Introduce the grill and tray in their respective runners. Once the operation is complete, turn the oven on to the maximum temperature for approximately 20 minutes to remove any traces of manufacturing grease, oil or resins which may cause unpleasant odours when cooking.
WARNING: During this first heating some smoke or unpleasant odours may appear. Should this happen ventilate the room suitably until the first operation is finalised.
Once this simple operation has been carried out the oven is ready to use for cooking.
This appliance is exclusively for domestic use.
Use the oven to cook food only.
USING THE OVEN
The oven is controlled by a thermostat between 50^ and 250 ^ C , depending on the temperature required. The thermostat pilot light turns on and off to indicate the temperature control during use.
The required cooking mode is selected using the multi-functional control button. The functions that may be selected are:

A. OVEN LIGHT. Automatic when selecting the cooking mode for all models. The oven light remains on when using the oven.

B. CONVECTION MODE. Provides traditional cooking with heat from the upper and lower elements.

C. UPPER ELEMENT MODE. For gentle cooking, brown- ing or keeping cooked dishes warm.

D. LOWER ELEMENT MODE. For slow cooking and heating food.

E. FAN-ASSISTED CIRCULAR ELEMENT MODE. Provides uniform heating with the fan and allows different dishes to be cooked at the same time on different levels.

F. FAN-ASSISTED LOWER ELEMENT MODE. This provides heating by semi-convection with the lower element for delicate dishes.

G. FAN-ASSISTED CONVECTION MODE. This provides convection heating of the upper and lower elements for uniform cooking.

H. GRILL. For gratinating and browning food.

- MAXI-GRILL. As above, but the grill element provides a larger area for roasting.

J. FAN-ASSISTED GRILL. This provides fast browning so that food remains juicy. For convection baking, this is the most energy-efficient function.

K. THAWING MODE
The fan works without heat to reduce the thawing time for frozen food.
USEFUL ADVICE
- Before cooking, make sure all oven accessories that are not required are removed from the oven.
- Pre-heat the oven to the cooking temperature before using it.
- Place the cooking trays in the centre of the oven and leave space in between when using more than one, so that the air can circulate.
- Do not fill the tray to full when preparing a juicy, fruit cake. Any fruit juice that drips from the tray will produce stains that cannot be removed.
- Do not put oven trays on the base of the oven or cover it with aluminium foil. This will cause thermal accumulation. The cooking and roasting times will not coincide and the enamel may be damaged.
- Try to open the oven door as little as possible to see the food (the oven light remains on during cooking).
Take care when opening the door to avoid contact with hot parts and steam.
COOKING INSTRUCTIONS
Read the information of the food packaging for the cooking temperatures and times. Once familiar with the performance of the appliance, the temperatures and times may be varied to adapt them to your personal tastes.
Check that frozen food is completely thawed before cooking, unless indicated otherwise.
| Type of food Temp. °C Runners Cooking time | Personal | ||
| in minutes Suggested | |||
| Cake mixture desserts in moulds | |||
| Sponges or buns 175 2 55-65 | |||
| Cake 175 3 60-70 | |||
| Short pastry desserts in moulds | |||
| Pie base 200 3 08-10 | |||
| Cheesecake pie base 200 3 25-35 | |||
| Fruit pie base 200 3 25-35 | |||
| Raised dough desserts in moulds | |||
| Pie base 180 3 30-45 | |||
| Soft bread 1 kg of flour | 200 3 25-35 | ||
| Small pastries | |||
| Short pastry 200 3 10-15 | |||
| Doughnut dough 200 2 35-45 | |||
| Biscuit dough 200 3 15-20 | |||
| Lasagne 225 2 40-50 | |||
| Meats (Cooking time per cm of thickness) | |||
| Long roasts 200 2 | 120-150 | ||
| Short roasts 200 2 60-90 | |||
| Meatballs | 200 2 30-40 | ||
| Poultry | |||
| Duck 1 1/2 Kg 200 2 | 120-180 | ||
| Goose 3 Kg | 200 2 | 150-210 | |
| Roast chicken | 200 2 60-90 | ||
| Turkey 5Kg | 175 2 | 240-260 | |
| Game | |||
| Hare | 200 2 60-90 | ||
| Leg of venison | 200 2 | 90-150 | |
| Vegetables | |||
| Oven-baked potatoes | 220 2 30-40 | ||
| Cooked vegetable flan | 200 2 40-50 | ||
| Fish | |||
| Trout 200 | 2 40-50 | ||
| Sea Bream | 200 2 40-50 | ||
| Pizza | 240 | 3 10-20 | |
| Grill | |||
| Chops | 4 | 8-12 | |
| Sausages | 4 | 10-12 | |
| Grilled chicken | 2 | 25-35 | |
| Spit-roasted veal 0,6Kg | 50-60 | ||
- The runner number is counted from the bottom of the oven up (Excluding the base of the oven as trays cannot be placed on it)
THE POSITION INFORMATION IS INDICATIVE BECAUSE THE COOKING TYPE AND TIMES CHANGE DEPENDING ON THE QUANTITY AND QUALITY OF THE FOOD.
HOW TO USE THE GRILL
Place the food to be browned on the grid or in the shallow tray. The grid has to be placed on the highest runner, whilst the tray for collecting fat should be on the lower runner. Connect the grill using the following positions of fan-assisted oven selector knob, or in the position of the multi-function oven selection knob.
Depending on the type of food (meat, fish, poultry, etc.) it will be necessary to turn it over to expose both sides to the infra-red rays of the grill. For guidance only, we indicate some cooking times below:
| Food to be grilled | Cooking times in minutes Suggested |
| Lean or thin meat | 4-6 |
| Normal meat | 5-8 |
| Fish without scales | 8-10 |
| Fish (e.g. Trout, salmon) | 12-15 |
| Sausages | 10-12 |
| Sandwiches | 2-5 |
WARNING
- Do not use aluminium foil to cover the grill tray or heat.
- Do not wrap elements in aluminium foil or place them under the grill - the great reflective quality of aluminium may damage the grill element.
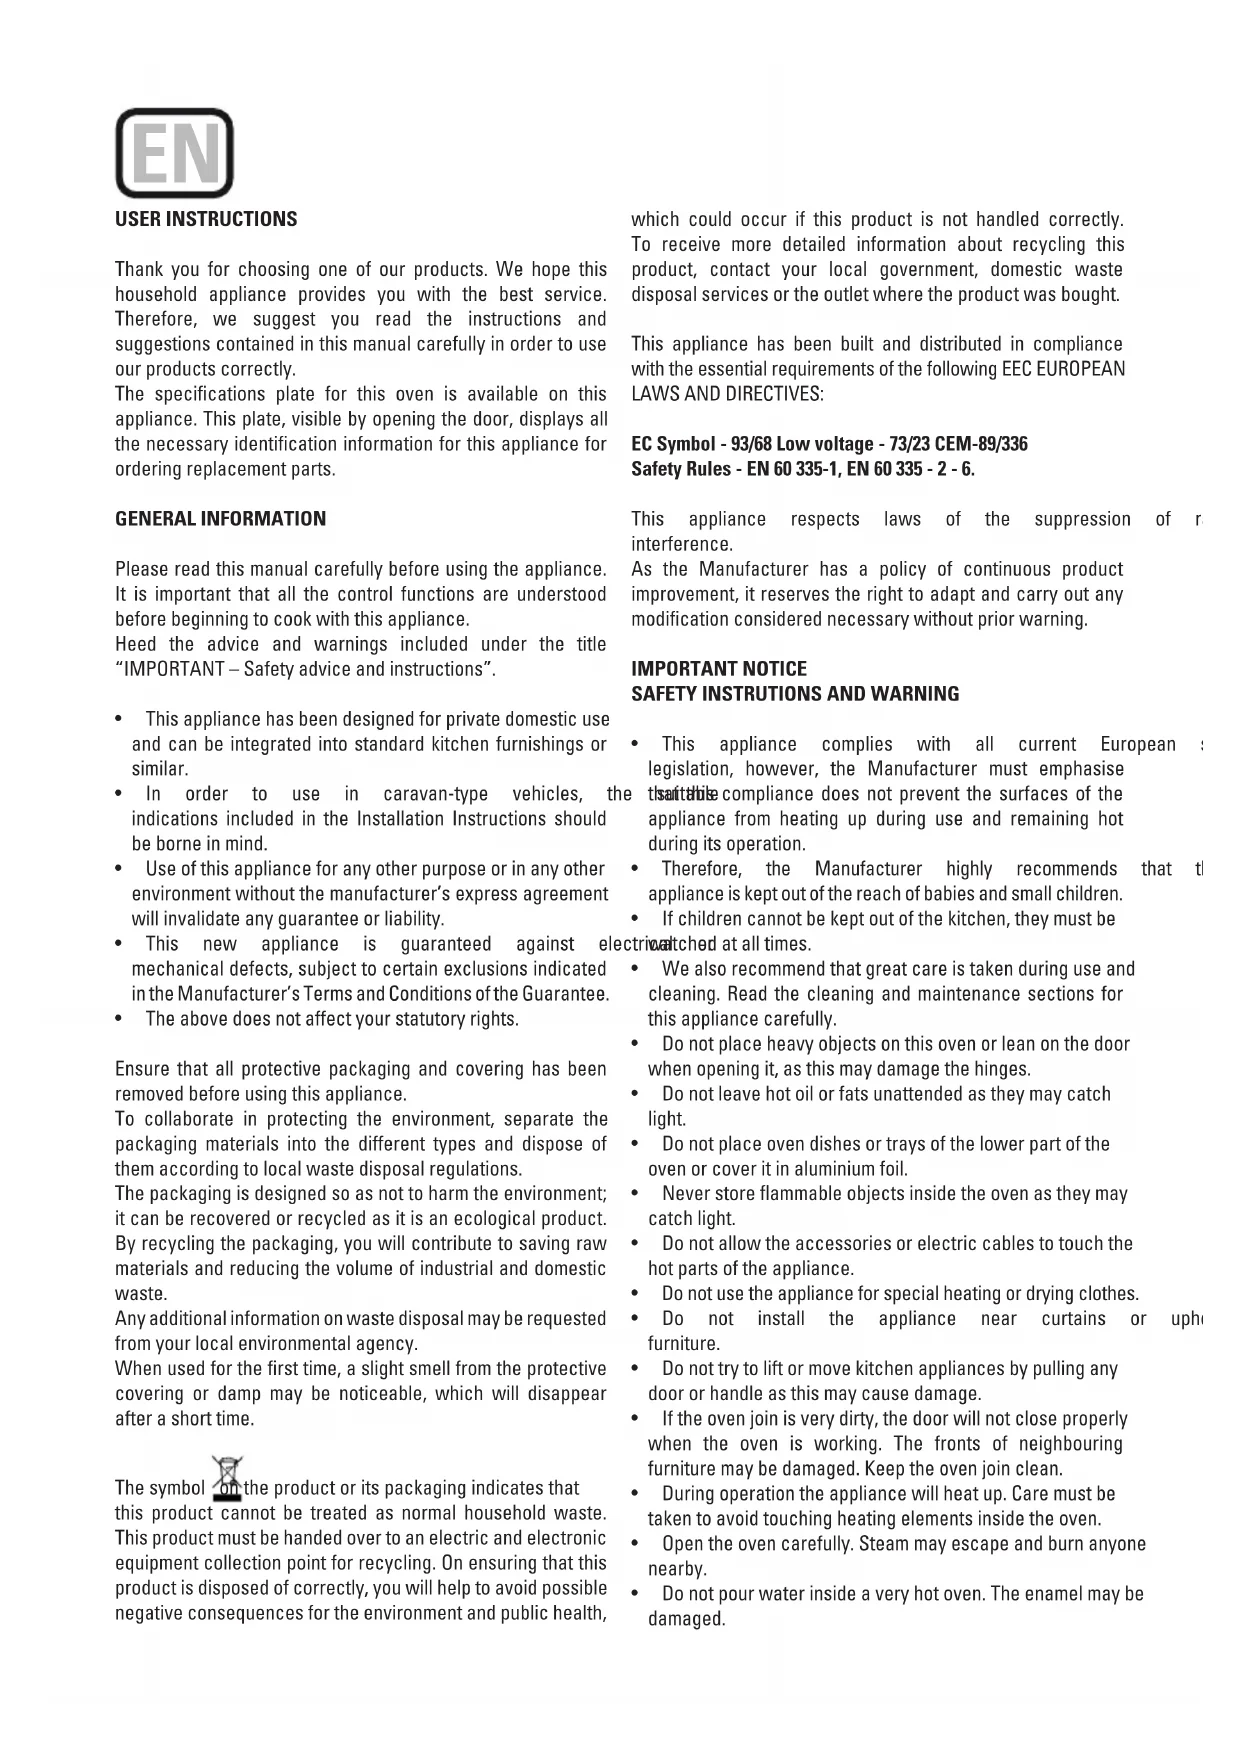
USING THE 6-BUTTONE ELECTRONIC TIMER
Description of the button functions:

Alarm

Automatic cooking (duration)

End of cooking time (end time)

Manual operation

Reducing numbers in all programmes

Adding numbers in all programmes
Meaning of the lit symbols:

Indicates that programmed cooking is under way or it is the manual position.

Programmed alarm.

More "AUTO" (Both flashing): Programming error.
AUTO: AUTOMATIC PROGRAMME
Flashing: Programmer in automatic position, but not programmed or ended.
(Light on): Programmer in automatic position and programmed.
No symbol lit, except the clock numbers means that a waiting time is programmed.
Programmer functions:
24-hour display clock.
Alarm (Maximum 23:59).
Automatic programming (start and end of cooking).
Semi-automatic cooking (only start or only end of cooking).
The timer only works when the appliance is connected to the electricity supply.
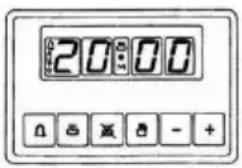
Electronic clock
Immediately after connection (Also after a power cut) THREE flashing digits will appear on the panel.
To enter the correct time press simultaneously and AT THE SAME TIME one of the buttons o until the cor- rect time is shown. There is a 5-second acceptance delay dur ing which no button should be touched.
The speed that the marker changes will noticeably increase some seconds after beginning to press the buttons and
Manual cooking
(Without using the programmer)
To use the oven with the help of the programmer, the ing AUTO indication must be cancelled by p button
If the AUTO indicator is not flashing (which means that the oven is programmed) the programming must be cancelled first by pressing and setting the marker to 0.
Automatic cooking.
(Start and end of cooking)
1)Programme the cooking time using
2) Programme the end of the cooking time using
3) Select the temperature and function required using the thermostat and selector knobs.
After these operations, the «AUTO» symbol will appear on the display, indicating that the oven has been programmed.
Practical example:
We wish to cook for 45 minutes and that the cooking time ends at 2 p.m.
- Pressing we set 0.45 on the display.
- Pressing we set 14:00 on the display.
After these operations the current time will reappear on the display as well as the «AUTO» symbol, indicating that our programming has been understood and memorised.
At 13:15 (14:00 minus 45 minutes), the oven will automatically start, the symbols and «AUTO» appearing during cooking.
At 14:00 the cooking will automatically stop and the alarm will sound intermittently.
Press turn the alarm off.
Semi-automatic cooking
A. Programming the duration of the cooking
Set the chosen cooking time using the button and set the duration.
Cooking will start immediately, the symbols «AUTO» and will appear on the display. When the programmed time has passed the cooking will stop and the alarm will sound intermittently. Turn the alarm off as described above.
B. Programming the end of the cooking
Set the chosen end time for the cooking using the button and set the end time. Cooking will start immediately and the symbols «AUTO» and 空 will appear on the display. Cooking will end at the set time and the alarm will sound intermittently. Turn it off as indicated above. The state of the programming can be checked at any time by pressing the corresponding button.
The programming can also be cancelled at any time by pressing and setting the marker to zero. By then pressing the oven will be ready for manual operation.
Electronic alarm
The timer function consists solely of an alarm which can be adjusted for a maximum period of 23:59. To adjust the time, press the button and at the same time (+) or (-) until the desired time appears. Having made the adjustment, the real time will reappear next to the symbol
The countdown will begin immediately and can be viewed on the display at any time by simply pressing the button. When the time has ended, the symbol will disappear and the alarm will sound intermittently, which may be turned off by pressing the butto The alarm does not control any of the oven functions.
NOTE
-
If an error is made it will be indicated via an alarm and the "AUTO" symbol will flash. Cancel the adjustment by pressing the button and then re-programme to rectify it.
The alarm that sounds at the end of a programme will continue for seven minutes unless cancelled by pressing the button. However, at the end of the seven minutes the "AUTO" symbol will continue flashing. -
The alarm has three tone positions, low, medium and high. To adjust the tone, check that the timer is in the manual mode, then press the button and hold down to hear the tone selected. On releasing the button, press again and hold down to select another time. Repeat the procedure until the required tone is heard.
WARNING! a power cut will result in the programmed functions to be cancelled, including the clock. Once the power returns three flashing zeros will appear and the oven can be re-programmed.
USING THE MECHANICAL TIMER
Once the thermostat controls are in the desired position, turn the knob clockwise to the maximum position and then turn it anti-clockwise to the desired time; at the end of this set time the buzzer will sound. The timer only indicates the end of the set time, but it does not stop the function being used.

CLEANING THE APPLIANCE
IMPORTANT
As a safety precaution, before beginning to clean the oven always unplug it from the power supply or remove the appliance power lead.
Cleaning an oven that does not self-cleaning panels must be done after use, when it is switched off but still warm, not hot, so that the film of grease produced by the cooking vapours on the walls is still easy to remove, as well as the drips and splashes of fat that are not yet hard and dry.
Remove the chrome-plated wire side supports; pull the front part upwards to unattach them from the wall and remove them from the rear orifices. Clean the oven with a soft cloth soaked in a diluted ammoniac solution; rinse and dry. If there are still stains and splashes, place a damp cloth soaked in ammoniac at the back, close the door and, after a few hours, wash the oven with warm water and liquid detergent, rinse and dry carefully. To clean the shiny metal outside doors, use a soft cloth with soap and water; do not use any powdered products that contain abrasive substances.
Also avoid the use of acid or alkaline substances (lemon juice, vinegar, salt, tomatoes, etc.). Avoid using products containing chlorine, acid or abrasive substances specially for cleaning the varnished walls. Do not use thick steel wool or hard utensils, as they can damage the surface finishes.
Do not use high pressure cleaners or steam appliances for cleaning the oven.
Normally, wiping with a damp soft cloth and warm detergent is enough, but for stubborn stains the following is recommended:
OVEN CLEANING SYSTEM EQUIPPED WITH THE AQUAS-MART SYSTEM
1 Take out the internal components: tray, screen, side screens.
2 Pour 200ml of soapy water on the bottom of the oven
3. Turn on and set the oven at 200^ for 15 minutes
4. Move the temperature control from 200^ to 0^ . Let the oven cool down for 20 minutes.
5. Move the AquaSmart function to 0. Wipe clean with a rag or soft cloth.
VTRIFIED ENAMELLED PARTS
Only use a recommended cleaner for this type of material - avoid chloride-based products such as bleach.
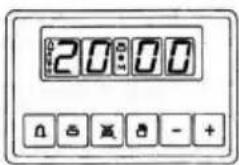
GLASSDOOR PANEL
Do not use abrasive products which could damage the glass. Remember that if the surface of the glass panel becomes scratched, it could cause a dangerous failure.
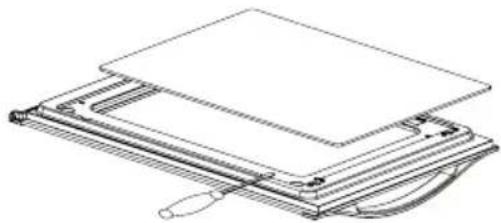
To simplify the cleaning, the inner glass panel can be taken out of the door. The method for removing the glass from the three types of door is shown below.
Door type A
After removing the screws fixing the glass, located on the inner face of the door, lift the glass out carefully. In versions with three glasses the intermediate glass can also be removed. The procedure is the same as above.
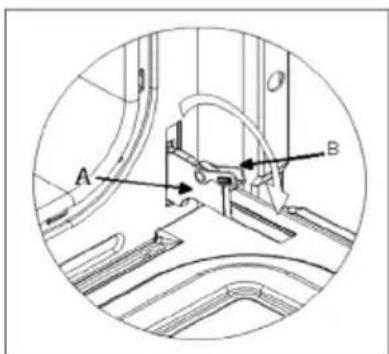
Door type B1/B2
After removing the screws fixing the upper support of the glass, remove the support in direction "A". Then the glass can be pulled out. In versions with three glasses the intermediate glass can also be removed.
Door type C
Carefully lever up the glass with a flat screwdriver located in the groove shown in the figure.
When refitting the glass, check that it is correctly fitted into the toothed joint of the door and all around.
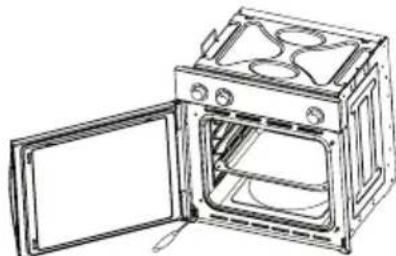
REMOVING THE DOOR FROM THE OVEN
To simplify cleaning the interior of the oven, the door can be removed. The process of removing the door for the three types is shown below:
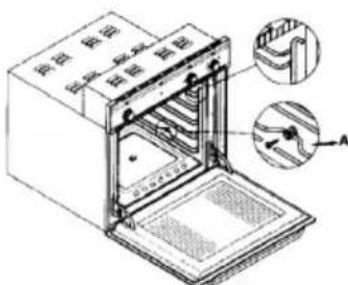
Door type A/B2
The hinges "A" have two moving bolts "B".
When the bolt "B" is lifted, the hinge comes out of its housing.
Then close the door to the half-way position.
Next, lift the door upwards and remove it, sliding it outwards; hold the door by the sides close to the hinges when doing this.
To replace the door, first slide the hinges into their grooves and open the door completely.
Remember to turn the two moving bolts "B" used to engage the two hinges before closing the door (Fig. 3).
WARNING
Take care not to remove the hinge locking system when taking off the door, as the hinge mechanism can spring back suddenly.
- Never submerge the door in water for any reason.
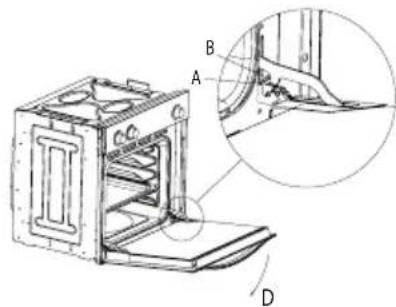
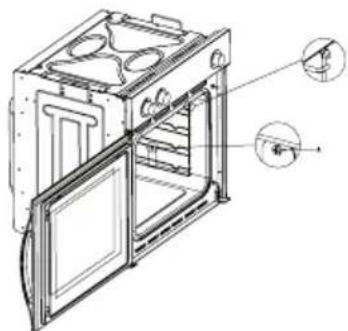
Door type B1
Open the door fully to position "D"
Lift the two mobile links "A" of the hinges, until fixing at point "B".
Then close the door to the half-way position.
Next, lift the door upwards and remove it, sliding it outwards; hold the door by the sides close to the hinges when doing this.
To replace the door, first slide the hinges into their grooves and open the door completely.
Remember to turn the two moving links "B" used to engage the two hinges before closing the door (Fig. X).
WARNING
Take care not to remove the hinge locking system when taking off the door, as the hinge mechanism can spring back suddenly.
- Never submerge the door in water for any reason.
Door type C
Open the door and support it firmly.
Using a suitable screwdriver remove the lower hinge by the part fixed to the oven.
Then remove the upper hinge from its place and take off the door.
To replace the door, follow the same steps in reverse.
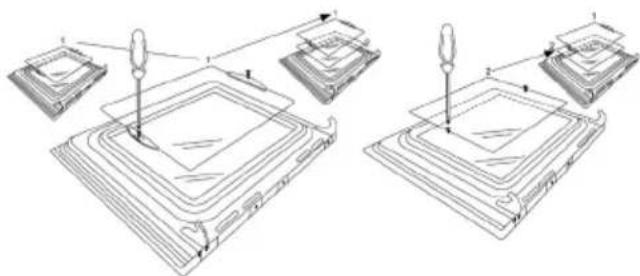
Oven accessories (Fig. 4)
The oven can be provided with lateral guides fitted to the oven wall. Insert the grid and oven sheet provided on the lateral guides. To remove the guides proceed as follows for the two types:
Bars type 1
To remove the lateral guides press downwards at point A.
Bars type 2
To remove the lateral guides take out the screw using a suitable screwdriver, lift the bars upwards until they are free.
INSTRUCTIONS FOR INSTALLATION
This appliance must be installed by a competent person, in accordance with the current version of the UK Safety Rules and Regulations or their European equivalent:
Urban development regulations (published by the Department of Environment).
Urban development laws (published by the Scottish Executive Development Department).
IEE wiring regulations.
Electricity in labour regulations.
PRIOR START-UP OF THE APPLIANCE
When it is unpacked, check that the following parts are with the oven:
- Instructions and Installation Manual
Oven grid
1 tray - Screws and stoppers for fitting the appliance in the housing
FITTING THE APPLIANCE (see Fig. 5)
These appliances are classified as Class I.
The earth is obligatory as provided for by law. The manufacturer declines all liability in the event that the accident prevention rules have not been followed.
IMPORTANT
The adjacent piece or furniture or cupboard and all the materials used in the installation must resist a minimum temperature increase of 85^ above the ambient temperature during use of the appliance.
Certain types of vinyl or laminated kitchen furniture are particularly susceptible to damage due to decolouration at temperatures below those indicated.
If the appliance is installed without paying attention to this temperature limit or if it is placed less than 4mm from the adjacent cupboards, liability will belong to the owner.
INSTALLATION NOTES
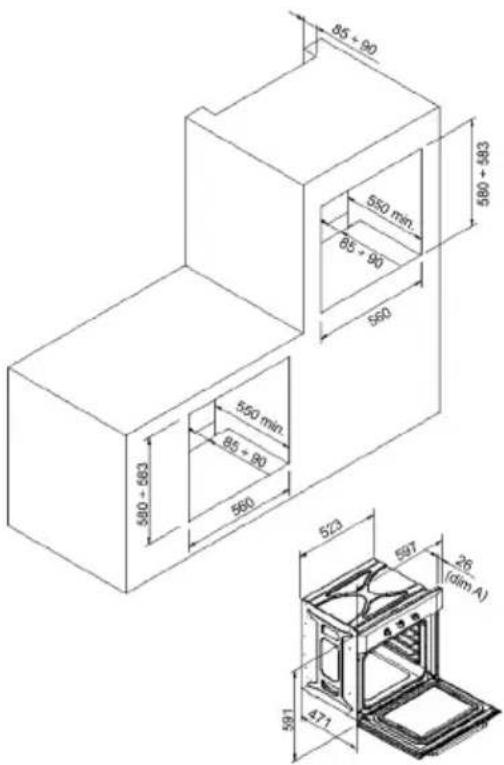
- The oven has to be installed in a standard gap of 600mm as indicated in Fig. 5, whether under a hob or in a column.
- On inserting the oven in a column, it is essential in order to ensure there is enough ventilation, to remove the rear panel of the furniture and have an opening of at least 85 - 90mm as indicated in Fig. 5.
- Check that the oven has been fixed securely in the housing. Fixing the oven into the cupboard is done using 4 screws "A" Fig.5. One in each corner of the oven door frame.
Fig. 5: Installation distanced for simple electric ovens of 60 cms wide (the shape of the upper casing may vary) and attachment to the cupboard.
BUILT IN DIMENSION FOR OVEN WITH DOOR THICKNESS OF 26mm (dim A)
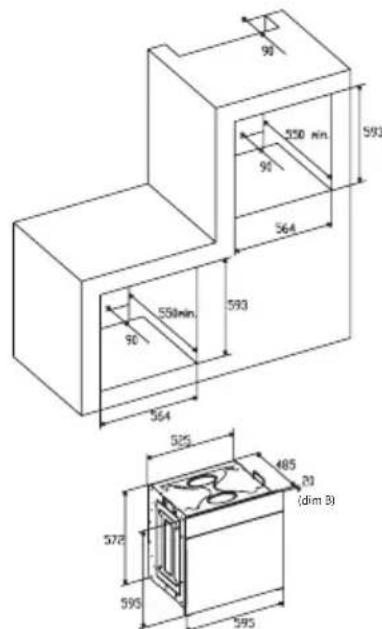
BUILT IN DIMENSION FOR OVEN WITH DOOR THICKNESS OF 20mm (dim B)
4. When installing multipurpose ovens install the s shown in figure n°6.
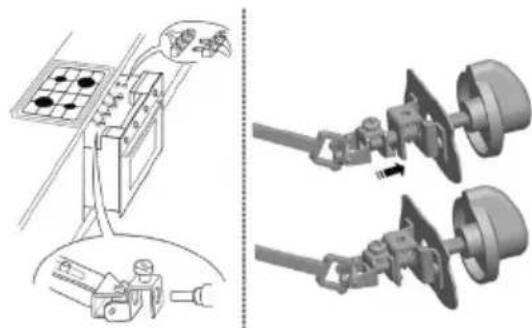
Fig. 7: Ventilation and gap requirements for the installation of a simple electric oven in a standard cooking unit. Minimum ventilation requirements for upper, base and support shelves for the rear part of the unit.
A. The support runner must be removed
B. Spacing of 75-90 mm between the wall and the rear part of the support shelf and the base of the cupboard
C. Base
D. False box front to be assembled
A.Rearpanel
B.Storagespace
C. Remove the rear part of this section
D.Realpanel
E.Storagespace
F.Base
G. Minimum ventilation gap 80~cm^2
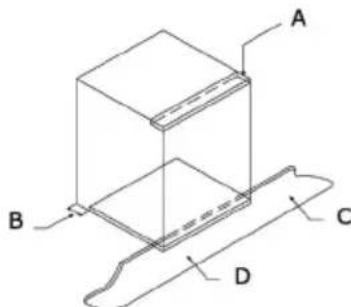
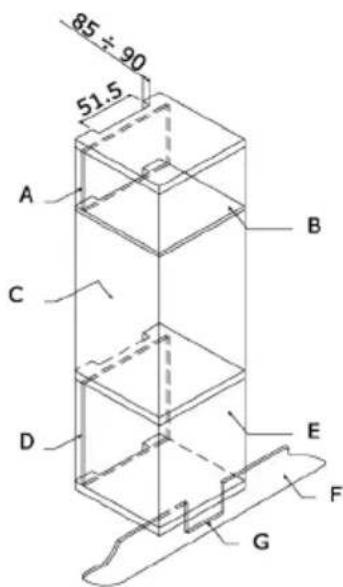
Fig. 8: Ventilation and gap requirements for the installation of a simple electric oven in an upper cupboard.
ELECTRICAL CONNECTION
Before connecting the appliance, check that the voltage marked on the specifications plate coincides with the voltage of the electricity network.
The NICEIC register is recommended for electrical installations.
WARNING - THIS APPLIANCE MUST BE EARTHED
This appliance must be wired to a 13 A bipolar automatic switch with protected socket, which has a 3mm separation between contacts and is placed in an easily accessible place next to the appliance.
IMPORTANT
The conductors of the network power supply lead are coded by colours are follows:
Green and yellow -Earth
Blue - Neutral
Brown-Live
- The green and yellow conductor must be connected to the terminal marked "E" or with the symbol of the earth or which is green and yellow.
- The blue conductor must be connected to the term marked "N".
- The brown conductor must be connected to the terminal marked "L".
The lead must not reach a temperature higher than above the ambient temperature at any point. - If the power lead is damaged, it must be replaced by a special lead or unit supplied by the manufacturer or it after-sales service.
REPLACEMENT OF THE NETWORK POWER SUPPLY LEAD
If it is necessary to replace the network power supply lead, proceed as follows:
- Disconnect the appliance from the power supply, unscrews the fastening screws and remove the rear panel.
- Unscrew the fastening screws and those of the terminals to free the existing lead.
- Assemble the replacement lead which must comply with the information listed in the Specifications, ensuring the correct connection of the colour codes and that all the screws are correctly tightened.
MAINTENANCE
Before carrying out maintenance, disconnect the appliance from the power supply.
During the guarantee period, if necessary all services should be commissioned to the Manufacturer's Technical Assistance Service Department. Bear in mind that intervention or repair by unauthorised personnel will invalidate this guarantee.
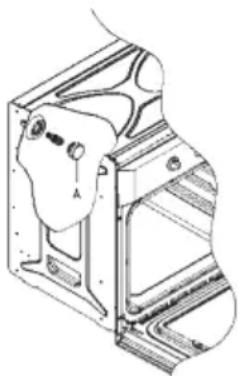
REPLACEMENT OF THE OVEN LIGHTBULB
Not covered by the appliance guarantee.)
The oven has a light with the following characteristics: 15 W or 25 W, 300^ and type E-14
WARNING: Disconnect the appliance from the electricity supply, remove the oven door (as described above), as well as the oven shelves.
Remove the glass cover that protects the light bulb by turning it anti-clockwise. Fig. 9 (A)
Unscrew the old light bulb and dispose of it safely and ecologically, change it for one as specified in the Specifications and replace the cover.
NOTE - The glass cover may be tight and, therefore, may need a grip to release it.
CARE AND REPLACEMENT OF THE CATALYTIC COVERING
(When assembled, the covering is not covered by the appliance guarantee).
In order to keep the covering "always clean" efficiently, the oven must be heated to a minimum of 200^ whenever there are stubborn stains, so that they do not become permanent.
If the covering becomes black and shiny, they must be replaced. Remove all the internal accessories to facilitate the replacement of the covering.
The replacement covering may be bought directly from the Manufacturer's Replacement Part Department (see details included in the cover). Indicate the reference numbers of the product type described in the specifications plate and/or the series number of the appliance on ordering.
SPECIFICATIONS
INTERIOR DIMENSIONS
Height: 340 mm
Width: 440 mm
Depth: 390 mm
Useful volume: 59 litres
ELECTRICAL INFORMATION
Nominal voltage:
220V-240V\~50Hz
Power connection: 13A (automatic bipolar switch with protected socket, with 3mm separation between contacts)
POWER ABSORPTION
Base Resistance: 1,30 kW
Roof Resistance: 0,90 kW
Fan Resistance: 2,30 kW
Grill Resistance: 1,35 kW
Network power cable:
3x1.5mm² type H07RN-F
Oven light bulb:
15 W - 25 W / 300 °C screw type E-14
The Manufacturer declines all liability for damage caused to persons and objects due to incorrect or improper installation of the appliance.
The Manufacturer reserves the right to make any modification it believes necessary and useful to the products, without prior warning.
ISTRUZIONI PER L'UTENTE
Volume utile: 59 litri
DATI ELETTRICI
Tensione nominale:
220V-240V\~50Hz
WAARSCHUWING en VEILIGHEIDSVOORSCHRIFTEN
(Zonder programminging)
WAARSCHUWING-DIT APPARAAT MOET GEAARD WORDEN
Para as instalacoes electrolyicas, recomenda-se o registo NICEIC.
JaHHoe yCTPOIcTB COOTBeTCTByeT 3aKOHAm O IIOaBJIeHN paDNONOMex.
Tak kak n3rotobntel npndepknaeTcnpnHnnoB NOCTOHHORO COBepweHCTBOBaHN npodykta, OH OCTaBnEET 3a c6oB npnHmAtb N BblONHb TBCAKHe MOINKauuN, KOTOpBle CHTaOTcH He06XOnMbIMn, 6e3 KaKOrO 6bl To Hn 6bln PpeDbapntelhoro yBeOMJhen.
AXHHOE 3AMEUAHNE - INHCTPYKUNI NO TEXHNIKEB630NACHOCTUNI PEPDYNPEXKDEHNE
3NeKtponpnp6op n ero OTKpbItbIe qactn MoryT 3HaunTeB DaHHoe yctpoiCTBO COOTBeTCTByET BcEMy TeKyuemy ebponenCKOMy 3aKOHoAteJIbCTBy NO6eONaCHOCTN, ODAKO N3ROTOBnTeJb DOJIKeH NODeRPKHyt, YTO 3TO COOTBeTCTBHe HE KAcaeTCHarpeBaHmIO NobepxHOCTeY cTPOiCTBA BO Bpem 3KcNpyataUHN, KOToPbIE OCTaOTCROPaHMMBO Bpem pa6Otbl.
He- IOnTOMy H3ROTOBNTeHb HAcTOAteHbHO peKoMeHnyeT HeJ DOnyCKaTb K YCTPOINCTBy MaJIeHbKnx DeTei.
Ecni oecneuHTb OTCyTCTBnE DeTei B KyxHe HeB MOxHO,3a HmH NyKHO NOCTOARHHo CNeDNTb.
Takke pekomeHnyem 6bItb OCTopoXhbIMN BO BpeM NOIb3OBaHnI OOHTKn. BHImaTeJIbHO npouHTaIte pa3dJIbI NO daHHOMy yCTpoJCTBy, KacaIOUneCra OoNCTKn I TexHnueCKOrO o6cLyKINBaHnI.
He KnaIte Ha IyXOBky TjKeIbIX PpeIMeTO H He OINpaTecb Ha DBepCy, KOrJa ee OTKpbIbAeTe, NOTOMy YTO 3TO MOKeT npNBecTu K NOBpeXJDeHIO NeTeNb.
He octabJIaIte 6e3 npncMoTpa ropraee maclo nnn Knp, TAK KaK OHN MOryT 3aRopeTbcr.
He KlaInte npOTBn NnIOHocbHa dHO dyXOBKn Hne npIKpbBaIte ee aIOMMHNEBOH oJbRoN.
Hikorda He xpaHnte BHTpn DyXOBKn IerKOBocnnaMeHReMbI ppeMetbl, NOTOMy YTO OHN MOrY 3aRopeTbCra.
- He donyckaIte npinkocHOBeHn npHaJNeKHOCTe nINn 3NeKtpnuecknx Ka6enei c ropeuMn deTaIaMn yCTpoIcTbA.
He nCnoB3yIte yCTpoINCTBO Ia CneuaJIbHbIX HArpeBaHn nn dny cyWeHHOeKDbI.
He yctaHaBnBaIte ycTpoIcTB0 B6n3n 3aHaBeCOK mRKO Me6eJI.
He nbTaIteCb NOHMAtb nn nepemeaatb KxOHbYcTpoCTBa 3a pyky nIn 3a DBepy, TaK KaK 3TmBbl MoXe IN NOBpeDnTb.
Ecnn nloockoctn cnpjxehnny duyxobkn ouheb rpa3hbl, DBepca He 6ydt Hndnxkaumm 06pa3om 3akpbBaTcB BO Bpem pa6oTb. Moryt 6bIb NobpekdeHb nepeHne qactn 6bn3ko pacnoJoxeHHo Me6enn. NoadepKuBaTe YNCTOTy nloockctn cnpjxehnny duyxobkn.
Bo Bpempa60bI yCTpoNCTBO HArpeBaETc. CneJyET 6bTb octopoxKhbIM n36eRaTb KOHTaTKa C HarpeBaTeNbHbIM 3JIeMeHTAmn BHyTpN dYXOBKn.
- OtkpbBaIte dYxOBky OCTOpOxHO. I3 dYxOBKn MoKet BblpBaTb nap n npuunHnB oXoN haxOJaUMCRA pJOM.
He BnBaIe BOy BOBHyTp b OyeHb rOpAey MoKeT 6bTb NOBpeKdHa 3MaJIb. - UcpoNCTBO DOnJXHO npaBnIbHO yCTaHaBnIBaTBCa JINiOm, OblaJaIOUIM DOCTaTOUHO KBaIIuΦkaUeN, B CTporOM COOTBeTCTBUN C INHCTpyKUmaN N3ROTOBUTeJ.
- I3roTOBnTeJIb CHImaET C Ce6I NIO6yIO TBetCTBeHHOCTb 3a TpaBMbl NIN MaTePnaJIbHbI yUeep6, HAcTyINBwne B pe3YJbTaTe HEnpaBnJIbHOI KcCnIyAtauN NIN HenpaBnJIbHOI yCTaHOBKn DaHHo JdyXOBKn.
Bo Bpempa60tbo 6op3ayetc TenIO, ncapaHnBn 36eraIte NOnyehnTpaBM n ObecneYbTe HAdnHexaUyO BeHTnJauNIO NOMEeHn. Pn Nolb3OBaHnB TeueHHe npoJOnKnteBHO rpeNoa MoKeT OKa3aTcB Heo6xOIMoJ DOnONHnTeBHaBa BeHTnJauNr -ecn y Bac Bo3HKnHYT comHeHn B OTHoWeHHn Heo6XoDMoro OObema, npOKOHcyIbTnpuTyecb C KBaIIHnOuPobAHbIM MONTaxHNKOM.
MHCTPYKUIN
DaHoe pykoBODCTBO NOb3oBaTeN JOnKHO xpaHnTbcB KaueCTBe CnpaBOuHOro Noc6nHa 6dyuee N dny NOb3oBAHnYeNoBekOM, He3HaKombiC daHHbmycTPOINCTBOM. PpeXd Yem NOb3oBaTbcy DxyOBKO, TuaTeNbHO OUnCTnTE BHyTpeHHne NOBepxHOCTNu Hea6pa3NBbIM cHTaUM CpeCDTBom N TeNIOB BOOn. UcTaHOBNTpeWetky INPOTnBEhB COOTBeTcByUOuNE HAnpabJIuOuNE. I0 3aBepWeHN 3ToI ONepaUN, BKJIOUHe DxyOBKY Ha MaKcMmAbHyIO Tempeatpy npImepHo Ha 20 MInHT dny UdaJeHnI CneoB 3aBODcKo CMa3Kn, Macna NNl CMOnbl, KOTOpbl MOrTy CTaTb pNUnHOHepnTbIX 3aNaXOB BO BpEmnPiNTOBJIeHN NIIuN.
PNEpyPExKHeHne:BoBpemnepBoroHarpeBaHnma MoKeT NOBnTbCnDblm NnHn HnprnTHbIe 3aNaXn.B TaKOM Clyuae XopoIo npOBeHTnIpyTe NOMEueHne, noka He 3aKOHHTcnpBaonepaun.
Iocne OKOHuaHnE 3ToI npocToI onepaunu DyXOBka 6ydet roTOBa dnn pnpiroTOBHeHn nui.
HactoJee yCTpoIcTBO npEHa3HaueHo NCKIIOHTeNbHO DnI DAOMaHIero NOB3OBAHn.
IcnoB3yTe dYxOBky ToIbKO dny npuroToBneHn nn.
ПОЛБЗОВАНЕ ПЛINTОД
Данная духова ретуниретс ТермocтамВдидао He ot 50^ do 250^ B3abncmoctnOT hyxhoT TemnepaTpybl.ИнdkaTopnaЯamnoчka Tepmoctata BKIOUaETcN BbIKIOUaETcДяУka3AHNAHa TEMpepaTyphbI KOHTpOJIb BO BpeM NOlb3OBAHNA.
Heo6xoDnmbi peKIM roTOBKn BbIbnpaTc npn NMOu MNHOOfoHKUHOHaBHO KNOpKn ynpabNeHn. MoHo BbIbpaTb CneDyUOuNE foHKUIN:

A.OCBEUHEHNE DYXOBKN.OHa aBTOMaTnuecka npu Bb6ope pexmra TOTOBKn Ira BCxMoJeNe).OcBeueHne dyXOBKn BcerdaBKloueHO npn Nolb3OBAHn eo.

B. KOHBEKUOHHBI PEKM. O6ecneuBaET TpaNtIOHHyTOBOTKY C NOCTyJIeHNEM TeIIa OT BepXHeRo I HIXHeRo 3JIeMeHTOB.

C. PEXKIM BEPXHEO 3JEMEHTA. JIЯ rOTOBKN Ha MeJIeHHOM OrHe, JIЯ NOJXapUNBaHnI INN
DyXOBKpaHHeHHraTOBbIX 6NIO TENNbIMN.

D.PEXKIM HIXHEIOJIEMEHTA.ДЯ FOTOBKNHa MeIeHHOM ORHe IДЯ NOOrpeBaHnI NIIUN.

E. PEXKIM KPYROBOTO 3JEMEHTA C NOIyBOM. O6ecneuBaet oHoo6pa3Hoe HaRpeBaHHe C npImeHHeM BeHTnIaTopa I daet BO3MOxHOCTb PnIROTaBnBaTb OJHOBpeMeHHO pa3NnHbIe 6JIoDa Ha pa3HbIx ypoBHx.

F. PEXKUM HNXHEO 3JEMEHTA C NOIDY-BOM. O6ecneuBaet HarpeBaHne c NonykoHBeKUnei HNXHM 3JEMeHTOM dIg I3bickaHHbIX 6JIoI.

G.KOHBEKUHOHHBIPEXKUM C NOIDYBOM. 06ecneuBaet KOHBeKUOHHoe HArpeBaHne BepxHM n HxHm 3JeMeHTaMn dJa paBHomepHoN TeNoBoo 6pa6OTKn.

Hn OINH CMBON He NODCBEeH 3a NCKJIIOUeHHem UOpP YacOB, YTO O3Haayet, YTO nporpaMMpyeTc BpEm OxN- daHn.
Функци nporpammaTopa:
YacbC 24-ycobim nucnjeem Cunhaun3aunna(Makcymm 23:59)
AbTomatnuecko nporpammmpoBaHne (Haayao n OkOHaHne TepnoBoi 6pa60TK)
IonyaBTomatnuecka TeNIOBaa 06pa6oTKa (ToIbKO Ha- yano nn ToIbKO OKOHuaHne TeNIOBOI 6pa6oTKn)
Taimep pa6oTaET ToIbKO B TOM Cnyae, ecnn DxyOBKa NODKIOUeHa K ICTOUYHKy 3JeKtpuyeCKORO NITAHN.
3neKtpoHHbIe yacblreloj electronic
Cpa3y Je nocJe coeHHeHn (TaKKe n nocJe OTKnIOUeHn 3NeKtpo3Heprn) Ha naHEn NOBJIaOTcra Tpu MuraIoux UOpbl.
Дя Вда npabnHOro BpeMeHn HaxMnte + icon OndOBpeMeHNo B TO KE CAMOE BPEM oHy n3 KHOOK nIN, nOka He noBHTc npabnHoe Bpe
M. BbINOJIHЯETc 5-CEkYHdHa 3aIepXka dIy npIeMa, B TeueHne KOTOpO HEnb3r HaxKMaTb Hn Ha KaKne KHONKn. CkopoCTb n3MeHeHn MapKepa 3amEtHO Bo3pactaet ue
pe3 HeCKoNbKO CeKyHd NocNe HaXaTna Ha KHOPIKn n
FToTobKa BpyHOM pexnme
(6e3 noJIb3OBAHnI npOrpAmMaTopa)
IJIIOJIb3OBAHnIaYXOBKnC NOMOUsIO nporpaMaTopa HJxHO OTMeHnTB MraIOUyIO INdNkauNIO «AUTO» HaxaTneM Ha KHONky
Ecnn Hndnkatop 《 AUTO He Muraet (UTo O3Haayet, UTo DxyOBka 3anporpammmpoBaHa), HyxHO OTMeHHTb npoRpaMMnpoBaHne ChauJa HaXaB Ha 3aTeM yCTaHO-BNB Mapkep Ha 0.
TOTOBKa B aBTOMaTHueCKom pexKmE.
(HaayaoIO OKOHuaHne TeNIOBOO o6pa6oTKu)
1) 3anporpammpnyite Bpemra rotobkn npnnoo
2) 3anporpammnpyTe KOHeC rOToBKn pIn nOMoUs
3) Bb6epnte TemnepaTpy n yHKunIO, HxKHyIO NOIb3OBAHnA TepMOCTaTOM n pyUkAMn CeJeKTOpHOrO nepeKJIIOuTaTeN.
Iocne BbINOJIHeHn 3Tnx OIepaun CmBOn «AUTO» noBNTcHa DaCnPee, yKa3bIBaR Ha To, UTo DyXOBka 3anpo-rgpAMMnpoBaHa.
Ppaktnueckn npumep:
Ham Hyxha TeNIOBaa 6pa6Oka B TeueHne 45 MmHyT uTo6bI BpeM OOKHaHn HAcTyNllo 6bl 14:00.
-HaKImaHaMbI yCTaHaBnBaem Ha dncnnee 0.45
-HaKmMaHaMbIyCTaHaBnBaemHa nCnnee 14:00
Iocne BbINOJIHeHnA 3TNX ONEpaun Ha dncnJe eNoBNTcTeKyuue Bpem, a TaKke CmBON «AUTO», yKa3bIbaR Ha To, YTO 3aDau nporpaMMnpOBaHN NOHrTa N BBeDeHa B nAmrTb. B 13:15 (14:00 MNHyC 45 MNHyT) dYxOBKa ABTomAtNueCKN BKNIOuHTc, IN BO Bpem rOTOBKn IORBArTCa CmBOnbl «AUTO».
B 14:00 tennoBa 6pa6oTKa aBTOMaTnueckn octaHOBNTc n 6ydet c nay3Am 3Byuatb cnHaHn3aun. HaxmTe Ha icon dIra BbIKUoyHeN CnHaHn3aun.
TOTOBKa B NOJyABTomatUeCKOM pexKIme.
KAK BbIHytb DBEPU NCH
Ibepua neu ChnmaeTcna 06nerueHHyOa 3a BHytpenHe nnoloctbIO neu. HnkeMb npnbODm ONscHne pa36OpKn Ibepcu neu nBCEXPex BO3MOKhbIX BNIDOB Ibepcu:
BnA DBepuI A/B2
3NEKTPNUECKNE DAHHbIE
HomnhaNbHoe HappxKeHne:
220-240 BoJbT, 50 repu
IopKnIOueHne nITAHn: 13-amNepHbI ABTomATUeCKn BbIKIOuAteNb C 3aunuEHHo PO3eTKoB, B KOTOpOM npedycmOTpeh 3a3Op 3 MM MExdy KOHTaTMN
3HEPronOTPE6JIeHHe:
Mouhoctb HxHKeHrO 3JeMeHTe:1,30 kBt
MoHocbBepxHero 3eMeHtA:0,90 kBt
MoUHocb BeHTnIaTopa:2,30 KBT
MoHoctb rpnla:1,35 kBt
MaKcMaJIbHoe 3HeprOnoTpe6JeHne:2,38 KBT
CeteBou Ka6eIb nHTaHnA:
3×1,5MM²,TnH07RN-F

- REEMPLACEMENT DE L'AMPOULE DU FOUR
- DIMENSIONS INTÉRIÉURES
- GENERAL INFORMATION
- IMPORTANT NOTICE SAFETY INSTRUCTIONS AND WARNING
- INSTRUCTIONS
- USING THE OVEN
- USEFUL ADVICE
- COOKING INSTRUCTIONS
- HOW TO USE THE GRILL
- WARNING
- USING THE 6-BUTTONE ELECTRONIC TIMER
- AUTO: AUTOMATIC PROGRAMME
- Programmer functions:
- Electronic clock
- Manual cooking
- Automatic cooking.
- Practical example:
- Semi-automatic cooking
- Programming the duration of the cooking
- Programming the end of the cooking
- Electronic alarm
- NOTE
- USING THE MECHANICAL TIMER
- CLEANING THE APPLIANCE
- IMPORTANT
- OVEN CLEANING SYSTEM EQUIPPED WITH THE AQUAS-MART SYSTEM
- VTRIFIED ENAMELLED PARTS
- GLASSDOOR PANEL
- Door type A
- Door type B1/B2
- Door type C
- REMOVING THE DOOR FROM THE OVEN
- Door type A/B2
- Door type B1
- Oven accessories (Fig. 4)
- Bars type 1
- Bars type 2
- INSTRUCTIONS FOR INSTALLATION
- PRIOR START-UP OF THE APPLIANCE
- FITTING THE APPLIANCE (see Fig. 5)
- INSTALLATION NOTES
- ELECTRICAL CONNECTION
- WARNING - THIS APPLIANCE MUST BE EARTHED
- REPLACEMENT OF THE NETWORK POWER SUPPLY LEAD
- MAINTENANCE
- CARE AND REPLACEMENT OF THE CATALYTIC COVERING
- SPECIFICATIONS
- INTERIOR DIMENSIONS
- ELECTRICAL INFORMATION
- POWER ABSORPTION
- ISTRUZIONI PER L'UTENTE
- DATI ELETTRICI
- WAARSCHUWING en VEILIGHEIDSVOORSCHRIFTEN
- WAARSCHUWING-DIT APPARAAT MOET GEAARD WORDEN
- AXHHOE 3AMEUAHNE - INHCTPYKUNI NO TEXHNIKEB630NACHOCTUNI PEPDYNPEXKDEHNE
- MHCTPYKUIN
- ПОЛБЗОВАНЕ ПЛINTОД
- Функци nporpammaTopa:
- 3neKtpoHHbIe yacblreloj electronic
- FToTobKa BpyHOM pexnme
- TOTOBKa B aBTOMaTHueCKom pexKmE.
- Ppaktnueckn npumep:
- TOTOBKa B NOJyABTomatUeCKOM pexKIme.
- KAK BbIHytb DBEPU NCH
- BnA DBepuI A/B2
- 3NEKTPNUECKNE DAHHbIE
- HomnhaNbHoe HappxKeHne:
- 3HEPronOTPE6JIeHHe:
Brand : CATA
Model : ME 605
Category : Oven