TE 391 Epok - Phone TELEFUNKEN - Free user manual and instructions
Find the device manual for free TE 391 Epok TELEFUNKEN in PDF.
| Brand | Telefunken |
| Model | TE 391 Epok |
| Product type | Cordless phone |
| Handset dimensions | 170 x 50 x 30 mm (estimate) |
| Base dimensions | 120 x 80 x 60 mm (estimate) |
| Handset weight | 150 g (estimate) |
| Base weight | 200 g (estimate) |
| Power supply | 6V DC power adapter (estimate) |
| Standby time | Up to 100 hours (estimate) |
| Talk time | Up to 10 hours (estimate) |
| Range outdoors | 300 m |
| Range indoors | Up to 50 m |
| Phonebook | 80 contacts |
| Built-in answering machine | Yes (99 messages, 15 min max) |
| Maximum number of handsets | 5 (estimate) |
| Hands-free function | Yes |
| Intercom function | Yes |
| Display | Backlit LCD screen |
| Keypad | Numeric with function keys |
| Warranty | 24 months |
| Maintenance | Clean with a soft, dry cloth. Do not use chemical products. |
| Safety | Use only the supplied batteries and adapter. Do not expose to moisture. |
| Spare parts | Rechargeable AAA NiMH batteries, power adapter (reference on manufacturer's website) |
Frequently Asked Questions - TE 391 Epok TELEFUNKEN
User questions about TE 391 Epok TELEFUNKEN
0 question about this device. Answer the ones you know or ask your own.
Ask a new question about this device
Download the instructions for your Phone in PDF format for free! Find your manual TE 391 Epok - TELEFUNKEN and take your electronic device back in hand. On this page are published all the documents necessary for the use of your device. TE 391 Epok by TELEFUNKEN.
USER MANUAL TE 391 Epok TELEFUNKEN
Digital cordless phone
ENGLISH
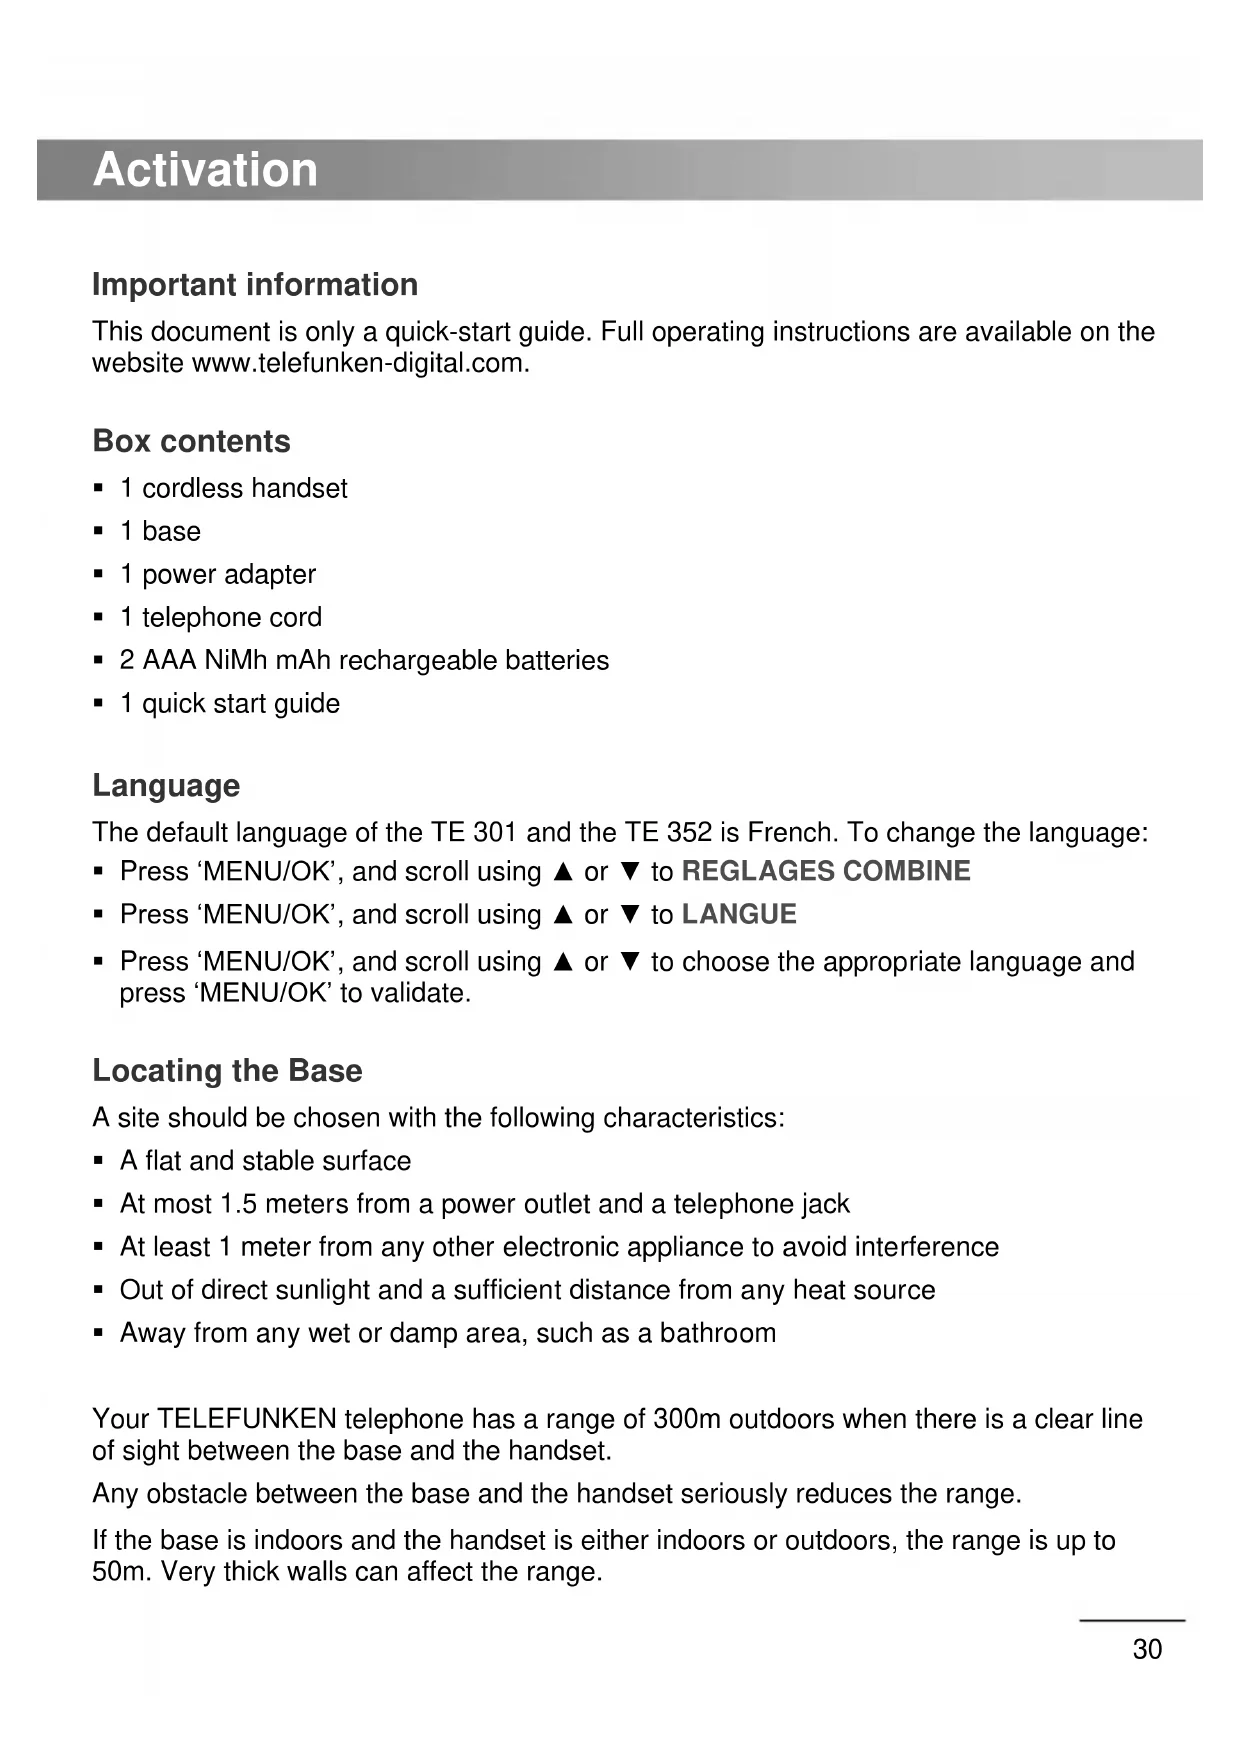
Important information
This document is only a quick-start guide. Full operating instructions are available on the website www.telefunken-digital.com.
Box contents
1 cordless handset
1 base
1 power adapter
1 telephone cord
- 2 AAA NiMh mAh rechargeable batteries
1 quick start guide
Language
The default language of the TE 301 and the TE 352 is French. To change the language:
- Press 'MENU/OK', and scroll using or to REGLAGES COMBINE
- Press 'MENU/OK', and scroll using or to LANGUE
- Press 'MENU/OK', and scroll using or to choose the appropriate language and press 'MENU/OK' to validate.
Locating the Base
A site should be chosen with the following characteristics:
A flat and stable surface
- At most 1.5 meters from a power outlet and a telephone jack
- At least 1 meter from any other electronic appliance to avoid interference
- Out of direct sunlight and a sufficient distance from any heat source
- Away from any wet or damp area, such as a bathroom
Your TELEFUNKEN telephone has a range of 300m outdoors when there is a clear line of sight between the base and the handset.
Any obstacle between the base and the handset seriously reduces the range.
If the base is indoors and the handset is either indoors or outdoors, the range is up to 50m. Very thick walls can affect the range.
Connection
Base
Plug the transparent connector of the power adapter into the place marked underneath the base, and plug the other end into a wall outlet.
Handset
- Insert the 2 AAA NiMH batteries supplied into the handset. Slide the battery compartment cover back into place.
- Place the handset in the base, and leave it to charge for at least 24 hours. Make sure it is inserted in the right direction. When the handset is charged, the symbol is displayed.
- After 24 hours, plug the telephone cord into the base and into the telephone wall jack.
Set Date and Time
If you subscribe to your telephone operator's Caller ID service, the date and time will be automatically set on all the handsets upon each call received.
If you do not subscribe to this service, you can set the date and time manually.
- Press 'MENU/OK', then to display 'CLOCK/ALARM'.
- Press 'MENU/OK': the screen displays 'SET TIME'.
- Enter the date in DD/MM format. Ex.: 04-08 for 4 August.
- Press 'MENU/OK', and enter the time in 24-hour, HH: MM format. Ex.: For example, 14-45 for 14:45 or 2:45pm.
- Press 'MENU/OK' to confirm, or press to return to standby mode.
Power outage
If the power goes out, you can only use the base to receive and make calls. The telephone will ring when a call comes in, but the screen will not illuminate, and caller ID will not be saved to the calls list. You will not be able to use the other features of the base or the handset until power is restored.
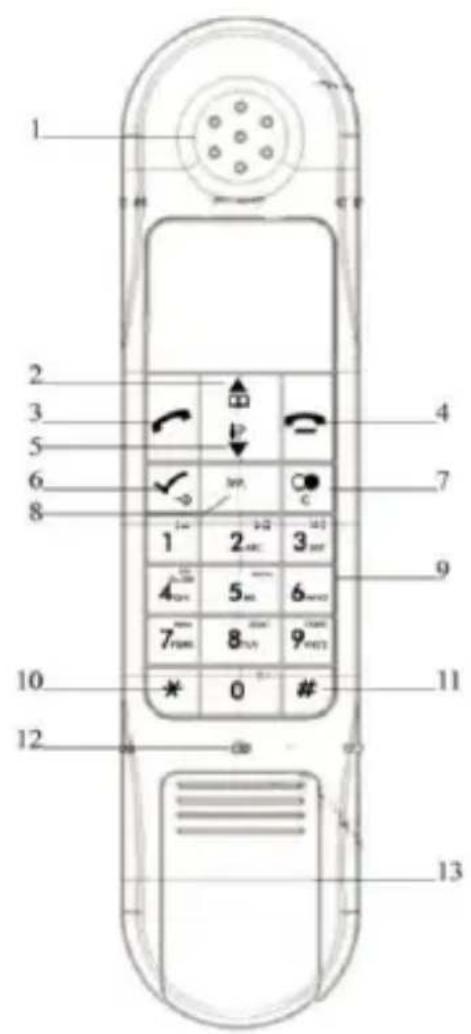
40. EARPIECE
41. UP KEY
Accesses the repertory. Scrolls upward through options. Raises the volume in the earpiece.
42. ANSWER
In STANDBY / PREPARATORY DIALLING mode: makes a call.
Redial list / call log / phonebook: makes a call to the selected contact.
When the telephone is ringing: answers a call.
43. END CALL KEY
During a call: ends the call and returns to standby mode. Turns the handset on/off.
44. DOWN KEY
Accesses the list of calls received. Scrolls downward through options. Lowers the volume in the earpiece.
45. OK/MENU
Accesses the menu and its various options.
Confirms a selection.
46. C KEY
Recall. Returns to the previous menu. Deletes a mistake when typing a number or a name.
47. INT
Intercom key Makes an internal call to another handset.
48. Numerical Keypad
- * KEY Locking the keypad (long press)
50. # KEY
Press and hold: deactivates the ringer.
51. MICROPHONE
52. BATTERIES CASE
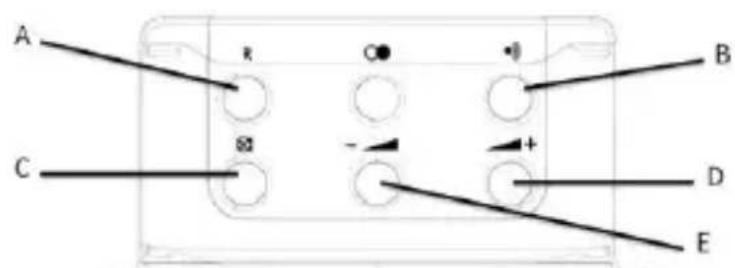
V. RECALL KEY
W. INTERCOM / LONG PRESS TO REGISTRATION
X. MUTE KEY
Y. INCREASE THE VOLUME
Z. DECREASE THE VOLUME
AA. REDIAL KEY on TE 301 / PLAY-PAUSE on TE 352
BB. HANDFREE
Telephoning
Making a Call
Press and dial the number.
Or you can use 'preparatory dialling' mode to enter a number and check it before making the call.
Enter the telephone number, and press on the base to dial the number. By pressing 'HANDSFREE' call is made. Press 'C' to delete if you make a mistake.
Answering a Call
When the handset rings, pick up the handset or press to answer the call.
Adjusting the Volume
During a call, press or on the handset or on the base to adjust the earpiece or speaker volume.
The sound level is shown on the screen.
Ending a Call
Press

Phonebook
The TELEFUNKEN TE 301 can store up to 80 names and numbers.
The numbers can have up to 20 digits, and names can have up to 12 letters. Entries are in alphabetical order.
Adding a contact
- Press 'MENU/OK'. 'PHONEBOOK' will appear.
- Press 'MENU/OK'. 'ENTER NAME' appears.
- Enter the name, then press 'MENU/OK'.
- Press 'MENU/OK'. 'ADD NUM.' appears.
-
Enter the number. Press 'MENU/OK' to confirm.
-
Press to return to standby mode.
You can cancel a new entry you are inputting by pressing at any time.
Deleting a contact
- Press .
- Press or to select the entry to delete, and press 'MENU/OK'.
-
Press or to select 'DEL. NUM', and press 'MENU/OK'.
-
Press to return to standby mode.
Deleting all contacts
- Press 'MENU/OK' three times.
- Press to select 'DEL. ALL', then press 'MENU/OK'.
- The screen asks 'CONFIRM ?'. Press 'MENU/OK'.
- Press to return to standby mode.
Resetting Your Telephone
Resetting lets you return to the telephone's default settings.
- Press 'MENU/OK' and to display 'BS SETUP, then press 'MENU/OK' again.
- Press to select 'ADVANCE SET'. Press 'MENU/OK'.
- Enter your PIN code (default is 0000) and press 'MENU/OK'
- Press to select 'DEFAULT'. Press 'MENU/OK'.
- The screen asks 'CONFIRM ?'. Press 'MENU/OK'.
The answering machine of your TE 352 records missed calls when it is enabled. It can record up to 99 messages for a total recording time of 15 minutes. Each message can last 9 minutes. Your greeting can last 1 minute.
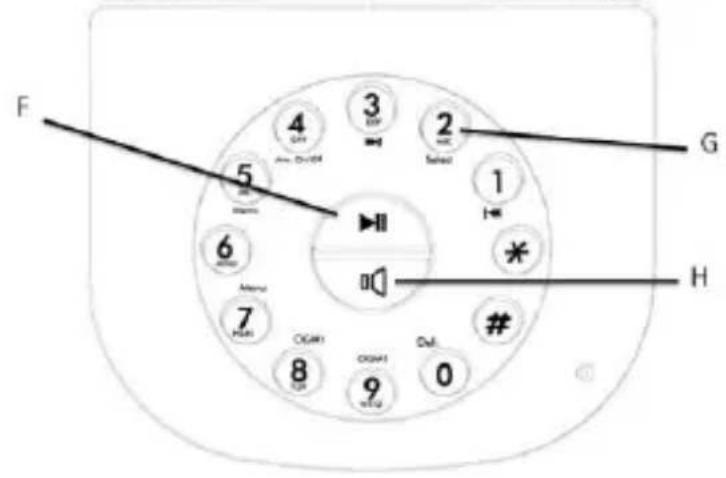
Operating the answering machine from the base
PLAY/PAUSE:Start or stop message playback
Answer mode
There are two pre-recorded messages and you can also record your own greeting.
Answer & record
The caller can leave a message. The pre-recorded message is "Hello, I cannot answer you right now; please leave a message after the beep"
Announce only
The caller hears your greeting but cannot leave a message. The pre-recorded message is "Hello, I cannot answer you right now and you cannot leave a message, please call again later"
Record, listen to or delete your announce
- Press 'MENU/OK' two times to select ANS MACHINE and press it again after the number of messages is displayed.
- Scroll using or to ANSWER and press MENU/OK to activate or desactivate the answering machine.
- Scroll using or to select DELETE ALL and press MENU/OK to delete all the voice mails.
- Scroll using or to select ANNOUNCE ONLY and press MENU/OK if you want the caller to hear a pre-recorded message but not to leave a message.
- Scroll using or to select OGM 1 or OGM 2 and press MENU/OK to select / listen / erase / record pre-recorded message 1 or 2.
- Scroll using or to select RING DELAY and press MENU/OK to choose the number of ring before the caller can hear the pre-recorded message.
- Scroll using or to select LANGUAGE and press MENU/OK to choose the language of the pre-recorded message.
- Scroll using or to select PASSWORD and press MENU/OK to set a password to your answering machine.
Intercom
To establish a call with another handset: press the Intercom button on the headset followed by the number of the headset you would like to call (for eg. Press Intercom 1 would intercom headset 1, press Intercom * would intercom all HS), any handset registered to that base will ring with Intercom melody and press on Handset would initiate the call.
Warranty
This telephone comes with a 24-month warranty, starting from the date the phone was purchased.
For more information on the applicability of this warranty, please refer to the full operating instructions available on the website www.telefunken-digital.com
After-Sales Service Contact
In the event of a technical problem, feel free to contact our after-sales service. assistance@sopeg.fr or +33 (0) 545 608 251 (International number)