TK76201RW - Machine à café SIEMENS - Free user manual and instructions
Find the device manual for free TK76201RW SIEMENS in PDF.
Download the instructions for your Machine à café in PDF format for free! Find your manual TK76201RW - SIEMENS and take your electronic device back in hand. On this page are published all the documents necessary for the use of your device. TK76201RW by SIEMENS.
USER MANUAL TK76201RW SIEMENS
Please read the operating instructions
carefully and keep them for future
This automatic espresso machine is
designed for domestic use and not
! Risk of electric shock
Connect and operate the appliance only in
accordance with the specications on the
Do not use if either the power cord or the
appliance is damaged.
Use indoors at room temperature only.
This appliance is not intended for use by
persons (including children) with reduced
physical, sensory or mental capabilities, or
lack of experience and knowledge, unless
they have been given supervision or
instruction concerning use of the appliance
by a person responsible for their safety.
Keep children away from the appliance.
Children should be supervised to ensure
that they do not play with the appliance.
In the event of malfunction, unplug the
appliance immediately.
To avoid potential hazards, repairs such as
replacing a damaged cord should only be
performed by our service personnel.
Never immerse the appliance or power cord
Do not reach into the grinding unit.
The milk frother for milk and hot water gets
very hot. After use, allow to cool down rst
− Factory settings 33
Preparation using coffee beans 33
Preparation using ground coffee 34
Preparing milk froth and warm milk 35
Dispensing hot water 35
Maintenance and daily cleaning 35
− Cleaning the milk system 36
− Cleaning the brewing unit 36
Storing accessories 37
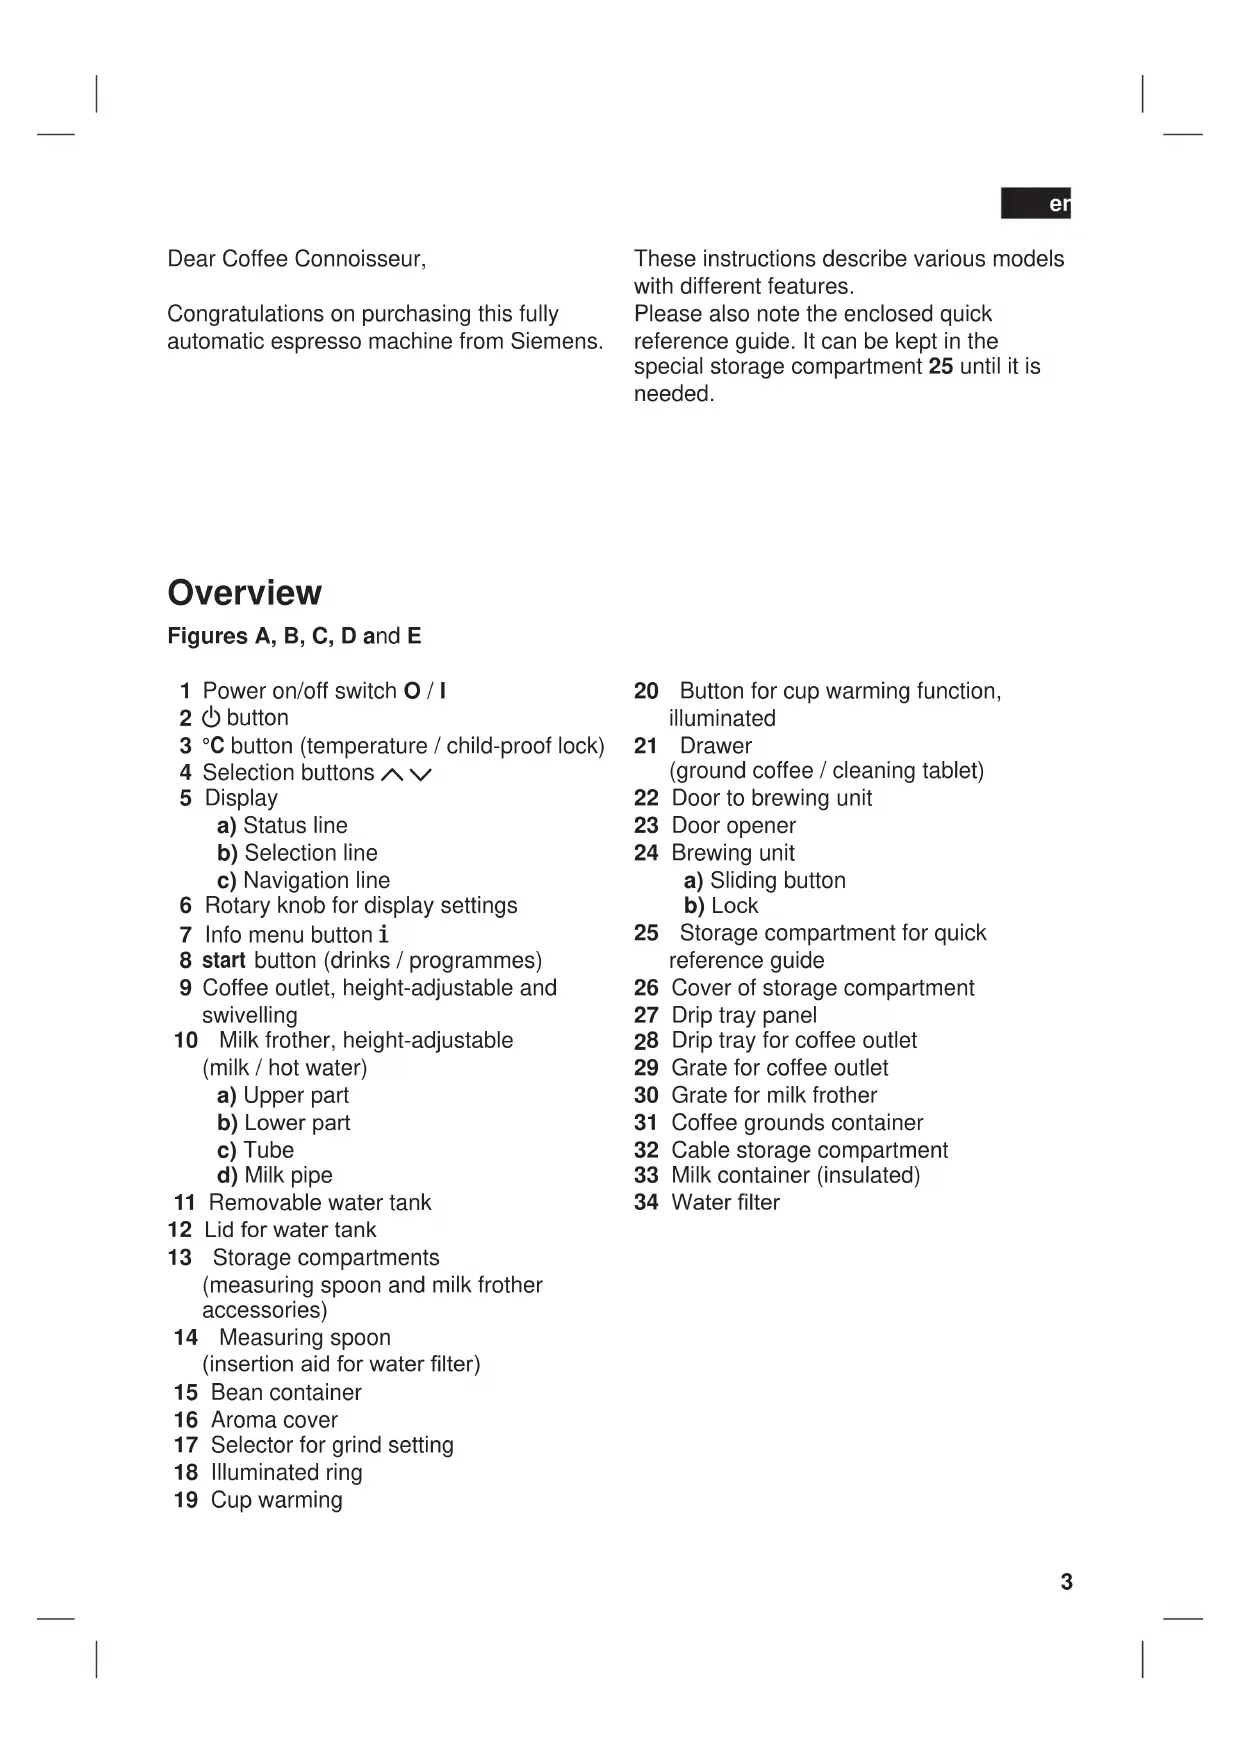
Congratulations on purchasing this fully
automatic espresso machine from Siemens.
These instructions describe various models
with different features.
Please also note the enclosed quick
reference guide. It can be kept in the
special storage compartment 25 until it is
Figures A, B, C, D and E
1 Power on/off switch O / I
9 Coffee outlet, height-adjustable and
10 Milk frother, height-adjustable
11 Removable water tank
12 Lid for water tank
13 Storage compartments
(measuring spoon and milk frother
(insertion aid for water lter)
17 Selector for grind setting
20 Button for cup warming function,
(ground coffee / cleaning tablet)
22 Door to brewing unit
25 Storage compartment for quick
26 Cover of storage compartment
8 Drip tray for coffee outlet
29 Grate for coffee outlet
30 Grate for milk frother
31 Coffee grounds container
32 Cable storage compartment
33 Milk container (insulated)
Fill the water tank with fresh, uncarbonated
water only, and preferably use only beans
for fully automatic coffee and espresso
machines. Do not use coffee beans that
have been glazed, caramelised or treated
with other additives containing sugar, since
they will block the brewing unit.
The water hardness setting can be adjusted
on this appliance. The factory default setting
for the water hardness is 4. Check the
water hardness with the enclosed test strip.
If a value other than water hardness 4 is
displayed, change the setting on the
appliance accordingly after switching on
(see “Menu settings Water hardness”).
Switching on the appliance
Place the fully automatic espresso
machine on a at surface that can take its
Note: The appliance has four runners under
its base and can be moved sideways in an
arc to make operation and positioning
Pull the power cord out of the storage
compartment 32 and plug in. Adjust the
length of the cable by pushing it back in
or pulling it out. The easiest way to do
this is to place the appliance so that its
back is ush with the edge of the counter
and either pull the cable downward or
Lift the lid of the water tank 12.
Remove and rinse the water tank 11 and
ll it with fresh cold water.
Do not ll above the “max” mark.
Replace the water tank 11 and push it
rmly downward into place.
Close the lid of the water tank 12 again.
Fill the bean container 15 with coffee
button 8 lights up and the different
languages appear in the display 5.
< and > 4 to select the
language in which you want the display
LanguageengLish startPycckийnederLands The selected language is highlighted by a
frame. The following languages can be
you selected is saved and the
●5 deen● Press the a button 2. The brand logo lights up in the display 5. The appliance now heats up and rinses. Some water will run out of the coffee outlet 9. The appliance is ready for use when the symbols for selecting the type of coffee preparation appear in the display 5. esPresso Ë Í
 à À Á Ä Å Note: The factory settings of the fully automatic espresso machine are programmed for optimal performance. The appliance switches to “energy saving mode” automatically after 1 hour (see “Menu settings auto oFF aFter”). Tip: If the appliance is being used for the rst time or has not been operated for a long period, the rst cup of coffee will not have the full aroma.When using the espresso machine for the first time, you will achieve a suitably thick and stable “crema” only after the first few cups have been dispensed. Controls Power on/off switch O / IThe power switch 1 O / I is used to switch the appliance to “energy saving mode” or to switch it off completely. In “energy saving mode” only the a button 2 lights up.Important: Do not switch the appliance off at the power on/off switch 1 until it is in energy saving mode, so that the automatic rinse process can take place. a button The appliance is switched on (ready for use) or put into “energy saving mode” with the a button 2. The
a button 2 ashes while the appliance is rinsing. The appliance does not rinse if:it is still warm when switched onno coffee was dispensed before it was switched to “energy saving mode”.The appliance is ready for use when the symbols for drink selection and the start
button 8 light up on the display 5.Rotary knobTurn the knob 6 to the left or right to navigate through the display 5, or to adjust parameters in the menu.Selection buttons < and >
Press the selection buttons < and > 4 to navigate up and down through the menu levels (navigation line 5c). ●
●6 deenDisplay The display 5 uses symbols to indicate the selection options, coffee strength and per-cup quantity, and uses texts to indicate settings, ongoing processes and messages. The rotary knob 6 and selection buttons 4 can be used to change settings. The selected setting is highlighted by a frame. esPresso ËË Í
 à À Á Ä Å The status line 5a in the display shows the name of the type of drink, along with the strength setting, e.g. 55 and per-cup quantity, e.g. � . The selection line 5b shows symbols for drink selection.The arrows in the navigation line 5c indicate the direction in which more menu levels can be found.Display messagesVarious messages are shown on the display 5.Information: Water tank aLmost emPty
Bean container aLmost emPty
PLease Wait Prompts: reFiLL Water tank
service - change FiLter
service - caLc‘n‘cLean
c7 deen my coFFee ËË Í
miLk system Coffee strength (only for coffee drinks) 5 5 5 5 5 5 mild regular strong Per-cup quantity (only for coffee drinks) � Ð Ò small medium largeIn addition to selecting the coffee strength and per-cup quantity you can choose the exact mix of espresso and milk for your own coffee setting my coFFee Ç. The setting can be dened in 20% steps by turning the rotary knob 6.8
button 8 to begin drink
button 8 again during drink
preparation to cut the dispensing process
button 3 to set the temperature
for coffee and tea water (press briey) and
to switch the child-proof lock on or off
(hold down for at least 3 seconds).
Setting the temperature:
button 3 briey and enter the
settings with the < and > buttons 4 and
button 3 again to save the
settings and return to drink selection.
These settings are automatically effective
for all types of coffee preparation.
The appliance can be locked to protect
children from scalding and burning.
button 3 for at least 3
seconds. The display 5 shows a key: the
child-proof lock is activated.
It is no longer possible to operate the
appliance and the cup warmer 19 is
● To deactivate the child-proof lock, hold
button 3 for at least 5
seconds. The key disappears from the
j button and settings
Use the j button 7 to display information
(press briey) and adjust settings (hold
down for at least 3 seconds).
Displaying information
The following information can be displayed
how many drinks have been dispensed
since the espresso machine was switched
when should the next service be
j button 7 briey and navigate
with the < and > buttons 4.
change FiLter in xxx cuPs *
*appears only if the lter is activated.
Press the j button 7 again briey to return
to drink selection. If no button is pressed for
about 10 seconds the appliance
automatically switches back to drink
(see “Menu settings”).
Adjusting the grinding unit
The rotary selector 17 adjusts the grind
settings from coarse to ne.
Adjust the grinding unit only while it is
running! Otherwise the appliance may be
● While the grinding unit is running, adjust
the rotary selector 17 from ne • • • to
coarse ● ● ● as required.
Note: The new setting will not become
apparent until after the second cup of
Tip: For dark roast coffee beans, choose a
The fully automatic espresso machine has a
cup warmer 19 that can be switched on or
off manually with button 20. When the cup
warmer 19 is on, button 20 lights up.
Tip: For optimal cup warming, place the
base of the cups on the cup warmer 19.
The cup warming function can also be pre-
programmed (see “Menu settings cuP Warmer on”).10 deen Menu settings ● Hold the j button down for at least 3 seconds.The different setting options are now displayed settings
descaLe In the following operating instructions, each new setting begins with j 3 sec. + > followed by an exact description.The different setting options can be selected with the < and > buttons 4. settingsWater hardnessdescaLe startcLeanN.B.: The changes you have made are saved automatically. It is not necessary to conrm them additionally.
Language ● Turn the knob 6 to select the required language j 3 sec. + >
Water hardness ● Turn the knob 6 to select the required water hardness 1,2,3 or 4. Note: It is important to set the water hardness correctly, so that the appliance indicates accurately when the descaling programme should be run. The factory setting for the water hardness is 4. You can check the water hardness using the enclosed test strip or by asking your local water supplier. ● Dip the test strip in the water briey and check the result after 1 minute.Level Water hardnessGerman (°dH) French (°fH) 1
descaLe ● If you want to descale the appliance, press the start button 8 and run the descaling programme (see “Descaling”). j 3 sec. + >
cLean ● If you want to clean the appliance, press the start button 8 and run the cleaning programme (see “Cleaning”). j 3 sec. + >
caLc‘n‘cLean ● If you want to descale and clean the appliance, press the start button 8 and run the Calc‘n‘Clean programme (see “Calc‘n‘Clean”).11
With this function you can set the clock to
show the time in the display 5 during energy
● Turn the knob 6 to switch the clock
display on = yes or off = no.
Note: You must already have set the time
as shown in set cLock.
In time mode you can turn the knob 6 to
● Turn the knob 6 to set the current time,
e.g. 08:25. The gure that can be set is
always backlit; the backlighting switches
automatically between the hours and
With this additional function the cup warmer
19 switches on automatically at a
programmable time, irrespective of whether
the appliance is in “energy saving mode” or
Note: You must already have set the time
Set the required time by turning the knob
6. If oFF is selected, the function is
Here you can set the time span after which
the cup warmer 19 switches off again
Turn the knob 6 to enter the time span
after which the appliance should
automatically switch to “energy saving
mode” following drink preparation.
A time between 5 minutes and 8 hours can
Before a new water lter 34 is used, it must
To do this, press the water lter 34 rmly
into the water tank 11 with the aid of the
measuring spoon 14. Fill the water tank
with water up to the “max” mark.
Turn the knob 6 to select start and
Place a container with a capacity of 0.5
litres under the milk frother 10.
button 8. Water will now
ow through the lter 34 to rinse it.
Next, empty the container. The appliance
is ready to use once more.
Note: Rinsing the lter 34 simultaneously
activates the setting for the “change lter”
You can nd detailed information about the
water lter in the enclosed lter instructions.
The lter 34 is no longer effective when the
change FiLter display appears, or at the
latest after 2 months. It needs to be
replaced for reasons of hygiene and so that
there is no build-up of limescale (this could
damage the appliance).
Replacement lters can be obtained from
retailers (TZ70003) or from customer
service (467873). If no new lter 34 is used,
turn the Water FiLter setting to no.
●12 deenNote: If the appliance has not been used for a prolonged period (e.g. vacation) the lter 34 should be rinsed before the appliance is used again. To do this, simply dispense a cup of hot water.j 3 sec. + >
contrast The display contrast can be set from –20 to +20. The factory setting is +0.Enter the required setting with the knob 6.j 3 sec. + >
Factory settings You can cancel your own settings and reactivate the factory settings.To activate the factory settings, press the start button 8.Note: The appliance can also be reset to the factory settings using a combination of buttons. The appliance must be switched off fully. Hold down the < and > buttons 4 and the on/off switch 1 O / I at the same time for at least 5 seconds. Press the start
button 8. The factory settings are now reactivated. Preparation
using coffee beans This fully automatic espresso machine grinds beans freshly for each brew. If possible, use only beans for fully automatic coffee and espresso machines. For optimal quality, deep-freeze the beans or store in a cool place in sealed containers. Coffee beans can be ground while frozen. Important: Fill the water tank 11 with fresh water every day. The tank should always contain sufcient water for operating the appliance.Tip: Pre-warm cups, especially small, thick espresso cups, on the cup warmer 19. ●
● Different coffee drinks can be prepared quite simply at the press of a button. Drink preparation without milkThe appliance must be ready for use.Place the pre-warmed cup(s) under the coffee outlet 9. Select the required espresso or coffee by turning the knob 6. The display 5 shows the selected drink along with the setting for coffee strength and the per-cup quantity for this drink. esPresso Ë Í
 à À Á Ä Å The settings can be altered (see “Controls”).Press the start button 8.The coffee is brewed and then dispensed into the cup(s).Drink preparation with milkThe appliance must be ready for use.● Place the pipe 10d of the milk frother 10 deep in the milk container 33.Swivel the coffee outlet 9 to the right until it clicks into place.Place the pre-warmed cup or glass under the coffee outlet 9 and milk frother 10.Select the required Macchiato Å
, Cappuccino Æ , White coffee Ä or My coffee Ç by turning the knob 6. The display 5 shows the selected drink along with the setting for coffee strength and the per-cup quantity for this drink. caPPuccino Ë Í
The settings can be altered (see “Controls”).
button 8. First milk is
delivered into the cup or glass. Then the
coffee is brewed and dispensed into the
Important: Dried milk residue is difcult to
remove, so clean the milk frother 10 with
lukewarm water immediately after use
(see “Cleaning the milk system”).
also be operated with ground coffee (not
instant coffee powder).
Drink preparation without milk
Select À or Á by turning the knob 6.
Place the pre-warmed cup(s) under the
Open the drawer 21 by pressing.
Pour in no more than 2 level measuring
spoons 14 of ground coffee.
Warning: Do not use whole beans or
The coffee is brewed and then dispensed
N.B.: Repeat the procedure for another cup
of coffee. If no coffee is taken within 90
seconds, the brewing chamber empties
automatically to avoid overlling. The appli-
Drink preparation with milk
Place the pipe 10d of the milk frother 10
in the milk container 33.
Swivel the coffee outlet 9 to the right until
it clicks into place.
Place the pre-warmed cup or glass under
the coffee outlet 9 and milk frother 10.
Open the drawer 21 by pressing.
Pour in no more than 2 level measuring
spoons 14 of ground coffee.
Warning: Do not use whole beans or
button 8. First milk is
delivered into the cup or glass. After that
the ground coffee is brewed and
dispensed into the cup or glass.
Important: Dried milk residue is difcult to
remove, so clean the milk frother 10 with
lukewarm water immediately after use (see
“Cleaning the milk system”).
N.B.: Repeat the procedure for another
coffee / milk drink. If no coffee is taken
within 90 seconds, the brewing chamber
empties automatically to avoid overlling.
The appliance rinses.
Preparing milk froth
The milk frother 10 gets very hot. After use,
allow to cool down rst before touching.
The appliance must be ready for use.
Place the pipe 10d of the milk frother 10
in the milk container 33.
Place the pre-warmed cup or glass under
the outlet of the milk frother 10.
Select the required setting
button 8. Milk froth or
warm milk ows from the outlet of the milk
frother 10 for about 40 or 60 seconds
button 8 again to cut the
Note: When preparing warm milk you may
hear a whistling sound. This is caused by
the milk frother 10 for technical reasons.
Tip: For optimal milk froth quality, use cold
low-fat milk (1.5% fat) if possible.
Important: Dried milk residue is difcult to
remove, so clean the milk frother 10 with
lukewarm water immediately after use (see
“Cleaning the milk system”).
Dispensing hot water
The milk frother 10 gets very hot. After use,
allow to cool down rst before touching.
The appliance must be ready for use.
Place the pre-warmed cup or glass under
the outlet of the milk frother 10.
Select the required setting for hot water
by turning the knob 6.
out of the milk frother outlet 10 for about
button 8 again to cut the
N.B.: It is possible to set the temperature of
the hot water (see “Controls, °
Maintenance and daily
! Risk of electric shock
Unplug the appliance before cleaning it.
Never immerse the appliance in water.
Do not use a steam cleaner.
Wipe the outside of the appliance with a
soft, damp cloth. Do not use abrasive
cloths or cleaning agents.
Rinse the water tank 11 and the brewing
unit 24 with water only.
The cover of the storage compartment
26, the drip tray panel 27 and the
insulating cover of the milk container 33
should only be wiped gently with a damp
cloth. Do not put them in the
Remove the grate for the coffee outlet 29,
and the grate for the milk frother 30. Take
out the drip tray for coffee outlet 28 with
the coffee grounds container 31 by pulling
them out forward, empty and clean. All
these parts can also be cleaned in the
Clean the measuring spoon 14, aroma
cover 16 and the inside of the milk
container 33 by hand or in the dish
Wipe out the inside of the appliance (tray
Important: Drip tray 28 should be emptied
and cleaned daily to prevent mould from
N.B.: If the appliance is cold when switched
a button 2, or if it is set to a
mode after brewing coffee, it rinses
automatically, in other words the system
Cleaning the milk system
Clean the milk system 10 immediately after
The milk system 10 can be pre-cleaned
symbol in the display 5 and
PLace emPty gLass under Frother,
P Lace suction PiPe in gLass
Place an empty glass under the milk
system 10 and put the end of the pipe
button 8. The appliance
now lls the glass automatically with
water and draws it in again through the
pipe 10d for cleaning. The rinse
procedure stops automatically after about
Now empty the glass and clean the pipe
In addition to this, clean the milk system
thoroughly at regular intervals (by hand or
Dismantling the milk system 10 for
Pull the milk system 10 forward out of the
Clean the individual parts (Fig. C) with a
detergent solution and a soft brush.
Rinse all parts with clear water and dry
Reassemble all the parts and replace fully
Note: All the parts of the milk frother 10 can
also be put in the dishwasher.
Cleaning the brewing unit
(refer also to the quick reference guide)
In addition to the automatic cleaning pro-
gramme, the brewing unit 24 should be
removed regularly for cleaning.
Switch to the “energy saving mode” with
Switch the appliance off completely at the
power on/off switch 1 O / I; no buttons
Slide the door opener 23 to the right and
open the door 22 to the brewing unit 24.
Slide the red lock 24b on the brewing unit
24 completely to the left.
Press the red button 24a, grasp the
brewing unit 24 by the recessed grips
(Fig. E) and remove carefully.
Rinse the brewing unit 24 under running
Important: Clean without detergent and do
not place in the dishwasher.
Wipe out the inside of the appliance with
Allow the brewing unit 24 and the inside
of the appliance to dry.
Reinsert the brewing unit 24 fully into the
Slide the red lock 24b fully to the right
The espresso machine has special com-
partments for storing the accessories and
quick reference guide inside the appliance.
To store the measuring spoon 14, milk
pipe 10d and tube 10c, remove the water
tank 11 and insert the parts in the shaped
The quick reference guide has its own
compartment by the brewing unit 24.
Open the door 22 to the brewing unit.
Grasp the red cover 26 to the storage
compartment 25 by the tab and remove.
Stow away the quick reference guide,
replace the cover 26 and close the door
to the brewing unit 22.
Tips on energy saving
The fully automatic espresso machine
switches to “energy saving mode”
automatically after one hour (factory
setting). The appliance uses very little
power in “energy saving mode”. The
default time of one hour can be altered:
(see Menu settings, “auto oFF aFter”) .
If the appliance is not being used, switch
it off at the power on/off switch 1 O / I on
If possible, do not interrupt coffee or milk
froth dispensing. Cutting the coffee or
milk froth dispensing process short
results in higher energy consumption and
in more residual water collecting in the
Descale the appliance regularly to avoid a
build-up of limescale. Limescale residue
results in higher energy consumption.
Tip: Refer also to the quick reference guide
in the storage compartment 25.
At regular intervals, the display 5 shows the
service - caLc‘n‘cLean.
The appliance should be cleaned or des-
caled immediately using the corresponding
programme. You also have the option of
combining both processes with thethe
Calc‘n‘Clean function (see “Calc‘n‘Clean”).
If the service programme is not run as
instructed, the appliance may be damaged.
Each time you run the service programme,
you should follow the instructions for using
the descaling and cleaning agents.
Never interrupt the service programme!
Do not drink the liquids!
Never use vinegar, vinegar-based products,
citric acid or citric acid-based products!
Never put descaling tablets or other
descaling agents in the ground coffee
drawer or the drawer for cleaning tablets!
For descaling, use only the descaling
tablets included with the appliance. They
have been developed specially for this coffee
machine to optimise the descaling process.
Specially developed descaling and
cleaning tablets are available from
retailers or customer service.
Order number Retail Customer
Important: If there is a lter 34 in the water
tank 11, it needs to be removed before the
service programme is run.17 deen Descaling
The start button 8 ashes while the different descaling processes are running.The gures on the top right indicate the progress of the programme.Hold the j button 7 down for at least 3 seconds. descaLe
start Press the start button 8; the display 5 will guide you through the programme. emPty driP tray
ePLace driP tray Empty drip tray 28 and replace them. PLace 0.5 L container under miLk Frother
start Place a container with a capacity of 0.5 litres under the milk frother 10.Press the start button 8. Note: If the water lter 34 is activated, the display will prompt you to remove the lter 34, then press the start button 8 again remove FiLter
add 0.5 L Water and descaLer
start Pour lukewarm water into the empty water tank 11 up to the “0.5” litre mark and dissolve 2 Siemens descaling tablets in it.Press the start button 8. The descaling programme will now run for about 20 minutes. descaLing
not enough descaLing
FLuid. reFiLL FLuid Note: If there is not enough descaling solution in the water tank 11, the corresponding prompt is displayed. Pour in descaling solution and press start 8 again. cLean and reFiLL Water tank
start Rinse the water tank 11 and rell it with fresh water up to the “max” mark.Press the start button 8. The descaling programme now runs for about 1 minute and rinses the appliance. descaLing
rePLace driP tray Empty drip tray 28 and replace them.The appliance has completed descaling and is ready for use again. Cleaning
The start button 8 ashes while the different cleaning processes are running.The gures on the top right indicate the progress of the programme.Fill the water tank 11 up to the “max” mark.Hold the j button 7 down for at least 3 seconds. cLean
ePLace driP tray Empty drip tray 28 and replace them. The appliance rinses twice. Position sWiveL arm Swivel the coffee outlet 9 to the left until it clicks into place. cLeaning
oPen draWer Open the drawer 21 by pressing. insert siemens cLeaning taBLet and
cLose draWer Drop a Siemens cleaning tablet in the drawer 21 and close. Press start Press the start button 8. The cleaning programme will now run for about 7 minutes. cLeaning
ePLace driP tray Empty drip tray 28 and replace them.The appliance is ready for use again. Calc‘n‘Clean Calc‘n‘Clean combines the separate functions of descaling and cleaning. If both programmes are due to be run soon, the espresso machine automatically suggests this service programmes. esPresso Ë Í
service - caLc‘n‘cLean
The start button 8 ashes while the different Calc‘n‘Clean processes are running. The ●
● gures on the top right indicate the progress of the programmes.Hold the j button 7 down for at least 3 seconds. caLc‘n‘cLean
start Press the start button 8; the display will guide you through the programme. emPty driP tray
rePLace driP tray Empty drip tray 28 and replace them.Swivel the coffee outlet 9 to the right until it clicks into place.Place a container with a capacity of at least 1 litre under the milk frother 10.Press the start button 8. The appliance rinses twice. cLeaning
Pen draWer Open the drawer 21 by pressing. insert siemens cLeaning taBLet and
cLose draWer Drop a Siemens cleaning tablet in the drawer 21 and close.Note: If the water lter 34 is activated, the display 5 will prompt you to remove the lter 34 and press the start button 8 again. remove FiLter
add 0.5 L Water and descaLer
start Pour lukewarm water into the empty water tank 11 up to the “0.5” litre mark and dissolve 2 Siemens descaling tablets in it.Press the start button 8. The descaling programme now runs for about 20 minutes. descaLing
not enough descaLing
FLuid. reFiLL FLuid Note: If there is not enough descaling solution in the water tank 11, the ●
●19 deencorresponding prompt is displayed. Pour in descaling solution and press start 8 again. cLean and reFiLL Water tank
start Rinse the water tank 11 and rell it with fresh water up to the “max” mark.Press the start button 8. The descaling programme now runs for about 1 minute more, followed by the cleaning programme for about 7 minutes, and rinses the appliance. descaLing
ePLace driP tray Empty drip tray 28 and replace them.The appliance has completed descaling and cleaning and is ready for use again.Important: If one of the service programmes is interrupted, e.g. by a power outage, proceed as follows:Rinse the water tank 11 and rell it with fresh water up to the “max” mark.Press the start button 8. The cleaning programme now runs for about 3 minutes, and rinses the appliance. cLeaning
ePLace driP tray Empty drip tray 28 and replace them.The appliance is ready for use again. Frost protection
! To avoid damage from low tempera-tures during transport and storage, the appliance must be completely emptied rst.Note: The appliance must be ready for use and the water tank 11 lled.Place a large, narrow receptacle under the milk frother 10. ●
● Select the “Milk froth” È setting, start and release steam for about 15 seconds.Switch the appliance off at the power on/ off switch 1 O / I. Empty the water tank 11 and the drip tray 28. Disposal
A This appliance is labelled in accordance with the European Directive 2002/96/EG relating to waste electrical and electronic equipment – WEEE. The directive provides the framework for the EU-wide take-back and disposal of end-of-life appliances.Please ask your specialist retailer about current disposal facilities. Accessories The following accessories can be obtained from retailers and customer service.Order numberRetail Customer serviceCleaning tabletsTZ60001 310575Descaling tabletsTZ60002 310967Water filters TZ70003 467873 Guarantee The guarantee conditions for this appliance are as dened by our representative in the country in which it is sold. Details regarding these conditions can be obtained from the dealer from whom the appliance was pur-chased. The bill of sale or receipt must be produced when making any claim under the terms of this guarantee.Right of modication reserved. ●
reFiLL Bean container
although the bean container
15 is full, or the grinding unit
does not grind the beans.
Beans are not falling into
Change the type of coffee if
When the bean container 15
is empty, wipe it with a dry
No hot water dispensed. The milk frother 10 or its
Clean the milk frother 10 or
Too little or no milk froth
The milk frother 10 does not
The milk frother 10 or its
Clean the milk frother 10 or
Milk unsuitable for frothing. Use low-fat milk (1.5 % fat).
The milk frother 10 is not
correctly assembled.
Assemble the milk frother 10
Coffee dispensing slows to
a trickle or stops completely.
Coffee is ground too nely.
Pre-ground coffee is too
Adjust the grinding unit to a
coarser setting. Use coarser
Build-up of limescale in the
Descale the appliance.
Coffee has no “crema”. Unsuitable type of coffee. Change type of coffee used.
The beans are no longer
The grinding setting is not
suitable for the beans.
Adjust grinding setting to
Coffee is too “acidic”. The grinding setting is too
coarse or the pre-ground
Adjust the grinding unit to a
ner setting or use ner pre-
Unsuitable type of coffee Use a darker roast.
Coffee is too “bitter”. The grinding setting is too
ne or the pre-ground
Adjust the grinding unit to a
coarser setting or use
coarser pre-ground coffee.
Unsuitable type of coffee. Change type of coffee used.
P Lease contact hotLine.
The appliance has a fault. Please call the hotline.
If you are unable to solve the problem, please call the hotline.
Simple troubleshooting21
Problem Cause Solution
The water filter 34 does not
stay in position in the water
The water filter 34 is not
Press the water filter 34
firmly into the tank
attachment until you feel it
The coffee grounds are not
compact and are too wet.
The grind setting is too fine
or too coarse, or you are
not using enough pre-
Adjust the grinding unit to a
coarser or finer setting, or
use 2 level measuring
spoons of ground coffee.
PLease check BreWing
Brewing unit is soiled. Clean brewing unit.
coffee in the brewing unit.
(Pour in no more than 2
level measuring spoons of
Coffee or milk froth quality
varies considerably.
Build-up of limescale in the
Descale the appliance with
two descaling tablets as
described in the instructions.
Water dripped onto the inner
floor of the appliance when
the drip tray was removed.
Drip tray removed too early. Wait a few seconds after
the last drink was dispensed
before removing the drip
If you are unable to solve the problem, please call the hotline.
c27 defr my coFFee ËË Í
Figure A, B, C, D ed E
(waste electrical and electronic equipment-
BSH Home Appliances FZE Round About 13,
HEATHERTON, Victoria 3202
Centrale Servicestation
www.bshappliancecare.co.uk/
Service Requests (nationwide)
mailto:mks-servicerequest@
Spares and Accessories
North Block, Skyway House
IE Republic of Ireland
Unit F4, Ballymount Drive
Ballymount Industrial Estate
Service Requests, Spares and
Industrial Park North
BSH Home Appliances (SEA)
15 th Rd., Randjespark