
XWW BTS5 - Pregnant PIONEER - Free user manual and instructions
Find the device manual for free XWW BTS5 PIONEER in PDF.
| Product type | Active 2-way speaker |
| Dimensions (W x H x D) | 140 mm x 218 mm x 160 mm (per speaker) |
| Weight | 3.8 kg per speaker (without packaging or adapter) |
| Power supply | AC 100 V - 240 V, 50/60 Hz or DC 20 V, 2.4 A (AC adapter included) |
| Power consumption | 48 W in operation, 0.5 W in standby |
| Output power (RMS) | 25 W + 25 W (left/right front) |
| Speakers | Tweeter: 2.5 cm cone × 1 per speaker; Woofer: 10 cm cone × 1 per speaker |
| Frequency range | 50 Hz - 20 kHz |
| Wireless connectivity | Bluetooth 2.4 GHz (A2DP profile) |
| Connectors | AUX IN jack (mini-jack), SPEAKER OUT jack for left speaker, DC IN |
| Control functions | Buttons: Standby/ON, Play/Pause, Mute, Volume +/-, Input selector (Bluetooth/AUX) |
| Auto power save mode (APS) | Standby after 20 minutes of inactivity (adjustable ON/OFF) |
| Operating temperature | +5°C to +35°C, relative humidity < 85% |
| Supplied accessories | AC adapter with regional plug, speaker cable (1), rubber feet (8), warranty card, instruction manual |
| Maintenance and cleaning | Wipe with a soft cloth; for stubborn stains, use a diluted neutral detergent; avoid alcohol, thinners, benzene |
| Safety precautions | Do not expose to water, flames, do not block ventilation openings (10 cm clearance), use only the supplied adapter |
Frequently Asked Questions - XWW BTS5 PIONEER
User questions about XWW BTS5 PIONEER
0 question about this device. Answer the ones you know or ask your own.
Ask a new question about this device
Download the instructions for your Pregnant in PDF format for free! Find your manual XWW BTS5 - PIONEER and take your electronic device back in hand. On this page are published all the documents necessary for the use of your device. XWW BTS5 by PIONEER.
USER MANUAL XWW BTS5 PIONEER
Wireless speaker system
Diffusore Wireless
Draadloos speaker system
Bluetooth
Operating Instructions
Mode d'emploi
The lightning flash with arrowhead symbol, within an equilateral triangle, is intended to alert the user to the presence of uninsulated "dangerous voltage" within the product's enclosure that may be of sufficient magnitude to constitute a risk of electric shock to persons.
CAUTION
RISK OF ELECTRIC SHOCK
DO NOT OPEN
CAUTION:
TO PREVENT THE RISK OF ELECTRIC SHOCK,DO NOT REMOVE COVER (OR BACK).NO USER-SERVICEABLE PARTS INSIDE.REFER SERVICING TO QUALIFIED SERVICE PERSONNEL.

The exclamation point within an equilateral triangle is intended to alert the user to the presence of important operating and maintenance (servicing) instructions in the literature accompanying the appliance.
D3-4-2-1-1_A1_En
WARNING
This equipment is not waterproof. To prevent a fire or shock hazard, do not place any container filled with liquid near this equipment (such as a vase or flower pot) or expose it to dripping, splashing, rain or moisture.
D3-4-2-1-3_A1_En
WARNING
Before plugging in for the first time, read the following section carefully.
The voltage of the available power supply differs according to country or region. Be sure that the power supply voltage of the area where this unit will be used meets the required voltage (e.g., 230 V or 120 V) written on the AC adapter label.
D3-4-2-1-4*A1En
WARNING
To prevent a fire hazard, do not place any naked flame sources (such as a lighted candle) on the equipment.
D3-4-2-1-7a_A1_En
VENTILATION CAUTION
When installing this unit, make sure to leave space around the unit for ventilation to improve heat radiation (at least 10cm at top, 10cm at rear, and 10cm at each side).
WARNING
Slots and openings in the cabinet are provided for ventilation to ensure reliable operation of the product, and to protect it from overheating. To prevent fire hazard, the openings should never be blocked or covered with items (such as newspapers, table-cloths, curtains) or by operating the equipment on thick carpet or a bed.
D3-4-2-1-7b*A1En
Operating Environment
Operating environment temperature and humidity:
+5°C to +35°C (+41°F to +95°F); less than 85%RH (cooling vents not blocked)
Do not install this unit in a poorly ventilated area, or in locations exposed to high humidity or direct sunlight (or strong artificial light)
D3-4-2-1-7c*A1En
WARNING
Store small parts out of the reach of children and infants. If accidentally swallowed, contact a doctor immediately.
If the AC plug of this unit does not match the AC outlet you want to use, the plug must be removed and appropriate one fitted. Replacement and mounting of an AC plug on the power supply cord of this unit should be performed only by qualified service personnel.
If connected to an AC outlet, the cut-off plug can cause severe electrical shock. Make sure it is properly disposed of after removal.
The equipment should be disconnected by removing the mains plug from the wall socket when left unused for a long period of time (for example, when on vacation).
D3-4-2-2-1a_A1_En
CAUTION
The STANDBY/ON switch on this unit will not completely shut off all power from the AC outlet. Since the power plug serves as the main disconnect device for the unit, you will need to unplug it from the AC outlet to shut down all power. Therefore, make sure the unit has been installed so that the power plug can be easily unplugged from the AC outlet in case of an accident.
To avoid fire hazard, the power plug should also be unplugged from the AC outlet when left unused for a long period of time (for example, when on vacation).
D3-4-2-2-2a*A1_EN
This product is for general household purposes. Any failure due to use for other than household purposes (such as long-term use for business purposes in a restaurant or use in a car or ship) and which requires repair will be charged for even during the warranty period.
K041_A1_En
POWER-CORD CAUTION
Handle the power cord by the plug. Do not pull out the plug by tugging the cord and never touch the power cord when your hands are wet as this could cause a short circuit or electric shock. Do not place the unit, a piece of furniture, etc., on the power cord, or pinch the cord. Never make a knot in the cord or tie it with other cords. The power cords should be routed such that they are not likely to be stepped on. A damaged power cord can cause a fire or give you an electrical shock. Check the power cord once in a while. When you find it damaged, ask your nearest PIONEER authorized service center or your dealer for a replacement.
S002*A1En
AC adapter CAUTION
- Make sure to grasp the body of the AC adapter when removing it from the power outlet. If you pull the power cord, it may become damaged which could lead to fire and/or electrocution.
- Do not attempt to plug in or remove the AC adapter with wet hands. This may result in electrocution.
- Do not insert the power cord of AC adapter into a power outlet where the connection remains loose despite inserting the prongs all the way into the outlet. Heat may be generated which could lead to fire. Consult with the retailer or an electrician regarding replacement of the power outlet.
Store the AC adapter out of the reach of children and infants.
The AC adapter cord may accidentally wind around the neck and it may cause suffocation.
Radio wave caution
This unit uses a 2.4 GHz radio wave frequency, which is a band used by other wireless systems (Microwave ovens and Cordless phones, etc.). In this event noise appears in your television image, there is the possibility this unit (including products supported by this unit) is causing signal interference with the antenna input connector of your television, video, satellite tuner, etc. In this event, increase the distance between the antenna input connector and this unit (including products supported by this unit).
- Pioneer is not responsible for any malfunction of the compatible Pioneer product due to communication error/malfunctions associated with your network connection and/or your connected equipment. Please contact your Internet service provider or network device manufacturer.
- A separate contract with payment to an Internet service provider is required to use the Internet.

If you want to dispose this product, do not mix it with general household waste. There is a separate collection system for used electronic products in accordance with legislation that requires proper treatment, recovery and recycling.
Private households in the member states of the EU, in Switzerland and Norway may return their used electronic products free of charge to designated collection facilities or to a retailer (if you purchase a similar new one).
For countries not mentioned above, please contact your local authorities for the correct method of disposal.
By doing so you will ensure that your disposed product undergoes the necessary treatment, recovery and recycling and thus prevent potential negative effects on the environment and human health.
K058b_A1_En
Discover the benefits of registering your product online at http://www.pioneer.co.uk (or http://www.pioneer.eu).
Table of Contents
Before Start 5
Accessory Check Up
Connect the Left and Right Speaker
Connect DC Power
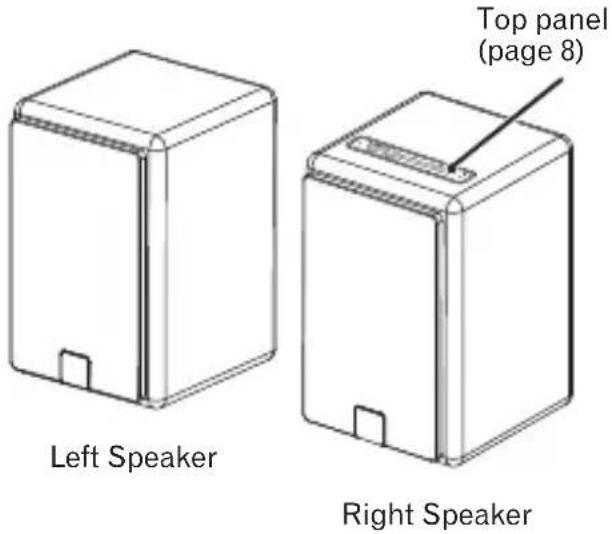
Part names and functions 7
Main view
Rear view
Back Panel
Top Panel
Getting started 9
Turning on
APS mode
Bluetooth Audio playback 10
Other Connections 14
Additional Information 15
Troubleshooting
Cautions on use
Specifications
- There will not be additional notification in this booklet if there is/ or will be any design change to the product itself.
- Thank you for the purchase of Pioneer product, please read Operating Instructions before use for the 1st time for correct operation. Keep this Operating Instructions for your future reference.
Switching type power adapter
Slide the power plug along the guide rails of the AC adapter as shown in the figure below until there is an audible click.

1. Accessory Check Up
Check the following items when opening the package:
- AC adapter × 1 (include Power Plug × 1 )
- Speaker cable × 1
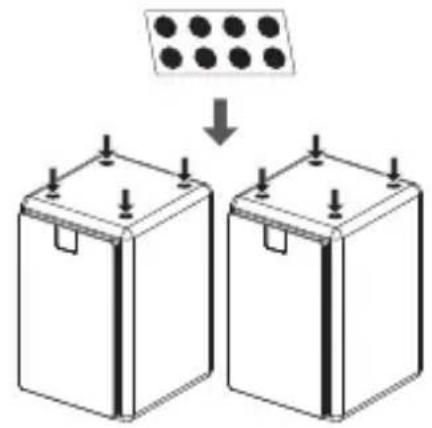
Rubber foot × 8
Warranty card × 1 - Operating Instructions (This Document)
2. Connect the Left and Right Speaker
Rear side of Right Speaker Rear side of Left Speaker
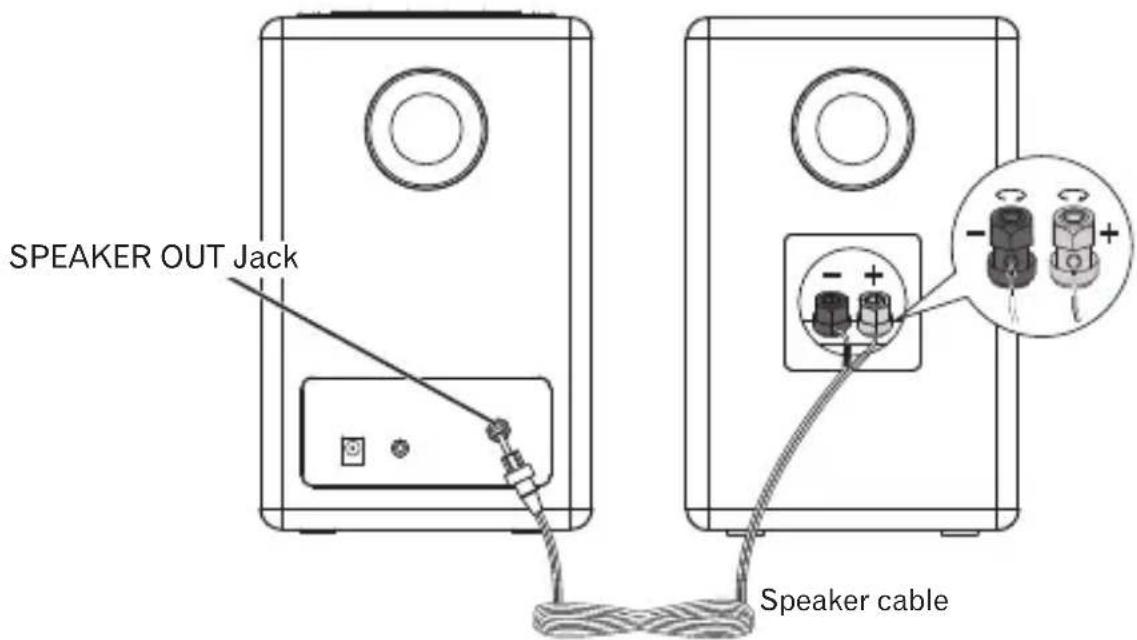
1.Unscrew the terminal a few turns until there is enough space to insert the exposed wire.
2. Connect the wire with a red belt to the red (+) terminal, and the wire with a black belt to the black (-) terminal.
3.Once the wire is in position, tighten the terminal until the wire is firmly clamped.
4. Connect the pin plug to the SPEAKER OUT Jack of the right speaker.

Note
- To avoid magnetic interference or unwanted noise, never place this product too close to any radiation devices.

CAUTION
- These speaker terminals carry HAZARDOUS LIVE voltage. To prevent the risk of electric shock when connecting or disconnecting the speaker cables, disconnect the power cord before touching any uninsulated parts.
- Do not connect the supplied speakers with any other amplifier. This may result in malfunction or fire.
- Do not let the bare speaker wires touch each other.
- Do not attach these speakers to the wall or ceiling, as they may cause injury in the event of a fall.
- Do not allow any objects to fall into or to be placed in the bass reflex ducts.
- Do not stand or sit on the speakers. You may be injured.
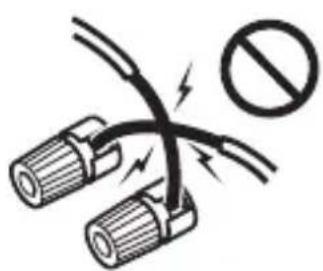
Incorrect
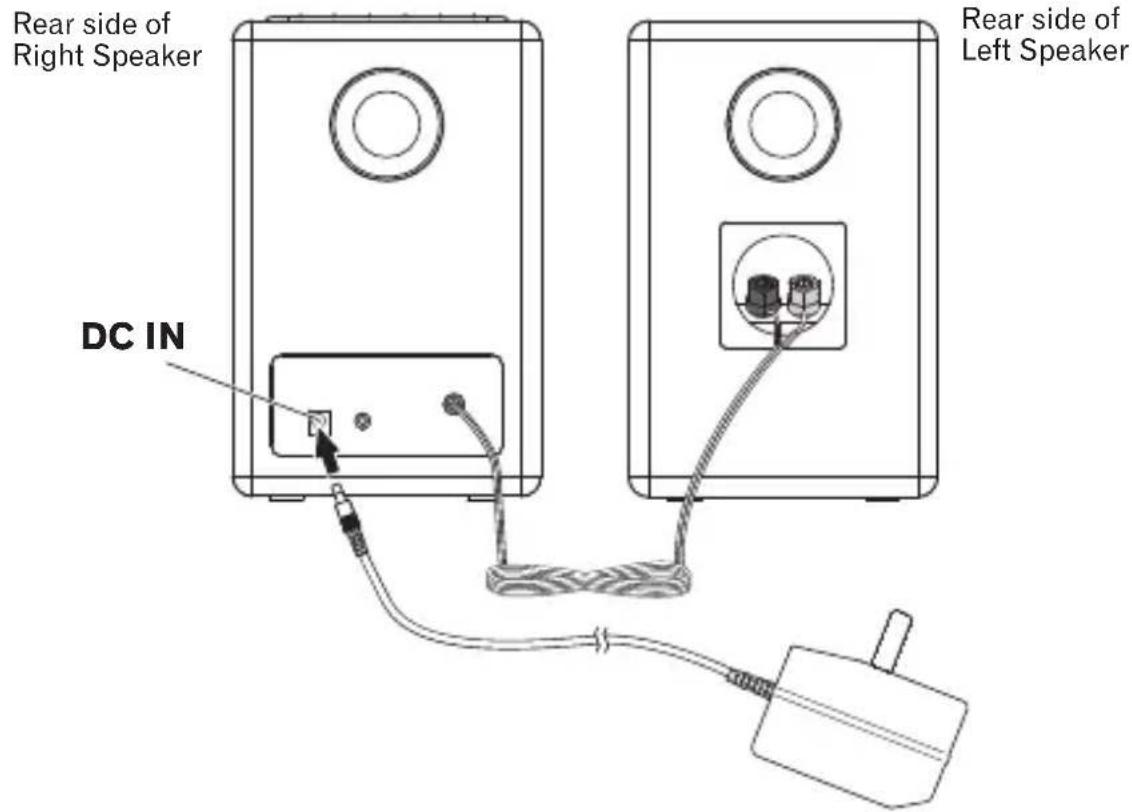
3. Connect DC Power
- Connect the AC adaptor's DC plug to the DC IN jack on the back panel. Then connect the power plug on the other end to the power outlet.
- Use only the AC adapter included in this package, do not use the power adapter of different specification.
Main view
Attaching Rubber feet
Apply the accessory rubber feet to the bottom surface of the unit.
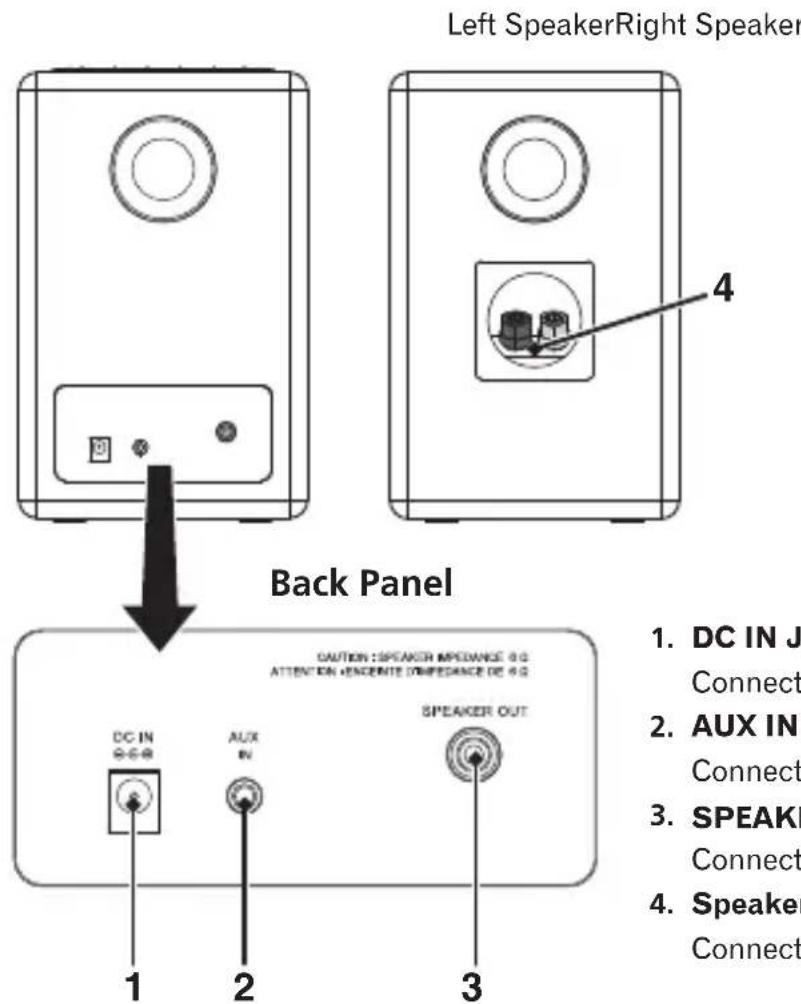
Rear view
- DC IN Jack
Connect the AC adapter.
- AUX IN Jack
Connect auxiliary components.
-
SPEAKER OUT Jack for Left Speaker Connect the pin plug of Speaker cable.
-
Speaker Terminal
Connect the Speaker cable.
Top Panel
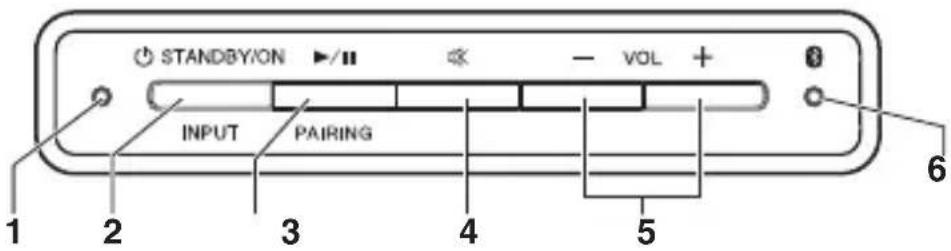
1. MODE Indicator
Light up Indicate green when the unit is in Bluetooth mode.
Light up Indicate orange when the unit is in AUX mode.
- In the standby mode, light up Indicated for 3 seconds when APS*1 is OFF.
- In the standby mode, light up Indicate green for 3 seconds when APS is ON.
2. STANDBY/ON
- Switch between standby and on. Press and hold to go into standby.
INPUT
- Switch the mode of Bluetooth and AUX.
3. Play / Pause
- Play/pause/resume playback.
PAIRING
- Press and hold to perform pairing with Bluetooth device.
4. Mute
- Silence the unit or restore the sound.
※ Blink MODE Indicator during Mute. - In the standby mode, press and hold to switch between APS on and off.
5. VOL + / -
- Adjust the listening volume.
The listening volume has a range from 0 to 30 (however, the unit is not equipped with a display to visually indicate the volume level). (Default setting: 10)
6. Bluetooth Indicator
Light up Indicate blue when Bluetooth device is connected.
- Blink during waiting for Bluetooth connection.
- Blink quickly for Bluetooth pairing.
Turning on
Press [STANDBY/ON] button. The indicator would light.
This unit switches to the last select mode.
APS mode
- After this unit is kept inactive for 20 minutes, it automatically switches to the standby mode.
- When 5 minutes before switching to the standby mode automatically, the indicator starts to blink.
How to turn off the APS mode
- Press and hold [Mute] button to turn off the APS mode in the standby mode and the indicator lights red for about 3 seconds.
- If the APS mode is turned on again, Press and hold [Mute] button in the standby mode and the indicator lights green for about 3 seconds.

Note
- When you play at low volume, this unit might switch to the standby mode automatically. Please increase the volume, or turn off the APS mode.
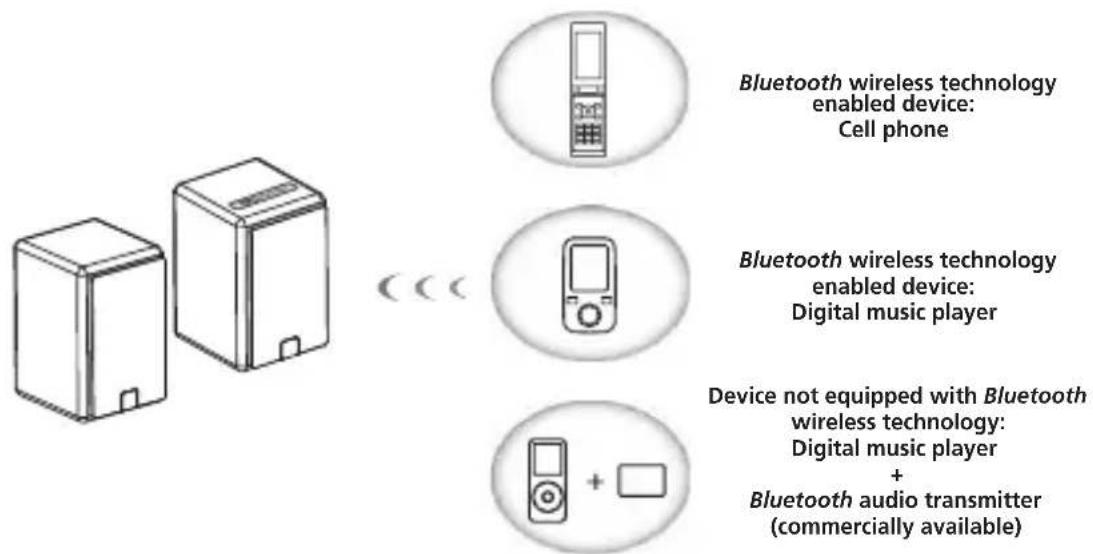
This product enables you to enjoy listening to music wirelessly from a Bluetooth wireless technology enabled device (cell phone, digital music player, etc.). *1 You can also enjoy music from a non-Bluetooth wireless technology enabled device using a Bluetooth audio transmitter available in stores. For details, refer to the user manual for the Bluetooth wireless technology enabled device.

Note
^*1 The Bluetooth wireless technology enabled device must support A2DP profiles.
- Pioneer does not guarantee proper connection and operation of this unit with all Bluetooth wireless technology enabled devices.
- The Bluetooth® word mark and logos are registered trademarks owned by Bluetooth SIG, Inc. and any use of such marks by PIONEER CORPORATION is under license. Other trademarks and trade names are those of their respective owners.
Pairing this unit and Bluetooth wireless technology device
To enjoy music from a Bluetooth wireless technology enabled device, pairing is required with this product. Make sure to perform pairing first time you operate the system or any time pairing data is cleared.
"Pairing" is the step necessary to register Bluetooth wireless technology device to enable Bluetooth communications. For more details, see also the operating instructions of your Bluetooth wireless technology device.
- Pairing is required when you first use Bluetooth wireless technology device and this unit.
-
To enable Bluetooth communication, pairing should be done with both of your system and Bluetooth wireless technology device.
-
Press [INPUT] button to select Bluetooth mode. (Mode Indicator: green).
- Press and hold [PAIRING] button until you hear 2 consecutive "beep" sounds. Then, the blue indicator on the top panel blinks quickly and the unit will enter the pairing mode.
- Switch on the Bluetooth wireless technology device that you want to perform pairing with, place the device within 1 m of the system, and set it to the pairing mode.
Pairing begins.
- In case of entering PIN code, use "0000".
(Only "0000" works for PIN code in this product.)
- When Bluetooth wireless technology device has connected, the blue indicator on the top panel will change from blinking to lit.
- Start playback of music contents stored in Bluetooth wireless technology device.
Connect the Latest Paired Bluetooth wireless technology Device
When the unit is switch on again to Bluetooth mode next time, it will be connected automatically with equipment that has the latest connected device already.
Connect previous Paired Bluetooth Device
- If you want to connect other paired device instead of the latest paired one, please make sure the Bluetooth connection of the latest device dis-connect. Then, the blue indicator on the top panel blinks slowly and the unit will change the waiting for connection mode.
*Alternatively, there is also a way to switch the unit in pairing mode.
- Switch on other paired device, and select this unit from this device Bluetooth list.
-
Connection with other devices is successful, the blue indicator will change from blinking to lit.
-
Operating range of Bluetooth audio is up to 10m (Measured in open space. Walls and structures may affect range of device.)
Radio wave caution
This unit uses a 2.4 GHz radio wave frequency, which is a band used by other wireless systems (see list below). To prevent noise or interrupted communication, do not use this unit nearby such devices, or make sure these devices are switched off during use.
- Cordless phones
- Cordless facsimiles
- Microwave ovens
- Wireless LAN devices
- Wireless AV equipment
- Wireless controllers for game systems
- Microwave-based health aids
Some baby monitors
Other, less common, equipment that may operate on the same frequency:
- Anti-theft systems
- Amateur radio stations (HAM)
- Warehouse logistic management systems
- Discrimination systems for train or emergency vehicles

Note
- In the event noise appears in your television image, there is the possibility that a Bluetooth wireless technology enabled device or this unit (including products supported by this unit) are causing signal interference with the antenna input connector of your television, video, satellite tuner, etc. In this event, increase the distance between the antenna input connector and the Bluetooth wireless technology enabled device or this unit (including products supported by this unit).
- If there is something obstructing the path between this unit (including devices supported by this unit) and the device equipped with Bluetooth wireless technology (such as a metal door, concrete wall, or insulation containing tinfoil), you may need to change the location of your system to prevent signal noise and interruptions.
Scope of operation
Use of this unit is limited to home use. (Transmission distances may be reduced depending on communication environment).
In the following locations, poor condition or inability to receive radio waves may cause the audio to be interrupted or stopped:
- In reinforced concrete buildings or steel framed or ironframed buildings.
Near large metallic furniture. - In a crowd of people or near a building or obstacle.
- In a location exposed to the magnetic field, static electricity or radio wave interference from radio communication equipment using the same frequency band (2.4 GHz) as this unit, such as a 2.4 GHz wireless LAN device or microwave oven.
- If you live in a heavily populated residential area(apartment, townhouse, etc.) and if your neighbor's microwave is placed near your system, you may experience radio wave interference. If this occurs, move your unit to a different place. When the microwave is not in use, there will be no radio wave interference.
Radio wave reflections
The radio waves received by this unit include the radio wave coming directly from the device equipped with Bluetooth wireless technology (direct wave) and waves coming from various directions due to reflections by walls, furniture and building (reflected waves). The reflected waves (due to obstacles and reflecting objects) further produce a variety of reflected waves as well as variation in reception condition depending on locations. If the audio cannot be received properly due to this phenomenon, try moving the location of the device equipped with Bluetooth wireless technology a little. Also note that audio may be interrupted due to the reflected waves when a person crosses or approaches the space between this unit and the device equipped with Bluetooth wireless technology.
- Before making or changing the connections, switch off the power and disconnect the power plug from the power outlet.
- When playing music through AUX mode, the music volume will vary depending on the volume of the music player. If there is distortion when the volume is set at max, lower the music player's volume and to avoid distortion.
1. Connecting auxiliary components
Connect the back panel AUX IN jack to your auxiliary playback component.
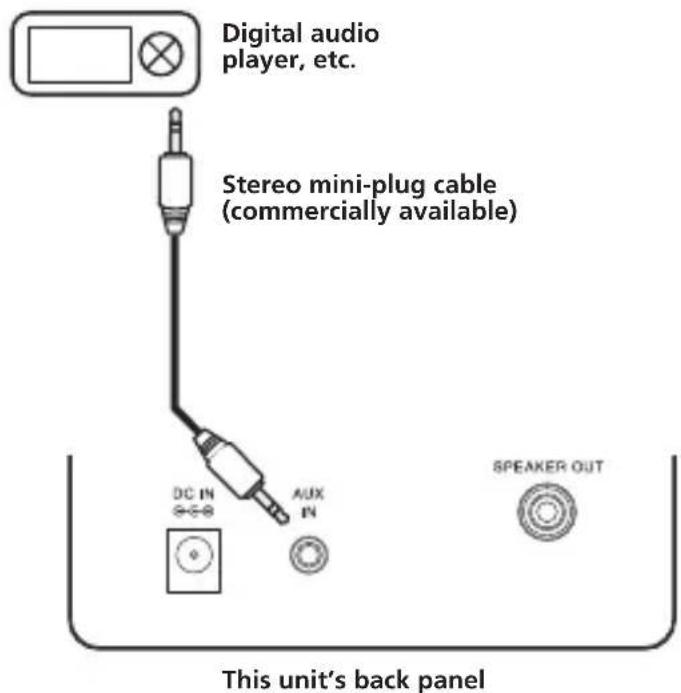
- Press [INPUT] button. (Mode indicator: orange)
- Start playback of the auxiliary component.
Troubleshooting

WARNING
- Never remove the casing of this apparatus.
Incorrect operation is often mistaken for trouble or malfunction. If you think that there is something wrong with this component, check the points below. Sometimes the trouble may lie in another component. Inspect the other components and electrical appliances being used. If the trouble cannot be rectified even after checking the points below, ask your nearest Pioneer authorized service center or your dealer to carry out repair work.
- If the unit does not operate normally due to external effects such as static electricity, disconnect the power plug from the outlet and insert it again to return to normal operating conditions.
| Problem | Remedy |
| The power does not turn on. · Disconnect the power plug from the outlet, and insert again. | |
| Power automatically switches to standby without user action. | · When no device is connected to the selected the AUX IN jack and this unit is not operated for 20 minutes or more after AUX mode is selected, power will automatically turn OFF. (Only when APS mode (page 9) is ON.) |
| No sound is output when a mode is selected. | · Make sure the component is connected correctly. |
| The Bluetooth wireless technology device cannot be connected or operated. Sound from the Bluetooth wireless technology device is not emitted or the sound is interrupted. | ·Check that no object that emits electromagnetic waves in the 2.4 GHz band (microwave oven, wireless LAN device or Bluetooth wireless technology apparatus) is near the unit. If such an object is near the unit, set the unit far from it. Or, stop using the object emitting the electromagnetic waves. ·Check that the Bluetooth wireless technology device is not too far from the unit and that obstructions are not set between the Bluetooth wireless technology device and the unit. Set the Bluetooth wireless technology device and the unit so that the distance between them is less than about 10 m* and no obstructions exist between them. ·The Bluetooth wireless technology device may not be set to the communication mode supporting the Bluetooth wireless technology. Check the setting of the Bluetooth wireless technology device. ·Check that pairing is correct. The pairing setting was deleted from this unit or the Bluetooth wireless technology device. Reset the pairing. ·Check that the profile is correct. Use a Bluetooth wireless technology device that supports A2DP profile. |
- The line-of-sight transmission distance is an estimate. Actual transmission distances supported may differ depending on surrounding conditions.
Cautions on use When moving this unit
When moving this unit, press
[STANDBY/ON] button, and then unplug the power cord.
Damage may occur when another device is connected to the AUX IN jack.
Place of installation
- Do not place this unit on top of a TV or color monitor. Also, install it away from cassette decks and other devices easily affected by magnetic forces.
Avoid the following locations:
- Places exposed to direct sunlight
- Humid or poorly ventilated places
- Extremely hot places
- Places exposed to vibrations
- Places in which there is much dust or cigarette smoke
- Places exposed to soot, steam, or heat (kitchens, etc.)
Do not place objects on this unit
Do not place any objects on top of this unit.
Do not obstruct the ventilation holes.
Do not use this unit on shaggy rugs, beds, sofas, etc., or wrapped in cloth, etc. Doing so will prevent the heat from dispersing, leading to damage.
Do not expose to heat.
Do not place this unit on top of an amplifier or other components that generate heat. When rack mounting it, to avoid the heat given off by the amplifier or other audio components, place it on a shelf below the amplifier.
- Turn off the power of this unit when not using it.
Depending on signal conditions, striped patterns may appear on a TV screen and noise may enter the sound of radio broadcasts when the power of this unit is on. If this happens, turn off the power of this unit.
Cleaning the this unit
- Unplug the power cord from the power outlet when cleaning this unit.
- Clean this unit using a soft cloth. For tough dirt, apply some neutral detergent diluted in 5 to 6 parts water to a soft cloth, wring out thoroughly, wipe off the dirt, and then wipe again with a soft, dry cloth.
- Alcohol, thinner, benzene, insecticides, etc., could cause the print or paint to peel off. Also, leaving rubber or vinyl products in contact with this unit for long periods of time could mar the cabinet.
- When using chemical-impregnated wipes, etc., read the cautions included with the wipes carefully.
Specifications
- Amplifier section
RMS Power Output:
Front Left/Right 25 W + 25 W
(RMS, 1 kHz, 10%, T.H.D., 6 Ω)
- Speaker section
System 2-way system
Speakers:
Tweeter. 2.5 cm cone × 1/each
Woofer. .10 cm cone × 1 /each
Frequency range. .50 Hz to 20 kHz
Miscellaneous
Power requirements
AC 100 V to 240 V, 50 Hz/60 Hz
DC 20 V, 2.4 A
Power consumption 48 W
In standby 0.5 W
Dimensions
140 mm (W) x 218 mm (H) x 160 mm (D)/each
Weight (without package and adapter). .3.8 kg
- Accessories
Speaker cable. 1
ACadapter. 1
Rubber foot 8
Warranty card. 1
Operating instructions (This document)

Note
- Specifications and the design are subject to possible modifications without notice, due to improvements.
IMPORTANT
- Lecture/pause/reprise de lecture.
PAIRING
(RMS, 1 kHz, 10%, D.H.T., 6 Ω)
(RMS, 1 kHz, 10%, T.H.D., 6 Ω)
WAARSCHUWING NETSNOER
EU Representative's:
Pioneer Europe NV
Haven 1087, Keetberglaan 1,
9120 Melsele, Belgium/Belgique
http://www.pioneer.eu212-0031, Japan
C E
[ ] XW-BTS5-K,XW-BTS5-W
Hereby, Pioneer, declares that this [^*] is in compliance with the essential requirements and other relevant provisions of Directive 1999/5/EC.
Suomi:
© 2012 PIONEER CORPORATION. All rights reserved.
© 2012 PIONEER CORPORATION.
PIONEER ELECTRONICS (USA) INC.
P.O. BOX 1540, Long Beach, California 90801-1540, U.S.A. TEL: (800) 421-1404
PIONEER ELECTRONICS OF CANADA, INC.
340 Ferrier Street, Unit 2, Markham, Ontario L3R 2Z5, Canada TEL: 1-877-283-5901, 905-479-4411
PIONEER EUROPE NV
Haven 1087, Keetberglaan 1, B-9120 Melsele, Belgium TEL: 03/570.05.11
PIONEER ELECTRONICS ASIACENTRE PTE. LTD.
253 Alexandra Road, #04-01, Singapore 159936 TEL: 65-6472-7555
PIONEER ELECTRONICS AUSTRALIA PTY. LTD.
5 Arco Lane, Heatherton, Victoria, 3202, Australia, TEL: (03) 9586-6300
PIONEER ELECTRONICS DE MEXICO S.A. DE C.V.
Blvd. Manuel Avila Camacho 138 10 piso Col.Lomas de Chapultepec, Mexico, D.F. 11000 TEL: 55-9178-4270
K002_B3_En