
Compact4All Juicer 204000 - Juicer PRINCESS - Free user manual and instructions
Find the device manual for free Compact4All Juicer 204000 PRINCESS in PDF.
| Product type | Electric citrus juicer |
| Brand | Princess |
| Model | Compact4All Juicer 204000 |
| Supply voltage | 220-240 V ~ 50/60 Hz |
| Rated power | Approx. 100 W |
| Juice collector capacity | 200 ml |
| Press cone material | Food-grade plastic |
| Main functions | Automatic pressing, anti-drip, automatic rotation direction reversal |
| Maximum continuous use time | 3 minutes |
| Recommended rest time | 5 minutes every 10 operations |
| Included accessories | Small press cone, large press cone, pulp collector, juice collector, shaft, dust cover |
| Care and cleaning | Clean with soapy water, do not immerse the motor |
| Safety | Automatic stop when pressure is released, power indicator |
| Approximate dimensions | 20 x 15 x 25 cm |
| Approximate weight | 1 kg |
Frequently Asked Questions - Compact4All Juicer 204000 PRINCESS
User questions about Compact4All Juicer 204000 PRINCESS
0 question about this device. Answer the ones you know or ask your own.
Ask a new question about this device
Download the instructions for your Juicer in PDF format for free! Find your manual Compact4All Juicer 204000 - PRINCESS and take your electronic device back in hand. On this page are published all the documents necessary for the use of your device. Compact4All Juicer 204000 by PRINCESS.
USER MANUAL Compact4All Juicer 204000 PRINCESS
You have purchased a Princess product. Our aim is to provide quality products with a tasteful design and at an affordable price. We hope that you will enjoy this product for many years.
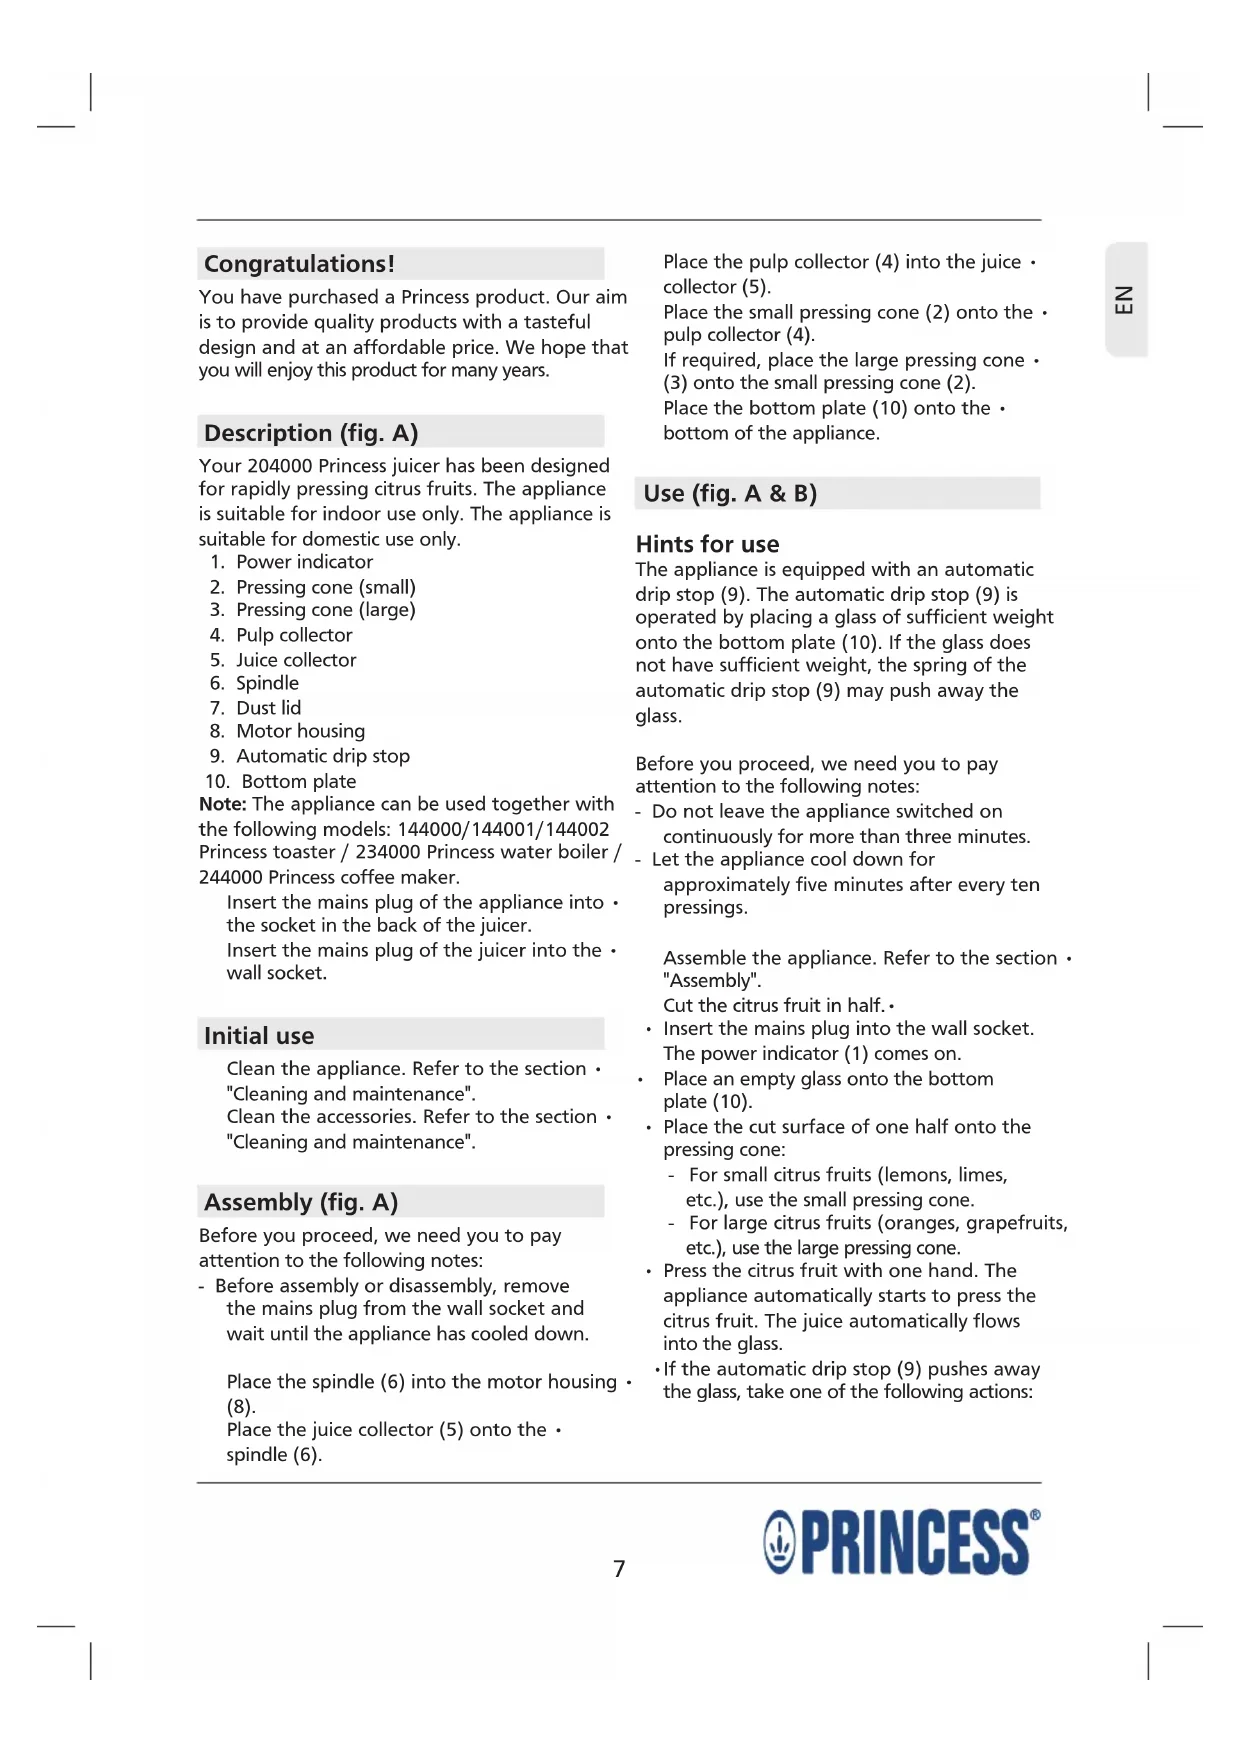
Description (fig. A)
Your 204000 Princess juicer has been designed for rapidly pressing citrus fruits. The appliance is suitable for indoor use only. The appliance is suitable for domestic use only.
- Power indicator
- Pressing cone (small)
- Pressing cone (large)
- Pulp collector
- Juice collector
- Spindle
- Dust lid
- Motor housing
- Automatic drip stop
- Bottom plate
Note: The appliance can be used together with the following models: 144000/144001/144002 Princess toaster / 234000 Princess water boiler / 244000 Princess coffee maker.
Insert the mains plug of the appliance into the socket in the back of the juicer.
Insert the mains plug of the juicer into the wall socket.
Initial use
Clean the appliance. Refer to the section "Cleaning and maintenance".
Clean the accessories. Refer to the section
"Cleaning and maintenance".
Assembly (fig. A)
Before you proceed, we need you to pay attention to the following notes:
- Before assembly or disassembly, remove the mains plug from the wall socket and wait until the appliance has cooled down.
Place the spindle (6) into the motor housing (8).
Place the juice collector (5) onto the spindle (6).
Place the pulp collector (4) into the juice collector (5).
Place the small pressing cone (2) onto the pulp collector (4).
If required, place the large pressing cone (3) onto the small pressing cone (2).
Place the bottom plate (10) onto the . bottom of the appliance.
Use (fig. A & B)
Hints for use
The appliance is equipped with an automatic drip stop (9). The automatic drip stop (9) is operated by placing a glass of sufficient weight onto the bottom plate (10). If the glass does not have sufficient weight, the spring of the automatic drip stop (9) may push away the glass.
Before you proceed, we need you to pay attention to the following notes:
- Do not leave the appliance switched on continuously for more than three minutes.
- Let the appliance cool down for approximately five minutes after every ten pressings.
Assemble the appliance. Refer to the section "Assembly". Cut the citrus fruit in half.
- Insert the mains plug into the wall socket. The power indicator (1) comes on.
- Place an empty glass onto the bottom plate (10).
-
Place the cut surface of one half onto the pressing cone:
-
For small citrus fruits (lemons, limes, etc.), use the small pressing cone.
-
For large citrus fruits (oranges, grapefruits, etc.), use the large pressing cone.
-
Press the citrus fruit with one hand. The appliance automatically starts to press the citrus fruit. The juice automatically flows into the glass.
-
If the automatic drip stop (9) pushes away the glass, take one of the following actions:
Fig. B1: Press the citrus fruit until the juice collector (5) is full (200ml) . Place an empty glass onto the bottom plate (10). Hold the glass against the automatic drip stop (9) until it is filled with the required amount of juice.
- Fig. B2: Place an empty glass onto the bottom plate (10). Hold the glass against the automatic drip stop (9) with one hand and press the citrus fruit with the other hand. Press the citrus fruit until hardly any more juice is extracted from the citrus fruit. The appliance automatically stops when the pressure is released.
Note: The appliance automatically changes direction when it is switched off and on in order to increase the amount of juice being extracted.
Stop pressing the citrus fruit in one of the following situations:
- no more juice is extracted from the citrus fruit;
- the juice collector is filled with the required amount of juice;
- the glass is filled with the required amount of juice.
After use, remove the mains plug from the wall socket. The power indicator (1) goes off.
Cleaning and maintenance
Before you proceed, we need you to pay attention to the following notes:
- Before cleaning or maintenance, remove the mains plug from the wall socket and wait until the appliance has cooled down.
- Do not immerse the appliance in water or any other liquids.
Before you proceed, we would like you to focus your attention on the following notes:
- Do not use aggressive or abrasive cleaning agents to clean the appliance.
- Do not use sharp objects to clean the appliance.
Regularly check the appliance for possible damage.
Clean the outside of the appliance with a soft, damp cloth. Thoroughly dry the outside of the appliance with a clean, dry cloth.
Clean the pressing cones in soapy water. Rinse the pressing cones under running water. Thoroughly dry the pressing cones. Clean the spindle, the juice collector and the pulp collector in soapy water. Rinse the spindle, the juice collector and the pulp collector under running water. Thoroughly dry the spindle, the juice collector and the pulp collector with a clean, dry cloth.
Clean the dust lid in soapy water. Rinse the dust lid under running water. Thoroughly dry the dust lid with a clean, dry cloth.
Clean the bottom plate in soapy water. Rinse the bottom plate under running water.
Thoroughly dry the bottom plate with a clean, dry cloth.
Storage
Put the appliance and the accessories in the original packaging.
Store the appliance with the accessories in a dry and frost-free place, out of the reach of children.
Safety instructions
General safety
Read the manual carefully before use. Keep the manual for future reference. Only use the appliance and the accessories for their intended purposes. Do not use the appliance and the accessories for other purposes than described in the manual. Children should be supervised to ensure that they do not play with the appliance. The appliance is not intended for use by persons (including children) with reduced physical, sensory or mental capabilities, or lack of experience and knowledge, unless they have been given supervision or instruction concerning use of the appliance by a person responsible for their safety.
Do not use the appliance if any part or any accessory is damaged or defective. If a part or an accessory is damaged or defective, it must be replaced by the manufacturer or an authorised repair agent.
Do not use the appliance near bathtubs, showers, basins or other vessels containing water.
Do not immerse the appliance in water or other liquids. If the appliance is immersed in water or other liquids, do not remove the appliance with your hands. Immediately remove the mains plug from the wall socket. If the appliance is immersed in water or other liquids, do not use the appliance again.
This appliance is intended to be used in domestic and similar applications such as staff kitchen areas in shops, offices and other working environments; farm houses; by clients in hotels, motels and other residential type environments; bed-and-breakfast type environments.
Electrical safety
Before use, always check that the mains - voltage is the same as the voltage on the rating plate of the appliance.
The appliance is not intended to be operated by means of an external timer or separate remote-control system.
Connect the appliance to an earthed wall - socket. If necessary, use an earthed extension cable of a suitable diameter (at least 3 × 1 ~mm^2 ).
For additional protection, install a residual - current device (RCD) with a rated residual operating current that does not exceed 30mA . Make sure that water cannot enter the - contact plugs of the mains cable and the extension cable.
Always fully unwind the mains cable and the extension cable.
Make sure that the mains cable does not hang over the edge of a worktop and cannot be caught accidentally or tripped over. Keep the mains cable away from heat, oil and sharp edges.
Do not use the appliance if the mains cable or the mains plug is damaged or defective. If the mains cable or the mains plug is damaged or defective, it must be replaced by the manufacturer or an authorised repair agent. Do not pull the mains cable to disconnect the mains plug from the mains.
Disconnect the mains plug from the mains when the appliance is not in use, before assembly or disassembly and before cleaning and maintenance.
Safety instructions for juicers
Do not use the appliance outdoors. Do not use the appliance in damp environments.
Place the appliance on a stable and flat surface. Place the appliance on a heat-resistant and splash-proof surface. Do not place the appliance on a hob.
Make sure that the appliance does not come into contact with flammable material.
- Keep the appliance away from heat sources. Do not place the appliance on hot surfaces or near open flames.
Make sure that your hands are dry before touching the appliance.
- Beware of sharp parts. Do not touch moving parts.
- Store the appliance in a dry place when not in use. Make sure that children do not have access to stored appliances.
U.K. Wiring instructions
The wires in the mains lead are coloured in accordance with the following code:
BLUE
NEUTRAL
BROWN
LIVE
GREEN/YELLOW
EARTH
As the colours of the wire in the mains lead of this appliance may not correspond with the colour markings identifying the terminals on your plug, proceed as follows:
The wire which is coloured BLUE must be connected to the terminal which is marked with the letter N or coloured black.
The wire which is coloured BROWN must be connected to the terminal which is marked with the letter L or coloured red.
The wire which is coloured GREEN/YELLOWED must be connected to the terminal which is
e marked with the letter E or 1一 and is coloured in GREEN or GREEN/YELLOW.
Warning! This appliance must be earthed.
Disclaimer
Subject to change; specifications can be changed without further notice.
Felicitations!
ExTe ayopaoEi eva npoiov nC Princess.
Tóxoc macéivai vaacnapéxoume TIOIOTiKa Tpoiovtae wpaio oxediagmo oikovouke C Tlnc. EAnizouve aatolauoente auto to Tpoiov yia tonla xpovia.
περιγραφή (εικ. A)
O aToxuWntc 204000 Princess exi oxediaote i yIy npyo oTupsiO eTepioeioV poutw. H oukeun npoopici tai mvo ia xpnon o EawtepikoC xwpouc. H oukeun npoopici tai ia oikiaKn npnon mvo.
sillil ybaill lal aol .9
10
:aiilll cjlalbga jglalpiai iay:la
144000/144001/144002 jie
/ Princess 234000 / Princess
.Princess 244000
jgljgl jgljgl jgljgl
jll jll jll jll
aJauall Jai jai Jai
bilal
1
aillll" aai 1 jie21 aiitii p
"ajll
aillll" pss 1
"ajall
(A)
Clll 1011111111111111111111
A( 1,0) .B( -34,34)

Brand : PRINCESS
Model : Compact4All Juicer 204000
Category : Juicer