PDXZ9 - CD Recorder PIONEER - Free user manual and instructions
Find the device manual for free PDXZ9 PIONEER in PDF.

| Product type | Integrated amplifier CD recorder/player |
| Output power | 50 W + 50 W (1 kHz, 10% THD, 4 Ω) |
| Speaker impedance | 4 Ω to 8 Ω |
| Compatible disc types | CD Audio, Super Audio CD (SACD), CD-R/RW (MP3/WMA) |
| Tuner | FM (87.5-108 MHz) and AM (531-1602 kHz) |
| Connectivity | Line input (LINE IN), phono input (PHONO IN), front audio input (F.AUDIO IN), USB, iPod, LAN (Ethernet) |
| Network functions | Home Media Gallery: playback of audio files from a PC (DLNA), Internet radio, USB memory, iPod |
| Network audio formats | MP3, WMA, AAC, FLAC, LPCM (WAV) |
| Repeat and random playback | Yes |
| Timer | Programmable wake-up and sleep timer |
| Remote control | Yes, with supplied AA/R6 batteries |
| Power supply | Mains 220-240 V, 50/60 Hz |
| Power consumption | 47 W (standby: 0.4 W) |
| Supplied accessories | Remote control, batteries, AM loop antenna, FM wire antenna, iPod control cable, LAN cable, power cord, warranty card, user manual |
| Maintenance and cleaning | Clean the cabinet with a soft, dry cloth; clean discs with a dedicated cloth; do not use solvents |
| Safety | Do not expose to water, do not block ventilation slots, do not open the cabinet (risk of electric shock) |
Frequently Asked Questions - PDXZ9 PIONEER
User questions about PDXZ9 PIONEER
0 question about this device. Answer the ones you know or ask your own.
Ask a new question about this device
Download the instructions for your CD Recorder in PDF format for free! Find your manual PDXZ9 - PIONEER and take your electronic device back in hand. On this page are published all the documents necessary for the use of your device. PDXZ9 by PIONEER.
USER MANUAL PDXZ9 PIONEER
Discover the benefits of registering your product online at http://www.pioneer.co.uk (or http://www.pioneer.eu).
The lightning flash with arrowhead symbol, within an equilateral triangle, is intended to alert the user to the presence of uninsulated "dangerous voltage" within the product's enclosure that may be of sufficient magnitude to constitute a risk of electric shock to persons.
CAUTION
RISK OF ELECTRIC SHOCK DO NOT OPEN
CAUTION:
TO PREVENT THE RISK OF ELECTRIC SHOCK,DO NOT REMOVE COVER (OR BACK).NO USER-SERVICEABLE PARTS INSIDE.REFER SERVICING TO QUALIFIED SERVICE PERSONNEL.

The exclamation point within an equilateral triangle is intended to alert the user to the presence of important operating and maintenance (servicing) instructions in the literature accompanying the appliance.
D3-4-2-1_En-A
Replacement and mounting of an AC plug on the power supply cord of this unit should be performed only by qualified service personnel.
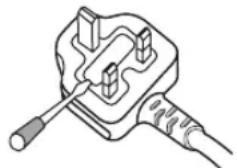
IMPORTANT: THE MOULDED PLUG
This appliance is supplied with a moulded three pin mains plug for your safety and convenience. A 5 amp fuse is fitted in this plug. Should the fuse need to be replaced, please ensure that the replacement fuse has a rating of 5 amps and that it is approved by ASTA or BSI to BS1362.
Check for the ASTA mark on the BSI mark on the body of the fuse.
If the plug contains a removable fuse cover, you must ensure that it is refitted when the fuse is replaced. If you lose the fuse cover the plug must not be used until a replacement cover is obtained. A replacement fuse cover can be obtained from your local dealer.
If the fitted moulded plug is unsuitable for your socket outlet, then the fuse shall be removed and the plug cut off and disposed of safely. There is a danger of severe electrical shock if the cut off plug is inserted into any 13 amp socket.
If a new plug is to be fitted, please observe the wiring code as shown below. If in any doubt, please consult a qualified electrician.
IMPORTANT: The wires in this mains lead are coloured in accordance with the following code:
Blue: Neutral Brown:Live
As the colours of the wires in the mains lead of this appliance may not correspond with the coloured markings identifying the terminals in your plug, proceed as follows;
The wire which is coloured BLUE must be connected to the terminal which is marked with the letter N or coloured BLACK.
The wire which is coloured BROWN must be connected to the terminal which is marked with the letter L or coloured RED.
How to replace the fuse: Open the fuse compartment with a screwdriver and replace the fuse.
D3-4-2-1-2-2_B_En
WARNING
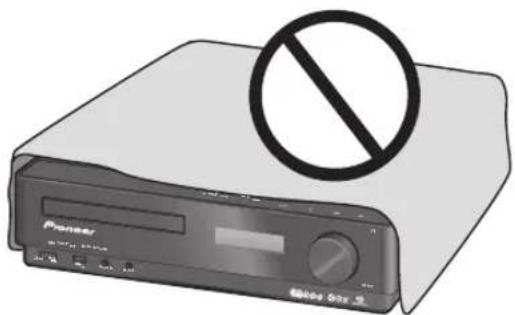
This equipment is not waterproof. To prevent a fire or shock hazard, do not place any container filled with liquid near this equipment (such as a vase or flower pot) or expose it to dripping, splashing, rain or moisture. D3-4-2-1-3_B_En
WARNING
Before plugging in for the first time, read the following section carefully. The voltage of the available power supply differs according to country or region. Be sure that the power supply voltage of the area where this unit will be used meets the required voltage (e.g., 230 V or 120 V) written on the rear panel. D3-4-2-1-4_A_En
This product complies with the Low Voltage Directive 2006/95/EC and EMC Directive 2004/108/EC.
D3-4-2-1-9a_A_En
If the AC plug of this unit does not match the AC outlet you want to use, the plug must be removed and appropriate one fitted. Replacement and mounting of an AC plug on the power supply cord of this unit should be performed only by qualified service personnel. If connected to an AC outlet, the cut-off plug can cause severe electrical shock. Make sure it is properly disposed of after removal. The equipment should be disconnected by removing the mains plug from the wall socket when left unused for a long period of time (for example, when on vacation). D3-4-2-2-1a_A_En
CAUTION
The STANDBY/ON switch on this unit will not completely shut off all power from the AC outlet. Since the power cord serves as the main disconnect device for the unit, you will need to unplug it from the AC outlet to shut down all power. Therefore, make sure the unit has been installed so that the power cord can be easily unplugged from the AC outlet in case of an accident. To avoid fire hazard, the power cord should also be unplugged from the AC outlet when left unused for a long period of time (for example, when on vacation). D3-4-2-2a A En

If you want to dispose this product, do not mix it with general household waste. There is a separate collection system for used electronic products in accordance with legislation that requires proper treatment, recovery and recycling.
Private households in the member states of the EU, in Switzerland and Norway may return their used electronic products free of charge to designated collection facilities or to a retailer (if you purchase a similar new one).
For countries not mentioned above, please contact your local authorities for the correct method of disposal.
By doing so you will ensure that your disposed product undergoes the necessary treatment, recovery and recycling and thus prevent potential negative effects on the environment and human health.
K058_A_En
CAUTION
This product is a class 1 laser product, but this product contains a laser diode higher than Class 1. To ensure continued safety, do not remove any covers or attempt to gain access to the inside of the product. Refer all servicing to qualified personnel. The following caution label appears on your unit. Location: inside of the unit

CLASS 1 LASER PRODUCT APPAREIL A LASER DE CLASSE 1
D3-4-2-1-8 B_En
WARNING
To prevent a fire hazard, do not place any naked flame sources (such as a lighted candle) on the equipment. D3-4-2-1-7a_A_En
VENTILATION CAUTION
When installing this unit, make sure to leave space around the unit for ventilation to improve heat radiation (at least 5cm at top, 10cm at rear, and 10cm at each side).
WARNING
Slots and openings in the cabinet are provided for ventilation to ensure reliable operation of the product, and to protect it from overheating. To prevent fire hazard, the openings should never be blocked or covered with items (such as newspapers, table-cloths, curtains) or by operating the equipment on thick carpet or a bed. D3-4-2-1-7b_A_En
Operating Environment
Operating environment temperature and humidity: +5^ to +35^ (+41^ to +95^) less than 85% RH (cooling vents not blocked) Do not install this unit in a poorly ventilated area, or in locations exposed to high humidity or direct sunlight (or strong artificial light) D3-4-2-1-7c_A_En
POWER-CORD CAUTION
Handle the power cord by the plug. Do not pull out the plug by tugging the cord and never touch the power cord when your hands are wet as this could cause a short circuit or electric shock. Do not place the unit, a piece of furniture, etc., on the power cord, or pinch the cord. Never make a knot in the cord or tie it with other cords. The power cords should be routed such that they are not likely to be stepped on. A damaged power cord can cause a fire or give you an electrical shock. Check the power cord once in a while. When you find it damaged, ask your nearest PIONEER authorized service center or your dealer for a replacement. S002_EN
This product is for general household purposes. Any failure due to use for other than household purposes (such as long-term use for business purposes in a restaurant or use in a car or ship) and which requires repair will be charged for even during the warranty period.
Thank you for buying this Pioneer product.
Please read through these operating instructions so that you will know how to operate your model properly. After you have finished reading the instructions, put them in a safe place for future reference.
Contents
01 Before you start
Checking what's in the box. 6
Putting the batteries in the remote control. 6
Range of the remote control unit 6
Disc / content format playback compatibility 7
Disc compatibility table 7
About DualDisc playback 7
02 Connecting up
Rear panel 8
Front panel. 8
Making cable connections 8
Connecting audio components.. 9
Connecting the AM and FM antennas 10
Connecting external antennas 10
Connecting the speakers 11
Bare wire connections 11
Plugging in. 11
03 Controls and displays
Front/top panel. 12
Front panel 12
Top panel 13
Remote control. 14
04 Playing SACD/CD discs
Playing discs 16
Basic playback controls 16
Other playback features 16
Using repeat play 16
Using random play 16
Creating a program list 17
Displaying disc information 17
Using the SACD Setup 17
05 Using the tuner
Listening to the radio 18
Improving poor FM reception 18
Memorizing stations. 18
Automatically saving station presets 18
Manually saving station presets 18
Listening to station presets 18
Using RDS 19
Displaying RDS information. 19
Searching for RDS programs 19
06 Home Media Gallery
Features of Home Media Gallery 20
Steps to enjoy the Home Media Gallery 20
Playing back audio files on the network and listening to Internet radio stations 20
Playing back audio files stored on a USB memory device 20
Playing back audio files stored on an iPod. 20
Connection 21
Connecting to the network through LAN interface... 21
Using the USB interface.. 21
Connecting an iPod 22
About network playback 22
Windows Media Connect 22
Windows Media DRM 22
DLNA 22
FLAC 23
aacPlus 23
Content playable over a network. 23
About playback behavior over a network 23
Authorizing this receiver 23
Playing back audio files stored on components on the network 24
Using repeat play 24
Using random play. 25
Registering and deleting audio files in and from the Favorites folder 25
Listening to Internet radio stations 25
Registering and deleting audio files in and from the Favorites folder 25
Saving Internet radio stations. 26
Retrieving saved Internet radio stations 26
About Internet radio. 26
Playing back audio files stored on
a USB memory device 27
Using repeat play 27
Using random play 27
About playback of audio from USB memory devices. 27
Playing audio files stored on an iPod 28
Using repeat play 28
Using random play 28
Displaying playback information. 28
About playable file formats. 29
Setting up the network 30
Checking the network settings 32
07 Adjusting the sound
SwitchingSound modes. 33
Adjusting the bass and treble. 33
Using the Loudness function 33
Using the Sound Retriever 33
Using Digital Noise Reduction 33
Confirming audio settings 33
08 Using the timer
Setting the clock. 34
Setting the wake-up timer. 34
Turning the wake-up timer on/off 34
Setting the sleep timer 34
09 Other settings
Listening to an external audio source. 35
Turning the display off 35
Dimming the display 35
Changing the clock's display mode 35
Disabling color reverse of the display 35
Volume mode setting 35
Resetting the system 35
10 Additional information
Hints on installation 36
Taking care of your receiver and discs 36
General 36
Damaged and shaped discs. 36
Cleaning discs 37
Cleaning the receiver's exterior 37
Cleaning the pickup lens 37
Condensation. 37
Moving the receiver 37
Troubleshooting 38
Displayed Messages 41
Glossary 42
General 42
Home Media Gallery. 42
Specifications. 43
Fine-tuned to world-class standards
With the cooperation of the world-class studio engineers at AIR Studios, this receiver has been AIR Studio certified.

Chapter 1 Before you start
Checking what's in the box
Please check that you've received the following supplied accessories:
Remote control
AA/R6 dry cell batteries (to confirm system operation) x2
AM loop antenna
FM wire antenna
- iPod control cable*
LAN cable
Power cord
Warranty card
These operating instructions
*This cable is for use with this unit only. Do not use it with other equipment.
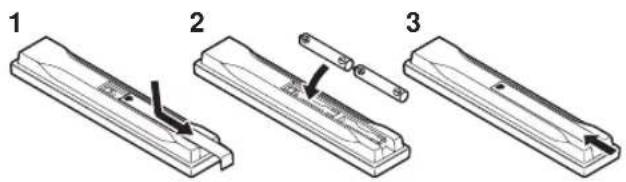
Putting the batteries in the remote control
1 Open the battery compartment cover on the back of the remote control.
2 Insert two AA/R6 batteries into the battery compartment following the indications ( ,) inside the compartment.
3 Close the cover.

Caution
Incorrect use of batteries can result in hazards such as leakage and bursting. Please observe the following:
- Don't mix new and old batteries together.
- Don't use different kinds of battery together — although they may look similar, different batteries may have different voltages.
- Make sure that the plus and minus ends of each battery match the indications in the battery compartment.
-
Remove batteries from equipment that isn't going to be used for a month or more.
-
When disposing of used batteries, please comply with governmental regulations or environmental public instruction's rules that apply in your country or area.

WARNING
- Do not use or store batteries in direct sunlight or other excessively hot place, such as inside a car or near a heater. This can cause batteries to leak, overheat, explode or catch fire. It can also reduce the life or performance of batteries.
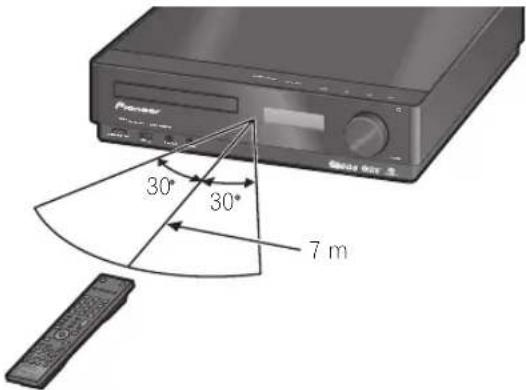
Range of the remote control unit
The remote control has a range of about 7 m. It may not work properly if:
- There are obstacles between the remote control and this unit's remote sensor.
- Direct sunlight or fluorescent light is shining onto the remote sensor.
- This receiver is located near a device that is emitting infrared rays.
- This unit is operated simultaneously with another infrared remote control unit.
Disc / content format playback compatibility
This receiver is compatible with a wide range of audio disc types and media formats. Playable discs will generally feature one of the following logos on the disc and/or disc packaging. Note however that some disc types, such as recordable CDs, may be in an unplayable format—see the Disc compatibility table below for further compatibility information.
Please also note that recordable discs cannot be recorded using this receiver.

Audio CD

CD-R

CD-RW

SUPERAUDIO CD
Super Audio CD
Disc compatibility table
| Media | Compatible formats |
| CD-R/RW | • CD-Audio, ISO 9660 CD-ROM* • ISO 9660 Level 1 or 2 compliant. CD physical format: Mode1, Mode2 XA Form1. Romeo and Joliet file systems are both compatible. • Multi-session playback: No • Unfinalized disc playback: No |
| Compressed audio | • MPEG-1 Audio Layer 3 (MP3), Windows Media Audio (WMA) • Sampling rates: 44.1 kHz • Bit-rates: Any (128 kbps or higher recommended) • VBR (variable bit rate) playback: No • WMA lossless encoding: No • DRM (Digital Rights Management) compatible: Yes (DRM-protected audio files will not play in this receiver). • File extensions: .mp3, .wma (these must be used for the receiver to recognize MP3/WMA files) • File structure (may differ): Up to 299 folders on a disc; up to 648 folders and files (combined) within each folder |
| PC-created disc | • Disks recorded using a PC may not be playable due to the setting of the software used to create the disc. In these instances, check the software manual or disc boxes for more on compatibility. • Disks recorded in packet write mode are not compatible. |
About DualDisc playback
A DualDisc is a new two-sided disc, one side of which contains DVD content video, audio, etc. while the other side contains non-DVD content such as digital audio material.
The non-DVD, audio side of the disc is not compliant with the CD Audio specification and therefore may not play. For more detailed information on the DualDisc specification, please refer to the disc manufacturer or disc retailer.
Chapter 2
Connecting up
Rear panel
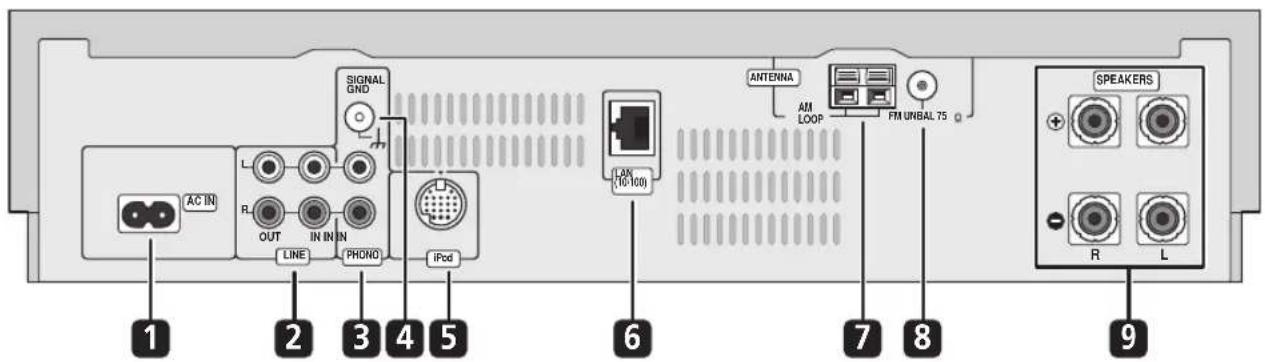
1 AC IN - Power inlet
Connect the supplied power cable (page 11).
2 LINE IN/OUT jacks
Connect an external component. To listen to components connected to the LINE IN jack, press INPUT on the remote control to select LINE (page 9).
3 PHONO IN jacks
Connect a turntable. To listen to audio from a connected turntable, press INPUT on the remote control to select PHONO (page 9).
4 SIGNAL GND terminal
If your turntable has a grounding wire, connect it here to reduce undesired sounds (page 9).
5 iPod IN terminal
Connect the provided iPod control cable here (page 9, 22)
6 LAN (10/100) terminal
Use provided LAN cable to connect to network (page 9, 21).
7 AM LOOP antenna terminal
Connect provided AM loop antenna here (page 10).
8 FM antenna socket
Connect provided FM wire antenna here (page 10).
9 SPEAKERS terminals
Connect the speakers here (page 11).
Front panel
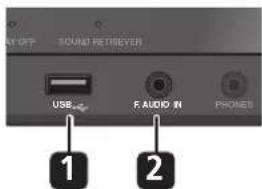
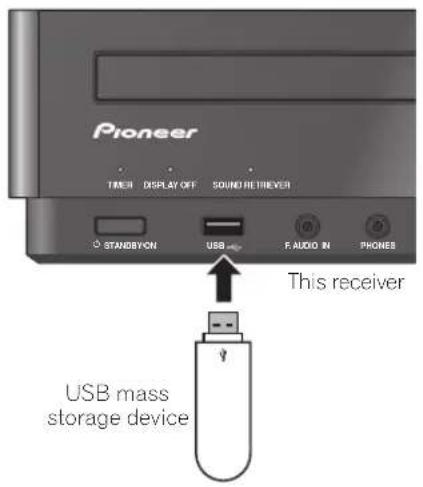
1 USB interface
Connect a USB mass storage device for playback (page 9, 21).
2 F.AUDIO IN jack
To listen to audio from an external component, connect with a stereo mini-plug cable. Once connected, the input automatically changes to FRONT AUDIO IN (page 9).
Making cable connections
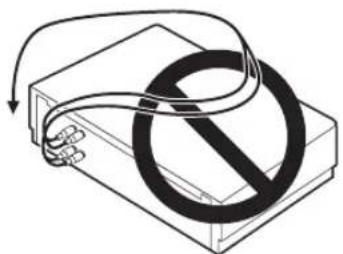
Make sure not to bend the cables over the top of this unit. This may cause a humming noise from the speakers.

Important
- Before making or changing any connections, switch off the power and unplug the power cord from the AC outlet.
Connecting audio components
The number and kind of connections depends on the kind of component you're connecting. Follow the steps below to connect a tape deck, turntable or other audio component.
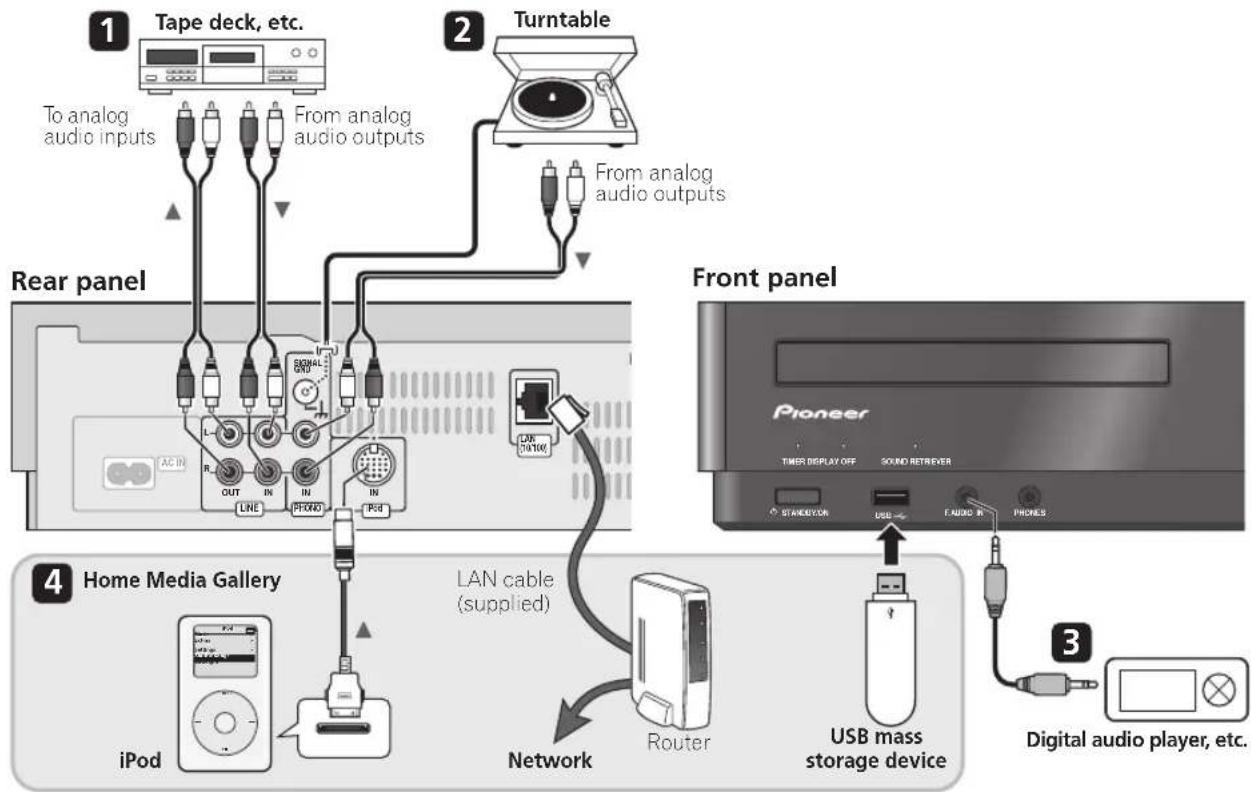
1 Connect the analog outputs of your tape deck (or other recorder) to the LINE IN jacks on this receiver. Then connect the audio inputs on the tape deck to the LINE OUT jacks on this receiver.
This will allow you to make recordings from the components connected to this receiver. Use stereo RCA pin-plug cables as shown.
2 Turntables only: Connect the audio outputs of your turntable to the PHONO IN jacks on this receiver.
If your turntable has a grounding wire, secure it to the SIGNAL GND terminal on this receiver.
- If your turntable has line-level outputs (i.e., it has a built-in phono pre-amp), connect it to the LINE IN jacks instead.
- Use only turntables equipped with MM type cartridges.
3 Connect the front panel F.AUDIO IN mini-plug jack to your auxiliary playback component.
These include components like a digital audio player or the analog audio output of a PC. Connect using a stereo mini-plug cable.
4 Connect your iPod, USB mass storage device, and/or network component.
You can listen to music stored on such components from Home Media Gallery (page 20).

Important
- Use only the supplied LAN cable to connect this receiver's LAN terminal to a network.
Note
The receiver automatically switches the input to FRONT AUDIO IN when you connect a mini-jack cable to the front panel (except when wake-up timer is set for power ON).
Connecting the AM and FM antennas
Connecting the supplied antennas will allow you to listen to both AM and FM radio broadcasts. If you find that reception quality is poor, an outdoor antenna should give you better sound quality—see Connecting external antennas right for more on how to do this.
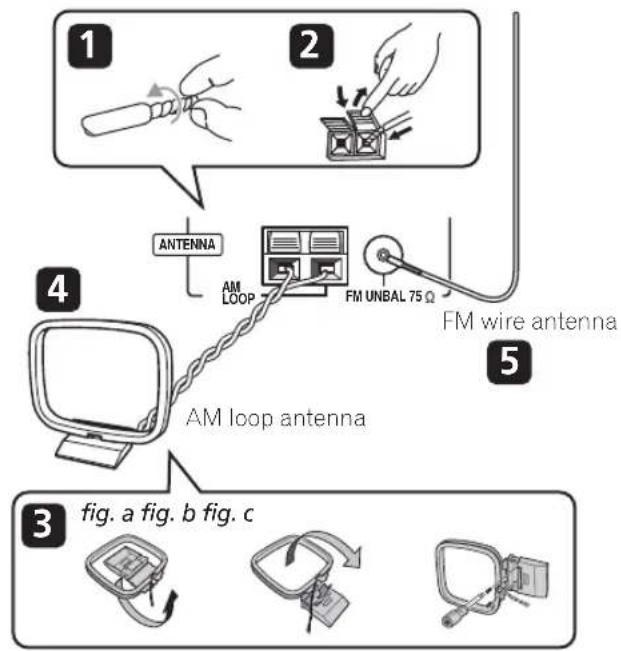
1 Pull off the protective shields of both AM antenna wires.
2 Push open the tabs, then insert one wire fully into each terminal, then release the tabs to secure the AM antenna wires.
3 Fix the AM loop antenna to the attached stand.
To fix the stand to the antenna, bend in the direction indicated by the arrow (fig. a) then clip the loop onto the stand (fig. b).
- If you plan to mount the AM antenna to a wall or other surface, secure the stand with screws (fig. c) before clipping the loop to the stand. Make sure the reception is clear.
4 Place the AM antenna on a flat surface and point in the direction giving the best reception.
Don't let it come into contact with metal objects and avoid placing near computers, television sets or other electrical appliances.
5 Connect the FM wire antenna in the same way as the AM loop antenna.
For best results, extend the FM antenna fully and fix to a wall or door frame. Don't drape loosely or leave coiled up.
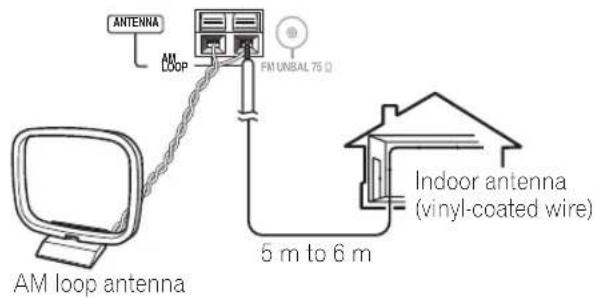
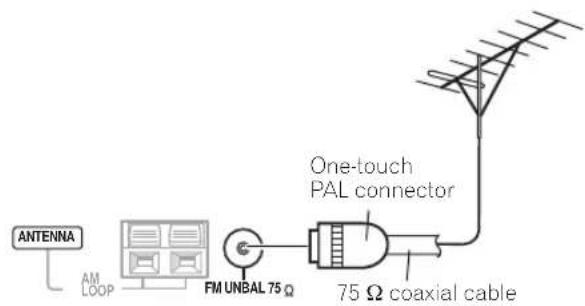
Connecting external antennas
External AM antenna
Use 5 to 6 meters of vinyl-insulated wire and set up either indoors or outdoors. Leave the AM loop antenna connected.
External FM antenna
Use a PAL connector to hook up an external FM antenna.
Connecting the speakers
Make sure you connect the speaker on the right to the right terminal and the speaker on the left to the left terminal. Also make sure the positive and negative (+ / - ) terminals on the receiver match those on the speakers. You can use speakers with a nominal impedance between 4 to 8
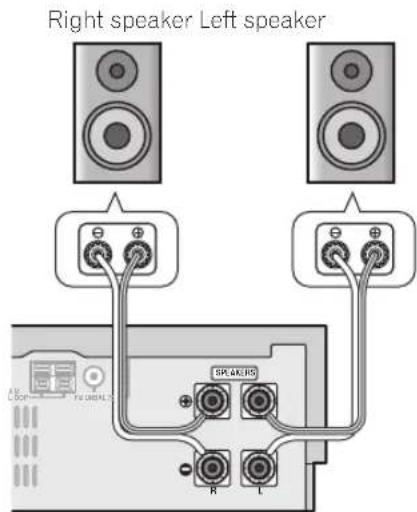
- Connect the speakers to the SPEAKERS terminals as shown above.
Bare wire connections
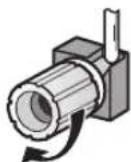
Make sure that the speaker cable you're going to use is properly prepared with about 10mm of insulator stripped from each wire, and the exposed wire strands twisted together (fig. A).
To connect a terminal, unscrew the terminal a few turns until there is enough space to insert the exposed wire (fig. B). Once the wire is in position, tighten the terminal until the wire is firmly clamped (fig. C).
fig.A
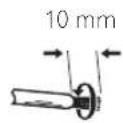
fig. B
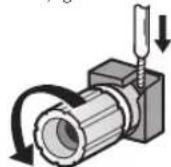
fig. C

Important
- Please refer to the manual that came with your speakers for details on how to connect the other end of the speaker cables to your speakers.

Caution
- These speaker terminals can be under HAZARDOUS VOLTAGE. When you connect or disconnect the speaker cables, to prevent the risk of electric shock, do not touch uninsulated parts before disconnecting the power cord.
- Make sure that all the bare speaker wire is twisted together and inserted fully into the speaker terminal. If any of the bare speaker wire touches the back panel it may cause the power to cut off as a safety measure.
Plugging in
Make sure to complete all connections before connecting to an AC IN inlet.
- Connect the AC power cord to the AC IN inlet on the rear panel of the receiver, then plug into a power outlet.
Chapter 3
Controls and displays
Front / top panel

Front
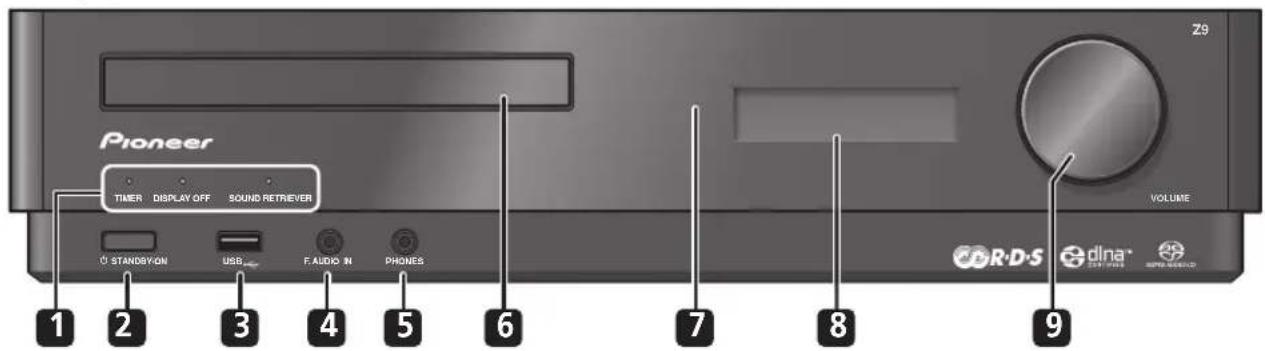
Front panel
1 TIMER indicator
Displays the timer operation status (page 34).
DISPLAY OFF indicator
Lights when the front panel display is turned off (page 35).
SOUND RETRIEVER indicator
Lights when Sound Retriever is active (page 33).
2 STANDBY/ON
Press to switch the receiver on/into standby.
3 USB interface
See Connecting up on page 8.
4 F.AUDIO IN jack
See Connecting up on page 8.
5 PHONES jack
Use to connect headphones. When the headphones are connected, there is no sound output from the speakers.
6 Disc tray (page 16)
7 IR remote sensor (page 6)
8 Front panel display
Displays various control functions.
If no operations are carried out for three minutes, the colours of the display reverse (page 35).
9 VOLUME dial
Top panel
10 Touch sensor
Lightly touch the center of displayed words or marks to control operations.
OPEN/CLOSE
Opens/closes the disc tray.
FUNCTION
Switches between functions as displayed below:

Starts playback/stops.

Stops playback.

Skipping to the start of the current track, then to previous tracks.

Skipping to the next track.
11 Action indicator
Lights when a touch sensor operation is performed.
Remote control
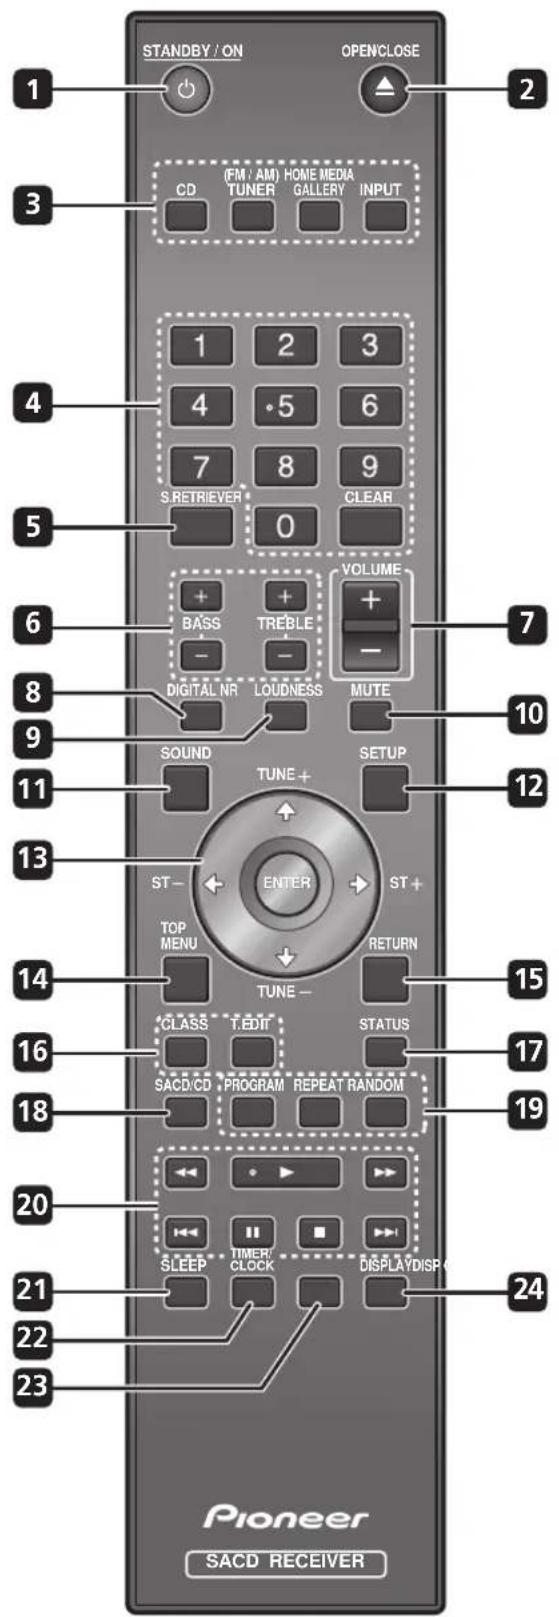
1 STANDBY/ON
Press to switch the receiver on/into standby.
2 △OPEN/CLOSE
3 Function select button
CD
Press to listen to CDs and SACDs (page 16).
(FM/AM) TUNER
Press to select the built-in radio tuner (page 18).
HOME MEDIA GALLERY
Press to listen to music from an iPod, USB memory device, internet radio, or audio components on the network in Home Media Gallery (page 24, 25, 27, 28).
INPUT
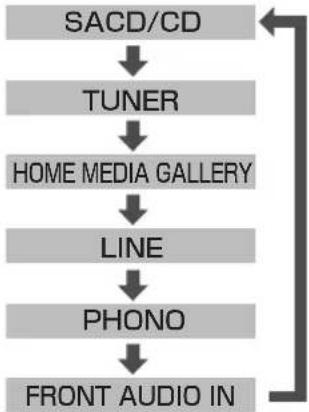
Press repeatedly to select one of the receiver's audio inputs (LINE, PHONO, FRONT AUDIO IN)(page 33).
4 Number buttons
Use to enter a track number or radio station.
5 S.RETRIEVER
Press to restore CD quality sound to compressed audio sources (page 33).
6 BASS +/- , TREBLE +/-
Use the bass and treble controls to adjust the overall tone (page 33).
7 VOLUME + / -
Use to set the listening volume.
8 DIGITAL NR
May improve the quality of sound for noisy sources (page 33).
9 LOUDNESS
Press to enable the Loudness function (page 33).
10 MUTE
Mutes/unmates the sound.
11 SOUND
Press to switch the Sound mode (page 33).
12 SETUP
Press to make various settings.
13 (TUNE + / - , ST + / - ) ,ENTER
Use to select/switch system settings and modes, and to confirm actions.
Use TUNE + / - to find radio frequencies and use ST + / - to find preset stations.
14 TOP MENU
Press to display the Category screen from Home Media Gallery (page 24, 25, 27, 28).
15 RETURN
Use to cancel settings.
16 Internet radio controls
CLASS
Switches between the three banks of radio station presets (page 26).
T.EDIT
Memorizes stations for recall (page 26).
17 STATUS
Press to confirm audio settings (page 33).
18 SACD/CD
Use to access SACD setup (page 17).
19 PROGRAM
Use to program the order of songs to be played back from a SACD/CD, or to register favorites for Home Media Gallery (page 17, 25).
REPEAT
Press to repeat a song playing from a SACD/CD or in Home Media Gallery (page 16, 24, 27, 28).
RANDOM
Press to randomize the order of songs played back from a SACD/CD or in Home Media Gallery (page 16, 25, 27, 28).
20Playback controls

Press to start playback.

Press to pause playback.

Press to stop playback.

Press to start fast reverse scanning.

Press to start fast forward scanning.

Skipping to the start of the current track, then to previous tracks.

Skipping to the next track.
21 SLEEP
Use to put the receiver in sleep mode and select the amount of time before sleep (page 34).
22 TIMER/CLOCK
Use for setting the clock, as well as for setting and checking the timers (page 34).
23 DISP OFF
Use to turn the front panel display off (page 35).
24 DISPLAY
Press to change the display for songs playing back from SACD/CD or Home Media Gallery (page 17, 28).
Press to change the display for RDS information in the FM band (page 19).
Chapter 4
Playing SACD/CD discs
Playing discs
The basic playback controls for playing CDs, SACDs, and MP3/WMA discs are covered here.
1 If the receiver isn't already on, press STANDBY/ON to switch it on.
2 Press OPEN/CLOSE to load a disc.
Load a disc with the label side facing up, using the disc tray guide to align the disc. Once properly seated, press OPEN/CLOSE to close the disc tray.
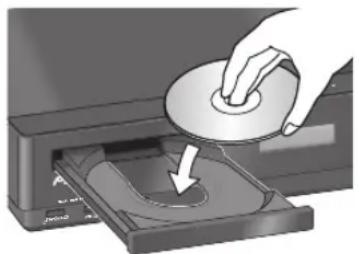
3 Press (play) to start playback.
Basic playback controls
The table below shows the basic controls for playing discs.
| Button | What it does |
| ► | Starts playback. |
| ■ | Pauses a disc that's playing, or restarts a paused disc. |
| ■ | Stops playback. |
| ► | Press to start fast reverse scanning. Press▶(play) to resume normal playback. |
| ► | Press to start fast forward scanning. Press▶(play) to resume normal playback. |
| ► | Skipping to the start of the current track, then to previous tracks. |
| ► | Skipping to the next track. |
| Number buttons (not available with MP3/WMA data discs) | Use to enter a track number. Press ENTER to select. • If the disc is stopped, playback starts from the selected track. • If the disc is playing, playback jumps to the start of the selected track. |
Other playback features
The following features allow you to customize the playback order. Note that these features are not available with data discs (containing WMA/MP3 files).
Using repeat play
There are two repeat play options available during playback.
- During playback, press REPEAT to select a repeat play mode.
Select between 1-track repeat (rights in the display), all repeat (rights in the display), or repeat off.
Using random play
Use the random play feature to play tracks at random. You can set the random play option when a disc is playing or stopped.2
- Press RANDOM to start random play.
Random play remains in effect (RDM shows in the display) until you press (or RANDOM again) to cancel.

Tip
- Use the following controls during random play:
| Button | What it does |
| ▶► | Selects a new track at random. |
| ←► | Returns to the beginning of the current track. |

Note
When the REPEAT button is pressed during program play, the programmed contents will be played repeatedly. 2 You can't use random play together with program play.
Creating a program list
This feature lets you program the play order of tracks on a disc.
1 While stopped, press PROGRAM.
2 Use the number buttons and ENTER to select a track for the current step in the program list.
If you accidentally enter the wrong track, press CLEAR to delete it.
3 Repeat step 2 to build up a program list.
A program list can contain up to 24 tracks.
4 To play the program list, press (play).
Program play remains active (PGM shows in the display) until you stop playback (press▶(play) after ■ (stop) to start normal playback).
- Press PROGRAM then (play) to restart program play.
- To add more tracks to the program list, repeat steps 1 and 2.
- When the disc is stopped, press PROGRAM then CLEAR to erase one track at a time (from the end of the list), or simply press CLEAR to erase all tracks.
Displaying disc information
Various track information, such as the elapsed and remaining playing time can be displayed while a disc is playing.
- To switch the information displayed, press DISPLAY repeatedly.
Using the SACD Setup
Hybrid SACD discs include a conventional CD layer along with the high-resolution SACD layer, so it is necessary to indicate to the receiver which layer you want to listen to. Use the SACD Setup to do this.2
- When the disc is stopped, press SACD/CD to switch between the CD area and the SACD area of a hybrid disc.
Note
With data discs, MP3/WMA filenames are displayed (up to 25 characters). Note that some characters may not display correctly. 2 Note that this unit is not compatible with dual-layer or multichannel SACD discs.
Chapter 5
Using the tuner
Listening to the radio
The following steps show you how to tune in to FM and AM radio broadcasts.
1 Press TUNER (FM/AM) to switch to the tuner, then press repeatedly to select the FM or AM band. The display shows the band and frequency.
2 Tune to a frequency.
There are three tuning modes - manual, auto, and high-speed:
- Manual tuning - Press TUNE +/- repeatedly to change the displayed frequency.
- Auto tuning - Press and hold TUNE +/- until the frequency display starts to move, then release. The tuner will stop on the next station it finds. Repeat to keep searching.
- High-speed tuning - Press and hold TUNE +/- until the frequency display starts to move rapidly. Keep the button held down until you reach the frequency you want. If necessary, fine tune the frequency using the manual tuning method.
Improving poor FM reception
If you're listening to an FM station in stereo but the reception is weak, you can improve the sound quality by switching to mono.
1 Tune to an FM radio station then press SETUP.
2 Use ↑/↓ to choose 'Tuner Setup' then press ENTER.
3 Use ↑/↓ to choose 'FM Auto/Mono' then press ENTER.
4 Use ↑/↓ to select 'FM Mono' then press ENTER.
The mono indicator (Oights when the tuner is in mono reception mode.
Select FM Auto above to switch back to auto-stereo mode (the stereo indicator (rights when receiving a stereo broadcast).
Memorizing stations
You can save up to 30 station presets so that you always have easy access to your favorite stations without having to tune in manually each time.
Automatically saving station presets
1 Press DISPLAY repeatedly to display the current tuner frequency.
2 Press SETUP.
3 Use ↑/↓ to choose 'Tuner Setup' then press ENTER.
4 Use ↑/↓ to choose 'Auto Preset' then press ENTER.
Auto tuning starts in the FM band, stopping when a strong signal is received.
5 When auto tuning stops at a station, press ENTER to save the station as a preset.
If you don't wish to save the station, press CLEAR.
Auto tuning resumes. After the FM band is finished, auto tuning continues in the AM band. Press (stop) anytime to exit.
Auto tuning stops automatically after the AM band is finished, or after the limit of 30 presets has been reached. When this happens, the tuner automatically switches to preset Station-1.
Manually saving station presets
1 Tune to an FM or AM radio station.
For the FM band, select mono or auto-stereo reception as necessary. This setting is saved along with the preset.
2 Press SETUP.
3 Use ↑/↓ to choose 'Tuner Setup' then press ENTER.
4 Use ↑/↓ to choose 'Station Memory' then press ENTER.
5 Use ↑/↓ to select the station preset you want then press ENTER.
Listening to station presets
1 Make sure the tuner function is selected.
2 Use ST +/- to select a station preset. 1
Using RDS
Radio Data System (RDS) is a system used by most FM radio stations to provide listeners with various kinds of information - the name of the station and the kind of show they're broadcasting, for example.
One feature of RDS is that you can search by type of program. For example, you can search for a station that's broadcasting a show with the program type, Jazz Music.
You can search the following program types
News - News
Current Affairs - Current Affairs
Information - General Information
Sport-Sport
Education-Educational
Drama - Radio plays, etc.
Culture - National or regional culture, theater, etc.
Science- Science and technology
Varied Speech - Usually talk-based material, such as quiz shows or interviews.
Pop Music - Pop music
Rock Music - Rock music
Easy Listening - Easy listening Light Classics M-Light' classical music
Serious Classics - 'Serious' classical music
Other Music-Music not fitting above categories
Weather & Metr - Weather reports and forecasts, meteorological information
Finance - Stock market
reports, commerce, trading, etc.
Children's Progs - Programs for children
Social Affairs - Social affairs
Religion - Programs
concerning religion
Phone In - Public expressing their views by phone
Travel & Touring - Holiday-type travel information as opposed to traffic
announcements.
Leisure & Hobby - Leisure
interests and hobbies
Jazz Music-Jazz
Country Music - Country music
National Music - Popular music in a language other than English
Oldies Music - Popular music from the '50s and '60s
Folk Music - Folk music
Documentary - Documentary
Displaying RDS information
You can display the different types of RDS information available.2
Press DISPLAY for RDS information.
Each press changes the display as follows:
- PS, PTY and RT - PS (Program Service name) displays the name of the radio station. PTY (Program Type) displays the type of program currently being received. RT (Radio Text) displays messages transmitted from the radio station (for example, a talk radio station may provide a telephone number as RT).
- PTY Search - PTY search (see below)
- Current tuner frequency
Searching for RDS programs
You can search for a program type listed above.
1 Tune to an FM radio station. 3
2 Press DISPLAY repeatedly until 'PTY Search' appears in the display.
3 Use ↑/↓ to select the program type you want to hear.
4 Press ENTER to start the search.
The receiver searches the station presets for a match. If it finds one, searching stops for five sec.
5 If you want to keep listening to the station, press ENTER within the five seconds.
If you don't press ENTER, searching resumes.
When DISPLAY is pressed again, the PTY search function ends and the display returns to the tuner frequency.
Note
In addition, there are three other program types, Alarm Alarm!, Alarm Test, and None Alarm Alarm! and Alarm Test are used for emergency announcements. You can't search for these, but the tuner will switch automatically to this RDS broadcast signal. None appears when a program type cannot be found.
2 If any noise is picked up while displaying the RT scroll, some characters may be displayed incorrectly.
- If the No Radio Text Data message appears in the RT display, it may mean that RT data is not being transmitted from the radio station. In the same way, if the No Data message appears in the PS or PTY display, it may mean that no PS or PTY data are being transmitted from the radio station.
- When no broadcast can be received, selecting the RDS display will cause the No Data message to appear in all display areas, and thereafter the display will automatically return to the frequency display.
3 RDS is only possible in the FM band.
Chapter 6
Home Media Gallery
Features of Home Media Gallery
This receiver is equipped with the LAN terminal and the USB terminal, and you can enjoy the following features by connecting your components to these terminals. You can also connect your iPod to the iPod terminal to enjoy music.
- Playback the music files stored in PCs
You can playback a lot of musics stored in your PCs using this unit.
See Playing back audio files stored on components on the network on page 24.
- Listening to Internet radio stations
You can select and listen to your favorite Internet radio station from the list of Internet radio stations created, edited, and managed by the vTuner database service exclusively for use with the Pioneer products.
See Listening to Internet radio stations on page 25.
- Playing back audio files stored on a USB memory device
You can directly play back your desired song right from the folder/file list being displayed.
See Playing back audio files stored on a USB memory device on page 27.
- Playing back audio files stored on an iPod
You can control and listen to music stored on your iPod.
See Playing audio files stored on an iPod on page 28.
Steps to enjoy the Home Media Gallery
Playing back audio files on the network and listening to Internet radio stations
1 Connect to the network through LAN interface.
See Connecting to the network through LAN interface on page 21.
2 Configure the network settings.
The setup is necessary only when the router to be connected does not have the built-in DHCP server function.
See Setting up the network on page 30.
3 Playback with Home Media Gallery.
See Playing back audio files stored on components on the network on page 24 and Listening to Internet radio stations on page 25 for more on this.
Playing back audio files stored on a USB memory device
1 Connect USB memory device to the USB terminal.
See Using the USB interface on page 21 for more on this.
2 Playback with Home Media Gallery.
See Playing back audio files stored on a USB memory device on page 27 for more on this.
Playing back audio files stored on an iPod
1 Connect iPod to the iPod IN terminal, using the provided iPod control cable.
See Connecting an iPod on page 22 for more on this.
2 Playback with Home Media Gallery.
See Playing audio files stored on an iPod on page 28 for more on this.

Note
Besides a PC, you can also play back audio files stored on your other components with the built-in media server function based on DLNA 1.0 framework and protocols (i.e. network-capable hard disks and audio systems).
Connection

Important
- When making or changing connections on the rear panel of this receiver, be sure to switch power off and disconnect the power cord from the wall socket. After completing all connections, connect the power cord to the wall socket.
- Use only the supplied LAN cable to connect this receiver's LAN terminal to a network.
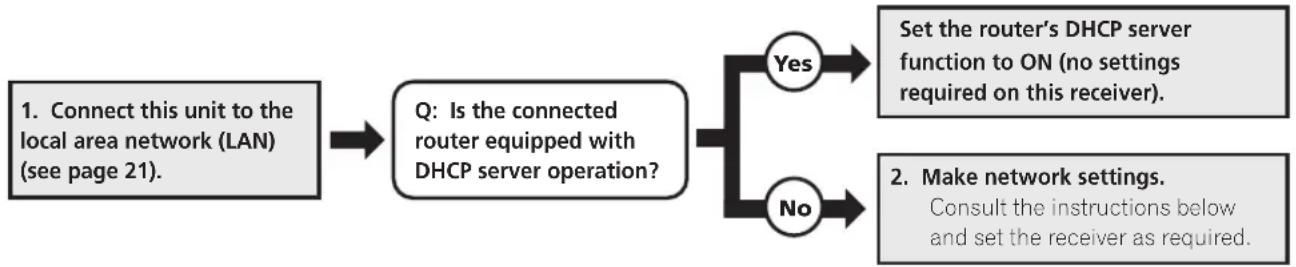
Connecting to the network through LAN interface
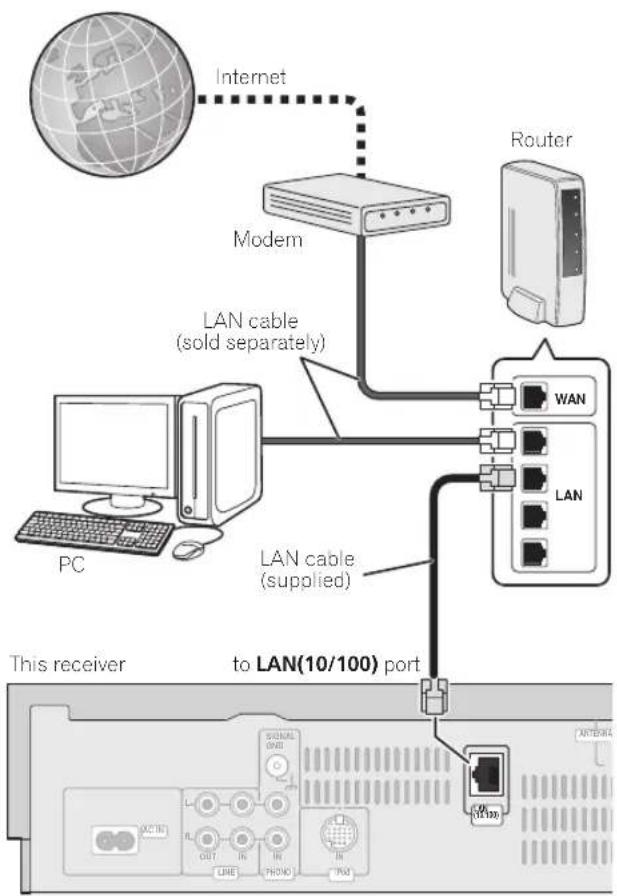
By connecting this receiver to the network via the LAN terminal, you can play back audio files stored on components on the network, including your PC, and listen to Internet radio stations.
Connect the LAN terminal on this receiver to the LAN terminal on your router (with or without the built-in DHCP server function) using the provided LAN cable.
Turn on the DHCP server function of your router. In case your router does not have the built-in DHCP server function, it is necessary set up the network manually. For details, see Setting up the network on page 30.
Using the USB interface
It is possible to listen to two-channel audio ^2 using the USB interface on the front of this receiver.
Note
To listen to Internet radio stations, you must sign a contract with an ISP (Internet Service Provider) beforehand.
Video files cannot be played back.
- With Windows Media Player 11 or Windows Media Connect, you can even play back copyrighted audio files on this receiver.
2. Compatible USB memory devices include external magnetic hard drives, portable flash memory (particularly keydrives) and digital audio players (MP3 players) of format FAT16/32. It is not possible to connect this unit to a personal computer for USB playback.
- Pioneer cannot guarantee compatibility (operation and/or bus power) with all USB mass storage devices and assumes no responsibility for any loss of data that may occur when connected to this receiver.
Connecting an iPod
This receiver has a dedicated iPod terminal that will allow you to control playback of audio content from your iPod using the controls of this receiver.
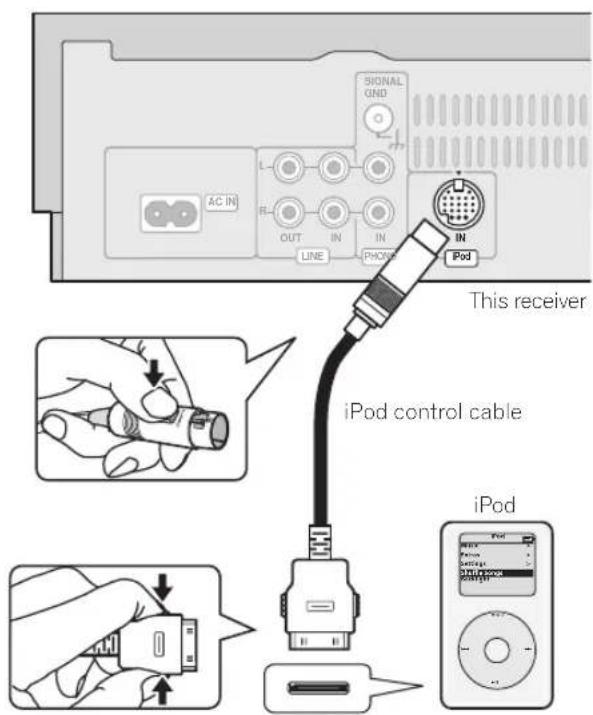
- Set this receiver to the standby mode, and then use the iPod control cable2 to connect your iPod to the iPod terminal on the rear panel of this receiver.
iPod is a trademark of Apple Inc., registered in the U.S. and other countries.
About network playback
The network playback function of this unit uses the following technologies:
Windows Media Connect
See Windows Media Player 11/Windows Media Connect on page 43 for more on this.
Windows Media DRM
Microsoft Windows Media Digital Rights Management (WMDRM) is a platform to protect and securely deliver content for playback on computers, portable devices and network devices. Home Media Gallery functions as a WMDRM 10 for networked devices. WMDRM protected content can only be played on media servers supporting WMDRM.
Content owners use WMDRM technology to protect their intellectual property, including copyrights. This device uses WMDRM software to access WMDRM protected content. If the WMDRM software fails to protect the content, content owners may ask Microsoft to revoke the software's ability to use WMDRM to play or copy protected content. Revocation does not affect unprotected content. When you download licenses for protected content, you agree that Microsoft may include a revocation list with the licenses. Content owners may require you to upgrade WMDRM to access their content. If you decline an upgrade, you will not be able to access content that requires the upgrade.
This product is protected by certain intellectual property rights of Microsoft. Use or distribution of such technology outside of this product is prohibited without a license from Microsoft.
DLNA


DLNA CERTIFIEDTM Audio Player
The Digital Living Network Alliance (DLNA) is a cross-industry organization of consumer electronics, computing industry and mobile device companies. Digital Living provides consumers with easy sharing of digital media through a wired or wireless network in the home.

Note
to use the latest available software version.
iPd is licensed for reproduction of non-copyrighted materials or materials the user is legally permitted to reproduce.
Features such as the equalizer cannot be controlled using this receiver, and we recommend switching the equalizer off before connecting. Pioneer cannot under any circumstances accept responsibility for any direct or indirect loss arising from any inconvenience or loss of recorded material resulting from the iPod failure.
2 For detailed instructions on using the iPod, please refer to the manual supplied with the iPod.
The DLNA certification logo makes it easy to find products that comply with the DLNA Interoperability Guidelines. This unit complies with DLNA Interoperability Guidelines v1.0.
When a PC running DLNA server software or other DLNA compatible device is connected to this receiver, some setting changes of software or other devices may be required. Please refer to the operating instructions for the software or device for more information.
DLNA and DLNA CERTIFIED are trademarks and/or service marks of Digital Living Network Alliance.
FLAC
FLAC Decoder
Copyright © 2000, 2001, 2002, 2003, 2004, 2005, 2006, 2007 Josh Coalson
Redistribution and use in source and binary forms, with or without modification, are permitted provided that the following conditions are met:
- Redistributions of source code must retain the above copyright notice, this list of conditions and the following disclaimer.
- Redistributions in binary form must reproduce the above copyright notice, this list of conditions and the following disclaimer in the documentation and/or other materials provided with the distribution.
- Neither the name of the Xiph.org Foundation nor the names of its contributors may be used to endorse or promote products derived from this software without specific prior written permission.
THIS SOFTWARE IS PROVIDED BY THE COPYRIGHT HOLDERS AND CONTRIBUTORS "AS IS" AND ANY EXPRESS OR IMPLIED WARRANTIES, INCLUDING, BUT NOT LIMITED TO, THE IMPLIED WARRANTIES OF MERCHANTABILITY AND FITNESS FOR A PARTICULAR PURPOSE ARE DISCLAIMED. IN NO EVENT SHALL THE FOUNDATION OR CONTRIBUTORS BE LIABLE FOR ANY DIRECT, INDIRECT, INCIDENTIAL, SPECIAL, EXEMPLARY, OR CONSEQUENTIAL DAMAGES (INCLUDING, BUT NOT LIMITED TO, PROCEDURE OF SUBSTITUTE GOODSOR SERVICES; LOSS OF USE, DATA, OR PROFITS; OR BUSINESS INTERUPTION) HOWEVER CAUSED AND ON ANY THEORY OF LIABILITY, WHETHER IN CONTRACT, STRICT LIABILITY, OR TORT (INCLUDING NEGLIGENCE OR OTHERWISE) ASING IN ANY WAY OUT OF THE USE OF THIS SOFTWARE, EVEN IF ADVISED OF THE POSSIBILITY OF SUCH DAMAGE.
aacPlus


The AAC decoder uses aesPlus developed by Coding Technologies (www.codingtechnologies.com).
Content playable over a network
- Even when encoded in a compatible format, some files may not play correctly.
- Movie and photo files cannot be played back.
- There are cases where you cannot listen to an Internet radio station even if the station can be selected from a list of radio stations.
- Some functions may not be supported depending on the server type or version used.
- Supported file formats vary by server. As such, files not supported by your server are not displayed on this unit. For more information check with the manufacturer of your server.
About playback behavior over a network
- Playback may stall when the PC is switched off or any media files stored on it are deleted while playing content.
- If there are problems within the network environment (heavy network traffic, etc.) content may not be displayed or played properly (playback may be interrupted or stalled). For best performance, a 100BASE-TX connection between receiver and PC is recommended.
- If several clients are playing simultaneously, as the case may be, playback is interrupted or stalled.
- Depending on the security software installed on a connected PC and the setting of such software, network connection may be blocked.
Pioneer is not responsible for any malfunction of the receiver and/or the Home Media Gallery features due to communication error/malfunctions associated with your network connection and/or your PC, or other connected equipment. Please contact your PC manufacturer or Internet service provider.
"Windows MediaTM" is a trademark of Microsoft Corporation. This product includes technology owned by Microsoft Corporation and cannot be used or distributed without a license from Microsoft Licensing, Inc.
Microsoft, Windows Vista, Windows XP, Windows 2000, Windows Millennium Edition, Windows 98, and Windows NT are either registered trademarks or trademarks of Microsoft Corporation in the United States and/or other countries.
Authorizing this receiver
In order to be able to play with Home Media Gallery, this receiver must be authorized. This happens automatically when the receiver makes a connection over the network to the PC. If not, please authorize this receiver manually on the PC. The authorization (or permission) method for access varies depending on the type of server currently being connected. For more information on authorizing this receiver, refer to the instruction manual of your server.
Playing back audio files stored on components on the network
The Home Media Gallery allows you to play music stored on media servers connected on an identical Local Area Network (LAN) as the player. This unit allows for the playing of files stored on the following:
- PCs running Microsoft Windows XP with Windows Media Connect installed
PCs running Microsoft Windows Vista or Windows XP with Windows Media Player 11 installed - DLNA-compatible digital media servers (on PCs or other components)
To play back audio files stored on components on the network or listen to Internet radio stations, you must turn on the DHCP server function of your router. In case your router does not have the built-in DHCP server function, it is necessary to set up the network manually. Otherwise, you cannot play back audio files stored on components on the network or listen to Internet radio stations. See Setting up the network on page 30 for more on this.

Important
- When you play back audio files, 'Connecting...' is displayed before playback starts. The display may continue for several seconds depending on the type of file.
- In case a domain is configured in a Windows network environment, you cannot access a PC on the network while you are logged onto the domain. Instead of logging onto the domain, log onto the local machine.
- This receiver can play back audio files compressed in VBR (Variable Bitrate) mode, but there are cases where the time elapsed may not be correctly displayed.
1 Press HOME MEDIA GALLERY.
It may take several seconds for this receiver to access the network.
2 Use / to select the server (i.e. audio components on the network) from which you want to play back, and then press
The names of folders and files will be displayed.
3 Use ↑/↓ to select the folder, music file to play back, and then press ENTER.
Press / to scroll up and down the list and select the desired item. When you press , playback starts with the playback screen being displayed for the selected item. To return to the list screen, press RETURN.
Only the audio files with the mark can be played back. In case of the folders with the mark, use / and to select the desired folder and audio file.
4 Repeat Step 3 to play back the desired song.
You can perform the following operations with the remote control of this receiver. Note that some buttons are not available for operation depending on the category currently being played back.
| Button | What it does |
| ▶ | Starts playback. |
| || | Pauses playback. |
| ■ | Stops playback. |
| ← | Skipping to the start of the current track, then to previous tracks. |
| → | Skipping to the next track. |
Using repeat play
There are two repeat play options available during playback.
- During playback, press REPEAT to select a repeat play mode.
Select between 1-track repeat (dots in the display), all repeat (within current folder) (dots in the display), or repeat off.

Note
- Playback stops when the last song in a folder is played back to the end.
To select another track or folder during playback, press , then perform steps 3 and 4. (To return to the currently playing track, press DISPLAY.)
To select tracks in other categories in Home Media Gallery, press TOP MENU (playback of the current track will stop).
Using random play
Use the random play feature to play tracks at random. The random play option can be set during playback.1
- Press RANDOM to start random play.
Random play remains in effect (RDM shows in the display) until you press RANDOM again to cancel.

Tip
- Use the following controls during random play:
| Button | What it does |
| ▶► | Selects a new track at random. |
| ←← | Returns to the beginning of the current track. |
Registering and deleting audio files in and from the Favorites folder
Press PROGRAM while a song is being played back or stopped. The selected song is then registered in the Favorites folder.
Up to a total of 20 audio files stored on components on the network and Internet radio stations can be stored.
To delete a registered song, select the Favorites folder, select the song you want to delete from the folder, and press CLEAR The selected song is then deleted from the Favorites folder.
Listening to Internet radio stations
1 Press HOME MEDIA GALLERY.
2 Use ↑/↓ to select 'Internet Radio', and then press →
The names of folders and Internet radio stations will be displayed.
3 Use ↑/↓ to select the folder or Internet radio station to play back, and then press ENTER.
Press ↑/↓ to scroll up and down the list and select the desired item. When you press →, playback starts with the playback screen being displayed for the selected item. To return to the list screen, press RETURN.
Only the Internet radio stations with the mark can be played back. In case of the folders with the mark, use / and to select the desired folder and Internet radio station.
4 Repeat Step 3 to play back the desired Internet radio station.2

Tip
- To stop playback, press (stop).
Registering and deleting Internet radio stations in and from the Favorites folder
Press PROGRAM while a station is being played back or when Internet radio station has been selected in the preceding step 3. The selected station is then registered in the Favorites folder.
Up to a total of 20 Internet radio stations and audio files stored on components on the network can be stored.
To delete a registered station, select the Favorites folder, select the station you want to delete from the folder, and press CLEAR. The selected station is then deleted from the Favorites folder.
Note
If a specific track is selected during random play, it will not play. To play the desired track, cancel random play first.
2 To listen to Internet radio stations, you must have high-speed broadband Internet access. With a 56 K or ISDN modem, you may not enjoy the full benefits of Internet radio.
The port number varies depending on the Internet radio station. Check the firewall settings.
- A list of Internet radio stations provided by the vTuner database service is subject to change or deletion without notice due to various reasons.
- Broadcasts may be stopped or interrupted depending on the Internet radio station. In this case, you cannot listen to a radio station selected from the list of Internet radio stations.
To select another radio station or folder during playback, press , then perform steps 3 and 4. (To return to the currently playing radio station, press
DISPLAY)
To select tracks in other categories in Home Media Gallery, press TOP MENU (playback of the current track will stop)
Saving Internet radio stations
This receiver can remember the Internet radio stations that you often listen to in 3 classes (A, B, and C) with up to 10 stations in each class to make the total of 30 stations at its maximum capacity.
1 Tune into the Internet radio station that you want to save.
Tune into the desired Internet radio station by following Steps 1 to 3 on (page 25).
2 Press T.EDIT to switch to the station-saving mode.
3 Press CLASS to select the class that you want to save the station in.
Select the desired class from A, B, and C.
4 Use ST + / - to select the number that you want to save the station as, and then press ENTER.
You can also select the station number by using the number buttons. Select the desired number from 0 to 9.
Retrieving saved Internet radio stations
You need to save Internet radio stations first before retrieving them. If there are no Internet radio stations currently being saved, see Saving Internet radio stations above and save at least one Internet radio station before proceeding with the following steps.
1 Select the class that you want to retrieve an Internet radio station from.
Each time you press CLASS, the class switches to A, B, and C in turn.
2 Use the number buttons to select the station number that you want to retrieve.
You can also select the station number by using the number buttons.
'Preset Not Stored' appears when you select an Internet radio station currently not being saved.
About Internet radio
Internet radio is an audio broadcasting service transmitted via the Internet. There are a large number of Internet radio stations broadcasting a variety of services from every corner of the world. Some are hosted, managed, and broadcast by private individuals while others are by the corresponding traditional terrestrial radio stations or radio networks. Whereas terrestrial, or OTA (over-the-air), radio stations are geographically restricted on the range of radio waves broadcast from a transmitter through the air, Internet radio stations are accessible from anywhere in the world, as long as there is a connection to the Internet, as services are not transmitted through the air but are delivered over the World Wide Web. On this receiver you can select Internet radio stations by genre as well as by region.
About list of Internet radio
The list of Internet radio stations on this receiver is created, edited, and managed by the vTuner database service exclusively for use with this receiver.
Playing back audio files stored on a USB memory device
1 Press HOME MEDIA GALLERY.
2 Use ↑/↓ to select 'USB', and then press →→
The names of folders and files will be displayed.
3 Use ↑/↓ to select the folder or music file to play back, and then press ENTER.
Press ↑/↓ to scroll up and down the list and select the desired item. When you press →, playback starts with the playback screen being displayed for the selected item. To return to the list screen, press RETURN.
Only the audio files with the mark can be played back. In case of the folders with the mark, use ↑/↓ and to select the desired folder and audio file.
4 Repeat Step 3 to play back the desired song.
You can perform the following operations with the remote control of this receiver. Note that some buttons are not available for operation depending on the category currently being played back.
| Button | What it does |
| ► | Starts playback. |
| ■ | Pauses playback. |
| ■ | Stops playback. |
| ► | Skipping to the start of the current track, then to previous tracks. |
| ► | Skipping to the next track. |
Using repeat play
There are two repeat play options available during playback.
- During playback, press REPEAT to select a repeat play mode.
Select between 1-track repeat (dots in the display).
all repeat (within current folder) (rights in the display), or repeat off.
Using random play
Use the random play feature to play tracks at random. The random play option can be set during playback.
- Press RANDOM to start random play.
Random play remains in effect (RDM shows in the display) until you press RANDOM again to cancel.

Tip
- Use the following controls during random play:
| Button | What it does |
| ▶► | Selects a new track at random. |
| ←► | Returns to the beginning of the current track. |
About playback of audio from USB memory devices
The maximum number of levels that you can select in Steps 3 and 4 is 10. Also, you can display and play back up to 2000 folders and files within a single folder.
Note
- Playback stops when the last song in a folder is played back to the end.
To select another track or folder during playback, press , then perform steps 3 and 4. (To return to the currently playing track, press DISPLAY.)
To select tracks in other categories in Home Media Gallery, press TOP MENU (playback of the current track will stop). - When a USB memory device with a large capacity is connected, it may take some time to read all the contents.
This receiver does not support a USB hub.
Copyrighted audio files cannot be played back on this receiver.
Playing audio files stored on an iPod
1 Press HOME MEDIA GALLERY.
2 Use ↑/↓ to select 'iPod', and then press →→
The names of categories and files will be displayed.
3 Use ↑/↓ to select the category or music file to play back, and then press ENTER.
Press / to scroll up and down the list and select the desired item. When you press, playback starts with the playback screen being displayed for the selected item. To return to the list screen, press RETURN.
Only the audio files with the mark can be played back.
In case of the categories with the mark, use
to select the desired category and audio file.
4 Repeat Step 3 to play back the desired song.
You can perform the following operations with the remote control of this receiver. Note that some buttons are not available for operation depending on the category currently being played back.
| Button | What it does |
| ▶ | Starts playback. |
| || | Pauses playback. |
| ■ | Stops playback. |
| ↔ | Skips to the start of the current track, then to previous tracks. |
| ▶ | Skips to the next track. |
Using repeat play
There are two repeat play options available during playback.
- During playback, press REPEAT to select a repeat play mode.
Select between 1-track repeat (chints in the display), all repeat (within current category) (chints in the display), or repeat off.
Using random play
Use the random play feature to play tracks at random.
The random play option can be set during playback.
- Press RANDOM to start random play.
Random play remains in effect (it shows in the display) until you press RANDOM again to cancel.

- Use the following controls during random play:
| Button | What it does |
| ▶► | Selects a new track at random. |
| ←► | Returns to the beginning of the current track. |
Displaying playback information
When using Home Media Gallery for playback, the display contents can be changed.
- To switch the information displayed, press DISPLAY repeatedly.
Note
To select another track or category during playback, press then perform steps 3 and 4. (To return to the currently playing track, press DISPLAY.)
To select tracks in other categories in Home Media Gallery, press TOP MENU (playback of the current track will stop).
The items displayed on this unit may differ from the menu structure found on the iPod.
About playable file formats
The Home Media Gallery feature of this receiver supports the following file formats. Note that some file formats are not available for playback although they are listed as playable file formats. Also, the compatibility of file formats varies depending on the type of server. Check with your server to ensure the compatibility of file formats supported by your server.
Category Extension Stream
| MP3 | .mp3 MPEG-1 Audio Layer-3 Sampling frequency 8 kHz to 48 kHz | |
a. LPCM files recorded on a USB memory device cannot be played directly, and are supported only when output from a server. Depending on the server, some formats not supported by this receiver can be output by transcoding them to LPCM format. For details, see the operating instructions for your server.
"MPEG Layer-3 audio decoding technology licensed from Fraunhofer IIS and Thomson multimedia."
Setting up the network
In case the router connected to the LAN terminal on this receiver is a broadband router (with the built-in DHCP server function), simply turn on the DHCP server function, and you will not need to set up the network manually. You must set up the network as described below only when you have connected this receiver to a server without the DHCP server function. Before you set up the network, consult with your ISP or the network manager for the required settings. It is advisory that you also refer to the operation manual supplied with your network component.
In case you make changes to the network configuration without the DHCP server function, make the corresponding changes to the network settings of this receiver.
IP Address
The IP address to be entered must be defined within the following ranges. If the IP address defined is beyond the following ranges, you cannot play back audio files stored on components on the network or listen to Internet radio stations.
Class A: 10.0.0.1 to 10.255.255.254
Class B: 172.16.0.1 to 172.31.255.254
Class C: 192.168.0.1 to 192.168.255.254
Subnet Mask
In case an xDSL modem or a terminal adapter is directly connected to this receiver, enter the subnet mask provided by your ISP on paper. In most of the cases, enter 255.255.255.0.
Gateway IP
In case a gateway (router) is connected to this receiver, enter the corresponding IP address.
DNS Server Preferred/DNS Server Alternate
In case there is only one DNS server address provided by your ISP on paper, enter 'DNS Server Preferred'. In case there are more than two DNS server addresses, enter 'DNS Server Alternate' in the other DNS server address field.
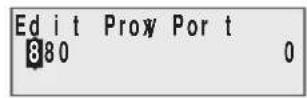
Proxy Hostname/Proxy Port
This setting is required when you connect this receiver to the Internet via a proxy server. Enter the IP address of your proxy server in the 'Proxy Hostname' field. Also, enter the port number of your proxy server in the 'Proxy Port' field.
Tip
To delete alphanumeric characters entered one at a time, press CLEAR.
- To return to the immediately previous setting menu, press RETURN. When 'Cancel Key Editing Lose Changes?' is display, press to return to the previous setting menu (the previously set menu contents will be canceled). Press to return to the current setting menu.
- It may prove convenient to make a note of the addresses input in each step.
1 Press HOME MEDIA GALLERY.
It may take several seconds for this receiver to access the network.
2 Use ↑/↓ to select 'SETUP' then press
3 Use ↑/↓ to select 'Network Setup' then press ENTER.
The 'Network Connection' screen appears.
4 Either 'Network Found' or 'No Network Found' appears. Check the network connection status and press
Network Found - Connected to a component on the network.
- No Network Found - Not connected to a component on the network.

The 'Network IP Settings' screen appears.
5 Use ↑/↓ to select 'Static IP Address' then press ENTER.
| Nettwork IP Settigns |
| -Automatic(DHCP)↑ |
| -Statistic IP Address↓ |
The 'IP Address' screen appears.
When you select 'Automatic (DHCP)', the network is automatically set up, and you do not need to follow Steps 6 to 15. Proceed with Step 16.
6 Use ↑/↓ to select 'Change' then press ENTER.
The 'Edit IP Address' screen appears.
7 Enter the IP address.
Use the number buttons to input the IP address. Use / to move the cursor. When the final numeral is input, the 'Subnet Mask' display screen will appear.
| Edit | IP | Address |
| 192. | 168. | 000.002 |

8 Use ↑/↓ to select 'Change' then press ENTER.
The 'Edit Subnet Mask' screen appears.
9 Enter the subnet mask.
After entry, press ENTER. The Gateway IP screen appears.
| Edit Subnet Mask | |
| 255.255.255.000 |

10 Use ↑/↓ to select 'Change' then press ENTER.
The 'Edit Gateway' screen appears.
11 Enter the default gateway IP address.
After entry, press ENTER. The 'DNS Server Preferred' screen appears.
| Edit Gateway IP 192.168.000.001 |

12 Use ↑/↓ to select 'Change' then press ENTER.
The 'Edit DNS Preferred' screen appears.
13 Enter the preferred DNS server address.
After entry, press ENTER. The 'DNS Server Alternate' screen appears.
| Edit DNS Preferred |
| 192.168.000.001 |

14 Use ↑/↓ to select 'Change' then press ENTER.
The 'Edit DNS Alternate' screen appears.
15 Enter the alternate DNS server address.
In case there is only one DNS address, you do not need to enter the alternate DNS server address.
After entry, press ENTER. The 'Enable Proxy Server' screen appears.
| Edit DNS Alternate 192.168.000.001 |

16 Use ↑/↓ to select 'No' or 'Yes' for the proxy server setting to deactivate or activate the proxy server, then press ENTER.
| Enable Proxy Serve |
| •No ↑ |
| •Yes ↓ |
In case you select 'No', proceed with Step 21. In case you select 'Yes', on the other hand, proceed with Step 17. The Proxy Hostname' screen appears.
17 Use ↑/↓ to select 'Change' then press ENTER.
The 'Edit Proxy Hostname' screen appears.
18 Enter the address of your proxy server or the domain name.
Use / to input characters, and / to move the cursor. Up to 127 characters can be input.
After entry, press ENTER.
| Edit Prox Host name |
| Proxy Pioneer |


The 'Proxy Port' screen appears.
19 Use ↑/↓ to select 'Change' then press ENTER. The 'Edit Proxy Port' screen appears.
20 Enter the port number of your proxy server. After entry, press ENTER. The 'Setting OK?' screen appears.

21 Press ENTER to complete the network setup procedure.
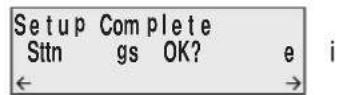
After 'Applying Settings...' appears, the display will return to the 'Top Menu' screen.
Checking the network settings
You can check the following network settings of this receiver: the MAC address, the IP address, the subnet mask, the gateway IP address and the proxy server.
Before proceeding with the following steps, check whether you have followed Steps 1 and 2.
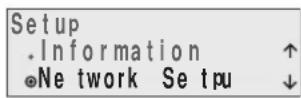
3 Use ↑/↓ to select 'Information' then press ENTER.
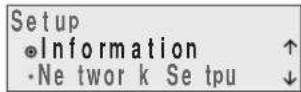
The 'MAC Address' screen appears.
4 Check the network settings.

Use / to switch the display. Each time you use / , the display switches as follows.
MAC Address IP Address Gateway IP Proxy Server Subnet Mask
Chapter 7
Adjusting the sound
Switching Sound modes
You can add exciting effects to audio sources.
Sound mode settings are saved separately for each function.
- Press SOUND during playback of an audio source to switch Sound modes.
You can choose from the following Sound modes:
VIVID-For lively, sharp sound.
- EXCITING - For dynamic, stimulating sound.
- RELAXING - For laid-back sound.
- Off - Revert sound to its natural state.
Adjusting the bass and treble
Use the bass and treble controls to adjust the overall tone.
- Adjust the bass and treble by pressing BASS +/-, TREBLE +/-.
You can adjust low and high sounds on a scale of -6 to +6 .
Using the Loudness function
Used to get good bass and treble from music sources at low volumes.
- Press LOUDNESS to switch on or off.
Using the Sound Retriever
- Default setting: On (FRONT AUDIO IN and HOME MEDIA GALLERY functions) / Off (all other functions)
When audio data is removed during the WMA/MP3/ MPEG-4 AAC compression process, sound quality often suffers from an uneven sound image. The Sound Retriever feature employs new DSP technology that helps bring CD quality sound back to compressed 2-channel audio by restoring sound pressure and smoothing jagged artifacts left over after compression.
Sound Retriever settings are saved separately for each playback function.
- During playback, press S.RETRIEVER to switch the sound retriever on or off.
Using Digital Noise Reduction
May improve the quality of sound in a noisy source (for example, cassette or video tape with lots of background noise) when switched on.3
Digital Noise Reduction settings are saved separately for each function.
- Press DIGITAL NR to switch on or off.
Confirming audio settings
You can make various audio settings.
- Press STATUS.
A listing of the audio settings will be displayed.
Note
- You cannot change sound modes during the playback of SACD sources.
- When Sound mode is set to any mode other than OFF, the Sound Retriever and Digital Noise Reduction are turned OFF.
2 The Sound Retriever settings cannot be changed during SACD playback. - When Sound Retriever is set to ON, sound mode and digital noise reduction are turned OFF.
3 - When Digital Noise Reduction is set to ON, Sound mode and Sound Retriever are turned OFF.
Digital Noise Reduction cannot be switched when functions other than PHONO, LINE, and TUNER are selected.
Chapter 8
Using the timer
Setting the clock
Setting the clock allows you to use the timer.1
1 Press TIMER/CLOCK.
The current time and date are displayed.
The first time you use the clock, you are taken to the Timer Setup screen. Make sure that 'Clock Adjust' is selected, then press and skip to Step 4.
2 Press TIMER/CLOCK again.
The Timer Setup screen is displayed.
3 Use ↑/↓ to choose 'Clock Adjust' then press ENTER.
4 Use ↑/↓ to set the day then press ENTER.
5 Use ↑/↓ to set the hour then press ENTER.
6 Use ↑/↓ to set the minute then press ENTER to confirm.
After setting the clock, press TIMER/CLOCK once to check the current time.
Setting the wake-up timer
Use the wake-up timer to set the receiver to switch on at any time and start playing whatever source you want.

Important
The clock must be set to the correct time for the wake-up timer to work properly (see Setting the clock above).
1 Select the source you want played.
Press INPUT to switch between CD, TUNER and LINE sources.
For example, press TUNER to select the radio as your source.
2 Prepare the source and set the volume.
For example, tune in the radio station you want to wake up to. Adjust the volume as necessary.
3 Press TIMER/CLOCK twice, use ↑/↓ to select 'Wake-up' then press ENTER.
4 Use ↑/↓ to select 'Timer Edit' then press ENTER.
5 Set the switch-on time.
Use / to set the hour, then press. Set the minute in the same way, pressing when you're done.
By pressing ENTER here, you can end the timer editing step and advance to step 8.
6 Set the switch-off time.
Set as above, pressing when done.
7 Set the day(s) of the week.
Use / to choose the day(s) and / to select/ deselect it (an asterisk () indicates the day will be skipped).
8 Press ENTER until you reach the end and see OK? and then press ENTER to confirm.
The TIMER indicator light, and the settings are confirmed in the display.
9 Switch the receiver into standby mode.
- You can check the timer settings in standby by pressing TIMER/CLOCK.
Turning the wake-up timer on/off
If you have already set the wake-up timer, you can switch it on/off by selecting Timer Edit or Timer Off in step 4 above (press ENTER).
Setting the sleep timer
The sleep timer switches off the receiver after a specified time so you can fall asleep without worrying about it.

Important
- You cannot use the Sleep Timer function when a Wake-Up Timer is on.
- Press SLEEP repeatedly to select a switch-off time.
Choose between 5 min, 15 min, 30 min, 60 min, 90 min, Auto (automatically switches off after the currently playing CD or SACD has finished) or Off.
- To check how much time is left, press SLEEP (the remaining time is displayed momentarily).
Chapter 9
Other settings
Listening to an external audio source
To listen to audio from a connected external component on this receiver, choose its input function on the remote control.
For more information on how to connect external components, see Connecting audio components on page 9.
- When you connect a cable to the F.AUDIO IN jack, this unit's input automatically switches to FRONT AUDIO IN.
1 Turn on the power of the playback component.
2 Turn on the power of the receiver.
3 Press INPUT until you have selected the source you want to play back.
4 Start playback of the component you selected in step 1.
Turning the display off
- Press DISP OFF.
When you turn the display off, the DISPLAY OFF indicator lights. If you press DISP OFF once more, the display is once again shown.
Even when set to not display, the display is temporarily shown when you carry out a control function.
Dimming the display
You can choose one of three brightness settings for the front panel display.
When set to AUTO, the display is shown brightly only when you carry out a control function.
1 Press SETUP.
2 Use ↑/↓ to choose 'Dimmer' then press ENTER.
3 Use ↑/↓ to adjust the brightness of the display then press ENTER.
Changing the clock's display mode
You can choose to display the clock in 12-hour mode or 24-hour mode.
1 Switch the receiver into standby.
2 Press SETUP.
3 Use ↑/↓ to choose 'Hour Display' then press ENTER.
4 Use ↑/↓ to select '12H' or '24H' then press ENTER.
Disabling colour reverse of the display
If no operations are carried out for three minutes, the colours of the text on this unit's display reverse. You have the option to disable this feature.
1 Switch the receiver into standby.
2 Press SETUP.
3 Use ↑/↓ to choose 'Reverse Display' then press ENTER.
4 Use ↑/↓ to select 'Mode Off' then press ENTER.
To turn Display Reverse back on, choose Mode On.
Volume mode setting
You can set the sensitivity of the volume control to either a 50-step system or an 80-step system.
1 Switch the receiver into standby.
2 Press SETUP.
3 Use ↑/↓ to choose 'Volume Step' then press ENTER.
4 Use ↑/↓ to select '80 Step' or '50 Step' then press ENTER.
- When the mode is changed, the volume returns to 0.
Resetting the system
Use this procedure to reset all system settings to the factory default.
1 Switch the receiver on.
2 Press and hold FUNCTION on the top panel, and then press and hold STANDBY/ON for three seconds.
Power is set to standby mode.
The next time you switch on, all the system settings should be reset.
Chapter 10
Additional information
Hints on installation
We want you to enjoy using this product for years to come, so please use the following guidelines when choosing a suitable location:
Do...
- Use in a well-ventilated room.
- Place on a solid, flat, level surface, such as a table, shelf or stereo rack.
Don't...
- Use in a place exposed to high temperatures or humidity, including near radiators and other heat-generating appliances.
- Place on a window sill or a place where the receiver will be exposed to direct sunlight.
- Use in an excessively dusty or damp environment.
- Place directly on top of an amplifier, or other component in your stereo system that becomes hot in use.
Use near a television or monitor as you may experience interference—especially if the television uses an indoor antenna. - Use in a kitchen or other room where the receiver may be exposed to smoke or steam.
- Use on a thick rug or carpet, or cover with cloth—this may prevent proper cooling of the unit.
- Place on an unstable surface, or one that is not large enough to support all four of the unit's feet.
Taking care of your receiver and discs
General
Hold discs by the edge or by the center hole and edge.
When you're not using a disc, return it to its case and store upright. Avoid leaving discs in excessively cold, humid, or hot environments (including under direct sunlight).
Don't glue paper or put stickers on to discs. Do not use a pencil, ball-point pen or other sharp-tipped writing instrument to write on the disc.

Don't use self-adhesive disc labels on discs as these can cause the disc to warp slightly during playback causing distortion in the picture and/or sound.
Damaged and shaped discs
Do not use cracked, chipped, warped, or otherwise damaged discs as they may damage the receiver.
This receiver is designed to be used only with conventional, fully circular discs. Do not use shaped discs. Pioneer disclaims all liability arising in connection with the use of shaped discs.
Cleaning discs
Fingerprints and dust on discs can affect playback performance. Clean using a soft, dry cloth, wiping the disc lightly from the center to the outside edge as shown below.
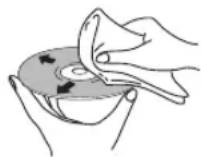
If necessary, use a cloth soaked in alcohol, or a commercially available CD/DVD cleaning kit to clean a disc more thoroughly. Never use benzine, thinner or other cleaning agents, including products designed for cleaning vinyl records.
Cleaning the receiver's exterior
Unplug the unit before cleaning.
Use a dry cloth to wipe off dust and dirt. If the surfaces are very dirty, wipe with a soft cloth dipped in some neutral cleanser diluted five or six times with water and wrung out well, then wipe again with a dry cloth.
Do not use furniture wax or cleaners. Never use thinners, benzine or insecticide sprays or other chemicals on or near this receiver.
If you use a chemical-impregnated cleaning cloth, read the instructions carefully before use. These cloths may leave smear marks on half-mirror finish surfaces; if this happens, finish with a dry cloth.
Cleaning the pickup lens
The receiver's lens should not become dirty in normal use, but if for some reason it should malfunction due to dust or dirt, consult your nearest Pioneer-authorized service center. We do not recommend using commercially available lens cleaners for CD players.
Condensation
Condensation may form inside the receiver if it is brought into a warm room from outside, or if the temperature of the room rises quickly. Although the condensation won't damage the receiver, it may temporarily impair its performance. Leave it to adjust to the warmer temperature for about an hour before switching on.
Moving the receiver
If you need to move the receiver, first switch the unit into standby (press STANDBY/ON on the remote control), then unplug the power cable. Never lift or move the unit during playback—discs rotate at a high speed and may be damaged.
Troubleshooting
Incorrect operations are often mistaken for trouble and malfunctions. If you think that there is something wrong with this component, check the points below. Sometimes the trouble may lie in another component. Investigate the other components and electrical appliances being used. If the trouble cannot be rectified even after exercising the checks listed below, ask your nearest Pioneer authorized service center or your dealer to carry out repair work.
- If the unit does not operate normally due to external effects such as static electricity disconnect the power plug from the outlet and insert again to return to normal operating conditions.
General
| Problem | Remedy |
| Power can't be turned on, or power suddenly turns off by itself. (In some cases, the green TIMER indicator may flash, and when power is turned on again an error message may appear in the display.) | Without disconnecting the power cord, wait for one minute and then try pressing the STANDBY/ON button to turn power on again.A speaker cable may be short circuited. Remove the speaker cables, securely twist the cores of the wires, and once again connect the wires properly to their speaker terminals.Overheating may have been caused by lack of sufficient air space around the unit. Install the unit so as to allow sufficient ventilation around all sides.Try lowering the volume level when using the unit.If none of these remedies works, call a Pioneer-authorized independent service company. |
| No sound, or sound is distorted. | Check that the disc is not damaged, and free from dust and dirt (page 36).Check that all interconnects are firmly inserted.Check that the plugs and terminals are free of dirt, oxide, etc. and clean if necessary. Also check the cable for damage.Make sure the audio component's output is not connected to the receiver's phono (turntable) inputs.Check receiver's settings (volume, input function, etc.).Make sure the component is connected correctly (refer to Connecting audio components on page 9).Press MUTE on the remote control to turn muting off. |
| Noise during playback of a cassette deck. | Move the cassette deck further from your receiver, until the noise disappears. |
| The remote control doesn't seem to work. | The remote control is too far from the receiver, or the angle with the remote sensor is too wide: Use the remote within its operating range (page 6).The battery is exhausted: Replace the batteries (page 6). |
SACD/CD
| Problem Remedy | |
| The disc won't play or is automatically ejected after loading. | ·Make sure the disc is free from dirt and dust and is not damaged (page 36). ·Check Disc / content format playback compatibility on page 7 to confirm that the disc is compatible with this receiver. ·Make sure the disc is loaded with the label side face-up and aligned properly in the disc tray guide. ·Condensation inside the receiver: Allow time for condensation to evaporate. Avoid using the receiver near an air-conditioning unit. |
| Noticeable difference in SACD and CD volume. | ·This is due to differences in the audio format and is not a malfunction. |
| Cannot play multichannel audio. | ·This receiver is not compatible with multichannel audio. |
Home Media Gallery
| Symptoms | Causes Remedies | |
| Cannot access the network. The LAN cable is not firmly connected. Firmly connect the LAN cable (see page 21). | ||
| The router is not switched on. Switch on the router. | ||
| Internet security software is currently installed in the connected component. | There are cases where a component with Internet security software installed cannot be accessed. | |
| The audio component on the network which has been switched off is switched on. | Switch on the audio component on the network before switching on this receiver. | |
| Playback does not start while 'Connecting...' continues to be displayed. | The component is currently disconnected from this receiver or the power supply. | Check whether the component is properly connected to this receiver or the power supply. |
| The PC or Internet radio is not properly operated. | The corresponding IP address is not properly set. | Switch on the built-in DHCP server function of your router, or set up the network manually according to your network environment. See Setting up the network on page 30. |
| The IP address is being automatically configured. | The automatic configuration process takes time. Please wait. | |
| The audio files stored on components on the network, such as a PC, cannot be played back. | Windows Media Player 11 is not currently installed on your PC. | Install Windows Media Player 11 on your PC (see page 22). |
| Audio files were recorded in formats other than MP3, WAV (LPCM only), MPEG-4 AAC, FLAC, and WMA. | Play back audio files recorded in MP3, WAV (LPCM only), MPEG-4 AAC, FLAC, or WMA. Note that some audio files recorded in these formats may not be played back on this receiver. | |
| Audio files recorded in MPEG-4 AAC or FLAC are being played back on Windows Media Player 11 or Windows Media Connect. | Audio files recorded in MPEG-4 AAC or FLAC cannot be played back on Windows Media Player 11 or Windows Media Connect. Try using another server. Refer to the operation manual supplied with your server. | |
| The component connected to the network is not properly operated. | Check whether the component is affected by special circumstances or is in the sleep mode. Try rebooting the component if necessary. | |
| The component connected to the network does not permit file sharing. | Try changing the settings for the component connected to the network. | |
| The folder stored on the component connected to the network has been deleted or damaged. | Check the folder stored on the component connected to the network. | |
| Audio playback is undesirably stopped or disturbed. | The audio file currently being played back was not recorded in a format playable on this receiver. | Check whether the audio file was recorded in a format supported by this receiver (page 29). Check whether the folder has been damaged or corrupted. Note that there are cases where even the audio files listed as playable on this receiver cannot be played back or displayed. |
| The LAN cable is currently disconnected. | Connect the LAN cable properly. | |
| There is heavy traffic on the network with the Internet being accessed on the same network. | Use 100BASE-TX to access the components on the network. | |
| Cannot access the component connected to the network. | The component connected to the network is not properly set. | If the client is automatically authorized, you need to enter the corresponding information again. Check whether the connection status is set to “Do not authorize”. |
| There are no playable audio files on the component connected to the network. | Check the audio files stored on the component connected to the network. | |
| Cannot access Windows Media Player 11. | You are currently logged onto the domain through your PC with Windows XP installed. | Instead of logging onto the domain, log onto the local machine (page 24). |
| Cannot listen to Internet radio stations | The firewall settings for components on the network are currently in operation. | Check the firewall settings for components on the network. |
| You are currently disconnected from the Internet. | Check the connection settings for components on the network, and consult with your network service provider if necessary. See Setting up the network on page 30. | |
| The broadcasts from an Internet radio station are stopped or interrupted. | There are cases where you cannot listen to some Internet radio stations even when they are listed in the list of Internet radio stations on this receiver. | |
| The folders/files stored on a USB memory device are not displayed. | The folders/files are currently stored in a region other than the FAT (File Allocation Table) region. | Store the folders/files in the FAT region. |
| The number of levels in a folder is more than 8. | Limit the maximum number of levels in a folder to 8 (page 27). | |
| There are more than 2000 folders/files stored in a single folder. | Limit the maximum number of folders/files stored in a single folder to 2000 (page 27). | |
| The audio files are copyrighted. Copyrighted audio files stored on a USB memory device cannot be played back (page 27). | ||
| A USB memory device is not recognized. | The USB memory device does not support the mass storage class specifications. | Try using a USB memory device compatible with the mass storage class specifications. Note that there are cases where even the audio files stored on a USB memory device compatible with the mass storage class specifications are not played back on this receiver (page 21). |
| Connect the USB memory device and switch on this receiver (page 21). | ||
| A USB hub is currently being used. This receiver does not support a USB hub (page 21). | ||
| This receiver recognizes the USB memory device as a fraud. | Switch off and on again this receiver. | |
| A USB memory device is connected and displayed, but the audio files stored on the USB memory device cannot be played back. | Some formats of a USB memory device, including FAT 12, NTFS, and HFS, cannot be played back on this receiver. | Check whether the format of your USB memory device is either FAT 16 or FAT 32. Note that the FAT 12, NTFS, and HFS formats cannot be played back on this receiver (page 21). |
| The file format cannot be properly played back on this receiver. | See the list of file formats that can be played back on this receiver. | |
Tuner
Displayed Messages
| Problem | Remedy |
| Considerable noise in radio broadcasts. | ·Connect the antenna (see Connecting the AM and FM antennas on page 10). ·Fully extend the FM wire antenna, position for best reception, and secure to a wall. ·Connect an outdoor FM antenna (see Connecting external antennas on page 10). ·Adjust the direction and position for best reception. ·Connect an additional internal or external AM antenna (see Connecting the AM and FM antennas on page 10). ·Turn off any other equipment that may be causing the noise or move it away from the unit. ·Place the antenna farther away from any other equipment that may be causing the noise. |
| Auto tuning does not pick up some stations. | ·The radio signal is weak. Auto tuning will only detect radio stations with a good signal. For more sensitive tuning, connect an outdoor antenna. |
| Sound is mono only. | Check that the tuner is not set to FM mono (see Improving poor FM reception on page 18). |
General
| Message | Description |
| Can't use during "SACD" | • Displayed when you press SOUND or S.RETRIEVER while listening to audio from an SACD source. |
| Can't use during "This Function" | • Displayed when you press DIGITAL NR when listening to functions other than LINE, PHONO or TUNER. |
| Can't use during "Wake-up" | • Displayed when you press SLEEP while a Wake-Up timer is on. |
| Can't use during "Tray Lock" | • Press and hold ▲ OPEN/CLOSE on the top panel for about eight seconds. Then the tray can be opened/closed using ▲ OPEN/CLOSE. |
| EEPROM Error | • Contact your Pioneer authorized service center or your dealer for servicing. |
Home Media Gallery
| Message | Description |
| Please Wait | ·A component on the network, including a PC, is currently being connected. Wait for a while. |
| Connection Down | ·The selected category or Internet radio station cannot be accessed. |
| File Format Error | ·Cannot be played back for some reasons. |
| License Error | ·The license for the contents to be played back is invalid. |
| Track Not Found | ·The selected song has not been found anywhere on the network. |
| Server Error | ·The selected server cannot be accessed. |
| Server Disconnected | ·The server has been disconnected. |
| Empty | ·There are no files stored in the selected folder. |
| Preset Not Stored | ·The selected Internet radio station is not currently registered and saved. |
| Network Problem | ·There is a problem with the network settings. Check the network settings. The message also appears then the network settings of this receiver have been changed. In this case, please wait. |
| Out of Range | ·The value entered is beyond the permitted range of the network settings. |
| USB Error | ·The amount of electricity consumption for a USB memory device is too large. |
Glossary
General
Analog audio
Direct representation of sound by an electrical signal. See also Digital audio.
Digital audio
Indirect representation of sound using numbers. See also Sampling frequency and Analog audio.
DRM
DRM (digital rights management) copy protection is a technology designed to prevent unauthorized copying by restricting playback, etc. of compressed audio files on devices other than the PC (or other recording equipment) used to record it. For detailed information, please see the instruction manuals or help files that came with your PC and/or software.
File extension
A tag added to the end of a filename to indicate the type of file. For example, ".mp3" indicates an MP3 file.
ISO 9660 format
International standard for the volume and file structure of CD-ROM discs.
MP3
MP3 (MPEG1 audio layer 3) is a compressed stereo audio file format. Files are recognized by their file extension ".mp3".
PCM (Pulse Code Modulation)
Digital audio encoding system found on CDs. Good quality, but requires a lot of data compared to compressed audio formats. See also Digital audio.
Sampling frequency
The rate at which sound is measured to be turned into digital audio data. The higher the rate, the better the sound quality. CD is 44.1kHz ; DVD can be up to 96kHz . See also Digital audio.
Super Audio CD (SACD)
Super Audio CD is a high quality audio disc format that can accommodate high sampling rate stereo and multi-channel audio, as well as conventional CD audio all on the same disc.
Home Media Gallery
Default Gateway
Default Gateway is a node on a computer network that serves as an access point to another network. A default gateway (such as a computer and router) is used to forward all traffic that is not addressed to a station within the local subnet.
DHCP (Dynamic Host Configuration Protocol)
Server
A DHCP server is a server that allocates IP addresses to hosts (network devices). In most cases, a broadband router serves as a DHCP server in a home network.
DLNA
The Digital Living Network Alliance (DLNA) is a cross-industry organization of consumer electronics, computing industry and mobile device companies. Digital Living provides consumers with easy sharing of digital media through a wired or wireless network in the home.
The DLNA certification logo makes it easy to find products that comply with the DLNA Interoperability Guidelines. This unit complies with DLNA Interoperability Guidelines v1.0.
DNS
DNS is an abbreviation for the Domain Name System, which stores and associates many types of information with domain names. Most importantly, DNS translates domain names (computer hostnames or sitenames, such as www.pioneerelectronics.com) to IP addresses (such as 202.221.192.106).
Ethernet
A frame-based computer networking technology for local area networks (LANs). This receiver supports 100BASE-TX and 10BASE-T.
FLAC
FLAC (Free Lossless Audio Codec) is an audio format allows lossless codec. Audio is compressed in FLAC without any loss in quality. For more details about FLAC, visit the following website: http://flac.sourceforge.net/
IP (Internet Protocol) address
A unique number that devices use in order to identify and communicate with each other on a network utilizing the Internet Protocol standard, such as '192.168.0.1'. No duplicate numbers are allowed in the network.
LAN
LAN is an abbreviation for the Local Area Network, which is a computer network covering a small geographical area, like a home, office, or group of buildings. Current LANs are most likely to be based on switched IEEE 802.3 Ethernet technology, running at 10, 100, or 1000 Mbit/s, or on IEEE 802.11 Wi-Fi technology.
MAC (Media Access Control) address
An address attached to the port of any device. The MAC address cannot be changed.
Subnet mask
The IP address is divided into the network address part and the host address part. The subnet mask is expressed as '255.255.255.0'. In most cases, the subnet mask is automatically assigned by the DHCP server.
vTuner
vTuner is an online database service that allows you to listen to radio on the Internet. vTuner lists thousands of stations from over 100 different countries around the globe.
"This product is protected by certain intellectual property rights of NEMS and BridgeCo. Use or distribution of such technology outside of this product is prohibited without a license from NEMS and BridgeCo or an authorized subsidiary."
Windows Media
Windows Media is a multimedia framework for media creation and distribution for Microsoft Windows. Windows Media is either a registered trademark or trademark of Microsoft Corporation in the U.S. and/or other countries. Use an application licensed by Microsoft Corporation to author, distribute, or play Windows Media formatted content. Using an application unauthorized by Microsoft Corporation is subject to malfunction.
Windows Media DRM
Windows Media DRM is a DRM (Digital Rights Management) service for the Windows Media platform. It is designed to provide secure delivery of audio and/or video content over an IP network to a PC or other playback device in such a way that the distributor can control how that content is used. The WMDRM-protected content can only be played back on a component supporting the WMDRM service.
Windows Media Player 11/ Windows Media Connect
Windows Media Connect is software to deliver music, photos and movies from a Microsoft Windows XP computer to home stereo systems and TVs.
With this software, you can play back files stored on the PC through various devices wherever you like in your home.
At this time you cannot download the Windows Media Connect software from Microsoft's website. If your server currently does not have Windows Media Connect installed, install Windows Media Player 11 (for Windows XP) instead. This software can be downloaded from Microsoft's website.
For more information check the official Microsoft website.
Specifications
- Amplifier section
RMS Power Output. 50 W + 50 W (1 kHz, 10% T.H.D., 4 Ω)
Continuous Power Output 40 W + 40 W (20 Hz to 20 kHz, 1.0 % T.H.D., 4 Ω)
FM tuner section
Frequency range. 87.5 MHz to 108 MHz Antenna. 75 unbalanced
AMtuner section
Frequency range. 531 kHz to 1602 kHz Antenna .Loop antenna
Network section
LAN terminal Ethernet jack 10BASE-T/100BASE-TX
- Other connectors
Power supply
USB connector .5 V, 500 mA
iPod connector .5 V, 500 mA
Miscellaneous
Power requirements.. AC 220 V to 240 V, 50 Hz/60 Hz
Power consumption . 47 W
Power consumption in standby. 0.4 W
Dimensions... 386 mm (W) x 88 mm (H) x 347 mm (D)
Weight . 5.0 kg
- Accessories
Remote control 1
AA/R6 dry cell batteries (to confirm system operation) 2
AM loop antenna 1
FM wire antenna 1
iPod control cable (for use with this unit only) 1
LAN cable 1
Power cord 1
Warranty card 1
These operating instructions

Note
- Specifications and design subject to possible modification without notice, due to improvements.
Published by Pioneer Corporation.
Copyright © 2008 Pioneer Corporation.
All rights reserved.
IMPORTANT

Home Media Gallery. 20
Home Media Gallery. 42
2 Prises LINE IN/OUT
Current Affairs - Affaires
courantes
Information-Informations generales
Sport-Sports
Education - Education
Copyright © 2000, 2001, 2002, 2003, 2004, 2005, 2006, 2007 Josh Coalson
DNS Server Preferred/DNS Server Alternate
Dimensions. .386 mm (L) x 88 mm (H) x 347 mm (P)
Poids .5,0 kg
- Accessoires
Télécommande 1
http://www.pioneer.co.uk
http://www.pioneer.fr
http://www.pioneer.eu
Published by Pioneer Corporation.
Copyright © 2008 Pioneer Corporation.
All rights reserved.
Publication de Pioneer Corporation.
© 2008 Pioneer Corporation.
PIONEER ELECTRONICS (USA) INC.
P.O. BOX 1540, Long Beach, California 90801-1540, U.S.A. TEL: (800) 421-1404
PIONEER ELECTRONICS OF CANADA, INC.
300 Allstate Parkway, Markham, Ontario L3R 0P2, Canada TEL: 1-877-283-5901, 905-479-4411
PIONEER EUROPE NV
Haven 1087, Keetberglaan 1, B-9120 Melsele, Belgium TEL: 03/570.05.11
PIONEER ELECTRONICS ASIACENTRE PTE. LTD.
253 Alexandra Road, #04-01, Singapore 159936 TEL: 65-6472-7555
PIONEER ELECTRONICS AUSTRALIA PTY. LTD.
178-184 Boundary Road, Braeside, Victoria 3195, Australia, TEL: (03) 9586-6300
PIONEER ELECTRONICS DE MEXICO S.A. DE C.V.
Blvd.Manuel Avila Camacho 138 10 piso Colomas de Chapultepec, Mexico,D.F. 11000 TEL: 55-9178-4270