CDSB10 - CD Recorder PIONEER - Free user manual and instructions
Find the device manual for free CDSB10 PIONEER in PDF.

| Product type | Sirius interface (SIRIUS bus) |
| Brand | Pioneer |
| Model | CD-SB10 |
| Supply voltage | 14.4 V DC (10.8 V to 15.1 V acceptable) |
| Ground | Negative pole |
| Maximum current consumption | 2.0 A |
| Main functions | Sirius tuner, Game Alert, Instant Replay, selection by number/category, memory of 6 channels per band |
| Available bands | SR-1, SR-2, SR-3 |
| Number of presets | 6 per band (18 total) |
| Game Alert function | Yes, up to 12 teams |
| Instant Replay | Yes (with compatible plug-and-play unit) |
| Information display | Channel number, name, category, artist, title, composer, play time |
| Compatibility with head units | Groups 1 to 7 (DEH, AVH, AVIC, etc.) |
| Connection | Color-coded IP-BUS connectors |
| Installation | Using Velcro fasteners, in a dry and ventilated place |
| Maintenance and cleaning | Clean with a soft, dry cloth |
| Safety | Do not expose to water, use only in a 12 V vehicle with negative ground |
Frequently Asked Questions - CDSB10 PIONEER
User questions about CDSB10 PIONEER
0 question about this device. Answer the ones you know or ask your own.
Ask a new question about this device
Download the instructions for your CD Recorder in PDF format for free! Find your manual CDSB10 - PIONEER and take your electronic device back in hand. On this page are published all the documents necessary for the use of your device. CDSB10 by PIONEER.
USER MANUAL CDSB10 PIONEER
Please read through these operating instructions, you will know how to operate your model properly. After you have finished reading the instructions, keep this manual safe place for future reference.

BeforeYouStart
InformationtoUser3
Aboutthisunit3
Aboutthismanual3
OperatingwithdifferentPioneerhead units3
Functioncompatibilitycharts4
-Headunitgroup24
-Headunitgroup35
-Headunitgroup45
-Headunitgroup56
-Headunitgroup67
-Headunitgroup77
Detailedinstructionsonselectingateam9
- Pausingplayback15

Installation
Connectingtheunits16
Connections17
Installingthisunit17
-Installingwithhookandloop fasteners17

AdditionalInformation
Specifications19

SIRIUSuner
What's What10
-Headunitgroup1(e.g.DEHP6000UB)10
-Remotecontrol10
SelectingSIRIUSsource11
ListeningtoSIRIUS11
-SelectingaSIRIUSchannel directly11
-SwitchingtheSIRIUSdisplay12
-Storingandrecallingchannels12
-DisplayingtheRadioID12
Introductionofadvancedoperations12
SelectingtheSIRIUSchannelselect mode13
-Selectingachannelinthechannel category13
UsingtheGameAlertfunction14
-SelectingteamsforGameAlert14
-SwitchingtheGameAlertonoroff14
-Whenthegameoftheselectedteam starts14
-Displayinggameinformation14
UsingInstantReplayfunction15
BeforeYouStart
InformationtoUser
Alterationnormodificationscarriedoutwithout appropriateauthorizationmayinvalidatethe user'srighttooperatethequipment.
Thisdevicecomplieswithpart15oftheFCC Rules. Operationissubjecttothefollowing twoconditions:
(1)Thisdevicemaynotcauseharmfulinterference,and(2)thisdevicemustacceptanyinterferencereceived,includinginterferencethat maycauseundesiredoperation.

Aboutthisunit

WARNING
Handlingthecordonthisproductorcordsassociatedwithaccessoriesoldwiththe productmayexposeyoutochemicalslistedonproposition65knowntotheStateofCaliforniaandothergovernmententitiestocausecancerandbirthdefectsortherreproductiveharm.Washhandsafterhandling.

CAUTION
- Donotallowthisunittocomeintocontact withliquids. Electricalshockcouldresult. Also,damagetothisunit,smoke,andoverheatingcouldresultfromcontactwithliquids.
- Keepthismanualhandyasareferenceforoperatingproceduresandprecautions.
Aboutthismanual
InstructionsinthisismanualuseDEH-P6000UB asanexampleheadunit.Whenusingother
headunits,refertoOperatingwithdifferent Pioneerheadunitsonthispage.
Operatingwithdifferent Pioneerheadunits
Headunitsaredividedintoseveralgroups; findwhichgroupyoursfallsintoandoperatite accordingtothecorrespondingfunctioncompatibilitychartsonthefollowingpages.
- SelectSIRIUSsourcewhenusingthisssystemwithheadunitsgrouped1,2and3.SelectEXTERNALsourcectousewithotherheadunits.FordetailsaboutEXTERNAL source,refertotheheadunit'smanual.
Headunitgroup1
Operationofthefollowingheadunitsisthe sameasthe"DEH-P6000UB".Refertothein
structionstartingonpage10. DEH-P600UB,DEH-P680MP,DEH-P690UB, DEH-P700BT,DEH-P780MP,DEH-P790BT, DEH-P800PRS,DEH-P880PRS,DEH-P980BT, DEH-P6800MP,DEH-P6900UB,DEH-P7000BT, DEH-P7800MP,DEH-P7900BT,DEH-P9800BT, FH-P800BT,FH-P8000BT
Headunitgroup2
Whenusingthisystemwiththesehead units, operatewhilereferringtotheheadunit group2functioncompatibilitychart. DEH-P390MP,DEH-P480MP,DEH-P490MP, DEH-P2900MP,DEH-P3800MP,DEH-P3900MP, DEH-P4800MP,DEH-P4900MP
Headunitgroup3
When using this system with these head units, operate while referring to the head unit group3functioncompatibilitychart. DEH-P400UB,DEH-P500UB,DEH-P3000IB, DEH-P4000UB,DEH-P5000UB
Headunitgroup4
Whenusingthisystemwiththesehead units, operatewhilereferringtotheheadunit group4functioncompatibilitychart. DEH-P580MP,DEH-P960MP,DEH-P5800MP, DEH-P9600MP,DVH-P5000MP,FH-P5000MP
Headunitgroup5
Whenusingthisystemwiththesehead units, operatwhilereferringtotheheadunit group5functioncompatibilitychart. DEH-P8MP,DEH-P80MP,DEH-P860MP,DEHP8600MP
Headunitgroup6
When using this system with these head units, operate whitelereferring to the head unit group6functioncompatibilitychart. AVH-P6600DVD,AVH-P7600DVD,AVX-P8DVD*
^ 念 ADD-ONmode(M)only.
Headunitgroup7
When using this system with these head units, operate whitelerefererring to the head unit group7functioncompatibilitychart. AVIC-N2
Otherheadunits
Operationofthefollowingheadunitsisfully explainedintheheadunits'manual.Referto theinstructionmanualthatcamewithyour headunit. AVH-P4000DVD,AVH-P4900DVD,AVH- P5000DVD,AVH-P5900DVD,AVH-P7800DVD, AVIC-D2,AVIC-D3,AVIC-F700BT,AVIC-F900BT, AVIC-N3,AVIC-Z1,AVIC-Z2
FUNCTION3andFUNCTION4arenot availablewithAVIC-D2.
Functioncompatibilitycharts Headunitgroup2
| Controls | |
| SelectingthesourcePressSOURCEtoselect SIRIUS. | |
| SelectingchannelPressor. | |
| ChangingbandsPressBAND. | |
| StoringpresetsPressandhold1to6. | |
| RecallingpresetsPress1to6. | |
| Recallingpresetssequentially(inChannel NumberSelectmode) | Press▲or▼. |
| Selectingcategory(in ChannelCategorySe- lectmode) | Press▲or▼. |
| Displayingthefunction menu | PressFUNCTION. |
| Switchingchannelin- formation | PressDISPLAY. |
| Switchingthechannel selectmode(inthe functionmenu) | SelectCHNUMBER/CATE- GORY and press ▲ or ▲. |
| Turningthegamealert functionon/off(inthe functionmenu) | SelectTEAMSETTINGand pressandhold▲or▼. |
| Selectingaleague(in thefunctionmenu) | Intheleagueselectmode, press▲or▼. |
| Switchingthedisplay totheteamselect mode(inthefunction menu) | Intheleagueselectmode andwithadesiredleague displayed,pressandhold ▲or▼. |
| Selectingateam(in thefunctionmenu) | Intheteamselectmode, press▲or▼. |
| Storingtheselected teammemory(inthe functionmenu) | Intheteamselectmode andwithadesiredteam displayed,pressandhold ▲or▼. |
BeforeYouStart
| Controls | |
| Deletingtheeamse-lectionfrommemory (inthefunctionmenu) | Intheamselectmode andwiththeselectedteam displayed,pressandhold ▲or▼. |
| Displayinggameinfor-mentation(inthefunction menu) | SelectGAMEINFOand press▲or▼. |

Notes
- Withsomeunits,pressingandholding CLOCKcandirectlychangethechannelselect mode.
- FordetailedinstructionsontheTeamSetting function,refertoDetailedInstructionsonselectingteamonpage9.
Headunitgroup3
| Controls | |
| SelectingthesourcePressSRC(SOURCE)tose- lectSIRIUS. | |
| SelectingchannelPushMULTI-CONTROLleft orright. | |
| ChangingbandsPressBAND. | |
| StoringpresetsPressLISTandthenuse MULTI-CONTROL. | |
| RecallingpresetsPressLISTandthenuse MULTI-CONTROL. | |
| Recallingpresetsse- quentially(inChannel NumberSelectmode) | PushMULTI-CONTROLup ordown. |
| Selectingcategory(in ChannelCategorySe- lectmode) | PushMULTI-CONTROLup ordown. |
| Displayingthefunction menu | UseMULTI-CONTROL. |
| Switchingchannelin- formation | PressDISP. |
| Switchingthechannel selectmode(inthe functionmenu) | SelectCHSELECTMODE andpressMULTI-CON- TROL. |
| Controls | |
| Turningthegamealert functionnon/off(inthefunctionmenu) | SelectGAMEALERTand pressMULTI-CONTROL. |
| Selectingaleague(in thefunctionmenu) | Intheleagueselectmode, turnMULTI-CONTROL. |
| Switchingthedisplay totheteamselect mode(inthefunction menu) | Intheleagueselectmode andwithadesiredleague displayed,pressMULTI-CONTROL. |
| Selectingaleam(in thefunctionmenu) | Inthelemselectmode, turnMULTI-CONTROL. |
| Storingtheseled teaminmemory(inthefunctionmenu) | Inthelemselectmode andwithadesiredteam displayed,pressandhold MULTI-CONTROL. |
| Deletingtheteamse-lectionfrommemory (inthefunctionmenu) | Inthelemselectmode andwiththeseledteam displayed,pressandhold MULTI-CONTROL. |
| Displayinggameinformation(inthefunction menu) | SelectGAMEINFOand pressMULTI-CONTROL. |

Note
- Withsomeunits,pressingandholding SATMODEcandirectlychangethechannel selectmode.
Headunitgroup4
| Controls | |
| SelectingthesourcePressSOURCEtoselectan externalsourceforSIRIUS. | |
| SelectingchannelPressor. | |
| ChangingbandsPressBAND. | |
| StoringpresetsPressandhold1to6. | |
| RecallingpresetsPress1to6. | |
| Recallingpresetsse- Press▲or▼. sequentially(inChannel NumberSelectmode) | |
| Selectingcategory(in ChannelCategorySe- lectmode) | Press▲or▼. |
| Displayingthefunction menu | PressFUNCTION. |
| Switchingchannelin- formation(FUNC1) | Press▲or▼. |
| Switchingthechannel selectmode(FUNC2) | Press▲or▼. |
| Turningthegamealert functionon/off (FUNC3) | Pressandhold▲or▼. |
| Selectingaleague (FUNC3) | Intheleagueselectmode, press▲or▼. |
| Switchingthedisplay totheteamselect mode(FUNC3) | Intheleagueselectmode andwithadesiredleague displayed,pressandhold ▲or▼. |
| Selectingateam (FUNC3) | Intheteamselectmode, press▲or▼. |
| Storingtheselected teaminmemory (FUNC3) | Intheteamselectmode andwithadesiredteam displayed,pressandhold ▲or▼. |
| Deletingtheteamse- lectionfrommemory (FUNC3) | Intheteamselectmode andwiththeselectedteam displayed,pressandhold ▲or▼. |
| Displayinggameinfor- mation(FUNC4) | Press▲or▼. |

Notes
- FordetailedinstructionsonFUNCTION3, refereToDetailedinstructionsonselectinga teamonpage9.
- Withsomeheadunits, AUTO/MANUAL(A/M)mayappearinthefunctionmenu,butthisfunctionisnotavailablewithSIRIUSsource.
Headunitgroup5
| Controls | |
| SelectingthesourcePressSOURCEselectan externalsourceforSIRIUS. | |
| SelectingchannelPushMULTI-CONTROLleft orrigh. | |
| ChangingbandsPressBAND. | |
| StoringpresetsPressandhold1to6. | |
| RecallingpresetsPress1to6. | |
| Recallingpresetssequentially(inChannel NumberSelectmode) | PushMULTI-CONTROLup ordown. |
| Selectingcategory(in ChannelCategorySe- lectmode) | PushMULTI-CONTROLup ordown. |
| Displayingthefunction menu | UseMULTI-CONTROL. |
| Switchingchannelin- formation(FUNC1) | PressMULTI-CONTROL. |
| Switchingthechannel selectmode(FUNC2) | PressMULTI-CONTROL. |
| Turningthegamealert functionon/off (FUNC3) | PressandholdMULTI- CONTROL. |
| Selectingaleague (FUNC3) | Intheleagueselectmode, pushMULTI-CONTROLup ordown. |
| Switchingthedisplay totheteamselect mode(FUNC3) | Intheleagueselectmode andwithadesiredleague displayed,pressandhold MULTI-CONTROL. |
| Selectingateam (FUNC3) | Intheteamselectmode, pushMULTI-CONTROLup ordown. |
| Storingtheselected teammemory (FUNC3) | Intheteamselectmode andwithadesiredteam displayed,pressandhold MULTI-CONTROL. |
BeforeYouStart
| Controls | |
| Deletingtheame-lectionfrommemory (FUNC3) | Intheamselectmode andwiththeselectedteam displayed,pressandhold MULTI-CONTROL. |
| Displayinggameinfor-mation (FUNC4) | PushMULTI-CONTROLup ordown. |

Notes
- FordetailedinstructionsonFUNCTION3, refereToDetailedinstructionsonselectinga teamonpage9.
- Withsomeheadunits,
AUTO/MANUAL(A/M)mayappearinthefunctionmenu,butthisfunctionisnotavail-ablewithSIRIUSource.
Headunitgroup6
| Controls | |
| SelectingthesourcePressSOURCEetoselectan externalsourceforSIRIUS. | |
| SelectingchannelTouchor. | |
| ChangingbandsPressBAND. | |
| StoringpresetsKeeptouchingoneof 1KEYto6KEY. | |
| RecallingpresetsTouchoneof1KEYto 6KEY. | |
| Recallingpresentsse- quentially(inChannel NumberSelectmode) | Touch ▲ or ▼. |
| Selectingcategory(in ChannelCategorySe- lectmode) | Touch ▲ or ▼. |
| Displayingthefunction menu | TouchA.MENUandthen touchFUNCTION(FUNC). |
| Switchingchannelin- formation(FUNC1) | Touch ♂. |
| Switchingthechannel selectmode(FUNC2) | Touch ♂. |
| Controls | |
| Turningthegamealert functionon/off (FUNC3) | Keeptouching ♂. |
| Selectingaleague (FUNC3) | Intheleagueselectmode, touch ♂. |
| Switchingthedisplay totheteamselect mode (FUNC3) | Intheleagueselectmode andwithadesiredleague displayed,keeptouching ♂. |
| Selectingaleam (FUNC3) | Intheteamselectmode, touch ♂. |
| Storingtheselected teaminmemory (FUNC3) | Intheteamselectmode andwithadesiredteam displayed,keeptouching ♂. |
| Deletingtheteamse-lectionfrommemory (FUNC3) | Intheteamselectmode andwiththeselectedteam displayed,keeptouching ♂. |
| Displayinggameinfor-mentation (FUNC4) | Touch ♂. |

Notes
- FordetailedinstructionsonFUNCTION3, refereToDetailedinstructionsonselectinga teamonpage9.
- Withsomeheadunits, AUTO/MANUAL(A/M)mayappearinthefunctionmenu,butthisfunctionisnotavailablewithSIRIUSsource.
Headunitgroup7
| Controls | |
| SelectingthesourceTouchthesourceiconand touchanexternalsource forSIRIUS. | |
| SelectingchannelTouchor. | |
| ChangingbandsTouchBAND. | |
| StoringpresetsTouchA.MENUand 1-6KEY.Then,touchoneof 1KEYto6KEY. | |
| Controls | |
| RecallingpresetsTouchoneof1to6. | |
| Recallingpresetssequentially(inChannelNumberSelectmode) | Touch▲ or▼. |
| Selectingcategory(in ChannelCategorySe-lectmode) | Touch▲ or▼. |
| Displayingthefunctionmenu | TouchA.MENUandthen touchFUNCTION. |
| Switchingchannelin-formation(FUNCTION 1) | TouchSEND. |
| Switchingthechannelselectmode(FUNC-TION2) | TouchSEND. |
| Turningthegamealertfunctionon/off(FUNC-TION3) | KeeptouchingSEND. |
| Selectingaleague(FUNCTION3) | Intheleagueselectmode, touchSEND. |
| Switchingthedisplaytotheteamselectmode(FUNCTION3) | Intheleagueselectmode andwithadesiredleague displayed,keeptouchingSEND. |
| Selectingateam(FUNCTION3) | Intheteamselectmode, touchSEND. |
| Storingtheselectedteammemory(FUNCTION3) | Intheteamselectmode andwithadesiredteam displayed,keeptouchingSEND. |
| Deletingtheteamse-lectionfrommemory(FUNCTION3) | Intheteamselectmode andwiththeselectedteam displayed,keeptouchingSEND. |
| Displayinggameinfor-mation(FUNCTION4) | TouchSEND. |

Notes
- FordetailedinstructionsonFUNCTION3, refereToDetailedinstructionsonselectinga teamonthenthetae.
- Withsomeheadunits, AUTO/MANUAL(A/M)mayappearinthe
functionmenu,butthisfunctionisnotavailablewithSIRIUSource.
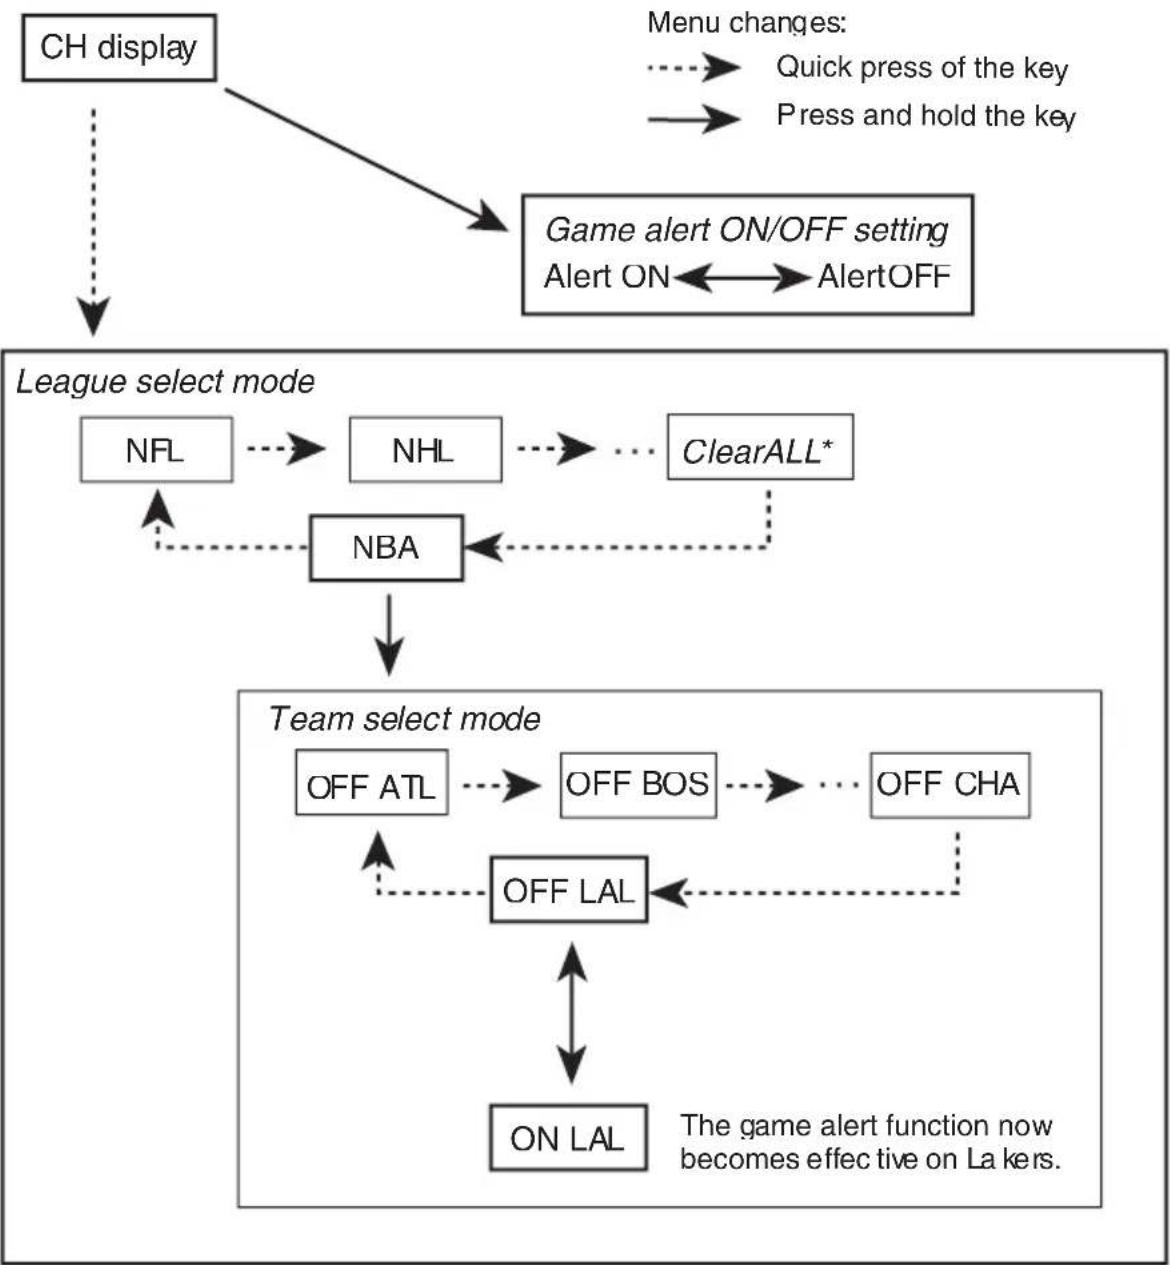
Detailedinstructionsonselectingteam
ThechartbelowillustratestheTeamSettingmenu.SelectteamsfortheGameAlertfunctionreferringto thischartandthefunctioncompatibilitychartforyourheadunit.
The key" referred to in the diagram below varies depending on the head unit.
Example: When selecting an NBA team Lakers
-
- With the ClearAll selected, holding "the key" deletes all team selections.
Toreturntothenormaldisplay,pressBAND.

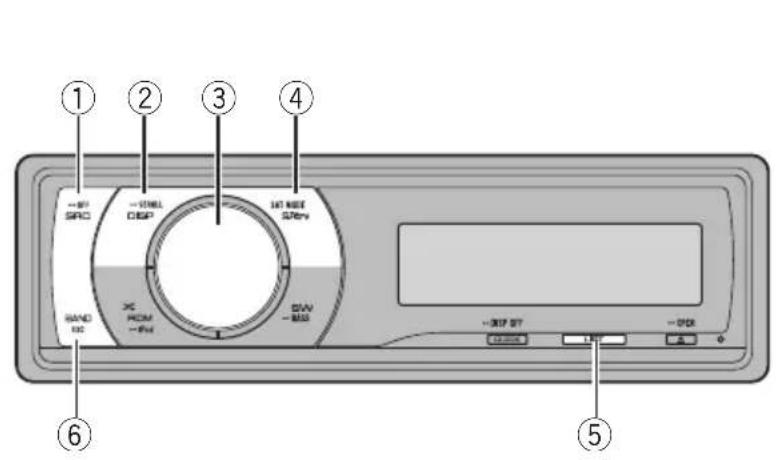
What'sWhat
Headunitgroup1 (e.g.DEH-P6000UB)
①SRC/OFFbutton
Theheadunitisturnedonbyselectingasource.Presstocyclethroughalltheavailablesources.
②DISP/SCROLLbutton
Presstoselectdifferentdisplays.
③MULTI-CONTROL
Movetoperformchannelselect,channelrecallandcategoryselect Alsousedforcontrollingfunctions.
Turntoincreaseordecreassethevolume.
④S.Rtrv/SATMODEbutton
WhenXMturenorSIRIUSunerisselected asthesource,presstochangethechannel selectmode.
WhenSIRIUSunerisselectedasthe source,pressandholdtoperformthelnstantReplaymode.
⑤LISTbutton
Presstodisplaythepresetchannellist.
⑥BAND/ESCbutton
Presstoselectamongthreebandsandcancelthecontrolmodeoffunctions.
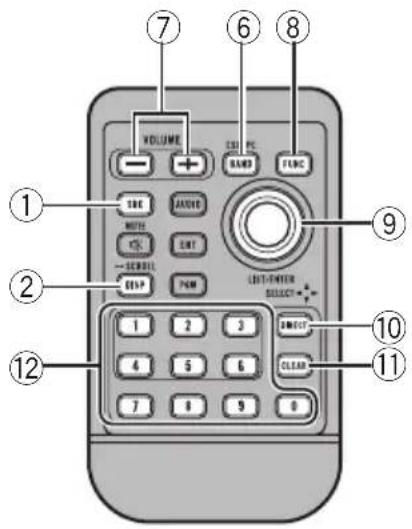
Remotecontrol
Operationisthesameaswhenusingthebuttonsontheheadunit.
⑦VOLUMEbuttons
Presstoincreaseordecreasethevolume.
FUNCTIONbutton
Presstoselectfunctions.
⑨Thumbpad
Movetoperformchannelselect,channelrecallandcategoryselect Alsousedforcontrollingfunctions.
Functionsarethesames
MULTI-CONTROLexceptforvolumecontrol.
10DIRECTbutton
Presstodirectlyselectthedesiredchannel.
SIRIUStuner
⑪CLEARbutton
Presstocanceltheinputnumberwhen0to 9areused.
120to9buttons
Presstodirectlyselectthedesiredchannel orpresettuning Buttons1to6canoperat thepresettuning.
SelectingSIRIUSsource
- PressSRCtoselectSIRIUS.

ListeningtoSIRIUS
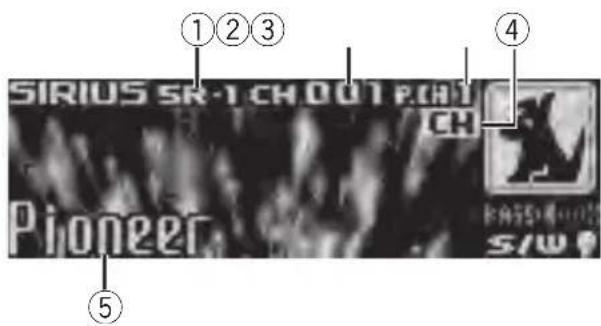
①SIRIUSbandindicator
②SIRIUSchannelnumberindicator
③SIRIUSpresetnumberindicator
④SIRIUSchannelselectsettingindicator Showswhatchannelselectsettinghasbeens selected.CHisdisplayedwhen Channelnumberisselected,andCATisdisplayedwhenCategoryisselected. I.RisdisplayedduringthelstantReplay mode.
⑤SIRIUSchannelname Showsthechannelnameofbroadcast channel.
- SelectaSIRIUSband. PressBAND.
BandcanbeselectedfromSR-1,SR-2or SR-3.
- Selectachannel.
PushMULTI-CONTROLleftorright.
IfyoupushhandholdMULTI-CONTROLleftor right,youcanincreaseordecreasechannelnumbercontinuously.
- You canalsoperformtuning from adesired channelcategory. (RefertoSelectingachannelin thechannelcategoryonpage13.)

Notes
- It may take a few seconds before you can hear anything while this system acquires and processes the satellites signal.
- When you change the channel, the channel name is displayed, followed by the category name.
SelectingaSIRIUSchanneldirectly
When using theremotecontrol, you can select the SIRIUS channel directly by entering the desired channel number.
1PressDIRECT.
Channelnumberinputdisplayappears.
2Press0to9toenterthedesiredchannel number.
- Youancanceltheinputnumberbypressing CLEAR.
3PressDIRECT.
TheSIRIUSchannelofenterednumberis selected.
Afterenteringthenumberinputmode,ifyoudonotperformmanoperationwithinabouteightseconds,themodeisautomaticallycanceled.
SwitchingtheSIRIUSdisplay
Variousinformation,includingchannelnumber,nameandcategory,song/programtitle,artist/featureandcomposer,canbedisplayedfortheselectedchannel.
- PressDISPtoswitchtheSIRIUSdisplay.
EachpressofDISPchangestheSIRIUSdis
playinthefollowingorder:
Playtime—Channelnumber—Channelname
—Categoryname—Artistname—Songtitle/
programtitle—Composename
- When you touch the display, text automatically scrolls.
PlaytimeisdisplayedduringtheInstantReplaymode.RefertoUsingInstantReplayfunction onpage15.
Playtimedisplayindicatessthetimeinverted fromthelivebroadcast.Playtimeisdisplayedin negativenumber.
Storingandrecallingchannels
Youcaneasilystoreuptosixbroadcaststationsforlaterrecall.
- Onlytheremotecontrolcanoperatethis function.
- Sixstationsforeachbandcanbestoredin memory.
- Channelsarestoredandrecalledona broadcaststationbasis. This meansthat if thebroadcaststationyoustoredhasbeen assignedtoadifferentchannelbySIRIUS, youcanstillrecallthesamebroadcaststation(thoughhadifferentchannelnumber mayappearinthedataplay).
- Whenyoufindastationthatyouwant tostoreinmemorypressoneofpresettuningbuttons1to6andholduntiltheSIRIUS presetnumberstops flashing.
Thenumberyouhavepressedwillflashinthe SIRIUSpresetnumberindicatorandthenre
mainlit.Theselectedstationhasbeenstored inmemory.
Thenexttimeyoupressthesamepresettuningbuttonthestationisrecalledfrommemory.
- You canalsorecallstationsassignedtopreset tuningnumbersbypushing MULTI-CONTROLup ordown.

Note
Ifachannelcannotberecalledfrommemory,the tunerautomaticallyreceivesthechannel184.
DisplayingtheRadioID
If you select CH000, the ID code is displayed.
- PushMULTI-CONTROLleftorrightto selectCH000.

Note
ToselectCH000,setthechannelselectsettingto Channelnumber.Aboutthechannelselectsetting,refertoSelectingtheSIRUSchannelselectmodeonthenthenthpage.
Introductionofadvanced operations
1PressMULTI-CONTROLtodisplaythemainmenu.
2UseMULTI-CONTROLtoselect FUNCTION.
Thefunctionselectionmenuisdisplayed. Turntochangethemenuoption.Presssto select.
3TurnMULTI-CONTROLtoselectthe function.
Channelmode channelselectmodesetting)
Gamealert(gamealertsetting)
TeamSetting(seamsetting)—Gamelinfo
(gameinfo)—Pause(pause)

Notes
- You canalsoselect the function by pressing FUNCTION ontheremotecontrol.
Toreturntotheordinarydisplay,pressBAND. - If youdonotoperatefunctionswithinabout 30seconds, the displayisautomatically returnedtotheordinarydisplay.
- During the Instant Replay mode, you can select Pause(pause).Refer to Using Instant Re
playfunctiononpage15.
SelectingtheSIRIUS channelselectmode
You havetwomethodsforselectingachannel: bynumberandbycategory.Whenselecting bynumber,channelsinanycategorycanbe selected. Selectbycategorytonarrowyour searchdowntoonlychannelsinaparticular category.
- PressSATMODErepeatedlytoselect thedesiredchannelselectsetting.
Channelnumber(channelnumberselectset
ting)—Category channelcategoryselect setting)

Note
You canalsoperformthisoperationinthemenu thatappearsbyusingMULTI-CONTROL.
Selectingachannelinthe channelcategory
Channelsareorganizedintovarousprogram categories,e.g.Rock,Classic,Jazz.You can specify channelsbyselectingthedesiredcategory.
1Selectthechannelselectsettingsto Category.
ReferToSelectingtheSIR/USchannelselectmodeonthispage.
2PushMULTI-CONTROLupordownto selectthedesiredchannelcategory.
Onceyouselectachannelcategory,thetuner searchesforchannelsinthatcategory.During search,thechannelcategorydoesnimmediatelychangeevenifyoupush
MULTI-CONTROL.Tosuccessivelychangethe channelcategory,continuepushing
MULTI-CONTROL.
3PushMULTI-CONTROLleftorrightto selectthedesiredchannelintheselected channelcategory.
Thechannelnumbermovestupordowntinthe selectedchannelcategory.
Channelsthatcannotcurrentlybeselected areskipped,andthenextchannelinthat channelcategoryisselected.

Note
Ifyouselectachannelofanothercategoryby channelrecall,etc.,duringstep2and3,the categoryselectedinstep2remainsinmemory.Ifyou pushMULTI-CONTROLleftorright,thechannel numbermovesupordowninthecategoryselectedinstep2regardlessofthecategoryofthe presetchannel.
UsingtheGameAlertfunction
Thissystemcanalertyouwhengamesinvolvingyourfavoriteamsareabouttostart.To usethisfunctionyouneedinadvancetoset upagamealertfortheteams.
SelectingteamsforGameAlert
1UseMULTI-CONTROLtoselect
TeamSettinginthefunctionmenu.
RefertoIntroduktionofadvancedoperationson page12.
2PushMULTI-CONTROLleftorrightto selectadesiredleague.
Leaguesareswitchedinthedisplay.
3PushMULTI-CONTROLLupordownto selectadesiredteam.
Teamsinthesesectedcategoryareswitchedin thedisplay.
4PressMULTI-CONTROLtostoretheselectedteaminmemory.
Thegamealertfunctionwillstartonthat team.
-
ToturntheGameAlertofftheselected team,pressMULTI-CONTROLagain.
-
When you have already made 12 team selections, FULL is displayed and additional team selection is not possible. In this case, first delete the team selection and then try again.
5Repeatthesestepsforselectingother teams.
Upto12teamscanbeselected.
SwitchingtheGameAlertonoroff
Onceyoumadeteamselections,youneedtorturnthegameAlertfunctionon.
TheGameAlertfunctionisonatthedefault setting.
1UseMULTI-CONTROLtoselect Gamealertinthefunctionmenu.
Referto/Introductionofadvancedoperationson page12.
2PressMULTI-CONTROLtoturnthe GameAlerton.
TheGameAlertfunctionisnowon.
- ToturntheGameAlertfunctionoff,press MULTI-CONTROLagain.
Whenthegameoftheselected teamstarts
Whenagameoftheselectedteamisabouttostart(oriscurrentlyplaying)onadifferentstation,Gamealertinfoisdisplayed.PressandholdMULTI-CONTROLtoswitchtothatstation,andyoucanlistentothatgame.
- If youdonotoperatethefunctionwithin about10seconds, the displayisautomaticallyreturned.
Displayinggameinformation
Ifgamesofyourselectedteamsarecurrently playing,youcandisplayinformationofthe gamesandtunetothebroadcastchannel. Youcandisplayinformationofthegames whileenjoyingthesoundfromcurrentlytuningstation.Youcanalsotunetothebroadcast channelwhenyouwishto.
1UseMULTI-CONTROLtoselect Gamelinfointhefunctionmenu.
Thegameinformationofyourselectedteamis displayed. RefertoIntroduktionofadvancedoperationson page12.
2PushMULTI-CONTROLupordownto selectagame.
Thegameisdisplayed,followedbymoredetailedgameinformation.
SIRIUStuner
Gamescorewillbeupdatedautomatically.
3PressMULTI-CONTROLtoswitchtothat stationolistentothegame.

Notes
- If you haven't made any team selections, NOTSET is displayed.
- Whengamesinvolvingyourfavoriteteamsare notcurrentlyplaying,NOGAMEisdisplayed.
UsingInstantReplayfunction
Followingfunctionscanbeoperatedduring theInstantReplaymode.
- Tousethisfunction, Pioneerheadunit whichiscompatiblewithInstantReplay Functionisrequired.
- Tousethisfunction, SIRIUSplug-and-play unit with InstantReplayFunction is required.
-PerformingthelInstantReplaymode
WhenSIRIUStunerisselectedasthesource, pressandholdSATMODE.
- Inthefollowingconditions,tunerexitsfrom theInstantReplaymode.
-WhenBANDispressed
—Whenanothersourceisselected
- Selectatrack
PushMULTI-CONTROLleftorright.
Fastforwardorreverse
PushandholdMULTI-CONTROLleftorright.
Pausingplayback
You can operate this function only during the instantReplaymode.
1UseMULTI-CONTROLtoselectPause in thefunctionmenu.
Referto/Introductionofadvancedoperationson page12.
2PressMULTI-CONTROLtoturnpause on.
Playbackofthecurrentrtrackpauses.
- Toturnpauseoff,pressMULTI-CONTROL again.
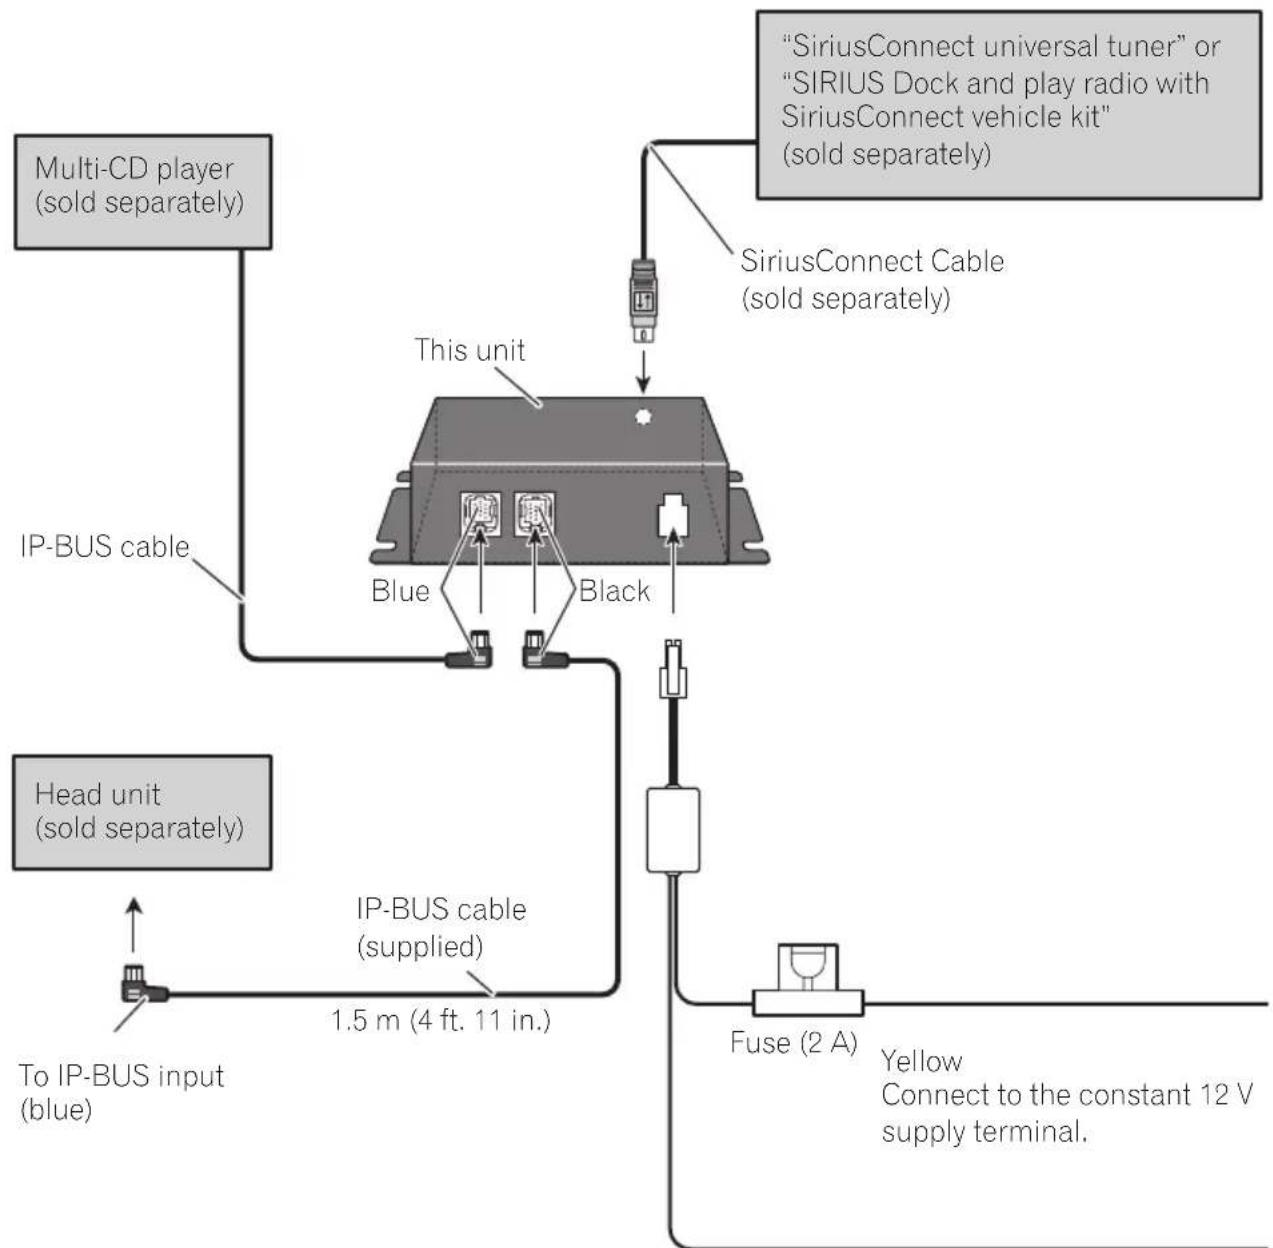
Connectingtheunits
Black (chassis ground)
Connect to a clean, paint-free metal location.

Connections

Important
- Useofthisunitinconditionsotherthan the followingcouldresultinfireormalfunction. Vehicleswitha12-voltbatteryandnegative grounding.
- Topreventashort-circuit,overheatingormalfunction,besuretofollowthedirections below.
—Disconnectthenegativeterminalofthe batterybeforeinstallation.
Securethewiringwithcableclampsoradhesivetape.Toprotectthewiring,wraphesivetapearoundthemwheretheylie againstmetalparts.
—Placeallcablesawayfrommovingparts, suchasgearshiftandseatrails.
—Placeallcablesawayfromhotplaces, suchasneartheheateroutlet.
—Donotpasstheyellowcablethroughaholeintotheengineeringcompartmenttoconnecttoabattery.
—Donotshortanycables.
- Nevercuttheinsulationofthepowercable ofthisunitinordertosharethepower withotherdevices.Currentcapacityofthe cableislimited.
—Useafuseoftheratingprescribed.
- IP-BUSconnectorsarecolor-coded. Besure toconnectconnectorsoftthesamecolor.

Installingthisunit

Important
- Checkallconnectionsandsystemsbefore finalinstallation.
- Donotuseunauthorizedparts.Useofunauthorizedpartsmaycausealfunctions.
-
Consultyourdealerinstallationrequiresdrillingofholesorothermodificationstothevehicle.
-
Donotinstallthisunitwhere:
-itmayinterferewithoperationofthevehicle.
-itmaycauseinjurytoapassengersaresultofasuddenstop. - Whenmountingthisunit, makesurenone of theleadsaretrappedbetweenthisunitand thesurroundingmetalworkor fittings.
- Donotmountthisunitnearheateroutlets whereitwouldbeaffectedbyheat,ornearthe doorswhererainwatermightsplashontoit.
- Beforedrillinganymountingholes,always checkbehindwhereyouwanttodrillthe holes.Donotdrilltothegasline,brakeline, electricalwiringorotherimportantparts.
- Ifthisunitisininstalledinthepassengercompartment,anchoritsecurelysoitdoesnotbreakfreewhilethevehicleismoving,causinginjuryoranaccident.
- Ifthisunitisininstalledunderthefrontseat, makesureitdoesnotobstructseatmovement. Routeallleadssandcordscarefully aroundtheslidingmechanismssotheydoare notcaughtorpinchedinthemechanismand causeashort-circuit.
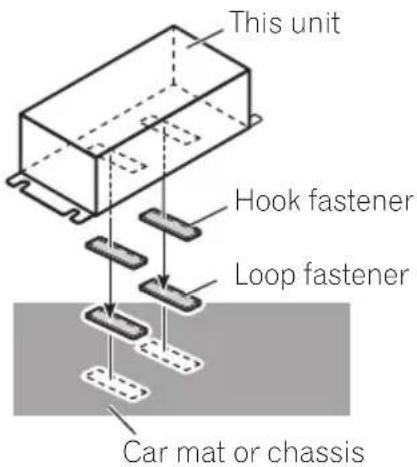
Installingwithhookandloop fasteners
Thoroughlywipeoffthesurfacebeforeaffixing thehookandloopfasteners.
-
If the hook fasteners padheretohecarmat directly, you may install this unit without using the loop fasteners.
-
Mountthisunitusingthehookand loopfasteners.

AdditionalInformation
Specifications
General
Powersource.14.4VDC(10.8Vto15.1V
allowable)
Groundingsystem.. Negativetype
Max.currentconsumption
2.0A
Dimensions(W×H×D)...127×35×52mm
(5× 1.3 / 8× 2in)
Weight. 185g(6.53oz)

Notes
- Specificationsandthedesignaresubjecttomodificationswithoutduteloimprovements.
- "SIRIUS", "SiriusConnect"and the SIRIUS dog logoandrelatedmarksaretrademarksofSIR
IUSSatelliteRadioInc. All rights reserved.

Tabledesmatieres
Dimensions(LxHxP).....127x35x52mm
Poids. 185g

Remarques
4-1,MEGURO1-CHOME,MEGURO-KU
TOKYO153-8654,JAPAN
PIONEERELECTRONICS(USA)INC.
P.O.Box1540,LongBeach,California90801-1540,U.S.A.
TEL:(800)421-1404
PIONEEREUROPENV
Haven1087,Keetberglaan1,B-9120Melsele,Belgium
TEL:(0)3/570.05.11
PIONEERELECTRONICSASIACENTREPRELTD.
253AlexandraRoad,#04-01,Singapore159936
TEL:65-6472-7555
PIONEERELECTRONICSAUSTRALIAPTY.LTD.
178-184BoundaryRoad,Braeside,Victoria3195,Australia
TEL:(03)9586-6300
PIONEERELECTRONICSOCANADA,INC.
300AllstateParkway,Markham,OntarioL3R0P2,Canada
TEL:1-877-283-5901
TEL:905-479-4411
PIONEERELECTRONICSDEMEXICO,S.A.deC.V.