
EC67385RW - Cooker GORENJE - Free user manual and instructions
Find the device manual for free EC67385RW GORENJE in PDF.
| Product type | Electric cooker |
| Brand | Gorenje |
| Model | EC67385RW |
| Dimensions (H x W x D) | 85 cm x 60 cm x 60 cm (estimated) |
| Weight | 55 kg (estimated) |
| Power supply | 230 V ~ 50 Hz |
| Control type | Touch controls |
| Display | Digital display with icons |
| Timer | Electronic, duration and end of cooking setting, audible alarm |
| Child safety | Timer lock |
| Automatic shut-off | Yes, programmable |
| Oven functions | Baking, roasting (not detailed) |
| Cleaning | Enameled interior (estimated) |
| Spare parts | Available |
| Repairability | Not specified |
| General information | Manual available in multiple languages |
Frequently Asked Questions - EC67385RW GORENJE
User questions about EC67385RW GORENJE
0 question about this device. Answer the ones you know or ask your own.
Ask a new question about this device
Download the instructions for your Cooker in PDF format for free! Find your manual EC67385RW - GORENJE and take your electronic device back in hand. On this page are published all the documents necessary for the use of your device. EC67385RW by GORENJE.
USER MANUAL EC67385RW GORENJE
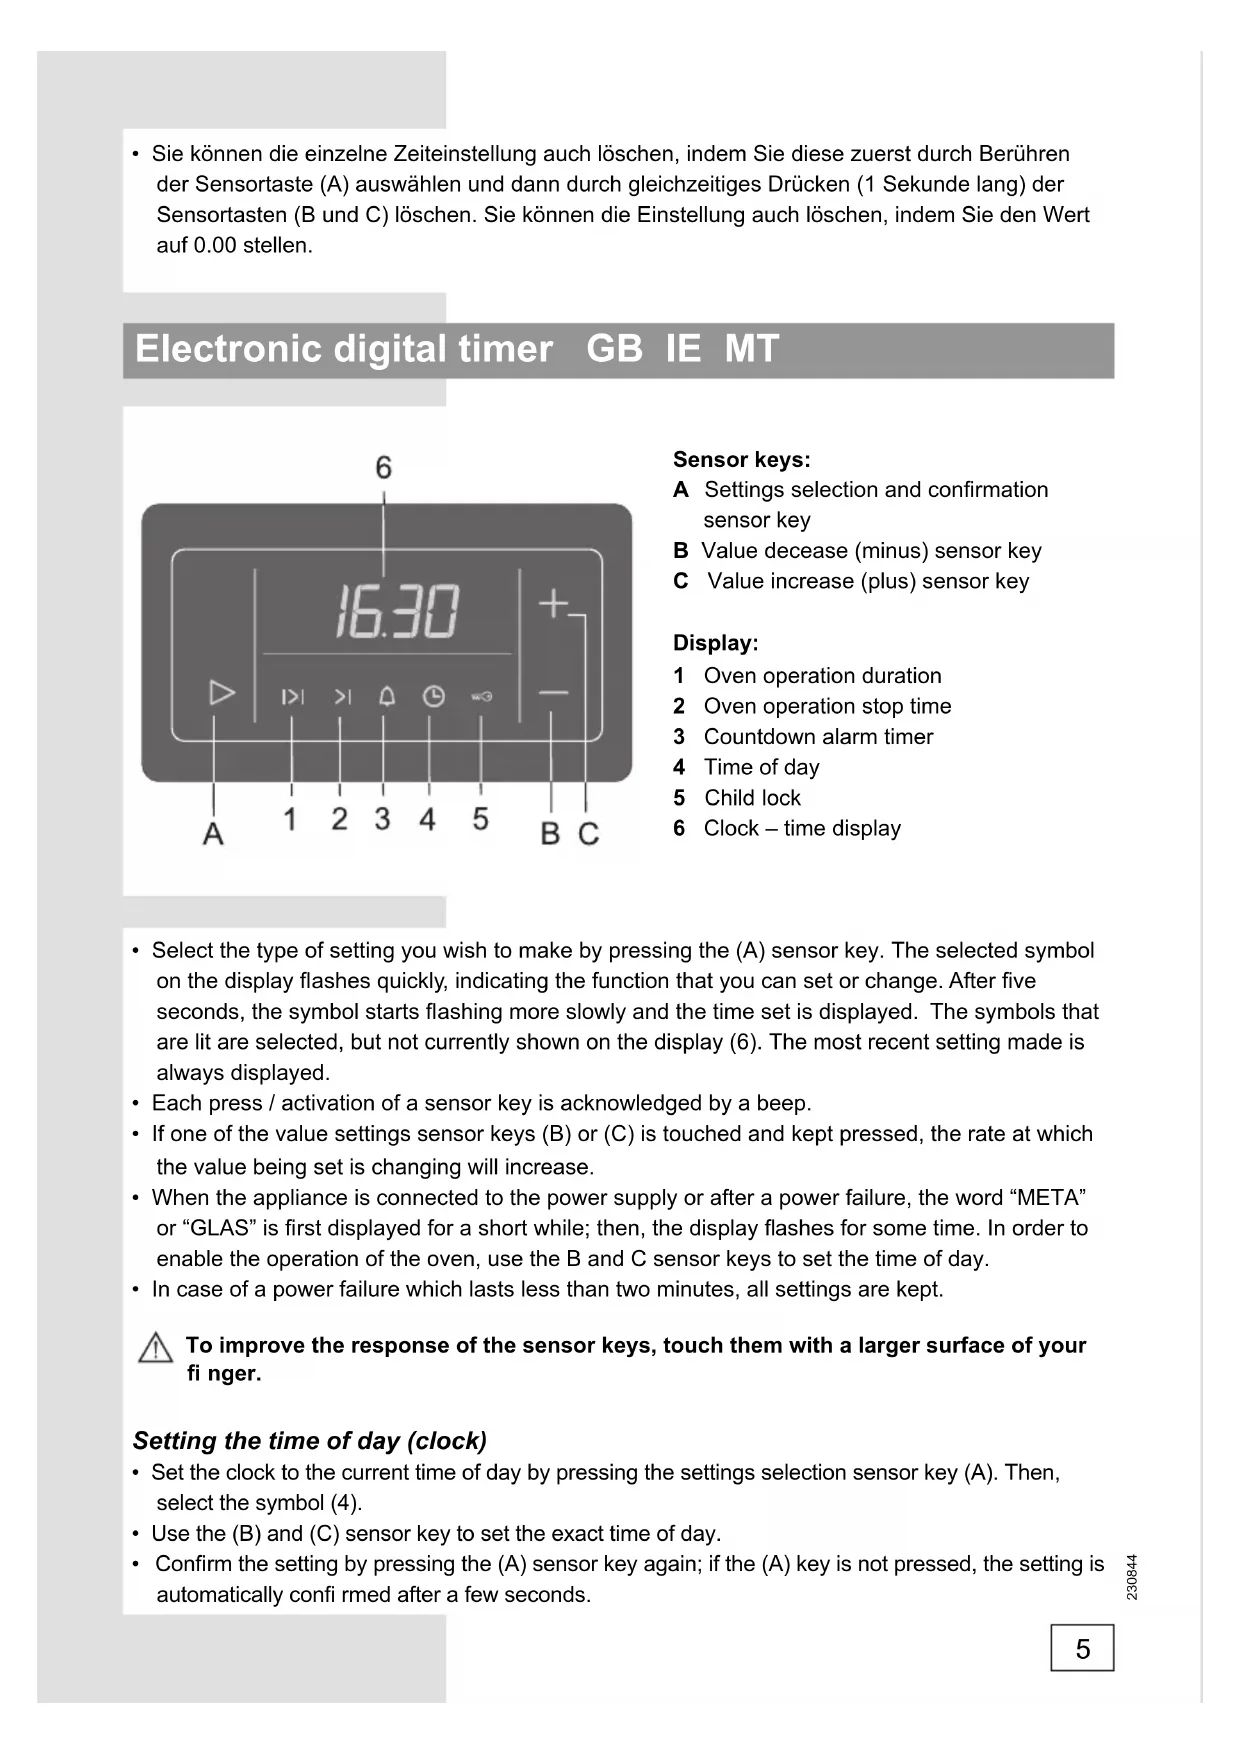
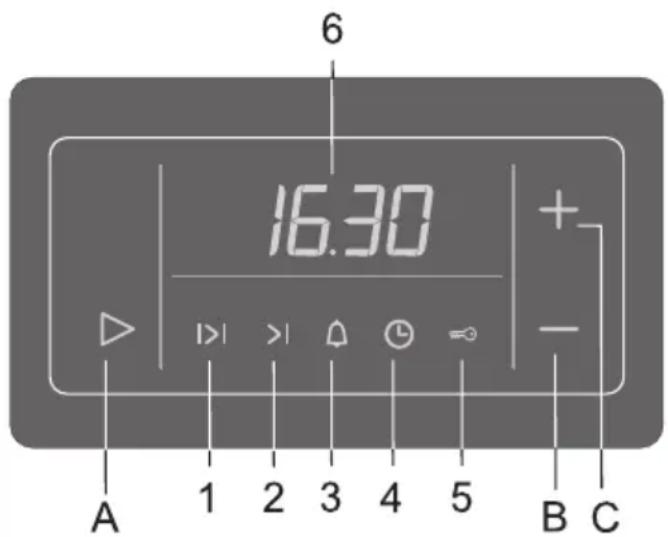
A Settings selection and confirmation sensor key
B Value decease (minus) sensor key
C Value increase (plus) sensor key
Display:
1 Oven operation duration
2 Oven operation stop time
3 Countdown alarm timer
4 Time of day
5 Child lock
6Clock-time display
- Select the type of setting you wish to make by pressing the (A) sensor key. The selected symbol on the display flashes quickly, indicating the function that you can set or change. After five seconds, the symbol starts flashing more slowly and the time set is displayed. The symbols that are lit are selected, but not currently shown on the display (6). The most recent setting made is always displayed.
Each press / activation of a sensor key is acknowledged by a beep. - If one of the value settings sensor keys (B) or (C) is touched and kept pressed, the rate at which the value being set is changing will increase.
- When the appliance is connected to the power supply or after a power failure, the word "META" or "GLAS" is first displayed for a short while; then, the display flashes for some time. In order to enable the operation of the oven, use the B and C sensor keys to set the time of day.
- In case of a power failure which lasts less than two minutes, all settings are kept.

To improve the response of the sensor keys, touch them with a larger surface of your finger.
Setting the time of day (clock)
- Set the clock to the current time of day by pressing the settings selection sensor key (A). Then, select the symbol (4).
- Use the (B) and (C) sensor key to set the exact time of day.
- Confirm the setting by pressing the (A) sensor key again; if the (A) key is not pressed, the setting is automatically confirmed after a few seconds.
The program timer can be used to program the oven operation in three ways:
- Cooking time setting - immediate start of oven operation; after a set period of time, the oven is turned off automatically.
- Cooking end time setting - the time at which oven operation is to end is set.
- Delayed start setting - automatic start and end of oven operation at a selected time.
Setting the cooking time
With this program mode, the duration of oven operation is set (cooking time). Maximum setting allowed is 10 hours.
- Press the (A) sensor key to select the symbol (1). Use the (B) and (C) sensor keys to set the duration / cooking time.
- Turn on the oven (use the corresponding oven knobs to set the operation mode and temperature). After the expiration of the set time, the oven will automatically stop operating (end of cooking time). An intermittent beep will sound, which can be stopped by pressing any key; if no key is pressed, the beep stops after one minute.
- The symbol (1) and the sign (_ _ _) will flash. If you wish to resume cooking, press the (A) sensor key and set a new duration if necessary.
Setting the cooking end time
This mode allows you to set the time at which the oven should stop operating. Maximum setting allowed is 10 hours relative to the current time of day.
- Make sure the current time of day is set correctly.
- Use the (A) sensor key and select the symbol (2). The current time of day is indicated on the display. Press the (B) and (C) sensor keys to set the cooking end time.
- Turn on the oven (use the corresponding oven knobs to set the operation mode and temperature). The oven starts to operate immediately and stops operation at the set time. An intermittent beep will sound, which can be stopped by pressing any key; if no key is pressed, the beep stops after one minute.
- The symbol (1) and the sign (_ :_ _ will flash. If you wish to resume cooking, press the (A) sensor key and set a new duration if necessary.
Setting the oven delayed start
With this operation mode, two settings have to be made: cooking time (duration of oven operation) and cooking end time (tie at which the operation should stop).
Cooking end time can be delayed by a maximum of 24 hours relative to the current time of day.
- Make sure the current time of day is set correctly.
- First, set the cooking time: Press the (A) sensor key to select the symbol (1). Use the (B) and (C) sensor keys to set the duration / cooking time.
- Then, set the cooking end time: Use the (A) sensor key and select the symbol (2). (A sum of the current time of day and the oven operation time is automatically shown on the display). Press the (B) and (C) sensor keys to set the cooking end time.
- The timer will wait for the start of the cooking - both symbols (1 and 2) are lit.
-
Turn on the oven (use the corresponding oven knobs to set the operation mode and temperature). At the corresponding time, the oven starts operating automatically (the symbol (2) goes off upon the start of operation), and switches off when the set cooking time has elapsed. An intermittent beep will sound, which can be stopped by pressing any key; if no key is pressed, the beep stops after one minute.
-
The symbol (1) and the sign (_ _ _) will flash. If you wish to resume cooking, press the (A) sensor key and set a new duration if necessary.
Setting the alarm timer
The clock can also be used independently of the oven operation, as an alarm timer that sounds an alarm after the expiration of a preset time.
- Use the (A) sensor key to select the symbol (3). Then, use the (B) and (C) sensor keys to set the time before the alarm sounds. Maximum setting allowed is 10 hours.
- When the set time has elapsed, an intermittent beep will sound, which can be stopped by pressing any key; if no key is pressed, the beep stops after one minute. The symbol (3) will go off.

The last minute of the timer countdown is displayed in second intervals.
Setting the beep volume (loudness)
The alarm volume can be set when no timer function is activated (only current time of day is displayed).
- Press the (B) sensor key and hold it approximately three seconds; a volume indicator will appear, and the corresponding sample sound will sound. "ooo" indicates maximum volume, and "o" indicates minimum volume. Use the (B) sensor key to select among the four loudness levels.
- Confirm the selected volume level by pressing the (A) sensor key; if the (A) sensor key is not pressed, the setting will be confirmed and stored automatically after a few seconds.
Setting the child lock
The clock may be locked only after one of time functions had been previously set (period of operation, end of operation, or alarm). The oven will function normally, but you will not be able to change settings.
Activation: Press the (A) sensor key to select the symbol (5). Use the (B) and (C) sensor keys to activate the child lock; the display will read "ON". Confirm the setting by pressing the (A) sensor key.
Deactivation: Press the (B) or (C) sensor to deactivate the child lock; "OFF" is displayed.
The setting must be confirmed by pressing the (A) sensor key.
Display dimmer
One minute after the appliance is turned off, the display will be dimmed.
Deleting the timer settings
- All timer settings can be deleted any time by pressing the (B) and (C) sensor keys simultaneously and holding them for three seconds. The set programs are automatically interrupted and the timer switches to display of the current time of day.
- Any timer setting can also be deleted in the following way: selecting it using the (A) sensor key, then press the (B) and (C) sensor keys simultaneously. Another way to delete a setting is by setting the timer value to "0.00".
Aioθntnpia πλnktpa:
A Aioθntnpio πλκτpo επiλoγns kai επiβεβαiωσn ρuθμiσεωv
B Aioθntnpio πλκτpo μεiωσnc TIPWv (μεiov)
C Aioθntnpio πλnktpo αuεησnε tiμωv (ouv)
EvEiEIGoOvns:
1 Diapkeia aeitoupyiaq oupvou
2 Xpovoc Anngs Aetoupyiaq ooupvou
3 Xpovobiaokottnc avtiotpopnC Etpno
4 Opa TnG nepac
5 Kλεδωμα ασραλείαγ γι τα ταιδία
6 Poλοι - evδειξη nτς ωρας
Stille inn forsinket start
CnmboJ (1) i 3naK ( ) noHyTb CbiHTncra. JaKIO Bam Tpe6a noHOBtN npOuec roTyBaHHa, HATNCiTB ceHcop (A) Ta BCTaHOBiTb HOBn iHTepBaI yacy.
BcTaHOBJIeHHa 6yDnJIbHnKa
ToDHHNKOM TAKOX MOXHa KOpNCTyBaTnCra He3aJIeXHOb BiD pO6OTn DyXOBKn, JaK 6yDINbHNKOM, AKNi HaDCnJaE 3ByKObN CnHaN nICnTaTOrO, JaK BCTaHOBHeH N ac CnPiHe.
- HaTnCHiTB ceHcOp (A) ta o6epiTb cImbOJ (3). Notim 3a donomoroIO ceHcOpIB (B) ta (C) BCTaHOiTB yac 6ydnIbHnka. MakcImaIbHa yctaHOBka cknaIae 10 roDInH.
KoIN BCTaHOBHeH yac cPiHHe, LyHaTHe 3ByKObN CnHaJI, kIn MoXHa 3yHNHTn, kIIO HaTNCHy T 6yNb-ky KhoNkY. KaIO JODHa KHOJa He HATNCHyTa, 3ByKObN CnHaJI BuxxHe Ype3 OdHy XBNIHy.CmBOJ (3) 3HnKHe.

OcTaHnXBnInHa 3BOpOTHoro BiDnIky yacy 3'YBnEeTbc3 iHTepBaIOM B OndHy cekyHdy.
BcTaHOBJIeHHrIyHocTi 3ByKOBOrO cnHaJy
TyuHicTb 3BykoBOrO cnHaNy MoKe 6byTu BCTaHOBNeHa, KOJIxKoJHa 3 cyHKui TaIMepy He AKTINBOBaHa (dEMOHCTpyEcTbcra TInbKn NToOuHn Yac).
BcTaHOBneHHsIokyBaHHaBIDiTeH
ToDHHNK MoXHa 3a6nOkyBaTu TINbKn NiCn JonepeHbOoi YcTaHOBKn OdHiei 3 fynKcii TaMepa (Yac po6oTn, 3aBepWeHnRa p6oTn a6o fynKciia ByuNbHnKa).
DyxOBka npaIOBaTmHe HopMaJIbHO, aJIe BN He 3MOXKeTe 3MiHIny yCTaHOBKn.
AknBaui: HATnCHiTb ceHcop (A) Ta oBepiTb CmB0n (5). 3a donomoroTO ceHCopIB (B) i (C) aKTHByIte 6nOKyBaHH BID nITEe; nucPnei NOBIOMNTb "ON". IIO6 nIITBepdntu yCTaHOBky HATnCHiTb ceHcop (A).
IeaktnBaucia: 606 BiKnOHTN 6NoKYBaHHaBnH aD iTeiHaTNCiHcHcOp (B) a6o (C); nncnnei NObiOMtB "OFF".
YcTaHObky Tpe6a nIITBepdntn HATNCHyBUn ceHcop (A).
OcbItIeHHaDnCnJIeIO
Yepe3 xbuniny nicra toro, k npna BmKHeTbcra, dinne norache.
CkacyBaHHy yCTaHOBok TaMepy
- Yci yctaHOBKn 6ynde cKacOBAHO y 6yd-b-akn qac, kkuo CnHXPOHNO hATNCHTN ceHCOPn (B) Ta (C) ta ytpmByatn ix npotraom Tpbox cekynd. BcTaHOBHeHHn porpam ABtOMaTHNO nepeepNaetbcra i TaMep dEmOHCTpye TiNbKn nOtOHn qac.
- Byd-b-ky yctaHOBky TaImepy TakoK MoKHa cKacyBaTu HaCTyNHm YHOM: o6epiTb II 3a DonomoroIO ceHCopa (A), notim cnHXPOHHO HATNCHTb ceHCopn (B) i (C). Ihun cnoci6 ckacyBaTu yCTaHOBky, BCTaHOBtN TaImep Ha 3HaueHHI «0.00».
3neKmpoHbI npoaspMaMop
Iocne nepBoro NOdkJIOUeHnna np6opa K 3JIeKTPoCetn n B Cnyae OTKIOUeHnna 3JIeKtpO3Heprn HEO6xOIMO yCTaHOBTb Tekyuee Bpemr.

Бe3 yctaHOBKN TeKyuIero BpeMeH NOnb3OBAHne DyXOBKO HEB03MOxHO.
HarpeBaTeIbHbIe 3IeMeHTbI MoryT pa6oTaTb npn OTKpbITOn DBepue dYxOBKn, ecnn npnbOp He obopyObaH BCTpoEHbIM BbIKIOuATEIeM dYxOBKn. OnaChocTb oxora!

Cechopbl:
A CeHcOp BbIbopa n IoTBepeKdEHHa yHKuN
B CeHcop «-»
C CeHcop +
HdNkaTopbI:
1 PpOdoJXnTeJIbHOCTb npIroTOBJeHnA
2 OkOHuaHne npNFOTOBJeHnA
3 ByuHbHK (yHKnOOnBeueHn)
4 Yacbi
5 3aunTHa6noknpOBka
6 LnpoBoi DnCpnei
-Дя Вьбopa Heo6xOdImoH cyHKuHn HaxmMaIte Ha ceHcop A.CmbBbIbpaHHoH cyHKuHa DnCnIee NaHET 6bICTpo MIRaTb, TeNepb Bbl MOKeTe yCTaHOBt bIIN I3MeHHTb npaMeTpby cyHKuH. Upe3 5 cekyHd CmBOJ NaHET MIRaTb MeJIeHHee, Ha DnCnIee BBICBeHuBaETcYCTaHOBJIeHHoe BpemA cyHKuH.
- Понсветка симь�юнoka3ыаet,чToФункцяВьбраHA,Ho ee Врем He ИндануETсЯ на диспee.Ha dincпee BBicBceuNBaETcЯ NOcneHЯФункця,KOTopyU Bbl yCTaHabnBaII.
Kakdoe haxatne Ha ceHcop noTBepkdaeTcKoPOTkIM 3ByKObblm CnHaJIOM.
- Ecni ceHcop B «-» nII C «+» ydepxnBaTb, To 3naueHne 6ydet MeHrTbcra 6bictpee (yBENuHBaTcra nIyMeHbUaTbcra COOTBetCTBeHHO).
- Послne подкюченя духовки к сикгтося и в сиуае откlioченя сикгтосянни на диспee Heckoько секунд Всicbeчubae садпсь META улл GLAS, посne зтоу диспee HekOTOpoe BpemЯ мiraet. Дя павы dуховки Heobxodmo yctahOBNTb Tekyujee Bpemя ceHCOPamn Bи C.
- Пи OTКлioуени злесьгим MeHee Yem Ha 2 МнHyтbl BCE yctaHOBkn nporpaMaTopa coxpaHЯOTcR, И духовka aBTOMaTnueckn npodJnxI pa6Oty (ecnв BKlIOyeha).

ДяТOrOчTo6bIceHcOpblnyuwepearInpOBaHnHaHaxaTn,ПоцадьнжatnaJIbueMdoJxHa6bITb6onbWe.
YctahOBka Tekyuzero BpeMeHH
OkoHuaHne npnroTOBJeHna
Данна Функця NO3BOJЯТ 3anporpaMMNPOBaT BpeM OTKIQUeHn AYXOBKn (OKOHuaHne npiroTOBHeHn).
OkoHuaHne npiroTOBHeHnMoXHO 3aInporpaMMnpoBaTb He no3Ke yem yepe3 10 cAcOB C MOMeHTa yCTaHOBKn yHKuH!
- Поберп, установлень Лин тонhoe Врем стOK.
- Cechopom A Bblbepnte cunboJ 2. Ha dincnnee BbICBETnTcR Tekyuue BpeM cyTOK. CeHcopamn B «-» n C «+» yCTaHOBNTe BpeM OKOHuaHnI npiroTOBneHnI.
BkIIOHTe DyXOBky (BbI6epnte pexnH HArpeBa n TemnepaTpy).DyXOBka cpa3y BKIOHTcny ABTOMaTHueCKN BbIKIOHTcB yCTaHOBNeHHoe Bpemr. Pa3dactc npepbIBNCtby 3ByKOBoi CnHaJI, KOTOpBI MOxHO BbIKIOHTb HaKaTneM Ha IIOboi CeHCop, INI Ype3 1 MmHyTu CnHaJI BbIKIOHTcABTOMaTHueCKN.
Ha dincnpee MraIOT cIMB0n 1 n HndnkaunrA «:_». Ecnn npriroTOBneHne Heo6xOdmo npoJOnKntb, haxmnte ceHcOp A n npn Heo6xoDnMoCTn yctaHOBNTe HOBOe Bpemn npoJOnKnteJIbHOCTn npriROToBHeHn.