— Washing machine — Mode d'emploi PDF")
ECOT7F 1291 (EU) - Washing machine HOTPOINT-ARISTON - Free user manual and instructions
Find the device manual for free ECOT7F 1291 (EU) HOTPOINT-ARISTON in PDF.
| Product Type | Front-loading washing machine |
| Brand | HOTPOINT-ARISTON |
| Model | ECOT7F 1291 (EU) |
| Dimensions (W x H x D) | 40 x 85 x 60 cm |
| Maximum washing capacity | 7 kg |
| Drum volume | 42 liters |
| Maximum spin speed | 1200 rpm |
| Water pressure | 0.05 – 1 MPa (0.5 – 10 bar) |
| Number of programs | 13 |
| Special programs | Mix 15', Good Night, Shirts, Silk/Curtains, Wool, Eco |
| Customizable functions | Delay start, Intensive, Extra rinse, Easy iron |
| Child safety | Key lock |
| Installation type | Freestanding (floor installation) |
| Power supply | See rating plate (220-240 V typical) |
| Standby consumption | 0.5 W |
| Off-mode consumption | 0.5 W |
| After-sales service | 0.825.05.44.44 |
| Country of manufacture | Not specified (estimated: Europe) |
Frequently Asked Questions - ECOT7F 1291 (EU) HOTPOINT-ARISTON
User questions about ECOT7F 1291 (EU) HOTPOINT-ARISTON
0 question about this device. Answer the ones you know or ask your own.
Ask a new question about this device
Download the instructions for your Washing machine in PDF format for free! Find your manual ECOT7F 1291 (EU) - HOTPOINT-ARISTON and take your electronic device back in hand. On this page are published all the documents necessary for the use of your device. ECOT7F 1291 (EU) by HOTPOINT-ARISTON.
USER MANUAL ECOT7F 1291 (EU) HOTPOINT-ARISTON
Unpacking and levelling
Connecting the electricity and water supplies
The first wash cycle
Technical data
Care and maintenance, 4
Cutting off the water or electricity supply
Cleaning the washing machine
Caring for your appliance door and drum
Cleaning the pump
Checking the water inlet hose
How to clean the detergent dispenser
Precautions and tips, 5
General safety
Disposal
Saving energy and respecting the environment
Description of the washing machine and starting a wash cycle, 6-7
Control panel
Indicator lights
How to open and shut the drum
Starting a wash cycle
Wash cycles, 8
Table of wash cycles
Personalisation, 9
Setting the temperature
Setting the spin speed
Functions
Detergents and laundry, 10
Detergent dispenser drawer
Bleach cycle
Preparing the laundry
Garments requiring special care
Load balancing system
Troubleshooting, 11
Service, 12
! Keep this instruction manual in a safe place for future reference. Should the appliance be sold, transferred or moved, make sure the instruction manual accompanies the washing machine to inform the new owner as to its operation and features.
!Read these instructions carefully: they contain vital information on installation, use and safety.
Unpacking and levelling
Unpacking
- Unpack the washing machine.
- Check whether the washing machine has been damaged during transport. If this is the case, do not install it and contact your retailer.
-
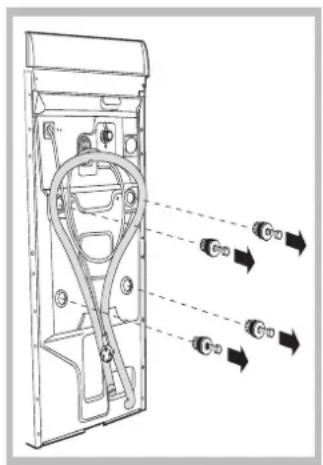
Remove the four protective screws and the rubber washer with the respective spacer, situated on the rear of the appliance (see figure).
-
Seal the gaps using the plastic plugs provided.
- Keep all the parts: you will need them again if the washing machine needs to be moved to another location.
Warning: should the screws be re-used, make sure you fasten
the shorter ones at the top.
! Packaging materials are not children's toys.
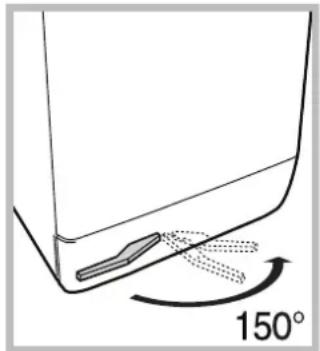
Levelling
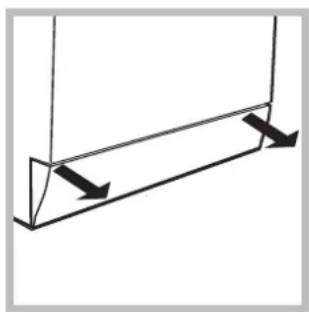
- Install the washing machine on a flat sturdy floor, without resting it up against walls, furniture cabinets or other.
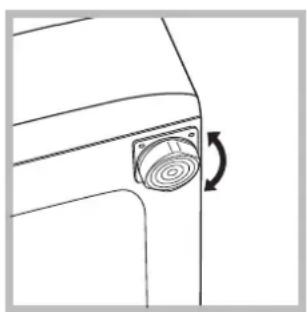
- If the floor is not perfectly level, compensate for any unevenness by tightening or loosening the adjustable front feet (see figure); the angle of inclination, measured according to the worktop, must not exceed 2^ .
Levelling your appliance correctly will provide it with stability and avoid any vibrations, noise and shifting during operation.
If it is placed on a fitted or loose carpet, adjust the feet in such a way as to allow enough room for ventilation beneath the washing machine.
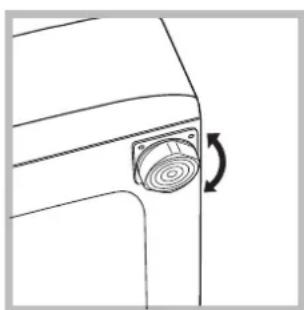
Putting your appliance in place and moving it.
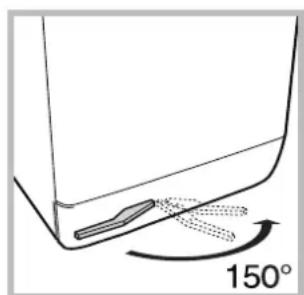
If your washing machine is equipped with a special set of retractable wheels you can easy move it. To lower the wheels and thus move the appliance effortlessly, just pull the lever, situated on the left
hand side beneath the base. Once the appliance is in the required position, put the lever back in place. The washing machine is now firmly in place (see figure).
Electric and water connections
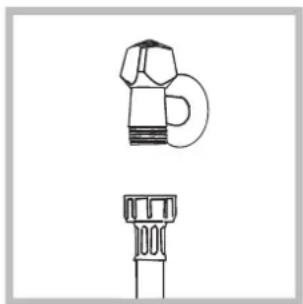
Connecting the water inlet hose
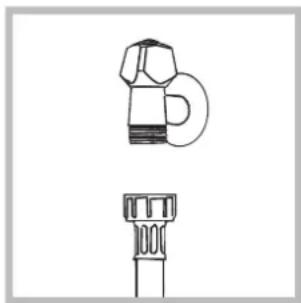
- Connect the supply pipe by screwing it to a cold water tab using a 3 / 4 gas threaded connection (see figure).
Before performing the connection, allow the water to run freely until it is perfectly clear.

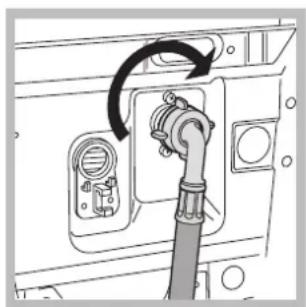
- Connect the other end of the water inlet hose to the washing machine,
screwing it onto the appliance's cold water inlet, situated on the top right-hand side on the rear of the appliance (see figure).
- Make sure there are no kinks or bends in the hose.
The water pressure at the tap must be within the values indicated in the Technical details table (on the next page).
If the water inlet hose is not long enough, contact a specialist store or an authorised serviceman.
! Never use hoses that have already been used.
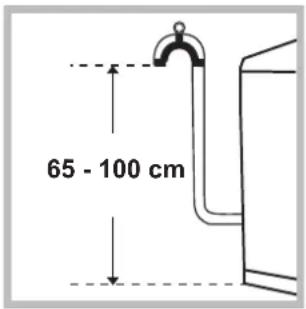
Connecting the drain hose
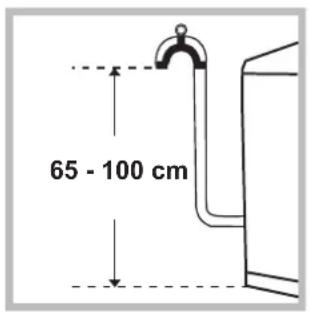
Connect the drain hose, without bending it, to a drainage duct or a wall drain located at a height between 65 and 100cm from the floor;
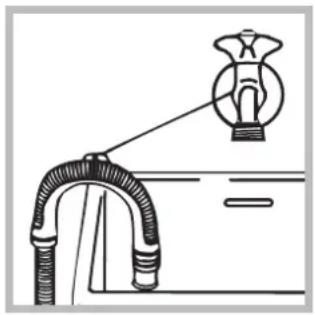
alternatively, rest it on the side of a washbasin or bathtub, fastening the duct supplied to the tap (see figure). The free end of the hose should not be underwater.
! We advise against the use of hose extensions; if it is absolutely necessary, the extension must have the same diameter as the original hose and must not exceed 150 cm in length.
Electrical connections
Before plugging the appliance into the electricity socket, make sure that:
- the socket is earthed and complies with all applicable laws;
- the socket is able to withstand the maximum power load of the appliance as indicated in the Technical data table (see opposite);
- the power supply voltage falls within the values indicated in the Technical data table (see opposite);
- the socket is compatible with the plug of the washing machine. If this is not the case, replace the socket or the plug.
! The washing machine must not be installed outdoors, even in covered areas. It is extremely dangerous to leave the appliance exposed to rain, storms and other weather conditions.
When the washing machine has been installed, the electricity socket must be within easy reach.
! Do not use extension cords or multiple sockets.
The cable should not be bent or compressed.
The power supply cable must only be replaced by authorised technicians.
Warning! The company shall not be held responsible in the event that these regulations are not respected.
The first wash cycle
Once the appliance has been installed, and before you use it for the first time, run a wash cycle with detergent and no laundry, using the wash cycle 2.
| Technical details | |
| Model | ECOT7F 1291 |
| Dimensions | 40 cm wide 85 cm high 60 cm deep |
| Capacity | from 1 to 7 kg |
| Electric connections | Please refer to the technical data plate fixed to the machine |
| Water connections | maximum pressure 1 MPa (10 bar) minimum pressure 0.05 MPa (0.5 bar) drum capacity 42 litres |
| Spin speed | up to 1200 rpm |
| Test wash cycles in accordance with directives 1061/2010 and 1015/2010 | Programme 2: Cotton standard 60°C. Programme 3: Cotton standard 40°C. |
| CE | This appliance is compliant with the following European Community Directives: - 2004/108/CE (Electromagnetic Compatibility) - 2006/95/CE (Low Voltage) - 2002/96/CE |
Cutting off the water and electricity supplies
- Turn off the water tap after every wash cycle. This will limit wear on the hydraulic system inside the washing machine and help to prevent leaks.
- Unplug the washing machine when cleaning it and during all maintenance work.
Cleaning the washing machine
The outer parts and rubber components of the appliance can be cleaned using a soft cloth soaked in lukewarm soapy water. Do not use solvents or abrasives.
Caring for the door and drum of your appliance
- Always leave the porthole door ajar in order to prevent unpleasant odours from forming.
Cleaning the pump
The washing machine is fitted with a self-cleaning pump which does not require any maintenance. Sometimes, small items (such as coins or buttons) may fall into the pre-chamber which protects the pump, situated in its bottom part.
! Make sure the wash cycle has finished and unplug the appliance.
To access the pre-chamber:
- using a screwdriver, remove the cover panel on the lower front part of the washing machine (see figure); 2. unscrew the lid by rotating it anti-clockwise (see figure): a little water may trickle out. This is perfectly normal;

- clean the inside thoroughly;
- screw the lid back on;
- reposition the panel, making sure the hooks are securely in place before you push it onto the appliance.
Checking the water inlet hose
Check the inlet hose at least once a year. If there are any cracks, it should be replaced immediately: during the wash cycles, water pressure is very strong and a cracked hose could easily split open.
! Never use second-hand hoses.
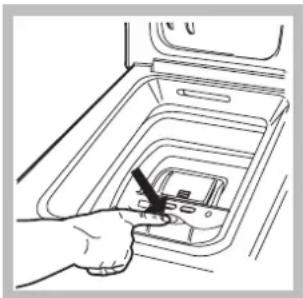
How to clean the detergent dispenser
Disassembly:
Press lightly on the large button on the front of the detergent dispenser and pull it upwards (fig. 1).
Cleaning:
Then clean the dispenser under a tap (fig. 3) using an old toothbrush and, once the pair of siphons inserted in the top of compartments 1 and 2 (fig. 4) have been pulled out, check whether the same are not clogged and then rinse them.
Reassembly:
Do not forget to rein- sert the pair of siphons into the special housings and then to replace the dispenser into its seat, clicking it into place (fig. 4,2 and 1).
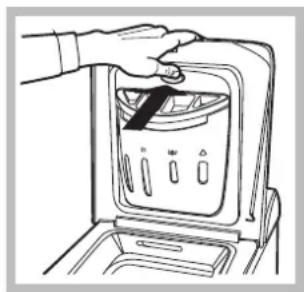
Fig. 1 Fig. 2
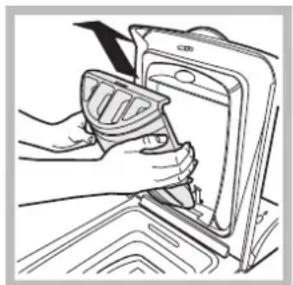
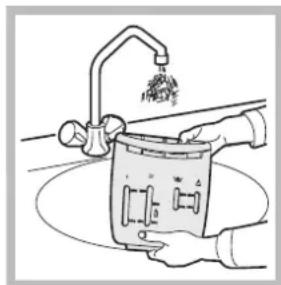
Fig. 3
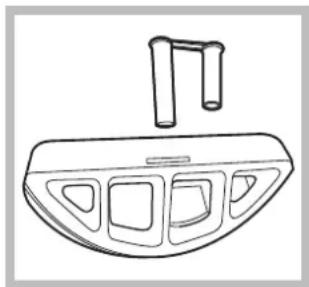
Fig. 4
This washing machine was designed and constructed in accordance with international safety regulations. The following information is provided for safety reasons and must therefore be read carefully.
General safety
- This appliance was designed for domestic use only.
- This appliance can be used by children aged from 8 years and above and persons with reduced physical, sensory or mental capabilities or lack of experience and knowledge if they have been given supervision or instruction concerning use of the appliance in a safe way and understand the hazards involved. Children shall not play with the appliance. Cleaning and user maintenance shall not be made by children without supervision.
- The washing machine must only be used by adults, in accordance with the instructions provided in this manual.
- Do not touch the machine when barefoot or with wet or damp hands or feet.
- Do not pull on the power supply cable when unplugging the appliance from the electricity socket. Hold the plug and pull.
- Do not touch the drained water as it may reach extremely high temperatures.
- Never force the porthole door. This could damage the safety lock mechanism designed to prevent accidental opening.
- If the appliance breaks down, do not under any circumstances access the internal mechanisms in an attempt to repair it yourself.
- Always keep children well away from the appliance while it is operating.
- If the appliance has to be moved, work in a group of two or three people and handle it with the utmost care. Never try to do this alone, because the appliance is very heavy.
- Before loading laundry into the washing machine, make sure the drum is empty.
Disposal
- Disposing of the packaging materials: observe local regulations so that the packaging may be re-used.
- The European Directive 2002/96/EC on Waste Electrical and Electronic Equipment, requires that old household electrical appliances must not be disposed of in the normal unsorted municipal waste stream. Old appliances must be collected separately in order to optimise the recovery and recycling of the materials they contain and reduce the impact on human health and the environment.
The crossed out "wheeled bin" symbol on the product reminds you of your obligation, that when you dispose of the appliance it must be separately collected. Consumers should contact their local authority or retailer for information concerning the correct disposal of their old appliance.
Saving energy and respecting the environment
Saving on detergent, water, energy and time
- To avoid wasting resources, the washing machine should be used with a full load. A full load instead of two half loads allows you to save up to 50% on energy.
- The pre-wash cycle is only necessary on extremely soiled garments. Avoiding it will save on detergent, time, water and between 5 and 15% energy.
- Treating stains with a stain remover or leaving them to soak before washing will cut down the need to wash them at high temperatures. A programme at 60^ instead of 90^ or one at 40^ instead of 60^ will save up to 50% on energy.
- Use the correct quantity of detergent depending on the water hardness, how soiled the garments are and the amount of laundry you have, to avoid wastage and to protect the environment: despite being biodegradable, detergents do contain ingredients that alter the natural balance of the environment. In addition, avoid using fabric softener as much as possible.
- If you use your washing machine from late in the afternoon until the early hours of the morning, you will help reduce the electricity board's peak load. The "DELAYED START" option helps to organise your wash cycles accordingly.
- If your laundry has to be dried in a tumble dryer, select a high spin speed. Having the least water possible in your laundry will save you time and energy in the drying process.
Description of the washing machine and starting a wash cycle
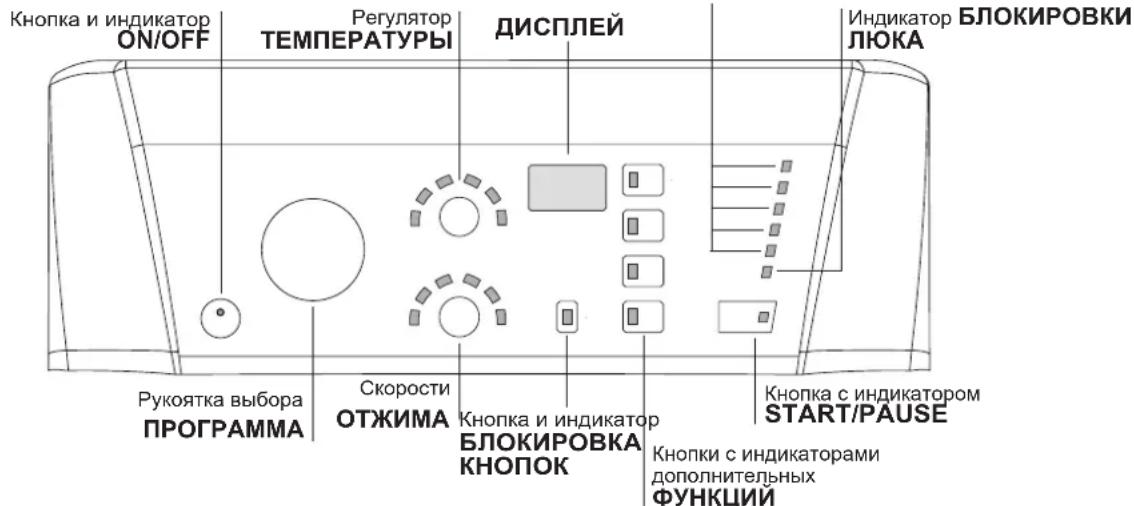
Control panel
WASH CYCLE PROGRESS

CONTROL PANEL LOCK button with indicator light
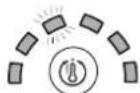
ON/OFF button with indicator light: switches the machine on and off. If the indicator light is illuminated, this indicates that the machine is switched on.
WASH CYCLE knob: programmes the wash cycles. During the wash cycle, the knob does not move.
SPIN SPEED button: sets the spin speed or exclude the spin cycle completely (see "Personalisation").
TEMPERATURE button: sets the temperature or the cold wash cycle (see "Personalisation").
DISPLAY: indicates the time remaining for the selected wash cycle and, if a delayed start has been programmed, the time remaining until the start of the wash cycle.
CONTROL PANEL LOCK button with indicator light: activates or deactivates the control panel lock.
FUNCTION buttons with indicator light: used to select the available functions. The indicator light corresponding to the selected function will remain lit.
WASH CYCLE PROGRESS indicator lights: used to monitor the progress of the wash cycle. The illuminated indicator light shows which phase is in progress.
DOOR LOCKED indicator light: indicates whether the door may be opened or not (see next page).
START/PAUSE button with indicator light: starts or temporarily interrupts the wash cycles.
N.B. To pause the wash cycle in progress, press this button; the corresponding indicator light will flash orange, while the indicator light for the current wash cycle phase will remain lit in a fixed manner. If the DOOR LOCKED indicator light is switched off, the door may be opened. To start the wash cycle from the point at which it was interrupted, press this button again.
Standby mode
This washing machine, in compliance with new energy saving regulations, is fitted with an automatic standby system which is enabled after about 30 minutes if no activity is detected. Press the ON-OFF button briefly and wait for the machine to start up again.
Consumption in off-mode: 0,5 W
Consumption in Left-on: 0,5 W
Indicator lights
The indicator lights provide important information.
This is what they can tell you:
Wash cycle phase indicator lights
As the WASH CYCLE knob is rotated, the indicator lights illuminate, indicating the stages which will be performed by the machine in accordance with the selected wash cycle.
Once the desired wash cycle has been selected and has begun, the indicator lights switch on one by one to indicate which phase of the cycle is currently in progress.
Wash
Rinse
Spin
Drain
End of wash cycle

END
Function buttons and corresponding indicator lights
When a function is selected, the corresponding indicator light will illuminate. If the selected function is not compatible with the programmed wash cycle, the corresponding indicator light will flash, a sound signal will be emitted and the function will not be activated. If a function which is incompatible with another function selected previously, only the most recent selection will remain active.
Temperature indicator light
When a temperature value is selected, the corresponding indicator light will illuminate.
Spin indicator light
When a spin value is selected, the corresponding indicator light will illuminate.

Control panel lock indicator light
To activate the control panel lock, press and hold the button for approximately 2 seconds. When the indicator light is illuminated, the control panel is locked. This means it is possible to prevent wash cycles from being modified accidentally, especially where there are children in the home. To deactivate the control panel lock, press and hold the button for approximately 2 seconds.
Lid locked indicator light
If this indicator light is on, the appliance door is locked to prevent it from being opened accidentally; to avoid any damage, wait for the indicator light to switch off (it will take about three minutes) before you open the appliance door.
N.B. If the DELAY TIMER function is activated, the door cannot be opened; pause the machine by pressing the START/PAUSE button if you wish to open it.
If the START/PAUSE indicator light (orange) flashes rapidly at the same time as the function indicator light, this indicates a problem has occurred (see "Troubleshooting").
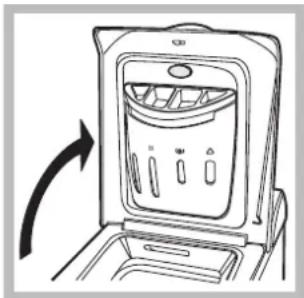
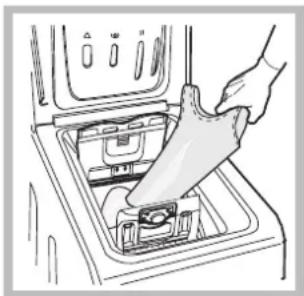
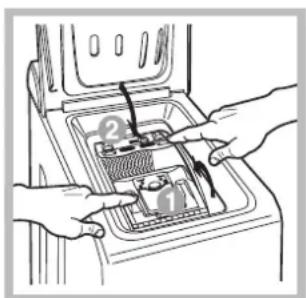
How to open and to close the drum
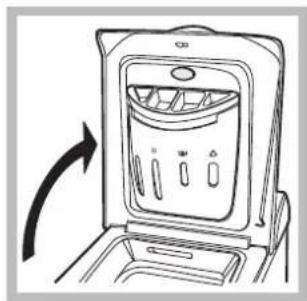
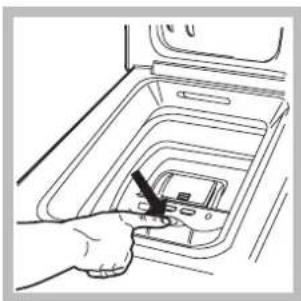
Fig. 2
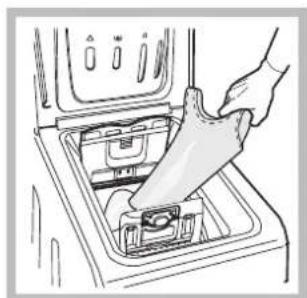
Fig.1
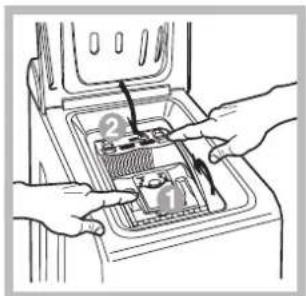
Fig. 3
Fig. 4
Lift the external lid and open it completely.
B) Opening the drum (Soft opening):
With one finger, push the button indicated in fig. 2 and the drum will open delicately.
C) Loading the washing machine (Fig. 3).
- close the drum fully by first shutting the front door followed by the rear one;
- then ensure the hooks on the front door are perfectly housed within the seat of the rear door
- after the hooks have clicked into position, press both doors lightly downwards to make sure they do not come loose;
- finally shut the external lid.
E) Drum End Stop (Fig. 2):
Once the wash cycle has been completed, the drum will position itself with doors facing upward for ease pf opening.
Starting a wash cycle
- Turn the washing machine on by pressing the ON/OFF button. All the indicator lights will turn on for a few seconds, then only the indicator lights relative to the selected programme settings will remain lit and the START/PAUSE indicator light will flash.
- Load the laundry, close the door and the lid.
- Set the WASH CYCLE knob to the desired programme.
- Set the washing temperature (see "Personalisation").
- Set the spin speed (see "Personalisation").
- Measure out the detergent and washing additives (see "Detergents and laundry").
- Select the desired functions.
- Start the wash cycle by pressing the START/PAUSE button and the corresponding indicator light will remain lit in a fixed manner, in green.
To cancel the set wash cycle, pause the machine by pressing the START/PAUSE button and select a new cycle.
- At the end of the wash cycle the EmIndicator light will switch on. The LID LOCKED indicator light will switch off, indicating that the door may be opened. Take out your laundry and leave the appliance door ajar to make sure the drum dries completely.
Switch the washing machine off by pressing the ON/OFF button.
Table of wash cycles
| Wash cycles | Description of the wash cycle | Max.temp.(°C) | Max.speed(rpm) | Detergents | Max. load (kg) | Residual dam-ness % | Energy consumption kWh | Total water it | Cycle duration | ||
| Wash | Fabric soften-ner | Ble-ach | |||||||||
| Essentials cycles | |||||||||||
| 1 | Cotton: extremely soiled whites. 90° 1200 | ● | ● | ● | 7 53 | 1,99 6 | 2 145' | ||||
| 2 | Cotton Standard 60° (1): heavily soiled whites and resistant colours. 60° 1200 | ● | ● | ● | 7 53 | 1,17 5 | 2,5 195' | ||||
| 3 | Cotton Standard 40° (2): lightly soiled whites and delicate colours. 40° 1200 | ● | ● | ● | 7 53 | 1,09 9 | 2 190' | ||||
| 4 | Synthetics: heavily soiled resistant colours. 60° 800 | ● | ● | ● | 3 44 | 0,85 3 | 9 110' | ||||
| 4 | Synthetics (3): lightly soiled resistant colours. | 40° | 800 | ● | ● | ● | 3 44 | 0,53 3 | 9 100' | ||
| 5 | Mix 15': to refresh lightly soiled garments quickly (not suitable for wool, silk and clothes which require washing by hand). | 30° 800 | ● | ● | - | 1,5 | 71 0 | 08 29 | 15' | ||
| Special cycles | |||||||||||
| 6 | Goodnight cycle: lightly soiled delicate colours. | 40° 800 | ● | ● | ● | 4 - | - | - | 280' | ||
| 7 | Shirts | 40° 600 | ● | ● | ● | 2 - | - | - | 80' | ||
| 8 | Silk/Curtains: for garments in silk and viscose, lingerie. | 30° | 0 | ● | ● | - | 1 | - | - | - | 55' |
| 9 | Wool: for wool, cashmere, etc. | 40° 800 | ● | ● | - | 1 | - | - | - | 65' | |
| Eco cycles | |||||||||||
| 10 | Cotton Standard 20°: lightly soiled whites and delicate colours. | 20° | 1200 | ● | ● | - | 7 | - | - | - | 180' |
| 11 | Cottons | Cold Water | 1200 | ● | ● | - | 7 53 | 0,10 5 | 1 85' | ||
| 12 | Synthetics | Cold Water | 800 | ● | ● | - | 2,5 | 48 0 | 07 27 | 70' | |
| 13 | Fast Wash | Cold Water | 800 | ● | ● | - | 2,5 | 71 0 | 04 34 | 30' | |
| Partials wash cycles | |||||||||||
| Rinse | - | 1200 | - | ● | ● | 7 - | - | - | 36' | ||
| Spin | - | 1200 | - | - | - | 7 | - | - | - | 16' | |
| Pump out | - | 0 | - | - | - | 7 | - | - | - | 2' | |
The length of cycle shown on the display or in this booklet is an estimation only and is calculated assuming standard working conditions. The actual duration can vary according to factors such as water temperature and pressure, the amount of detergent used, the amount and type of load inserted, load balancing and any wash options selected.
1) Test wash cycle in compliance with directive 1061/2010: set wash cycle 2 with a temperature of 60^ .
This cycle is designed for cotton loads with a normal soil level and is the most efficient in terms of both electricity and water consumption; it should be used for garments which can be washed at 60^ . The actual washing temperature may differ from the indicated value.
2) Test wash cycle in compliance with directive 1061/2010: set wash cycle 3 with a temperature of 40^ .
This cycle is designed for cotton loads with a normal soil level and is the most efficient in terms of both electricity and water consumption; it should be used for garments which can be washed at 40^ . The actual washing temperature may differ from the indicated value.
For all Test Institutes:
2) Long wash cycle for cottons: set wash cycle 3 with a temperature of 40^ .
3) Synthetic program along: set wash cycle 4 with a temperature of 40^ .
Mix 15' (wash cycle 5) this wash cycle was designed to wash lightly soiled garments quickly: it lasts just 15 minutes and therefore saves both energy and time. By selecting this wash cycle (5 at 30^ ), it is possible to wash different fabrics together (except for wool and silk items), with a maximum load of 1.5kg .
Goodnight cycle (wash cycle 6). This is a silent cycle which can be run at night, when the electricity prices are lower. The wash cycle is designed for cottons and synthetics. At the end of the cycle the machine stops while there is still water in the drum; to spin and drain the laundry press the START/PAUSE button; alternatively the machine will perform the spin cycle and drain the water automatically after 8 hours.
Cotton Standard 20^ (programme 10) ideal for heavily soiled cotton loads. The effective performance levels achieved at cold temperatures, which are comparable to washing at 40^ , are guaranteed by a mechanical action which operates at varying speed, with repeated and frequent peaks.
Eco cycles
The Eco Cycles assure energy saving by eliminating the need of heating water and it's an advantage both to your energy bill and the environment! These innovative Eco programmes (Cotton 11, Synthetics 12 and Fast Wash 13) are available for various fabrics and different quantity of garment; they have been designed to guarantee a high cleaning action even at low temperature and can be used for lightly to medium soiled loads.
Eco Cycles give the best results thanks to an intensified wash action, water optimization and are carried out in the same average time of a standard cycle.
For the best washing results with Eco Cycles we recommend the usage of a liquid detergent.
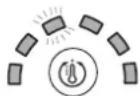
Setting the temperature
By pressing the TEMPERATURE button to set the wash temperature (see Table of wash cycles).
The temperature may be lowered, or even set to a cold wash (
The washing machine will automatically prevent you from selecting a temperature which is higher than the maximum value set for each wash cycle.
Setting the spin speed
By pressing the SPIN SPEED button to set the spin speed for the selected wash cycle.
The maximum spin speeds available for each wash cycle are as follows:
Wash cycles Maximum spin speed
Cottons 1200 rpm
Synthetics 800 rpm
Wool 800 rpm
Silk drain only
The spin speed may be lowered, or the spin cycle can be excluded altogether by selecting the symbol
The washing machine will automatically prevent you from selecting a spin speed which is higher than the maximum speed set for each wash cycle.
Functions
The various wash functions available with this washing machine will help to achieve the desired results, every time.
To activate the functions:
- Press the button corresponding to the desired function;
- the function is enabled when the corresponding indicator light is illuminated.
Note: If the indicator light flashes rapidly, this signals that this particular function may not be selected in conjunction with the selected wash cycle.

Delay timer
To set a delayed start for the selected wash cycle, press the button repeatedly until the desired delay time is displayed (this may be between 1 hour and 24 hours).
To disable the function press the button until the text displayed.
N.B. Once you have pressed the START/PAUSE button, the delay time may only be decreased if you wish to modify it.
This option is enabled with all programmes.

Super Wash
Because a greater quantity of water is used in the initial phase of the cycle, and because of the increased cycle duration, this function offers a high-performance wash.
!This function may not be used in conjunction with wash cycles 5,8,9,10,11,12,13, 四

Extra rinse
By selecting this function, the efficiency of the rinse is increased and optimal detergent removal is guaranteed. It is particularly useful for sensitive skin.
This function may not be used in conjunction with wash cycles 5, 13,
Easy iron
By selecting this function, the wash and spin cycles will be modified in order to reduce the formation of creases. At the end of the cycle the washing machine will perform slow rotations of the drum.
For the 8 wash cycle, the machine will end the cycle while the laundry is soaking, the EASY IRON and START/PAUSE indicator lights will flash (orange) and the RINSE phase will remain lit in a fixed manner. To drain the water so that the laundry may be removed, press the START/PAUSE button or the EASY IRON button.
This function may not be used in conjunction with wash cycles 5, 6, 9, 11, 12, 13, 日
Detergents and laundry
GB
Detergent dispenser drawer
Good washing results also depend on the correct dose of detergent: adding too much detergent won't necessarily make for a more efficient wash, and may in fact cause build up on the interior of your appliance and even pollute the environment.
! Do not use hand washing detergents because these create too much foam.
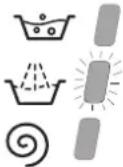
! Use powder detergent for white cotton garments, for prewashing, and for washing at temperatures over 60^ .
! Follow the instructions given on the detergent packaging.
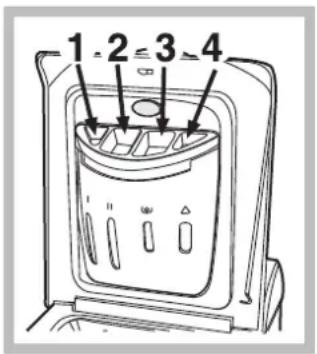
Open up the detergent dispenser and pour in the detergent and fabric softener, as follows.
compartment 1: Do not pour detergent into this compartment.
compartment 2: Detergent for the wash cycle (powder or liquid)
It is recommended that you place liquid detergent directly into the compartment using the appropriate dosing cup.
compartment 3:Additives (softener, etc.)
When pouring the softener in compartment 3, avoid exceeding the "max" level indicated.
The softener is added automatically into the machine during the last wash. At the end of the wash programme, some water will be left in compartment 3. This is used for the inlet of denser fabric softeners into the machine, i.e. to dilute the more concentrated softeners. Should more than a normal amount of water remain in compartment 3, this means the emptying device is blocked. For cleaning instructions, see "Care and maintenance".
compartment 4: Bleach
Bleach cycle
Bleaching may only be performed in conjunction with wash cycles 1, 2, 3, 4, 8, 7,
Pour the bleach into compartment 4; pour the detergent and softener into the corresponding compartments, then select one of the abovementioned wash cycles.
This option is recommended only for very soiled cotton garments.
Preparing the laundry
- Divide the laundry according to:
- the type of fabric/the symbol on the label
- the colours: separate coloured garments from whites.
- Empty all garment pockets and check the buttons.
- Do not exceed the values listed in the "Table of wash cycles", which refer to the weight of the laundry when dry.
How much does your laundry weigh?
1 sheet 400-500 g
1 pillow case 150-200 g
1 tablecloth 400-500 g
1 bathrobe 900-1200 g
1 towel 150-250 g
Garments requiring special care
Shirts: use special wash cycle 7 to wash shirts in various fabrics and colours.
It guarantees maximum care is taken of the garments and minimises the formation of creases.
Silk: use special wash cycle 8 to wash all silk garments. We recommend the use of special detergent which has been designed to wash delicate clothes.
Curtains: fold curtains and place them in a pillow case or mesh bag. Use wash cycle 8.
Wool: The wool wash cycle on this Hotpoint-Ariston machine has been tested and approved by The Woolmark Company for washing wool garments labelled as hand washable provided that the garments are washed according to the instructions on the garment label and those issued by the manufacturer of this washing machine. Hotpoint-Ariston is the first washing machine brand to be approved by The Woolmark Company for Apparel Care- Platinum for its washing performance and consumption of energy and water.

In UK, Eire, Hong Kong and India the Woolmark trade mark is a Certification trade mark.
Load balancing system
Before every spin cycle, to avoid excessive vibrations and to distribute the load in a uniform manner, the drum rotates continuously at a speed which is slightly greater than the washing rotation speed. If, after several attempts, the load is not balanced correctly, the machine spins at a reduced spin speed. If the load is excessively unbalanced, the washing machine performs the distribution process instead of spinning. To encourage improved load distribution and balance, we recommend small and large garments are mixed in the load.
Your washing machine could fail to work. Before contacting the Technical Assistance Centre (see "Assistance"), make sure that the problem cannot be not solved easily using the following list.
Problem:
The washing machine does not switch on.
The wash cycle does not start.
The washing machine does not take in water (the indicator light for the first wash cycle stage flashes rapidly).
The washing machine continuously takes in and drains water.
The washing machine does not drain or spin.
The washing machine vibrates a lot during the spin cycle.
The washing machine leaks.
The START/PAUSE indicator light (orange) and the function indicator lights flash rapidly.
There is too much foam.
Possible causes / Solutions:
- The appliance is not plugged into the socket fully, or is not making contact.
- There is no power in the house.
The appliance Lid is not shut properly.
- The ON/OFF button has not been pressed.
- The START/PAUSE button has not been pressed.
- The water tap has not been opened.
- A delayed start has been set (see "Personalisation").
- The water inlet hose is not connected to the tap.
The hose is bent.
The water tap has not been opened. - There is no water supply in the house.
The pressure is too low. -
The START/PAUSE button has not been pressed.
-
The drain hose is not fitted at a height between 65 and 100cm from the floor (see "Installation").
- The free end of the hose is under water (see "Installation").
- The wall drainage system is not fitted with a breather pipe.
If the problem persists even after these checks, turn off the water tap, switch the appliance off and contact the Assistance Service. If the dwelling is on one of the upper floors of a building, there may be problems relating to water drainage, causing the washing machine to fill with water and drain continuously. Special anti-draining valves are available in shops and help to avoid this inconvenience.
- The wash cycle does not include draining: some wash cycles require the drain phase to be started manually.
- The EASY IRON function has been activated: To complete the wash cycle, press the START/PAUSE button ("Personalisation").
-
The drain hose is bent (see "Installation").
The drainage duct is clogged. -
The drum was not unlocked correctly during installation (see "Installation").
- The washing machine is not level (see "Installation").
-
The washing machine is trapped between cabinets and walls (see "Installation").
-
The water inlet hose is not screwed on properly (see "Installation").
- The detergent dispenser drawer is blocked (for cleaning instructions, see "Care and maintenance").
-
The drain hose is not fixed properly (see "Installation").
-
Switch off the machine and unplug it, wait for approximately 1 minute and then switch it back on again.
If the problem persists, contact the Technical Assistance Service.
- The detergent is not suitable for machine washing (it should display the text "for washing machines" or "hand and machine wash", or the like).
- Too much detergent was used.
Before calling for Assistance:
- Check whether you can solve the problem alone (see "Troubleshooting");
- Restart the programme to check whether the problem has been solved;
- If this is not the case, contact an authorised Technical Assistance Centre using the telephone number provided on the guarantee certificate.
! Always request the assistance of authorised technicians.
Have the following information to hand:
the type of problem;
the appliance model (Mod.);
the serial number (S/N).
This information can be found on the data plate situated on the rear of the washing machine.

Français
Sommaire
Installation, 14-15
Coton 1200 tours/minute
Anomalies: Causes / Solutions possibles:
Levante la tapa externa y abrala Completely.
B) Abertura del cesto (Soft opening):
B) Avaia pa kabou (Soft opening):
Me eva bxtuao meote to koupti nou uno6eikvuetan 2kai o kabo8a aoigei anala.
C) EIAIARHPOYXON(E1K.3).
IopKJIIOHHeK BOOJPOBOy N 3NeKTPnueCTBy
PepBbI uKJ CTnRpKn
Onncahne cTnpaIbHOJ MaunHbI N nopraKa 3anycka nporpaMMbl,64-65
Panaelb ynpablenia
UHdkaTopbi
KaOKtpbITb 3aKpbTb 6apa6aH
Popraok 3anycka nporpaMMbl
PporpaMMbl,66
Tabnua nporpaMM
ECOT7F 1291
NepcoHaHn3nPoBaHHbIe HAcTpOKn, 67
PerynipOBKa TEmnepaTpybI
BbI6op ckopocTN OTXIMa
DIOJINHTeIbHbIeФyHKU
Mooune cpeTba n Tnbl 6eJb8, 68
PacnpedeIeIteMbMOIOxxCpeIcTB
OT6eINBaHne
IoproToBka6b
I3JeJn, Tpe6yUoJne DeJNKaTHoN CTnPKn
CnTeMa 6aJHaHcnpOBKn 6eJIbI
Ipeoctopoxknohtn pekomehdaun,69
Obune TpeboBAnnK 6e3oNaCHOCTN
YTNn3aun
3KoHOMn 3Heprn n OxpaHa OkpyKaIOUeI cpebl
Texnueckoe 6cnykBaHne uyo,70
OTKJIIOUHeH BOdbI N 3JIeKTpnuEcTbA
YxOa3a CTnpaJIbHOI MaUNHOI
Xo3aDBepeMauHbIb6apabahom
UHCTKa HAcOca
Поберка злИВHorOшlaHra
Kak nctntb paacnpdeIeNTeMb MOUux cpeIcTB
PONCK HENCnpaBHOCTeN MeToDbI IN yCTpaHEnn, 71
CepBnchoe 06cnyxmbaHne,72
TexHnueckne daHHbIe

AIO 77
! CoxpaHnTe daHHepe pyKoBOcTBo. OHO DoJXHo 6bITb B KOMnJIeKTe CO CTnpaIbHOm MaunHOB B Cnyuae npOdaXn, nepeDaun o6OpyIDOBAHn Hn npn nepee3de Ha HObyIO KBaPTnpy, YTObI HObI BnaJeIeU o6OpyIDOBAHn MOr O3HaKOMnTbcrC nPaBnIaMn erO cyHKUOHIpOBAHn N obcnykmbAHn.
!BHMaTeIbHO npOHTaTe pyKOBOCTBO:B HEM coepKataBaxHbIE CBeDEHnNo yCTaHOBKe N 6e3oNaCHO kCnnyatauN CTnpaBHO MaunHbl.
PacnaKOBka N BbIpaBnBaHne

PacnaKOBka
- PacnakyTe CTnpaBHyIO MaunHy.
- Y6eIntecb,чTo
obopydOBaHHe He 6blIO
NoBpeXdeHO BO BpeM
TpaHCnOpTnpOBKn.
Ppi O6hApUkeHn
NoBpeXdeHn -
He NODKNUoyaTe
MaUNHy-CBRAKITecb
C NOCTABUINKOM
HEMeDJIeHHO.
3.YdaInte Yetbipe TpaHCnOpTnpoBOUHbIX BnHTa Ipe3nHOBbI npO6Kn CpoknaKamn,
pacnoJIOXeHHbIe B 3aHHeY qAcTn CTnpaJIbHOm MaUNHbI (CM.puc.).
4.3akpoTe OTBepCTn npJlaHaoMmncn PnactIKOBbIMN 3aJIyUkAmN.
5. CoxpaHnTe BCE deTaI: OH Bam noHaio6Tcnpi nocJeDyIOSe TpaHCnOpTnpOBKe ctnpaJIbHOIMaUNHbl.
6oNTbI,pe3HOBBle Wai6bI N 60nbWyo MeTaJINuYeCKyIO nonepueHyIO INaHKy.3aKpOte o6pa3ObaBwneCeOTBepC TnI NaCTMacCOBbIMN 3aRnyUkAmN.
!He pa3pewaIte DeTmIrpaTb C ynaKOBouHbIMM MaTePnAJaMn.
BbipabHnBaHne
1.YctaHOBInTe CTnpaIbHyo MaunHy Ha POBHOM n npOHm noLy, TaK TTO6bl OHa He KacaJacb CTeH, Me6JIu N npOuNX npEIMeTOB.
2. Nocne yctaHOBKn MaunHbHa MeCTO oTpeynpyTe ee ycToOnHBOe NOIOKeHne nyTEM BpaueHnA
peepnHX HOKe (CM. puc.).ДЯ 3TOrO cHaJaNA OCna6bTe KOHTprayKy, nocne 3aBepWeHnpeRyInpOBKn KOHTprayKy 3aTaNHe. Nocne yCTaHOBKn MaunHbI
Ha MeTo npOBepbTe No ypOBHIO rOpN3OHTaJIbHOCTb BepxHei KpbIuKn KopnyCa,OTKJIOHeHne rOpN3OHTaJIu DoJXHO 6bITb He 6oJee 2^
PpabnIbHoe BbipaBnBaHne 06OpyIOBaHnI NOMOKeT n36ExKaTb Wyma, Bn6paun I CMeUeHn BO BpeM pa6oTb MaunHbl.
EcnI CTnpaBna MaunHa CToHT Ha NoTy, NOKpbITOM KOBpOM, y6eHntEcB, YTO ee OCHOBAHne BO3BbIaTaTc HAD KOBPOM. B npOTNBHom cnyae BeHTnJIaCn 6yDet 3aTpUdHeHa nn BOBce HeBO3MOxHa.
YcTaHOBkaMaunHbHaMeCTO INepeMeueHne
BaHa cTnpaBna MaHnHa MoKet 6bItb OChaueHa CneuaNbHbIMN ybnpaOUMMC KOnecamnIaOBerHee ee nepemeeHn. YTo6bl OnyCTHTb KOleca npeDbHNytb ObopyoDaHne, npocTo NotAHte 3a pbHar,pacnoJIOxKeHHb CNEBa NOD OCHOBaHnEMMaHnbl. Nocne yctaHOBKnObopyoBaHn B Tpe6ye
MOE IIOJXeHHe BepHnTe pblaR B INCXoHoe IIOJI.
IopKJIIOUeHHe K BOIOJPOBOHOH N 3JIeKTpNUeCKOcTeN
IopcoeHHeHne3aINBHoro 7nHaHra
- PnKpyTte 7aHaH nOdau K KpaHy XoNoDHO BObI C pe3b6OBbIM OTBepCTHeM 3/4 gas (cm. cxemy).
Ppei noCoeINHeHem OTKpOte BOOpPOBOHbIKpaH Do Tex nop, noka n3 HeRo He NoteHT YnCTa BOda.
2.ПОДСоЕДИНTE 3aINBHOJ WJIaHr K CTnpaJIbHOJ MaIuHne, HABNHTB ERO Ha BOdONPnEeMHNK, paCNoJIOKeHHbY B 3aDHeB BerXHe YAcTn Cnpaba (CM.puc.).
3.Y6eNTecb,HTO ⅢaHn He nepekpyen Hn He nepexkat.
!DaBHeHne BObI DoJXHO 6bITb NpeJeJax 3HaYeHni, yKa3aHHbIX B Ta6JIue TexHnuecknx XapakTepcntNK.
!EcInIINHa BOJOpBOJHO OJNaHra OKaKeTcHHeIOCTaTOUHO,OBpaNTecb ABTopn3OBAHHbI CepBnCHbI ueHTp.
PoeHHeNcBHO 7aHa
NobecbTe 3aHrybI KOHeC cnBHO r hnaHra Ha Kpa paKOBnHb, BaHHb, NIN nOmeCTne B CneuHaNbHbIB bIBoD KaHaN3aun. UNaHR He doJXeH nepeRb6atbc.BepxHra TOka cNBHO r hnaHra DOJXHa HaxOHTbcr Ha BBicote 65-100 cm ot nJa.PacnoLoKeHne cNBHO r hnaHra DoJXHo obEcneuBaTb pa3pbIB cTpy npc cNBE (KOHeU shaHra He doJXeH 6bITb onyueH B Body). B cnyae KpennHe Hn KpaB aHHo nn paKOBnHb, WnAhr Beuaetc C NOMoubH O HapBaJIIOUeB (BXODIT B KOMPiEKT NoCTabKN) KOTOPa KpeNTcR K kpaHy (puC.).
!He pekomeHnyetc npimehene ydHHnHTeJe dna CnHBORO WJNAHra, npu Heo6xOIMOCtN DOyckaetc erO HapaunBaHne WJAHROM TAKORO Xe DnAmETpa N DnHOH ne 60one 150 cm.
PoiocoeHHeHneK3JeKtpocetN
BHHMaHHe! O6OpyObaHne 68a3aTeNbHO DoJXHo 6bITb 3a3eMJIeHo!
1.MaunHa nOdkJIOHuaeTc K 3NeKtpnuecko cTeN npn NOMOu DByxNIOIOCHOn p03ETKn C 3a3EmJHOUM KOHTAKTOM (po3eTKa He NoCTabJIeTcC MaunHO).Fa3HbI npBOOD oJKeH 6bITb NOkJIIOUeH uepe3 ABTOMaT 3aUNTb CEtN, paccuTaHHbI Ha MAKcMAmJIbHbI TK (TOK cpaBaTbAHn) 16 A, n MeouB BPem cpaTaIBAHn He 6oJee 0,1 c.
2.ПинанчИи B6IIN3ОТпpeДNoIraeMOrO MeCTa YcTAHOBKIMaUNHbIpo3ETKN C3a3EMJIHOUIMMOKTOM,IMeIOUeI TpExnPobODHyIOJBODKy Ka6eRc MMeHbIMN KINAMCeHeHEm He MeHee 1,5 KB.MM(NJN aIOMHMHeBbIMN KINAMm CeHeHEm He MeHee 2,5 KB.MM),dopa6OTka 3NeKTPOcETn He Ipnu3BODNTcA.PnO tCytCTBnYkAsaHHoN Po3ETKN INPOBODKCJIeDyET PNOBECTn IX MOHTax.
3.Прokладka 3a3eMнeHnЯ OTdEJIbHbIM npOBODm He DOnyckaetcra.
4.Дяdoap60K3Jektpnuecko ceTpeKomeHnyeTc npimeHaTb npoBOD Tnna PNB 3x1,5 380 FOCT 6223-79. Donyckaetc npimeHeHne dpynx Mapok Ka6eIy, o6ecneuBaOux NoXapo- n3Jektpo6e3onacHocTb npn 3KcnIy-aTaun MaunHbl.
Ipeed 6knoueHueMaunHb6cemy6ebumecb,ymo:
- po3eTKa n IPOBOkA COOTBETCTBYIOT Tpe6oBaHnA, n3JIOXeHHbIM B DaHHOM pa3JeNE INHCTpyKuN;
HAnpJxHeHn Yactota TOKa CETn COOTBETCTBYOT DaH-HbIM MaUNHbI; - po3eTka n BUNka OJHOro Tuna;
p03eTKa 3a3emIeHa B COOTBeTCTBn C HopMaMn 6e3oNaCHOCn, ONNCAHHbIMN B DAHHOM pa3dJe NHCtpyKcN (DOnyckAeTC OPAHn3aCnra 3a3emJIeHnpa6OuHM Hynm, npu yCNOBn, YTO 3aunTHa JINHn He NMeET pa3pbBa n NOkIouHe HaNPMyB O6BOJ KaKx-JIn6o Pnp6OpOB (HapnPmep, 3neKTpueCKoro CteTnka).
Ecnn BnIka He noDxOuNT K po3eTke, ee cneJyET 3aMeHHTb Ha HOByIO, COOTBeTCTBHyIOUyIO po3eTke, ININ 3aMeHHTb IITAOUHN Ka6enb. 3a MeHa Ka6enr DOJXHa npOn3BOUHTbcra ToJIbKO KBaIINΦIuPObaHHbIM NepCOHaON.
3anpeaaetc nCNoB30BaHne nepexOHNKOB, DBOHBIX N 6oJee po3eTOK uDInHnTeJe (OHn CO3aOT ONaCHOCTb BO3rOpAHn). EcIn Bb CHTaete IN cNoB30BaHne Heo6XoINMbIM, npImeHnTe OINH eINHCTBeHHbI yDInHnTeJIb, yDObNETBOPAIOuN Tpe6OBAHnM 6e3OnacHOCTn.
ObopydoaHue, noKnKHeHoe c HapyuHue mpe6oBaHu 6e3onacHocMu 6bImobEx npubopoe BoIbwo MouHocMu, u3IOKeHHbIX 6 daHHou UHcmpykuu, RnaemrNoMeHuaNbHO ONaChbIM.
Ppou36o0umenb He Hecem oemeemcmbeHHocmu 3a yueep6 3doopoebu u co6cmeeHHocmu, ecnu OH eb13eaH HecobnO deHuem yka3aHHbIX Hopm ycmaHOeku.
PepBbIuKnCTnpKn
No 3aBepWeHn yCTaHOBKn, npei HaayIOM 3KcNlyaTaunn HeoXoDIMO npOn3BecTN OINH cIKN CTnpKN CO CTnpAJIbHbIM nopOwKom, Ho 6e3 6eJb, no nporpamme 2.
Описнениясторы машинь и поядka зашисторамbli
PanaHb ynpaBneHn
HnDnkaTopbBbINONHEHNA3 LUKJI A
KhONka n INDnKaTOp ON/OFF: cnyknt IJRA BKNIOueHnI BbIKIOeHnI MaunHbI. TOpAun IINDnKaTOp NOKa3bIBaET, YTO MaUNHa BKNIOueHa.
PykoTka Bb6opa NPOrPAMM: cnjKITnBb6opa nporpamM. B npoecce BbINOHeHn nporpaMMb pykoTka He Bpaaetc.
Ckopoctn OTKIMMA: cnjxnt nBn BbIbopa ckopoctn OTKIMMA ININ DnE rO NCKIOUHeHn (cm «PepcoHaUN3upoBaHnBHe HacmpouKu").
PerynTop TEMNEPATybl: cnkynt nna Hacptponk TemnepaTpybl nnn dny ctnpkn B XoJIOHOB NOe (cm. «IpecoHaUN3upObaHnbie Hacmpouku").
DNCPIEN:ДЯ OTObpaKHeH N BpeMeH, OCTaHOUeROcdo OKOHaHn 3aHaHHOrO cTnPKn, n, ecNb 3anpOprpAMMnPoBaH 3aNyCK C 3aepXkOJ - BpeMeH, OCTaIOUeROcdo 3aNYCKa cIKNa.
Khonnka n HnDnkaTOp ELOKINPOBKA KHONOK: cnyjnt dny BKNIOUeHn/OTKnIOUeHn 6JIOKINPOBKn NaHeN ynpabNeHn.
KhONKn C HnDnKaTOpAm DOnONHnTeNbHbIX ΦYHKU: cnJxKAT DnB Bbl6opa NMeOuXxCd DOnONHnTeNbHbIX YHKU. INDnKaTOp, COOTBCTByIOUm Bbl6paHHo fYHKU, OCTaHEcR BKNIOUeHHbIM.
INHINKaTOPbBbINONHEHNA3UKNLA:NOKAsBaHT NocIeIOBaTeNbHOCTb BbINOJIHeHEm IPOrpaMMbl CTnPKBkIouHeHHb INHINKaTOP COOTBeTcByETeKuSeI pa3e.
INHnKaTOp BLOKPOBKn IIOKA: NOKa3bIbAeT, MOxHO JN OTKpbTb IIOK (CM. cmpaHuuy c6Oky).
KhonnKa CnHnKaTopom START/PAUSE: cnyKt nna 3anycKa nn DnBpeMeHHoro npepbBaHn nporpaMMbl.
IPNMEAHNE:ДЯВpeMeHHOROпрьИBaHnIaTeKuIeO uNKla CTnPkN HaxMnte 3Ty KhoNkY.CoOTBeTCTByIOUmI INdNKaTOP 3AmrAeT opaHKeBbIM cBeTOM,a INdNKaTOP TeKuIeI pa3bl CTnPk6bET ropeTb,He MIRa.Ecnn INdNKaTOP BLOKINPOBKN IIOKA rac,MOxHo OTkpbl TIOK.
Дя ВОЗБНОЕНИЙ CTINКИ C MОмERTA, KORDA OH 6byI npeBaH, BHOBн haKMITE START/PAUSE.
PekimOxndaHn
Hactoaa CTnpaIbHa MaunHa OTBeueaET Tpe6BaHnM HObx HOpMaTINBOB NO 3KOHOMN 3JeKtpO3Heprn, YKOMPNeKTOBaHa CNTeMOABTOMaTUnCeCKOrO OTKIOUChENr (peXIM COxpaHEnr 3Heprn), BKNIOAIOUeIcR qEe3 30 MInyT npocTo r MaUNbI. HaxmTe OIN pa3 KhoNky ON/OFF nnoDoxnte, noka MaunHa BHOBB BKIOUHTCra.
HdkaTopbI
INHdkaTopb1coo6aIOTNOJb30BaTeJIIOBaxKhIeCBeDeHnA. 3NaueHne INHdkaTopOB:
HnKaTOpbI Tekyuei pa3bluKla:
NobepHnTe pyKoTky PPOrPAMMbI, n 3aropTc
nHnKaTOPbI, Noka3bIBaJ pa3bI, KOTOpBie MauHa 6yJeT
BbINOJIrTaB cOrnaCHO 3aDaHHoN IporpAmMe.
Iocne BbIbopa n 3anycka zukla cTnpKn INdIKaTOpbI
6byt 3aropatbcra Odn H 3a DpyHM, Noka3bIBaR
nOcneDoBaTeNbHOCT BbINOJIHeHn IporpAMMbI:
CTnnpka
Полockане
OTXMM
CnVB
Koheu zukna

KhONKn DonONHnTeJIbHbIX FyHKnN COOTBETCTByIOUne INHdNKaTOPbl
Pn Bb6ope fynKuIN 3aRopaETc8 COOTBeTCTBvUOua KhONka.EcnBb6paHNaFyHKUINHEcoOBMeCTMa C 3aDaHHoN nporpAMMO,6yDet MIRATb COOTBeTCTBvUOua INDnKaTOp,BKJIOnHTc8 3ByKOBoCnHApI,N3Ta fynKUIN BKJIOueHa He 6yDet.Ecn6yDet Bb6paHa fynKUIN, HecOBMeCTMa Cdpyro,paHee Bbl6paHNof yHKUeN, OCTaHETc8 BkJIOueHHO ToIbKO nocJeHra Bbl6paHNa fynKUIN.
INHnkaTop TemnepaTpybI
PnBbIbope TempepaTpyHOro 3NaueHnna 3aRopaetc COOTBeTCTByHouN INHnKaTOp.
HdNkaTopOTKIma
PnBbIbope cKOpOCTn OTKIMa 3aropaetc COOTBeTCTByUoUHINDKaTOP.


HdkaTop 6nokpoBkn KhoNOK
Дяв BKЛIOчEHЯ 6JLOKINOBKN paHEnI ynpaBHeHЯ ДерЖITE KHOJIky HaxKaToI pyIMepHO 2 cekyHdbI. ВКЛIOчEHьи ИнДИКATOP O3Haayet, YTO paHelb уnpaBHeHЯ 3a6JLOKINOBaHa. TAKIM o6pa3OM прогамma He можeT 6bITb CnyaHNo n3MeHeHa, OCO6EHHO ecIn B DoME DeTn.
ДлгOTKЛIOUeHn6IOKIpOBKn NaHEnn ynpaBNeHn depXnte KHOKNy HAnKaToN npImepHo 2 cekHyDbI.
-0 INHdkaTop 6IOKnpoBKN IIOka:
BkIIOUeHHbI INHdkaTOp 03HaayaeT, YTO IIOK 3a6NoKIpOBaH BO n36exKaHne erO cIyauHoro OTkpBbAHn. Bo n36exKaHne ero NOBpeJdeHnre Heo6xOIMO DoXdTaBcR, KOrda INHdkaTOp norachET, NpeD TeM KaK OTkpBtB IIOK. O6bIHO INHdkaTOp rachet chepe3 MInHyTbI NocNe OKOHuaHn CTnPKN.
PIMMEAHNE: ecn BkHoueHa yHKuYra TaMep OTCPOUKN, NOK OKpbItb HeJIb3r. IJRA 3TORO Heo6xOIMO nepeKlIOHTb MaUNHy B pexm nay3bl npn NOMOu KNOHKn START/PAUSE.
!BbCTpoe MngaHne INndkaTopa START/PAUSE (opahxkeb) OndHOBeMeHHO C INndkaTopoM cyHKm03Haayet HeNCnpaBHocTb (cm. «HeucnpaBHoCmu u Memodbl ux ycmpaHeHura»).
Kak otkpblb 3aKpbItb 6apa6aH
pnc.1
pnc.2
pnc.3
pnc.4
A)OTKpbIBAHNE(pnc.1):
IOnHMnTe BHeHIO KpbUkIy NONHOCTbIO ee OTKPOITe
CIS
B) OTKpbIbAHne 6apa6aHa (Soft opening - PnabHoe OTKpbIbAHne):
Haxmnte KhONky, nokaahHyo Ha puc. 2, kpbuika 6apabaha nnabHO OTKpoetcra.
C) 3AΓPY3KA CTNPAJIbHOI MAUINHbl (pnc. 3).
3ko-nporpaMMbl (XJIOOK 11, CnHTETNKA 12 n BbICTPAI CTIPKA 30' 13) pa3pa6oTaHb I nra pa3nUHbIX BnO8 TkaHe n He oueh 3aqrpa3HeHHo OdeKDbI.
Ira rapaHTn ONTImaHbHO pe3yNbTaTa peKOMeHdyem IcNoMb3OBaTb XnIKoe MOIOue cpeCTBO; MaHXeTb, BOPOTHKIN IITHa IpeDbapntelho 6o6oTaTb.
PerynpoBka TempeaTypbI
Hacroika Tempeatpybctnnpkn npoanboDITc npn nmoon peryaTopa TEMNEPATybl (cm.Tabuuy npoaapmM).
3HaueHHe TemnepaTpybMoKet 6bItb yMeHbWeHO BnIOb Do CTnPKB XoNoHOB OBe
MaunHa aBtOMaTnueeKn He dOnyckaet Bb6op TempepaTypbI, npeBblaOuUs MaKcmaJIbHoe 3HaueHne, npedymTopeHHoe dJa KaKdo npopamMbI.
Bb6op ckopoCTn OTXIMa
Bb6op ckopoctn OTKIMBA6paHNo nporpammbn npon3BoNDTC npn nomoU peryIaTopa ckopoctn OTKIM.
Ipa3hbx nporpamm npedymatpnaetc pa3ha MaKcMaJIbHa cKOPOCTb OTXIMa:
PporpaMbl MaKcMaIbHa KcOPOCTb OTKIMa
XJIOOK 1200o6oPoTOB BMHyTy
CnHTeTneckne TkaHn 800 o6oPOTOB MmHyTy
Uepcb 800 o6oPoTOB MHyTy
WeJ6e3OTKIma
CKOPoCTb OTKIMMA MOKeT 6bITb yMeHbUeHa, NJI Xe OTKIM MOKeT 6bITb COBcEM NCKJIIOueH, NOBepHyB peYJrAToP B NOJOXKeHne
MaunHa aBToMaTnueeKn He Donyckaet Bb6op CKOpOCTn OTKIma, npeBbIwaUoJIM MaKcImaJIbHyIO CKOpocTb, npedymOTpeHHyIO dJa KaKdo npopamMbI.
DOnoJIHnTeJIbHbIe cyHKcN
Pa3nHbIe cyHKcN CTnPK MaunHb IO3BOJIO TIOCTNb JKeJaEMO NCTOTb N6eN3Hb BaWero 6enB.
IopraokBb6opa yHkui:
- HaxMMTe KHOKNy HxKHOB Bam yHKLm;
2.BKJIIOUeHHe COOTBETCTBYIOUeIHOINIKaTopaO3HaayAeT,YTOΦyHKnB KBIIOUeHa.
PnmeHne: Yactoe MuaHne HndkaTopa O3Haayet, yTo daHHa FyHKunr He MoXeT 6bItb BbIpaHa dJaahHO nporpaMMbl.

Taimepotcpoukn
Ipy nporpammpnoBaHn 3aepxKn 3ayncKa Bb6paHHo nporpammbl HaxmTe HeckOJIbKO pa3 KHOKNy NOKa HE OTPa3NTcHryKHOe BpeMg 3aepxKn (OT 1 do 24 yacob).
IaONHn 30n HxMnTe KONy nKa He NoBnTc coo6eHne QFF
EcnHnCnpaBHOCTb He ycTpaHReTc, o6paTntecb CepBnchHyo Cnyk6y.
MoOJIeE cpeIcTBo HENPnIOHO dIa CTnPK B CTnpaIbHO MaUNHe (Ha yNAKOBe DOJXHO 6bITb yKa3aHO «DIIa CTnPK B CTnpaIBHO MaUNHe》, «dIpyHOn mMaunHHo CTnPKN» INI NOIo6Hoe).
BpacpepeiTeIb 6blIO nOmeUeHO Upe3MepHoe KOJIueCTBO MOIOeGcpeDCTBA.
Ipeed Tem kaK o6paTntbC B Cnyk6y CepBnca:
- Поберпг, Heьзя Лу устразиь HeucnpabHocь camoctorteьho (cM. «Heucnpaehocmu u memodby ux ycmpaHnura»);
BHOb3aNyCTnTe nporpaMMy dI npoBepKn nCnpaBHOcT MaunHbI;
B npotbHOM cnuyae o6paTntbcra B ABtopn3ObaHHbI CepBnchbI LcHTp N0 TeNefoHAM, yka3aHHbIM B rapaHTnHOM TaTNOHe.
!HnKoIa He o6paauTecb K HeaBtOpN3OBaHHbIM CepBnCHbIM LcHTpAM.
Pn o6paueHn B CepBnchnyo Cnyk6y Heo6xOuMo coo6uNTb:
TNHHeCNpabHOCTN;
HOMep rapaHTnHOro DOkUMeHTo (cepBnCHOn KHNKKN, cepBnCHOrO cepTnΦnKaTa n T.n.);
- MoideJIb MaunHbI (MoI.) n cepuHbI Homep (S/N), yka3aHHbIe B INHΦopMaUHOHHO Ta6nUKe, pacnoJIOXeHHoHa 3aJHe IaHeJI CTnpaBHO MauHHbI.
MmnpTeP: OOO "INHe3nT Pyc"
C Bonpocamn (B Poccn) do 01.01.2011: Pocnn, 129223, MockBa, IpcneK T mpa, BBL, naB.46
obpaatbcno aepcy: c01.01.2011: Pocn, 127018, MockBa, yI. DInHueB, Iom 12, Kopn. 1

Slovensky