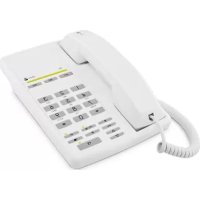
USER MANUAL HearPlus 317ci DORO
- Powerful flashing light
- Headset connector
- Redial function
- Flash button
- Tone control
- Handset volume control
- Button for extra amplification
- Speed dial memories
- Handsfree/headset volume control
10.End handsfree call/headset call/delete/cancel
11.Handsfree/headset button and LED
12 Caller ID
13.Line indicator
14. Telephone cord socket
15.Socket for power supply
16.Socket for additional alert equipment
Espanol
Disclaimer and limitation of liability
Doro AB and its affiliates or licensees assume no responsibility for any damage or loss resulting from the use of this guide. Doro AB and its affiliates or licensees assume no responsibility for any loss or claims by third parties that may arise through the use of this software. Doro AB and its affiliates or licensees assume no responsibility for any damage or loss caused by deletion of data as a result of malfunction, dead battery, or repairs. Be sure to make backup copies of all important data on other media to protect against data loss.
TO THE MAXIMUM EXTENT PERMITTED BY APPLICABLE LAW, UNDER NO CIRCUMSTANCES SHALL DORO AB OR ANY OF ITS AFFILIATES OR LICENSEES BE RESPONSIBLE FOR ANY LOSS OF DATA OR INCOME OR ANY SPECIAL, INCIDENTAL, CONSEQUENTIAL OR INDIRECT DAMAGES HOWSOEVER CAUSED. THE CONTENTS OF THIS DOCUMENT ARE PROVIDED "AS IS." EXCEPT AS REQUIRED BY APPLICABLE LAW, NO WARRANTYIES OF ANY KIND, EITHER EXPRESS OR IMPLIED, INCLUDING, BUT NOT LIMITED TO, THE IMPLIED WARRANTYES OF MERCHANTABILITY AND FITNESS FOR A PARTICULAR PURPOSE, ARE MADE IN RELATION TO THE ACCURACY, RELIABILITY, OR CONTENTS OF THIS DOCUMENT. DORO AB RESERVES THE RIGHT TO REVISE THIS DOCUMENT OR WITHDRAW IT AT ANY TIME WITHOUT PRIOR NOTICE.
IMPORTANT SAFETY INSTRUCTIONS
Your unit is a technically advanced product and should be treated with the greatest care. Negligence may void the warranty.
When using your unit, basic safety precautions should always be followed to reduce the risk of fire, electric shock and injury to persons, including the following:
- Read and understand all instructions.
- Follow instructions and warnings marked on the unit.
- Do not use this product near water, for example, near a bathtub, bathroom sink, kitchen sink or laundry tub, in a wet basement or near a swimming pool.
- Protect the unit from moisture. Rain/snowfall, moisture and all types of liquid can contain substances that corrode the electronic circuits.
- Never spill liquid of any kind on the unit.
- If the unit gets wet, unplug the unit from the wall outlet and remove the battery. Allow the unit to dry completely before reinserting the battery. Using the unit while wet may be dangerous.
- Avoid using a telephone (other than a cordless type) during an electrical storm. There is a remote risk of electric shock from lightning.
- Do not use the telephone to report a gas leak in the vicinity of the leak.
- Do not use or keep the unit in dusty, dirty environments. The unit's moving parts and electronic components can be damaged.
- Do not keep the unit in warm places. High temperatures can reduce the lifespan of electronic equipment, damage batteries and distort or melt certain plastics.
- Do not keep the unit in cold places. When the unit warms up to normal temperature, condensation may form on the inside, which can damage the electronic circuits.
- The unit and the accessories may contain small parts. Keep the unit out of reach of small children. Never allow children to play with the unit. Small parts are a choking hazard, and the amplified volume may cause hearing damage.
Save these instructions
IMPORTANT SAFETY INSTRUCTIONS
- Do not drop the unit. Do not knock or shake it, either. If it is treated roughly, the circuits and precision mechanics can be broken.
- Do not use harsh chemicals, cleaning solvents, or strong detergents to clean the unit.
- Do not push objects of any kind into this unit as they may touch dangerous voltage points or short out parts that could result in a risk of fire or electric shock.
- To reduce the risk of electric shock, do not disassemble this unit. Take it to the place of purchase when service or repair work is required. Opening or removing covers may expose you to dangerous voltages or other risks. Incorrect re-assembly can cause electric shock when the unit is subsequently used.
- Do not place this unit on an unstable cart, stand or table. The unit may fall, causing serious damage to the unit.
- Do not allow anything to be placed on the power cord. Do not place this unit where the cord can damaged by persons walking on it.
- Use only the power cord and batteries indicated in this manual.
- Never throw a battery into open flames as it may explode!
- Observe proper polarity orientation.
- Do not open or mutilate the battery. Released electrolyte is corrosive and may cause damage to the eyes and skin. It may be toxic if swallowed.
- Never use a damaged battery.
- Dispose batteries in accordance with applicable rules and regulations (e.g., recycling). Do not throw batteries out with household waste.
- Using the phone at a high volume can damage your hearing. Adjust the sound volume carefully when using the unit.
Save these instructions
IMPORTANT SAFETY INSTRUCTIONS
-
Although there is no single volume setting that is appropriate for everyone, you should always use the handset with the volume set at moderate levels and avoid prolonged exposure to high sound levels. The louder the volume, the less time is required before your hearing could be affected. If you experience hearing discomfort, you should stop using the unit. To protect your hearing some experts suggest that you:
-
Set the volume control at a low position and then adjust the volume to a comfortable level.
- Limit the amount of time you use the handset at high volume.
- Avoid turning up the volume to block out noisy surroundings.
The advice applies to the unit, battery, AC adapter and other accessories. If the telephone is not working as it should, please contact the place of purchase for service. Don't forget the receipt or a copy of the invoice.
Your telephone equipment is approved for connection to the Public Switched Telephone Network and is in compliance with parts 15 and 68, FCC Rules and Regulations and the Technical Requirements for Telephone Terminal Equipment published by ACTA.
1 Notification to the Local Telephone Company
On the bottom of this equipment is a label indicating, among other information, the US number and Ringer Equivalence Number (REN) for the equipment. You must, upon request, provide this information to your telephone company.
The REN is useful in determining the number of devices you may connect to your telephone line and still have all of these devices ring when your telephone number is called. In most (but not all) areas, the sum of the RENs of all devices connected to one line should not exceed 5. To be certain of the number of devices you may connect to your line as determined by the REN, you should contact your local telephone company.
A plug and jack used to connect this equipment to the premises wiring and telephone network must comply with the applicable FCC Part 68 rules and requirements adopted by the ACTA. A compliant telephone cord and modular plug is provided with this product. It is designed to be connected to a compatible modular jack that is also compliant.
Notes
- This equipment may not be used on coin service provided by the telephone company.
- Party lines are subject to state tariffs, and therefore, you may not be able to use your own telephone equipment if you are on a party line. Check with your local telephone company.
- Notice must be given to the telephone company upon permanent disconnection of your telephone from your line.
- If your home has specially wired alarm equipment connected to the telephone line, ensure the installation of this product does not disable your alarm equipment. If you have questions about what will disable alarm equipment, consult your telephone company or a qualified installer.
US Number is located on the cabinet bottom
REN Number is located on the cabinet bottom.
2 Rights of the Telephone Company
Should your equipment cause trouble on your line which may harm the telephone network, the telephone company shall, where practicable, notify you that temporary discontinuance of service may be required. Where prior notice is not practicable and the circumstances warrant such action, the telephone company may temporarily discontinue service immediately. In case of such temporary discontinuance, the telephone company must: (1) promptly notify you of such temporary discontinuance; (2) afford you the opportunity to correct the situation; and (3) inform you of your right to bring a complaint to the Commission pursuant to procedures set forth in Subpart E of Part 68, FCC Rules and Regulations.
The telephone company may make changes in its communications facilities, equipment, operations or procedures where such action is required in the operation of its business and not inconsistent with FCC Rules and Regulations. If these changes are expected to affect the use or performance of your telephone equipment, the telephone company must give you adequate notice, in writing, to allow you to maintain uninterrupted service.
This device complies with Part 15 of the FCC Rules. Operation is subject to the following two conditions: (1) This device may not cause harmful interference; and (2) This device must accept any interference received, including interference that may cause undesired operation.
This equipment has been tested and found to comply with the limits for a Class B digital device, pursuant to Part 15 of the FCC Rules. These limits are designed to provide reasonable protection against harmful interference in a residential installation.
This equipment generates, uses, and can radiate radio frequency energy and, if not installed and used in accordance with the instructions, may cause harmful interference to radio communications. However, there is no guarantee that interference will not occur in a particular installation.
Privacy of Communications may not be ensured when using this product.
If this equipment does cause harmful interference to radio or television reception, which can be determined by turning the equipment off and on, the user is encouraged to try to correct the interference by one or more of the following measures:
- Reorient or relocate the receiving antenna (that is, the antenna for radio or television that is "receiving" the interference).
- Reorient or relocate and increase the separation between the telecommunications equipment and receiving antenna.
- Connect the telecommunications equipment into an outlet on a circuit different from that to which the receiving antenna is connected.
If these measures do not eliminate the interference, please consult your dealer or an experienced radio/television technician for additional suggestions. Also, the Federal Communications Commission has prepared a helpful booklet, "How To Identify and Resolve Radio/TV Interference Problems." This booklet is available from the U.S. Government Printing Office, Washington, D.C. 20402. Please specify stock number 004-000-00345-4 when ordering copies.
Notice: The changes or modifications not expressly approved by the party responsible for compliance could void the user's authority to operate the equipment.
Hearing Aid Compatibility (HAC)
This telephone system meets FCC standards for Hearing Aid Compatibility.
Operation
Making a call
Regular dialing
- Pick up the handset.
- Enter the desired number.
Dialing using correction function
If necessary, the telephone number entered can be altered before it is connected.
- Enter the required number. You can delete with
- Pick up the handset, the number is dialed.
To make a call using the handsfree/headset, see separate description.
Redial function
Press REDIAL one or more times to scroll between the 5 most recently dialed numbers, which will be shown on the LCD display. Pick up the handset to dial or press to cancel.
Memory
This telephone has 4 speed dial memories.
Once a number has been saved in a memory location, you only need to press one button to make the call. Speed dial numbers are marked A, B, C, and D.
Dialing/control using Speed Dial
- Select required speed dial (A-D) by pressing on the appropriate button.
- The saved number is shown in the display.
- Pick up the handset to dial or press to cancel.
Volume control
This product can adjust the sound in a number of ways:

OL Normal volume control for the handset.
Press the button to activate powerful amplification. The amplification is normally deactivated at the end of each call to avoid harming people with normal hearing. This safety function is adjustable, see Technical Information.
Warning!
The handset volume can be turned up very loud. Using the phone at a high volume can cause damage to your hearing. The powerful amplification should only be used by people with impaired hearing ability.
Note!
When using this function for the first time, hold the handset away from your ear and slowly bring it closer as the person on the other end of the line is talking. If you are not comfortable with the volume, you should not use the powerful amplification function.
TONE Change frequency range/tone level and quality (on the left side). PLEASE NOTE! Only works when the powerful amplification is active.
SPEAKER Handsfree/Headset volume control.
VOL
Caller ID
Caller ID allows you to see who is calling before you answer a call or to see who has called in your absence. If the number has been saved in the memory, the name is shown instead.
Calls received are stored chronologically, with the sequence number shown next to the telephone number.
When the memory is full, the oldest number will be deleted automatically as the new call is logged. New numbers are indicated by
Please note!
You must subscribe to this service from your network operator in order for this feature to function.
Retrieving and dialing incoming numbers
- Press CALLER ID to scroll between the numbers of calls that have been received.
- Pick up the handset to dial or press to cancel.
Please Note!
Depending on how the incoming caller's phone number is formatted when it is received, and whether or not you previously pre-programmed your local area code (see Date/Time/Set Area
Code), you may need to adjust the format of the incoming caller's stored phone number before making the call.
Messages
Apart from phone numbers, the display can show:
???? No information received, e.g. an international call.
The call comes from a withheld number or a PBX.

Number not previously seen.
OO Message indication (sent from your network operator)*.
*Message indication can be deleted manually by pressing down for a few seconds in standby mode.
Deleting telephone numbers
- Scroll to the required entry with CALLER ID.
- Press down until the number disappears.
Hands free function
- Press The hands free function will be activated and the LED indicator next to the button will illuminate.
- Dial the required telephone number. Adjust the volume using the volume control located on the side of the telephone.
- Press to terminate the call.
Please note!
If you wish, you can switch between handset and hands free mode by simply pressing or lifting the handset. Please remember that in hands free mode it is only possible for one person at a time to talk.
Connecting a headset
You can connect a headset to the socket on the telephone's left side. When a headset is connected the speaker buttons are used to connect /disconnect a telephone call (equivalent to lifting and putting down the handset). The volume in the headset can be adjusted, see previous page.
Please note!
On delivery, the telephone is set for speaker function.
Select headset function by setting the switch behind the battery cover on the underside of the telephone to (see Technical Information).
A neck loop/extra handset can be connected to this socket instead of a headset.
DORO original headsets are tested and adapted for this model. Other types and makes of headsets may be used, though the function and sound quality cannot be guaranteed. In the worst case, these could damage the headset and telephone. This type of damage is not covered by the telephone's guarantee.
Hearing loop
The handset has a built-in hearing loop for those who wish to use their hearing aids while using the telephone. Select the T mode on your hearing aid to enable this feature.
Installation/Settings
Connection
- Connect the telephone cord to a network wall socket and to the socket on the back of the telephone.
- Connect the mains adapter to the mains power socket and to the socket on the back of the telephone.
- Connect the curly cord to the handset and to the socket on the base of the telephone. (You will hear a click when the modular plug is correctly in place).
- Lift the handset and listen for the dial tone.
Date/Time/Area code
- Press down CALLER ID until ① is shown.
- Enter date (MM/DD).
- Enter time of day (HH:MM).
- Enter 1 = A(M) or 2 = P(M)
- Set Area Code XXX.
- Press to cancel and return to standby mode.
Please note!
The telephone uses the area code to determine the number format to display when a valid Caller ID signal is received. Numbers that match the local area code are displayed as seven digits and are used for dialing back previous numbers.
Batteries
Four 1.5V type AAA batteries are needed so that caller ID, memory etc will continue to function in the event of a power cut. When the batteries have almost expired the - + symbol will light up. Only use high quality batteries.
- Check that the adapter is correctly inserted to avoid losing saved information.
- Unplug the telephone cable and remove the cover on the base of the telephone.
- Insert the batteries according to the markings for plus and minus terminals.
- Replace the battery cover and reconnect the telephone cord.
Ring signal
Ring volume, melody and tone can be adjusted to ensure you can hear the ring clearly. These are found underneath the telephone:
RINGER Ring volume
RINGER MELODY Ring melody
RINGER TONE Ring tone
LCD Display
Underneath the telephone there is a switch LCD to change the style of the LCD display. Choose the style you are able to see more clearly.
Memory
Saving Speed Dial Numbers
- Press down until 123... is shown.
- Enter the telephone number, including the area code.
- Press down until ABC... is shown.
- Press equivalent numerical digit key one or more times for desired name (the characters are printed below the numerical keys). Space=1.
- Press down until DA-D is shown.
- Select speed dial (A-D) by pressing on the appropriate button.
- is shown. The number is now saved.
If a pause is required in the telephone number, press REDIAL. The display shows P.
If a number needs changing, simply save the new number in place of the old one. You can go back/delete using
STROBE (Flashing light)
To alert you to incoming calls, a powerful flashing light can be activated when the telephone is ringing. The settings can be found under the telephone.
ON Flashing light ON.
OFF Flashing light OFF.
SHAKER Socket for additional alert equipment
Extra equipment e.g. a vibrator for the ring signal can be connected to the SHAKER socket on the back of the telephone.
Behind the battery cover on the underside of the telephone you will find several switches.
These switches set technical parameters as detailed below.
Remove the small cover on the base of the telephone.
KEY TONE
The sound that is heard when the buttons are pressed can be switched off/on.
SEND
The microphone level may need to be adjusted for certain people.
0 is the standard setting for most countries.
+6 gives a somewhat higher sound and -6 gives a somewhat lower sound.
T / P (Tone / Pulse)
Select dialing method.
RESET/LATCH Locking the powerful amplification
The powerful amplification is set to switch off after every call, this can be changed so the very high amplification stays permanent switched on using the LATCH setting. This setting should only be activated if all users have impaired hearing and require powerful amplification. The standard setting is RESET.
Warning!
When the LATCH setting is engaged, powerful amplification cannot be turned off. This setting should only be used if all potential users have impaired hearing requiring powerful amplification. Use of the LATCH setting by users who do not need powerful amplification could cause damage to their hearing
Selecting headset or speaker function
Select headset-/handsfree-function by setting the switch
. Please note that the speaker function will not work
when the headset function is activated and vice versa.
Troubleshooting
Check that the telephone cord is undamaged and properly plugged in. Disconnect any additional equipment, extension cords and other phones. If the problem is resolved, the fault is with some other equipment.
Test the equipment on a known working line (e.g. at a neighbour's house). If the equipment works there the fault is probably with your telephone line. Please inform your network operator.
If you are still experiencing difficulties, contact the place of purchase.
Guarantee
This product is guaranteed for a period of 12 months from the date of purchase. In the unlikely event of a malfunction during this period, please contact the place of purchase. Proof of purchase is required for any service or support needed during the guarantee period.
This guarantee does not apply to malfunctions caused by an accident or a similar incident or damage, liquid penetrating the casing, negligence, abnormal usage, insufficient maintenance or any other circumstances due to the user's negligence.
Furthermore, this guarantee does not apply to any malfunction caused by a thunderstorm or any other voltage fluctuations. As a matter of precaution, we recommend disconnecting the device during a thunderstorm.
Batteries are consumables and are not included in any guarantee.
NOTE!
This guarantee does not affect your legal (statutory) rights under your applicable national laws relating to the sale of consumer products.
Support
For assistance, please contact:
Telephone: 1-888-551-doro (1-888-551-3676)
TTY/TDD: 1-888-561-doro (1-888-561-3676)
E-Mail: support.usa@doro.com
Further information are available on our website:
www.doro.com