
Solo TV - Soundbar BOSE - Free user manual and instructions
Find the device manual for free Solo TV BOSE in PDF.
User questions about Solo TV BOSE
0 question about this device. Answer the ones you know or ask your own.
Ask a new question about this device
Download the instructions for your Soundbar in PDF format for free! Find your manual Solo TV - BOSE and take your electronic device back in hand. On this page are published all the documents necessary for the use of your device. Solo TV by BOSE.
USER MANUAL Solo TV BOSE
natural_image
Black Boise brand audio equipment with a small remote control (no visible text or symbols)Solo
TV Sound System
Owner's Guide | Brugervejledning | Bedienungsanleitung | Gebruikershandleiding
Guía del usuario | Käyttöohje | Notice d'utilisation | Manuale di istruzioni
Step 1: Place the system....7
Step 2: Connect the Solo system to power....8
Step 3: Choose the type of audio cable to use....9
Step 4: Plug the audio cable into the Solo system 10
Step 5: Plug the other end of the audio cable into your TV.... 12
Step 6: Place your TV on the Solo system. 13
Step 7: Check your TV settings.... 14
Step 8: Check for sound .... 15
Alternate Setup Connections
When to use an alternate connection 16
Connecting to a cable box audio output 16
Connecting to a TV headphones output 17
Connecting multiple devices to the Solo system.... 18
Operation
Remote control 19
System status indicator.... 19
Decreasing the bass.... 20
Optional universal remote control 20
Using a third-party remote.... 20
Care and Maintenance
Troubleshooting 21
Replacing the remote battery 22
Cleaning.... 22
Customer service.... 23
Limited warranty 23
Technical information 23
Please read this guide
Please take the time to follow the instructions in this owner's guide carefully. It will help you set up and operate your system properly and enjoy its advanced features. Please save this guide for future reference.
All Bose products must be used in accordance with local, state, and federal regulations.
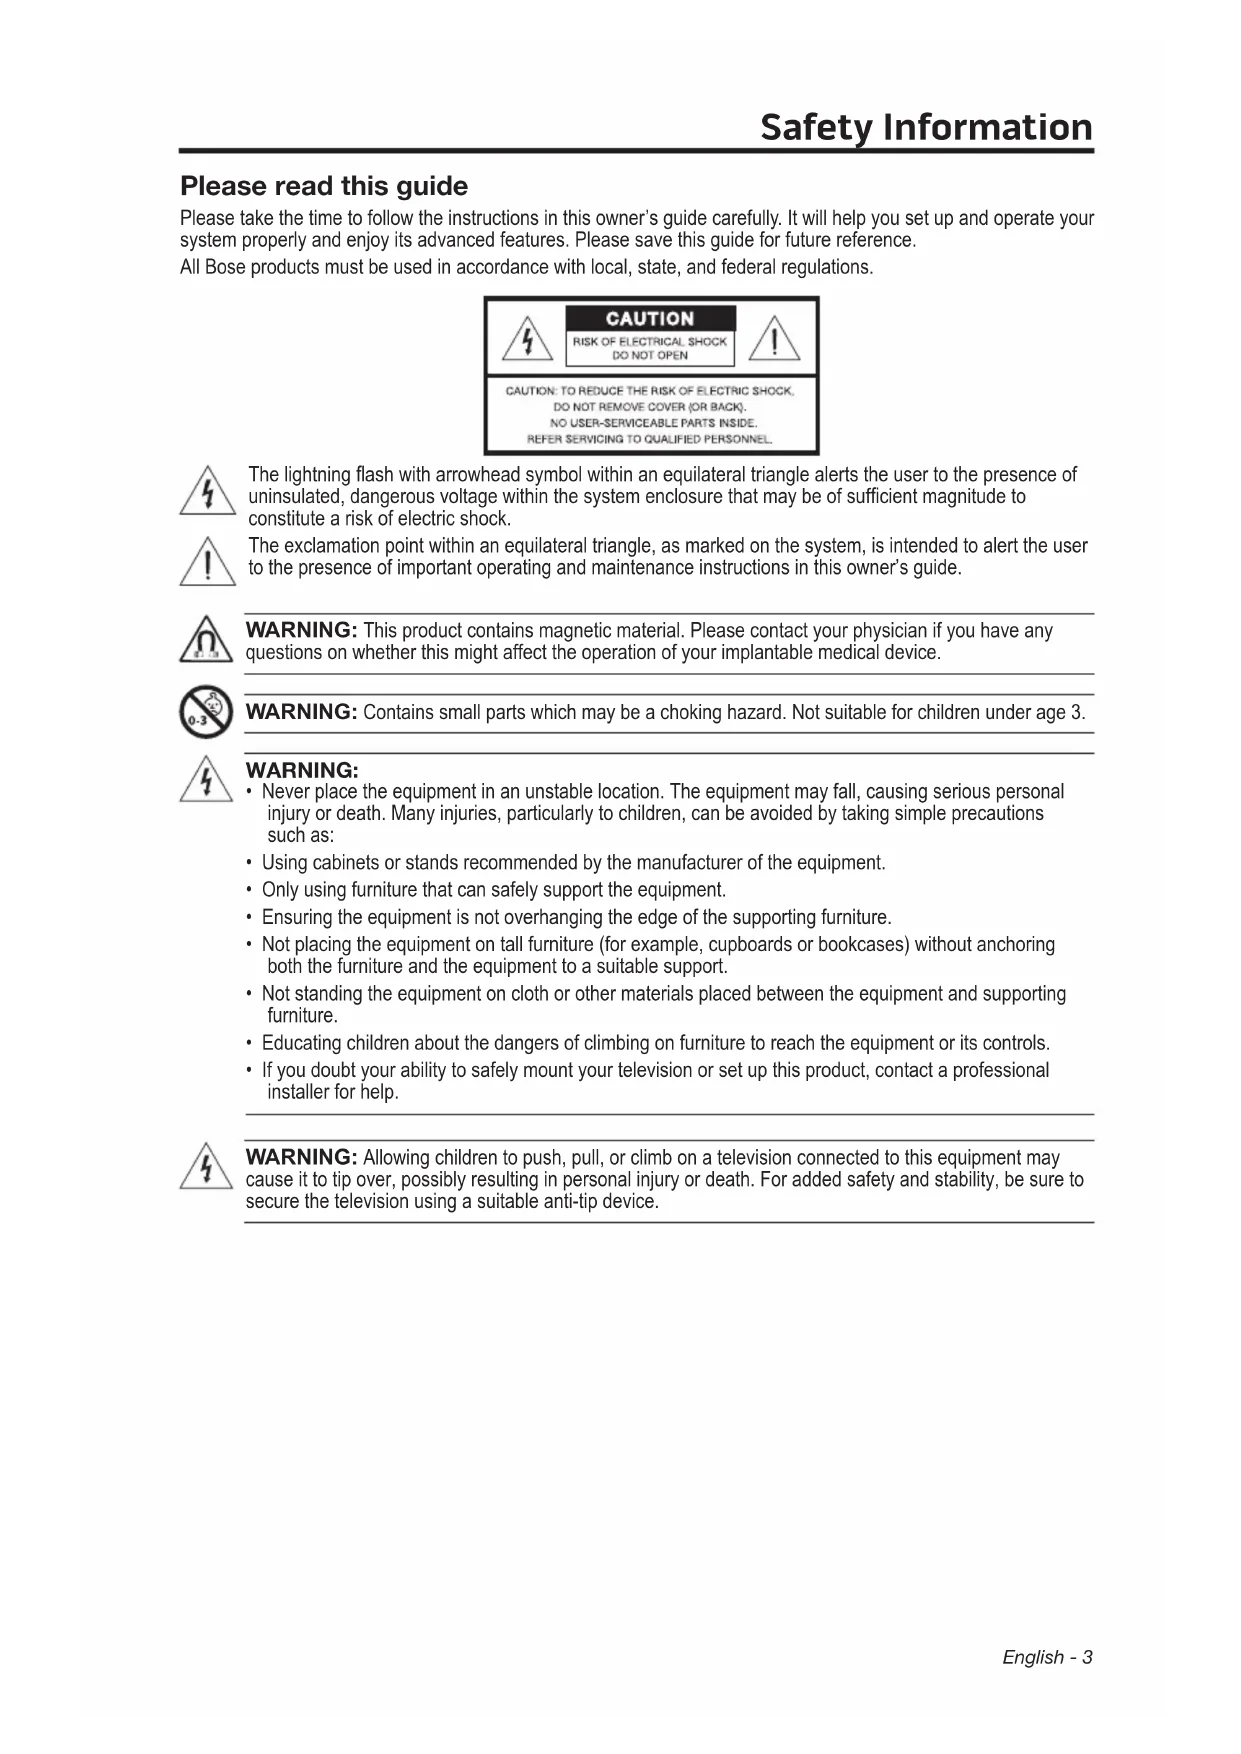
text_image
CAUTION RISK OF ELECTRICAL SHOCK DO NOT OPEN CAUTION: TO REDUCE THE RISK OF ELECTRIC SHOCK, DO NOT REMOVE COVER (OR BACK). NO USER-SERVICEABLE PARTS INSIDE. REFER SERVICING TO QUALIFIED PERSONNEL.
The lightning flash with arrowhead symbol within an equilateral triangle alerts the user to the presence of uninsulated, dangerous voltage within the system enclosure that may be of sufficient magnitude to constitute a risk of electric shock.

The exclamation point within an equilateral triangle, as marked on the system, is intended to alert the user to the presence of important operating and maintenance instructions in this owner's guide.

WARNING: This product contains magnetic material. Please contact your physician if you have any questions on whether this might affect the operation of your implantable medical device.

WARNING: Contains small parts which may be a choking hazard. Not suitable for children under age 3.

WARNING:
- Never place the equipment in an unstable location. The equipment may fall, causing serious personal injury or death. Many injuries, particularly to children, can be avoided by taking simple precautions such as:
- Using cabinets or stands recommended by the manufacturer of the equipment.
- Only using furniture that can safely support the equipment.
- Ensuring the equipment is not overhanging the edge of the supporting furniture.
- Not placing the equipment on tall furniture (for example, cupboards or bookcases) without anchoring both the furniture and the equipment to a suitable support.
- Not standing the equipment on cloth or other materials placed between the equipment and supporting furniture.
• Educating children about the dangers of climbing on furniture to reach the equipment or its controls.
- If you doubt your ability to safely mount your television or set up this product, contact a professional installer for help.

WARNING: Allowing children to push, pull, or climb on a television connected to this equipment may cause it to tip over, possibly resulting in personal injury or death. For added safety and stability, be sure to secure the television using a suitable anti-tip device.

WARNING:
- To reduce the risk of fire or electrical shock, do not expose the product to rain or moisture.
- Do not expose this apparatus to dripping or splashing, and do not place objects filled with liquids, such as vases, on or near the apparatus. As with any electronic products, use care not to spill liquids into any part of the system. Liquids can cause a failure and/or a fire hazard.
- Do not place any naked flame sources, such as lighted candles, on or near the apparatus.

WARNING:
- Keep the remote control battery away from children. It may cause a fire or chemical burn if mishandled. Do not recharge, disassemble, heat above 212°F (100°C), or incinerate. Dispose of used batteries promptly. Replace only with a battery of the correct type and model number.
- Do not ingest battery, chemical burn hazard. The remote control supplied with this product contains a coin/button cell battery. If the coin/button cell battery is swallowed it can cause severe internal burns in just 2 hours and can lead to death. Keep new and used batteries away from children. If the battery compartment does not close securely, stop using the product and keep it away from children. If you think the battery may have been swallowed or placed inside any part of the body seek immediate medical attention.
- Danger of explosion if battery is incorrectly replaced. Replace only with an agency-approved (e.g. UL) CR2032 or DL2032 3-volt lithium battery.

CAUTION: Make no modifications to the system or accessories. Unauthorized alterations may compromise safety, regulatory compliance, and system performance, and may void the warranty.
Notes:
- Where the mains plug or appliance coupler is used as the disconnect device, such disconnect device shall remain readily operable.
- The product must be used indoors. It is neither designed nor tested for use outdoors, in recreation vehicles, or on boats.
- The product label is located on the bottom or the back of the product.


廢電池請回收
Please dispose of used batteries properly, following any local regulations. Do not incinerate.

This product conforms to all applicable EU Directive requirements. The complete Declaration of Conformity can be found at www.Bose.com/compliance.
| Names and Contents of Toxic or Hazardous Substances or Elements | ||||||
| Part Name | Toxic or Hazardous Substances and Elements | |||||
| Lead (Pb) | Mercury (Hg) | Cadmium (Cd) | Hexavalent (CR(VI)) | Polybrominated Biphenyl (PBB) | Polybrominated diphenylether(PBDE) | |
| PCBs X 0 0 0 0 0 | ||||||
| Metal parts X 0 0 | 0 0 0 | |||||
| Plastic parts 0 0 | 0 0 0 | |||||
| Speakers X 0 0 0 | 0 0 | |||||
| Cables X 0 0 0 0 | 0 | |||||
| 0: Indicates that this toxic or hazardous substance contained in all of the homogeneous materials for this part is below the limit requirement in SJ/T 11363-2006. | ||||||
| X: Indicates that this toxic or hazardous substance contained in at least one of the homogeneous materials used for this part is above the limit requirement in SJ/T 11363-2006. | ||||||
Important Safety Instructions
- Read these instructions.
- Keep these instructions.
- Heed all warnings.
- Follow all instructions.
- Do not use this apparatus near water.
- Clean only with a dry cloth.
- Do not block any ventilation openings. Install in accordance with the manufacturer's
- instructions.
- Do not install near any heat sources such as radiators, heat registers, stoves, or other apparatus (including amplifiers) that produce heat.
- Protect the power cord from being walked on or pinched particularly at plugs, convenience receptacles, and the point where they exit from the apparatus.
- Only use attachments/accessories specified by the manufacturer.
- Unplug this apparatus during lightning storms or when unused for long periods of time.
- Refer all servicing to qualified personnel. Servicing is required when the apparatus has been damaged in a way, such as power-supply cord or plug is damaged, liquid has been spilled or objects have fallen into the apparatus, the apparatus has been exposed to rain or moisture, does not operate normally, or has been dropped.
NOTE: This equipment has been tested and found to comply with the limits for a Class B digital device, pursuant to Part 15 of the FCC rules. These limits are designed to provide reasonable protection against harmful interference in a residential installation. This equipment generates, uses, and can radiate radio frequency energy and, if not installed and used in accordance with the instructions, may cause harmful interference to radio communications. However, there is no guarantee that interference will not occur in a particular installation. If this equipment does cause harmful interference to radio or television reception, which can be determined by turning the equipment off and on, you are encouraged to try to correct the interference by one or more of the following measures:
- Reorient or relocate the receiving antenna.
- Increase the separation between the equipment and receiver.
- Connect the equipment to an outlet on a different circuit than the one to which the receiver is connected.
- Consult the dealer or an experienced radio/TV technician for help.
Changes or modifications not expressly approved by Bose Corporation could void the user's authority to operate this equipment.
Complies with the Canadian ICES-003 Class B specifications.
Please complete and retain for your records
The serial and model number can be found on the bottom panel.
Serial number: ____
Model number: ____
Purchase date: ____
We suggest you keep your receipt with this owner's guide.

DOLBY. DIGITAL
Manufactured under license from Dolby Laboratories. Dolby and the double-D symbol are registered trademarks of Dolby Laboratories.
©2013 Bose Corporation. No part of this work may be reproduced, modified, distributed, or otherwise used without prior written permission.
Thank you...
Thank you for choosing the Bose® Solo TV sound system for your home. This stylish, unobtrusive speaker system is designed to fit under most TVs with screens up to 32 inches, and many TVs with screens up to 42 inches. It delivers superb acoustic performance that will greatly enhance your TV viewing experience.
Unpacking
Carefully unpack the carton and confirm that you have all the parts shown here:
natural_image
3D rendering of a rectangular electronic component with a small notch and mounting base (no text or symbols)
Bose Solo TV sound system Remote
natural_image
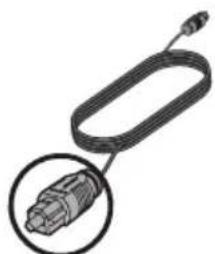
Close-up of a black cable with a circular inset showing a connector (no text or symbols visible)Power cord (The appropriate power cord for your region is included)
natural_image
Illustration of a USB cable with a connector, shown in two views (no text or symbols)Optical digital audio cable
natural_image
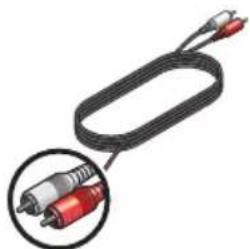
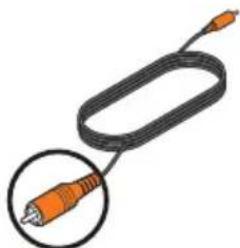
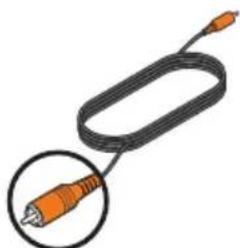
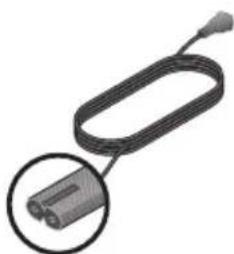
Coiled black cable with two red connectors and a magnified inset showing internal components (no text or symbols)Analog stereo audio cable

natural_image
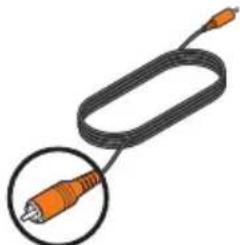
Illustration of a black cable with an orange connector, shown in a circular inset (no text or symbols)Coaxial digital audio cable
If any part of the product appears to be damaged, do not attempt to use it. Contact your authorized Bose dealer immediately or call Bose Customer Service. Refer to the contact list enclosed in the carton for contact information.
Be sure to save the carton and packing materials. They provide the safest means for transporting or storing the product.
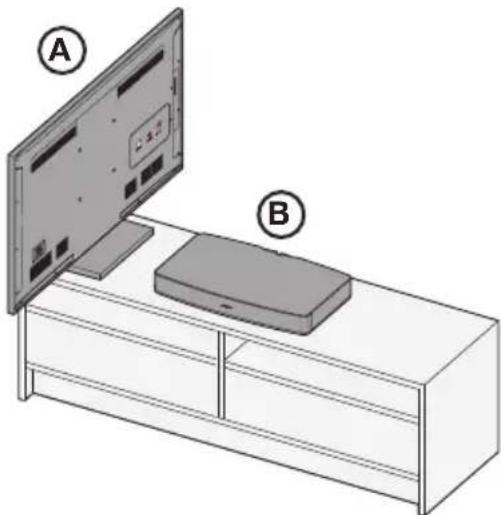
Step 1: Place the system
A. Move your TV aside and turn it so you can see the connection panel.
B. Place the Solo system where you had your TV.
natural_image
Illustration of a TV setup with two labeled components (A and B) showing front and back views of a box (no text or symbols on the device itself)Placement guidelines:
- The Bose Solo system is designed to fit under TVs that weigh no more than 40 lb (18 kg) and have bases no wider than 20" (508 mm) and no deeper than 10¼" (260 mm). Many 42" and most 32" TVs and smaller meet these requirements.
- The base of your TV should be centered on the top of the system and must not hang over any of its edges.
- If the TV base is too large to fit on top of the system, place the sound system in another location such as on an open shelf under the TV, but keep it close to your TV so the audio cable will reach. You also could mount your TV on the wall above the system.
- If placing the sound system in a cabinet, or on a shelf, position the front of the system as close as possible to the front edge of the shelf for optimum audio performance.
Note: Placing the system in a corner, in a cabinet, or on a shelf may cause the system audio to sound heavy or have a booming bass quality. To decrease the bass, see “Decreasing the bass” on page 20.
CAUTIONS:
- DO NOT place a CRT type TV on this system. It is not designed for use with this type of TV.
- Allowing the base of your TV to hang over any edge of this speaker system increases the risk of the TV tipping, which may result in injury.
- If placing the sound system backed up to a wall, make sure there is a space of at least 1" (2.5 cm) between the wall and the rear of the system.
- With any placement of this product, make sure the ventilation openings on the rear panel are not blocked.
- If your TV comes with an anti-tip device, install it according to the manufacturer's instructions and adjust the tether as instructed after placing the TV on top of the system. Installing an anti-tip device is recommended when using a TV with this product. If your TV did not come with an anti-tip device, you can get one from most retail TV suppliers.
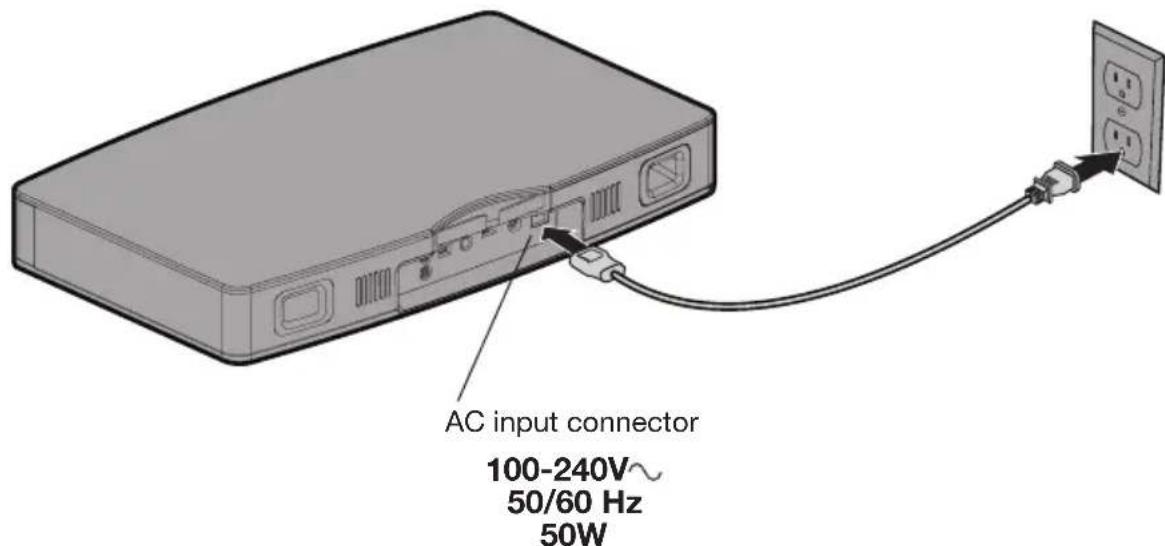
Step 2: Connect the Solo system to power
A. Plug one end of the power cord into the AC input connector.
B. Plug the other end into a live AC power (mains) outlet.
A few moments after applying power, the system emits two tones indicating that it is ready to use.
text_image
AC input connector 100-240V~ 50/60 Hz 50WNote: Bose recommends using a safety agency-approved surge protector on all electronic equipment. Voltage variations and spikes can damage electronic components in any system.
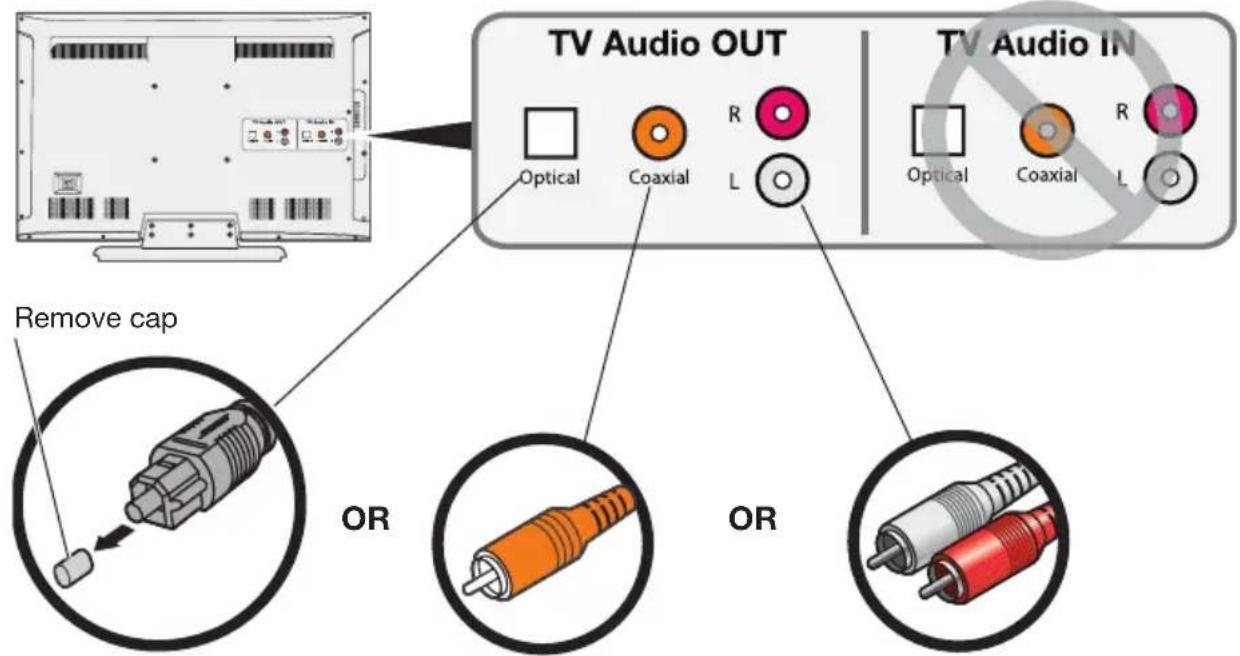
Step 3: Choose the type of audio cable to use
On the back of your TV, look for one of the following audio output connections and locate the cable for the one you want to use. Refer to the unpacking diagram on page 6.
Choose only one
Audio OUT connection
text_image
TV Audio OUT Optical Coaxial R L Remove cap OR OR TV Audio IN Optical Coaxial R LOptical digital audio
- A digital audio output that passes digital data through a fiber optic cable.
• If available, use this connection for best audio performance.
Coaxial digital audio
- A digital audio output that passes digital data through a 75-ohm coaxial cable.
- Use this connection if an optical output is not available.
Analog stereo audio
- The most common type of audio output where the left and right channel are connected separately.
- Use this connection if no digital audio outputs are available.
Tip: If your TV does not have any audio outputs, you can use the audio outputs on another device. For example, if a cable or satellite box is connected to your TV, you can connect audio outputs from that device to the Solo system. See “Alternate Setup Connections” on page 16 for other ways to connect the Solo TV sound system.
Step 4: Plug the audio cable into the Solo system
Tip: If you selected the optical digital audio cable, see “Important instructions for optical cable connections” on page 11.
A. Plug one end of the selected audio cable into the correct Audio IN connector on the Solo system.

text_image
Solo system Audio IN Make only one connection R L Optical Coaxial Service OR OR Remove capB. If you wish, you can slide the cable behind the built-in cable clip. (Optical cable shown only for example.)
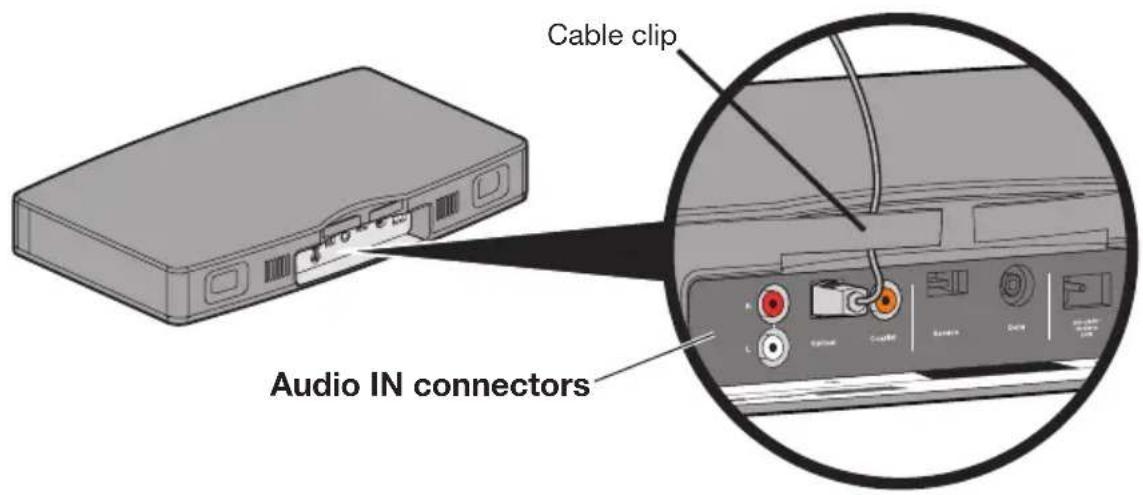
text_image
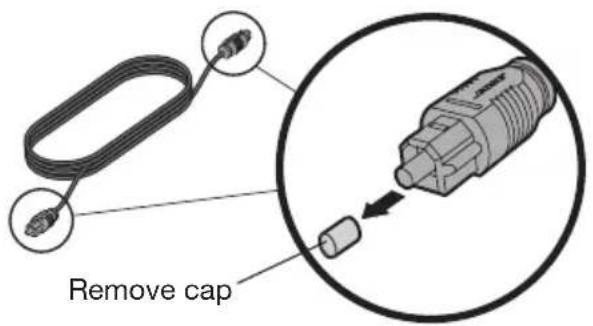
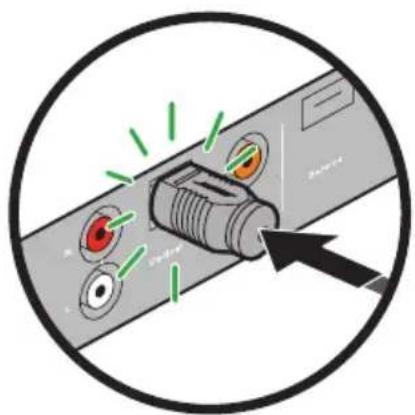
Cable clip Audio IN connectorsImportant instructions for optical cable connections
- Remove the protective cap from both ends of the cable.
text_image
Remove cap- Hold the optical cable plug as shown Ⓐ. Align the plug with the Optical connector and insert the plug carefully Ⓑ.
Note: The connector has a hinged door that swings out of the way when inserting the plug.
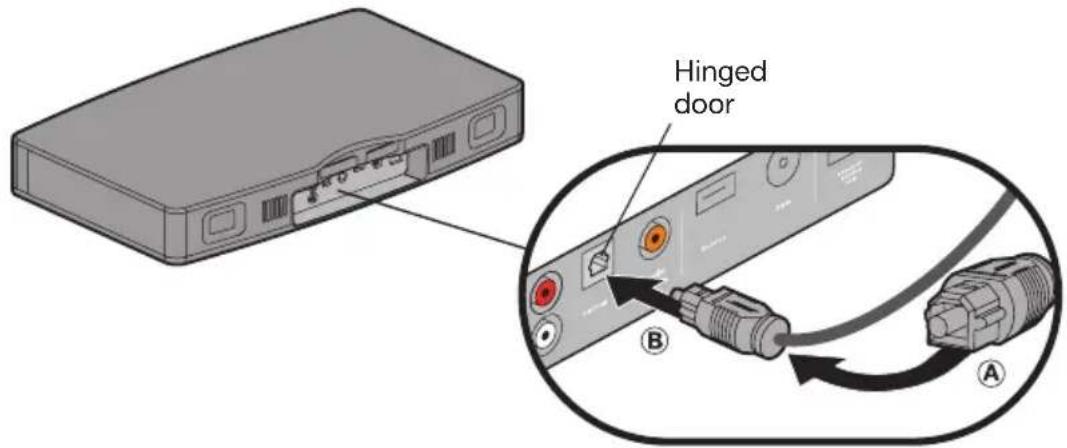
text_image
Hinged door B ACAUTION: Inserting the plug in the wrong orientation can damage the plug and/or the connector.
- Firmly push the plug into the connector until you hear or feel a click.
natural_image
Diagram of a connector with colored pins and a black arrow pointing to it (no text or symbols present)System Setup
Step 5: Plug the other end of the audio cable into your TV
A. Find the Audio OUT connections on your TV.
B. Plug the other end of the audio cable into the correct Audio OUT connector.
CAUTION: If using an optical digital audio cable, make sure you hold the plug in the correct orientation for the Audio OUT connector on your TV. You may need to rotate the plug differently than you did for the Solo system.
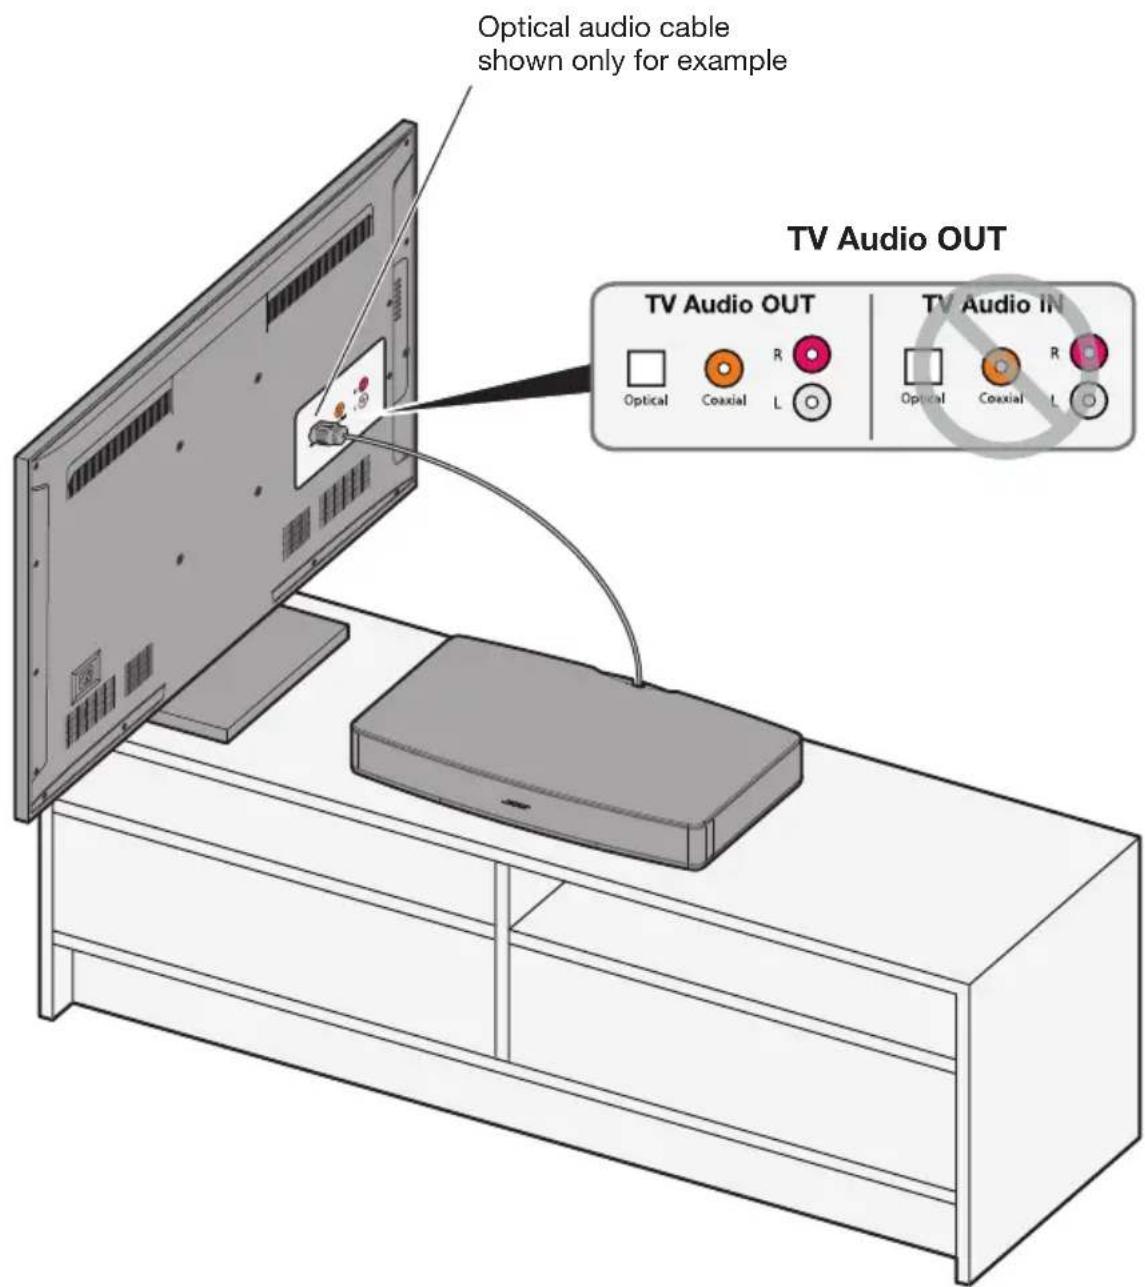
text_image
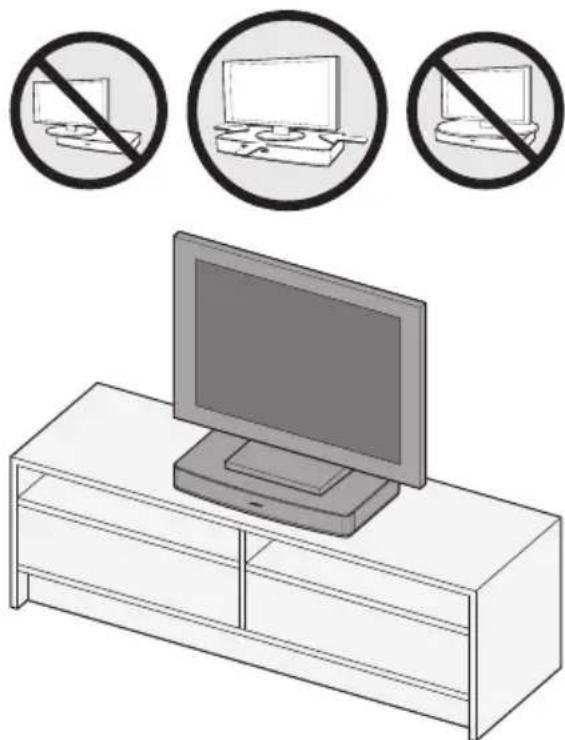
Optical audio cable shown only for example TV Audio OUT TV Audio OUT Optical Coaxial R L TV Audio IN Optical Coaxial R LStep 6: Place your TV on the Solo system.
Place your TV on the Solo system, making sure the TV stand is centered on the top of the system. Refer to “Placement guidelines:” on page 7.
CAUTION: Be sure to center the base of your TV on the top of this product.
natural_image
Illustration of a TV set with three circular icons showing a computer monitor and two crossed-out devices, all without any text or symbols.CAUTIONS:
- DO NOT place a CRT type TV on this system. It is not designed for use with this type of TV.
- Allowing the base of your TV to hang over any edge of this speaker system increases the risk of the TV tipping, which may result in injury.
- If placing the sound system backed up to a wall, make sure there is a space of at least 1" (2.5 cm) between the wall and the rear of the system.
- If your TV comes with an anti-tip device, install it according to the manufacturer's instructions and adjust the tether as instructed after placing the TV on top of the system. Installing an anti-tip device is recommended when using a TV with this product. If your TV did not come with an anti-tip device, you can get one from most retail TV suppliers.
Step 7: Check your TV settings
To enjoy the full benefit of hearing TV audio through the Solo TV sound system, the internal speakers in your TV should be turned off. Also, you need to make sure that some audio settings do not inhibit the audio output signal.
Note: Check the user manual for your TV for help on using the TV menus and changing any TV settings. Manufacturers usually make user manuals available on their web sites.
A. Turn on your TV.
B. Go to the TV menu and select Audio, Sound, or Speaker Settings.
C. Look for the menu item that allows you to turn off the TV speakers. This menu item may be called Speakers On/Off or something closely related.
If there is no setting for turning the TV speakers off, adjust the TV volume to its lowest setting.
D. If you decided to use either an optical or coaxial digital audio output, look for a menu item in the Audio Settings that may affect digital audio output. You may have to select the digital output you want to use.
E. Look for any setting that selects the type of audio output, such as Stereo or 5.1 Channel Audio output. You may need to select such a setting in order to enable the audio output.
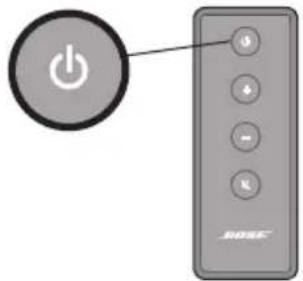
Step 8: Check for sound
A. Press the power button on the Solo system remote.
Make sure the system status indicator is solid green.
text_image
Image showing a power button icon next to a BOSE remote control with labeled buttons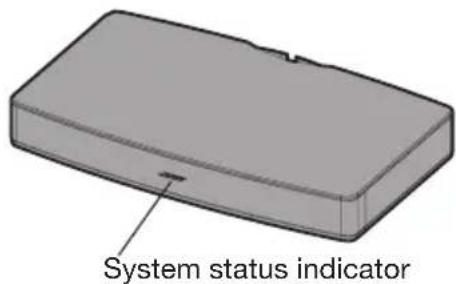
text_image
System status indicatorB. Make sure your TV is on.
C. Check if sound is coming from the Solo system speakers.
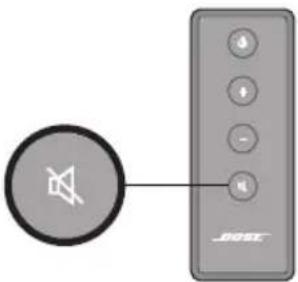
Tip: To confirm your TV speakers are off, press the mute button on the Solo system remote and check that no sound is coming from the TV. The system status indicator on the front panel blinks green when the system is muted.
text_image
Diagram showing a speaker icon connected to a device labeled 'BMW' with control buttonsNote: Depending on where you placed your Solo system and the program currently playing, you may notice that the audio sounds too heavy or has a booming bass quality. To decrease the amount of bass in the audio output, see “Decreasing the bass” on page 20.
If you do not hear sound from the Solo speaker system:
- Make sure the Solo system is on. The system status indicator (page 19) on the front panel should be solid green.
• Using the Solo system remote, increase the volume.
• Make sure the audio cable is plugged into a connector on your TV labelled Audio Output or Audio OUT, not Audio Input or Audio IN.
- If using the optical digital audio cable, make sure it is seated correctly. Refer to “Important instructions for optical cable connections” on page 11. If you still hear no audio after checking the cable installation, try another type of audio connection.
- See "Alternate Setup Connections" on page 16 for other ways to connect to the Solo system.
When to use an alternate connection
You may discover that your TV does not provide audio outputs or when you have connected one of its audio outputs to the Solo system your TV may not deliver the audio to the Solo system.
If you have difficulty getting sound from the Solo system when it is directly connected to your television, one of these alternate connection schemes may help.
- If your TV does not have any audio output connections or does not deliver the audio to the Solo system, see
"Connecting to a cable box audio output" below, or
"Connecting to a TV headphones output" on page 17.
- If you do not get sound from a DVD player that is connected to your TV, see
"Connecting multiple devices to the Solo system" on page 18.
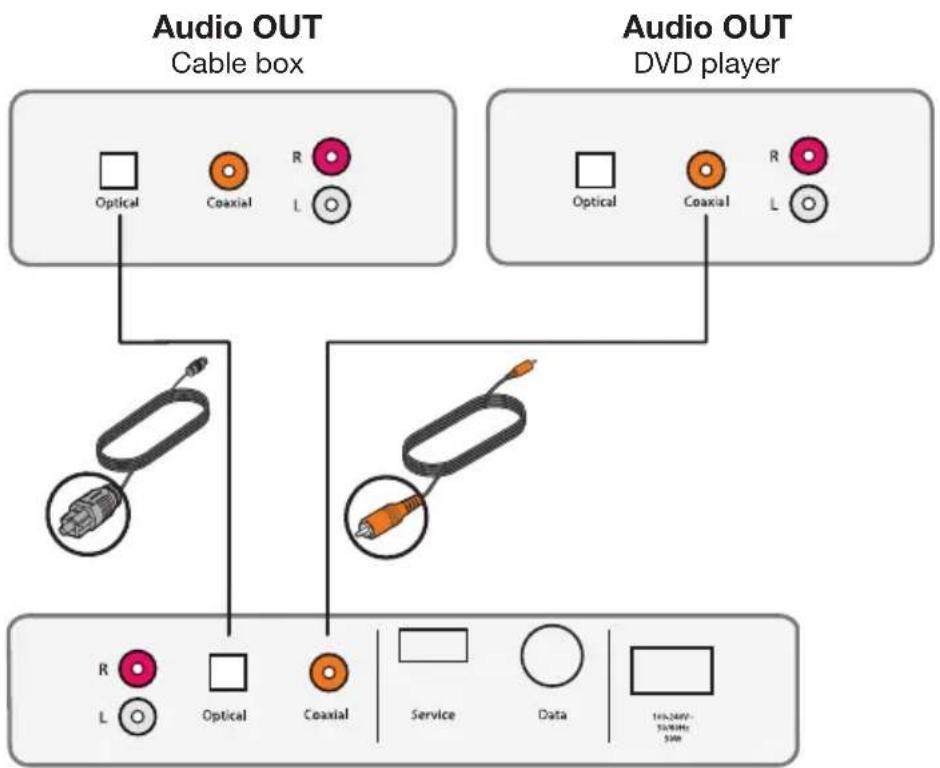
Connecting to a cable box audio output
Instead of connecting your TV to the system, you can connect one of the cable box audio outputs to the Solo system. Be sure to use only one audio connection.
CAUTION: If you choose to make an optical digital cable connection, refer to "Important instructions for optical cable connections" on page 11.
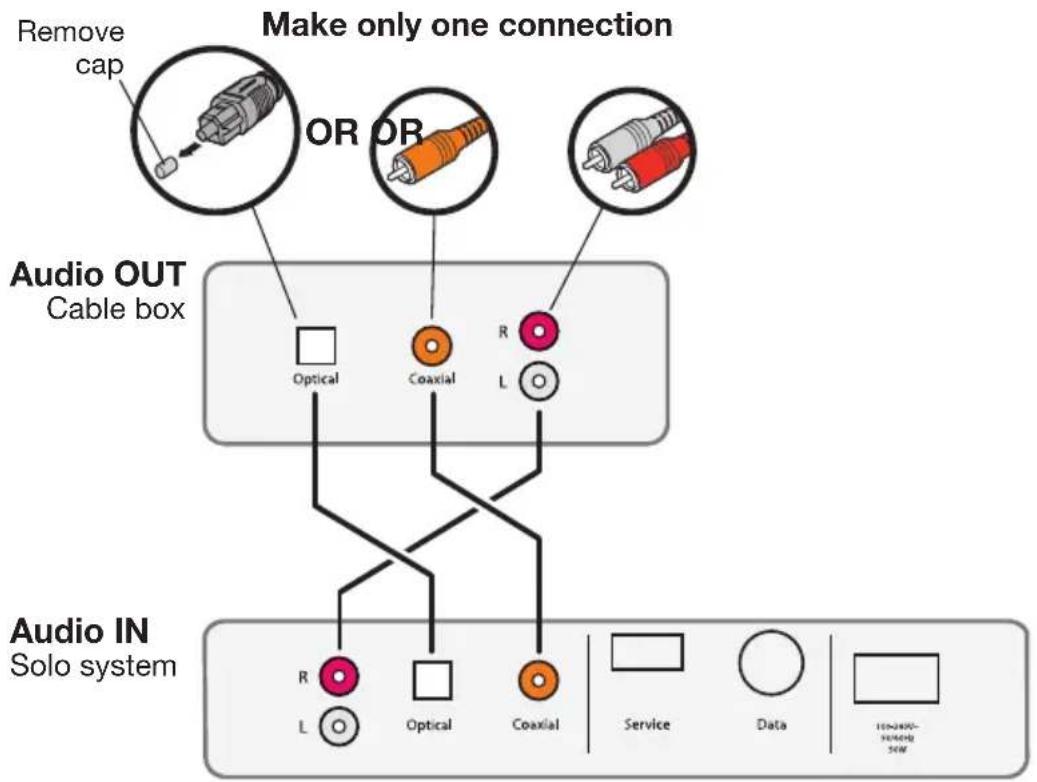
text_image
Make only one connection Remove cap OR OR Audio OUT Cable box Optical Coaxial R L Audio IN Solo system R L Optical Coaxial Service Data 105-2400- SHEMID SEWConnecting to a TV headphones output
If your TV only has a headphones jack, you can connect this audio output to the Solo system using a Dual RCA to 3.5 mm stereo cable.
After making this connection, turn your TV volume up to near maximum and control the volume with the Solo system remote.
Audio OUT
TV headphones or other variable audio output
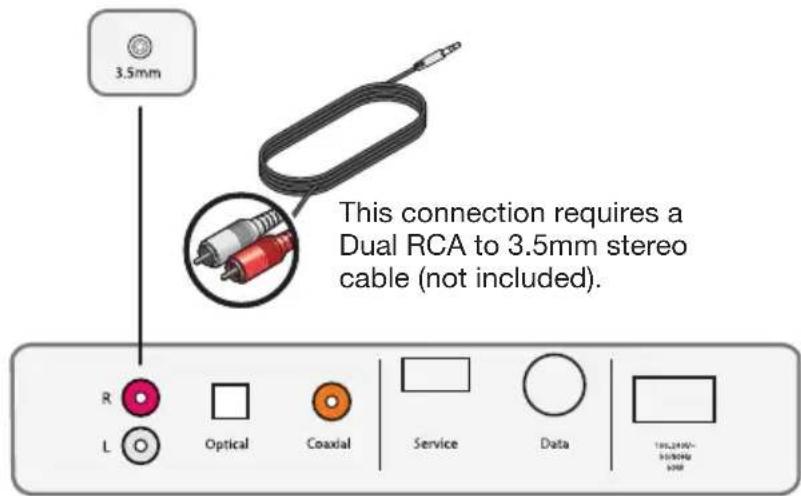
text_image
3.5mm This connection requires a Dual RCA to 3.5mm stereo cable (not included).Audio IN
Solo system
Alternate Setup Connections
Connecting multiple devices to the Solo system
If you have a device such as a DVD player connected to your TV, you may discover that your TV does not pass audio from the DVD player to the audio output on your TV. The Solo system provides a solution to this problem. You can connect up to three devices to the Solo system using a different type of audio cable for each. For example, the figure below shows a cable box and a DVD player connected to the Solo system.
Note: This alternate connection scheme may not work with the equipment you have in your home because some devices like cable/satellite boxes always remain on. When multiple devices are connected to the Solo system, turn on only the device you want to use and turn off the others.
CAUTION: If you choose to make an optical digital cable connection, refer to "Important instructions for optical cable connections" on page 11.
flowchart
graph TD
    A["Audio OUT Cable box"] --> B["Optical"]
    A --> C["Coxial"]
    A --> D["R L"]
    E["Audio OUT DVD player"] --> F["Optical"]
    E --> G["Coxial"]
    E --> H["R L"]
    I["Video System"] --> J["R L"]
    I --> K["Optical"]
    I --> L["Coxial"]
    M["Service"] --> N["Data"]
    O["145.24W-30MHz 30Hz"]
Audio IN Solo system
Remote control
The Solo TV sound system is easily operated using the small remote control. Just point the remote at the front of the system and press the buttons.
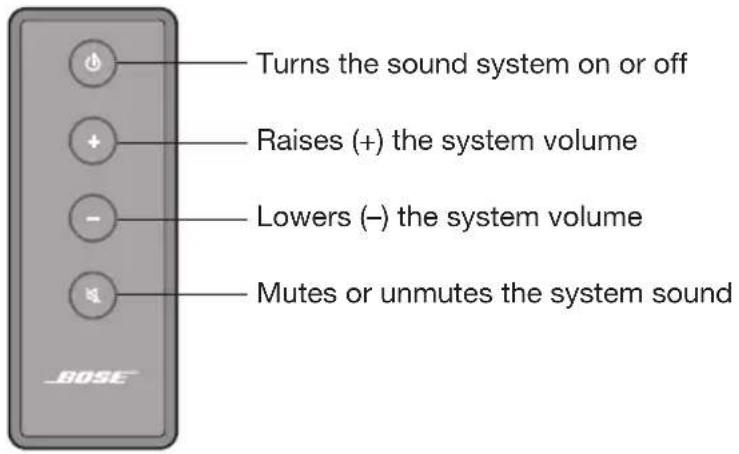
text_image
Turns the sound system on or off Raises (+) the system volume Lowers (-) the system volume Mutes or unmutes the system soundSystem status indicator
The system status indicator tells you when the system is on and provides you with a system status during operation.
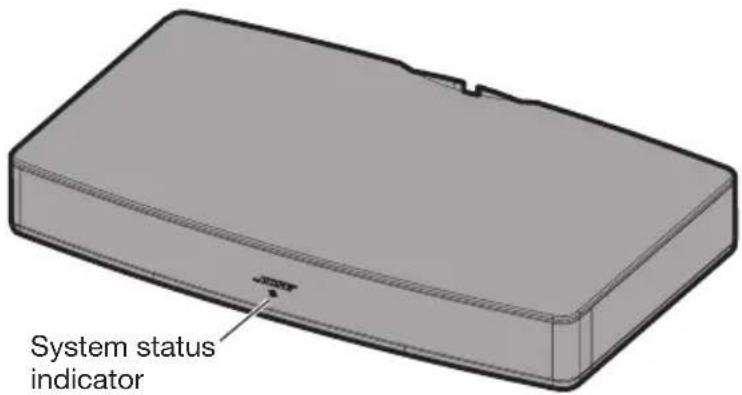
text_image
System status indicatorSystem status:
Off....System off (standby)
Solid green ......Power is on
Fast blinking green....System is muted
Very fast blinking green ......Volume is being adjusted
Solid amber ....Decreased bass setting
Solid red ......System error - call Bose Customer Service
Decreasing the bass
Depending on the placement of your Solo system or the program currently playing, the audio may produce more bass than you would like.
To select the decreased bass setting
-
Point the remote at the system.
-
Press and hold the Mute button

until the following happens:
The system mutes the audio, plays three descending tones (going down) and flashes the status indicator (page 19) amber three times. Audio returns and the status indicator turns solid amber.
- Release the Mute button.
To return to the normal bass setting
-
Point the remote at the system.
-
Press and hold the Mute button

until the following happens:
The system mutes the audio, plays three ascending tones (going up) and flashes the status indicator (page 19) green three times. Audio returns and the status indicator turns solid green.
- Release the Mute button.
Optional universal remote control
A universal remote control is available from Bose that can operate this system and be programmed to control your TV and other components connected to it. Contact Bose Corporation or your local dealer for more information. See the contact list included in the carton.
Using a third-party remote
A third-party remote, such as your set-top box remote, can be programmed to control your Solo system.
Referring to the owner's guide for your set-top box remote, follow the instructions for programming the remote to control a TV. When it is time to enter a device code, the owner's guide for the cable remote should tell you what to enter for a Bose system. Once programmed, the third-party remote should control basic functions such as power on/off and volume.
Troubleshooting
| Problem What to do | |
| TV base is too large to place on the system | Place the sound system in another location such as on an open shelf under the TV.If possible mount your TV on the wall above the sound system. |
| System will not turn on | Make sure the power cord is securely connected on both ends.Make sure the power cord is plugged into a live AC (mains) outlet.If the outlet is controlled by a switch, make sure the switch is in the ON position or test the outlet using a lamp.Reset the system: Unplug the power cord for at least one minute. Plug the power in again and listen for the system to emit two tones confirming it has power. |
| No soundMake sure the sound system is turned on and the power indicator is on (solid green).Make sure the sound system is not muted.Increase the volume.Make sure the audio cable connection is correct and secure on the sound system and the TV.Make sure the TV is on and set to the correct input.If you are using a digital audio connection, make sure that the digital audio output is not disabled in your TV. See your TV owner's guide for information.If a digital audio connection is not possible, use an analog stereo audio connection.If the sound system is connected to a TV output labelled VARIABLE (VAR), make sure the TV internal speakers are turned off, the TV volume is turned up, and the TV is not muted.Turn off all devices connected to the Solo system except the one you want to hear. | |
| Remote control is inconsistent or does not work | Check the battery to be sure it is installed properly or if it needs to be replaced. See “Replacing the remote battery” on page 22.Point the remote control at the sound system when you press a button.Check that the system status indicator on the sound system flashes when you press the remote volume or mute button. |
| Audio sounds too heavy, too much bass | Change the bass setting to decrease the amount of bass. See “Decreasing the bass” on page 20.Change the position or orientation of the system. In some situations the system may produce more bass. See Placement Guidelines on page 7. |
| Sound is distorted | Make sure cable connections are secure on the Solo system and TV.If the sound system is connected to a TV output labelled VARIABLE (VAR), reduce the TV volume.Bypass the TV and connect directly to the source using one of the Alternate setup methods (page 16). |
| Sound is coming from the TV | Turn off your TV's internal speakers.Adjust the TV volume. |
| System status indicator is red | System error. Call Bose Customer Service. |
Care and Maintenance
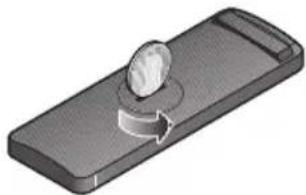
Replacing the remote battery
When the remote stops operating or its range seems reduced, it is time to change the remote battery.
WARNING: Keep battery (or batteries) away from children, May cause a fire or chemical burn if mishandled. Do not recharge, disassemble, heat above 212^ F ( 100^ C), or incinerate. Dispose of used batteries promptly. Replace only with a battery of the correct type and model number.
- Using a coin, turn the battery cover slightly counterclockwise.
natural_image
3D illustration of a remote control switch with a knob and circular arrow (no text or symbols)- Remove the cover and insert the new battery (CR2032 or DL2032) flat side up, with the plus (+) symbol in view.

natural_image
3D illustration of a pushpin pressing into a button on a rectangular device (no text or symbols)- Re-seat the cover and turn it clockwise to lock into place.

natural_image
3D illustration of a handheld device with a circular knob and handle (no text or symbols)Cleaning
• You can clean the surface of the speaker with a soft, dry cloth.
- Do not use any sprays near the speaker. Do not use any solvents, chemicals, or cleaning solutions containing alcohol, ammonia, or abrasives.
• Do not allow liquids to spill into any openings.
- The speaker grille requires no special care, although you may carefully vacuum it with a brush attachment, if necessary.
Customer service
For additional help in solving problems, contact Bose Customer Service. Refer to the address sheet included with the Solo TV sound system.
In the U.S. only, call: 800-901-0472.
Limited warranty
Your Bose® Solo TV sound system is covered by a limited warranty. Details of the limited warranty are provided on the product registration card that is included in the carton. Please refer to the card for instructions on how to register. Failure to register will not affect your limited warranty rights.
Technical information
Power rating
100-240V\~ 50/60 Hz 50W
Dimensions
20 ^3/4 " (525.00 mm) W x 12 ^1/4 " (308.96 mm) D x 3" (73.50 mm) H
Weight
10.1 lb (4.6 kg)
natural_image
3D rendering of a rectangular electronic component with a small notch, shown in isometric view (no text or symbols)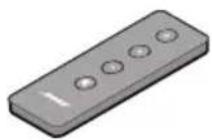
natural_image
Close-up of a black cable with a circular inset showing a connector (no text or symbols visible)natural_image
Illustration of a USB cable with a connector, no text or symbols presentnatural_image
Close-up of a black cord with two red connectors and a magnified inset showing the red connector (no text or symbols)Analogt stereolydkabel
natural_image
Illustration of a black cable with an orange connector, shown in a circular inset (no text or symbols)natural_image
Illustration of a TV setup with two labeled components (A and B) showing front and back views of a monitor mounted on a wooden stand (no text or symbols present)natural_image
Diagram of a mechanical connector with colored ports and green laser lines, no text or symbols presentnatural_image
Illustration of a TV set with three circular icons showing a computer monitor and two crossed-out devices, all without any text or symbols.FORSIGTIG:
text_image
Diagram showing a circular icon connected to a device labeled 'DADE' with control buttons and function keys.natural_image
3D illustration of a knob on a rectangular device with an arrow indicating rotation (no text or symbols)natural_image
3D illustration of a button on a rectangular device (no text or symbols)natural_image
3D illustration of a handheld device with a circular knob and handle (no text or symbols)Rengøring
natural_image
3D rendering of a rectangular electronic component or housing (no text or symbols visible)natural_image
Close-up of a black cable with two connectors, one highlighted in circle (no text or symbols)natural_image
Illustration of a cable with a connector, showing a magnified view of the connector (no text or symbols present)natural_image
Close-up of a black cable with two red connectors and a magnified inset showing internal components (no text or symbols)Analoges Stereo- Audiokabel
natural_image
Illustration of a black cable with an orange connector, shown in a circular inset (no text or symbols)Digitales Koaxial-Audiokabel
natural_image
Illustration of a TV setup with two labeled components (A and B) showing a monitor, tower, and base unit (no text or symbols beyond labels)natural_image
Diagram of a mechanical component with green arrows indicating motion or force, no text or symbols presentSystemeinrichtung
natural_image
Illustration of a computer monitor on a TV set with three circular icons showing no restrictions on devices (no text or symbols present)ACHTUNG:
text_image
Diagram showing a speaker icon connected to a device labeled 'BOSK' with control buttonsnatural_image
3D illustration of a mechanical component with a knob and rotation arrow (no text or symbols)natural_image
3D illustration of a pushpin pressing into a button on a rectangular device (no text or symbols)natural_image
3D illustration of a handheld device with a circular knob and handle (no text or symbols)Reinigung
natural_image
3D rendering of a rectangular electronic component or housing (no text or symbols visible)
natural_image
Close-up of a black cable with two connectors, one highlighted in circle (no text or symbols)natural_image
Illustration of a USB cable with a connector, showing no text or symbolsnatural_image
Coiled black cable with red and white connectors, shown in a magnified inset (no text or symbols)natural_image
Illustration of a black cable with an orange connector, shown in a circular inset (no text or symbols)Coaxiale digitale audiokabel
natural_image
Illustration of a TV set with two labeled components (A and B), showing a front panel and a box on a wooden stand (no text or symbols beyond labels)natural_image
Diagram of a connector with colored pins and a black arrow pointing to it (no text or symbols present)natural_image
Illustration of a TV set with three circular icons showing a computer monitor and a 'no' symbol, no text or labels present.WAARSCHUWINGEN:
text_image
Diagram showing a circular icon connected to a device labeled 'BROSE' with five control buttons.natural_image
3D illustration of a mechanical component with a knob and circular arrow indicating rotation (no text or symbols)natural_image
3D illustration of a pushpin pressing into a button on a rectangular device (no text or symbols)natural_image
3D illustration of a handheld device with a circular knob and rectangular base (no text or symbols)Schoonmaken
natural_image
3D rendering of a rectangular electronic component or housing (no text or symbols visible)natural_image
Close-up of a black cable with two connectors, one highlighted in circle (no text or symbols)natural_image
Illustration of a cable with a connector, showing a magnified view of the connector (no text or symbols present)natural_image
Coiled black cable with red and white connectors, shown in a magnified inset (no text or symbols)natural_image
Illustration of a black cable with an orange connector, shown in a circular inset (no text or symbols)Cable coaxial de audio digital
natural_image
Illustration of a TV setup with two labeled components (A and B) showing front and back views of a monitor mounted on a wooden stand (no text or symbols present)text_image
TV Audio OUT Optical Coaxial R L Retire la tapa O BIEN O BIEN TV Audio IN Optical Coaxial R LAudio digital coaxial
natural_image
Diagram of a cable connector with red and orange ports, no text or symbols presentnatural_image
Illustration of a TV set with three circular icons showing a computer monitor and two crossed-out devices, all without any text or symbols.PRECAUCIONES:
text_image
Diagram showing a speaker icon connected to a device labeled 'BISSC' with five control buttonsnatural_image
3D illustration of a mechanical component with a rotating knob and curved arrow (no text or symbols)natural_image
3D illustration of a pushpin pressing into a button labeled 'OK' (no text or symbols on the object itself)natural_image
3D illustration of a rectangular electronic device with a circular button on top (no text or symbols)Limpieza
natural_image
3D rendering of a rectangular electronic component with a notch, shown in isometric view (no text or symbols)natural_image
Close-up of a black cable with a circular inset showing a connector detail (no text or symbols)natural_image
Illustration of a cable with a connector, showing a magnified view of the internal component (no text or symbols present)natural_image
Illustration of a black coiled cable with two red connectors and a magnified inset showing internal components (no text or symbols)natural_image
Illustration of a black cable with an orange connector, no text or symbols presentnatural_image
Illustration of a TV setup with two labeled components (A and B) showing a monitor, tower, and base unit (no text or symbols beyond labels)text_image
TV Audio OUT Optical Coaxial R L TV Audio IN Optical Coaxial R L Irrota kansi. TAITAInatural_image
Diagram of a connector with colored pins and a black arrow pointing to it (no text or symbols present)natural_image
Illustration of a TV set with three circular icons showing a computer monitor and two crossed-out devices, all without any text or symbols.VAROTOIMENPITEET:
text_image
Diagram showing a circular icon connected to a device labeled 'BOSER' with control buttons and a plus symbol.natural_image
3D illustration of a remote control switch with a knob and circular arrow (no text or symbols)natural_image
3D illustration of a pushpin pressing into a button on a rectangular device (no text or symbols)natural_image
3D illustration of a handheld device with a circular knob and handle (no text or symbols)Puhdistaminen
natural_image
3D rendering of a rectangular electronic component or housing with a small notch and mounting hole (no text or symbols)natural_image
Close-up of a black cable with two connectors, one highlighted in circle (no text or symbols)natural_image
Illustration of a USB cable with a connector, showing no text or symbolsnatural_image
Close-up of a black cable with two red connectors and a magnified inset showing internal components (no text or symbols)natural_image
Illustration of a black cable with an orange connector, shown in a circular inset (no text or symbols)natural_image
Illustration of a TV set with two labeled components (A and B), showing front panel, back panel, and chassis (no text or symbols beyond labels)text_image
TV Audio OUT Optical Coaxial R L TV Audio IN Optical Coaxial R L Enlever le capuchon OU OUnatural_image
Diagram of a cable connector with red and orange components, no text or symbols presentnatural_image
Illustration of a TV set with three circular icons showing a computer monitor and a laptop, all without any text or symbols.ATTENTION
text_image
Diagram showing a device with a circular icon connected to a rectangular device labeled 'BIKE' with five control buttons.natural_image
3D illustration of a knob on a rectangular device with an arrow indicating rotation (no text or symbols)natural_image
3D illustration of a button inserted into a rectangular device (no text or symbols)natural_image
3D illustration of a handheld device with a circular knob and handle (no text or symbols)Nettoyage
natural_image
3D rendering of a rectangular electronic component or housing (no text or symbols visible)Impianto audio Bose Solo TV Telecomando


natural_image
Close-up of a black cable with two connectors, one highlighted in circle (no text or symbols)natural_image
Illustration of a cable with a connector, no text or symbols presentnatural_image
Coiled black cable with red and white connectors, shown in a magnified inset (no text or symbols)natural_image
Illustration of a black cable with an orange connector, shown in a circular inset (no text or symbols)natural_image
Illustration of a TV setup with two labeled components (A and B) showing front and back views of a box (no text or symbols on the device itself)text_image
TV Audio OUT Optical Coaxial R L Rimuovere il tappo OPPUREOPPURE TV Audio IN Optical Coaxial R Lnatural_image
Diagram of a cable connector with red and orange ports, no text or symbols presentnatural_image
Illustration of a TV set with three circular icons showing a computer monitor and two crossed-out devices, all without any text or symbols.ATTENZIONE:
text_image
Diagram showing a circular icon connected to a device labeled 'BOSK' with five control buttons.natural_image
3D illustration of a knob on a rectangular device with an arrow indicating rotation (no text or symbols)natural_image
3D illustration of a pushpin pressing into a button on a rectangular device (no text or symbols)natural_image
3D illustration of a handheld device with a circular knob and rectangular body (no text or symbols)Pulizia
527 mm (L) × 311 mm (P) × 76 mm (A)
Peso
4,6 kg
natural_image
3D rendering of a rectangular electronic component or housing (no text or symbols visible)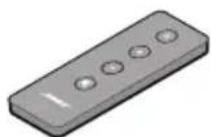
natural_image
Close-up of a black cable with a magnified inset showing a connector detail (no text or symbols)Tápkábel
natural_image
Illustration of a cable with a connector, showing a magnified view of the connector (no text or symbols present)natural_image
Close-up of a black cable with red connectors and a magnified inset showing internal components (no text or symbols)Analóg sztereó hangkábel
natural_image
Illustration of a black cable with an orange connector, shown in a circular inset (no text or symbols)natural_image
Illustration of a TV setup with two labeled components (A and B) showing front and back views of a box (no text or symbols on the device itself)natural_image
Diagram of a cable connector with red and orange ports, no text or symbols presentnatural_image
Illustration of a TV set with three circular icons showing a computer monitor and two crossed-out devices, all without any text or symbols.FIGYELEM!
text_image
Diagram showing a circular icon connected to a device labeled 'BROSE' with five control buttons.natural_image
3D illustration of a knob on a rectangular device with an arrow indicating rotation (no text or symbols)natural_image
3D illustration of a pushpin pressing into a button on a rectangular device (no text or symbols)natural_image
3D illustration of a rectangular electronic device with a circular button and handle (no text or symbols)Tisztítás
natural_image
3D rendering of a rectangular electronic component or housing (no text or symbols visible)natural_image
Close-up of a black cable with two connectors, one highlighted in circle (no text or symbols)natural_image
Illustration of a cable with a connector, showing a magnified view of the connector (no text or symbols present)natural_image
Illustration of a black cable with two red connectors and a magnified inset showing internal components (no text or symbols)natural_image
Illustration of a black cable with an orange connector, shown in a circular inset (no text or symbols)natural_image
Illustration of a TV set with two labeled components (A and B), showing a front panel and a box on a wooden base (no text or symbols beyond labels)natural_image
Diagram of a cable connector with red and orange ports, no text or symbols presentnatural_image
Illustration of a TV set with three circular icons showing a computer monitor and two crossed-out devices, no text or symbols present.PRZESTROGI:
text_image
Diagram showing a circular icon connected to a device labeled 'BROSE' with five control buttons.natural_image
3D illustration of a mechanical component with a knob and rotation arrow (no text or symbols)natural_image
3D illustration of a pushpin pressing down on a rectangular object (no text or symbols)natural_image
3D illustration of a rectangular electronic device with a circular knob on top (no text or symbols)Czyszczenie
natural_image
3D rendering of a rectangular electronic component or housing (no text or symbols visible)Sistema de som Solo TV da Bose Telecomando

natural_image
Close-up of a black cable with two connectors, one highlighted in circle (no text or symbols)natural_image
Illustration of a cable with a connector, no text or symbols presentnatural_image
Close-up of a black cable with two red connectors and a magnified inset showing internal components (no text or symbols)natural_image
Illustration of a black cable with an orange connector, shown in a circular inset (no text or symbols)natural_image
Illustration of a TV setup with two labeled components (A and B) showing a monitor, tower, and box on a wooden stand (no text or symbols beyond labels)text_image
TV Audio OUT Optical Coaxial R L Retire a tampa OU OU TV Audio IN Optical Coaxial R LÁudio digital ótico
Áudio digital coaxial
text_image
Retire a tampanatural_image
Diagram of a USB cable connector with red and orange ports, showing signal lines and an arrow pointing to the cable (no text or symbols present)natural_image
Illustration of a TV set with three circular icons showing a computer monitor and two crossed-out devices, all without any text or symbols.CUIDADOS:
text_image
Diagram showing a circular icon connected to a device labeled 'BOSER' with control buttons and display screen.natural_image
3D illustration of a knob on a rectangular tray with an arrow indicating rotation (no text or symbols)natural_image
3D illustration of a button presser pressing a circular button on a rectangular device (no text or symbols)natural_image
3D illustration of a rectangular electronic device with a metallic knob and a circular button (no text or symbols)Limpeza
natural_image
3D rendering of a rectangular electronic component with a small notch and base (no text or symbols)
Ljudsystemet Bose Solo TV Fjärrkontroll

natural_image
Close-up of a black cable with a circular inset showing two connectors (no text or symbols)natural_image
Illustration of a USB cable with a connector, shown in two views (no text or symbols)natural_image
Coiled black cable with two red connectors and a magnified inset showing internal components (no text or symbols)natural_image
Illustration of a black cable with an orange connector, shown in a circular inset (no text or symbols)natural_image
Illustration of a TV set with two labeled components (A and B) showing front and back views, no text or symbols present.natural_image
Diagram of a cable connector with red and orange ports, no text or symbols presentFörbereda systemet
natural_image
Illustration of a TV set with three circular icons showing a computer monitor and two crossed-out devices, all without any text or symbols.TÄNK PÅ:
text_image
Diagram showing a power button next to a device labeled 'BOSER' with control buttons