
GWS 850 C Professional - Coffee grinder BOSCH - Free user manual and instructions
Find the device manual for free GWS 850 C Professional BOSCH in PDF.
| Product Type | Angle Grinder |
| Brand | Bosch |
| Model | GWS 850 C Professional |
| Max. grinding wheel diameter | 125 mm |
| Weight (according to EPTA 01:2014) | 1.9 kg |
| Rated power input | 850 W |
| Rated power output | 490 W |
| Rated speed | 11 000 rpm |
| Speed adjustment | No (fixed speed) |
| Spindle thread | M14 |
| Max. spindle thread length | 22 mm |
| Protection class | II (double insulation) |
| Inrush current limitation | Yes (allows use on 16 A fuse) |
| Constant-Electronic | Yes (maintains speed under load) |
| Main functions | Grinding, cutting, brushing, sanding (with appropriate accessories) |
| Maintenance and cleaning | Clean ventilation slots regularly; use a suitable vacuum for dust |
| Safety | Adjustable protective guard, extra handle, spindle lock, quick stop |
| Spare parts and repairability | Bosch after-sales service; parts available through authorized network |
| Power supply | 230 V (220 V compatible), 50/60 Hz |
Frequently Asked Questions - GWS 850 C Professional BOSCH
User questions about GWS 850 C Professional BOSCH
0 question about this device. Answer the ones you know or ask your own.
Ask a new question about this device
Download the instructions for your Coffee grinder in PDF format for free! Find your manual GWS 850 C Professional - BOSCH and take your electronic device back in hand. On this page are published all the documents necessary for the use of your device. GWS 850 C Professional by BOSCH.
USER MANUAL GWS 850 C Professional BOSCH
OBJ_DOKL-12327-405 fm Page 1 Tuesday, November 29, 2016 8:51 AM
Robert Bosch Power Tools GmbH
70538 Sutagrt
GERMANY
www.bosch-pt.com
160992A2V812016.11098

1609 92A 2V8
GWS Professional HEAVY DUTY
8-100C|8-100CE|8-125C|8-125CE|850C|850CE
1
12 =
2
1
0512

BOSCH
en Original Instructions
CD正本使用说明书
tw原始使用线明
ko山
th.
General Power Tool SafetyWarnings

WARNING Read all safety warnings and all instruc-tions. Failure to follow the warnings and
instructions may result in electric shock, fire and/or serious injury.
Save all warnings and instructions for future reference.
The term "power tool" in the warnings refers to your mains-operated (corded) power tool or battery-operated (cordless) power tool.
Work area safety
- Keep work area clean and well lit. Cluttered or dark areas invite accidents.
Do not operate power tools in explosive atmospheres, such as in the presence of flammable liquids, gases or dust. Power tools create sparks which may ignite the dust or fumes. - Keep children and bystanders away while operating a power tool. Distractions can cause you to lose control.
Electrical safety
Power tool plugs must match the outlet. Never modify the plug in any way. Do not use any adapter plugs with earthed (grounded) power tools. Unmodified plugs and matching outlets will reduce risk of electric shock.
- Avoid body contact with earthed or grounded surfaces, such as pipes, radiators, ranges and refrigerators. There is an increased risk of electric shock if your body is earthed or grounded.
Do not expose power tools to rain or wet conditions. Water entering a power tool will increase the risk of electric shock.
Do not abuse the cord. Never use the cord for carrying, pulling or unplugging the power tool. Keep cord away from heat, oil, sharp edges and moving parts. Damaged or entangled cords increase the risk of electric shock.
When operating a power tool outdoors, use an extension cord suitable for outdoor use. Use of a cord suitable for outdoor use reduces the risk of electric shock.
If operating a power tool in a damp location is unavoidable, use a residual current device (RCD) protected supply. Use of an RCD reduces the risk of electric shock.
Personal safety
Stay alert, watch what you are doing and use common sense when operating a power tool. Do not use a power tool while you are tired or under the influence of drugs, alcohol or medication. A moment of inattention while operating power tools may result in serious personal injury.
Use personal protective equipment. Always wear eye protection. Protective equipment such as dust mask, non-skid safety shoes, hard hat, or hearing protection used for appropriate conditions will reduce personal injuries.
Prevent unintentional starting. Ensure the switch is in the off-position before connecting to power source and/or battery pack, picking up or carrying the tool. Carrying power tools with your finger on the switch or energising power tools that have the switch on invites accidents.
Remove any adjusting key or wrench before turning the power tool on. A wrench or a key left attached to a rotating part of the power tool may result in personal injury.
Do not overreach. Keep proper footing and balance at all times. This enables better control of the power tool in unexpected situations.
Dress properly. Do not wear loose clothing or jewellery. Keep your hair, clothing and gloves away from moving parts. Loose clothes, jewellery or long hair can be caught in moving parts.
If devices are provided for the connection of dust extraction and collection facilities, ensure these are connected and properly used. Use of dust collection can reduce dust-related hazards.
Power tool use and care
Do not force the power tool. Use the correct power tool for your application. The correct power tool will do the job better and safer at the rate for which it was designed.
Do not use the power tool if the switch does not turn it on and off. Any power tool that cannot be controlled with the switch is dangerous and must be repaired.
- Disconnect the plug from the power source and/or the battery pack from the power tool before making any adjustments, changing accessories, or storing power tools. Such preventive safety measures reduce the risk of starting the power tool accidentally.
Store idle power tools out of the reach of children and do not allow persons unfamiliar with the power tool or these instructions to operate the power tool. Power tools are dangerous in the hands of untrained users.
- Maintain power tools. Check for misalignment or binding of moving parts, breakage of parts and any other condition that may affect the power tool's operation. If damaged, have the power tool repaired before use. Many accidents are caused by poorly maintained power tools.
- Keep cutting tools sharp and clean. Properly maintained cutting tools with sharp cutting edges are less likely to bind and are easier to control.
- Use the power tool, accessories and tool bits etc. in accordance with these instructions, taking into account the working conditions and the work to be performed. Use of the power tool for operations different from those intended could result in a hazardous situation.
Service
Have your power tool serviced by a qualified repair person using only identical replacement parts. This will ensure that the safety of the power tool is maintained.
English | 7
SafetyWarnings for AngleGrinder
SafetyWarnings common for Grinding, Sanding,Wire Brushing or Abrasive Cutting Off Operations
This power tool is intended to function as a grinder, sander, wire brush or cut-off tool. Read all safety warnings, instructions, illustrations and specifications provided with this power tool. Failure to follow all instructions listed below may result in electric shock, fire and/or serious injury.
Operations such as polishing are not recommended to be performed with this power tool. Operations for which the power tool was not designed may create a hazard and cause personal injury.
Do not use accessories which are not specifically designed and recommended by the tool manufacturer. Just because the accessory can be attached to your power tool, it does not assure safe operation.
The rated speed of the accessory must be at least equal to the maximum speed marked on the power tool. Accessories running faster than their rated speed can break and fly apart.
The outside diameter and the thickness of your accessory must be within the capacity rating of your power tool. Incorrectly sized accessories cannot be adequately guarded or controlled.
- Threaded mounting of accessories must match the grinder spindle thread. For accessories mounted by flanges, the arbour hole of the accessory must fit the locating diameter of the flange. Accessories that do not match the mounting hardware of the power tool will run out of balance, vibrate excessively and may cause loss of control.
Do not use a damaged accessory. Before each use inspect the accessory such as abrasive wheels for chips and cracks, backing pad for cracks, tear or excess wear, wire brush for loose or cracked wires. If power tool or accessory is dropped, inspect for damage or install an undamaged accessory. After inspecting and installing an accessory, position yourself and bystanders away from the plane of the rotating accessory and run the power tool at maximum no-load speed for one minute. Damaged accessories will normally break apart during this test time.
Wear personal protective equipment. Depending on application, use face shield, safety goggles or safety glasses. As appropriate, wear dust mask, hearing protectors, gloves and workshop apron capable of stopping small abrasive or workpiece fragments. The eye protection must be capable of stopping flying debris generated by various operations. The dust mask or respirator must be capable of filtrating particles generated by your operation. Prolonged exposure to high intensity noise may cause hearing loss.
- Keep bystanders a safe distance away from work area. Anyone entering the work area must wear personal protective equipment. Fragments of workpiece or of a broken accessory may fly away and cause injury beyond immediate area of operation.
Hold the power tool by insulated gripping surfaces only, when performing an operation where the cutting accessory may contact hidden wiring or its own cord. Cutting accessory contacting a "live" wire may make exposed metal parts of the power tool "live" and could give the operator an electric shock.
Position the cord clear of the spinning accessory. If you lose control, the cord may be cut or snagged and your hand or arm may be pulled into the spinning wheel.
- Never lay the power tool down until the accessory has come to a complete stop. The spinning wheel may grab the surface and pull the power tool out of your control.
Do not run the power tool while carrying it at your side. Accidental contact with the spinning accessory could snag your clothing, pulling the accessory into your body.
Regularly clean the power tool's air vents. The motor's fan will draw the dust inside the housing and excessive accumulation of powdered metal may cause electrical hazards.
Do not operate the power tool near flammable materials. Sparks could ignite these materials.
Do not use accessories that require liquid coolants. Using water or other liquid coolants may result in electrocution or shock.
Kickback and related warnings
- Kickback is a sudden reaction to a pinched or snagged rotating wheel, backing pad, brush or any other accessory. Pinching or snagging causes rapid stalling of the rotating accessory which in turn causes the uncontrolled power tool to be forced in the direction opposite of the accessory's rotation at the point of the binding. For example, if an abrasive wheel is snagged or pinched by the workpiece, the edge of the wheel that is entering into the pinch point can dig into the surface of the material causing the wheel to climb out or kick out. The wheel may either jump toward or away from the operator, depending on direction of the wheel's movement at the point of pinching. Abrasive wheels may also break under these conditions.
Kickback is the result of power tool misuse and/or incorrect operating procedures or conditions and can be avoided by taking proper precautions as given below. - Maintain a firm grip on the power tool and position your body and arm to allow you to resist kickback forces. Always use auxiliary handle, if provided, for maximum control over kickback or torque reaction during start-up. The operator can control torque reactions or kickback forces, if proper precautions are taken.
Never place your hand near the rotating accessory. Accessory may kickback over your hand.
Do not position your body in the area where power tool will move if kickback occurs. Kickback will propel the tool in direction opposite to the wheel's movement at the point of snagging.
Use special care when working corners, sharp edges, etc. Avoid bouncing and snagging the accessory. Corners, sharp edges or bouncing have a tendency to snag the rotating accessory and cause loss of control or kickback.
8|English
Do not attach a saw chain woodcarving blade or toothed saw blade. Such blades create frequent kickback and loss of control.
Safety warnings specific for Grinding and Abrasive Cutting-Off operations
Use only wheel types that are recommended for your power tool and the specific guard designed for the selected wheel. Wheels for which the power tool was not designed cannot be adequately guarded and are unsafe.
The grinding surface of the centre depressed wheels must be mounted below the plane of the guard lip. An improperly mounted wheel that projects through the plane of the guard lip cannot be adequately protected.
The guard must be securely attached to the power tool and positioned for maximum safety, so the least amount of wheel is exposed towards the operator. The guard helps to protect operator from broken wheel fragments, accidental contact with wheel and sparks that could ignite clothing.
Wheels must be used only for recommended applications. For example: do not grind with the side of the cut-off wheel. Abrasive cut-off wheels are intended for peripheral grinding; side forces applied to these wheels may cause them to shatter.
Always use undamaged wheel flanges that are of correct size and shape for your selected wheel. Proper wheel flanges support the wheel thus reducing the possibility of wheel breakage. Flanges for cut-off wheels may be different from grinding wheel flanges.
Do not use worn down reinforced wheels from larger power tools. Wheels intended for larger power tools are not suitable for the higher speed of a smaller tool and may burst.
Additional safety warnings specific for abrasive cutting off operations
Do not "jam" the cut-off wheel or apply excessive pressure. Do not attempt to make an excessive depth of cut. Overstressing the wheel increases the loading and susceptibility to twisting or binding of the wheel in the cut and the possibility of kickback or wheel breakage.
Do not position your body in line with and behind the rotating wheel. When the wheel, at the point of operation, is moving away from your body, the possible kickback may propel the spinning wheel and the power tool directly at you.
When wheel is binding or when interrupting a cut for any reason, switch off the power tool and hold the power tool motionless until the wheel comes to a complete stop. Never attempt to remove the cut-off wheel from the cut while the wheel is in motion otherwise kickback may occur. Investigate and take corrective action to eliminate the cause of wheel binding.
Do not restart the cutting operation in the workpiece. Let the wheel reach full speed and carefully re-enter the cut. The wheel may bind, walk up or kickback if the power tool is restarted in the workpiece.
Support panels or any oversized workpiece to minimize the risk of wheel pinching and kickback. Large workpieces tend to sag under their own weight. Supports must be placed under the workpiece near the line of cut and near the edge of the workpiece on both sides of the wheel.
Use extra caution when making a "pocket cut" into existing walls or other blind areas. The protruding wheel may cut gas or water pipes, electrical wiring or objects that can cause kickback.
Safety warnings specific for sanding operations
Do not use excessively oversized sanding disc paper. Follow manufacturers recommendations, when selecting sanding paper. Larger sanding paper extending beyond the sanding pad presents a laceration hazard and may cause snagging, tearing of the disc, or kickback.
Safety warnings specific for wire brushing operations
Be aware that wire bristles are thrown by the brush even during ordinary operation. Do not overstress the wires by applying excessive load to the brush. The wire bristles can easily penetrate light clothing and/or skin.
If the use of a guard is recommended for wire brushing, do not allow any interference of the wire wheel or brush with the guard. Wire wheel or brush may expand in diameter due to work load and centrifugal forces.
Additional safety warnings

Wear safety goggles.
Use suitable detectors to determine if utility lines are hidden in the work area or call the local utility company for assistance. Contact with electric lines can lead to fire and electric shock. Damaging a gas line can lead to explosion. Penetrating a water line causes property damage or may cause an electric shock.
Release the On/Off switch and set it to the off position when the power supply is interrupted, e. g., in case of a power failure or when the mains plug is pulled. This prevents uncontrolled restarting.
Secure the workpiece. A workpiece clamped with clamping devices or in a vice is held more secure than by hand.
- Products sold in GB only: Your product is fitted with a BS 1363/A approved electric plug with internal fuse (ASTA approved to BS 1362). If the plug is not suitable for your socket outlets, it should be cut off and an appropriate plug fitted in its place by an authorised customer service agent. The replacement plug should have the same fuse rating as the original plug. The severed plug must be disposed of to avoid a possible shock hazard and should never be inserted into a mains socket elsewhere.
Products sold in AUS and NZ only: Use a residual current device (RCD) with a rated residual current of 30mA or less.
English | 9
Product Description and Specifications

Read all safety warnings and all instruc-tions. Failure to follow the warnings and in-structions may result in electric shock, fire and/or serious injury.
Intended Use
The machine is intended for cutting, roughing and brushing of metal and stone materials without the use of water. For cutting with bonded abrasives, a special cutting guard (accessory) must be used.
When cutting in stone, provide for sufficient dust extraction. With approved sanding tools, the machine can be used for sanding with sanding discs.
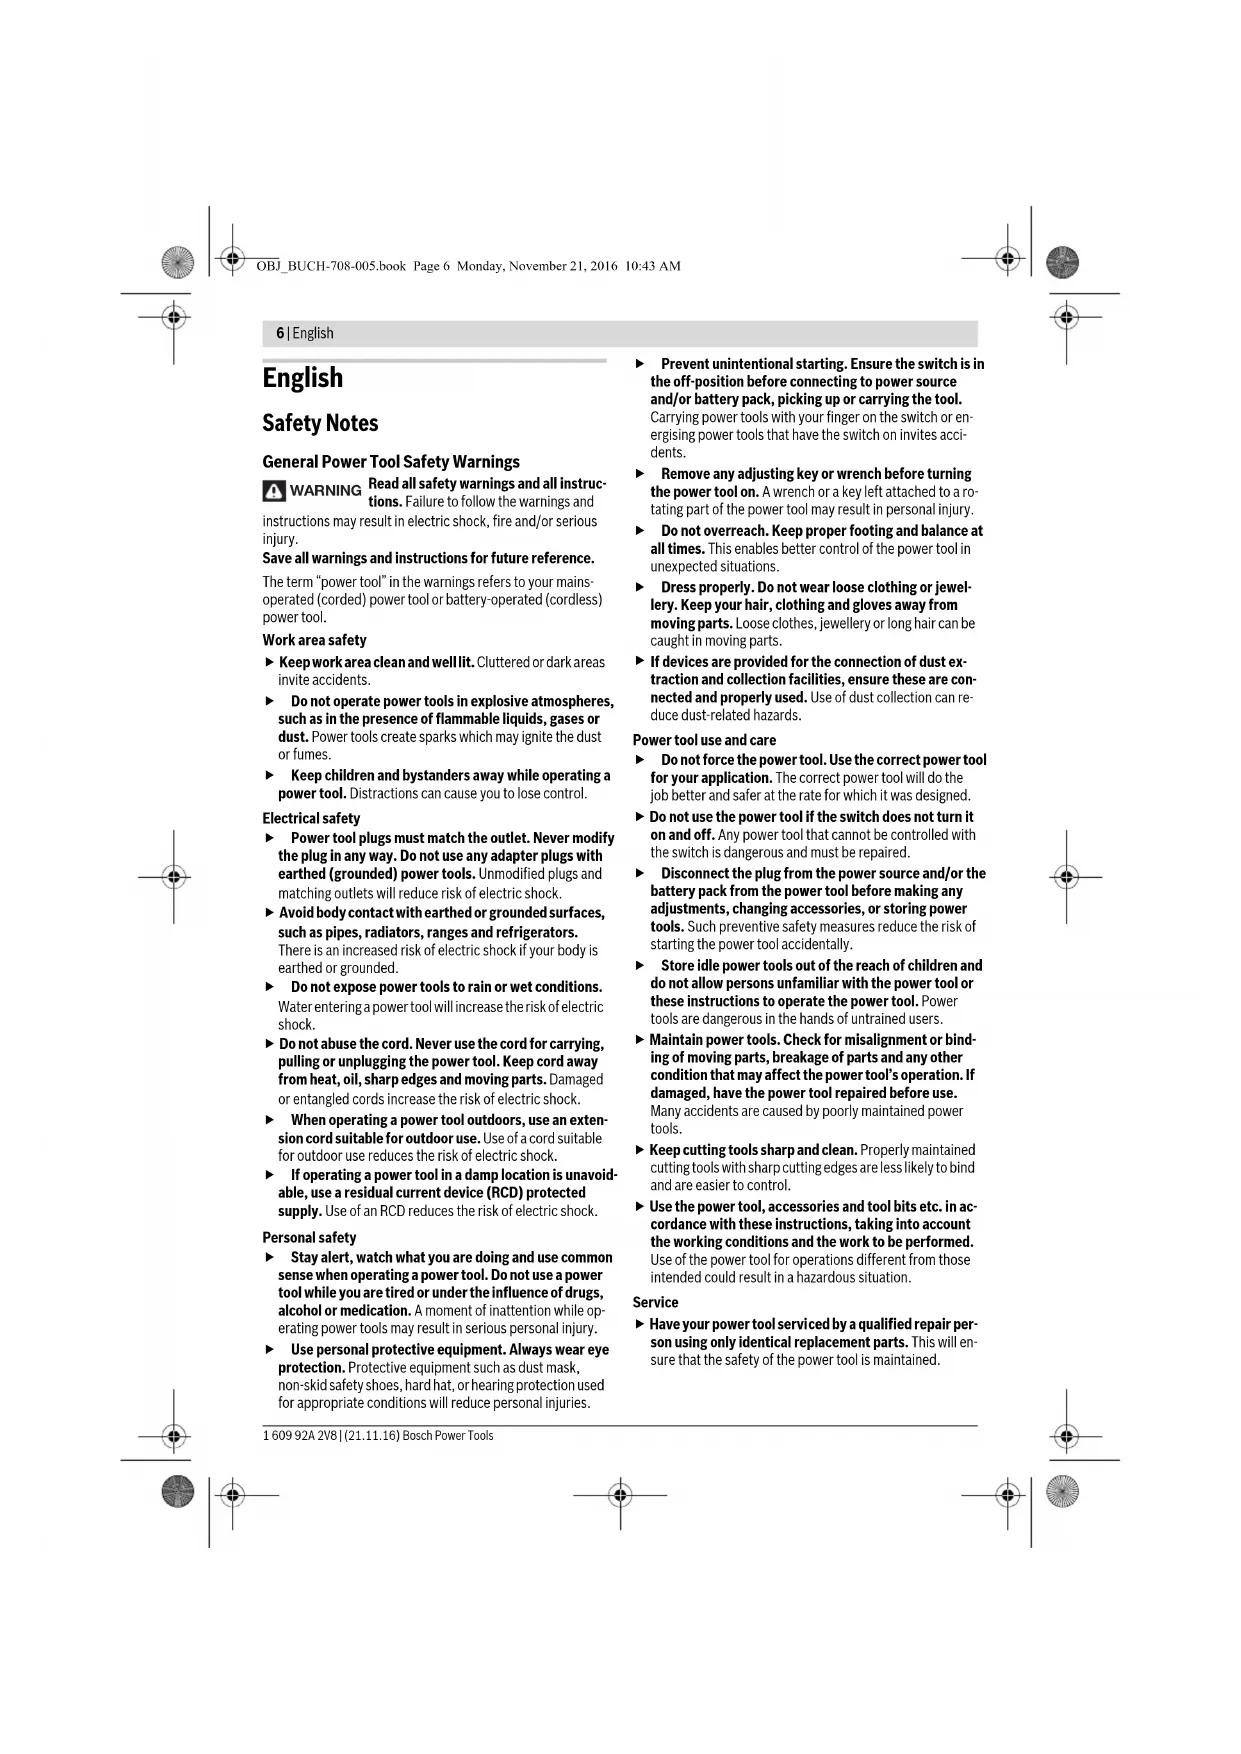
Product Features
The numbering of the product features refers to the illustration of the machine on the graphics page.
1 Spindle lock button
2 On/Off switch
3 Thumbwheel for speed preselection (GWS 8-100 CE/GWS 8-125 CE/GWS 850 CE)
4 Auxiliary handle (insulated gripping surface)
5 Combination spanner for M 14 grinder spindle
6 Combination spanner for M 10 grinder spindle
7Grinder spindle
8 Protection guard for grinding
9 Locking screw for protection guard
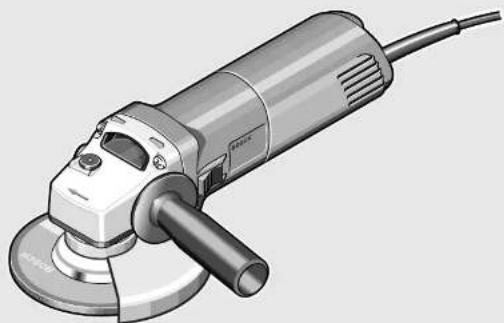
10 Mounting flange with O-ring
11 Grinding wheel
12 Clamping nut
13 Quick-clamping nut SDS-cie
14 Carbide grinding head
15 Protection guard for cutting
16 Cutting disc
17 Hand guard
18 Rubber sanding plate
19 Sanding sheet
20 Round nut*
21 Cup brush
22 Cutting guide with dust extraction protection guard *
23 Diamond cutting disc
24 Handle (insulated gripping surface)
*Accessories shown or described are not part of the standard delivery scope of the product. A complete overview of accessories can be found in our accessories program.
Technical Data
| Angle Grinding GWS... | 8-100 C 8-100 CE 8-125 C | ||
| Professional | |||
| Article number 0 601 ... 377 ... 378 ... 377 ... | |||
| Rated power input | W 850 850 850 | ||
| Output power | W 490 490 490 | ||
| Rated speed | min-1 | 11000 | 11000 11000 |
| Speed control adjustment | min-1 | - | 2800 |
| - | 11000 | ||
| Grinding disc diameter, max. mm 100 100 125 | |||
| Thread of grinder spindle | M 10 M 10 M 14 | ||
| Thread length (max.) of grinder spindle | mm | 17 | 17 |
| Reduced starting current | ● | ● | |
| Constant electronic control | ● | ● | |
| Speed preselection | - | ● | |
| Weight according to EPTA-Procedure 01:2014 | kg | 1.8 | 1.8 |
| Protection class | ☐/II | ☐/II | |
| Angle Grinding GWS... | 8-125 CE | 850 C | |
| Professional | |||
| Article number | 0 601 ... 378 ... | 377 7.. | 378 7.. |
| 377 9.. | 378 9.. | ||
| Rated power input | W 850 850 850 | ||
| Output power | W 490 490 490 | ||
| Rated speed | min-1 | 11000 | 11000 11000 |
| The values given are valid for a nominal voltage [U] of 230 V. For different voltages and models for specific countries, these values can vary. | |||
Bosch Power Tools 1609 92A 2V8| (21.11.16)
10|English
| Angle Grinder | GWS... Professional | 8-125 CE | 850 C | 850 CE |
| Speed control adjustment | min-1 | 2800 | - | 2 |
| - 11000 | - 11000 | |||
| Grinding disc diameter, max. mm 125 125 125 | ||||
| Thread of grinder spindle | M 14 M 14 M 14 | |||
| Thread length (max.) of grinder spindle | mm 22 22 22 | |||
| Reduced starting current | ● ● | ● | ||
| Constant electronic control | ● ● | ● | ||
| Speed preselection | ● - ● | |||
| Weight according to EPTA-Procedure 01:2014 | kg | 1.9 | 1.9 | 1.9 |
| Protection class | ☐/II /II /II ☑ | ☐ | ||
| The values given are valid for a nominal voltage [U] of 230 V. For different voltages and models for specific countries, these values can vary. | ||||
Assembly
Mounting the Protective Devices
Before any work on the machine itself, pull the mains plug.
Note: After breakage of the grinding disc during operation or damage to the holding fixtures on the protection guard/power tool, the machine must promptly be sent to an after-sales service agent for maintenance. For addresses, see section "After-sales Service and Application Service".
Protection Guard for Grinding
Place the protection guard 8 on the spindle collar. Adapt the position of the protection guard 8 to the requirements of the work step. Lock protection guard 8 by tightening locking screw 9 with combination spanner 5/6.
Adjust the protection guard 8 in such a manner that sparking is prevented in the direction of the operator.
Note: The encoding keys on the protection guard 8 ensure that only a protection guard that fits the machine type can be mounted.
Protection Guard for Cutting
For cutting with bonded abrasives, always use the protection guard for cutting 15.
Provide for sufficient dust extraction when cutting stone.
The protection guard for cutting 15 is mounted in the same manner as the protection guard for grinding 8.
Cutting Guide with Dust Extraction Protection Guard
The cutting guide with dust extraction protection guard 22 is mounted in the same manner as the protection guard for grinding 8.
Auxiliary Handle
Operate your machine only with the auxiliary handle 4.
Screw the auxiliary handle 4 on the right or left of the machine head depending on the working method.
Hand Guard
For operations with the rubber sanding plate 18 or with the cup brush/wheel brush/flap disc, always mount the hand guard 17.
The hand guard 17 is fastened with the auxiliary handle 4.
Mounting the Grinding Tools
Before any work on the machine itself, pull the mains plug.
Do not touch grinding and cutting discs before they have cooled down. The discs can become very hot while working.
Clean the grinder spindle 7 and all parts to be mounted.
For clamping and loosening the grinding tools, lock the grinder spindle with the spindle lock button 1.
- Actuate the spindle lock button only when the grinder spindle is at a standstill. Otherwise, the machine may become damaged.
Grinding/Cutting Disc
Pay attention to the dimensions of the grinding tools. The mounting hole diameter must fit the mounting flange without play. Do not use reducers or adapters.
When using diamond cutting discs, pay attention that the direction-of-rotation arrow on the diamond cutting disc and the direction of rotation of the machine (see direction-of-rotation arrow on the machine head) agree.
See graphics page for the mounting sequence.
To fasten the grinding/cutting disc, screw on the clamping nut 12 and tighten it with the combination spanner 5/6, (see section "Quick-clamping Nut").
After mounting the grinding tool and before switching on, check that the grinding tool is correctly mounted and that it can turn freely. Make sure that the grinding tool does not graze against the protection guard or other parts.
English | 11
Mounting flange for grinding spindle M 14: A plastic part (O-ring) is fitted around the centring collar of mounting flange 10. If the O-ring is missing or damaged, the mounting flange 10 must be replaced before resuming operation.
Mounting flange for grinding spindle M 10: The mounting flange can be used on both sides.
Flap Disc
For operations with the flap disc, always mount the hand guard 17.
Rubber Sanding Plate
For operations with the rubber sanding plate 18, always mount the hand guard 17.
See graphics page for the mounting sequence.
Screw on round nut 20 and tighten it with the combination spanner 5/6.
Cup Brush/Disc Brush
For operations with the cup brush/wheel brush, always mount the hand guard 17.
See graphics page for the mounting sequence.
The cup brush/disc brush must be able to be screwed onto the grinder spindle until it rests firmly against the grinder spindle flange at the end of the grinder spindle threads. Tighten the cup brush/disc brush with an open-end spanner.
Quick-clamping Nut SDS-e/ie
For convenient changing of grinding tools without the use of additional tools, you can use the quick-clamping nut 13 instead of the clamping nut 12.
The quick-clamping nut 13 may be used only for grinding or cutting discs.
Use only a flawless, undamaged quick-clamping nut 13.
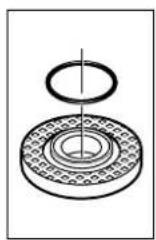
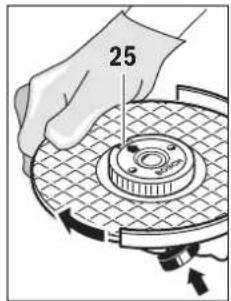
When screwing on, pay attention that the side of the quick-clamping nut 13 with printing does not face the grinding disc; the arrow must point to the index mark 25.
Lock the grinder spindle with the spindle lock button 1. To tighten the quick-clamping nut, firmly turn the grinding disc in clockwise direction.
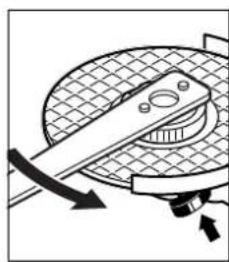
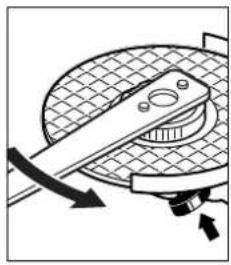
A properly fastened, undamaged quick-clamping nut can be manually loosened by turning the knurled ring in anticlockwise direction.
Never loosen a tight quickclamping nut using pliers; always use the combination spanner. Apply the combination spanner 5/6 as shown in the figure.
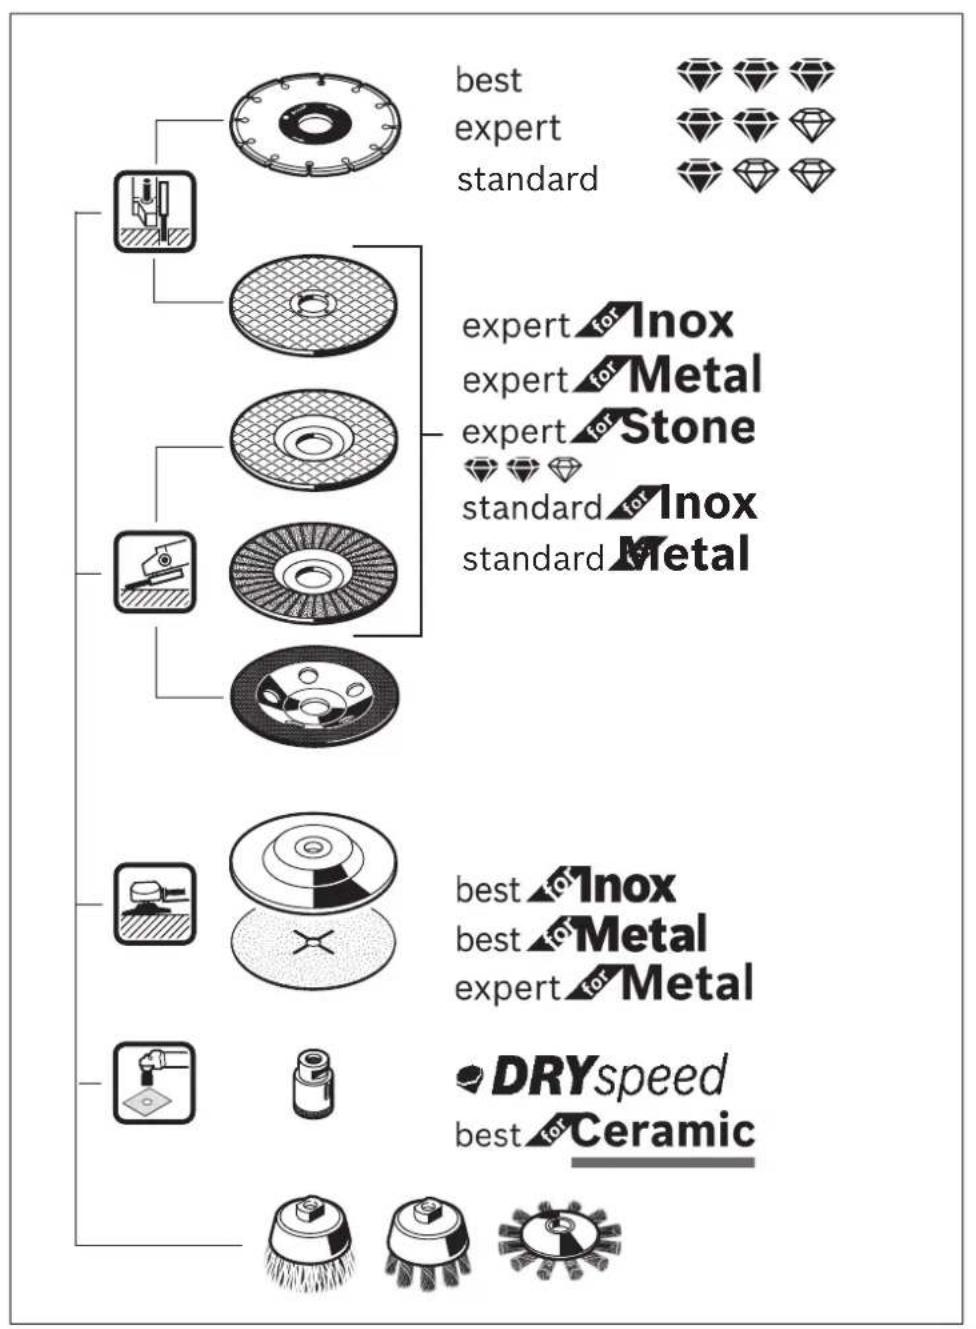
Approved Grinding Tools
All grinding tools mentioned in these operating instructions can be used.
The permissible speed [^-1] or the circumferential speed [m / s] of the grinding tools used must at least match the values given in the table.
Therefore, observe the permissible rotational/circumferential speed on the label of the grinding tool.
| max. [mm] D bd [min] | [mm] -1] [m/s] | |||
| b D | 100 | 6 | 16.0 | 11000 80 |
| 115 | 6 | 22.2 | 11000 80 | |
| 125 | 6 | 22.2 | 11000 80 | |
| D | 100 | - | - | 11000 80 |
| 115 | - | - | 11000 80 | |
| 125 | - | - | 11000 80 | |
| b D | 70 | 30 | M 10 | 11000 45 |
| 75 | 30 | M 14 | 11000 45 | |
Rotating the Machine Head
Before any work on the machine itself, pull the mains plug.

The machine head can be rotated with respect to the machine housing in 90^ steps. In this manner, the On/Off switch can be brought into a more convenient position for special working situations, e.g. for left-handed persons.
Completely unscrew the four screws. Rotate the machine head carefully,
without removing it from the housing, to the new position.
Screw in and tighten the four screws again.


12 | English
Dust/Chip Extraction
Dust from materials such as lead-containing coatings, some wood types, minerals and metal can be harmful to one's health. Touching or breathing-in the dust can cause allergic reactions and/or lead to respiratory infections of the user or bystanders.
Certain dust, such as oak or beech dust, is considered carcinogenic, especially in connection with wood-treatment additives (chromate, wood preservative). Materials containing asbestos may only be worked by specialists.
-As far as possible, use a dust extraction system suitable for the material.
- Provide for good ventilation of the working place.
- It is recommended to wear a P2 filter-class respirator. Observe the relevant regulations in your country for the materials to be worked.
Prevent dust accumulation at the workplace. Dust can easily ignite.
Operation
Starting Operation
Observe correct mains voltage! The voltage of the power source must agree with the voltage specified on the nameplate of the machine. Power tools marked with 230V can also be operated with 220V .
Hold power tool by insulated gripping surfaces 24 and auxiliary handle 4 only. The accessory may contact hidden wiring or its own cord. Accessory contacting a "live" wire may make exposed metal parts of the power tool "live" and shock the operator.
When operating the machine with power from mobile generators that do not have sufficient reserve capacity or are not equipped with suitable voltage control with starting current amplification, loss of performance or untypical behavior can occur upon switching on.
Please observe the suitability of the power generator being used, particularly with regard to the mains voltage and frequency.
Switching On and Off
To start the power tool, push the On/Off switch 2 forwards. To lock the On/Off switch 2, press the On/Off switch 2 down at the front until it latches.
To switch off the power tool, release the On/Off switch 2 or, if it is locked, briefly push down the back of the On/Off switch 2 and then release it.
To save energy, only switch the power tool on when using it.
Check grinding tools before using. The grinding tool must be mounted properly and be able to move freely. Carry out a test run for at least one minute with no load. Do not use damaged, out-of-centre or vibrating grinding tools. Damaged grinding tools can burst and cause injuries.
Reduced starting current
The electronic reduced starting current limits the power consumption when switching the tool on and enables operation from a 13 ampere fuse.
Constant Electronic Control
Constant electronic control holds the speed constant at no-load and under load, and ensures uniform working performance.
Speed preselection (GWS 8-100 CE/GWS 8-125 CE/GWS 850 CE)
The required speed can be preselected with the thumbwheel 3 (also while running).
The data in the following table are recommended values.
| Material Application Accessory Thumbwheel Position | |||
| Metal Removing paint Sanding disc 2 - 3 | |||
| Wood, metal Brushing, rust removal Cup brush, sanding disc 3 | |||
| Metal, masonry | Grinding | Grinding disc | 4 - 6 |
| Metal Rough grinding | Grinding disc | 6 | |
| Masonry, stone | Cutting | Cutting disc and cutting guide | 6 |
| (Cutting masonry/stone is permitted only with use of the cutting guide) | |||
| Working Advice | |||
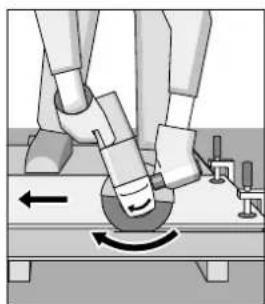
| • Exercise caution when cutting slots in structural walls; see Section "Information on Structures". • Clamp the workpiece if it does not remain stationary due to its own weight. • Do not strain the machine so heavily that it comes to a standstill. • After heavily straining the power tool, continue to run it at no-load for several minutes to cool down the accessory. | Do not touch grinding and cutting discs before they have cooled down. The discs can become very hot while working. Do not use the power tool with a cut-off stand. Rough Grinding Never use a cutting disc for roughing. The best roughing results are achieved when setting the machine at an angle of 30° to 40°. Move the machine back and forth with moderate pressure. In this manner, the workpiece will not become too hot, does not discolour and no grooves are formed. | ||
Flap Disc
With the flap disc (accessory), curved surfaces and profiles can be worked.
Flap discs have a considerably higher service life, lower noise levels and lower sanding temperatures than conventional sanding sheets.
Cutting Metal
For cutting with bonded abrasives, always use the protection guard for cutting 15.
When cutting, work with moderate feed, adapted to the material being cut. Do not exert pressure onto the cutting disc, tilt or oscillate the machine.
Do not reduce the speed of running down cutting discs by applying sideward pressure.
The machine must always work in an upgrinding motion. Otherwise, the danger exists of it being pushed uncontrolled out of the cut.
When cutting profiles and square bar, it is best to start at the smallest cross section.
Cutting Stone
- Provide for sufficient dust extraction when cutting stone.
Wear a dust respirator.
The machine may be used only for dry cutting/grinding.
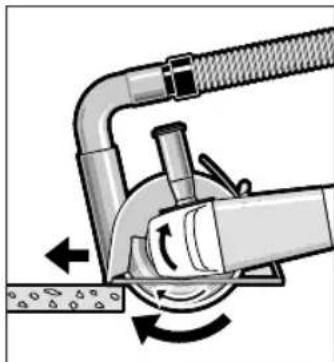
For cutting stone, it is best to use a diamond cutting disc. When using the cutting guide with dust extraction protection guard 22, the vacuum cleaner must be approved for vacuuming masonry dust. Suitable vacuum cleaners are available from Bosch.
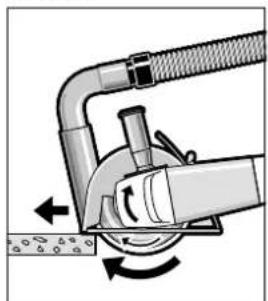
Switch on the machine and place the front part of the cutting guide on the workpiece. Slide the machine with moderate feed, adapted to the material to be worked.
For cutting especially hard material, e.g., concrete with high pebble content, the diamond cutting disc can overheat and
become damaged as a result. This is clearly indicated by circular sparking, rotating with the diamond cutting disc. In this case, interrupt the cutting process and allow the diamond cutting disc to cool by running the machine for a short time at maximum speed with no load.
Noticeably decreasing work progress and circular sparking are indications of a diamond cutting disc that has become dull. Briefly cutting into abrasive material (e.g. lime-sand brick) can resharpen the disc again.
Information on Structures
Slots in structural walls are subject to the Standard DIN 1053 Part 1, or country-specific regulations.
These regulations are to be observed under all circumstances. Before beginning work, consult the responsible structural engineer, architect or the construction supervisor.
Maintenance and Service
Maintenance and Cleaning
Before any work on the machine itself, pull the mains plug.
For safe and proper working, always keep the machine and ventilation slots clean.
In extreme conditions, always use dust extraction as far as possible. Blow out ventilation slots frequently and install a portable residual current device (PRCD). When working metals, conductive dust can settle in the interior of the power tool. The total insulation of the power tool can be impaired.
Please store and handle the accessory(-ies) carefully. If the replacement of the supply cord is necessary, this has to be done by Bosch or an authorized Bosch service agent in order to avoid a safety hazard.
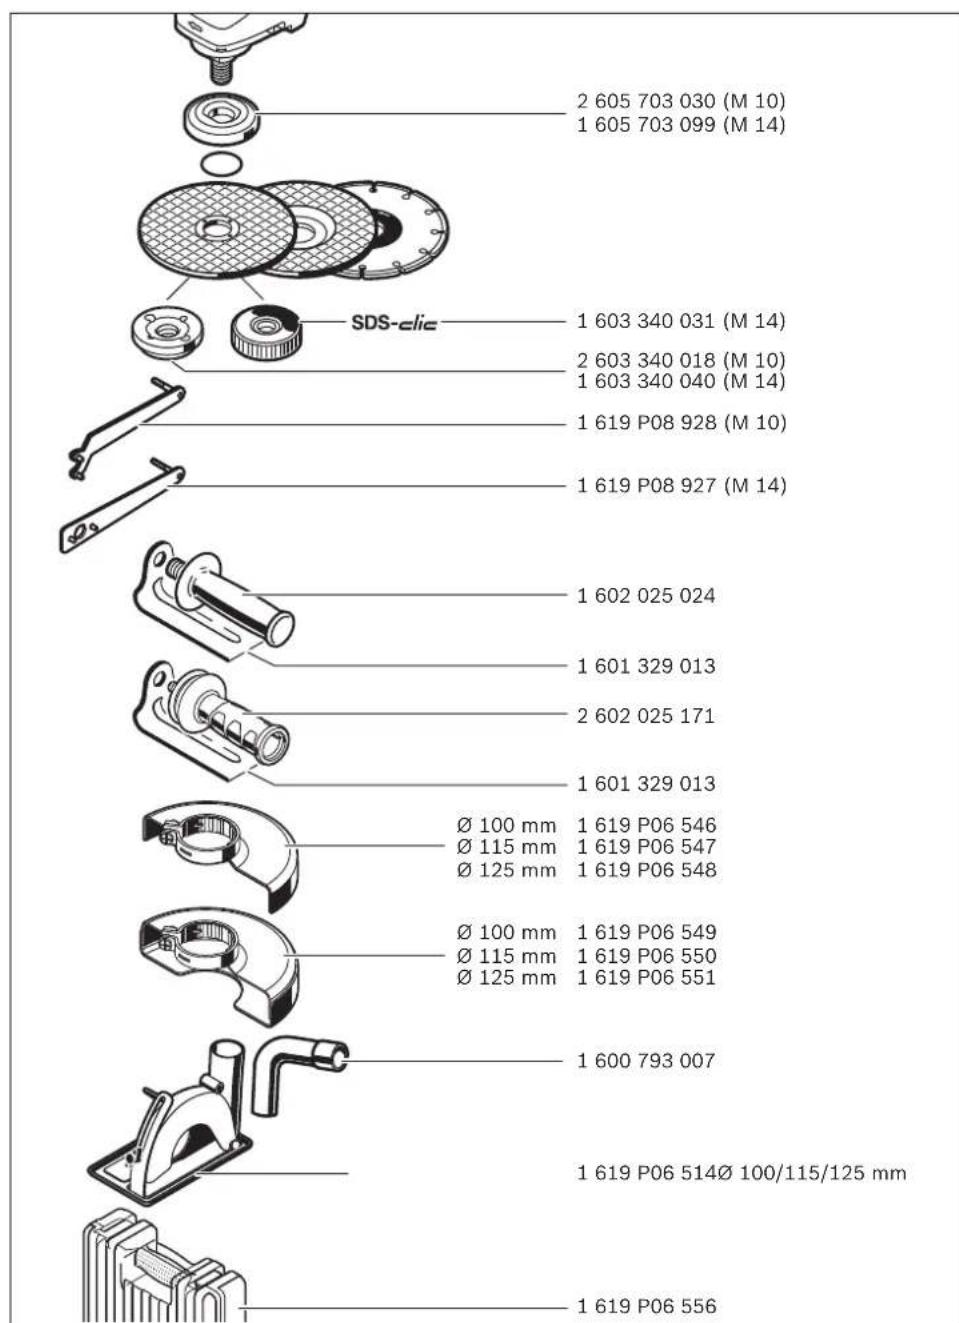
After-sales Service and Application Service
Our after-sales service responds to your questions concerning maintenance and repair of your product as well as spare parts. Exploded views and information on spare parts can also be found under:
www.bosch-pt.com
Bosch's application service team will gladly answer questions concerning our products and their accessories.
In all correspondence and spare parts orders, please always include the 10-digit article number given on the nameplate of the product.
People's Republic of China
China Mainland
Bosch Power Tools (China) Co., Ltd.
567, Bin Kang Road
Bin Jiang District 310052
Hangzhou, P.R.China
Service Hotline: 4008268484
Fax: (0571) 87774502
E-Mail: contact.ptcn@cn.bosch.com
www.bosch-pt.com.cn
Our after-sales service responds to your questions concerning maintenance and repair of your product as well as spare parts. Exploded views and information on spare parts can also be found under:
14|English
HK and Macau Special Administrative Regions
Robert Bosch Hong Kong Co. Ltd.
21st Floor, 625 King's Road
North Point, Hong Kong
Customer Service Hotline: +852 2101 0235
Fax:+85225909762
E-Mail: info@hk.bosch.com
www.bosch-pt.com.hk
Indonesia
PT Robert Bosch
Palma Tower 10^th Floor
JL RA Kartini II-S Kaveling 6 Sek II
Pondok Pinang, Kebayoran Lama
28th Floor Fort Legend Towers,
3rd Avenue corner 31st Street,
Fort Bonifacio Global City,
1634 Taguig City, Philippines
Tel.: (02) 8703871
Fax: (02) 8703870
matheus.contiero@ph.bosch.com
www.bosch-pt.com.ph
Bosch Service Center:
9725-27 Kamagong Street
San Antonio Village
Makati City, Philippines
Tel.: (02) 8999091
Fax: (02) 8976432
E-Mail: rosalie.dagdagan@ph.bosch.com
Malaysia
Robert Bosch Sdn. Bhd.
No.8A,Jalan 13/6
G.P.O.Box 10818
46200 Petaling Jaya
Selangor, Malaysia
Tel.: (03) 79663194
Fax: (03) 79583838
E-Mail: cheehoe.on@my.bosch.com
Toll-Free: 1800 880188
www.bosch-pt.com.my
Thailand
Robert Bosch Ltd.
Liberty Square Building
No.287,11 Floor
Silom Road, Bangrak
Bangkok 10500
Tel.: 026393111
Fax:022384783
Robert Bosch Ltd., P. O. Box 2054
Bangkok 10501, Thailand
www.bosch.co.th
Bosch Service - Training Centre
La Salle Tower Ground Floor Unit No.2
10/11 La Salle Moo 16
Srinakharin Road
Bangkaew, Bang Plee
Samutprakarn 10540
Thailand
Tel.:027587555
Fax:027587525
Singapore
Powerwell Service Centre Ptd Ltd
65 Ubi Crescent, #06-03 Hola Centre
Singapore 408559
Tel.: 67469770/71
Fax:67469760
E-Mail: powerwellsc@gmail.com
Toll-Free: 1800 3338333
www.bosch-pt.com.sg
Vietnam
Robert Bosch Vietnam Co. Ltd
13th Floor, 194 Golden Building
473 Dien Bien Phu Street
Ward 25, Binh Thanh District
84 Ho Chi Minh City
Vietnam
Tel.: (08) 6258 3690
Fax: (08) 62583692
Hotline: (08) 6250 8555
E-Mail: tuvankhachhang-pt@vn.bosch.com
www.bosch-pt.com.vn
www.baohanhbosch-pt.com.vn
Australia, New Zealand and Pacific Islands
Robert Bosch Australia Pty. Ltd.
Power Tools
Locked Bag 66
Clayton South VIC 3169
Customer Contact Center
Inside Australia:
Phone: (01300) 307044
Fax: (01300) 307045
Inside New Zealand:
Phone: (0800) 543353
Fax: (0800) 428570
Outside AU and NZ:
Phone:+61395415555
www.bosch-pt.com.au
www.bosch-pt.co.nz
Egypt
Unimar
20 Markaz kadmat
Eltagmoa EL Aoul - New Cairo
Tel: +202 224 76091-95 / +202 224 78072-73
Fax:+20222478075
E-Mail: adelzaki@unimaregypt.com

中文|15
Ethiopia
Forever plc
Kebele 2,754,BP 4806
Addis Ababa, Ethiopia
Tel: +251 111 560 600, +251 111 560 600
E-Mail: foreverplc@ethionet.et
Nigeria
C. Woermann Ltd.
P.O.Box 318
- Badejo Kalesanwo Street
Matori Industrial Estate
Lagos, Nigeria
Tel: +234 17 736 498, +234 17 730 904
E-Mail: d.kornemann@woermann-nigeria.com
Republic of South Africa
Customer service
Hotline: (011) 6519600
Gauteng - BSC Service Centre
35 Roper Street, New Centre
Johannesburg
Tel.: (011) 4939375
Fax: (011) 4930126
E-Mail: bsctools@icon.co.za
KZN - BSC Service Centre
Unit E, Almar Centre
143 Crompton Street
Pinetown
Tel.: (031) 7012120
Fax: (031) 7012446
E-Mail: bsc.dur@za.bosch.com
Western Cape - BSC Service Centre
Democracy Way, Prosperity Park
Milnerton
Tel.: (021) 5512577
Fax: (021) 5513223
E-Mail: bsc@zsd.co.za
Bosch Headquarters
Midrand, Gauteng
Tel.: (011) 6519600
Fax: (011) 6519880
E-Mail: rbsa-hq.pts@za.bosch.com
Disposal
The machine, accessories and packaging should be sorted for environmental-friendly recycling.
Do not dispose of power tools into household waste!
Subject to change without notice.
中文
安全规章
电动工具通用安全警告

記記本登的安進平數和紅人,紅人紅人紅人紅人紅人紅人紅人紅人紅人紅人紅人紅人紅人紅人紅人紅人紅人紅人紅人紅人紅人紅人紅人紅人紅人紅人紅人紅人紅人紅人紅人紅人紅人紅人紅人紅人紅人紅人紅人紅人紅人紅人紅人紅人紅人紅人紅人紅人紅人紅人紅
将至少击日元用期查到,如能成功,
上
ducuoeo 1
#
凿藻藻藻藻藻藻藻藻藻藻藻藻藻藻藻藻藻藻藻藻藻藻藻藻藻藻藻藻藻藻藻藻藻藻藻藻藻藻藻藻藻藻藻藻藻藻藻藻藻藻藻藻藻藻藻藻藻藻藻藻藻藻藻藻藻藻藻藻藻藻藻藻藻藻藻藻藻藻藻藻藻藻藻
龍本號書部樂樂樂樂樂樂樂樂樂樂樂樂樂樂樂樂樂樂樂樂樂樂樂樂樂樂樂樂樂樂樂樂樂樂樂樂樂樂樂樂樂樂樂樂樂樂樂樂樂樂樂樂樂樂樂樂樂樂樂樂樂樂樂樂樂樂樂樂樂樂樂樂樂樂樂樂樂樂樂樂樂樂樂樂樂樂樂樂樂樂樂樂樂樂樂樂樂樂樂樂
本章 《》
本章内容包括以下内容:
→連通中子,本名,电电电电电电电电电电电电电电电电电电电电电电电电电电电电电电电电电电电电电电电电电电电电电电电电电电电电电电电电电电电电电电电电电电电电电电电电电电电电电电电
- 關於此和上列所列之相應的,請參閱《京建通貨運公司之運營公司之運營公司法》。
电影的音速,当有音速时,将自动播放。
Mechanics and Electronics Ltd. PT/SAX-ASA
298 Bojeong-dong Giheung-gu
Yongin-si, Gyeonggi-do, 446-913
Republic of Korea
080-955-0909

mynline139
司
吉和的
徒通国将责
JANNAVAIINIAI WAIYAWAOWAENWUANWUANWUANWUANWUANWUANWUANWUANWUANWUANWUANWUANWUANWUANWUANWUANWUANWUANWUANWUANWUANWUANWUANWUANWUANWUANWUANWUANWUANWUANWUANWUANWUANWUAN
vanduulwivnwnnuunnuuwwan wannnuuul 1 u wia nauwunauu uua quu uuduvnuuunnnnngnllwugnuunnnn nnualwnuuunnuu
aannnnnnae annnnnne nnnnnnne aannnnnne
1 1 1 1 1 1 1 1 1 1 1 1 1 1 1 1 1 1 1 1 1 1 1 1 1 1 1 1 1 1 1 1 1 1 1
aalnnae aen nannnnnne eanennnne
nlaananaananaananaananaananaananaananaananaananaananaananaananaananaananaananaananaananaananaananaananaananaananaananaananaananaananaananaananaananaananaananaananaananaananaananaananaananaananaananaananaananaananaananaananaananaananaananaananaananaananaan ana anannnaaannnnnnnnnnnnnnnnnnnnnnnnnnnnnnnnnnnnnnnnnnnnnnnnnnnnnnnnnnnnnnnnnnnnnnnnnnnnnnnnnnnnnnnnnnnnnnnnnnnnnnnnnnnnnnnnnnnnnnnnnnnnannannannannannannannannannannannannannannannannannannannannannannannannannannannannannannannannannannannannannannannannannannannannannannannannannannannannannannannannannannannannannannannannannannannannannannannannannannannannannannannannannannannannannannannannannannannannannannannannannannannann annn aennn nne nne nne nne nne nne nne nne nne nne nne nne nne nne nne nne nne nne nne nne nne nne nne nne nne nne nne nne nne nne nne nne nne nne nne nne nne nne nne nne nne nne nne nne nne nne nne nne nne nne nae
7777777777
nnuuuaanunwuuuauu uunnuuunuunuunuunuun uunnuuunuunuunuunuun uunnuuunuunuunuun uunnuuunuunuunuun uunnuuunuunuun uunnuuunuunu un
aunnnnnae annnne aannnnnnae anan nnnnnae annnnnnae annnnnnae annnnnnae
Jauunnaa aalaae 1000000000000000000000000000000000000000000000000000000
yovnuuynnnnnae nnnnnae nnne ne nnnnne nnnnne nnnnne nnnnne nnnnne nnnnne nnnnne nnnnne nnnnne nnnnne nnnnne nnnnne nnnnne nnnnne nnnnne nnnnne nnnnne nnnnne nnnnne nnnnne nnnnne nnnnne nnnnne nnnnne nnnnne nnnnnee nnnnne nnnnne nnnnne nnnnne nnnnne nnnnne nnnnne nnnnne nnnnne nnnnne nnnnne nnnnne nnnnne nnnnne nnnnne nnnnne nannnee
nannnnnnnnnnnnnnnnnnnnnnnnnnnnnnnnnnnnnnnnnnnnnnnnnnnnnnnnnnnnnnnnnnnnnnnnnnnnnnnnnnnnnnnnnnnnnnnnnnnnnnnnnnnnnnnnnnnnnnnnnnnnnnnnnnnn
Tnannnnnnnnnnnnnnnnnnnnnnnnnnnnnnnnnnnnnnnnnnnnnnnnnnnnnnnnnnnnnnnnnnnnnnnnnnnnnnnnnnnnnnnnnnnnnnnnnnnnnnnnnnnnnnnnnnnnnnnnnnnnnnnnnnnn
nannnnnnae nnnnne nnnnne nnnnne nnnnne nnnnne nnnnne nnnnne nnnnne nnnnne nnnnne nnnnne nnnnne nnnnne nnnnne nnnnne nnnnne nnnnne nnnnne nnnnne nnnnne nnnnne nnnnne nnnnne nnnnne nnnnne nnnnnee nnnnne nnnnne nnnnne nnnnne nnnnne nnnnne nnnnne nnnnne nnnnne nnnnne nnnnne nnnnne nnnnne nnnnne nnnnne nnnnne nnnnne nnnnne nnnnne nnnnne nnnnne nnnnne nnnnne nnnnne nnnnae
nnaaannnnnnnnnnnnnnnnnn
aalnnaeannnnnneanennnne anen nnnnne aannnnnne
401
aaiiiaaiinaiinaiinaiinaiinaiinaiinaiinaiinaiinaiinaiinaiinai
nauuue uuaaunnnnnae nnaa aannnnnne ananen ananennnnae
aannnnnne nnnnne nnnnnnne nnnnnnne nnnnnnne nnnnnnne nnnnnnne nnnnnnne nnnnnnne nnnnnnne nnnnnnne nnnnnnne nnnnnnne nnnnnnne nnnnnnne nnnnnnne nnnnnnne nnnnnnne nnnnnnne nnnnnnne nnnnnnne nnnnnnne nennnnnne nnnnnnne nnnnnnne nnnnnnne nnnnnnne nnnnnnne nnnnnnne nnnnnnne nnnnnnne nnnnnnne nannnne nannnne nannnne nannnne nannnne nannnne nannnne nannnne nannnne nannnne nannnne nannnne nannnne nannnne nannnne nannnne nannnne nannnne nannnne nannnne nannnne nannnne nannnne nannnne nannnne nennnee
1
yannnnnnaaannnnnnaaannnnnnaanennnnnnaaannnnnnaaannnnnnaaannnnnnaaannnnnnaaannnnnnaaannnnnnaaannnnnnaaannnnnnaaannnnnnaaannnnnnaaannnnnnaaannnnnnaaannnnnnaaannnnnnaaannnnnnaaannnnnnaaannnnnnaaannnnnnaaannnnnnaaannnnnnaaennnnnnaaannnnnnaaannnnnnaaannnnnnaaannnnnnaaannnnnnaaannnnnnaaannnnnnaaannnnnnaaannnnnnaaannnnnnaaannnnnnaaannnnnnaaannnnnnaaannnnnnaaannnnnnaaannnnnnaaannnnnnaaannnnnnaaannnnnnaaa
aannnnnnae aae nnnnne ane ae annnne
#
aunauuulnuiuunnnnnnnnnnnnnnnnnnnnnnnnnnnnnnnnnnnnnnnnnnnnnnnnnnnnnnnnnnnnnnnnnnnnnnnnnnnnnnnnnnnnnnnnnnnnnnnnnnnnnnnnnnnnnnnnnnnnnnnnnnnnnnnnnnnnnnnnn
nannnnnnnnnnnnnnnnnnnnnnnnnnnnnnnnnnnnnnnnnnnnnnnnnnnnnnnnnnnnnnnnnnnnnnnnnnnnnnnnnnnnnnnnnnnnnnnnnnnnnnnnnnnnnnnnnnnn
nannnnnnnnnnnnnnnnnnnnnnnnnnnnnnnnnnnnnnnnnnnnnnnnnnnnnnnnnnnnnnnnnnnnnnnnnnnnnnnnnnnnnnnnnnnnnnnnnnnnnnnnnnnnnnnnnnnnnnnnnn
nnaaannnnnnaananaananaananaananaananaananaananaananaananaananaananaananaananaananaananaananaananaananaananaananaananaananaananaananaananaananaananaananaananaananaananaananaananaananaananaananaananaananaananaananaananaananaananaananaananaananaananaananaananaananaan
nannnuuunnnnnae"nana"wneanneeauuuuul uannnnnnaaiauuaiaaaanu uannnnaa aannnnnnaa aannnnnnaa aannnnnnaa aannnnnnaa
aunnnnnaannnnnnnnnnnnnnnnnnnnnnnnnnnnnnnnnnnnnnnnnnnnnnnnnnnnnnnnnnnnnnnnnnnnnnnnnnnnnnnnnnnnnnnnnnnnnnnnnnnnnnnnnnnnnnnnnnnnnnnnnnnnnnnnnnnnnnnnnnnnnnnnnnn nn
1 1
421
aunnnae nnnnne nee eae nne nne nne nne nne nne nne nne nne nne nne nne nne nne nne nne nne nne nne nne nne nne nne nne nne nne nne nne nne nne nne nne nne nne nne nne nne nne nne nne nne nne nne nne nne nne nne nne nne nne nnee
mnnnnnnaaannnnnnaaennnnnnnnnnnnnnnnnnnnnnnnnnnnnnnnnnnnnnnnnnnnnnnnnnnnnnnnnnnnnnnnnnnnnnnnnnnnnnnnnnnnnnnnnnnnnnnnnnnnnnnnnnnnnnnnnnnnnnnnnnnnnnnnnnnnnnnnnnnnnnnnn
1 1
H
aannnnnnaanennnnnnnnnnnnnnnnnnnnnnnnnnnnnnnnnnnnnnnnnnnnnnnnnnnnnnnnnnnnnnnnnnnnnnnnnnnnnnnnnnnnnnnnnnnnnnnnnnnnnnnnnnnnnnnnnnnnnnnnnnnnnnnnnnnnnnnnnnnnnnnn
i#
Vnnuuunnnnnnnnnnnnnnnnnnnnnnnnnnnnnnnnnnnnnnnnnnnnnnnnnnnnnnnnnnnnnnnnnnnnnnnnnnnnnnnnnnnnnnnnnnnnnnnnnnnnnnnnnnnnnnnnnnnnnnnnnnnnnnnnnnnnnnnnnnnnnnnnn
aannnnnnae annnnnne aen nnnnne
T

aunnnnnae
Tnannnnnnnnnnnnnnnnnnnnnnnnnnnnnnnnnnnnnnnnnnnnnnnnnnnnnnnnnnnnnnnnnnnnnnnnnnnnnnnnnnnnnnnnnnnnnnnnnnnnnnnnnnnnnnnnnnnnnnnnnnnnnnnnnnnnnnnnnnnnnnnnnnnnnnnnnnnnnnn nn nannn nannn nannn nannn nannn nannn nannn nannn nannn nannn nannn nannn nannn nannn nannn nannn nannn nannn nannn nannn nannn nannn nannn nannn nannn nannn nannn nannn nannn nannn nannn nannn nannn nannn nn annn nn annn nn annn nn annn nn annn nn annn nn annn nn annn nn annn nn annn nn annn nn annn nn annn nn annn nn annn nn annn nn annn nn annn nn annn nn annn nn annn nn annn nn annn nn annn nn annn nn annn nn annn nn annn nn annn nn annn nn annn nn annn nn annn nn ann
Jauuuaaiaa auaaunuiuuiuuiuau
y

aannnnnnaanennnnnnnnnnnnnnnnnnnnnnnnnnnnnnnnnnnnnnnnnnnnnnnnnnnnnnnnnnnnnnnnnnnnnnnnnnnnnnnnnnnnnnnnnnnnnnnnnnnnnnnnnnnnnnnnnnnnnnnnnnnnnnnnnnnnnnnnnnnnnnnn
y
nnnn nnnn nn nnnn nnnn nnnn nnnn nnnn nnnn nnnn nnnn nnnn nnnn nnnn nnnn nnnn nnnn nnnn nnnn nnnn nnnn nnnn nnnn nnnn nnnn nnnn nnnn nnnn nnnn nnnn nnnn nnnn nnnn nnnn nnnn nnnn nnnn nn
nna-n
nannnnn nnnnnaaennnnn 2 2
Jauuuaa aannnnnnae 2 nnnnnn
Wuwenwuyu Wuaanmuaon


461
1 1 1 1 1 1 1 1 1 1 1 1 1 1 1 1 1 1 1 1 1 1 1 1 1 1 1 1 1 1 1 1 1 1
nssnnnsuaa wwnnnnne
wannnnnnaaennnnnnaanennnnnnnnnnnnnnnnnnnnnnnnnnnnnnnnnnnnnnnnnnnnnnnnnnnnnnnnnnnnnnnnnnnnnnnnnnnnnnnnnnnnnnnnnnnnnnnnnnnnnnnnnnnnnnnnnnnnnnnnnnnnnnnnnnnnnn
n77777777777777777777777777
yannnnnnaanrnnnnaaennnnnnaaannnnnnaaannnnnnaaannnnnnaaannnnnnaaannnnnnaaannnnnnaaannnnnnaaannnnnnaaannnnnnaaannnnnnaaannnnnnaaannnnnnaaannnnnnaaannnnnnaaannnnnnaaannnnnnaaannnnnnaaannnnnnaaannnnnnaaannnnnnaaennnnnnaaannnnnnaaannnnnnaaannnnnnaaannnnnnaaannnnnnaaannnnnnaaannnnnnaaannnnnnaaannnnnnaaannnnnnaaannnnnnaaannnnnnaaannnnnnaaannnnnnaaannnnnnaaannnnnnaaannnnnnaaannnnnnaaennnnnnaa
n (GWS 8-100 CE/GWS 8-125 CE/GWS 850 CE)
nannnnnnnnnnnnnnnnnnnnnnnnnnnnnnnnnnnnnnnnnnnnnnnnnnnnnnnnnnnnnnnnnnnnnnnnnnnnnnnnnnnnnnnnnnnnnnnnnnnnnnnnnnnnnnnnnnnn
| lang | name of the country | language of origin | nationality |
| lang | 牙签肉汤 | 牙签肉汤 | 2-3 |
| lang, lang | 山楂, 糖醋鱼汤 | 山楂烧鸡块, 鸡胸肉汤 | 3 |
| lang, vunio | 牙签肉汤 | 牙签肉汤 | 4-6 |
| lang | 牙签肉汤 | 牙签肉汤 | 6 |
| vunio, nu | 牙签肉 | 牙签肉汤 | 6 |
fouuununnu
1 1
nauuovnuunnuuunnuuauuauuauuauuuu uuuuuuuuuuuuuuuuuuuuuuuuuuuuuuuuuuuuuuuuuuuuuuuuuuuuuuuuuuuuuuuuuuuuuuuuuuuuuuuuuuuuuuuuuuuuuuuuuuuuuuuuuuuuuuuuuuuuuuuuuuuuuuuuuuuuuuuuuuuuuuuuuuuuuuuuuuuuuuuuuuuuuuuuuuuuuuuuuuuuuuuuuuuuuuuuuuuuuuuuuUU
a
n7n
nntnnnnnnnnnnnnnnnnnnnnnnnnnnnnnnnnnnnnnnnnnnnnnnnnnnnnnnnnnnnnnnnnnnnnnnnnnnnnnnnnnnnnnnnnnnnnnnnnnnnnnnnnnnnnnnnnnnnnnnnnnnnnnnnnnnnnnnnnnnnnnnnnnnnnnnnnnnnnnnnnnnnnnnnn
zhuangzhuan
ywnnnaa (nnnnnnaa) nnnnnnnnnnnnnnnnnnnnnnnnnnnnnnnnnnnnnnnnnnnnnnnnnnnnnnnnnnnnnnnnnnnnnnnnnnnnnnnnnnnnnnnnnnnnnnnnnnnnnnnnnnnnn
yannnnnnaaannnnnnnnnnnnnnnnnnnnnnnnnnnnnnnnnnnnnnnnnnnnnnnnnnnnnnnnnnnnnnnnnnnnnnnnnnnnnnnnnnnnnnnnnnnnnn
nnaan
i0000000000000000000000000000000000000000000

mynline147
m
- →
Aaannnnnnae aennnnne nnnnne
y 22 2000000000000000000000000000000000000000000000

nannnnnnnnnnnnnnnnnnnnnnnnnnnnnnnnnnnnnnnnnnnnnnnnnnnnnnnnnnnnnnnnnnnnnnnnnnnnnnnnnnnnnnnnnnnnnnnnnnnnnnnnnnnnnnnnnnnnnnnnnnnnnnnnnnnnnnnnnnnn
10000000000000000000000000000000000000000000000000
lunuui uynnnnnae uanrnnnnaaennnnaa aen
yuaanmnuuun
nannnnnnnnnnnnnnnnnnnnnnnnnnnnnnnnnnnnnnnnnnnnnnnnnnnnnnnnnnnnnnnnnnnnnnnnnnnnnnnnnnnnnnnnnnnnnnnnnnnnnnnnnnnnnnnnnnnnnnnnnnnnnnnnnnnnnnnnnnnnnnnn
nunnuuaaunnn
nynnynnnaaannnaa
Vaaanannnnnnaaannnnnnnnnnnnnnnnnnnnnnnnnnnnnnnnnnnnnnnnnnnnnnnnnnnnnnnnnnnnnnnnnnnnnnnnnnnnnnnnnnnnnnnnnnnnnn
Wulwuluulwunwnnnuuuaaannnnn
wnnnn nn nnnn nnnnnnnnnnnnnnnnnnnnnnnnnnnnnnnnnnnnnnnnnnnnnnnnnnnnnnnnnnnnnnnnnnnnnnnnnnnnnnnnnnnnnnnnnnnnnnnnnnnnnnnnnnnnnnnnnnnnnnnnnnnnnnnnnnnnnnnnnnnnnnnnnnnn nn nannn nn nannn nn nannn nn nannn nn nannn nn nannn nn nannn nn nannn nn nannn nn nannn nn nannn nn nannn nn nannn nn nannn nn nannn nn nannn nn nannn nn nannn nn nannn nn nannn nn nannn nn nannn nn nannn nn nannn nn nannn nn nennn nn nannn nn nannn nn nannn nn nannn nn nannn nn nannn nn nannn nn nannn nn nannn nn nannn nn nannn nn nannn nn nannn nn nannn nn nannn nn nannn nn nannn nn nannn nn nannn nn nannn nn nannn nn nannn nn nannn nn nannn nn n ann
nunnnnnnnnnnnnnnnnnnnnnnnnnnnnnnnnnnnnnnnnnnnnnnnnnnnnnnnnnnnnnnnnnnnnnnnnnnnnnnnnnnnnnnnnnnnnnnnnnnnnnnnnnnnnnnnnnnnnnnnnnnnnnnnnnnnnnnnnnnnnnnnnnnnnnnnnnnnnnn nn nannnannnannnannn annn nannnannnannnannn nannnannnannnannn nannnannnannnannn nannnannnannn nannnannnannn nannnannnannn nannnannnannn nannnannnannn nannnannn nannnannn nannnannn nannnannn nannnannn nannnannn nannnann nannn nannn nann nann nann nann nann nann nann nann nann nann nann nann nann nann nann nann nann nann nann nann nann nann nann nann nann nann nann nann nann nann nann nann nann nann
nnsnnnnnnnnnnnnnnnnnnnnnnnnnnnnnnnnnnnnnnnnnnnnnnnnnnnnnnnnnnnnnnnnnnnnnnnnnnnnnnnnnnnnnnnnnnnnnnnnnnnnnn
Palma Tower 10th Floor
JI. RA Kartini II-S Kaveling 6 Sek II
Pondok Pinang. Kebayoran Lama
Canh Bao An Toan cho May Mai Hinh Goc
Cac canh bao an toan dung chung cho cac hoat dong mai, cha nham, cha bang ban bian chai kim loai hay cat bang da cat
Dung cu dien cam tay nay duoc thié ké de the hién chuc nang nuot may mai, may cha nhám, ban chai kim loai hay may cat. Xin hay doc tāc ca cac canh bao an toan, chi dan, hin h anh minh hou va cac dac tinh ky thuaq duoc cung cap kem theo dung cu dien cam tay nay. Khong tuan thu cac huong dan duoc liet ké duoi day co the dan den viec bi dien giut, gay chay/hoac bi thuong tich ngiem trong.
Dung cu dien cam tay nay khong nen su dung de dansbong.Van hanh theo cach ma dung cu dien cam tay khong duoc thiet ke de su dung co the dan den viec gap nguy hiem va gay thuong tich cho ban than.
Khong su dung loai phu tung khong duoc thiiet ké chuyen dung va da ducq nha san xuat may khuyen cao. Chi vi phu tung co the lap vao dungc dung cu dien cua ban, no khong dam bao su yan hanh an toan.
Toc do dans dinh cua phu tung phai it nhat la bang voi toc do toi da ducg ghi tren dung cu dien cam tay. Phu tung chay nanh hon toc do dans dinh cua chung co the vang va ra.
Duong kinh ngoai va do day phu tung cua ban phai nam trong cóng suat danh dinh cua dung cu dien cuan. Khong the bao vé hay dieu khien dung cach duoc voi phu tung khong dung kich co.
Duong ren cua phu kien gan vao thai tong xung voi dong ren cua truc may mai. Doi voi cac phu kien bat vao bang bich, lo tam cua phu
kien phai vua khit voi duong kinh dinh vi cua bich. Phu kien khong thich hop voi vong cu lap cua dung cu dien se chay mat thang bang, rung du dai va co they nen su mat kiem soat.
Khong duoc su dung phu tung da bi hong. Trucc moi lan su dung, kiem tra phu tung giad u hnu la dia hat mai xem co bi sut me hay ran nut, mieng dem xem co bi rach hay qua mon, ban chai kim loai xem rau co bi gay hay dinh khong chat. Neu dung cu dien hay phu tung bi roi xuong, kiem tra xem co hu dong hay lap phu tung c ont nguyen vao. Sau khi kiem tra va lap phu tung vao, bo tri ban than ban va nhung nguoi gan do ra xa khoi cac diem tiep can duoc cua phu tung dang quay va cho dung cu dien cuan ban chay voi toc do khong tai tdi da trong mot phut. Phu tung bi hong thuong thi se bi vang vo ra tong thai diem kiem tra nay.
Hay mang trang bi bao hovao. Tuy theo loai cong viec, su dung chan che mat, kinh chup mat hay kinh bao ho. De thich hop, mang mat na chong bui, do dung bao ho tai nghe, gang tay va quan ao bao ho co kha nang gn bui da hay cac manh vcu vatgia tong ban vao. Su bao ve mat la phai co kha nang ngan duoc cac manh vo vang ra tu cac ung dung khac nhau tao nen. Mat na chong bui hay khau trang phai co kha nang loc duoc cac hat no phat sinh ra tu chinh cac hoat dong may cua ban. Keo dai thiqian de tai tran tiep xuc voi tieng on co cuong do manh co the gay diec.
Bó tri nhung nguòi dung xem d khoang cach an toan ra xa khoi noi lam vièc. Nhug ai di vao khu vu c lam vièc phai co trang bj bao hô ca nhān. Mnh v cua vat gia cóng hay cua phu tung co khā näng väng ra va gay thuong tich ben ngoài khu vu c van hàn h May.
Chi nam giu dung cu dien o phan nam da duoc cach dien, khi v an hanh may o nai dung cu cat co the cham phai day dien duoc thiet ke dau khong nhin thay duoc hay cinh day dan cua may. Dung cu cat cham phai day "co dien" co the lam cho cac bo phan kim loai khong duoc bao boc "co dien" va giut nguoi van hanh may.
De day dien tranh xa phu tung dang quay. Neu su kiem soat dung cu dien bi mat, day dien co the bi cat, tay hay canh tan cua ban co the bi quan lai va biloi vao phu tung dang quay.
Khong bao gio duoc dat dung cu dien xuong cho den khi phu tung da ngung quay hoan toan. Phu tung dang quay co the an vao vao be mat vat lieu va keo dung cu dien ra khoi su dieu khiien cua ban.
60 | Tiếng Viết
Khong cho dung cu dien hoat dong khi dang mang ben hong. Votinh cham vao phu tung dang quay,quan ao ban co the bi quan vao,keo phu tung xia vao minh ban.
Thuong xuyen lam sach cac khe thong gio cua dung cu dien. Quat gio moto se keo bui nam trong vo may ra va su tich tu qua nhieu bot kim loai co the gay nen cac nguy hiem ve dien.
Khong duoc van hanh dung cu dien gan nao cac chat de chay. Tia lua bān ra co the gay chay cac nguyen lieu nay.
Khong su dung phu tung loai can co chat long lam mat. Su dung nuoc hay cac loai chat long lam mat khac co the dan den viec chet do dien giut hay bi dien giut.
Cac canh bao phu them

Hāy mang kinh bao hó.
Dung thiiet bi do tim thich hop de xac dinh neu co cac cong trinh cong cóng lap dat ngam trong khu vu c lam vioc hay lien he voi Cty cong trinh Cong cong dia phuong de nho h tro. Dung cham duong dan dien co thegay ra hoa hoan va dien giut. Lam hui duong dan khi ga co thegay no. Lam tung duong dan nuoc gay hu hong tai san hay co kha nang gay ra dien giut.
Nha cng tac Tat/Mo ra va chuyen vvi tri taki nguon dien cung cap bi ngat,vi du.nh khi bi mat dien hay khi pich cam bi tuot ra. Cach nay de ngan su khoi dong lai khong duc kiem soat.
Kep chat vatgia cong. Vatgia cong duoc kep bang mot thiet bi kep hay bang eto thi vung chan hon giu bang tay.
Chan Bao Vé Dung De Cát
Khi cat bang chat lieu mai nén ket, luon luon su dung chan bao v de cat 15.
Tao du hieu qua cho viiec hut bui khi cat da.
Chan bao védung de cat 15 duoc lap vao gionn hu cach lap chan bao védung de cha nham 8.
Durong Cato Chao Bao Vedanh cho viec Hut Bui
Duroc kat co chan bao vê dang cho viêc hut bui 22 duoc lap vao gion nhu cach gan chan bao vê dang chogia cóng mai 8.
Taynamphu
Chi vanh may cua ban khi da gan tan nam phu 4.
Vān tay nam phu vao 4 vao trén ben bàn phai hay trai dαu may tuy theo cach thuc thao tac.
Chán Bao Vé Tay
Dung cho viéc van hanh voi dia cha cao su 18 hay voi ban chai kim loai/ban chai dia/dia cha gap nep, luon luon gan chan bao vé tay vao 17.
Chán bao vé tay 17 duçc bát chat cung voi tay nam phu 4.
Lap Dung Cu Mai
▶ Truckhi tien hanh bat cu viec gi tren may, keo phich cam dien nguon ra.
Khong duoc cham vao dia mai hay dia cat truck hi cac dia nay da ngoi. Dia co the tro nen rat nong trong luc hoat dong.
Lam sach truc may mai 7 va tát ca bó phán sap duoc láp vao.
De cap chat hay thao long dung cu mai, khoa trunc may mai bang nut khoa trunc 1.
Chho nut khoa truc hoat dong khi truc may mai da dung yan. Neu khong, may co the bi lam hong.
Dia Mai/Cat
Háy lu yén kich co cua dung cu mai. Duong kich cu la lap dung cu phai vua khit voi bich lap dung cu ma khong co khe h. Khong duoc su dung bo phan thu nho hay bo phan tiep hop.
Khi su dung dia cat hat kim cuong, hay luu y mui tien chi chieu quay trn dia cat kim cuong va chiue quay cua may phai cung chieu (xem phan mui tien chi chieu quay in dap tren dau may).
Xem trang hinh anh de biét cac buoc lap rap.
Débat chat dia mai/cat, ván dai oc chan 12 vao va siét chat dai oc lái bang chia ván dai oc két hop 5/6. (xem phan "Dai Oc Khoa Nanh").
Sau khi lap dung cu mai va truck hmi mo may, kiem tra xem dung cu mai co lap vao dung cach khong va co the quay tu do khong. Dam bao dung cu mai khong cham vao chan bao v hay cac bo phan khac.

Bich lap cho truc may mai co
co M 14: Chi tiét bang nhua
(vong dem chu' O) duoc lap vao
vanh dinh tam cua bich lap 10.
Neu vong dem chu' O bj m
hay bi hu, thai thay bich lap 10
trucc khi cho may hoat dong tro
lai.
Bich lap cho truc may mai co co M 10: Cai maitcua bich lap deu co the su dung duoc.
Dia cha gap nep
De vanh hàn chéi dia cha gāp nép, luon luong gán chan bao vé tay 17 vào.
Dia Chà Cao Su
De vanh nao dia cha de cao su 18, luon luon gan chan bao vay 17 vao.
Xem trang hinh anh de biét cac buoc lap rap.
Vän dai oc trón 20 va siét chat lái bang chia ∀n dai oc két hop 5/6.


64 | Tiéng Viét
Bàn Chái kim loai/Bàn Chái Dia
De vanh voi ban chai loai/ban chai dia, luon luon gan chan bao ve tay 17 vao.
Xem trang hinh anh de biét cac buoc lap rap.
Ban chai kim loai/ban chai dia phai vanc duoc hét vao tan vong ren cuoi cuia truc may mai cho den khi nam chac sat vao bich lap cuia truc may mai. Siét chat ban chai kim loai/ban chai dia lai bang khoa mo mieng hai chau.
Dai Oc Khoa Nanh SDS-lee
De duoc tien lei trong viec thay dung cu mai ma khong can su dung den cac dung cu ho tro khac, ban co the su dung dai oc khoa nhanh 13 they cho dai oc khoa thuong 12.
Dai oc khoa nanh 13 co le chi duoc dung cho dia mai hay dia kat.
Chi su dung dai oc khoa nanh con tot nguyen, khong khuyet tat 13.
Khi vān vào, hāy luu y rang mat cua dai oc khoa nhanh 13 co in chu khong huong vé phia dia mai; mui ten pah chi vé nc douky hiéu 25.
Khoa truc may mai bang nut khoa trunc may 1. De siet chat dai oc khoa nhanh. xoay that chat dia mai theo chieu dong ho.
Mòt dai òc khong bi hu hóng, duoc vān chàt dung cach, co the dung tay de vān long ra bang cach vān vong vān khia nguc chieu kim dong hó.
Khong bao gio duoc
thao dai oc kep nanh
dinh chat sat ra bang
kem; luon luon su
dung chia vān dai oc ket hop. Ap dung chia vān dai oc ket hop 5/6 nhu trinh bay trong hinve.
Tang 10,194 Golden Building
473 Dién Bién Phu
Phuong 25, Quan Binh Thanh
Thanh Pho Ho Chi Minh
Viet Nam
Tel.: (08) 6258 3690 Ext 413
Fax: (08) 6258 3692
hieu.lagia@vn.bosch.com
www.bosch-pt.com
Thai bo
julal aclilll abioill
-06000a
+213(0)982400992:
+213(0)34201569:J<
sav@siestal-dz.com:
uigj
Ug
25-99 0a j ugs uw gooJ.1p.o
JUUGUJUJUNSO.2014
+21671428770:
+21671354175:J
sotel2@planet.tn:gj
Jawg
LdoJlJ20
00-0yJyJyj0j0j0j0j0j0j0j0j0j0j0j0j0j0j0j0j0j0j0j0j0j0j0j0j0j0j0j0j0j0j0j0j0j0j0j0j0j0j0j0j0j0j0j0j0j0j0j0j0j0j
+20222476091-95/+20222478072-73:
+20222478075:UaSla
boschegypt@unimaregypt.com:j
aJySsI oSsI no yalil
g g g g g g g g g g g g g g g g
sLcAaIJI UaJIUgJb Jc aUauo aJy
-
Jg g 0g bglal aolc jg gll ng
Jg jg jj g jg jg jg jg jg
.0uullJgJU
jull o ggb Lswg ggoggol 1
Jag. JUJ UJU 9 JUJIg bai j
aJ 10 JgBg
LgUSSI LgUSS
山
J 1 J 1 J 1
aJdJI JUg1jU 1053 uJg
gulwUWuSioo uuwI.5gJgO 0
gJgwsal Jaaal yo gI Jggsal JaaJI u Jaq
J.
doJgduJl
.aaJgSJI oSsI Jc Joc 1
.1gJUuUaagill
4 aJj
gagw g aui
A
a 1000
(PRCD) aaiJ JUJ 10aLgU alao g
.13 3 aaa aaa aaa aaa aaa aaa aaa aaa aaa
1g2gaoi gjoc jbcjuc aulllaailll ogsalllogleolj!
IJIbIgJINJNLLAglggagllalolsaIg g JIgJIgJGLgIgOgJgJLgS JIg SaaIgJIgJIgJIgJIgJIgJIgJIgJIgJIgJIgJIgJIgJIgJIgJIgJIgJIgJIgJIgJIgJIgJIgJIgJIgJIgJIgJIgJIgJIgJIgJIgJIgJIgJ1 IaIIaIIaIIaIIaIIaIIaIIaIIaIIaIIaIIaIIaIIaIIaIIaIIaIIaIIaIIaIIaIIaIIaIIaIIaIIaIIaIIaIIaIIaIIaIIaIIaIIaIIaIIaIIaIIaIIaIIaIIaIIaIIaIIaIIaIIaIIaIIaIIaIIaIIa
slic Jaa Jlao 100 j0 uS ydyu i ydi aioi gJuaa oJyIaIbui d. yauag Ula Jia G uUaI cuiuol oogssoll Jauu Iuall Jaa
Joo JI I JIgai Sic bag agjaoi
aui jkll gai gai gai ooc uoi li n
gai sccn .auai jygi jil gai aai ai
dji yds ayw yu yu ell w woi li i
aui jygi si o dy aegwossall aydsall jydi
.aylgai do ay p daiiai
jIgJl JI
Jy g aI ySJI aSJI Iy SJI gI
. jlgJI JI 0sc JI eclj g
Ocagui JI JI aJI ySJI oSJI
oJLJI Osc wol Loo ASJI Uc JI
xll pKill uSg JI ySLoos
JU 1Ssw JswI ooc aowlo sic uu Lsw
a1i j 1000000000000000000000000000000000000000000000000
gwhl lclj. clll 0m m g 11
sll pslw .dii jall jasll g
I! sgl dgl aannll JwJ uJyR
.ogbl kll g

1s#g
aD
4 aaij y dloc jao jc jnai slaui qii Jaiy JiaJI gBJ IaauI bag JaaaaiJ JglJol Jc abalalll j no
gjjl laljll
aagaaagaaagaaagaaagaaagaaagaaagaaagaaagaaagaaagaaagaaagaaagaaagaaagaaagaaagaaagaaagaaagaaagaaagaaagaaagaaagaaagaaagaaagaaagaaagaaagaaagaaagaaagaaagaaagaaagaaagaaagaaagaaagaaagaaagaaagaaagaaagaaagaaagaaagaaa
y. g 15g y sao o w jgs g aai I g g g g g g g g g g g g g g g g g g g g g g g g g g g g g
1 1
aJySs o sll gssj p jll 2xssw l! .uIg jpaalll
4 a2a5g a2a
A. 1,2,11
一 ~ g _ 1 日 ~ l ~ o ~ a ~ i ~ w ~ l ~
U! .uJy aui jySJI oai Jgai JI Laaay
Josj ayu jy SJI oai yu gill cuu aylsol Jyso
Lalao uji asjil sui ayi jySJI uui Jyau Jy So
Jshil 1
g jg jg jg jg jg jg jg jg jg jg jg jg jg jg jg jg jg jg jg jg jg jg jg jg jg jg jg jg jg jg jg jg jg jg jg jg jg jg jg jg jg jg jg
40
sall jSaa 2. auiqss sall cwwal p q
Lgio laai gai baiu wloai iJwI S
.
Jkuagglao
A 10000000000000000000000000000000000000000000000000000000000000000000000000000000000
J
gaiill gie jiljgl 11aiai jllg 11g 11g 11g 11g 11g 11g 11g 11g 11g 11g 11g 11g 11g 11g 11g 11g 11g 11g 11g 11g 11g 11g 11g 11g 11g 1
jolai
auius ooc oosu 1nue ayuysll oessy uuuuuglo sic guluo ngsoo sio aull ouii ooc aggglg uogssll gl Udsall oosu
JgJgglgLgJgJgJgJgJgJgJgJgJgJgJgJgJgJgJgJgJgJgJgJgJgJgJgJgJgJgJgJgJgJgJgJgJgJgJgJgJgJgJgJgJgJgJgJgJgJgJgJgJgJg
JlJI JI JI JI JI JI JI JI JI JI JI JI JI JI JI JI JI JI JI JI JI JI JI JI JI JI JI JI JI JI JI JI JI JI JI JI JI JI JI JI JI JI JI JI JI JI JI JI JI JI JI J1
g giaI eaiI g o sJg .aJqSJI 29j Jl jLJI Jo Jg Jg
g 100000000000000000000000000000000000000000000000000000000000000000000000000000000000000000000000000
aaiyjlll lsswgl aolao jn
Laiuaii paaai jiaai bai jai 1 kui i. ai dai aai yjg Sdai
gi aai aai ayjai gai jiaig jiai
. gaii lii o i aai jayjai 1
gaii ayai yai jayjai 1
. gaii ayai yai jayjai 1
. gaii ayai yai jayjai 1
. gaii ayai yai jayjai 1
. gaii ayai yai jayjai 1
. gaii ayai yai jayjai 1
. gaii ayai yai jayjai 1
. gaii ayai yai jayjail
. gaii ayai yai jayjail
. gaii ayai yai jayjail
. gaii ayai yai jayjail
. gaii ayai yai jayjail
. gaii ayai yai jayjail
. gaii ayai yai jayjail
. gaii ayai yai jayjail
. gaii ayai yajil
. gaii ayai yajil
. gaii ayai yajil
. gaii ayai yajil
. gaii ayai yajil
. gaii ayai yajil
. gaii ayai yajil
. gaii ayai yajil
. gaii ayai yajil
. gaii ayai yajil
. gaii ayai yajill
. gaii ayai yajill
. gaii ayai yajill
. gaii ayai yajill
. gaii ayai yajill
. gaii ayai yajill
. gaii ayai yajill
. gaii ayai yajill
. gaii ayai yajill
. gaii ayai yajill
. gaii ayai yajll
. gaii ayai yajll
. gaii ayai yajll
4 abwgljLssy g alao lo 1qilg laa Jc
Joo
auijqSJI sdoJ aolc ajjd juolo
- aalalalgaiuulalalalalalalalalalalalalalalalalalalalalalalalalal
4 1g5 j0 sSb. gaoa yu JsB uaiy iaiy
JooI JooJoo
a 1
lalag jolg cag aunu uall glog qj g ljlgl jlgwul ag jegu 51g jao kaw auiy jkll .Jaiuw dIaJI Jmu 51.6jB8g oecJ Uwq ybu 51 JwU
aa 9. aui jssll oessll jao wloie sdd .gulil sic jlaill lc ojswll jiu jai jla
JgJ 10 JyI yI yI yI yI yI yI yI yI yI yI yI yI yI yI yI yI yI yI yI yI yI yI yI yI yI yI yI yI yI yI yI yI yI yI yI yI yI yI yI yI yI yI yI yI yI yI yI yI yI yI
4 jbjj joo b
4
4auiS1
4uuiLg
gaiJgSjE
Jusuwu
4duJgSJJ
y ojglawo g jgj ju
j
jLJ LwUgWu gJUuOua JI
JIaIeio gUsdy Iabg njuagm g uugwu,
IaBg OJU JUsclblgglau JSLdolgaewu
gws josoluiu wJdsilguoI JcIaIeio gSdu
:Jai
www.bosch-pt.com
Jusu u wuywuyjuiyuyu yuuaaay
paai g o slaiuw jub,dyu jdu laaw d Juo .dyaowu caleio g uqaa
caleia g u dyjulw u g uigw dgiu 1u
julg s uwwuoyu LkUo o ouuau laia .sudg U
Ljulg g o kwsuasu. jiljol aoiu 1u
olkssjS jI 0jI
Jjoo 1y jg daw g oalao jj J sigw cajg g jl oj j Cwuj bao Jjlsilj jla jduj jd jg y
.101bgaosu jai aggj m
Jg Jy Jj
Caaag jI g dS
Uy slaii Uy gl
Jg Js cda (sg) y
Jy Cya Jy Uy
dabu u wliu
Jlaiau u Ls
csglb
Sio oJd sao y ju d aagj, caw slgo wip plo S i 0o ool Jauw aalw wur caw u koo. 8u wuuu gds sglg daa (sma do do .u y go jui jui lai , u uu uauu auu u uu uuuu u uu uuuu u uuuu uuuu uuuu uuuu uuuu uuuu uuuu uuuu uuuu uuuu uuuu uuuu uuuu uuuu uuuu uuuu uuuu uuuu uuuu uuuu uuuu uuuu uuuu uuuu uuuu uuuu uuuu uuuu uuuu uuuu uuuu uuuu uuuu uuuu uu
g sis 1s uks jbs jls cag aqia
ssu o ujol j. gw osu (s g do sl q
j Cals y. Cwi o w si Ssw dawd A
Siw ao dao j o s m s lao g o syu slgo a
sik j 1s yo jil qulg (Sml j)
Jlaalw lwlol jds
g1 1053 pgi d y sljlg jd l a k w .wioo abgno g o g o jra cai jn j s g jl q g j j g j j g j j g j j g j j g j j g j j g j j g j j g j j g j j g j j g j j g j j g j j g j j g j j g
uugw9cBJr
oljus jS jai g josiju
Ss jg jj jil jilal
- S,J J J
33
- jj1s oji jia
jolgao jL
JSo JnJnJnJnJnJnJnJnJnJnJnJnJnJnJnJnJnJnJnJnJnJnJnJnJnJnJnJnJnJnJnJnJnJnJnJnJnJnJnJnJnJnJnJnJnJnJnJnJnJnJn
gabgcoa 1jolSsws laleio g jjlab
J5 (jj g) slj jgbsa sgl
gssoswaijlsalso gjjl si
wss qil g yg ywcbaa n j sis jI
gawgo el JwJgB Jlaa
.1j k jw u 1u w g | jg j|
(u|w)gl
.1sioiaowuulwglpuoaoj j5
J 1 J 1 J 1 J 1 J 1 J 1 J 1 J 1 J 1 J 1 J 1 J 1 J 1 J 1 J 1 J 1 J 1 J 1 J 1 J 1 J 1 J 1 J 1 J 1 J 1 J 1 J 1 J 1 J 1
aWljjgOJmuJjS
4
Lw sly slgio o jIg g Jsao slgo u gj I 1g gJ S Jn J G JJJ C W .siu J
Ls y sI Lg g Jg JcL Cw I S
S Jd J d s Jg Jg S Olaaw
bgl juc g sil oogao sljuc g s
g i j. gao. siiu j u j u j u j u j u g
slo g o log s) og (sg) jL sI dS sI Ig o L u
sljI bag . siguo o yls (og j l cboLa sIy
siwluo cwwjI sI JdS sI Igo L sijlao caiaio
. slls
.0s olaiw (j5 c2b) 0slo
- jg△ jg cui liu
Lg
-15gdmggjjLai
- julg daa J L i
sui slaui P2
uabj jggsjmuo o g jglg 2.1s dgi jLcag g slgo jol aai
1JssSs
.igwJsiuwojilwUd jilgjo Jue g sJJJgI
oLsws JJSLjB
*0suiu LAs Uggaoo gdo 20
* (U| dULS) Jg So Uw UJ 21
oIsO wogwdu jgoo (bfo) gai bla 22
Uba UwU
*dawJU d23
g jj j j j j j j j j j j j j j j j j j j j j j j j j j j j j j j j j j j j j j j j j j j j j j j j j j j j j j j j j j j j j j j j j j j j j j j j j j j j j j j j j j j j j j j j j j j j j j j j j j j j jjjjjjjjjjjjjjjjjjjjjjjjjjjjjjjjjjjjjjjjjjjjjjjjjjjjjjjjjjjjjjjjjjjjjjjjjjjj
4 1 y g u w l w t alao jg o cew jn jy o g o s (j) j l d a wgs n i w l k jis y (s) w o o o o o o o o o o o o o o o o o o o o o o o o o o o o o o o o o o o o o o o o o o o o o o o o o o o o o o o o o o o oo
4 oLsw s g jg aJg jjI cJg g jg 4S uJg Jg Jg Jg S gJg Jg Jg Jg Jg Jg Jg Jg Jg Jg Jg Jg Jg Jg Jg Jg Jg Jg Jg Jg Jg Jg Jg Jg Jg Jg Jg Jg Jg Jg Jg Jg Jg Jg
<0iJgjjgjjgjj|
g oJg aolSs Jcuaa d s 1jI cabasis jnss. siu uclab .siuui yuui g uusu uucu .uicu
4 0slouLlusbuiLihjbsCunhupoog jilgwiJ .swu o gds uyyjI JyJg jI yj I Jy Jy Jy Sj yj yg jy gl jg osw cyal J .swu o Cuiu Lg jy gos Js da
ogj nI gws blo J oJg g jgsw go 1
olkws nI I do ly dS yjLs dy Sgblaiy
egj gSls bJw ayn iqam .siu aui s wli
Sls yIg0 yj yj ly. dS .dgi JSL
bJw siigoo, cwi Oswi aqj jn l syds
. gsw ia oJ Slijbs
g lalao
jI.0JaiWpJ
4 1
a 05iws [5g] a
4 1
auiu
4.
auiisulgi b
oLswSgJyIaIgIgIaIj j6i
SLSOsw 1y jw yjw SjL Jw
Jg 0slaaw s g ySg Sg Sg Sg Sg Sg Sg Sg Sg Sg Sg Sg Sg Sg Sg Sg Sg Sg Sg Sg Sg Sg Sg Sg Sg Sg Sg Sg Sg Sg Sg Sg Sg Sg Sg Sg Sg Sg Sg Sg Sg Sg Sg Sg Sg Sg Sg Sg Sg Sg Sg
j j j j j j j j j j j j j j j j j j j j j j j j j j j j j j j j j j j j j j j j j j j j j j j j j j j j j j j j j j j
j j s j j j j j j j j j j j j j j j j j j j j j j j j j j j j j j j j j j j j j j j j j j j j j j j j j j j j j j j j j j j j j j j j j j j j j j j j j j j j j j j j j j j j j j
g l u jy j 1 y y g b o slawl (joj ly lai o sis gbs aL) noj g l u jy j 1 y o laow .s
Jol
Jg JSL gjS Jl jI y Jol S g g g g g g g g g g g g g g g g g g g g g g g g g g g g g g g g g g g g g g g gg
Sswlo sio I jj J o laaw .sis o laow g iol k, jol s o jol s o k, jol b, jol l j jg j w g
jbu 15u 45 u 5u 1u 1u 1u 1u 1u 1u 1u 1u 1u 1u 1u 1u 1u 1u 1u 1u 1u 1u 1u 1u 1u 1u 1u 1u 1u 1u 1u 1u 1u 1u 1u 1u 1u 10


- General Power Tool SafetyWarnings
- Work area safety
- Electrical safety
- Personal safety
- Power tool use and care
- Service
- SafetyWarnings for AngleGrinder
- Kickback and related warnings
- 8|English
- Safety warnings specific for Grinding and Abrasive Cutting-Off operations
- Additional safety warnings specific for abrasive cutting off operations
- Safety warnings specific for sanding operations
- Safety warnings specific for wire brushing operations
- Additional safety warnings
- Product Description and Specifications
- Intended Use
- Product Features
- Assembly
- Mounting the Protective Devices
- Protection Guard for Grinding
- Protection Guard for Cutting
- Cutting Guide with Dust Extraction Protection Guard
- Auxiliary Handle
- Hand Guard
- Mounting the Grinding Tools
- Grinding/Cutting Disc
- English | 11
- Flap Disc
- Rubber Sanding Plate
- Cup Brush/Disc Brush
- Quick-clamping Nut SDS-e/ie
- Approved Grinding Tools
- Rotating the Machine Head
- | English
- Dust/Chip Extraction
- Operation
- Starting Operation
- Switching On and Off
- Reduced starting current
- Constant Electronic Control
- Speed preselection (GWS 8-100 CE/GWS 8-125 CE/GWS 850 CE)
- Cutting Metal
- Cutting Stone
- Information on Structures
- Maintenance and Service
- Maintenance and Cleaning
- After-sales Service and Application Service
- www.bosch-pt.com
- People's Republic of China
- China Mainland
- 14|English
- HK and Macau Special Administrative Regions
- Indonesia
- Malaysia
- Thailand
- Singapore
- Vietnam
- Australia, New Zealand and Pacific Islands
- Egypt
- Ethiopia
- Nigeria
- Republic of South Africa
- Customer service
- Gauteng - BSC Service Centre
- KZN - BSC Service Centre
- Western Cape - BSC Service Centre
- Bosch Headquarters
- Disposal
- 中文
- 安全规章
- 电动工具通用安全警告
- #
- 本章 《》
- 本章内容包括以下内容:
- 司
- 7777777777
- nnaaannnnnnnnnnnnnnnnnn
- 401
- nannnnnnnnnnnnnnnnnnnnnnnnnnnnnnnnnnnnnnnnnnnnnnnnnnnnnnnnnnnnnnnnnnnnnnnnnnnnnnnnnnnnnnnnnnnnnnnnnnnnnnnnnnnnnnnnnnnn
- nnaaannnnnnaananaananaananaananaananaananaananaananaananaananaananaananaananaananaananaananaananaananaananaananaananaananaananaananaananaananaananaananaananaananaananaananaananaananaananaananaananaananaananaananaananaananaananaananaananaananaananaananaananaananaan
- 421
- H
- i#
- T
- Jauuuaaiaa auaaunuiuuiuuiuau
- y
- nna-n
- 461
- nssnnnsuaa wwnnnnne
- n77777777777777777777777777
- fouuununnu
- n7n
- zhuangzhuan
- nnaan
- m
- yuaanmnuuun
- nunnuuaaunnn
- nynnynnnaaannnaa
- nnsnnnnnnnnnnnnnnnnnnnnnnnnnnnnnnnnnnnnnnnnnnnnnnnnnnnnnnnnnnnnnnnnnnnnnnnnnnnnnnnnnnnnnnnnnnnnnnnnnnnnnn
- Canh Bao An Toan cho May Mai Hinh Goc
- | Tiếng Viết
- Cac canh bao phu them
- Chan Bao Vé Dung De Cát
- Durong Cato Chao Bao Vedanh cho viec Hut Bui
- Taynamphu
- Chán Bao Vé Tay
- Lap Dung Cu Mai
- Dia Mai/Cat
- Dia cha gap nep
- Dia Chà Cao Su
- | Tiéng Viét
- Bàn Chái kim loai/Bàn Chái Dia
- Dai Oc Khoa Nanh SDS-lee
- Thai bo
- aJySsI oSsI no yalil
- doJgduJl
- gjjl laljll
- jolai
- Joo
- auijqSJI sdoJ aolc ajjd juolo
- JooI JooJoo
- y ojglawo g jgj ju
- j
- olkssjS jI 0jI
- Jlaalw lwlol jds
- uugw9cBJr
- oljus jS jai g josiju
- J5 (jj g) slj jgbsa sgl
- gssoswaijlsalso gjjl si
- wss qil g yg ywcbaa n j sis jI
- gawgo el JwJgB Jlaa
- .1j k jw u 1u w g | jg j|
- (u|w)gl
- .1sioiaowuulwglpuoaoj j5
- aWljjgOJmuJjS
- oLsws JJSLjB
- oLswSgJyIaIgIgIaIj j6i
Brand : BOSCH
Model : GWS 850 C Professional
Category : Coffee grinder