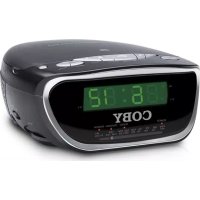
CDRA147 - Alarm clock radio COBY - Free user manual and instructions
Find the device manual for free CDRA147 COBY in PDF.


| Product Type | Radio alarm clock with CD player and dual alarm |
| Brand | Coby |
| Model | CDRA147 |
| Power | 120V AC, 60 Hz (AC adapter); 9V backup battery (not included) |
| Display | 4-digit LED, large display |
| Radio | AM 530-1710 kHz / FM 87.5-108 MHz |
| CD Player | Top loading, 20-track programming, repeat and random playback |
| Alarms | Dual independent alarm, wake to radio, CD or buzzer |
| Clock Functions | 12/24h display, manual time setting, battery time backup |
| Sleep Timer | Music sleep: 90, 60, 30 or 15 minutes |
| Speakers | Full-range stereo |
| Headphone Jack | 3.5 mm |
| Maintenance | Clean CDs with a soft dry cloth; dust the lens with a brush |
| Safety | Do not expose to water; do not open the cabinet; use only recommended accessories |
| Repairability | Have repairs performed by a qualified technician; contact Coby support |
| Dimensions | Approx. 25 x 15 x 10 cm (estimated) |
| Weight | Approx. 1 kg (estimated) |
Frequently Asked Questions - CDRA147 COBY
User questions about CDRA147 COBY
0 question about this device. Answer the ones you know or ask your own.
Ask a new question about this device
Download the instructions for your Alarm clock radio in PDF format for free! Find your manual CDRA147 - COBY and take your electronic device back in hand. On this page are published all the documents necessary for the use of your device. CDRA147 by COBY.
USER MANUAL CDRA147 COBY
Dual Alarm Clock Radio/CD Player
Instruction Manual ..... Page 2
ES
Please read carefully before use. Léa el manual antes de usar
Clock Backup 6
Using AC Power. 6
Changing the Function Mode 7
Adjusting the Volume 7
CLoCk MoDE 8
Setting the Clock Time 8
Using the Alarm Clock 9
Setting the Alarm Timers 9
Setting the Alarm Mode (Wake to Radio, CD, or Buzzer) 9
Turning the Alarm Off / Snooze 10
Setting a Sleep Timer (Sleep to Music) 11
CD MoDE 12
Loading a CD 12
Playing a CD 12
Repeat and Random Playback 13
Programmed CD Playback 13
RADio MoDE 15
CD CARE & MAINTENANCE 16
SPECiFiCATioNS 18
ToubLESHooTiNG 19
SAFETY NoTICES 21
Thank You
Thank you for purchasing the Coby CDRA147 Dual Alarm Clock Radio/CD Player. Please read this manual carefully before operation.
Visit the Coby website at www.cobyusa.com to find the most current version of this manual as well as other helpful guides.
Your CDRA147 features:
Digital clock with large 4-digit LED display
Top-loading CD player with programmable track memory
Sensitive AM/FM analog tuner
Dual alarm clock with sleep/snooze timers
Wake to CD, radio, or buzzer
Full-range stereo speaker system
3.5mm headphone jack
Controls at a Glance
4s16u3
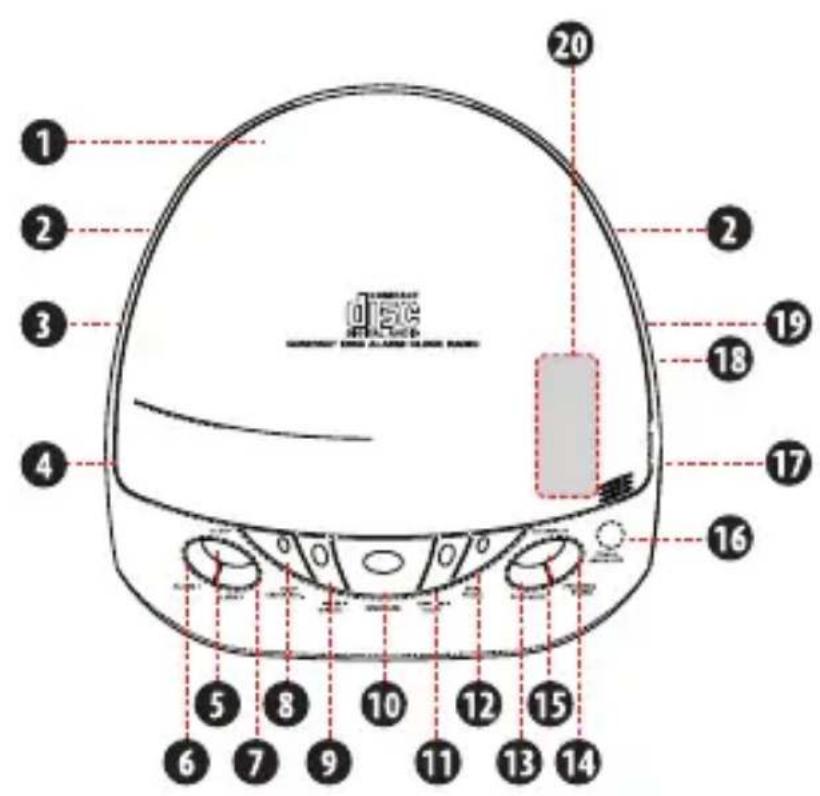
CD Door1.
Speakers2.
Headphone Jack3.
Buzzer / Music4.
Sleep Button5.
Alarm 1 Button6.
Alarm 2 Button7.
CD: Stop/Clock Adjusting 8. Button
CD: Skip Prev/Minute 9. Button
Snoopze Button10.
CD:Skip Next/Hour Button11.
CD: Play/Pause Button12.
- Play Mode Button
(Repeat1/Repeat All/
Random/Normal)
- CD: Program Button
- CD Track Display Button
- Power/Alarm Off Button
- Tuning Knob
- Function Switch
(AM/FM/CD)
- Volume Knob
- Battery Compartment
Controls at a Glance
English
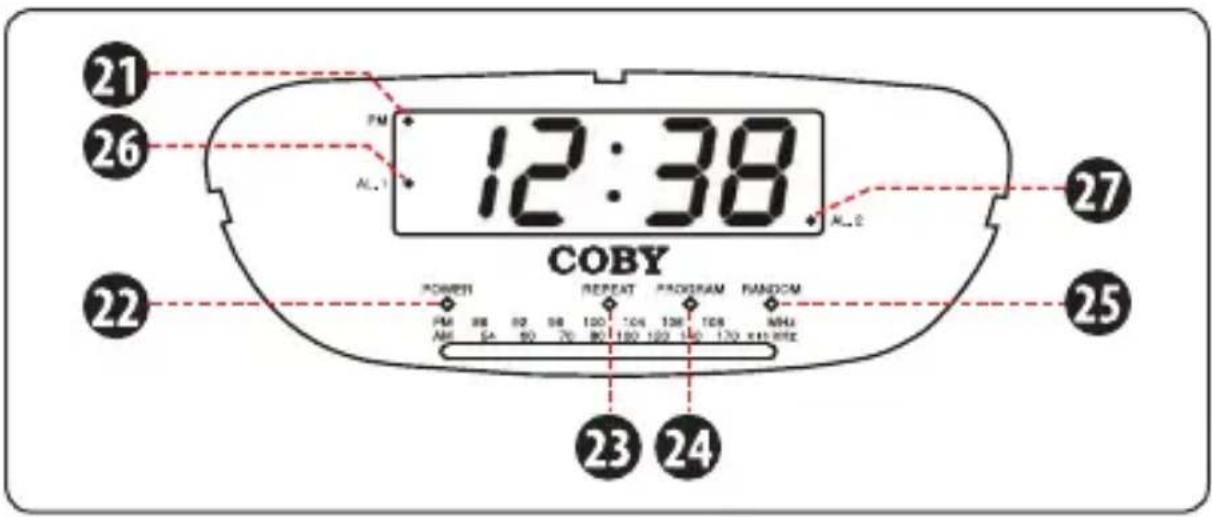
Time: PM Indicator21.
Power On Indicator22.
CD: Repeat Indicator23.
CD: Program Indicator24.
CD: Random Indicator25.
Alarm 1 Indicator26.
Alarm 2 Indicator27.
Getting Started
Power
Clock Backup
Open the BATTERY COMPARTMENT [20] and connect one 9-volt battery (not included) to the appropriate terminals. This backup battery will allow your clock to maintain the correct time during a power outage or other interruption of the AC connection.

If the AC connection is interrupted, the clock will continue to mark the correct time internally. The time will not be displayed until AC power is reconnected.
An alkaline type battery is recommended. For optimum performance, this battery should be replaced every six months.
Using AC Power
Make sure that the voltage of your electrical power supply corresponds to the voltage indicated by the manufacturer. If the voltage is incorrect, consult your dealer or service center.

This unit should be used with AC 120V/60 Hz wall outlets, only.
Connect the electrical cord by plugging it into the wall outlet. Keep objects clear of the cord where it connects to the device and to the wall. Do not stretch the cord.
Getting Started
To turn on the unit, press POWER/ALARM OFF [16]. The POWER ON INDICATOR [22] will light up.
To turn off the unit, press POWER/ALARM OFF [16] again. The POWER ON INDICATOR [22] will darken.
Changing the Function Mode
Set the FUNCTION SWITCH [18] to one of the following positions to change the function mode of the unit.
AM: Listen to AM radio broadcasts.
FM: Listen to FM radio broadcasts.
CD: Listen to a CD.
Adjusting the Volume
To increase the volume, turn the VOLUME KNOB [19] clockwise to the right.
To decrease the volume, turn the VOLUME KNOB [19] counter-clockwise to the left.
Setting the Clock Time
Make sure the unit has been turned off before setting the time.
To toggle the clock display between 12-hour mode and 24-hour mode:
Press and hold STOP/CLOCK ADJ [8] for 3 seconds. The screen will display "12H" for 12-hour mode, or "24H" for 24-hour mode.
To change modes again, wait until the normal clock display returns, then press and hold STOP/CLOCK ADJ [8] again.

The PM indicator will light up in 12-hour mode to indicate PM hours.
To set the clock time:
Press STOP/CLOCK ADJ [8] once. The screen will begin to flash.
While the screen is flashing:
Press SKIP NEXT/HOUR [11] to adjust the hour.
Press SKIP PREV/MINUTE [9] to adjust the minutes.
Press STOP/CLOCK ADJ [8] to finish setting the time.
Using the Alarm Clock
Setting the Alarm Timers
Set one or two independent alarms to wake at different times.
To set the Alarm 1 timer:
Make sure the unit has been turned off (the POWER 1. ON INDICATOR [22] should be dark).
Press ALARM 1 [6]. The ALARM 1 INDICATOR [26] will 2. light and the display will flash the Alarm 1 time.
Press SKIP NEXT/HOUR [11] to adjust the hour; press 3.
SKIP PREV/HOUR [9] to adjust the minutes.
Press ALARM 1 [6] again to save the Alarm 1 time. The 4. ALARM 1 INDICATOR [26] will remain on; the unit will now sound at the set time.
To set the Alarm 2 timer, follow all of the steps above, but press ALARM 2 [7] instead of ALARM 1. When the Alarm 2 timer has been set and is active, the ALARM 2 INDICATOR [27] will light.
Setting the Alarm Mode (Wake to Radio, CD, or Buzzer)
Set the BUZZER/MUSIC switch [4] to the "MUSIC" position, then:
Set the FUNCTION SWITCH [18] to the "AM" or FM" position to wake to the radio. Turn the VOLUME KNOB [19] to adjust the volume to the desired level.
Set the FUNCTION SWITCH [18] to the "CD" position to wake to a CD. Turn the VOLUME KNOB [19] to adjust the volume to the desired level.
Set the BUZZER/MUSIC switch [4] to the "BUZZER" position to wake to the alarm buzzer.

When waking to the radio, ensure that you have tuned to a radio station within frequency range before setting the alarm. See the section "Radio Mode" to learn how to tune to a radio station.
When waking to a CD, ensure that you have loaded a compatible disc into the compartment tray before setting the alarm. If no disc has been loaded, the unit will default to a buzzer when the alarm sounds.
Turning the Alarm Off / Snooze
When the alarm sounds, press SNOOZE [10] to reset the alarm to sound again 5 minutes later.
To turn off the alarm completely, press ALARM 1 [6] or ALARM 2 [7].
Setting a Sleep Timer (Sleep to Music)
The sleep timer allows you to go to sleep to music. The unit will turn itself off automatically at the end of the timer.
To set the sleep timer:
While the radio or CD is playing, press SLEEP [5]. The screen will display the default sleep timer duration of 90 (minutes).
Decrease the length of the sleep timer by pressing SLEEP [5] again. You can set the sleep timer to 90, 60, 30, or 15 minutes.
To cancel the sleep timer, press SLEEP [5] until the sleep timer is no longer displayed on the screen.
To turn off the music before the sleep timer ends, simply press POWER [16] to turn off the unit.
To place the unit in CD mode, set the FUNCTION SWITCH [18] to "CD".
Loading a CD
Gently lift the CD lid to open the disc tray compartment.1.
Place the CD into the disc tray. Make sure that the 2. label of the CD is facing up.
Lower the CD lid to close the disc tray compartment.3.
Playing a CD
After you have loaded a CD:
Press PLAY/PAUSE [12] to start playing the CD. The dis- play will indicate the track number of the current song.
Press PLAY/PAUSE [12] while a CD is playing to pause playback. Press PLAY/PAUSE [12] again to resume playback.
Press NEXT/HOUR [11] to advance to the next track. Hold this button down to scan forward through the track.
Press PREV/MINUTE [9] to return to the previous track. Hold this button down to scan backwards through the track.
Press STOP/CLOCK ADJ [8] to stop CD playback.

You can press the CD TRACK DISPLAY [15] button to view the number of CD track, then it will return to the clock time after few seconds.
Repeat and Random Playback
While a CD is playing:
Press PLAY MODE [13] once to repeat the current track. The REPEAT INDICATOR [23] will flash.
Press PLAY MODE [13] again to repeat all tracks. The REPEAT INDICATOR [23] will light a steady red.
Press PLAY MODE [13] again to play all tracks in random order. The RANDOM INDICATOR [25] will light a steady red.
Press PLAY MODE [13] again to resume normal playback. The REPEAT and RANDOM indicators will turn off.
Programmed CD Playback
Create and enjoy a customized CD track list. After you have loaded a CD:
Press PROGRAM [14] to enter start creating your 1. program list. The display will flash "P 01".
Press NEXT/HOUR [11] or PREV/MINUTE [9] to select a 2. track number and then press PROGRAM [14] to save it to the program list. The display will now flash "P02".
Repeat Step 2 until you have completed your 3. program list, or until you have saved the maximum of 20 tracks.
To cycle through and review the saved program list, 4. press PROGRAM [14].
CD Mode
When you are satisfied with the program list, press 5. PLAY/PAUSE [12] to start playback.
To clear all programmed tracks, press PROGRAM [14] 6. and then press STOP/CLOCK ADJ [8].
Radio Mode
To place the unit in Radio mode, set the FUNCTION SWITCH [18] to either "AM" or "FM".
Set the switch to AM to listen to AM radio broadcasts.
Set the switch to FM to listen to FM radio broadcasts.
English
To tune to a higher station frequency, turn the
TUNING KNOB [17] clockwise to the right.
To tune to a lower station frequency, turn the
TUNING KNOB [17] counter-clockwise to the left.

There is an FM wire antenna on the rear of the unit.
Extend and adjust the wire's position to obtain the
best FM reception.
Handling CDs
4s16u3
Hold a CD by its edges. Avoid touching the recorded side of the disc. To remove a CD from its storage case, press down on the center retention mechanism of the case and lift the disc out.
Cleaning CDs
Use a dry, soft cloth to wipe off any fingerprints and dusts from the playing surface of the disc. Wipe in a straight line radially from the center to the outside edge of the disc. Small dust particles and light stains will not affect playback quality.
Never use chemicals such as record sprays, anti-static sprays, benzene, or thinners to clean your CDs.
To reduce the risk of scratches, always put CDs back in their case after use.
Do not subject CDs to prolonged exposure to direct sunlight, high humidity, or high temperatures.
Do not place stickers or labels on either side of the CD.
Cleaning the CD Player Lens
A dirty lens can cause CD playback to skip. If the lens is very dirty, the CD may not work at all. Unplug the power supply, open the CD door, and clean the lens as follows:
For Dust or Dry Particles - use a camera lens brush/ blower to blow on the lens a few times. Then, wipe the lens gently with the brush, and blow on the lens once more.
For Fingerprints - use a dry cotton swab to wipe the lens in a straight line radially from the center to the outside edge.
Specifications
4sll6u3
| Radio Frequency Range AM 530 – 1710 | kHz | |
| FM 87.5 – 108 MHz | ||
| Power Supply AC 120V, 60 Hz | ||
| DC 9V for clock back-up | ||
*Specifications and design are subject to change without notice.
Troubleshooting
If you have a problem with this device, please check our website at www.cobyusa.com for Frequently Asked Questions (FAQs) and firmware updates. If these resources do not resolve the problem, please contact Technical Support.
Address
Coby Electronics Technical Support
56-65 Rust Street
Maspeth, NY 11378
techsupport@cobyusa.com
Web
www.cobyusa.com
Phone
800-727-3592: Mon-Fri, 8:00AM-11:00PM EST
Saturdays, 9:00AM-5:30PM EST
718-416-3197: Mon-Fri, 8:00AM-5:30PM EST
Power is switched on, but unit will not function.
Ensure that the AC cord is securely connected to your wall outlet.
Check that fuses and circuit breakers are functioning properly. If a fuse has malfunctioned, it may need to be replaced.
No sound or distorted sound from speakers.
Check that Volume is turned up.
If in CD mode, check that the Pause button has not been pressed.
Troubleshooting
Player will not recognize an inserted disc.
Check the the disc is inserted correctly, with label side up.
Check that the disc is not damaged or dirty.
Sound is poor, distorted or jumpy.
Check that the CD is not scratched or dirty.
Confirm that player is functioning correctly by load- ing and playing another CD.
Safety Notices
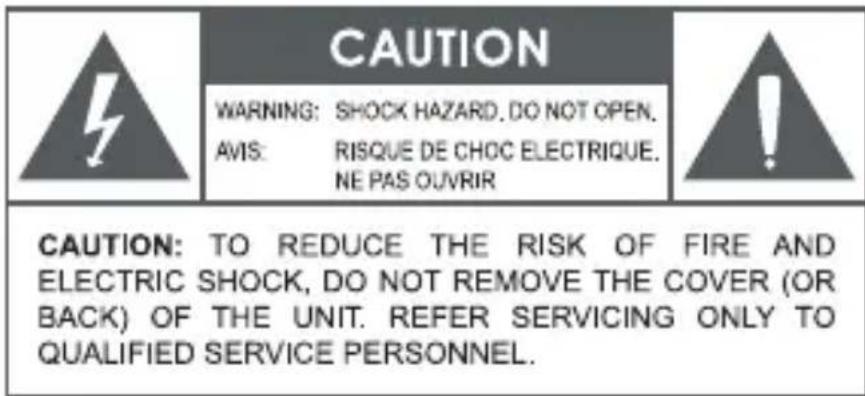

The lightning flash with arrowhead symbol within an equilateral triangle is intended to alert the user to the presence of uninsulated "dangerous voltage" within the product's enclosure that may be of sufficient magnitude to constitute a risk of electric shock.

The exclamation point within an equilateral triangle is intended to alert the user to the presence of important operation and servicing instructions in the literature accompanying the appliance.
For Customer Use:
Enter below the serial number that is located on the rear of the unit. Retain this information for future reference.
Model No. CDRA147
Serial No.
WARNING: To prevent fire or shock hazard, do not expose this device to rain or moisture. Dangerous high voltage is present inside the enclosure. Do not open the cabinet.
CAUTION: To prevent electric shock, match wide blade of plug to wide slot of outlet and fully insert.

For recycling or disposal information about this product, please contact your local authorities or the Electronics Industries Alliance: www.eiae.org.
FCC Statement:
This device complies with Part 15 of the FCC Rules. Operation is subject to the following two conditions:
(1) This device may not cause harmful interference, and
(2) This device must accept any interference received, including interference that may cause undesired operation.
Note: This equipment has been tested and found to comply with the limits for Class B digital devices, pursuant to Part 15 of the FCC rules. These limits are designed to provide reasonable protection against harmful interference in a residential installation. This equipment generates, uses and can radiate radio frequency energy and, if not installed and used in accordance with the instructions, may cause harmful interference to radio communications. However, there is no guarantee that interference will not occur in a particular installation. If this equipment does cause harmful interference to radio or television reception, which can be determined by turning the equipment off and on, the user is encouraged to try to correct the interference by one or more of the following measures:
Reorient or relocate the receiving antenna.
Increase the separation between the equipment and receiver.
Connect the equipment into an outlet on a circuit different from that to which the receiver is connected.
Consult the dealer or an experienced radio/TV technician for help
Use of shielded cable is required to comply with Class B limits in Subpart B of Part 15 of the FCC rules.
Do not make any changes or modifications to the equipment unless otherwise specified in the manual. If such changes or modifications should be made, you could be required to stop operation of the equipment.
Important Safety Instructions
Read Instructions: All the safety and operating instructions should be 1. read before the product is operated.
Retain Instructions: The safety and operating instructions should be 2. retained for future reference.
HeedWarnings: All warnings on the product and in the operating instructions should be adhered to.
Follow Instructions: All operating and usage instructions should be 4. followed.
Cleaning: Unplug this product from the wall outlet before cleaning. 5. Do not use liquid cleaners or aerosol cleaners. Use a damp cloth for cleaning.
Attachments: Use only attachments recommended by the manufac-6. turer. Use of other attachments may be hazardous.
Water and Moisture: Do not use this product near water (e.g., near a 7. bath tub, washbowl, kitchen sink, laundry tub, in wet basements, or near a swimming pool and the like).
Ventilation: Slots and openings in the cabinet are provided for venti-8. lation to ensure reliable operation of the product and to protect it from overheating. These openings should never be blocked by placing the product on a bed, sofa, rug, or other similar surface. This product should not be placed in a built-in installation such as a bookcase or rack unless proper ventilation is provided or the manufacturer instructions have been adhered to.
Power Sources: This product should be operated only from the type 9. of power source indicated on the rating label. If you are not sure of the type of power supply to your home, consult your product dealer or local power company. For products intended to operate from battery power or other sources, refer to the operating instructions.
Power-Cord Protection: Power supply cords should be routed so 10. that they are not likely to be walked on or pinched by items placed upon or against them, paying particular attention to cords at plugs, convenience receptacles, and at the point which they exit from the product.
Lightning: For added protection for this product, unplug it from the 11. wall outlet and disconnect the antenna or cable system during a light- ning storm or when it is left unattended and unused for long periods of time. This will prevent damage to the product due to lightning or power-line surges.
Safety Notices
Overloading: Do not overload wall outlets, extension cords, or in-12. tegral convenience receptacles as this can result in a risk of fire or electric shock.
Object and Liquid Entry: Never push objects of any kind into this 13. product through openings as they may touch dangerous voltage points or shout-out parts that could result in a fire or electric shock. Never spill liquid of any kind on the product.
Servicing: Do not attempt to service this product yourself as opening 14. or removing covers may expose you to dangerous voltage or other hazards. Refer all servicing to qualified service personnel.
Damage Requiring Service: Unplug this product from the wall outlet 15. and refer servicing to qualified service personnel under the following conditions: a) when the power-supply or plug is damaged; b) if liquid has been spilled or if objects have fallen into the product; c) if the product has been exposed to rain or water; d) if the product does not operate normally by following the operating instructions. Adjust only those controls that are covered by the operating instructions as improper adjustment of other controls may result in damage and will often require extensive work by a qualified technician to restore the product to its normal operation; e) if the product has been dropped or damaged in any way; f) when the product exhibits a distinct change in performance—this indicates a need for service.
Replacement Parts: When replacement parts are required, be sure 16. that your service technician has used replacement parts specified by the manufacturer or have the same characteristics as the original part. Unauthorized substitutions may result in fire, electric shock, or other hazards.
Safety Check: Upon completion of any service or repairs to this prod-17. Uct, ask the service technician to perform safety checks to ensure that the product is in proper operating condition.
Heat: The product should be situated away from heat sources such 18. as radiators, heat registers, stoves, or other products (including amplifiers) that produce heat.
Índice
MuCHAS GRACiAs 27
PANoRAMA DE LoS CoNTRoLES 28
PARA EMPEZAR 30
Alimentacion 30
Coby Electronics Technical Support
56-65 Rust Street
Maspeth, NY 11378
techsupport@cobyusa.com
La Red
www.cobyusa.com
Coby Electronics Technical Support
56-65 Rust Street
Maspeth, NY 11378
techsupport@cobyusa.com
Site Web
www.cobyusa.com
Telephone
Coby Electronics Corporation
1991 Marcus Ave, Suite 301
Lake Success, NY 11042
www.cobyusa.com
www.ecoby.com
Coby is a registered trademark of Coby Electronics Corporation. Printed in China.
COBY es lamarca registrada de COBY Electronics Corporation. Imprimido en China.

- Thank You
- Controls at a Glance
- Getting Started
- Power
- Clock Backup
- Using AC Power
- Changing the Function Mode
- Adjusting the Volume
- Setting the Clock Time
- Using the Alarm Clock
- Setting the Alarm Timers
- Setting the Alarm Mode (Wake to Radio, CD, or Buzzer)
- Turning the Alarm Off / Snooze
- Setting a Sleep Timer (Sleep to Music)
- Loading a CD
- Playing a CD
- Repeat and Random Playback
- Programmed CD Playback
- CD Mode
- Radio Mode
- Handling CDs
- Cleaning CDs
- Cleaning the CD Player Lens
- Specifications
- Troubleshooting
- Address
- Web
- Phone
- Power is switched on, but unit will not function.
- No sound or distorted sound from speakers.
- Player will not recognize an inserted disc.
- Sound is poor, distorted or jumpy.
- Safety Notices
- For Customer Use:
- FCC Statement:
- Important Safety Instructions
- Índice
- MuCHAS GRACiAs 27
- PANoRAMA DE LoS CoNTRoLES 28
- PARA EMPEZAR 30
- La Red
- Site Web
- Telephone
- Coby Electronics Corporation
Brand : COBY
Model : CDRA147
Category : Alarm clock radio