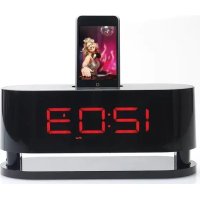
CSMP162 - Alarm clock radio COBY - Free user manual and instructions
Find the device manual for free CSMP162 COBY in PDF.


| Product Type | Clock radio with iPod docking station |
| Brand | Coby |
| Model | CSMP162 |
| Power Supply | AC 110-240V ~ 50/60Hz with AC adapter; backup batteries 2×AA 1.5V (not included) |
| Output Power | 6W × 2 (RMS) |
| Speakers | 2 × 3 inches (76 mm) |
| Radio Tuner | Digital AM/FM |
| Clock Functions | Digital clock with dual alarm (A1/A2), sleep timer (15-60 min), nap timer (15-60 min), alarm snooze (9 min) |
| Audio Sources | iPod/iPhone via dock, AM/FM radio, auxiliary input 3.5 mm jack |
| Light Alarm | Brightness-adjustable alarm with switchable blue lamp |
| Dimensions (approx.) | 20 × 15 × 10 cm |
| Weight (approx.) | 1 kg |
| Included Accessories | Remote control (CR2032 battery included), FM antenna, AUX 3.5 mm cable, AC adapter |
| iPod Compatibility | iPod touch (1st and 2nd gen.), iPod classic, iPod nano (1st-4th gen.), iPod mini, iPod 4th and 5th gen.; iPhone in airplane mode |
| Maintenance and Cleaning | Unplug before cleaning; use a damp cloth; do not use liquid or aerosol cleaners |
| Safety | Do not expose to rain or moisture; do not open the casing; use only the supplied adapter |
| Spare Parts and Repairability | Replaceable backup batteries (2×AA); for other parts, contact technical support |
| General Information | Model number: CSMP162; manufactured in China; FCC Class B compliance |
Frequently Asked Questions - CSMP162 COBY
User questions about CSMP162 COBY
0 question about this device. Answer the ones you know or ask your own.
Ask a new question about this device
Download the instructions for your Alarm clock radio in PDF format for free! Find your manual CSMP162 - COBY and take your electronic device back in hand. On this page are published all the documents necessary for the use of your device. CSMP162 by COBY.
USER MANUAL CSMP162 COBY
natural_image
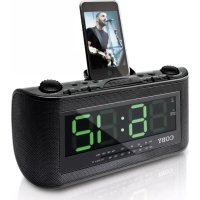
Black digital alarm device with a CD displaying '6:30' and an iPod-mounted screen (no readable text or symbols beyond the display)CSMP162
EN
Dual Alarm Clock/Radio for iPod Instruction Manual ......Page 2
ES
SET CloCk MoDE ......9
AIARM MoDE ....10
To set the alarm 10
To set the alarm type 10
To activate the alarm ....11
Snooze and Timer 12
Snooze/Off.... 12
Sleep 12
Nap Timer....12
oTHER FuNCTioNS 13
Lamp 13
Clock backup batteries 13
TRoubIESHooTiNg 14
SPECiFiCATioNS 17
SAFETY NoTiCES ....18
Thank You
Congratulations on your purchase of the Coby CSMP162 Dual Alarm Clock/Radio for iPod. This system is designed for use with iPod and is compatible with most iPod models including the 3 ^rd -generation iPod Nano, the iPod Touch, and others. To enjoy high-quality audio playback from your iPod,dock it on top of the unit, use the MODE button to select ‘iPod’, and press play.
System features include:
iPod dock for charging and audio playback ★
Dimmable clock ★
Dual alarms with iPod, radio or buzzer option ★
Auxiliary Audio Input for audio playback of non-iPod ✦ audio devices
AM/FM Radio ★
Touch-sensitive controls for easy use ★
Please read all operational and safety instructions thoroughly before using this system, and follow all instructions carefully.
Package Contents & Features
Package Contents
Please make sure that the items shown below are included in the package. Should an item be missing, please contact the local retailer from which you purchased this product.
CSMP162 (main unit) ★
Remote control with 1 x CR2025 battery ✦
FM antenna ★
3.5mm auxiliary cable ★
AC 100-240V power adapter ★
Features
Universal dock for iPod charges and plays your favorite iPod music
Digital AM/FM radio ★
Digital clock with 2 independent alarms and snooze/✦ sleep timers
Wake up to your iPod, radio, or buzzer ✦
High-output, full-range stereo speakers ★
3.5mm audio line-in jack for use with any portable ★ audio device
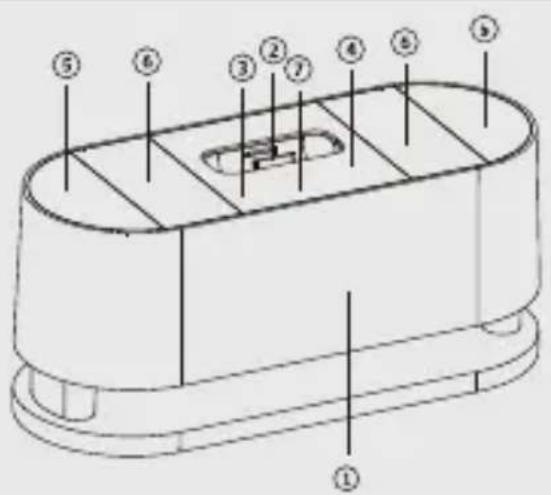
Clock display1.
iPod Dock2.
MODE: select audio input3.
SET: select clock settings4.
VOLUME 5.
TUNING/SONG SELECT +/ - : Skip to next/previous 6. track or increase/decrease radio frequency
POWER7.
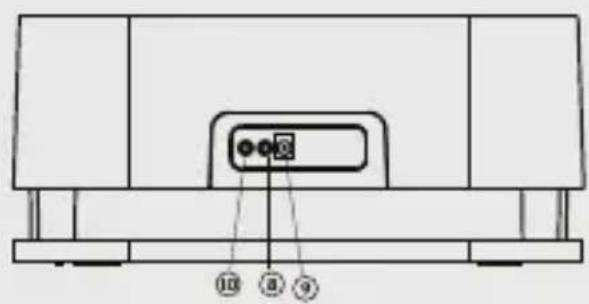
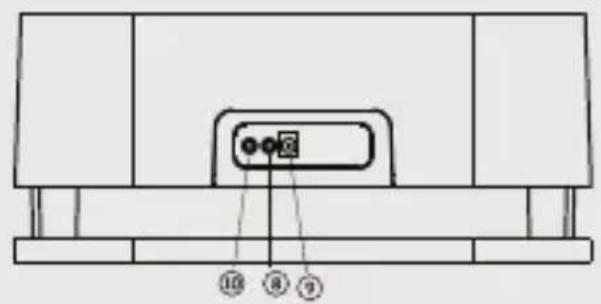
Auxiliary Input8.
DC Power Jack9.
FM Antenna Socket10.
Operation
To set up your iPod speaker system, please follow these simple steps:
Carefully unpack the unit speaker, remote control, 1. and power cord.
Unwind power cord and connect to the socket on 2. the rear of the system. Connect the other end to your power outlet.
Place the system on a stable, flat surface. Avoid plac-3. ing the system in direct sunlight.
To turn the system on, press the POWER touch pad 4. on the top panel. The blue light on the underside of the unit will illuminate.
To dock, charge and play your iPod, please follow the instructions below:
Select the correct iPod insert for your model of iPod. 1. Place the insert into the dock.
Press POWER to turn the system on.2.
Carefully insert your iPod into the dock. Your iPod 3. should slide easily into the docking station; if it does not fit, confirm that the correct iPod insert is in place. Do not attempt to force your iPod into the dock.
Play mode will automatically switch to 'iPod'. iPod 4. will begin playing immediately.

If the Mode does not switch automatically to 'iPod', please manually select iPod input by pressing the MODE touch pad. Press play on your iPod's controls to begin playback.
Select desired song using the remote control, system 5. controls, or controls on your iPod.
Adjust the volume using the remote control, or the 6. volume pad on the unit's top panel.
Aux and Radio Mode
To listen to the radio, please follow these instructions:
Press POWER to turn on the system.1.
Press MODE to select AM or FM radio band. 2. Frequency will display on screen.
Use the [+] or [-] controls to select the desired 3. radio frequency.
Adjust the volume using the Volume pad on the unit 4. or the remote control.

To scan up or down for the next available frequency, press and hold the [+]/[-] controls for approximately one second. Frequency will scan to the next station automatically.
To listen to an audio device via the Auxiliary Input feature, please follow these instructions:
Connect the desired audio source to the 3.5mm 1. Auxiliary Input socket located on the rear panel of the system.
Press POWER to turn on the system.2.
Press MODE to select the AUX mode.3.
Use the controls on the external audio source to 4. begin playback.
Adjust the volume using the Volume pad on the unit 5. or remote control.
Set Clock Mode
Your speaker system features a dimmable clock with large time display. The clock function displays at all times except when selecting an input source, adjusting the volume or tuning the radio.
To set the clock
The clock can be set at any time, even during audio playback. To set the clock:
Press and hold the MODE and SET pads until the 1. display's hour digits begin to flash.
Select the hour using the [ + ] / [ - ] controls. Press the 2. SET pad to confirm selection. The display's minute digits will begin to flash.
Select the minute using the [+]/[-] controls. Press 3. the SET pad to confirm selection.
To set the alarm
The clock on your speaker system includes a dual alarm, which can be set to two different wake times. The alarm can be set at any time, even during audio playback. To set the alarm:
Press and hold the SET pad until the hour display and 1. 'A1' begin to flash.

A1 denotes Alarm 1.
Select the alarm hour using the [+]/[-] controls. 2. Press the SET pad to confirm selection. The minute display will begin to flash.
Select the alarm minute using the [+]/[-] controls. 3. Press the SET pad to confirm selection. The alarm volume setting will begin to flash.
Select the alarm volume using the [+]/[-] controls. 4. Press the SET pad to confirm selection.
The hour digits and 'A2' (denoting Alarm 2) will begin 5. to flash. Repeat steps 2-4 to set Alarm 2.
To set the alarm type
You can select the alarm to wake you with a standard 'BEEP', AM/FM radio, or playback from your iPod. To choose an alarm type, at least one alarm must be set and activated. (Screen will display A1/A2.) The system speaker/radio must be turned off.
To set the alarm type:
Press and hold the MODE pad until the display 1. flashes the current alarm type (iPod, FM, AM or BEEP).
Press the MODE pad until you have reached the 2. desired alarm type. Wait for the display indicator to stop flashing, indicating that the alarm type is set.

You may also select the alarm type by pressing the ALARM MODE button on your remote control.
Once you have set an alarm, the Alarm Signal Format indicator will illuminate along with the audio mode when the speaker system is in use. (E.g. When alarm is set to RADIO type and system is playing iPod audio, both the iPod and RADIO logos will display on screen.)
To activate the alarm
Once your alarms are set, they can be activated in any combination (ALARM 1 only, ALARM 2 only, or ALARM 1 & 2). To activate the alarms:
Press the SET pad on the system, or the ALARM key ★ on the remote control. The screen will display the ALARM 1 time for three seconds. The 'A1' symbol will continue to display, indicating that ALARM 1 has been selected.
To select ALARM 2 or ALARM 1 & 2, press the SET pad ✦ until the display indicates that the desired alarm is selected.
Snooze and Timer
Snooze/Off
Your alarm clock includes a snooze function, which will temporarily turn off the alarm for 9 minutes. To Snooze, press the POWER pad on the unit when the alarm is sounding. The A1 or A2 Alarm indicator will flash while the system snoozes. When 9 minutes have passed, the alarm will sound again.
To turn the alarm off completely, press and hold the POWER pad while the system snoozes.
Sleep
The sleep function allows you to set the unit to shut off automatically after a set period of time. The sleep timer can be set in 15-minute intervals ranging from 15 minutes to one hour. To set the sleep timer, turn on the system and press the SLEEP button on your remote control until the desired time interval is displayed. The timer will begin automatically after 10 seconds.
Nap Timer
The nap timer function allows you to set the unit to turn on automatically after a set period of time. The nap timer can be set in 15-minute intervals ranging from 15 minutes to one hour. To set the nap timer, turn off the system and press the NAP button on your remote control until the desired time interval is displayed. The timer will begin automatically after 10 seconds.
Other Functions
Lamp
For your convenience, the blue base light on the underside of the unit can be turned on and off manually. To turn the light on or off, press the POWER pad on the system for 2 seconds.
Clock backup batteries
To ensure that Clock/Alarm features continue to function in the event of a power outage, your speaker system can accommodate two 1.5V AA batteries as a backup power source.
To insert batteries, slide open the battery compartment on the base of the unit and insert the batteries as indicated by the polarity diagram.

The batteries will provide backup power for the Clock/Alarm functions only. Batteries will not power the speaker unit.
Troubleshooting
If you have a problem with this device, please read the troubleshooting guide below and check our website at www.cobyusa.com for Frequently Asked Questions (FAQs) and firmware updates. If these resources do not resolve the problem, please contact Technical Support.
Address
Coby Electronics Technical Support 56-65 Rust Street Maspeth, NY 11378
techsupport@cobyusa.com
Web
www.cobyusa.com
Phone
800-727-3592: Mon–Fri, 8:00AM–11:00PM EST Saturdays, 9:00AM–5:30PM EST 718-416-3197: Mon–Fri, 8:00AM–5:30PM EST
If you experience problems with the speaker system, please take the following steps:
Check that the power cord connections to the system ✦ and wall outlet are secure.
Check that the system has been turned on. ★
Check that the volume has been turned up. ★
Check that the correct audio mode is selected. ✦
Check that a compatible iPod and correct connection adapter have been inserted in the dock.
Check that the correct radio frequency is selected. ★
Troubleshooting
If you experience problems while attempting to use the remote control, check that the batteries are inserted and fully charged.
Please refer to the table below for common troubleshooting techniques.
| Problem Cause Solution | ||
| No audio/ no display | Power is not connected | Connect power and recheck system |
| Unit is not turned on Turn | unit on and recheck system | |
| Faulty plug pack power supply | Contact manufacturer for a replacement plug | |
| Display functioning, but no audio | Incorrect audio mode selected | Select correct audio mode |
| Volume turned down on unit | Adjust volume using +/- controls on unit | |
| iPod not connected properly | Remove iPod from dock and reconnect | |
| Faulty equipment (speaker, iPod, dock connection) | Contact manufacturer | |
Troubleshooting
| Problem Cause Solution | ||
| Poor FM re-ception, static or crackling | Interference from other devices; poor reception quality | Reposition FM antenna, or relocate system to another position |
| iPhone not operating in airplane mode | Select airplane mode before connecting iPhone to the dock | |
| iPhone shows error mes-sage when connected to dock | iPhone may cause interference when operated outside of airplane mode | Select airplane mode before connecting iPhone to the dock |
Specifications
| Power Supply AC 110-240V ~ 50/60Hz |
| Output Power 6W x 2 (RMS) |
| Speaker Size 3” (76mm) |
| Auxiliary Input 3.5mm stereo |
| Tuner System AM, FM |
Compatible with

iPod touch
2nd generation
8GB 16GB 32GB

iPod
5th generation (video)
30GB 60GB 80GB

iPod nano
4th generation (video)
8GB 16GB

iPod nano
1st generation
1GB 2GB 4GB

iPod classic
80GB 120GB 160GB

iPod
4th generation (color display)
20GB 30GB 40GB 60GB

iPod touch
1st generation
8GB 16GB 32GB

iPod
4th generation
20GB 40GB

iPod nano
3rd generation (video)
4GB 8GB

iPod mini
4GB 6GB

iPod nano
2nd generation (aluminum)
2GB 4GB 8GB
Specifications and manual are subject to change without notice.
Safety Notices

CAUTION
WARNING: SHOCK HAZARD. DO NOT OPEN. AVIS: RISQUE DE CHOC ELECTRIQUE. NE PAS OUVRIR

CAUTION: TO REDUCE THE RISK OF FIRE AND ELECTRIC SHOCK, DO NOT REMOVE THE COVER (OR BACK) OF THE UNIT. REFER SERVICING ONLY TO QUALIFIED SERVICE PERSONNEL.

The lightning flash with arrowhead symbol within an equilateral triangle is intended to alert the user to the presence of uninsulated “dangerous voltage” within the product’s enclosure that may be of sufficient magnitude to constitute a risk of electric shock.

The exclamation point within an equilateral triangle is intended to alert the user to the presence of important operation and servicing instructions in the literature accompanying the appliance.
For Customer Use:
Enter below the serial number that is located on the rear of the unit. Retain this information for future reference.
Model No. CSMP162
Serial No. ____
WARNING: To prevent fire or shock hazard, do not expose this device to rain or moisture. Dangerous high voltage is present inside the enclosure. Do not open the cabinet.
CAUTION: To prevent electric shock, match wide blade of plug to wide slot of outlet and fully insert.
Protect your hearing: Hearing experts advise against the constant use of personal stereos played at high volume. Constant exposure to high volumes can lead to hearing loss. If you should experience ringing in the ears or hearing loss, discontinue use and seek medical advice.

For recycling or disposal information about this product, please contact your local authorities or the Electronics Industries Alliance: www.eiae.org.
Safety Notices
FCC Statement:
This device complies with Part 15 of the FCC Rules. Operation is subject to the following two conditions:
(1) This device may not cause harmful interference, and
(2) This device must accept any interference received, including interference that may cause undesired operation.
Note: This equipment has been tested and found to comply with the limits for Class B digital devices, pursuant to Part 15 of the FCC rules. These limits are designed to provide reasonable protection against harmful interference in a residential installation. This equipment generates, uses and can radiate radio frequency energy and, if not installed and used in accordance with the instructions, may cause harmful interference to radio communications. However, there is no guarantee that interference will not occur in a particular installation. If this equipment does cause harmful interference to radio or television reception, which can be determined by turning the equipment off and on, the user is encouraged to try to correct the interference by one or more of the following measures:
Reorient or relocate the receiving antenna.
Increase the separation between the equipment and receiver.
Connect the equipment into an outlet on a circuit different from that to which the receiver is connected.
Consult the dealer or an experienced radio/TV technician for help•
Use of shielded cable is required to comply with Class B limits in Subpart B of Part 15 of the FCC rules.
Do not make any changes or modifications to the equipment unless otherwise specified in the manual. If such changes or modifications should be made, you could be required to stop operation of the equipment.
Safety Notices
Important Safety Instructions
Read Instructions: All the safety and operating instructions should be 1. read before the product is operated.
Retain Instructions: The safety and operating instructions should be 2. retained for future reference.
Heed Warnings: All warnings on the product and in the operating 3. instructions should be adhered to.
Follow Instructions: All operating and usage instructions should be 4. followed.
Cleaning: Unplug this product from the wall outlet before cleaning. 5. Do not use liquid cleaners or aerosol cleaners. Use a damp cloth for cleaning.
Attachments: Use only attachments recommended by the manufac-6. turer. Use of other attachments may be hazardous.
Water and Moisture: Do not use this product near water (e.g., near a 7. bath tub, washbowl, kitchen sink, laundry tub, in wet basements, or near a swimming pool and the like).
Ventilation: Slots and openings in the cabinet are provided for venti-8. lation to ensure reliable operation of the product and to protect it from overheating. These openings should never be blocked by placing the product on a bed, sofa, rug, or other similar surface. This product should not be placed in a built-in installation such as a bookcase or rack unless proper ventilation is provided or the manufacturer instructions have been adhered to.
Power Sources: This product should be operated only from the type 9. of power source indicated on the rating label. If you are not sure of the type of power supply to your home, consult your product dealer or local power company. For products intended to operate from battery power or other sources, refer to the operating instructions.
Power-Cord Protection: Power supply cords should be routed so 10. that they are not likely to be walked on or pinched by items placed upon or against them, paying particular attention to cords at plugs, convenience receptacles, and at the point which they exit from the product.
Lightning: For added protection for this product, unplug it from the 11. wall outlet and disconnect the antenna or cable system during a lightning storm or when it is left unattended and unused for long periods of time. This will prevent damage to the product due to lightning or power-line surges.
Safety Notices
Overloading: Do not overload wall outlets, extension cords, or in-12. tegral convenience receptacles as this can result in a risk of fire or electric shock.
Object and Liquid Entry: Never push objects of any kind into this 13. product through openings as they may touch dangerous voltage points or shout-out parts that could result in a fire or electric shock. Never spill liquid of any kind on the product.
Servicing: Do not attempt to service this product yourself as opening 14. or removing covers may expose you to dangerous voltage or other hazards. Refer all servicing to qualified service personnel.
Damage Requiring Service: Unplug this product from the wall outlet 15. and refer servicing to qualified service personnel under the following conditions: a) when the power-supply or plug is damaged; b) if liquid has been spilled or if objects have fallen into the product; c) if the product has been exposed to rain or water; d) if the product does not operate normally by following the operating instructions. Adjust only those controls that are covered by the operating instructions as improper adjustment of other controls may result in damage and will often require extensive work by a qualified technician to restore the product to its normal operation; e) if the product has been dropped or damaged in any way; f) when the product exhibits a distinct change in performance—this indicates a need for service.
Replacement Parts: When replacement parts are required, be sure 16. that your service technician has used replacement parts specified by the manufacturer or have the same characteristics as the original part. Unauthorized substitutions may result in fire, electric shock, or other hazards.
Safety Check: Upon completion of any service or repairs to this prod-17. uct, ask the service technician to perform safety checks to ensure that the product is in proper operating condition.
Heat: The product should be situated away from heat sources such as radiators, heat registers, stoves, or other products (including amplifiers) that produce heat.
Índice
gRACiAS 23
CoNTENiDoS DEI PAQuETE Y FuNCioNES ...... 24
gENERAliDADES 25
FuNCioNAMiENTo 26
MoDo iPoD ......27
MoDo RADio Y ENTRADA AuXiliAR 28
Coby Electronics Technical Support
56-65 Rust Street
Maspeth, NY 11378
techsupport@cobyusa.com
La Red
www.cobyusa.com
Coby Electronics Technical Support
56-65 Rust Street
Maspeth, NY 11378
techsupport@cobyusa.com
Site Web
www.cobyusa.com
Téléphone
Coby Electronics Corporation
1991 Marcus Ave, Suite 301
Lake Success, NY 11042
www.cobyusa.com
www.ecoby.com
Coby is a registered trademark of Coby Electronics Corporation. Printed in China.

- CSMP162
- Thank You
- Package Contents & Features
- Package Contents
- Features
- Operation
- Aux and Radio Mode
- Set Clock Mode
- To set the clock
- To set the alarm
- To set the alarm type
- To activate the alarm
- Snooze and Timer
- Snooze/Off
- Sleep
- Nap Timer
- Other Functions
- Lamp
- Clock backup batteries
- Troubleshooting
- Address
- Web
- Phone
- If you experience problems with the speaker system, please take the following steps:
- Specifications
- Compatible with
- Safety Notices
- CAUTION
- For Customer Use:
- FCC Statement:
- Important Safety Instructions
- Índice
- La Red
- Site Web
- Téléphone
- Coby Electronics Corporation
Brand : COBY
Model : CSMP162
Category : Alarm clock radio