EF 300mm f4L IS USM - Camera lens CANON - Free user manual and instructions
Find the device manual for free EF 300mm f4L IS USM CANON in PDF.
User questions about EF 300mm f4L IS USM CANON
0 question about this device. Answer the ones you know or ask your own.
Ask a new question about this device
Download the instructions for your Camera lens in PDF format for free! Find your manual EF 300mm f4L IS USM - CANON and take your electronic device back in hand. On this page are published all the documents necessary for the use of your device. EF 300mm f4L IS USM by CANON.
USER MANUAL EF 300mm f4L IS USM CANON
Thank you for purchasing a Canon product.
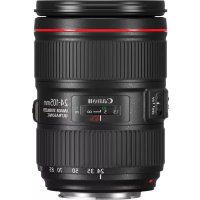
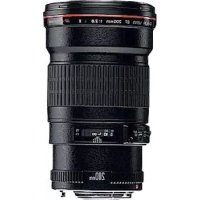
The Canon EF300mm f/4L IS USM lens is a high-performance telephoto zoom lens for EOS cameras, and it is equipped with an Image Stabilizer.
- "IS" stands for Image Stabilizer.
- "USM" stands for Ultrasonic Motor.
Conventions used in this instruction

Warning to prevent lens or camera malfunction or damage.

Supplementary notes on using the lens and taking pictures.
Features
- The Image Stabilizer gives the equivalent effect of a shutter speed two stops faster*. The lens also has a second image stabilizer mode that is optimized for following shots of moving subjects.
- UD lens elements for excellent imaging performance.
- Ultrasonic motor (USM) for quick and quiet autofocusing.
- Manual focusing is available after the subject comes into focus in autofocus mode (ONE SHOT AF).
-
The lens is compatible with Extender EF1.4X II and EF2X II.
-
Based on [1/focal length] second. Generally, it requires a shutter speed [1/focal length] second or faster to prevent camera shake.
Safety Precautions
Safety Precautions
- Do not look at the sun or a bright light source through the lens or camera. Doing so could result in loss of vision. Looking at the sun directly through the lens is especially hazardous.
- Do not point the lens or camera at the sun or photograph it. This is because the lens concentrates the sun's rays even when the sun is outside the image area or when shooting with backlight, which could cause malfunction or fire.
- Whether it is attached to the camera or not, do not leave the lens under the sun without the lens cap attached. This is to prevent the lens from concentrating the sun's rays, which could cause a fire.
Handling Cautions
- If the lens is taken from a cold environment into a warm one, condensation may develop on the lens surface and internal parts. To prevent condensation in this case, first put the lens into an airtight plastic bag before taking it from a cold to warm environment. Then take out the lens after it has warmed gradually. Do the same when taking the lens from a warm environment into a cold one.
- Do not leave the lens in excessive heat such as in a car in direct sunlight. High temperatures can cause the lens to malfunction.
This device complies with Part 15 of the FCC Rules. Operation is subject to the following two conditions: (1) This device may not cause harmful interference, and (2) this device must accept any interference received, including interference that may cause undesired operation.
Do not make any changes or modifications to the equipment unless otherwise specified in the instructions. If such changes or modifications should be made, you could be required to stop operation of the equipment.
This equipment has been tested and found to comply with the limits for a class B digital device, pursuant to part 15 of the FCC Rules. These limits are designed to provide reasonable protection against harmful interference in a residential installation. This equipment generates, uses and can radiate radio frequency energy and, if not installed and used in accordance with the instructions, may cause harmful interference to radio communications.
However, there is no guarantee that interference will not occur in a particular installation. If this equipment does cause harmful interference to radio or television reception, which can be determined by turning the equipment off and on, the user is encouraged to try to correct the interference by one or more of the following measures:
- Reorient or relocate the receiving antenna.
- Increase the separation between the equipment and receiver.
- Consult the dealer or an experienced radio/TV technician for help.
This Class B digital apparatus complies with Canadian ICES-003.
ENG-2
Nomenclature
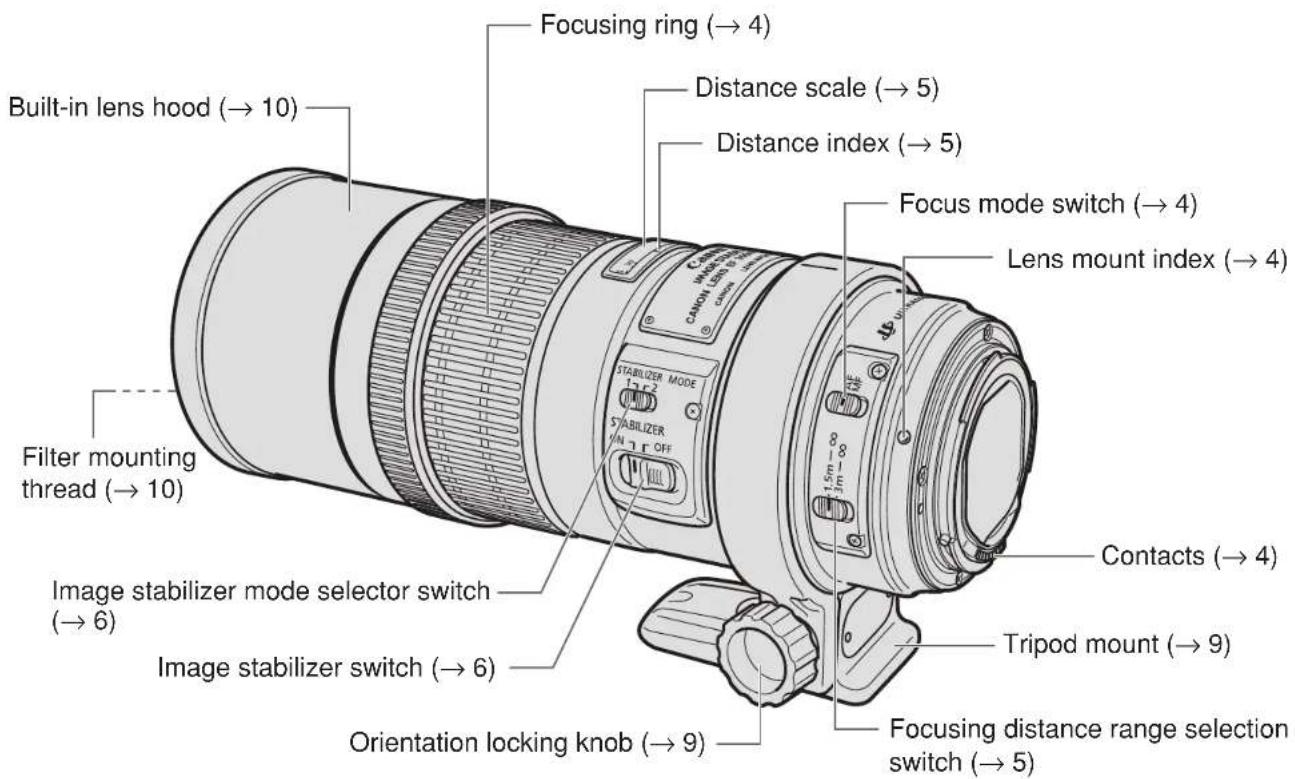
For detailed information, reference page numbers are provided in parentheses (^**)
1. Mounting and Detaching the Lens
See your camera's instructions for details on mounting and detaching the lens.

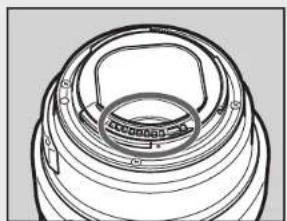
After detaching the lens, place the lens with the rear end up to prevent the lens surface and electrical contacts from getting scratched.
- If the contacts get soiled, scratched, or have fingerprints on them, corrosion or faulty connections can result. The camera and lens may not operate properly.
- If the contacts get soiled or have fingerprints on them, clean them with a soft cloth.
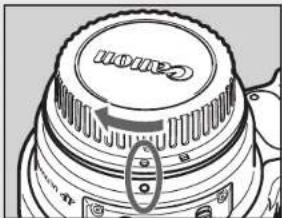
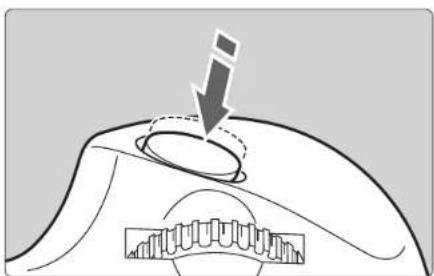
- If you remove the lens, cover it with the dust cap. To attach it properly, align the lens mount index and the index of the dust cap as shown in the diagram, and turn clockwise. To remove it, reverse the order.
2. Setting the Focus Mode
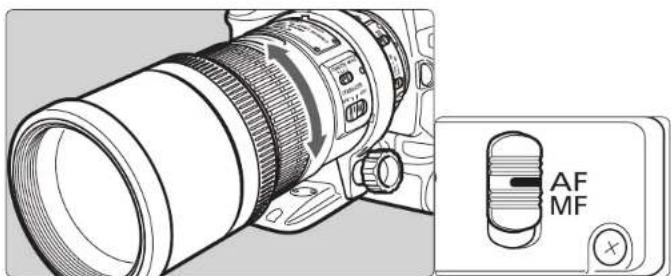
To shoot in autofocus (AF) mode, set the focus mode switch to AF.
To use only manual focusing (MF), set the focus mode switch to MF, and focus by turning the focusing ring. The focusing ring always works, regardless of the focus mode.

After autofocusing in ONE SHOT AF mode, focus manually by pressing the shutter button halfway and turning the focusing ring. (Full-time manual focus)
3. Switching the Focusing Distance Range
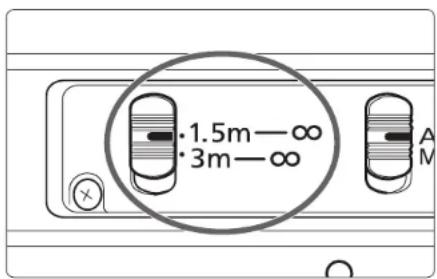
You can set the focusing distance range to 1.5m / 4.9 ft. to infinity or 3m / 9.8 ft. to infinity. By setting the suitable focusing distance range, the actual autofocusing time can be shorter.

If you autofocus outside the set focusing distance range, the lens may stop focusing at the start of the focusing range; however, this is not a malfunction. Press the shutter release button halfway again.
4. Infinity Compensation Mark
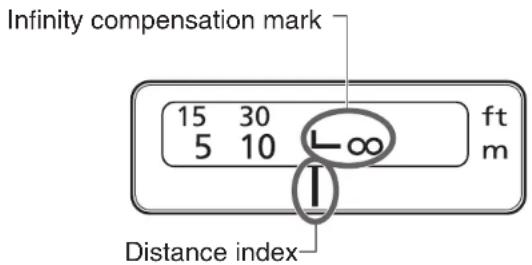
To compensate for shifting of the infinity focus point that results from changes in temperature. The infinity position at normal temperature is the point at which the vertical line of the L mark is aligned with the distance indicator on the distance scale.

For accurate manual focusing on subjects at infinity distance, look through the viewfinder while rotating the focusing ring.
5. Image Stabilizer Settings
You can use the image stabilizer in AF or MF mode.
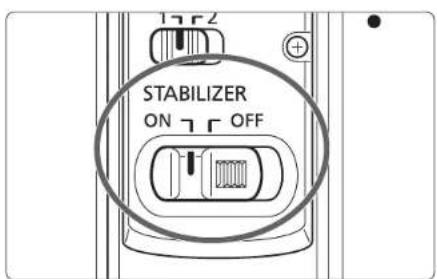
1 Set the STABILIZER switch to.ON
If you are not going to use the image stabilizer function, set the switch to OFF.
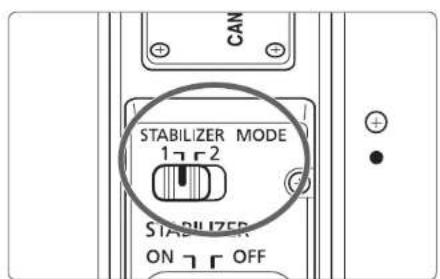
2 Select the stabilizer mode.
- MODE 1: Corrects vibrations in all directions. It is mainly effective for shooting still subjects.
- MODE 2: It compensates for vertical camera shake during following shots in a horizontal direction, and compensates for horizontal camera shake during following shots in a vertical direction.
3 When you press the shutter button halfway, the Image Stabilizer will start operating.
- Make sure the image in the viewfinder is stable, then press the shutter button the rest of the way down to take the picture.
6. Tips on Using the Image Stabilizer
The image stabilizer in this lens is effective for hand-held shots under the following conditions.
- MODE 1 -MODE 2
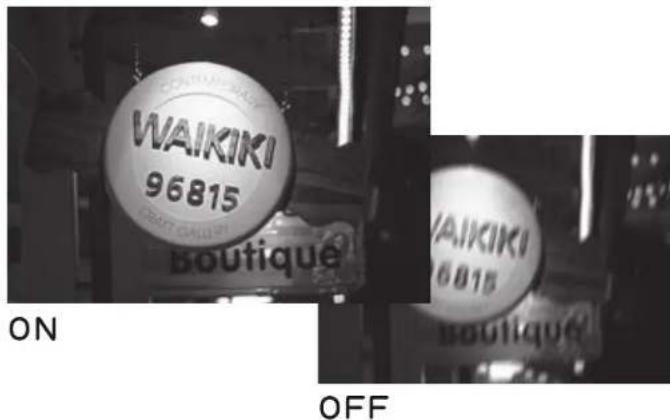
- In semi-darkened areas such as indoors or outdoors at night.
- In locations where flash photography is prohibited, such as art museums and theater stages.
- In situations where your footing is uncertain.
- In situations where fast shutter settings cannot be used.
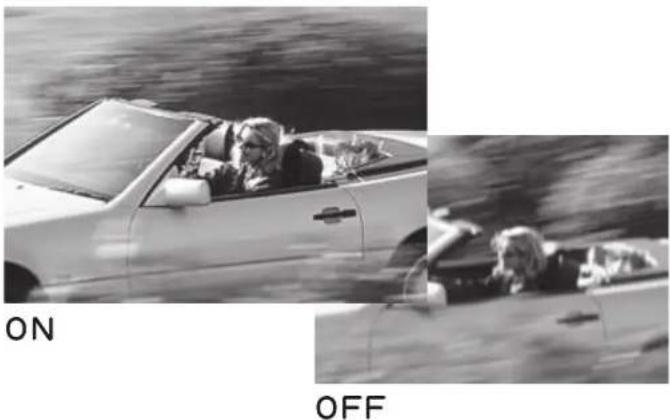
- When panning subjects in motion.
Tips on Using the Image Stabilizer

- The Image Stabilizer cannot compensate for a blurred shot caused by a subject that moved.
- Set the STABILIZER switch OFF when you are using a tripod. If the Stabilizer switch is set to ON, the image stabilizer function may introduce errors.
- Set the STABILIZER switch to OFF when you are taking pictures using the Bulb setting (long exposures). If the STABILIZER switch is set to ON, the image stabilizer function may introduce errors.
-
The Image Stabilizer might not be fully effective in the following cases:
-
You shoot while riding on a bumpy road.
- You move the camera dramatically for a panning shot in Mode 1.
-
You shoot using techniques other than following shots in Mode 2.
-
The Image Stabilizer consumes more power than normal shooting, so fewer shots can be taken if you use the function.
- The image stabilizer operates for about two seconds even when your finger is off the shutter button. Do not remove the lens while the stabilizer is in operation. This will cause a malfunction.
- With the EOS-1V/HS, 3, ELAN 7E/ELAN 7/30/33, ELAN 7NE/ELAN 7N/30V/33V, ELAN II/ELAN IIE/50/50E, REBEL 2000/300, IX, and D30, the Image Stabilizer will not work during self-timer operation.

- When using a tripod, set the STABILIZER switch OFF to prevent errors.
- The stabilizer is equally effective for hand-held photography and photography with a monopod.
- The Image Stabilizer function also operates when the lens is used with the EF12 II or EF25 II Extension Tube, and the EF1.4X II Extender.
With Extender EF2X II attached to the lens, the Image Stabilizer will work with the following cameras: EOS-1Ds Mark III, EOS-1Ds Mark II, EOS-1Ds, EOS-1D Mark III, EOS-1D Mark II N, EOS-1D Mark II, EOS-1D, EOS 40D, 30D, 20D, 20Da, 10D, 5D, DIGITAL REBEL XSi/450D, DIGITAL REBEL XTi/400D DIGITAL, DIGITAL REBEL XT/350D DIGITAL, DIGITAL REBEL/300D DIGITAL, D60, D30, EOS DCS1, DCS3, D2000, D6000, EOS-1V/HS, EOS-1N/DP/HS/RS, 3, ELAN 7E/ELAN 7/30/33, ELAN 7NE/ELAN 7N/30V/33V, ELAN II/ELAN IIE/50/50E, REBEL X/REBEL XS/500, REBEL G/500N, REBEL 2000/300, REBEL Ti/300V, REBEL T2/300X, REBEL K2/3000V, IX, IX Lite/IX7, 3000/88, 5000/888
Pictures may look distorted after being taken depending on the camera, but this doesn't affect shooting. - If you set the camera's Custom Function to change the assigned button to operate the AF, the Image Stabilizer will operate when you press the newly assigned AF button.
7. Using the Tripod Mount
Adjusting the Revolving Mount
You can loosen the orientation lock-knob on the tripod mount to allow it to rotate as needed to fit a particular camera model for switching between vertical and horizontal positions.
Detaching
Use the following procedures to remove and attach the tripod mount.
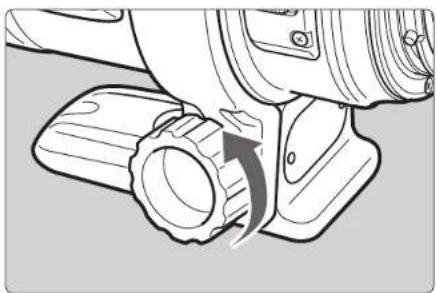
1 Loosen the orientation locking knob.
2 Rotate the tripod mount and align the mounting indicator on the tripod mount with the one on the lens.
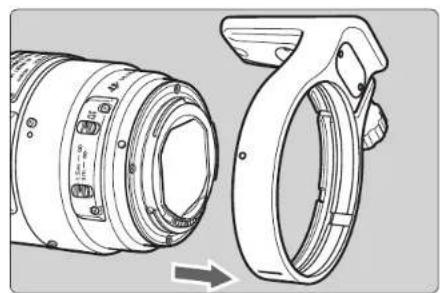
3 Slide off the tripod collar away from the rear of the lens.
If the foot of the tripod mount overlaps the switch, loosen the orientation locking knob on the tripod mount to move the foot.
8. Hood

The built-in lens hood can reduce unwanted reflections and also protects the front of the lens from rain, snow, dust, and other substances. When using the hood, extend it outward from the end of the lens until it stops and then turn it in the direction of the arrow. For storage, reverse the procedure.
9. Filters (Sold separately)
You can attach filters to the filter mounting thread on the front of the lens.

- If you need a polarizing filter, use the Canon Circular Polarizing Filter (77mm).
- To adjust the polarizing filter, first store the lens hood.
10. Extension Tubes (Sold separately)
You can attach Extension Tube EF12 II or EF25 II for magnified shots. The shooting distance and magnification are shown below.
| Camera-to-Subject Distance (mm) | Magnification | |||
| NearFar | NearFar | |||
| EF12 II | 1338 | 7795 | 0.30× | 0.04× |
| EF25 II | 1216 | 3946 | 0.37× | 0.09× |

Manual focusing is recommended for accurate focusing.
11. Close-up Lenses (Sold separately)
Attaching a 500D (77mm) Close-up Lens enables close-up photography.
Magnification will be 0.82 × -0.59 × .

- Close-up Lens 250D cannot be attached because there is no size that fits the lens.
- Manual focusing is recommended for accurate focusing.
12. Extenders (Sold separately)
With Extender EF1.4X II or EF2X II attached, the lens specifications will change as follows:
| Item | With EF1.4X II Extender | With EF2X II Extender | |
| Focal length (mm) 420600 | |||
| Aperture | f/5.6 - f/45 | f/8 - f/64 | |
| Angle of view | Diagonal | 6°10' | 4°10' |
| Vertical | 3°20' | 2°20' | |
| Horizontal | 5° | 3°30' | |
| Maximum magnification (×) | 0.33 | 0.47 | |

- First attach the Extender to the lens, then attach the lens to the camera. Detach it from the camera in the reverse order. If you attach the lens to the camera first, misoperation may occur.
- With Extender EF2X II attached to the lens, only manual focus is possible. However, with the EOS-1Ds Mark III, EOS-1Ds Mark II, EOS-1Ds, EOS-1D Mark III, EOS-1D Mark II N, EOS-1D Mark II, EOS-1D, EOS-1V/HS, EOS-3 camera, autofocusing with the center focusing point is possible.
- Only one Extender can be attached to the lens and camera.
- If you use an Extender on the lens mounted on a EOS A2/A2E/5, set the exposure compensation to -1/2 stop for the EF1.4X II or -1 stop for the EF2X II.

- Autofocusing is still enabled with Extender EF1.4X II attached.
- When an Extender is attached, the AF speed will become slower by design to retain proper AF control.
Specifications
| Focal Length & Max. Aperture | 300 mm, f/4 |
| Lens Construction | 15 elements in 11 groups |
| Min. Aperture f/32 | |
| Angle of View | Diagonal: 8°15' Vertical: 4°35' Horizontal: 6°50' |
| Min. Focusing Distance | 1.5 m / 4.9 ft. |
| Max. Magnification & Field of view | 0.24 ×, 101 × 150 mm / 4.0 × 5.9 inch (at 1.5 m) |
| Filter Diameter | 77 mm |
| Max. Diameter & Length | 90 × 221 mm / 3.5 × 8.7 inch |
| Weight | 1190 g / 42.0 oz |
| Lens Hood | Built-in |
| Lens Cap | E-77U/E-77 II |
| Case | LZ1128 |
- The lens length is measured from the mount surface to the front end of the lens. Add 21.5mm to include the E-77U lens cap and dust cap, and 24.2mm for the E-77 II.
- The size and weight listed are for the lens only, except as indicated.
- Aperture settings are specified on the camera.
- All data listed is measured according to Canon standards.
- Product specifications and appearance are subject to change without notice.
Canon
CT1-8505-004
0812Ni
© CANON INC. 2002
ENG EF LENS Quick Guide
FRN OBJECTIF EF Guide de demarrage rapide
Nomenclature
① Contacts
② Lens mount index
③ Focus mode switch
④ Focusing ring
⑤ Zoom ring
⑥ Zoom position index
⑦ Image stabilizer switch
The figures show you how to use the product. The actual product may differ from the figures.
** In some products, the positions of the focusing ring and zoom ring are in a reverse sequence to the figures.
Thank you for purchasing a Canon product.
This guide shows the basic tips on how to use the Canon EF lens. Make sure you read this guide in order to operate the lens correctly and safely.
- For further details on how to use the product you purchased, see the instruction (PDF format) stored in the CD-ROM provided.
Using the "EF Lens Instructions" CD-ROM
Adobe Reader 6.0 or higher must be installed in the your computer.
- Insert the EF Lens Instructions CD-ROM into your personal computer.
Never insert the CD-ROM into any drive incompatible with CD-ROMs. If you insert the CD-ROM into a CD player and try to play it, it may damage your speakers. The loud noise can also damage your ears if you are using headphones, earphones, etc. - Select the drive containing the CD-ROM.
- Select and open the "START.pdf" file.
- On the language menu, click on the desired language.
- On the lens selection menu, click on the name of your lens to open the lens instruction manual.
Safety Precautions
- Do not look at the sun or a bright light source through the lens or camera. Doing so could result in loss of vision. Looking at the sun directly through the lens is especially hazardous.
- Whether it is attached to the camera or not, do not leave the lens under the sun without the lens cap attached. This is to prevent the lens from concentrating the sun's rays, which could cause a fire.
Handling Cautions
- If the lens is taken from a cold environment into a warm one, condensation may develop on the lens surface and internal parts. To prevent condensation in this case, first put the lens into an airtight plastic bag before taking it from a cold to warm environment. Then take out the lens after it has warmed gradually. Do the same when taking the lens from a warm environment into a cold one.
- Do not leave the lens in excessive heat such as in a car in direct sunlight. High temperatures can cause the lens to malfunction.
This device complies with Part 15 of the FCC Rules. Operation is subject to the following two conditions: (1) This device may not cause harmful
Nomenclature
This device complies with Part 15 of the FCC Rules. Operation is subject to the following two conditions: (1) This device may not cause harmful interference, and (2) this device must accept any interference received, including interference that may cause undesired operation.
Do not make any changes or modifications to the equipment unless otherwise specified in the instructions. If such changes or modifications should be made, you could be required to stop operation of the equipment.
This equipment has been tested and found to comply with the limits for a class B digital device, pursuant to part 15 of the FCC Rules. These limits are designed to provide reasonable protection against harmful interference in a residential installation. This equipment generates, uses and can radiate radio frequency energy and, if not installed and used in accordance with the instructions, may cause harmful interference to radio communications.
However, there is no guarantee that interference will not occur in a particular installation. If this equipment does cause harmful interference to radio or television reception, which can be determined by turning the equipment off and on, the user is encouraged to try to correct the interference by one or more of the following measures:
- Reorient or relocate the receiving antenna.
- Increase the separation between the equipment and receiver.
- Consult the dealer or an experienced radio/TV technician for help.
This Class B digital apparatus complies with Canadian ICES-003.
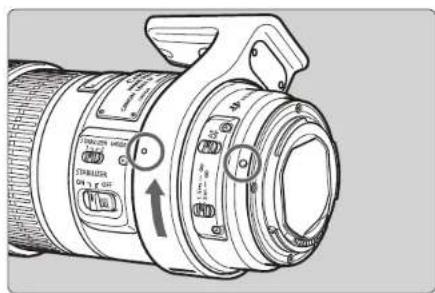
1. Attaching the Lens to the Camera
Align the lens mount index (white "□" or red "●") and the mount index on the camera, indicated with the same color, and turn the lens clockwise until it clicks. (Fig. 1)
After detaching the lens, place the lens with the rear end up to prevent the lens surface and electrical contacts from getting scratched. (Fig. 2)
- If the contacts get soiled, scratched, or have fingerprints on them, corrosion or faulty connections can result. The camera and lens may not operate properly.
- If the contacts get soiled or have fingerprints on them, clean them with a soft cloth.
- If you remove the lens, cover it with the dust cap. To attach it properly, align the lens mount index and the "O" or "□" index of the dust cap, and turn clockwise. (Fig. ⑧) To remove it, reverse the above order.
2.Setting the Focus Mode
For a lens that has a focus mode switch, it is possible to switch between autofocus (AF) mode and manual focusing (MF). (Fig. ①) To shoot in autofocus mode, set the focus mode switch to AF. To use only manual focusing, set the focus mode switch to MF, and focus by turning the focusing ring. (Fig. ③)
3.Zooming
The zoom lens enables zooming out or in by turning the zoom ring or moving it back and forth. (Fig. ⑥)
Be sure to finish zooming before focusing. Changing the zoom ring after focusing can affect the focus.
4. Setting the Image Stabilizer
A lens with an image stabilizer can compensate for camera shake by switching the function on.
You can use the image stabilizer in AF or MF mode.
-
Set the STABILIZER switch to "ON". (Fig. ①)
-
If you are not going to use the image stabilizer function set the switch to "OFF".
-
When you press the shutter button halfway, the Image Stabilizer will start operating.
-
Make sure the image in the viewfinder is stable, then press the shutter button the rest of the way down to take the picture.
5. Selecting the Image Stabilizer Mode (Fig. 8)
You can select the image stabilizer mode with the image stabilizer mode selector switch ⑧.
MODE 1:
Corrects vibrations in all directions. It is mainly effective for shooting still subjects.
MODE 2:
It is used when panning subjects in motion.
It compensates for vertical camera shake during following shots in a horizontal direction, and compensates for horizontal camera shake during following shots in a vertical direction.
During following shots in a diagonal direction, you may not obtain the image stabilizer effect in all directions.
30-2, Shimomaruco 3-chome, Ohta-ku, Tokyo 146-8501, Japan
U.S.A.
CANON U.S.A. INC.
One Canon Plaza, Lake Success, NY 11042-1198, U.S.A. For all inquiries concerning this product, call toll free in the U.S.
1-800-OK-CANON
CANADA
CANON CANADA INC. HEADQUARTERS
6390 Dixie Road, Mississauga, Ontario L5T 1P7, Canada CANON CANADA INC, MONTREAL BRANCH
5990, Côte-de-Liesse, Montréal QBEC H4T 1V7, Canada CANON CANADANICACCALGARY OFFICE
2828, 16th Street, N.E. Calgary, Alberta T2E 7K7, Canada For all inquiries concerning this product, call toll free in
Canada
1-800-OK-CANON
EUROPE, AFRICA & MIDDLE EAST
CANON EUROPA N.V.
Bovenkerkeweg 59, 1185 XB Amstelveen, The Netherlands CANON FRANCE S.A.S.
Woodhatch, Reigate, Surrey, RH2 8BF, United Kingdom
Gustav III:s Boulevard 26, 169 88 Solna, Sweden
CANON NORGE AS
Hallagerbakken 110, PO Box 33, Holmlia, 1201 Oslo, Norway
CENTRAL & SOUTH AMERICA
CANON LATIN AMERICA, INC.
703 Waterford Way, Suite 400 Miami, FL 33126, U.S.A.
ASIA
CANON (China) Co., LTD.
15F Jinbao Building No.89 Jinbao Street, Dongcheng District,
Beijing 100005, China
CANON HONGKONG CO., LTD.
19/F., The Metropolis Tower, 10 Metropolis Drive, Hunghom,
Kowloon, Hong Kong
CANON SINGAPORE PTE. LTD.
1 HarbourFront Avenue, #04-01 Keppel Bay Tower, Singapore
098632
CANON INDIA PVT. LTD.
7th Floor, Tower B, Building #5, DLF Cyber Terraces, DLF
Phase 3, Gurgaon, 122002, Haryana, India
CANON KOREA CONSUMER IMAGING INC.
Canon BS Tower 5F, #168-12 Samseong-dong, Gangnam-gu,
Seoul, Korea
OCEANIA
CANON AUSTRALIA PTY, LTD.
1 Thomas Holt Drive, North Ryde, Sydney N.S.W. 2113.
Australia
CANON NEW ZEALAND LTD
Akoranga Business Park, Akoranga Drive, Northcote,
Auckland, New Zealand
JAPAN
Dealer Record of Canon Purchase
Complete this card at time of sale.
ONINNS INTERESTED IN
Betain for your Records
CES CARTES NE SONT PAS CELLES POUR L'ENREGISTREMENT.
CANON® EF Lens and Accessories Limited Warranty-For U.S.A. & Canada Only
The limited warranty set forth below is given by Canon U.S.A., Inc. (Canon U.S.A.) in the United States or Canon Canada, Inc. (Canon Canada) in Canada with respect to the Canon products that are not covered by this limited warranty (collectively the "Products"), when purchased and used in the United States or Canada. The Products are the only Products to which this limited warranty applies.
Your Products, when delivered to you in new condition in its original container, are warranted against defects in materials or workmanship as follows: for a period of one (1) year from the date of original purchase, defective parts or defective Products returned to Canon U.S.A. or Canon Canada, or their associated Products service providers, as applicable, and proven to be defective upon inspection, will be repaired with new or comparable rebuilt parts or exchanged for refurbished Products, as determined by Canon U.S.A. or Canon Canada or the authorized Products service provider.
THIS WARRANTY DOES NOT COVER ANY ACCESSORIES NOT MENTIONED ABOVE. The limited warranty shall only apply if the Products are used in conjunction with compatible computer equipment and compatible software, as to which items Canon U.S.A. or Canon Canada shall have no responsibility.
Non-Canon brand equipment and software that may be distributed with the Products are sold "as is" and without warranty of any kind by Canon U.S.A. or Canon Canada, including any implied warranty regarding merchantability or fitness for a particular purpose, and all such warranties are disclosed. The sole warranty, if any, with respect to this product is that written warranties shall be given to the manufacturer.
This limited warranty covers all defects encountered in normal use of the Products, and does not apply in the following cases:
(a) Loss or damage due to neglect and/or abuse causing deterioration, erishing, accident or failure to follow operating instructions. (b) If a product is defective as a result of leaking hddction or damage due to water or other liquid.
(2) Defective materials or workmanship where the defect is due to a Product having been serviced or modified by other than Canon or a Canon authorized service provider. (3) Maficnion resulting from the use of accessories, attachments, supplies, parts or devices (including, without litation, batteries, film, flash attachments and other accessories) that do not
(a) Damage resulting during shipment. (Claim must be presented and examined by the shipper).
NO IMPLIED WARRANTY, INCLUDING ANY IMPLIED WARRANTY OF MERCHANTIABILITY OR FITNESS FOR A PARTICULAR PURPOSE, APPLIES TO A PRODUCT AFTER THE APPLICABLE PERIOD OF THE EXPRESS LIMITED WARRANTY STATED ABOVE, AND NO OTHER EXPRESS WARRANTY OR GUARantee, EXCEPT AS N mentioned ABOVE. GIVEN BY ANY PERSON OR ENTITY WITH RESPECT TO A PRODUCT SHALL BIND CANON (SOME STATES) AND PROVINCEES DO NOT ALLOW LIMITATIONS ON HOW LONG AN IMPLIED WARRANTY IS ISSUED. THIS LIMITATION IS NOT INTENDED TO BE ACTUALLY DEFINING OR DEFINING ANYTHING ELSE. THE LIMITATION IS NOT INTENDED TO BE ACTUALLY DEFINING OR DEFINING ANYTHING ELSE.
This limited warranty gives you specific legal rights, and you may also have other rights, which vary from state to state (or province to province in Canada).
Canon U.S.A., Inc.
Canon Canada, Inc.
Register Now!
Visit www.registercanon.com to register your new EF & EF-S Lenses today and receive the following:
- Telephone support
E-mail support
Product protection*
Receive information on new products and promotions*
There is no charge to register or for the benefits offered. * These benefits valid in the U.S. only. Please read the Terms and Conditions at www.registracgon.com for complete details.

For accessories and other supplies visit www.estore.usa.canon.com or an Authorized Canon Dealer.
Canon
2010 CANON U.S.A., INC.
Expand Your Photographic Knowledge
CANON
DIGITAL
LEARNING
CENTER


www.usa.canon.com/dlc
You may obtain technical support for your Products as follows:
Internet support at www.usa.canon.com/support (E-mail support also available)
Telephone assistance from a Canon U.S.A. Customer Care representative free of charge during regular business hours at 1-800-OK-CANON (1-800-652-2666).
Canon Canada
You may obtain technical support for your Products as follows:
Internet support for English at www.canon.ca/english/cs (E-mail support also available)
- Internet support for French at www.canon.ca/francais/cs (E-mail support also available)
(1-800-652-2666)