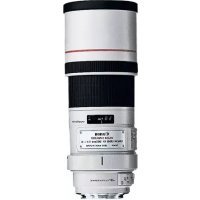
TSE 17MM F4L - Camera lens CANON - Free user manual and instructions
Find the device manual for free TSE 17MM F4L CANON in PDF.

| Product Type | Tilt-shift (TS-E) lens for Canon EF digital SLRs |
| Focal Length | 17mm (fixed) |
| Maximum Aperture | f/4 |
| Mount | Canon EF |
| Focusing | Manual only |
| Special Functions | Tilt, Shift, Mechanism Rotation, TS Rotation (parallel/perpendicular) |
| Dimensions (approx.) | Diameter 88.9mm x Length 106.9mm |
| Weight (approx.) | 820g |
| Power Supply | Not applicable (mechanical lens) |
| Care and Cleaning | Clean the contacts with a soft cloth; protect the lens with its dedicated cap when not in use |
| Safety | Do not look at the sun through the lens; when mounting/dismounting, set the tilt and shift scales to the 0 position to avoid pinching fingers |
| Spare Parts and Repairability | Dedicated lens cap; rear cap; hood (optional); repair by Canon authorized service center |
| Warranty | Canon limited warranty (varies by country) |
| Included Accessories | CD-ROM with detailed manual, front and rear cap |
| Applications | Architectural, landscape, product, and reproduction photography |
Frequently Asked Questions - TSE 17MM F4L CANON
User questions about TSE 17MM F4L CANON
0 question about this device. Answer the ones you know or ask your own.
Ask a new question about this device
Download the instructions for your Camera lens in PDF format for free! Find your manual TSE 17MM F4L - CANON and take your electronic device back in hand. On this page are published all the documents necessary for the use of your device. TSE 17MM F4L by CANON.
USER MANUAL TSE 17MM F4L CANON
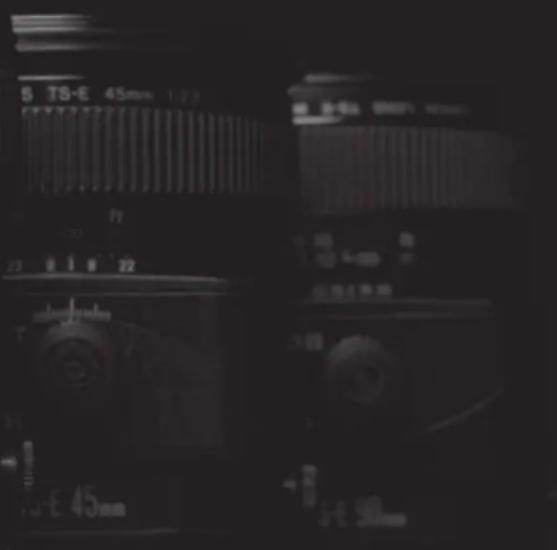
TS-E45mm f/2.8 TS-E45mm f/2.8
TS-E90mm f/2.8 TS-E90mm f/2.8
ENG
Instructions
Thank you for purchasing a Canon product.
Canon's TS-E lenses are tilt-shift lenses designed for EOS cameras. The tilt-shift mechanism enables photographers to control the depth of field and the area photographed and to correct image distortion, making it possible to take sophisticated pictures that cannot be shot using a conventional lens.
To ensure that you make the most of the TS-E lens functionality, it is recommended that you use it with an EOS camera with 100% viewfinder visibility (EOS-1, EOS-1D or EOS-1Ds series) and use the laser matte with grid focusing screen Ec-D and a tripod.
- On EOS cameras with a built-in flash, some partial restrictions may apply to the shift and rotation functions.
- On EOS cameras equipped with a grip for vertical shooting, some partial restrictions may apply to the shift and rotation functions.
Features
- The lens can be tilted up to ± 8^ and shifted up to ± 11mm .
- The tilt and shift functions can be used singly or in combination.
- The lens can be rotated to change the tilt or shift direction.
Conventions used in this instruction

Warning to prevent lens or camera malfunction or damage.

Supplementary notes on using the lens and taking pictures.

Safety Precautions
Safety Precautions
- Do not look at the sun or a bright light source through the lens or camera. Doing so could result in loss of vision. Looking at the sun directly through the lens is especially hazardous.
- Whether it is attached to the camera or not, do not leave the lens under the sun without the lens cap attached. This is to prevent the lens from concentrating the sun's rays, which could cause a fire.
Handling Cautions
- If the lens is taken from a cold environment into a warm one, condensation may develop on the lens surface and internal parts. To prevent condensation in this case, first put the lens into an airtight plastic bag before taking it from a cold to warm environment. Then take out the lens after it has warmed gradually. Do the same when taking the lens from a warm environment into a cold one.
Do not leave the lens in excessive heat such as in a car in direct sunlight. High temperatures can cause the lens to malfunction.
This device complies with Part 15 of the FCC Rules. Operation is subject to the following two conditions: (1) This device may not cause harmful interference, and (2) this device must accept any interference received, including interference that may cause undesired operation.
Do not make any changes or modifications to the equipment unless otherwise specified in the instructions. If such changes or modifications should be made, you could be required to stop operation of the equipment.
This equipment has been tested and found to comply with the limits for a class B digital device, pursuant to part 15 of the FCC Rules. These limits are designed to provide reasonable protection against harmful interference in a residential installation. This equipment generates, uses and can radiate radio frequency energy and, if not installed and used in accordance with the instructions, may cause harmful interference to radio communications.
However, there is no guarantee that interference will not occur in a particular installation. If this equipment does cause harmful interference to radio or television reception, which can be determined by turning the equipment off and on, the user is encouraged to try to correct the interference by one or more of the following measures:
- Reorient or relocate the receiving antenna.
- Increase the separation between the equipment and receiver.
- Consult the dealer or an experienced radio/TV technician for help.
This Class B digital apparatus complies with Canadian ICES-003.
Nomenclature
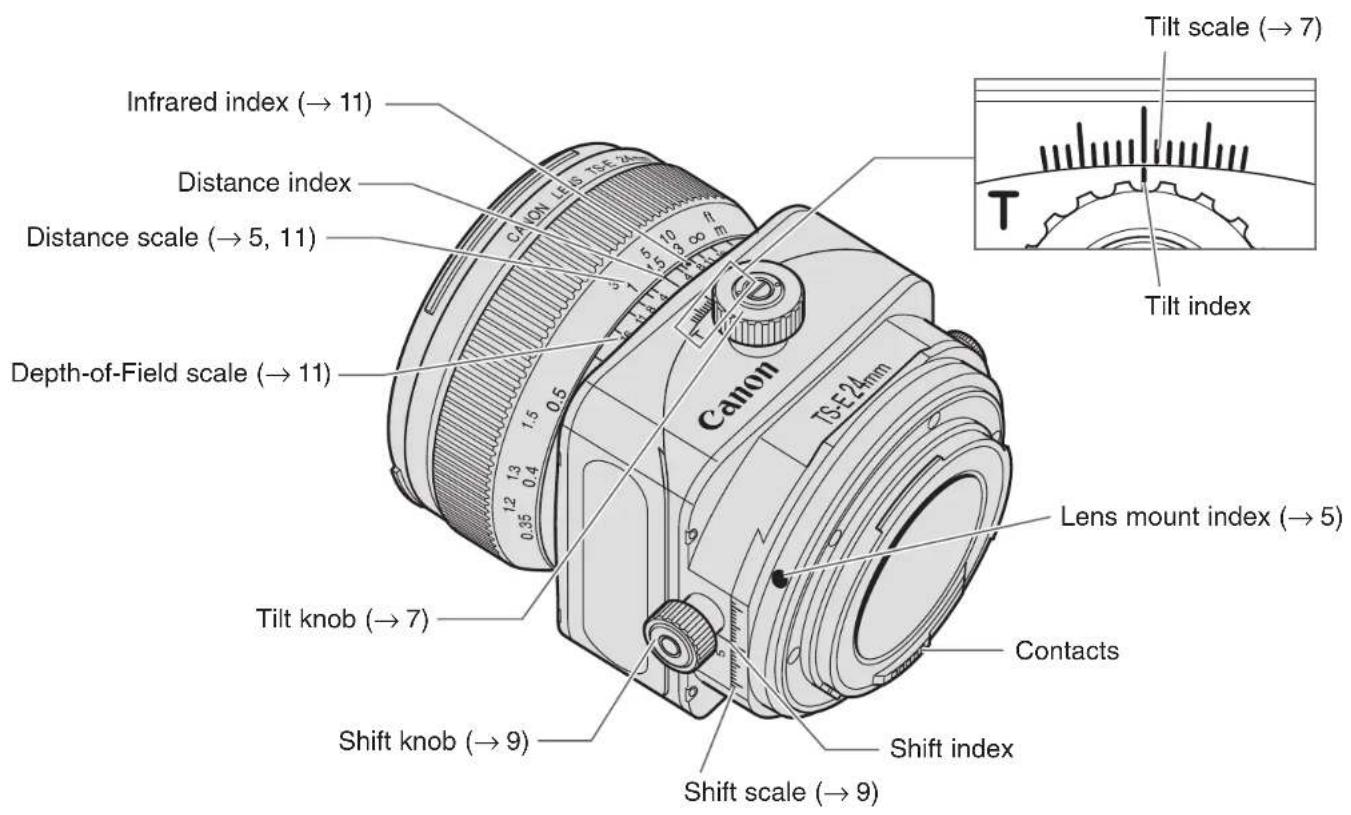
For detailed information, reference page numbers are provided in parentheses (^**)
Nomenclature
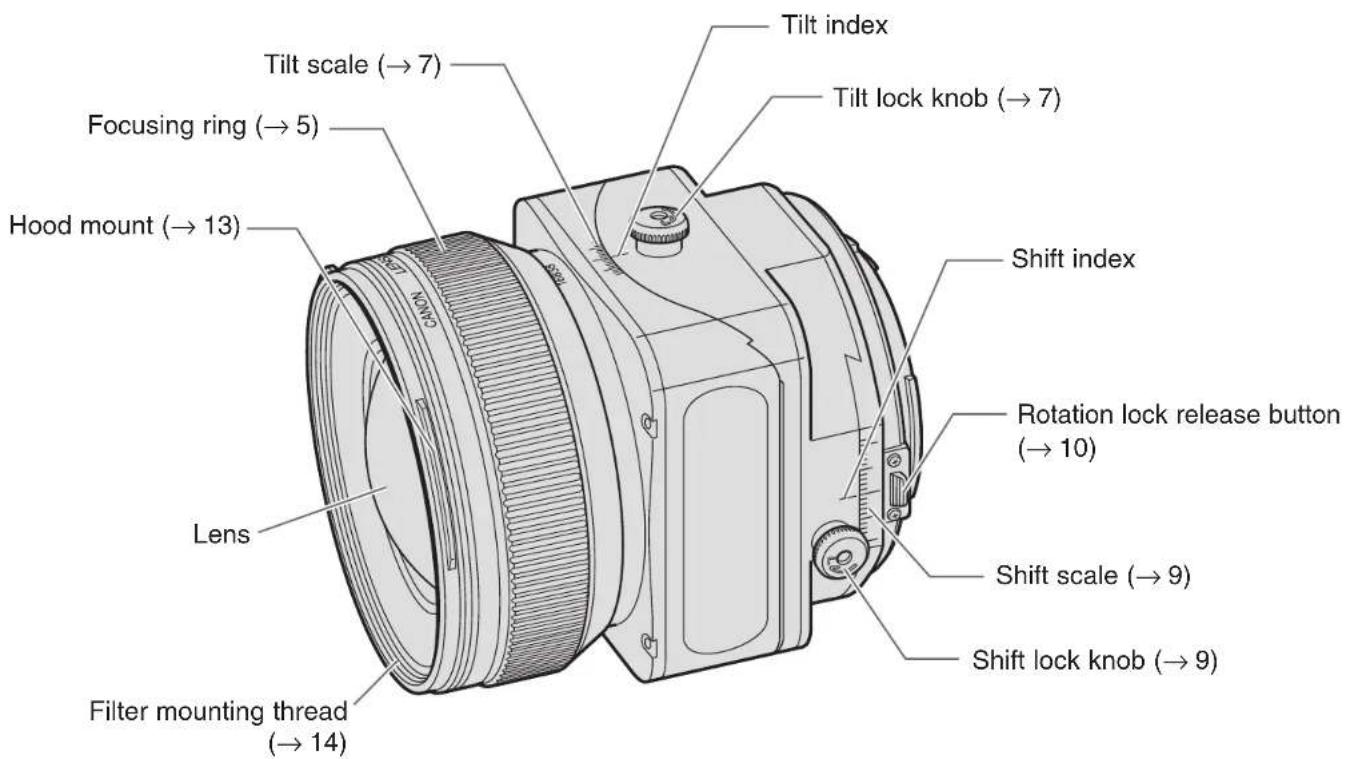
For detailed information, reference page numbers are provided in parentheses (^**)
ENG-4
1. Mounting and Detaching the Lens
See your camera's instructions for details on mounting and detaching the lens.

- When mounting or detaching the lens, always ensure that the tilt and shift scales are set to the "0" position.
After detaching the lens, place the lens with the rear end up to prevent the lens surface and contacts from getting scratched.
If the contacts get soiled, scratched, or have fingerprints on them, corrosion or faulty connections can result. The camera and lens may not operate properly. - If the contacts get soiled or have fingerprints on them, clean them with a soft cloth.
- If you remove the lens, cover it with the dust cap. To attach it properly, align the lens mount index and the Oindex of the dust cap, and turn clockwise. To remove it, reverse the order.
2. Focusing

Focus a TS-E lens by turning the focusing ring. (Shots cannot be taken using the auto focus.)

After using tilt or shift, readjust the focus.
The distance scale is only valid when the tilt scale is set to the "0" position.
3. Tilt Function
Tilting inclines the lens relative to the image plane. When the tilt scale is set to the "0" position, the focusing and imaging planes are parallel. However, tilting puts the focusing plane at an angle to the imaging plane.
Example 1 Example 2

To shoot so that all of an extensive subject is in focus, you must normally use a small aperture to obtain a large depth of field. But tilting allows you to keep all of the subject in focus even when there is insufficient depth of field (Example 1). Or, by tilting in the opposite direction, you can focus on a specific part of the subject (Example 2).
Using Tilt
1 Loosen the tilt lock knob by turning it in the direction of the arrow.
Turn the tilt knob to adjust the amount of tilt. Focus the shot by turning the focusing ring.
3 Turn the tilt lock knob in the direction of the arrow to lock the amount of tilt for the shot.
When you tilt the lens, sharp portions of the tilt mechanism are exposed and care should be taken to avoid touching these portions.
- If you use the tilt and shift functions on the TS-E24mm f/3.5L at the same time, only use them within the area of the light-gray tilt scale settings. Tilting the lens to other settings may cause vignetting. However, if the tilt function is used alone, none of the tilt scale settings cause vignetting.
4. Shift Function
Shifting moves the optical axis of the lens in parallel off the center of the imaging plane. Shift can be used to good effect in the situations shown below.
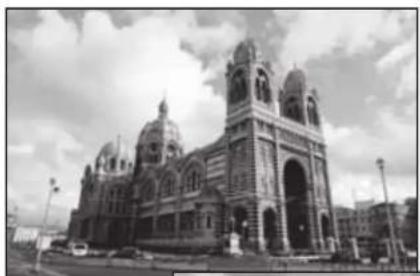
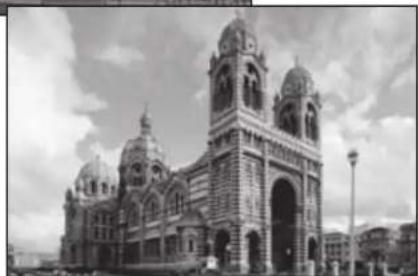
- If you photograph a subject such as a building with a normal lens, the top of the building tapers away. But by placing the camera parallel to the building and shifting the lens, you can correct this tapering effect.
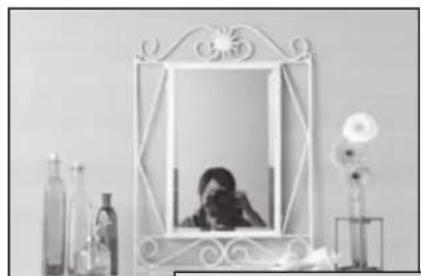
- When you are shooting a reflective subject, you can move the camera to a position where the camera does not appear in the shot and then use shift to take the picture. This lets you keep the camera out of the shot without having to change the shot composition.
ENG-8
Using Shift
1 Loosen the shift lock knob by turning it in the direction of the arrow.
2 Turn the shift knob to adjust the amount of shift. Focus the shot by turning the focusing ring.

3 Turn the shift lock knob in the direction of the arrow to lock the amount of shift for the shot.
When you shift the lens, sharp portions of the shift mechanism are exposed and care should be taken to avoid touching these portions.
- If you use the tilt and shift functions on the TS-E24mm f/3.5L at the same time, only use them within the area of the light-gray shift scale settings. Shifting the lens to other settings may cause vignetting.
With large amounts of shift, the amounts of peripheral light at the top and bottom or left and right sides of the screen may differ, so shooting with a small aperture is recommended.
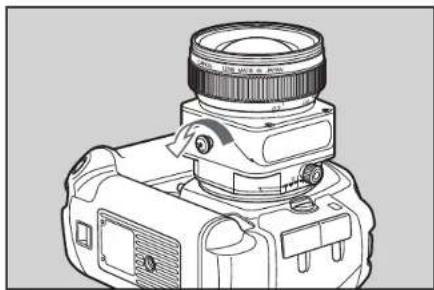
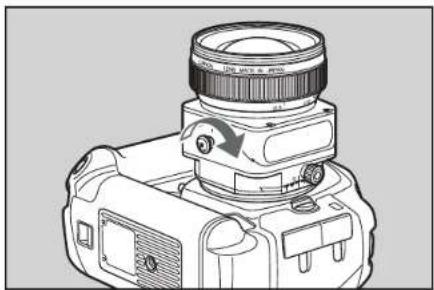
5. Rotation
The rotation function enables you to change the direction of tilt or shift by rotating the tilt-shift mechanism.
With the lens mounted on the camera, push the rotation lock release button towards the mount and then turn the tilt-shift mechanism.
The mechanism can be rotated through ± 90^ . The lens clicks every 30^ and locks in place in the 90^ position.

- When rotating the lens, set the tilt and shift scales to the "0" position.
Note that rotating the tilt-shift mechanism quickly while pressing on the rotation lock release button may cause the shift lock knob to strike your fingers.
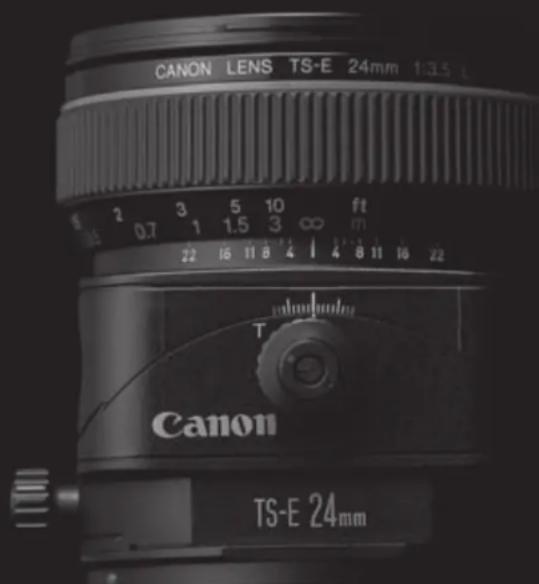
6. Depth-of-Field Scale (TS-E24mm f/3.5L)
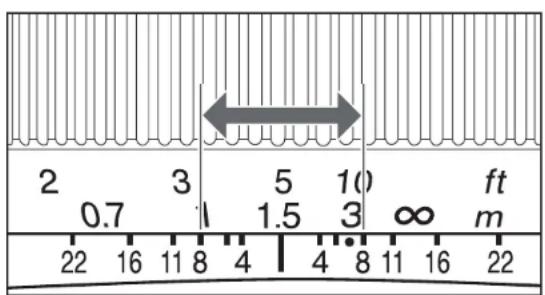
The depth of field is the distance in front of and behind the plane of focus on the subject that appears sharp. The depth of field is indicated by the area between the depth-of-field scale lines below the distance scale. The numbers on the scale are F values, and for example, if the shooting distance is 1.5m and the aperture is f/8, the area in focus will extend from about 1 m to 3 m.

The depth-of-field scale is only valid when the tilt scale is set to the "0" position.
The depth-of-field scale is an approximate indicator.
7. Infrared Index (TS-E24mm f/3.5L)
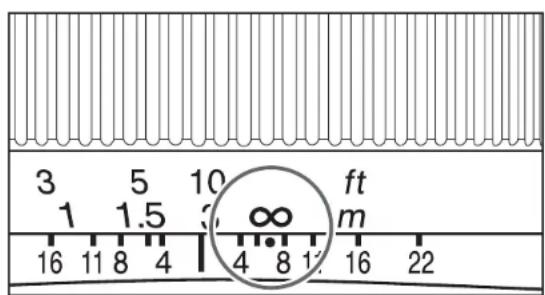
The infrared index corrects the focus setting when using monochrome infrared film. Focus on the subject in MF, then adjust the distance setting by moving the focusing ring to the corresponding infrared index mark.

Some EOS cameras cannot use infrared film. See the instructions for your EOS camera.

The infrared index position is based on a wavelength of 800nm
- Be sure to observe the manufacturer's instructions when using infrared film.
Use a red filter also when you take the picture.
8. TS-E Tripod Adapter (Sold Separately)
With some camera models, the tilt, shift and rotation functions can no longer be used when the camera is mounted directly on a tripod. When this happens, fit the optional TS-E tripod adapter into the tripod mount socket on the camera before mounting the camera on the tripod.
9. Exposure
Shots can be taken using AE (automatic exposure) as long as the tilt and shift scales are set to the "0" position.
The use of AE is not recommended when the lens is tilted or shifted as exposure errors may result. It is recommended that you use the exposure values when the tilt and shift scales are set to the "0" position as a guide and then take the shot with as many exposure settings as possible.
10. Hoods
The EW-75B II, EW-79B II and ES-65 III lens hoods can keep unwanted light out of the lens, and also protects the lens from rain, snow, and dust.
Attach the hood using the following procedure.
TS-E24mm f/3.5L
Turn the hood in the direction of the arrow to attach it securely.

TS-E45mm f/2.8 · TS-E90mm f/2.8
1) Pressing the buttons on the base of the hood inwards, push the hood onto the hood mount on the lens.
2) Release the buttons so that the catches on the hood fit into the grooves on the mount.
Hoods

Part of the picture may be blocked if the hood is not attached properly.
- When attaching or detaching the hood, grasp the base of the hood to turn it. To prevent deformation, do not grasp the rim of the hood to turn it.

The hood can be reverse-mounted on the lens for storage.
11. Filters (Sold Separately)
You can attach filters to the filter mounting thread on the front of the lens.

-Only one filter may be attached.
Use a polarizing Canon filter.
To adjust the polarizing filter, first remove the lens hood.
12. Extension Tubes
(Sold Separately)
You can attach extension tube EF12 II or EF25 II for magnified shots. The shooting distance and magnification are shown below.
TS-E24mm f/3.5L
| Focusing Distance Range (mm) | Magnification (×) | |||
| Close distance | Long distance | Close distance | Long distance | |
| EF12 II 1 | 71 179 0.62 | 0.49 | ||
| EF25 II 1 | 66 167 1.21 | 1.10 | ||
TS-E45mm f/2.8
| Focusing Distance Range (mm) | Magnification (×) | |||
| Close distance | Long distance | Close distance | Long distance | |
| EF12 II 239 299 0.44 | 0.27 | |||
| EF25 II Cannot be used | ||||
TS-E90mm f/2.8
| Focusing Distance Range (mm) | Magnification (×) | |||
| Close distance | Long distance | Close distance | Long distance | |
| EF12 II 4 | 15 817 0.43 | 0.14 | ||
| EF25 II 3 | 73 486 0.60 | 0.31 | ||
13. Close-up Lenses
(Sold Separately)
Attaching a 250D or 500D close-up lens enables close-up photography. Compatibility with close-up lenses is as follows.
TS-E24mm f/3.5L
- 250D: Cannot be used
- 500D (72mm): 0.19 to 0.05 ×
TS-E45mm f/2.8
- 250D: Cannot be used
- 500D (72mm): 0.25 to 0.09 ×
TS-E90mm f/2.8
250D (58mm): 0.69 to 0.36×
- 500D (58mm): 0.49 to 0.18 ×
Specifications
| TS-E24mm f/3.5L TS | E45mm f/2.8 TS-E90mm f/2.8 | |||
| Focal Length/Aperture | 24mm f/3.5 45mm | f/2.8 90mm f/2.8 | ||
| Lens Construction | 9 groups, 11 elements 9 groups, 10 elements 5 groups, 6 elements | |||
| Minimum Aperture | f/22 f/22 f/32 | |||
| Angle of View (Normal) | Diagonal | 84° 51° 27° | ||
| Vertical | 53° 30° | 15° 11' | ||
| Horizontal | 74° 44° | 22° 37' | ||
| Min. Focusing Distance | 0.3m (1.0ft.) | 0.4m (1.3ft.) | 0.5m (1.6ft.) | |
| Max. Magnification | 0.14× | 0.16× | 0.29× | |
| Field of View | 173 × 263mm (6.8 × 10.4inch) | 150 × 226mm (5.9 × 8.9inch) | 82 × 123mm (3.2 × 4.8inch) | |
| Tilt amount | ±8° | |||
| Shift amount | ±11mm | |||
| Tilt scale display | Each degree from 0 to ±6° (light gray), ±7° and ±8° (red) | Each degree from 0 to ±8° (light gray) | ||
| Shift scale display | Each mm from 0 to ±7mm (light gray), ±8 to ±11mm (red) | Each mm from 0 to ±11mm (light gray) | ||
| Rotation mechanism | Locks at -90°, 0° and +90°, clicks every 30° | |||
Specifications
| TS-E24mm f/3.5L TS-E45mm f/2.8 TS-E90mm f/2.8 | |||
| Filter Diameter 72mm | 58mm | ||
| Max. Diameter and Length | 78 × 86.7mm (3.1 × 3.4inch) | 81 × 90.1mm (3.2 × 3.5inch) | 73.6 × 88mm (2.9 × 3.5inch) |
| Weight 570g (18.4oz) | 645g (20.8oz) | 565g (18.2oz) | |
| Hood | EW-75B II | EW-79B II | ES-65 III |
| Lens Cap | E-72 | E-58 | |
| Case | LP1216 | LP1016 | |
The lens length is measured from the mount surface to the front end of the lens. Add 21.5mm when including the lens cap and dust cap.
The size and weight listed are for the lens only, except as indicated.
The EF1.4× II/EF2× II extenders cannot be used with the lenses listed above.
Aperture settings are specified on the camera.
All data listed is measured according to Canon standards.
- Product specifications and appearance are subject to change without notice.
Canon
ENG EF LENS Quick Guide
FRN OBJECTIF EF Guide de demarrage rapide
Nomenclature
① Contacts
② Lens mount index
③ Focus mode switch
④ Focusing ring**
⑤ Zoom ring**
⑥ Zoom position index
⑦ Image stabilizer switch
The figures show you how to use the product. The actual product may differ from the figures.
** In some products, the positions of the focusing ring and zoom ring are in a reverse sequence to the figures.
Thank you for purchasing a Canon product.
This guide shows the basic tips on how to use the Canon EF lens.
Make sure you read this guide in order to operate the lens correctly and safely.
- For further details on how to use the product you purchased, see the instruction (PDF format) stored in the CD-ROM provided.
Using the "EF Lens Instructions" CD-ROM
- Insert the EF Lens Instructions CD-ROM into your personal computer.
Never insert the CD-ROM into any drive incompatible with CD-ROMs. If you insert the CD-ROM into a CD player and try to play it, it may damage your speakers. The loud noise can also damage your ears if you are using headphones, earphones, etc. - Select the drive containing the CD-ROM.
- Select and open the "START.pdf" file.
Adobe Reader 6.0 or higher must be installed in the your computer.
- On the language menu, click on the desired language.
- On the lens selection menu, click on the name of your lens to open the lens instruction manual.
Safety Precautions
- Do not look at the sun or a bright light source through the lens or camera. Doing so could result in loss of vision. Looking at the sun directly through the lens is especially hazardous.
- Whether it is attached to the camera or not, do not leave the lens under the sun without the lens cap attached. This is to prevent the lens from concentrating the sun's rays, which could cause a fire.
Handling Cautions
- If the lens is taken from a cold environment into a warm one, condensation may develop on the lens surface and internal parts. To prevent condensation in this case, first put the lens into an airtight plastic bag before taking it from a cold to warm environment. Then take out the lens after it has warmed gradually. Do the same when taking the lens from a warm environment into a cold one.
- Do not leave the lens in excessive heat such as in a car in direct sunlight. High temperatures can cause the lens to malfunction.
Nomenclature
This device complies with Part 15 of the FCC Rules. Operation is subject to the following two conditions: (1) This device may not cause harmful interference, and (2) this device must accept any interference received, including interference that may cause undesired operation.
Do not make any changes or modifications to the equipment unless otherwise specified in the instructions. If such changes or modifications should be made, you could be required to stop operation of the equipment.
This equipment has been tested and found to comply with the limits for a class B digital device, pursuant to part 15 of the FCC Rules. These limits are designed to provide reasonable protection against harmful interference in a residential installation. This equipment generates, uses and can radiate radio frequency energy and, if not installed and used in accordance with the instructions, may cause harmful interference to radio communications.
However, there is no guarantee that interference will not occur in a particular installation. If this equipment does cause harmful interference to radio or television reception, which can be determined by turning the equipment off and on, the user is encouraged to try to correct the interference by one or more of the following measures:
- Reorient or relocate the receiving antenna.
- Increase the separation between the equipment and receiver.
- Consult the dealer or an experienced radio/TV technician for help.
This Class B digital apparatus complies with Canadian ICES-003.
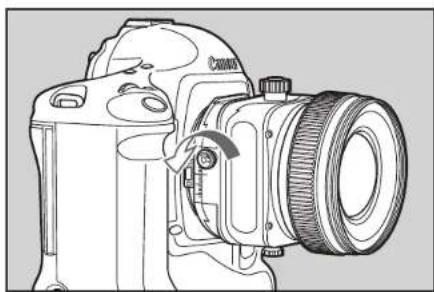
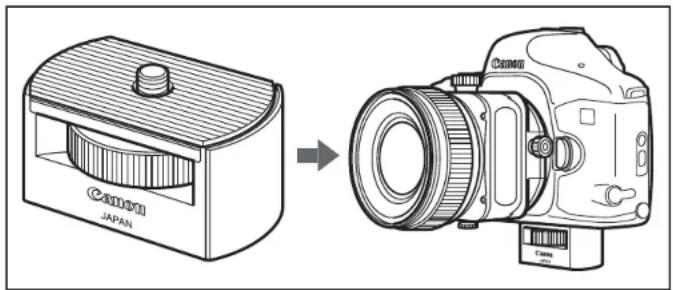
1. Attaching the Lens to the Camera
Align the lens mount index (white "□" or red "●") and the mount index on the camera, indicated with the same color, and turn the lens clockwise until it clicks. (Fig. 1)
After detaching the lens, place the lens with the rear end up to prevent the lens surface and electrical contacts from getting scratched. (Fig. 2)
- If the contacts get soiled, scratched, or have fingerprints on them, corrosion or faulty connections can result. The camera and lens may not operate properly.
- If the contacts get soiled or have fingerprints on them, clean them with a soft cloth.
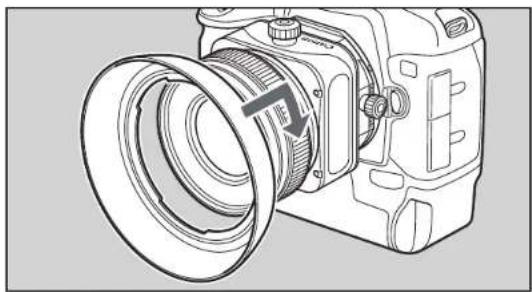
- If you remove the lens, cover it with the dust cap. To attach it properly, align the lens mount index and the "O" or "□" index of the dust cap, and turn clockwise. (Fig. ⑧) To remove it, reverse the above order.
2.Setting the Focus Mode
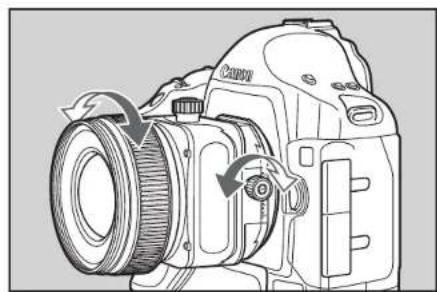
For a lens that has a focus mode switch, it is possible to switch between autofocus (AF) mode and manual focusing (MF). (Fig. ①)
To shoot in autofocus mode, set the focus mode switch to AF.
To use only manual focusing, set the focus mode switch to MF, and focus by turning the focusing ring. (Fig. 9)
3.Zooming
The zoom lens enables zooming out or in by turning the zoom ring or moving it back and forth. (Fig. 6)
Be sure to finish zooming before focusing. Changing the zoom ring after focusing can affect the focus.
4. Setting the Image Stabilizer
A lens with an image stabilizer can compensate for camera shake by switching the function on.
You can use the image stabilizer in AF or MF mode.
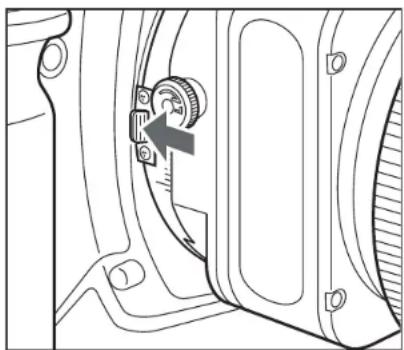
- Set the STABILIZER switch to "ON". (Fig. ①)
- If you are not going to use the image stabilizer function set the switch to "OFF".
-
When you press the shutter button halfway, the Image Stabilizer will start operating.
-
Make sure the image in the viewfinder is stable, then press the shutter button the rest of the way down to take the picture.
5. Selecting the Image Stabilizer Mode (Fig. 8)
You can select the image stabilizer mode with the image stabilizer mode selector switch 8.
MODE1:
Corrects vibrations in all directions. It is mainly effective for shooting still subjects.
MODE2:
It is used when panning subjects in motion.
It compensates for vertical camera shake during following shots in a horizontal direction, and compensates for horizontal camera shake during following shots in a vertical direction.
During following shots in a diagonal direction, you may not obtain the image stabilizer effect in all directions.
Thank you for purchasing a Canon product.
This guide explains how to use the TS-E lens and the supertelephoto lens among the Canon EF lenses. Also, please refer to the provided "EF LENS Quick Guide."
The information in this guide may not be available depending on the specifications of the product.
For further details, see the instruction (PDF format) stored in the CD-ROM provided.
The figures show you how to use the product. The actual product may differ from the figures.
TS-E Lens
Safety Precautions
- To mount/detach the lens, always move the tilt and shift scales to the "0" position. Your fingers may get caught or the camera may be damaged.
- When you tilt or shift the lens, the sharp portions of the tilt or shift mechanism are exposed and care should be taken to avoid touching these portions.
- Do not operate the shift function while operating the rotation function. Your fingers may get caught, resulting in injury.
Note that rotating the tilt-shift mechanism quickly while pressing the rotation lock release button ⑨ may cause the shift lock knob 5 to strike your fingers.
Precautions for Use
- The TS-E17mm f/4L lens protrudes from the front frame. To protect the lens, keep it covered with the exclusive lens cap when not shooting.
- With EOS cameras equipped with a built-in flash, lens may contact with the camera while operating the rotation function.
- While tilting or shifting significantly, vignetting may occur. Adjust the vignetting by looking through a 100% field of viewfinder visibility or by Live View shooting with the LCD monitor.
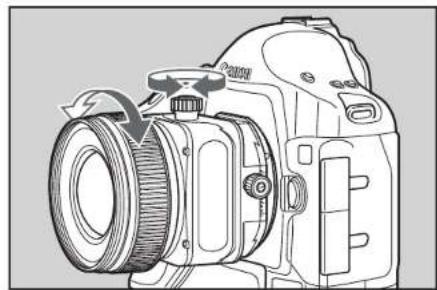
1. Focusing
Focus the TS-E lens by turning the focusing ring ①. (Shots cannot be taken using the auto focus.)
After using tilt or shift, readjust the focus.
- The distance scale ② is only valid when the tilt scale ③ is set to the "0" position.
2. Tilt and Shift Functions
- Loosen the tilt lock knob 4 /shift lock knob 5 by turning it in the direction of arrow B. (Fig. ) For the lens that has a tilt lock button 6, slide it in the direction of arrow A in the beginning of tilt operation. (Fig. )
- Turn the tilt knob 7 / shift knob 8 to adjust the amount of tilt or shift. (Fig. 9)
- Lock the amount of tilt or shift by turning the tilt lock knob (4) /shift lock knob (5) by turning it in the direction of arrow L. (Fig. 6)
- Focus the shot by turning the focus ring.
3. Rotation
The rotation function enables you to change the direction of tilt or shift by rotating the tilt-shift mechanism.
With the lens mounted on the camera, push the rotation lock release button ⑨ towards the mount and then turn the tilt-shift mechanism. (Fig.
- When rotating the lens, set the tilt scale ③ and the shift scale ⑩ to the "0" position.
- In order to prevent shifts in position while shooting, shooting while the rotation is locked or shooting by the click position are recommended.
- TS Rotation Function (TS-E17mm f/4L, TS-E24mm f/3.5L II) By using the TS rotation function, the relationship of the tilt and shift's operation direction can switch from a right angle to parallel.
Press the TS rotation lock release button ① in the mounting direction while the lens is mounted on the camera, and then turn the tilt component. (Fig. ⑥)
- When the tilt and shift are used in a parallel direction, vignetting will occur.
- There are clicks at the 45^ position, and these will be fixed in either the right angle or parallel position.
- In order to prevent shifts in position while shooting, shooting while TS rotation is locked or shooting by the click position are recommended.
5. Exposure
Shots can be taken using AE (automatic exposure) as long as the tilt and shift scales are set to the "0" position.
The use of AE is not recommended when the lens is tilted or shifted as exposure errors may result.
It is recommended that you use the exposure values when the tilt and shift scales are set to the "0" position as a guide and then take the shot with as many exposure settings as possible.
Super-Telephoto Lens

Safety Precautions
- For the product that has a strap mount ② on the lens side, do not use a strap which is attached to the camera.
- The mount may break and the lens may fall resulting in injury, or the camera may be damaged.
Correctly attach the exclusive strap to the strap mount on the lens.
- Do not stand on the lens case. Falling off the case could result in injury.
- Do not stack lens cases. A falling lens case could result in injury.
1. Switching the Focusing Distance Range (Fig. 7)
The focusing distance range can be selected by the focusing distance range selection switch ⑬. By setting the suitable focusing distance range, the actual autofocusing time can be shorter.
2. Focus Preset
By presetting any focusing distance, you can instantly focus at that point even while you are shooting a different subject. This function operates in both AF and MF modes.
- Set the focus preset switch ⑤ to "I" or "(●".
- Press the shutter button halfway to focus the distance you want to preset.
- Press the focus preset button 16
When turning the playback ring ⑦ to the left or right, the lens will focus at the preset distance.
While turning the playback ring, shutter release is available regardless of focusing in the autofocus mode.
3. AF Stop Button (Fig. 9)
During the autofocus operation, you can press the AF stop button to temporarily pause the autofocus.
If the shutter button is still pressed halfway when the AF stop button is released, the autofocus will continue as before.
Dealer Record of Canon Purchase
Complete this card at time of sale.
Retain for your Records
CES CARTES NE SONT PAS CELLES POUR L'ENREGISTREMENT.
CANON® EF Lens and Accessories Limited Warranty
For U.S.A. & Canada Only
The t h t t t t t t t t t t t t t t t t t t t t t t t t t t t t t t t t t t t t t t t t t t t t t t t t t t .
Your Products, when delivered to you in new condition its original container are warranted against defects in materials or workmanship as follows: for a period of one (1) year from the date of original purchase, defective parts or defective Products returned to Canon U.S.A. or Canon Canada, or their authorized Products service providers, as applicable, and proven to be defective upon inspection, will be repaired with new or comparable rebuilt parts or exchanged for refurbished Products, as determined by Canon U.S.A. or Canon Canada or the authorized Products service provider.
THIS WARRANTY DOES NOT COVER ANY ACCESSORIES NOTMNITED ABOVE. The limited warranty shall only apply if the Products are used in conjunction with compatible computer equipment and compatible software, as to which items Canon U.S.A. or Canon Canada shall have no responsibility
Non-Canon brand equipment and software that may be distributed with the Products are sold "as is" and without warranty of any kind by Canon U.S.A. or Canon Canada, including any implied warranty regarding merchantability or fitness for a particular purpose, and all such warranties are disclaimed. The sole warranty, if any, with the
respect to such non-Canon brand items is given by the manufacturer or producer thereof.
This limited warranty covers all defects encountered in normal use of the Products, and does not apply in the following cases:
(a) Loss or damage due to neglect and/or abuse causing deterioration, misbehavior, accident or failure to follow operating instructions.
(5) If a product is a candidate for a result of leading basepairs or damage due to water or other liquid
M
conform to Caoon specifications
(a) Damage resulting during shipment (Claim must be presented and examined by the shipper).
(1) Damage or damage from misfactuals or alterations to a product in any way (excluding any alteration or removal of its serial number or indication name).
(2) UNI-IMplied WARRANTY. INCLUDINGLY IMPLIED WARRANTY OF MERCHANT ABILITIES OR FITNESS FOR A PARTICULAR PURPOSE. APPLIED THIS PRODUCT AFTER THE DATE OF THE ORIGINAL PURCHASED AND SOLD.
(3) UNI-IMplied Warranty. INCLUDINGLY IMPLIED WARRANTY OF MERCHANT ABILITIES OR FITNESS FOR A PARTICULAR PURPOSE. APPLIED THIS WARRANTY AS MONDED ABOVE, GVEN BY ANY PERSON OR ENTITY WITH RESPECT TO A PRODUCT SHALL BIND CANON (SOME STATES AND PROVINCE DO NOT ALLOW LIMITATIONS ON HOW LONG AN IMplied WARRANTY LASTS. GO THE ABOVE LIMITATION MAY NOT APPLY TO YOU). CANON SHALL NOT BE LIABILITY FOR LOSS OF REVENUES OR PROFITS, INCONVENTION, EXPENSE OR COSTS FROM ORIGINATING ORIGINATING ORIGINATING ORIGINATING ORIGINATING ORIGINATING ORIGINATING ORIGINATING ORIGINATING ORIGINATING ORIGINATING ORIGINATING ORIGINATING ORIGINATING ORIGINATING ORIGINATING ORIGINATING ORIGINATING ORIGINATING ORIGINATING ORIGINATING ORIGINATING ORIGINATING ORIGINATING ORIGINATING ORIGINATING ORIGINATING ORIGINATING ORIGINATING ORIGINATING ORIGINATING ORIGINATING ORIGINATING ORIGINATINGORGING.
(4) UNI-IMplied Warranty. INCLUDINGLY IMPLIED WARRANTY OF MERCHANT ABILITIES OR FITNESS FOR A PARTICULAR PURPOSE. APPLIED THIS WARRANTY AS MONDED ABOVE, GVEN BY ANY PERSON OR ENTITY WITH RESPECT TO A PRODUCT SHALL BIND CANON (SOME STATES AND PROVINCE DO NOT ALLOW LIMITATIONS ON HOW LONG AN IMplied WARRANTY LASTS. GO THE ABOVE LIMITATION MAY NOT APPLY TO YOU). CANON SHALL NOT BE LIABILITY FOR LOSS OF REVENUES OR PROFIT, INCONVENTION, EXPENSE OR COSTS FROM ORIGINATING ORIGINATING ORIGINATING ORIGINATING ORIGINATING ORIGINATING ORIGINATING ORIGINATING ORIGINATING ORIGINATING ORIGINATING ORIGINATING ORIGINATING ORIGINATING ORIGINATING ORIGINATING ORIGINATING ORIGINATINGORGING.
The limited warranty gives you specific legal rights, and you may also have other rights, which vary from state to state (or province to province in Canada).
Cancer Canada, Inc.
Register Now!
Visit www.registerercanon.com to register your new EF & EF-S Lenses today and receive the following:
- Telephone support
E-mail support
Product protection*
Receive information on new products and promotions*
There is no charge to register or for the benefits offered. * These benefits valid in the U.S. only. Please read the Terms and Conditions at www.regisecan.com for complete details.

For accessories and other supplies visit www.estore.usa.canon.com or an Authorized Canon Dealer.
Canon
© 2010 CANON U.S.A., INC.
Expand Your Photographic Knowledge
Useful lessons on EOS Digital cameras, printers, software applications, wireless connectivity and more
- Expanded Tips & Technologies section with improved product and category search capabilities
- An enhanced Explorers of Light & PrintMasters Gallery section
- Improved Educational Events calendar with customizable view
- Completely FREE access
www.usa.canon.com/dlc

You may obtain technical support for your Products as follows:
Internet support at www.usa.canon.com/support (E-mail support also available)
Telephone assistance from a Canon U.S.A. Customer Care representative free of charge during regular business hours at 1-800-OK-CANON (1-800-652-2666).
Canon Canada
You may obtain technical support for your Products as follows:
Internet support for English at www.canon.ca/english/cs (E-mail support also available)
Internet support for French at www.canon.ca/francais/cs (E-mail support
- Telephone assistance from a Canon Canada Customer Care representative free of charge during regular business hours at 1-800-OK-CANON (1-800-652-2666).
Technical support program terms are subject to change without notice.
30-2, Shimomaruko 3-chome, Ohta-ku, Tokyo 146-8501, Japan
U.S.A.
CANON U.S.A. INC.
One Canon Plaza, Lake Success, NY 11042-1198, U.S.A. For all inquires concerning this product, call toll free in the U.S. 1-800-OK-CANON
CANADA
CANON CANADA INC. HEADQUARTERS
6390 Dixie Road, Mississauga, Ontario L5T 1P7, Canada
CANON CANADA INC. MONTREAL BRANCH
5990, Cote-de-Liesse, Montreal Quebec H4T 1V7, Canada
CANON CANADA INC. CALGARY OFFICE
2828, 16th Street, N.E. Calgary, Alberta T2E 7K7, Canada For all inquiries concerning this product, call toll free in Canada
1-800-OK-CANON
EUROPE, AFRICA & MIDDLE EAST
CANON EUROPA N.V.
Bovenkerwerweg 59-61, 1185 XB Amstelveen, The Netherlands
CANON FRANCE S.A.S.
Gustav III:s Boulevard 26, 169 88 Solna, Sweden
CANON NORGE AS
Hallagerbakken 110, PO Box 33, Holmlia, 1201 Oslo, Norway
CENTRAL & SOUTH AMERICA
CANON LATIN AMERICA, INC.
703 Waterford Way, Suite 400 Miami, FL 33126, U.S.A.
ASIA
CANON (China) Co., LTD.
15F Jinbao Building No.89 Jinbao Street, Dongcheng District, Beijing 100005, China
19/F., The Metropolis Tower, 10 Metropolis Drive, Hunghom, Kowloon, Hong Kong
CANON SINGAPORE PTE. LTD.
1 HarbourFront Avenue, #04-01 Keppel Bay Tower, Singapore 098632
CANON KOREA CONSUMER IMAGING INC.
Gangnam Finance Center 17F, 737, Yeoksam-Dong, Gangnam-Gu, Seoul, 135-984, Korea
OCEANIA
CANON AUSTRALIA PTY. LTD.
1 Thomas Holt Drive, North Ryde, Sydney N.S.W. 2113, Australia
Akoranga Business Park, Akoranga Drive, Northcote, Auckland, New Zealand
JAPAN