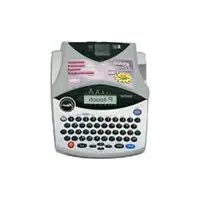
PT2710 - Label printer BROTHER - Free user manual and instructions
Find the device manual for free PT2710 BROTHER in PDF.
User questions about PT2710 BROTHER
0 question about this device. Answer the ones you know or ask your own.
Ask a new question about this device
Download the instructions for your Label printer in PDF format for free! Find your manual PT2710 - BROTHER and take your electronic device back in hand. On this page are published all the documents necessary for the use of your device. PT2710 by BROTHER.
USER MANUAL PT2710 BROTHER
Read this User's Guide before you start using your P-touch. Keep this User's Guide in a handy place for future reference.
natural_image
Line drawing of a broadband telephone with keypad and control panel (no text or symbols)1 INTRODUCTION
② GETTING STARTED
3 EDITING A LABEL
4 LABEL PRINTING
⑤ USING THE MEMORY
6 MAINTAINING YOUR P-TOUCH LABELER
7 TROUBLESHOOTING
8 APPENDIX
⑨ INDEX
• IBM is a trademark of International Business Machines, Inc.
- Microsoft and Windows are registered trademarks of Microsoft Corporation, USA.
• Macintosh and Mac OS are registered trademarks of Apple Computer, Inc.
- The names of other software or products used in this document are trademarks or registered trademarks of the respective companies that developed them.
Contents
INTRODUCTION 4
What You Can Do .... 4
Safety Precautions 6
General Precautions....9
Symbols Used in this Guide 9
Quick Index 10
GETTING STARTED 11
Unpacking Your P-touch 11
General Description.... 12
LCD Display & Keyboard.... 13
LCD Display.... 13
Key Names and Functions.... 14
Power Supply 16
Battery....16
AC Adapter 17
Inserting a Tape Cassette 18
Turning Power On/Off 20
Feeding Tape 21
LCD Display 21
LCD Contrast 21
Display Mode 22
Back Light 22
Setting Language and Unit.... 23
Language 23
Unit 23
EDITING A LABEL.... 24
Entering and Editing Text.... 24
Entering Text from the Keyboard 24
Adding a New Line....24
Adding a New Block....24
Moving the Cursor....24
Inserting Text 25
Inserting a Tab 25
Deleting Text....25
Entering Symbols 26
Entering Symbols Using Key 26
Entering Symbols Using the Symbol Function.... 26
Using Symbol Update Function 27
INTRODUCTION
Entering Accented Characters 29
Setting Character Attributes ....31
Setting Character Attributes by Label ....31
Setting Character Attributes by Each Line....31
Setting Auto Fit Style 35
Setting Label Attributes 36
Using Auto-Format Layouts 38
Using Templates - Example creating an Asset Tag....38
Using Block Layouts 43
Using Time & Date Function 48
Clock Setting....48
Time & Date Format Setting 49
Time Stamp Setting 51
[Timing] 51
[Time Stamp Format] 52
[Forward] 53
Creating a Bar Code Label....54
Setting Bar Code Parameters....54
Entering Bar Code Data....55
Editing and Deleting a Bar Code 57
LABEL PRINTING 58
Label Preview....58
Printing a Label 58
Printing a Single Copy 59
Printing Multiple Copies 59
Auto-numbering Labels....60
Mirror Printing 61
Tape Cutting Options 62
Manual Cutting....64
Adjusting the Label Length....64
Attaching Labels....65
USING THE FILE MEMORY 66
Storing a Label into Memory 66
Opening a Stored Label File 67
Printing a Stored Label File....68
Deleting a Stored Label File....69
MAINTAINING YOUR P-touch 70
Resetting the P-touch....70
Maintenance....70
Cleaning the Main Unit 70
Cleaning the Print Head....70
Cleaning the Tape Cutter....71
TROUBLESHOOTING....72
What to do when.... 72
Error Messages....75
APPENDIX....79
Specifications 79
Accessories 82
INDEX......86
INTRODUCTION
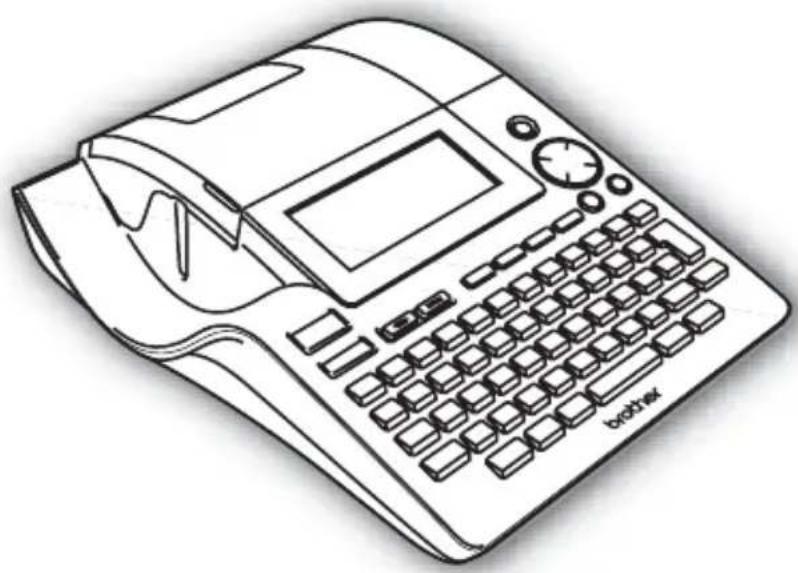
Thank you for purchasing the P-touch PT-2700.
Your new P-touch is an easy to operate, feature packed labeling system that makes creating professional, high quality labels a breeze. In addition to easy label creation via pre-formatted label layouts, the P-touch editing software features advanced label formatting, block formats, bar codes and auto-numbering functions.
What You Can Do
■ Create a label with the P-touch
1 | Prepare the P-touch.
flowchart
graph LR
    A["Install the batteries and/or connect the AC adapter."] --> B["Set a tape cassette."]
    B --> C["Turn the P-touch on."]
2| Enter the label text.
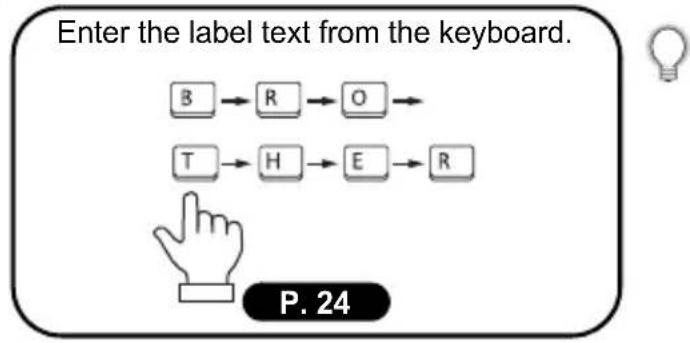
flowchart
graph TD
    B["B"] --> R["R"]
    R --> O["O"]
    T["T"] --> H["H"]
    H --> E["E"]
    E --> R["R"]
In addition to entering text, the P-touch has a large range of editing functions. "Create labels like these"
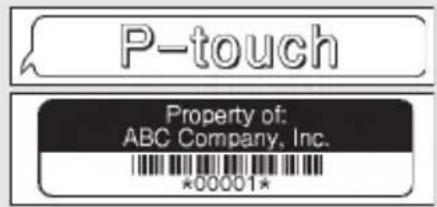
text_image
P-touch Property of: ABC Company, Inc. *00001*3 | Print the label.
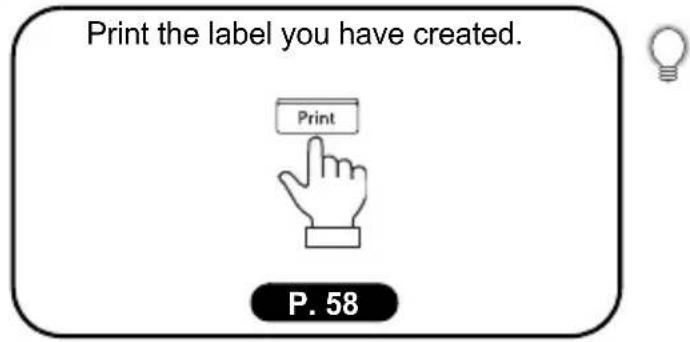
text_image
Print the label you have created. Print P. 58You can check the layout of your label before printing. Checking the label preview before printing prevents wasting tape on incomplete labels.

text_image
"Preview function" Brother 1" x 4.0"■ Create a label with your personal computer
1 Prepare the P-touch. (Refer to step 1 in the previous section.)
2 Prepare the personal computer.
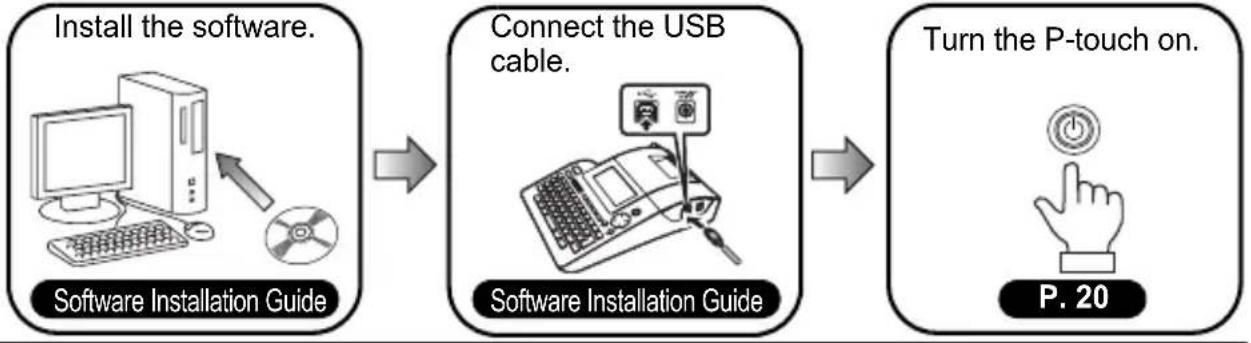
flowchart
graph LR
    A["Install the software."] --> B["Connect the USB cable."]
    B --> C["Turn the P-touch on."]
3| Enter the label text using P-touch Quick Editor.
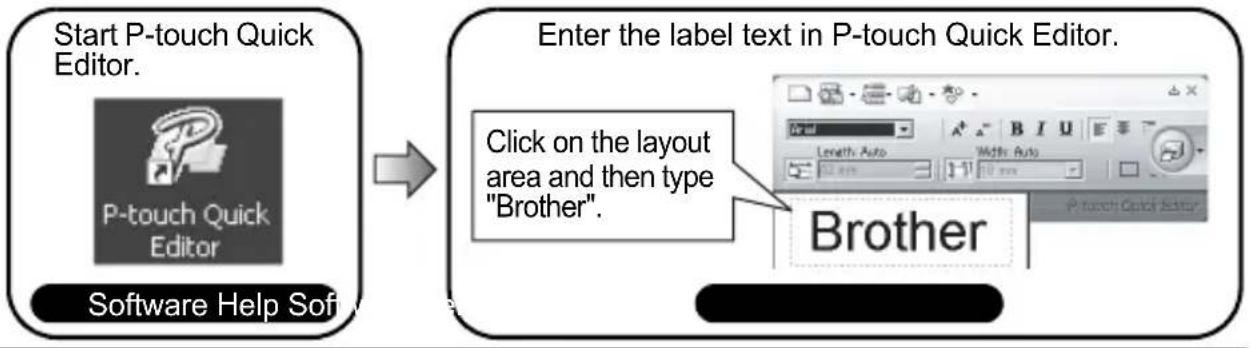
flowchart
graph LR
A["Start P-touch Quick Editor.<br>P-touch Quick Editor<br>Software Help Software"] --> B["Enter the label text in P-touch Quick Editor."]
B --> C["Click on the layout area and then type "Brother".<br>Brother"]
4 | Print the label.
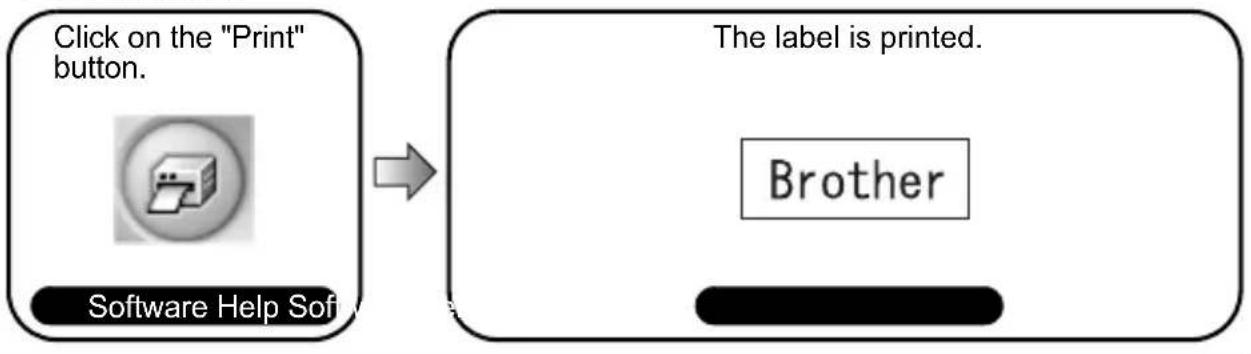
flowchart
graph LR
    A["Click on the "Print" button."] --> B["Software Help Software"]
    B --> C["The label is printed."]
    C --> D["Brother"]

P-touch Quick Editor (simple label editing software) is ideal for creating simple labels. To create labels with more complex designs, use P-touch Editor (fully featured label editing software).
"P-touch Editor" "Create labels with complex designs like these"
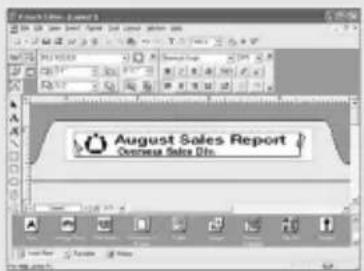
text_image
August Sales Report Overseas Sales Dis.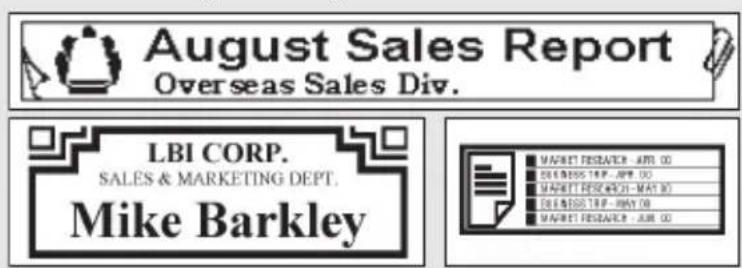
text_image
August Sales Report Overseas Sales Div. LBI CORP. SALES & MARKETING DEPT. Mike Barkley MARKET RESEARCH - APR 00 DEGREESE TIP - APR 00 MARKET RESEARCH - MAY 00 DEGREESE TIP - MAY 00 MARKET RESEARCH - JUL 00Safety Precautions
To prevent injury and damage, important notes are explained using various symbols. The symbols and their meanings are as follows:
 | WARNING | This indicates the possibility of death or serious injury if instructions are ignored. |
 | CAUTION | This indicates the possibility of personal injury or property damage if instructions are ignored. |
The symbols used in this manual are as follows:
 | symbol indicates prohibition. Detailed prohibited matters are shown in the figure (e.g. the left figure shows the prohibition against disassembly). |
 | symbol indicates special instructions. Detailed instructions are shown in the figure (e.g. the left figure shows the method for pulling the power plug out of the outlet). |

WARNING
P-touch
Please note the following to avoid fire, damage, electric shock and choking.

Do not disassemble the P-touch. For inspection, adjustment, and repair of the P-touch, contact the retail outlet where the P-touch was purchased or your local authorized service center. (If the damage is caused by disassembly or modification of the P-touch by the customer, it may void the customer's warranty and servicing (parts and labor) may be charged to the customer.)

Do not drop, hit or otherwise strike the P-touch.

Do not touch any metal parts near the print head. The print head becomes very hot during use and remains very hot immediately after use. Do not touch it directly with your hands.

Do not wet the P-touch by touching with wet hands, spilling drinks such as coffee, juice or water onto the P-touch. Do not use the P-touch with a foreign object in it. If water, metallic substance or any foreign object enters the P-touch, disconnect the AC adapter and remove batteries, and contact the retail outlet where the P-touch was purchased or your local authorized service center.

Do not put the plastic packing bag near face, mouth or nose as bag may become a choking hazard. Dispose of the plastic bag immediately and keep it out of the reach of children. The plastic packing bag is not a toy.

Disconnect the AC adapter and remove batteries immediately and stop using when you notice abnormal odor, heat, discoloration, deformation or anything unusual while using or storing it.


WARNING
Battery
Please note the following to avoid liquid leakage, heat, rupture of the battery.

Do not throw into fire, heat up, or disassemble the battery.
AC adapter
Please note the following to avoid fire, electric shock, or failure.

Always use the specified voltage (120V) and the suggested AC adapter (AD-24).

Do not overload the power outlet.

Do not drop, hit or otherwise damage the AC adapter.

Do not place heavy objects on, damage or modify the power cord or plug. Do not forcibly bend or pull the power cord.

Do not use a damaged power cord.

Do not touch the AC adapter or power plug with wet hands.

Do not use the AC adapter in places of high humidity such as bathrooms.

Make sure that the plug is fully inserted to the power outlet. Do not use an outlet that is loose.

CAUTION
Battery
Please note the following to avoid liquid leakage, heat, rupture of the battery.

Do not use old and new batteries together.

Do not mix alkaline batteries with other type batteries.

Do not set the positive and negative end in the wrong position.

Remove the batteries if you do not intend to use the P-touch for an extended period of time.
AC adapter

Be sure to disconnect the AC adapter from the power outlet and the P-touch when not using the P-touch for any extended period of time.

Always hold the plug when disconnecting the power cord from the power outlet.
Tape Cutter
Please note the following to avoid personal injury and damage of the P-touch.

Do not touch the blade of the cutter unit.

Do not open the tape compartment cover when operating the cutter unit.

Do not apply excessive pressure to the cutter unit.

CAUTION
Usage/Storage
Please note the following to avoid personal injury and damage of the P-touch.

When using the P-touch, do not place it on a unstable environment, such as dilapidated table or top of the shelf.

Do not place any heavy objects on top of the P-touch.
Memory

Any data stored in memory will be lost due to failure or repair of the P-touch, or if the battery expires.

When power is disconnected for more than two minutes, all text and format settings will be cleared. Any text files stored in the memory and clock settings will also be cleared.
Tape

Depending on the environmental conditions and the material and condition of the affixing surface, the label may peel off or the color of the tape may change. When removing labels, adhesive may remain, the tape's color may be transferred to the surface, or the surface beneath the label may otherwise be damaged. Be sure to test the label on the intended surface and material before affixing the label.
General Precautions
- Do not use the P-touch in any way or for any purpose not described in this guide. Doing so may result in accidents or damage the machine.
- Use only Brother TZ tapes with this machine. Do not use tapes that do not have the mark.

- Do not pull or press on the tape in the cassette.
- Do not put any foreign objects into the tape exit slot, AC adapter connector, or USB port, etc.
- Do not try to print labels using an empty tape cassette or without a tape cassette set in the P-touch. Doing so will damage the print head.
- Do not touch the print head with your fingers.
- Do not clean the machine with alcohol or other organic solvents. Only use a soft, dry cloth.
- Do not place the P-touch in direct sunlight, near heaters or other hot appliances, in any location exposed to extremely high or low temperatures, high humidity, or dusty locations. Standard operating temperature range: 10^ to 35^ ( 50^ to 95^ ).
- It is recommended that you use the USB cable supplied with the P-touch. Should another USB cable need to be used, ensure it is of high quality construction.
- Be careful not to scratch the CD-ROM. Do not place the CD-ROM in any location exposed to high or low temperatures. Do not place heavy objects on the CD-ROM or bend it.
- The software on the CD-ROM is intended for use with the P-touch and may be installed on more than one PC.
- We strongly recommend that you read this User's Guide carefully before using your P-touch, and then keep it nearby for future reference.
Symbols Used in this Guide
The following symbols are used throughout this guide to indicate additional information.

This symbol indicates information or directions that may result in damage or injury if ignored, or operations that will result in errors.

This symbol indicates information or directions that may help you understand and use the P-touch more efficiently.

text_image
Quick IndexThis section provides quick and easy access to information on tasks often needed by users.
Simply look for your task below and then go to the page indicated.
If the task you are looking for is not shown here, try the Contents or Index pages.
text_image
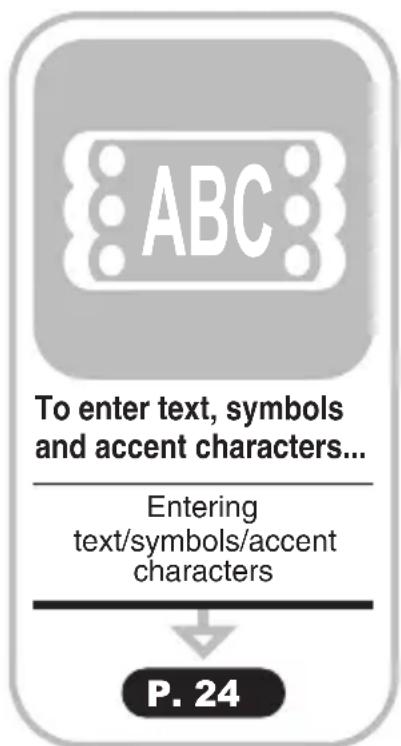
ABC To enter text, symbols and accent characters... Entering text/symbols/accent characters P. 24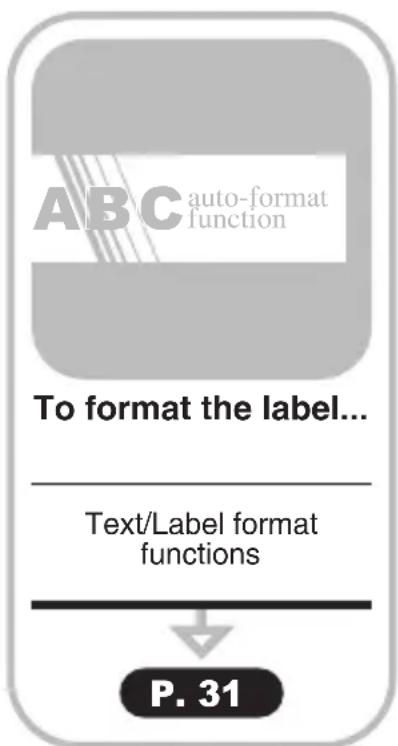
text_image
ABC auto-format function To format the label... Text/Label format functions P. 31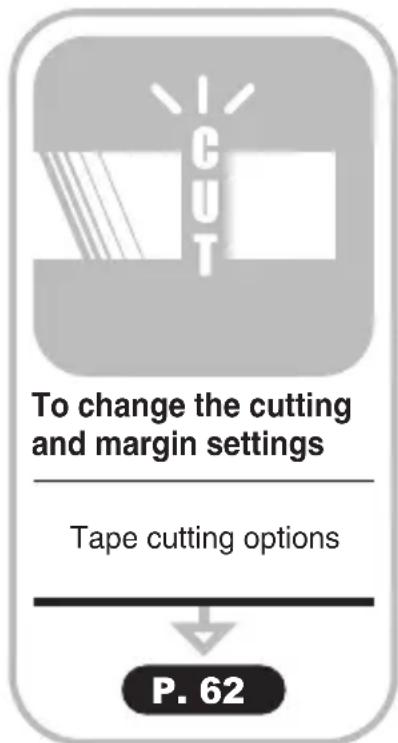
text_image
To change the cutting and margin settings Tape cutting options P. 62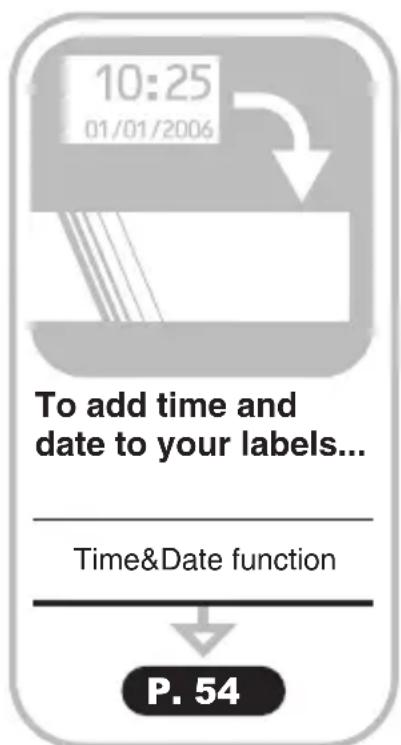
text_image
10:25 01/01/2006 To add time and date to your labels... Time&Date function P. 54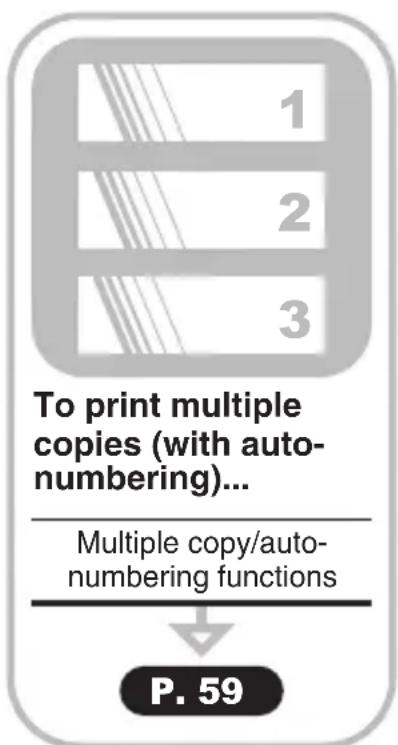
text_image
To print multiple copies (with auto-numbering)... Multiple copy/auto-numbering functions P. 59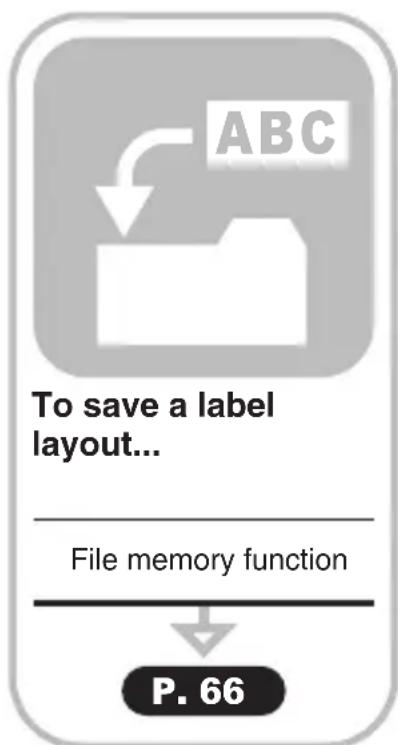
text_image
ABC To save a label layout... File memory function P. 66GETTING STARTED
Unpacking Your P-touch
Check that the package contains the following before using your P-touch.
P-touch PT-2700 TZ tape cassette
natural_image
Line drawing of a vintage telephone receiver with keyboard, dials, and display (no text or symbols)CD-ROM USB cable
AC adapter User's Guide
natural_image
Simple line drawing of a rectangular device connected to a coiled cable (no text or symbols)Software Installation Guide
natural_image
Isometric line drawing of a rectangular block with a flat top and side grooves (no text or symbols)
natural_image
Isometric line drawing of a mechanical device casing (no text or symbols)
natural_image
Line drawing of a coiled cable with two connectors (no text or symbols)
natural_image
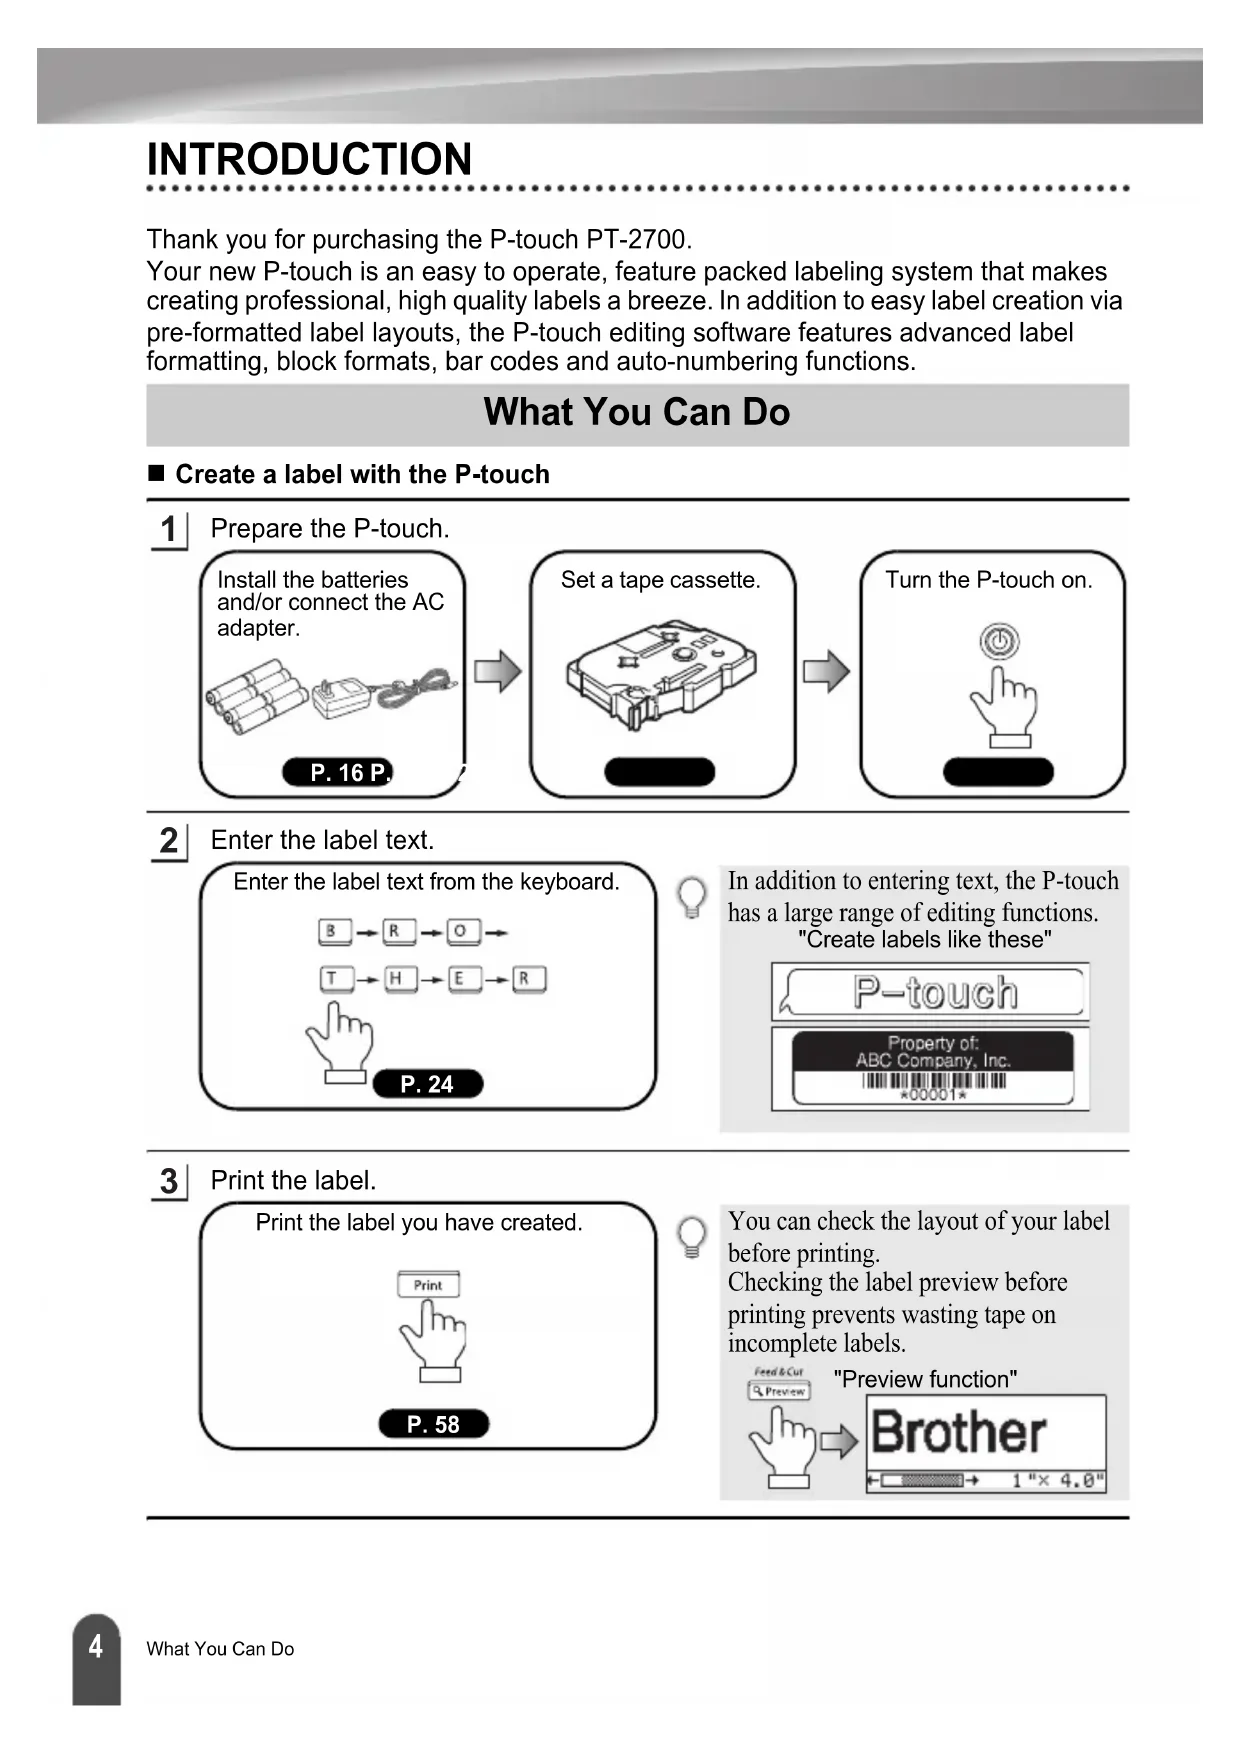
Isometric line drawing of a rectangular block with a textured top and bottom edge (no text or symbols)General Description
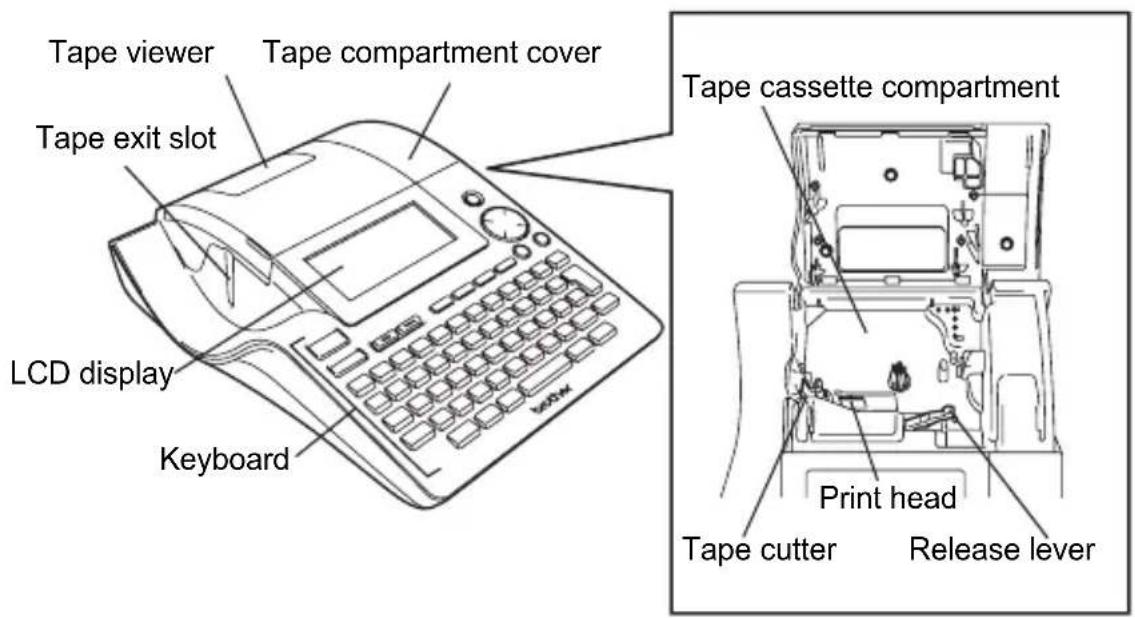
text_image
Tape viewer Tape compartment cover Tape exit slot LCD display Keyboard Tape cassette compartment Print head Tape cutter Release lever
When shipped from the factory, the LCD display is covered with a protective sheet to prevent damage. Remove this sheet before using the P-touch.
text_image
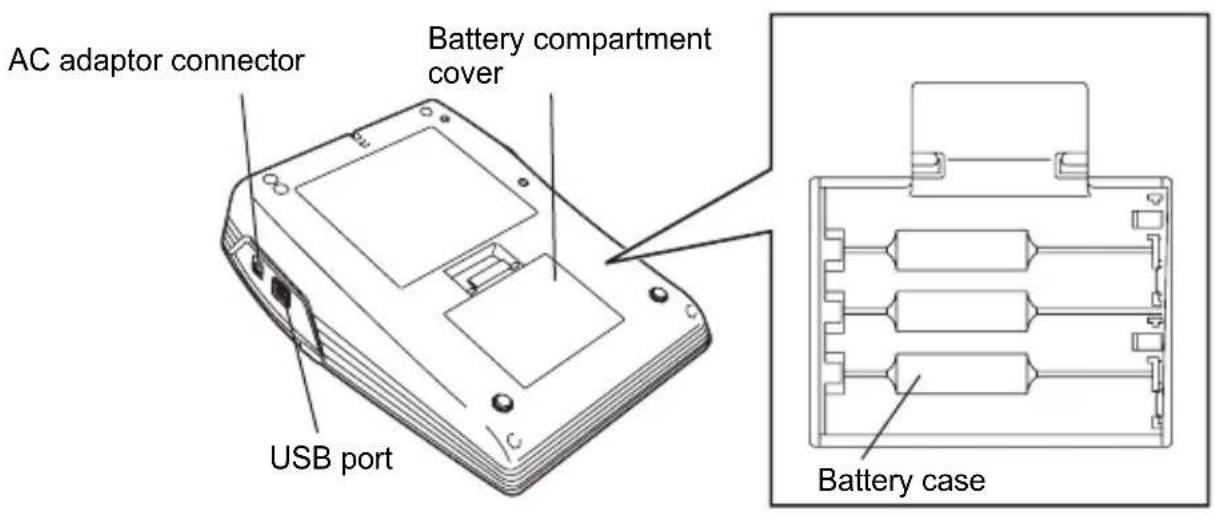
AC adaptor connector Battery compartment cover USB port Battery caseLCD Display & Keyboard
LCD Display
text_image
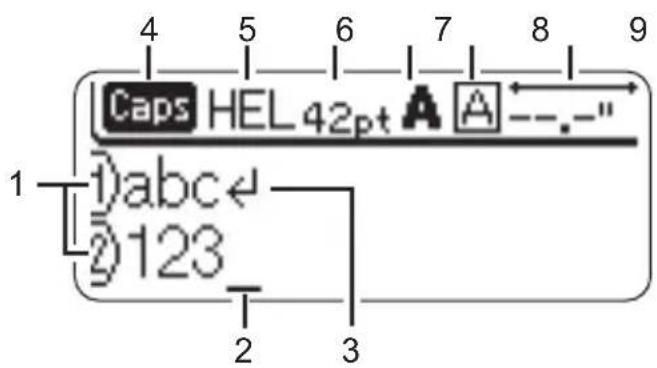
Caps HEL42pt A A 1 abc 2 123 2 3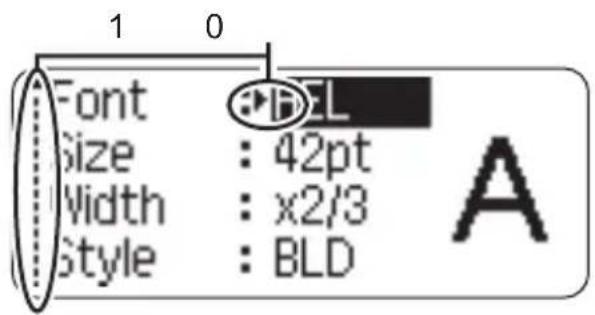
text_image
Font Size : 42pt Width : x2/3 Style : BLD A1. Line number
Displayed at the beginning of each line, this mark indicates the line number within the label layout.
2. Cursor
Indicates the current position of the cursor. New characters are entered to the left of the cursor, and the character to the left of the cursor is deleted when the key is pressed.
3. Return mark
Indicates the end of a line of text.
4. Caps mode
Indicates that the Caps mode is on.
5.\~8. Style guidance
Indicates the current font (5), character size (6), character style (7) and frame (8) settings.
9. Tape length
Indicates the tape length for the text entered.
10.Cursor selection
Indicates that you can use the cursor keys to select the items on the screen. Use the and keys to select a menu item, and the and keys to change the setting.

Refer to “LCD Display” on page 21 for changing the contrast and display mode, and for turning the back light on/off.
Key Names and Functions

text_image
7 8 9 10 11 12 Print Options Print Feed & Cut Preview Mode Light File Text Label Setup Esc OK Display Function Clear 1 2 3 4 5 % 6 ' 7 & 8 * 9 ' 0 ' - "Power Supply
Battery
1 After making sure that the power is off, remove the battery compartment cover on the back of the machine. If the batteries are already in the machine, remove them. Make sure that the power is turned off when replacing batteries. natural_image
Technical line drawing of a device casing with internal components (no text or symbols)natural_image
Technical line drawing of a device with internal components and mounting holes (no text or symbols)natural_image
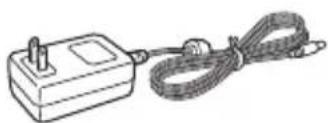
Isometric line drawing of a device casing with internal components (no text or symbols)AC Adapter
Connect the AC adapter directly to the P-touch. text_image
DC N1-LSVInserting a Tape Cassette
Tape cassettes of 9/64", 1/4", 3/8", 1/2", 3/4", or 1" (3.5mm, 6mm, 9mm, 12mm, 18mm, or 24mm) width can be used in your P-touch. Use only Brother tape cassettes with the TE mark. If the new tape cassette has a cardboard stopper, be sure to remove the stopper before inserting the cassette. natural_image
Diagram of a device's internal components with an arrow indicating a specific part (no text or symbols present)natural_image
Mechanical assembly diagram showing internal components and a close-up view of a housing (no text or symbols)natural_image
Line drawing of a vintage computer with keyboard, mouse, and monitor components (no text or symbols)natural_image
Line drawing of a computer setup with monitor, keyboard, and accessories (no text or symbols)natural_image
Line drawing of a vintage computer control panel with an open circuit board and keyboard (no text or symbols)Turning Power On/Off
Press the Ⓞkey to turn the P-touch on. Press the ⓚkey again to turn the P-touch off. text_image
HEL 1_| P-touch only Connected to PC | ||
| With AC adapter | 8 hours 8 hours | |
| With battery | 5 minutes | 5 minutes with no operation.1 hour after printing from PC. |
Feeding Tape
The Feed & Cut function feeds 0.92" (23mm) of blank tape then cuts the tape.  - Be sure to feed tape to remove any slack in the tape and ink ribbon after inserting the tape cassette. - Do not pull the label coming out of the tape exit slot. Doing so will cause the ink ribbon to be discharged with the tape. - Do not block the tape exit slot during printing or when feeding tape. Doing so will cause the tape to jam. 1 Hold down the key and press the key "Feed & Cut?" appears on the display. 2 | Press the or key to feed tape. The message “Feeding Tape... Please Wait” appears while the tape is fed, and then the tape is cut.  Press ☑ while “Feed & Cut?” is displayed to cancel tape feeding.LCD Display
LCD Contrast
You can change the contrast setting of the LCD display to one of five levels (+2, +1, 0, -1, -2) to make the screen easier to read. The default setting is "0". 1 Press the key to display the Mode menu, select "LCD Contrast" using the or key, and then press the OK or key. text_image
Set Clock Tab LCD Contrast Symbol Updatetext_image
+2 +1 0 -1 -2 〈LCD Contrast〉 [ABCDE] [abcde]GETTING STARTED
Display Mode
You can change the display mode to your preferable style by pressing the key repeatedly. You can select from three text entry screens (guidance + 2 text lines, 3 text lines, guidance + 1 line) and clock display. flowchart
graph LR
    A["HEL AA 2.5" 2ghijkl 3mnopqr"] --> B["1) abcdef 2ghijkl 3mnopqr"]
    B --> C["HEL AA 2.5" 3mnopqr"]
    C --> D["12:00 AM 01/01/2006"]
Back Light
You can turn the back light on / off by pressing the key. The back light can be used when you wish to see the display more clearly. The default setting is ON. flowchart
graph LR
    A["HEL AAA 2.3""] --> B["a"]
    C["HEL AAA 2.3""] --> D["a"]
Setting Language and Unit
Language
Select the language("English", "Español", "Dansk", "Deutsch", "Français", "Italiano", "Nederlands", "Norsk", "Português", "Suomi", or "Svenska") for menu commands and messages shown on the LCD display. The default setting is "English". 1 Press the key to display the Setup menu, select "Language" using the or key, and then press the OK or key. text_image
Auto Fit Style Manual Cutting Language Unittext_image
〈Language〉 Dansk Deutsch EnglishUnit
Select the units ("inch" or "mm") for dimensions shown on the LCD display. The default setting is "inch". 1 Press the key to display the Setup menu, select "Unit" using the or key, and then press the or key. text_image
Auto Fit Style Manual Cutting Language Unittext_image
inch mm ⟨Unit⟩Entering and Editing Text
Using the keyboard of your P-touch is very similar to using a typewriter, word processor, or personal computer.Entering Text from the Keyboard
- To enter a lowercase letter or a number, simply press the desired key. - To enter a blank space in the text, press the key: - To enter an uppercase letter or one of the symbols on the number keys, hold down the key and then press the desired key. - To enter uppercase letters continuously, press the key to enter Caps mode, and then press the desired keys.  \- To exit Caps mode, press the key again. \- To enter a lowercase letter while in Caps mode, hold down the key and then press the desired key.Adding a New Line
\- To end the current line of text and start a new line, press the key. A return mark appears at the end of the line and the cursor moves to the start of the new line.  \- There is a maximum number of lines of text that can be entered for each tape width. A maximum of 7 lines can be entered for 1" (24mm) tape, 5 lines for 3/4" (18mm) tape, 3 lines for 1/2" (12mm) tape, 2 lines for 3/8" (9mm) and 1/4" (6 mm) tape, and 1 line for 9/64" (3.5mm) tape. \- If you press the 'key when seven lines already exist, an error message is displayed. \- To change the character attribute of each line, refer to “Setting Character Attributes by Each Line” on page 31.Adding a New Block
\- To create a new block of text/lines to the right of your current text, press the key while holding down the key. A mark will appear at the end of the block and the cursor moves to the start of the new block.  A maximum of 5 blocks can be entered in one label.Moving the Cursor
\- To move the cursor left, right, up or down, press the <, or keys. Each press of the key moves the cursor one space or line. \- To move the cursor to the beginning or end of the current line, hold down the key and then press the or keys. \- To move the cursor to the very beginning or end of the text, hold down the key and then press the ▲or keys.Inserting Text
• To insert additional text into an existing line of text, move the cursor to the character to the right of the position where you want to start inserting text and then enter the additional text. The new text is inserted to the left of the cursor.Inserting a Tab
\- To insert a tab space between the existing line of text, move the cursor where you wish to add a tab and press the key. A mark appears to indicate the position which the tab space will be entered.  - To change the length setting of the tab, refer to "Setting Label Attributes" on page 36. - The tab space can also be entered by pressing the key to open the Setup menu and selecting "Tab" by using or keys, and then pressing the or key.Deleting Text
■ Deleting one character at a time
\- To delete a character from an existing line of text, move the cursor to the character to the right of the position you want to start deleting text and then press the key. The character to the left of the cursor is deleted each time the key is pressed.  If you hold down the key, the characters left to the cursor are deleted continuously.■ Deleting all text at once
\- Use the and key to delete all text at once. 1 Press the key while holding down key. The Clear options are displayed. text_image
Clear? Text&Format Text Onlytext_image
Clear? Text&Format Text Onlytext_image
HEL AAA -- 1_Entering Symbols
In addition to the symbols available on the keyboard, there are various symbols (including international and extended ASCII characters) available with the symbol function. There are two methods of entering symbols: - Using the key. • Using the Symbol function.Entering Symbols Using Key
Symbols printed in upper-right corner of the keys on the keyboard can be entered using the Shift key. \- To enter one of these symbols, hold down the key and then press the desired key.Entering Symbols Using the Symbol Function
| 1 | Press thekey.A list of symbol categories and symbols in that category is displayed.The last symbol entered is selected in the list displayed. | |
| 2 | Select a symbol category (Punctuation, Business, Mathematics, etc.) using theorkeyor by pressing thekeyrepeatedly, and then select a symbol using theorkeys. | |
| 3 | Press theorkey.The selected symbol is inserted into the line of text. |
Using Symbol Update Function
You can create your personal category of symbols by using the Symbol Update Function. The "Personal category" will appear first when selecting the symbols to help you locate the desired symbols quickly.| 1 | Press thekey to display the Setup menu, and then select "Symbol Update" using the▲or keys. | Set ClockTabLCD ContrastSymbol Update |
| 2 | Press theorkey to display the Symbol Update screen, and then select "On" to create your personal category by using the▲or keys. | (Symbol Update)OnOff |
| 3 | Press theorkey to apply the setting.The screen returns to the text entry screen. | HELAAA--.-"1)_ |
| 4 | Enter the symbol you wish to add to your personal Category.Refer to “Entering Symbols Using the Symbol Function” on page 26 for detail. | Mathematics+ - x , |
| 5 | Press thekey.The "Personal category" appears, including the symbol entered in step 4. | Personal Category+ , |
Symbol List
| Category Symbols | ||
| Personal Category | Refer to “Using Symbol Update Function” on page 27 for detail. | |
| Punctuation | . , : ; " ' • ? ! ¿ i - & ~ _ \ / § | |
| Business | @ # % ® © ™ ∈ √ | |
| Mathematics | + - × ÷ ± = * | |
| Bracket | ( ) [ ] < > « » | |
| Arrow | → ← ↑ ↓ ↔ ⇌ ≡ ≡ ≡ ≡ ≡ ≡ ≡ ≡ ≡ ≡ ≡ ≡ ≡ ≡ ≡ ≡ ≡ ≡ ≡ ≡ ≡ ≡ ≡ ≡ ≡ ≡ ≡ ≡ ≡ ≡ ≡ ≡ ≡ ≡ ≡ ≡ ≡ ≡ ≡ ≡ ≡ ≡ ≡ ≡ ≡ ≡ ≡ ≡ ≡ ≡ ≨ ≡ ≡ ≡ ≡ ≡ ≡ ≡ ≡ ≡ ≡ ≡ ≡ ≡ ≡ ≡ ≡ ≡ ≡ ≡ ≡ ≡ ≡ ≡ ≡ ≡ ≡ ≡ ≡ ≡ ≡ ≡ ≡ ≡ ≡ ≡ ≡ ≡ ≡ ≡ ≡ ≡ ≡ ≡ ≡ ≡ ≡ ≡ ≡ ≡ ≢ ≡ ≡ ≡ ≡ ≡ ≡ ≡ ≡ ≡ ≡ ≡ ≡ ≡ ≡ ≡ ≡ ≡ ≡ ≡ ≡ ≡ ≡ ≡ ≡ ≡ ≡ ≡ ≡ ≡ ≡ ≡ ≡ ≡ ≡ ≡ ≡ ≡ ≡ ≡ ≡ ≡ ≡ ≡ ≡ ≡ ≡ ≡ ≡ ≡ ≓ ≡ ≡ ≡ ≡ ≡ ≡ ≡ ≡ ≡ ≡ ≡ ≡ ≡ ≡ ≡ ≡ ≡ ≡ ≡ ≡ ≡ ≡ ≡ ≡ ≡ ≡ ≡ ≡ ≡ ≡ ≡ ≡ ≡ ≡ ≡ ≡ ≡ ≡ ≡ ≡ ≡ ≡ ≡ ≡ ≡ ≡ ≡ ≡ ≡ ≤ ≡ ≡ ≡ ≡ ≡ ≡ ≡ ≡ ≡ ≡ ≡ ≡ ≡ ≡ ≡ ≡ ≡ ≡ ≡ ≡ ≡ ≡ ≡ ≡ ≡ ≡ ≡ ≡ ≡ ≡ ≡ ≡ ≡ ≡ ≡ ≡ ≡ ≡ ≡ ≡ ≡ ≡ ≡ ≡ ≡ ≡ ≡ ≡ ≡ ≦ ≡ ≡ ≡ ≡ ≡ ≡ ≡ ≡ ≡ ≡ ≡ ≡ ≡ ≡ ≡ ≡ ≡ ≡ ≡ ≡ ≡ ≡ ≡ ≡ ≡ ≡ ≡ ≡ ≡ ≡ ≡ ≡ ≡ ≡ ≡ ≡ ≡ ≡ ≡ ≡ ≡ ≡ ≡ ≡ ≡ ≡ ≡ ≡ ≡ ≀ ≡ ≡ ≡ ≡ ≡ ≡ ≡ ≡ ≡ ≡ ≡ ≡ ≡ ≡ ≡ ≡ ≡ ≡ ≡ ≡ ≡ ≡ ≡ ≡ ≡ ≡ ≡ ≡ ≡ ≡ ≡ ≡ ≡ ≡ ≡ ≡ ≡ ≡ ≡ ≡ ≡ ≡ ≡ ≡ ≡ ≡ ≡ ≡ ≡ ≩ ≡ ≡ ≡ ≡ ≡ ≡ ≡ ≡ ≡ ≡ ≡ ≡ ≡ ≡ ≡ ≡ ≡ ≡ ≡ ≡ ≡ ≡ ≡ ≡ ≡ ≡ ≡ ≡ ≡ ≡ ≡ ≡ ≡ ≡ ≡ ≡ ≡ ≡ ≡ ≡ ≡ ≡ ≡ ≡ ≡ ≡ ≡ ≡ ≡ ≂ ≡ ≡ ≡ ≡ ≡ ≡ ≡ ≡ ≡ ≡ ≡ ≡ ≡ ≡ ≡ ≡ ≡ ≡ ≡ ≡ ≡ ≡ ≡ ≡ ≡ ≡ ≡ ≡ ≡ ≡ ≡ ≡ ≡ ≡ ≡ ≡ ≡ ≡ ≡ ≡ ≡ ≡ ≡ ≡ ≡ ≡ ≡ ≡ ≡ ≒ ≡ ≡ ≡ ≡ ≡ ≡ ≡ ≡ ≡ ≡ ≡ ≡ ≡ ≡ ≡ ≡ ≡ ≡ ≡ ≡ ≡ ≡ ≡ ≡ ≡ ≡ ≡ ≡ ≡ ≡ ≡ ≡ ≡ ≡ ≡ ≡ ≡ ≡ ≡ ≡ ≡ ≡ ≡ ≡ ≡ ≡ ≡ ≡ ≡ ≲ ≡ ≡ ≡ ≡ ≡ ≡ ≡ ≡ ≡ ≡ ≡ ≡ ≡ ≡ ≡ ≡ ≡ ≡ ≡ ≡ ≡ ≡ ≡ ≡ ≡ ≡ ≡ ≡ ≡ ≡ ≡ ≡ ≡ ≡ ≡ ≡ ≡ ≡ ≡ ≡ ≡ ≡ ≡ ≡ ≡ ≡ ≡ ≡ ≡ ≚ ≡ ≡ ≡ ≡ ≡ ≡ ≡ ≡ ≡ ≡ ≡ ≡ ≡ ≡ ≡ ≡ ≡ ≡ ≡ ≡ ≡ ≡ ≡ ≡ ≡ ≡ ≡ ≡ ≡ ≡ ≡ ≡ ≡ ≡ ≡ ≡ ≡ ≡ ≡ ≡ ≡ ≡ ≡ ≡ ≡ ≡ ≡ ≡ ≡ ≘ ≡ ≡ ≡ ≡ ≡ ≡ ≡ ≡ ≡ ≡ ≡ ≡ ≡ ≡ ≡ ≡ ≡ ≡ ≡ ≡ ≡ ≡ ≡ ≡ ≡ ≡ ≡ ≡ ≡ ≡ ≡ ≡ ≡ ≡ ≡ ≡ ≡ ≡ ≡ ≡ ≡ ≡ ≡ ≡ ≡ ≡ ≡ ≡ ≡ ≙ ≡ ≡ ≡ ≡ ≡ ≡ ≡ ≡ ≡ ≡ ≡ ≡ ≡ ≡ ≡ ≡ ≡ ≡ ≡ ≡ ≡ ≡ ≡ ≡ ≡ ≡ ≡ ≡ ≡ ≡ ≡ ≡ ≡ ≡ ≡ ≡ ≡ ≡ ≡ ≡ ≡ ≡ ≡ ≡ ≡ ≡ ≡ ≡ ≡ ≗ ≡ ≡ ≡ ≡ ≡ ≡ ≡ ≡ ≡ ≡ ≡ ≡ ≡ ≡ ≡ ≡ ≡ ≡ ≡ ≡ ≡ ≡ ≡ ≡ ≡ ≡ ≡ ≡ ≡ ≡ ≡ ≡ ≡ ≡ ≡ ≡ ≡ ≡ ≡ ≡ ≡ ≡ ≡ ≡ ≡ ≡ ≡ ≡ ≡ ≎ ≡ ≡ ≡ ≡ ≡ ≡ ≡ ≡ ≡ ≡ ≡ ≡ ≡ ≡ ≡ ≡ ≡ ≡ ≡ ≡ ≡ ≡ ≡ ≡ ≡ ≡ ≡ ≡ ≡ ≡ ≡ ≡ ≡ ≡ ≡ ≡ ≡ ≡ ≡ ≡ ≡ ≡ ≡ ≡ ≡ ≡ ≡ ≡ ≡ ≟ ≡ ≡ ≡ ≡ ≡ ≡ ≡ ≡ ≡ ≡ ≡ ≡ ≡ ≡ ≡ ≡ ≡ ≡ ≡ ≡ ≡ ≡ ≡ ≡ ≡ ≡ ≡ ≡ ≡ ≡ ≡ ≡ ≡ ≡ ≡ ≡ ≡ ≡ ≡ ≡ ≡ ≡ ≡ ≡ ≡ ≡ ≡ ≡ ≡ ≠ | |
| Unit | $ ¢ ¢ ¢ ¢ ¢ ¢ ¢ ¢ ¢ ¢ ¢ ¢ ¢ ¢ ¢ ¢ ¢ ¢ ¢ ¢ ¢ ¢ ¢ ¢ ¢ ¢ ¢ ¢ ¢ ¢ ¢ ¢ ¢ ¢ ¢ ¢ ¢ ¢ ¢ ¢ ¢ ¢ ¢ ¢ ¢ ¢ ¢ ¢ ¢ ¢ © | |
| International | a B γ δ μ Ω φ a o | |
| Number | 2 3 2 3 1/4 1/2 3/4 | |
| Pictograph | ★ ● ○ □ △ ♠ ♥ ◆ ♣ ⊕ + ⋅ ♂ ♀ | |
| Electrical | ↓ ~ == ++ ⓧ ➔ 📊 ○ | ⊕ Ⓤ ➔ 📊 ⇐ 📊 ⇐ 📊 ⇐ 📊 ⇐ 📊 ⇐ 📊 ⇐ 📊 ⇐ 📊 ⇐ 📊 ⇐ 📊 ⇐ 📊 ⇐ 📊 ⇐ 📊 ⇐ 📊 ⇐ 📊 ⇐ 📊 ⇐ 📊 ⇐ 📊 ⇐ 📊 ⇐ 📊 ⇐ 📊 ⇜ | |
| Others | ⓧ △ △ ≈ ⓧ 📊 📊 📊 📊 📊 📊 📊 📊 📊 📊 📊 📊 📊 📊 📊 📊 📊 📊 📊 📊 📊 📊 📊 📊 📊 📊 📊 📊 📊 📊 📊 📊 📊 📊 | |
Entering Accented Characters
The P-touch can display and print a set of accented characters such as other language specific characters. 1 Enter the character you wish to change to composite character.  Caps mode can be used with the Accent function. text_image
CEPS HEL AAA 2.6" D)U_text_image
Caps HEL AAA 2.6" Dùtext_image
CAPS HEL AAA 2.6" DUtext_image
Gaps HEL AAA 2.6" 10U_| Character | Accented Characters | Character | Accented Characters |
| a | á à â ä æ ã a á ã ã | n | ñ ñ ñ ñ |
| A | Á Á Á Á Á Á Á Á Á | N | Ñ Ñ Ñ Ñ Ñ Ñ Ñ Ñ Ñ Ñ Ñ Ñ Ñ Ñ Ñ Ñ Ñ Ñ Ñ Ñ Ñ Ñ Ñ Ñ Ñ Ñ Ñ Ñ Ñ Ñ Ñ Ñ Ñ Ñ Ñ Ñ Ñ Ñ Ñ Ñ Ñ Ñ Ñ Ñ Ñ Ñ Ñ Ñ Ñ Ñ Ñ Ð Ñ Ñ Ñ Ñ Ñ Ñ Ñ Ñ Ñ Ñ Ñ Ñ Ñ Ñ Ñ Ñ Ñ Ñ Ñ Ñ Ñ Ñ Ñ Ñ Ñ Ñ Ñ Ñ Ñ Ñ Ñ Ñ Ñ Ñ Ñ Ñ Ñ Ñ Ñ Ñ Ñ Ñ Ñ Ñ Ñ Ñ Ñ Ñ Ñ Û Ñ Ñ Ñ Ñ Ñ Ñ Ñ Ñ Ñ Ñ Ñ Ñ Ñ Ñ Ñ Ñ Ñ Ñ Ñ Ñ Ñ Ñ Ñ Ñ Ñ Ñ Ñ Ñ Ñ Ñ Ñ Ñ Ñ Ñ Ñ Ñ Ñ Ñ Ñ Ñ Ñ Ñ Ñ Ñ Ñ Ñ Ñ Ñ Ñ Ò Ñ Ñ Ñ Ñ Ñ Ñ Ñ Ñ Ñ Ñ Ñ Ñ Ñ Ñ Ñ Ñ Ñ Ñ Ñ Ñ Ñ Ñ Ñ Ñ Ñ Ñ Ñ Ñ Ñ Ñ Ñ Ñ Ñ Ñ Ñ Ñ Ñ Ñ Ñ Ñ Ñ Ñ Ñ Ñ Ñ Ñ Ñ Ñ Ñ Ú Ñ Ñ Ñ Ñ Ñ Ñ Ñ Ñ Ñ Ñ Ñ Ñ Ñ Ñ Ñ Ñ Ñ Ñ Ñ Ñ Ñ Ñ Ñ Ñ Ñ Ñ Ñ Ñ Ñ Ñ Ñ Ñ Ñ Ñ Ñ Ñ Ñ Ñ Ñ Ñ Ñ Ñ Ñ Ñ Ñ Ñ Ñ Ñ Ñ Ó Ñ Ñ Ñ Ñ Ñ Ñ Ñ Ñ Ñ Ñ Ñ Ñ Ñ Ñ Ñ Ñ Ñ Ñ Ñ Ñ Ñ Ñ Ñ Ñ Ñ Ñ Ñ Ñ Ñ Ñ Ñ Ñ Ñ Ñ Ñ Ñ Ñ Ñ Ñ Ñ Ñ Ñ Ñ Ñ Ñ Ñ Ñ Ñ Ñ Ï Ñ Ñ Ñ Ñ Ñ Ñ Ñ Ñ Ñ Ñ Ñ Ñ Ñ Ñ Ñ Ñ Ñ Ñ Ñ Ñ Ñ Ñ Ñ Ñ Ñ Ñ Ñ Ñ Ñ Ñ Ñ Ñ Ñ Ñ Ñ Ñ Ñ Ñ Ñ Ñ Ñ Ñ Ñ Ñ Ñ Ñ Ñ Ñ Ñ Ü Ñ Ñ Ñ Ñ Ñ Ñ Ñ Ñ Ñ Ñ Ñ Ñ Ñ Ñ Ñ Ñ Ñ Ñ Ñ Ñ Ñ Ñ Ñ Ñ Ñ Ñ Ñ Ñ Ñ Ñ Ñ Ñ Ñ Ñ Ñ Ñ Ñ Ñ Ñ Ñ Ñ Ñ Ñ Ñ Ñ Ñ Ñ Ñ Ñ í Ñ Ñ Ñ Ñ Ñ Ñ Ñ Ñ Ñ Ñ Ñ Ñ Ñ Ñ Ñ Ñ Ñ Ñ Ñ Ñ Ñ Ñ Ñ Ñ Ñ Ñ Ñ Ñ Ñ Ñ Ñ Ñ Ñ Ñ Ñ Ñ Ñ Ñ Ñ Ñ Ñ Ñ Ñ Ñ Ñ Ñ Ñ Ñ Ñ Ì Ñ Ñ Ñ Ñ Ñ Ñ Ñ Ñ Ñ Ñ Ñ Ñ Ñ Ñ Ñ Ñ Ñ Ñ Ñ Ñ Ñ Ñ Ñ Ñ Ñ Ñ Ñ Ñ Ñ Ñ Ñ Ñ Ñ Ñ Ñ Ñ Ñ Ñ Ñ Ñ Ñ Ñ Ñ Ñ Ñ Ñ Ñ Ñ Ñ à Ñ Ñ Ñ Ñ Ñ Ñ Ñ Ñ Ñ Ñ Ñ Ñ Ñ Ñ Ñ Ñ Ñ Ñ Ñ Ñ Ñ Ñ Ñ Ñ Ñ Ñ Ñ Ñ Ñ Ñ Ñ Ñ Ñ Ñ Ñ Ñ Ñ Ñ Ñ Ñ Ñ Ñ Ñ Ñ Ñ Ñ Ñ Ñ Ñ ä Ñ Ñ Ñ Ñ Ñ Ñ Ñ Ñ Ñ Ñ Ñ Ñ Ñ Ñ Ñ Ñ Ñ Ñ Ñ Ñ Ñ Ñ Ñ Ñ Ñ Ñ Ñ Ñ Ñ Ñ Ñ Ñ Ñ Ñ Ñ Ñ Ñ Ñ Ñ Ñ Ñ Ñ Ñ Ñ Ñ Ñ Ñ Ñ Ñ ç Ñ Ñ Ñ Ñ Ñ Ñ Ñ Ñ Ñ Ñ Ñ Ñ Ñ Ñ Ñ Ñ Ñ Ñ Ñ Ñ Ñ Ñ Ñ Ñ Ñ Ñ Ñ Ñ Ñ Ñ Ñ Ñ Ñ Ñ Ñ Ñ Ñ Ñ Ñ Ñ Ñ Ñ Ñ Ñ Ñ Ñ Ñ Ñ Ñ Ø Ñ Ñ Ñ Ñ Ñ Ñ Ñ Ñ Ñ Ñ Ñ Ñ Ñ Ñ Ñ Ñ Ñ Ñ Ñ Ñ Ñ Ñ Ñ Ñ Ñ Ñ Ñ Ñ Ñ Ñ Ñ Ñ Ñ Ñ Ñ Ñ Ñ Ñ Ñ Ñ Ñ Ñ Ñ Ñ Ñ Ñ Ñ Ñ Ñ ë Ñ Ñ Ñ Ñ Ñ Ñ Ñ Ñ Ñ Ñ Ñ Ñ Ñ Ñ Ñ Ñ Ñ Ñ Ñ Ñ Ñ Ñ Ñ Ñ Ñ Ñ Ñ Ñ Ñ Ñ Ñ Ñ Ñ Ñ Ñ Ñ Ñ Ñ Ñ Ñ Ñ Ñ Ñ Ñ Ñ Ñ Ñ Ñ Ñ è Ñ Ñ Ñ Ñ Ñ Ñ Ñ Ñ Ñ Ñ Ñ Ñ Ñ Ñ Ñ Ñ Ñ Ñ Ñ Ñ Ñ Ñ Ñ Ñ Ñ Ñ Ñ Ñ Ñ Ñ Ñ Ñ Ñ Ñ Ñ Ñ Ñ Ñ Ñ Ñ Ñ Ñ Ñ Ñ Ñ Ñ Ñ Ñ Ñ æ Ñ Ñ Ñ Ñ Ñ Ñ Ñ Ñ Ñ Ñ Ñ Ñ Ñ Ñ Ñ Ñ Ñ Ñ Ñ Ñ Ñ Ñ Ñ Ñ Ñ Ñ Ñ Ñ Ñ Ñ Ñ Ñ Ñ Ñ Ñ Ñ Ñ Ñ Ñ Ñ Ñ Ñ Ñ Ñ Ñ Ñ Ñ Ñ Ñ × Ñ Ñ Ñ Ñ Ñ Ñ Ñ Ñ Ñ Ñ Ñ Ñ Ñ Ñ Ñ Ñ Ñ Ñ Ñ Ñ Ñ Ñ Ñ Ñ Ñ Ñ Ñ Ñ Ñ Ñ Ñ Ñ Ñ Ñ Ñ Ñ Ñ Ñ Ñ Ñ Ñ Ñ Ñ Ñ Ñ Ñ Ñ Ñ Ñ Ê Ñ Ñ Ñ Ñ Ñ Ñ Ñ Ñ Ñ Ñ Ñ Ñ Ñ Ñ Ñ Ñ Ñ Ñ Ñ Ñ Ñ Ñ Ñ Ñ Ñ Ñ Ñ Ñ Ñ Ñ Ñ Ñ Ñ Ñ Ñ Ñ Ñ Ñ Ñ Ñ Ñ Ñ Ñ Ñ Ñ Ñ Ñ Ñ Ñ Î Ñ Ñ Ñ Ñ Ñ Ñ Ñ Ñ Ñ Ñ Ñ Ñ Ñ Ñ Ñ Ñ Ñ Ñ Ñ Ñ Ñ Ñ Ñ Ñ Ñ Ñ Ñ Ñ Ñ Ñ Ñ Ñ Ñ Ñ Ñ Ñ Ñ Ñ Ñ Ñ Ñ Ñ Ñ Ñ Ñ Ñ Ñ Ñ Ñ Ù Ñ Ñ Ñ Ñ Ñ Ñ Ñ Ñ Ñ Ñ Ñ Ñ Ñ Ñ Ñ Ñ Ñ Ñ Ñ Ñ Ñ Ñ Ñ Ñ Ñ Ñ Ñ Ñ Ñ Ñ Ñ Ñ Ñ Ñ Ñ Ñ Ñ Ñ Ñ Ñ Ñ Ñ Ñ Ñ Ñ Ñ Ñ Ñ Ñ ê Ñ Ñ Ñ Ñ Ñ Ñ Ñ Ñ Ñ Ñ Ñ Ñ Ñ Ñ Ñ Ñ Ñ Ñ Ñ Ñ Ñ Ñ Ñ Ñ Ñ Ñ Ñ Ñ Ñ Ñ Ñ Ñ Ñ Ñ Ñ Ñ Ñ Ñ Ñ Ñ Ñ Ñ Ñ Ñ Ñ Ñ Ñ Ñ Ñ Õ Ñ Ñ Ñ Ñ Ñ Ñ Ñ Ñ Ñ Ñ Ñ Ñ Ñ Ñ Ñ Ñ Ñ Ñ Ñ Ñ Ñ Ñ Ñ Ñ Ñ Ñ Ñ Ñ Ñ Ñ Ñ Ñ Ñ Ñ Ñ Ñ Ñ Ñ Ñ Ñ Ñ Ñ Ñ Ñ Ñ Ñ Ñ Ñ Ñ Æ Ñ Ñ Ñ Ñ Ñ Ñ Ñ Ñ Ñ Ñ Ñ Ñ Ñ Ñ Ñ Ñ Ñ Ñ Ñ Ñ Ñ Ñ Ñ Ñ Ñ Ñ Ñ Ñ Ñ Ñ Ñ Ñ Ñ Ñ Ñ Ñ Ñ Ñ Ñ Ñ Ñ Ñ Ñ Ñ Ñ Ñ Ñ Ñ Ñ Ä Ñ Ñ Ñ Ñ Ñ Ñ Ñ Ñ Ñ Ñ Ñ Ñ Ñ Ñ Ñ Ñ Ñ Ñ Ñ Ñ Ñ Ñ Ñ Ñ Ñ Ñ Ñ Ñ Ñ Ñ Ñ Ñ Ñ Ñ Ñ Ñ Ñ Ñ Ñ Ñ Ñ Ñ Ñ Ñ Ñ Ñ Ñ Ñ Ñ ì Ñ Ñ Ñ Ñ Ñ Ñ Ñ Ñ Ñ Ñ Ñ Ñ Ñ Ñ Ñ Ñ Ñ Ñ Ñ Ñ Ñ Ñ Ñ Ñ Ñ Ñ Ñ Ñ Ñ Ñ Ñ Ñ Ñ Ñ Ñ Ñ Ñ Ñ Ñ Ñ Ñ Ñ Ñ Ñ Ñ Ñ Ñ Ñ Ñ á Ñ Ñ Ñ Ñ Ñ Ñ Ñ Ñ Ñ Ñ Ñ Ñ Ñ Ñ Ñ Ñ Ñ Ñ Ñ Ñ Ñ Ñ Ñ Ñ Ñ Ñ Ñ Ñ Ñ Ñ Ñ Ñ Ñ Ñ Ñ Ñ Ñ Ñ Ñ Ñ Ñ Ñ Ñ Ñ Ñ Ñ Ñ Ñ Ñ ã Ñ Ñ Ñ Ñ Ñ Ñ Ñ Ñ Ñ Ñ Ñ Ñ Ñ Ñ Ñ Ñ Ñ Ñ Ñ Ñ Ñ Ñ Ñ Ñ Ñ Ñ Ñ Ñ Ñ Ñ Ñ Ñ Ñ Ñ Ñ Ñ Ñ Ñ Ñ Ñ Ñ Ñ Ñ Ñ Ñ Ñ Ñ Ñ Ñ â Ñ Ñ Ñ Ñ Ñ Ñ Ñ Ñ Ñ Ñ Ñ Ñ Ñ Ñ Ñ Ñ Ñ Ñ Ñ Ñ Ñ Ñ Ñ Ñ Ñ Ñ Ñ Ñ Ñ Ñ Ñ Ñ Ñ Ñ Ñ Ñ Ñ Ñ Ñ Ñ Ñ Ñ Ñ Ñ Ñ Ñ Ñ Ñ Ñ Ô Ñ Ñ Ñ Ñ Ñ Ñ Ñ Ñ Ñ Ñ Ñ Ñ Ñ Ñ Ñ Ñ Ñ Ñ Ñ Ñ Ñ Ñ Ñ Ñ Ñ Ñ Ñ Ñ Ñ Ñ Ñ Ñ Ñ Ñ Ñ Ñ Ñ Ñ Ñ Ñ Ñ Ñ Ñ Ñ Ñ Ñ Ñ Ñ Ñ ß Ÿ Ÿ Ÿ Ÿ Ÿ Ÿ Ÿ Ÿ Ÿ Ÿ Ÿ Ÿ Ÿ Ÿ Ÿ Ÿ Ÿ Ÿ Ÿ Ÿ Ÿ Ÿ Ÿ Ÿ Ÿ Ÿ Ÿ Ÿ Ÿ Ÿ Ÿ Ÿ Ÿ Ÿ Ÿ Ÿ Ÿ Ÿ Ÿ Ÿ Ÿ Ÿ Ÿ Ÿ Ÿ Ÿ Ÿ Ÿ Ÿ Ÿ ũ Ÿ Ÿ Ÿ Ÿ Ÿ Ÿ Ÿ Ÿ Ÿ Ÿ Ÿ Ÿ Ÿ Ÿ Ÿ Ÿ Ÿ Ÿ Ÿ Ÿ Ÿ Ÿ Ÿ Ÿ Ÿ Ÿ Ÿ Ÿ Ÿ Ÿ Ÿ Ÿ Ÿ Ÿ Ÿ Ÿ Ÿ Ÿ Ÿ Ÿ Ÿ Ÿ Ÿ Ÿ Ÿ Ÿ Ÿ Ÿ Ÿ Ũ Ÿ Ÿ Ÿ Ÿ Ÿ Ÿ Ÿ Ÿ Ÿ Ÿ Ÿ Ÿ Ÿ Ÿ Ÿ Ÿ Ÿ Ÿ Ÿ Ÿ Ÿ Ÿ Ÿ Ÿ Ÿ Ÿ Ÿ Ÿ Ÿ Ÿ Ÿ Ÿ Ÿ Ÿ Ÿ Ÿ Ÿ Ÿ Ÿ Ÿ Ÿ Ÿ Ÿ Ÿ Ÿ Ÿ Ÿ Ÿ Ÿ Ū Ÿ Ÿ Ÿ Ÿ Ÿ Ÿ Ÿ Ÿ Ÿ Ÿ Ÿ Ÿ Ÿ Ÿ Ÿ Ÿ Ÿ Ÿ Ÿ Ÿ Ÿ Ÿ Ÿ Ÿ Ÿ Ÿ Ÿ Ÿ Ÿ Ÿ Ÿ Ÿ Ÿ Ÿ Ÿ Ÿ Ÿ Ÿ Ÿ Ÿ Ÿ Ÿ Ÿ Ÿ Ÿ Ÿ Ÿ Ÿ Ÿ ŧ Ÿ Ÿ Ÿ Ÿ Ÿ Ÿ Ÿ Ÿ Ÿ Ÿ Ÿ Ÿ Ÿ Ÿ Ÿ Ÿ Ÿ Ÿ Ÿ Ÿ Ÿ Ÿ Ÿ Ÿ Ÿ Ÿ Ÿ Ÿ Ÿ Ÿ Ÿ Ÿ Ÿ Ÿ Ÿ Ÿ Ÿ Ÿ Ÿ Ÿ Ÿ Ÿ Ÿ Ÿ Ÿ Ÿ Ÿ Ÿ Ÿ Ŧ Ÿ Ÿ Ÿ Ÿ Ÿ Ÿ Ÿ Ÿ Ÿ Ÿ Ÿ Ÿ Ÿ Ÿ Ÿ Ÿ Ÿ Ÿ Ÿ Ÿ Ÿ Ÿ Ÿ Ÿ Ÿ Ÿ Ÿ Ÿ Ÿ Ÿ Ÿ Ÿ Ÿ Ÿ Ÿ Ÿ Ÿ Ÿ Ÿ Ÿ Ÿ Ÿ Ÿ Ÿ Ÿ Ÿ Ÿ Ÿ Ÿ Ű Ÿ Ÿ Ÿ Ÿ Ÿ Ÿ Ÿ Ÿ Ÿ Ÿ Ÿ Ÿ Ÿ Ÿ Ÿ Ÿ Ÿ Ÿ Ÿ Ÿ Ÿ Ÿ Ÿ Ÿ Ÿ Ÿ Ÿ Ÿ Ÿ Ÿ Ÿ Ÿ Ÿ Ÿ Ÿ Ÿ Ÿ Ÿ Ÿ Ÿ Ÿ Ÿ Ÿ Ÿ Ÿ Ÿ Ÿ Ÿ Ÿ ů Ÿ Ÿ Ÿ Ÿ Ÿ Ÿ Ÿ Ÿ Ÿ Ÿ Ÿ Ÿ Ÿ Ÿ Ÿ Ÿ Ÿ Ÿ Ÿ Ÿ Ÿ Ÿ Ÿ Ÿ Ÿ Ÿ Ÿ Ÿ Ÿ Ÿ Ÿ Ÿ Ÿ Ÿ Ÿ Ÿ Ÿ Ÿ Ÿ Ÿ Ÿ Ÿ Ÿ Ÿ Ÿ Ÿ Ÿ Ÿ Ÿ ŷ Ÿ Ÿ Ÿ Ÿ Ÿ Ÿ Ÿ Ÿ Ÿ Ÿ Ÿ Ÿ Ÿ Ÿ Ÿ Ÿ Ÿ Ÿ Ÿ Ÿ Ÿ Ÿ Ÿ Ÿ Ÿ Ÿ Ÿ Ÿ Ÿ Ÿ Ÿ Ÿ Ÿ Ÿ Ÿ Ÿ Ÿ Ÿ Ÿ Ÿ Ÿ Ÿ Ÿ Ÿ Ÿ Ÿ Ÿ Ÿ Ÿ Ņ Ÿ Ÿ Ÿ Ÿ Ÿ Ÿ Ÿ Ÿ Ÿ Ÿ Ÿ Ÿ Ÿ Ÿ Ÿ Ÿ Ÿ Ÿ Ÿ Ÿ Ÿ Ÿ Ÿ Ÿ Ÿ Ÿ Ÿ Ÿ Ÿ Ÿ Ÿ Ÿ Ÿ Ÿ Ÿ Ÿ Ÿ Ÿ Ÿ Ÿ Ÿ Ÿ Ÿ Ÿ Ÿ Ÿ Ÿ Ÿ Ÿ Ŝ Ÿ Ÿ Ÿ Ÿ Ÿ Ÿ Ÿ Ÿ Ÿ Ÿ Ÿ Ÿ Ÿ Ÿ Ÿ Ÿ Ÿ Ÿ Ÿ Ÿ Ÿ Ÿ Ÿ Ÿ Ÿ Ÿ Ÿ Ÿ Ÿ Ÿ Ÿ Ÿ Ÿ Ÿ Ÿ Ÿ Ÿ Ÿ Ÿ Ÿ Ÿ Ÿ Ÿ Ÿ Ÿ Ÿ Ÿ Ÿ Ÿ ż Ÿ Ÿ Ÿ Ÿ Ÿ Ÿ Ÿ Ÿ Ÿ Ÿ Ÿ Ÿ Ÿ Ÿ Ÿ Ÿ Ÿ Ÿ Ÿ Ÿ Ÿ Ÿ Ÿ Ÿ Ÿ Ÿ Ÿ Ÿ Ÿ Ÿ Ÿ Ÿ Ÿ Ÿ Ÿ Ÿ Ÿ Ÿ Ÿ Ÿ Ÿ Ÿ Ÿ Ÿ Ÿ Ÿ Ÿ Ÿ Ÿ Ų Ÿ Ÿ Ÿ Ÿ Ÿ Ÿ Ÿ Ÿ Ÿ Ÿ Ÿ Ÿ Ÿ Ÿ Ÿ Ÿ Ÿ Ÿ Ÿ Ÿ Ÿ Ÿ Ÿ Ÿ Ÿ Ÿ Ÿ Ÿ Ÿ Ÿ Ÿ Ÿ Ÿ Ÿ Ÿ Ÿ Ÿ Ÿ Ÿ Ÿ Ÿ Ÿ Ÿ Ÿ Ÿ Ÿ Ÿ Ÿ Ÿ ŵ Ÿ Ÿ Ÿ Ÿ Ÿ Ÿ Ÿ Ÿ Ÿ Ÿ Ÿ Ÿ Ÿ Ÿ Ÿ Ÿ Ÿ Ÿ Ÿ Ÿ Ÿ Ÿ Ÿ Ÿ Ÿ Ÿ Ÿ Ÿ Ÿ Ÿ Ÿ Ÿ Ÿ Ÿ Ÿ Ÿ Ÿ Ÿ Ÿ Ÿ Ÿ Ÿ Ÿ Ÿ Ÿ Ÿ Ÿ Ÿ Ÿ Ť Ÿ Ÿ Ÿ Ÿ Ÿ Ÿ Ÿ Ÿ Ÿ Ÿ Ÿ Ÿ Ÿ Ÿ Ÿ Ÿ Ÿ Ÿ Ÿ Ÿ Ÿ Ÿ Ÿ Ÿ Ÿ Ÿ Ÿ Ÿ Ÿ Ÿ Ÿ Ÿ Ÿ Ÿ Ÿ Ÿ Ÿ Ÿ Ÿ Ÿ Ÿ Ÿ Ÿ Ÿ Ÿ Ÿ Ÿ ũ Ÿ ũ Ÿ ũ Ÿ ũ Ÿ ũ Ÿ ũ Ÿ ũ Ÿ ũ Ÿ ũ Ÿ ũ Ÿ ũ Ÿ ũ Ÿ ũ Ÿ ũ Ÿ ũ Ÿ ũ Ÿ ũ Ÿ ũ Ÿ ũ Ÿ ũ Ÿ ũ Ÿ ũ Ÿ ũ Ÿ ũ Ÿ ũ Ÿ Ū Ÿ ũ Ÿ ũ Ÿ ũ Ÿ ũ Ÿ ũ Ÿ ũ Ÿ ũ Ÿ ũ Ÿ ũ Ÿ ũ Ÿ ũ Ÿ ũ Ÿ ũ Ÿ ũ Ÿ ũ Ÿ ũ Ÿ ũ Ÿ ũ Ÿ ũ Ÿ ũ Ÿ ũ Ÿ ũ Ÿ ũ Ÿ ũ Ÿ Ũ Ÿ ũ Ÿ ũ Ÿ ũ Ÿ ũ Ÿ ũ Ÿ ũ Ÿ ũ Ÿ ũ Ÿ ũ Ÿ ũ Ÿ ũ Ÿ ũ Ÿ ũ Ÿ ũ Ÿ ũ Ÿ ũ Ÿ ũ Ÿ ũ Ÿ ũ Ÿ ũ Ÿ ũ Ÿ ũ Ÿ ũ Ÿ ũ Ÿ |
Setting Character Attributes
Setting Character Attributes by Label
Using the key, you can select a font and apply size, width, style, line, and alignment attributes.| 1 | Press the key.The current settings are displayed. | 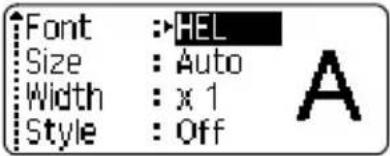 |
| 2 | Select an attribute using the or keys, and then set a value for that attribute using the or keys. | 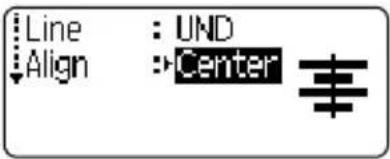 |
| 3 | Press the or key to apply the settings.New settings are NOT applied if you do not press the or key. | 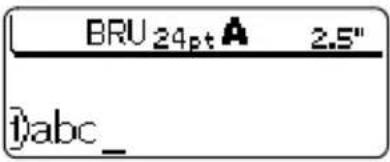 |
Setting Character Attributes by Each Line
When a label consists two or more lines of text, you can set different value of character attributes (font, size, width, style, line and alignment) for each line. Move the cursor to the line you wish to change the character attribute by using the ▲ or keys. Next, press the key while holding down key to display the attributes. ( On the screen indicates that you are now applying the attribute for that specific line only.) text_image
Font :→HEL Size : Auto Width : x 1 Style : Offtext_image
Font :* * * * * Size : 36pt Width : x 1 Style : Off| Attribute Value Result | ||
| Font | HEL (Helsinki) | ABCabc |
| BRU (Brussels) | ABCabc | |
| US (USA) | ABCabc | |
| FLO (Florida) | ABCabc | |
| BEL (Belgium) | ABCabc | |
| SGO (San Diego) | ABCabc | |
| LA (Los Angeles) | ABCabc | |
| CAL (Calgary) | ABCabc | |
| Size | Auto | When Auto is selected, the text is automatically adjusted to print in the largest size available for each tape width. |
| 48pt | ABCabc | |
| 42pt | ABCabc | |
| 36pt | ABCabc | |
| 24pt | ABCabc | |
| 18pt | ABCabc | |
| 12pt | ABCabc | |
| 9pt | ABCabc | |
| 6pt | ABCabc | |
| Width | x2 | ABCabc |
| x3/2 | ABCabc | |
| x1 | ABCabc | |
| x2/3 | ABCabc | |
| x1/2 | ABCabc | |
| Style | Off | ABCabc |
| BLD (Bold) | ABCabc | |
| OUT (Outline) | ABCabc | |
| SHD (Shadow) | ABCabc | |
| SLD (Solid) | ABCabc | |
| ITL (Italic) | ABCabc | |
| I+BLD (Italic Bold) | ABCabc | |
| I+OUT (Italic Outline) | ABCabc | |
| I+SHD (Italic Shadow) | ABCabc | |
| I+SLD (Italic Solid) | ABCabc | |
| VRT (Vertical) | A m o s o o | |
| Line | Off | ABCabc |
| UND (Underline) | ABCabc | |
| STR (Strikeout) | ABCabc | |
| Align(Alignment) | Left | ABCabc |
| Center | ABCabc | |
| Right | ABCabc | |
| Just(Justify) | A B C a b c | |
Setting Auto Fit Style
When "Size" is set to "Auto" and "Length" is set to a specific length, you can select the way of reducing the text size to fit within the label length. When "Text Size" is selected, the total text size is modified to fit within the label. When "Text Width" is selected, the text width will be reduced to the size of x1/2 setting. (If further size reduction is required to fit the text into the selected label length, the total text size will be modified after reducing the text width to x1/2 setting.) 1 Press the key to display the Setup menu, Select "Auto Fit Style" using the or keys, and then press the or key. The Auto Fit Style screen is displayed. text_image
Auto Fit Style Manual Cutting Language Unittext_image
〈Auto Fit Style〉 Text Size Text WidthSetting Label Attributes
Using the key, you can create a label with a frame around the text and specify the label length and tab length. (Cut Options and Length Adjust setting which may be needed when printing a label can also be set by using the key. Refer to "Tape Cutting Options" and "Adjusting the Label Length" on page 62 and 64.) 1 Press the key. The current settings are displayed. text_image
Frame : Off Length : Auto Cut : Large Option Margintext_image
Tab : 2.0" Length Adjust :+2 Lengthtext_image
HEL 1.3" abc_| Attribute Value Result | ||
| Frame | Off | ABCabc |
| 1 | ABCabc | |
| 2 | ABCabc | |
| 3 | ABCabc | |
| 4 | ABCabc | |
| 5 | ||
| 6 | ||
| 7 | ||
| 8 | ||
| 9 | ||
| 10 | ||
| 11 | ||
| 12 | ||
| 13 | ||
| 14 | ||
| 15 | ||
| Frame | 16 | ABCabc |
| 17 | ABCabc | |
| 18 | ABCabc | |
| 19 | ABCabc | |
| 20 | ABCabc | |
| Length | The length of the label can be set within the range 1.2" (30mm) - 12.0" (300mm). When Auto is selected, the length of the label is automatically adjusted based on the amount of text entered. | |
| Tab Length | The length of the tab can be set within the range 0.0" (0mm) - 4.0"(100mm). The default setting is 2.0" (50mm). | |
Using Auto-Format Layouts
Using the Auto-Format function you can quickly and easily create labels for a variety of purposes, such as file tabs, equipment labels, name badges, etc. Simply select a layout from the templates or block layouts, enter the text and apply formatting as desired.  Symbols and accented characters can also be used in auto-format layouts.Using Templates - Example creating an Asset Tag
1 Press the key to display the Auto-Format screen, and then select "Templates" using the or keys. text_image
Templates Block Layoutstext_image
Binder Spine 1 1"×8.6"| 3 | Select a template using the ▲ or keys. | 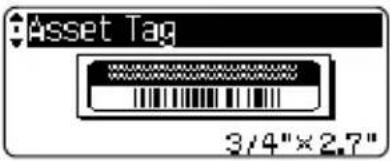 |
| 4 | Press the 📊 or 📞 key.The Style screen is displayed. | 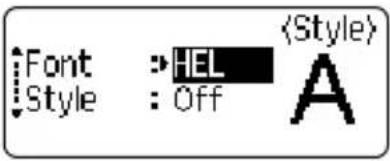 |
| 5 | Select an attribute using the ▲ or keys, and then set a value for that attribute using the ◄ or keys. | 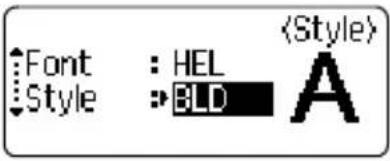 |
| 6 | Press the 🔒 or 🔔 key .The Bar Code Setup screen is displayed. | 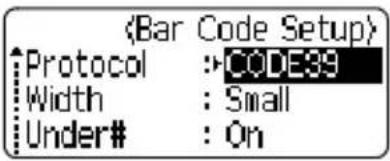 |
| 7 | Select an attribute using the ▲ or keys, and then set a value for that attribute using the ◄ or keys.The "C-Digit" (Check Digit) attribute is only available for the CODE39, I-2/5 and CODABAR protocols. | 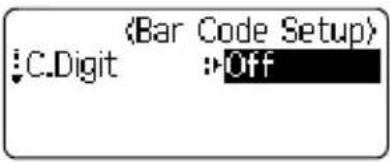 |
| 8 | Press the 📊 or 📞 key.The template text entry screen is displayed.Caps mode can be used when entering text. | 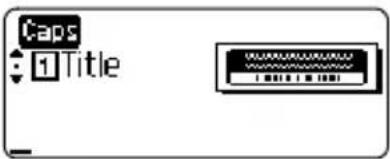 |
| 9 | Enter the text and then press the 🔒 or 🔔 key .Repeat this for each text field.After all text fields are entered, the print menu is displayed when the 📊 or 🔔 key is pressed. | 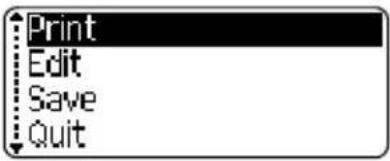 |
| 10 | Select "Print" using the ▲ or keys and then press the 🔒 or key to print the label.Select "Edit" to change the text data or style settings.Select "Save" to store the label in a file memory.Select "Quit" to exit the Auto-Format function. |
| Attribute Value Details | ||
| Template Name | Binder Spine 1 | PRESENTATION MATERIAL(1" x 8.6" [24 mm x 219 mm]) |
| Binder Spine 2 | PRESENTATION MATERIAL(3/4" x 8.6" [18mm x 219mm]) | |
| File Folder Tab | PAYABLES(1/2" x 3.2" [12 mm x 82 mm]) | |
| Divider Tab(Hanging Folder) | AUGUST(1/2" x 1.6" [12 mm x 42 mm]) | |
| Asset Tag | Property of:ABC Company, Inc.*00001*(3/4" x 2.7" [18 mm x 70 mm]) | |
| Bin Box | Lock Washer1/4-20 NF Thread Size012502 05400 9(3/4" x 3.0" [18 mm x 76 mm]) | |
| Equipment Label | ABC Company, Inc.Control SalesEquipment No. 123456789(1" x 2.2" [24 mm x 58 mm]) | |
| Faceplate (VRT) | (1/2" x 2.7" [12 mm x 70 mm]) | |
| Cable Wrap 1 | (1" x 1.5" [24 mm x 39 mm]) | |
| Cable Wrap 2 | (3/4" x 1.5" [18 mm x 39 mm]) | |
| Template Name | Name Badge 1 | 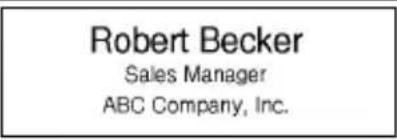 (1" x 2.8" [24 mm x 72 mm]) (1" x 2.8" [24 mm x 72 mm]) |
| Name Badge 2 | 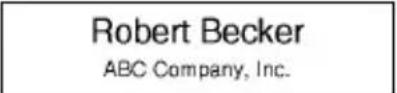 (3/4" x 2.8" [18 mm x 72 mm]) (3/4" x 2.8" [18 mm x 72 mm]) | |
| Name Badge 3 |  (1/2" x 2.8" [12 mm x 72 mm]) (1/2" x 2.8" [12 mm x 72 mm]) | |
| CD Case Spine 1 |  (1/4" x 4.4" [6 mm x 113 mm]) (1/4" x 4.4" [6 mm x 113 mm]) | |
| CD Case Spine 2 |  (9/64" x 4.4" [3.5 mm x 113 mm]) (9/64" x 4.4" [3.5 mm x 113 mm]) | |
| VHS Spine |  (3/4" x 5.5" [18 mm x 140 mm]) (3/4" x 5.5" [18 mm x 140 mm]) | |
| MiniDV Spine |  (3/8" x 1.7" [9 mm x 42 mm]) (3/8" x 1.7" [9 mm x 42 mm]) | |