DDB 3660 IN - Basket BAUKNECHT - Free user manual and instructions
Find the device manual for free DDB 3660 IN BAUKNECHT in PDF.

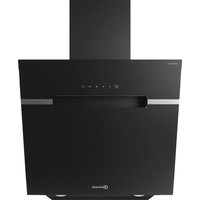
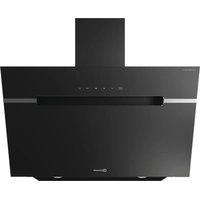
| Product type | Decorative hood |
| Brand | Bauknecht |
| Model | DDB 3660 IN |
| Minimum installation distance (electric cooker) | 50 cm |
| Minimum installation distance (gas or mixed cooker) | 65 cm |
| Operation type | Extraction or recirculation |
| Control | Control panel with lighting switch, on/off, power selection (min, intermediate, max) |
| Lighting | Halogen bulbs 20 W max, type G4 |
| Grease filter | Metallic, dishwasher safe (short cycle, low temperature), monthly cleaning |
| Charcoal filter (optional) | For recirculation version, dishwasher safe, replace every 3 years |
| General maintenance | Clean with a soft cloth and neutral detergent, do not use abrasive substances or alcohol |
| Electrical safety | Earthing mandatory (except class II), disconnect before maintenance, do not use extension cord |
| Installation | Reserved for qualified technician, requires at least two people (heavy appliance) |
| Supplied accessories | Hood assembled, duct support bracket, mounting template, filters, user manual, Torx adapters, wall plugs and screws |
| Exhaust duct | Metallic recommended, not supplied in some cases |
| Weight | Not specified |
Frequently Asked Questions - DDB 3660 IN BAUKNECHT
User questions about DDB 3660 IN BAUKNECHT
0 question about this device. Answer the ones you know or ask your own.
Ask a new question about this device
Download the instructions for your Basket in PDF format for free! Find your manual DDB 3660 IN - BAUKNECHT and take your electronic device back in hand. On this page are published all the documents necessary for the use of your device. DDB 3660 IN by BAUKNECHT.
USER MANUAL DDB 3660 IN BAUKNECHT
The minimum distance between the pan supports on the cooking appliance and the lowest part of the cooker hood must not be less than 50~cm for electric cookers or 65~cm for gas or combination cookers. If the installation instructions for a gas cooker specify a greater distance, then this distance must be observed.
Contact a qualified technician for installation. To install, follow steps ( 2 3 )
WARNING: Disconnect the power at the house main switch before electrically connecting the hood.
WARNING: Check whether the exhaust pipe and clamps are provided. If not, they must be purchased separately.
Note: Parts marked with the symbol “(*)” are optional accessories supplied only with some models or parts not supplied, to be purchased separately.
WARNING: Very heavy product; hood handling and installation must be carried out by at least two persons.
F INSTALLATION - INSTRUCTIONS DE MONTAGE
Remove all the components from the packets. Check that all the components are included.
- Hood assembled with motor and lamps installed.
- Flue support bracket
Assembly template - F i l t e r / s
- Instruction manual
- I -adapter Torx T10
- I -adapter Torx T20
- 2 - w a s h e r s
- 6 - plugs 8 × 40 ~mm
- 6 - screws 5 × 45 ~mm
- 2 - screws 2.9 × 6.5 mm
- 2 - s c r e w s 3 x 9 m m
SAFEGUARDING THE ENVIRONMENT
I. Packing
Packing materials are 100% recyclable and are marked with the recycling symbol Comply with the local regulations for disposal. The packing materials (plastic bags, polystyrene, etc.) are a potential source of danger and must be kept out of the reach of children.
2. Product
This appliance is marked in compliance with European Directive 2002/96/EC, Waste Electrical and Electronic Equipment (WEEE). By ensuring that this appliance is correctly scrapped, the user can help prevent potentially harmful consequences for the environment and the health of people.
The symbol on the product or the accompanying documentation indicates that this product should not be treated as domestic waste but must be taken to a suitable collection centre for the recycling of electrical and electronic equipment. Disposal must be carried out in compliance with local regulations on waste disposal. For further information on the treatment, recovery and recycling of this product, contact the competent local office, the household waste collection service or the shop where you purchased the appliance.
IMPORTANT INSTRUCTIONS FOR SAFETY
WARNING: To reduce the risk of accidents, electric shock, injury or damage, when using the hood comply with the basic precautions, including the following.
I. Always disconnect the hood from the power supply before carrying out any installation or maintenance operation on the appliance.
2. Installation must be carried out by a specialised technician, in compliance with the manufacturer's instructions and local safety regulations.
3. Earthing of the appliance is compulsory. (Not possible for Class II hoods).
4. Never use multisockets and extension leads.
5. The electrical components must no longer be accessible to the user after installation.
6. Do not touch the hood with wet parts of the body or use it when barefoot.
7. Do not pull the appliance power cable to unplug it.
8. After-sales service - do not repair or replace any part of the hood unless specifically indicated in the manual. All other maintenance services must be carried out by a specialised technician.
9. When drilling the wall, make sure not to damage the electrical connections and/or pipes.
10. The ventilation ducts must always discharge to the outside.
11. The Manufacturer declines any liability for improper use or incorrect setting of the controls.
- The appliance is not intended for use by children or persons with limited physical, sensory or mental abilities or without experience and knowledge of it, unless they are under the supervision of or instructed in its use by a person responsible for their safety.
- Keep children away.
- To reduce the risk of fire, only use a metal inlet duct.
- Children must be supervised so that they do not play with the appliance.
- The product must be disposed of in compliance with local regulations on waste disposal.
- For further information on the treatment, recovery and recycling of this product, contact the competent local office, the household waste collection service or the shop where you purchased the appliance.
- Regular cleaning and maintenance is essential for correct hood operation and good performance. Frequently clean all encrustations from dirty surfaces to prevent the accumulation of grease. Regularly clean or replace filters.
- Do not "flambe" food under the hood. Naked flames could cause a fire.
- The room must have adequate ventilation when the hood is used at the same time as appliances operating on gas or other fuels.
- The discharge air must not be eliminated in a duct used to remove fumes produced by appliances operating on gas or other fuels, but must have a separate outlet. All the national regulations on air discharge envisaged by art. 7.12.1 of CEI EN 60335-2-31 must be observed.
- If the hood is used together with other appliances operating on gas or other fuels, the negative pressure in the room must not exceed 4Pa (4× 10^-5 bar). Therefore, make sure the room is adequately ventilated.
- Do not leave pans unattended when frying, since the cooking oil could catch fire.
- Make sure the lamps are cold before touching them.
- The hood is not a shelf, therefore do not overload or place objects on it.
- Do not use or leave the hood without its lamps correctly installed - risk of electric shock.
- Wear work gloves for all installation and maintenance operations.
- The product is not suitable for outdoor use.
- The air sucked by the hood must not be eliminated through the same flue of the heating system or other appliances using gas or other fuels.
Electrical connection
The mains voltage must match that given on the rating plate located inside the hood. If provided with a plug, connect the hood to a socket complying with the current regulations and located in an accessible area. If it does not have a plug (direct connection to the power supply) or if the plug is not in an accessible place, fit a suitable double-pole switch that ensures complete disconnection from the power supply in category III overvoltage conditions, complying with the installation rules.
WARNING: Before reconnecting the hood circuit to the power supply and checking correct operation, always make sure the power cable is correctly fitted and that it was NOT crushed in its housing during installation. Make sure to have this operation carried out by a specialised technician.
Cleaning the hood
WARNING! Failure to remove oil/grease (at least once a month) could result in fire.
Use a soft cloth with a neutral detergent. Never use abrasive substances or alcohol.
Before using the hood
Please read these instructions carefully and keep them for future reference, in order to ensure best use of your hood.
The packing materials (plastic bags, polystyrene, etc.) are a potential source of danger and must be kept out of the reach of children.
Make sure the hood has not been damaged during transport.
Declaration of conformity
This product has been designed, manufactured and put on the market in conformity with:
- safety objectives of the "Low Voltage" Directive 2006/95/EC (which replaces 73/23/EEC as amended)
- protection requirements of "EMC" Directive 89/336/EEC amended by Directive 93/68/EEC.
Troubleshooting guide
If the hood does not work:
- Is the plug properly inserted in the power socket?
Is there a power failure?
If the hood is not extracting enough:
Is the right speed selected?
- Do the filters need cleaning or replacing?
- Are the air outlets blocked?
If the lamp does not work:
- Does the lamp need replacing?
Is the lamp correctly fitted?
AFTER-SALES SERVICE
Before calling the After-Sales Service
- Check to see if you can fix the problem yourself (see "Troubleshooting Guide").
- Switch the appliance off and then on again to check if the problem has been eliminated.
- If the problem persists, contact the After-Sales Service.
Specify:
the type of fault,
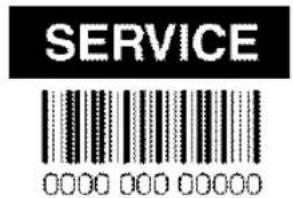
- the product model given on the dataplate inside the hood, visible on removing the grease filters,
- your full address,
- your telephone number and area code,
- the Service code (the number under the word SERVICE on the dataplate inside the hood, behind the grease filter).
If any repairs are necessary, contact an authorised Service Centre (to ensure the use of original spare parts and correct repair).
Failure to comply with these instructions can compromise the safety and quality of the product.
The hood is designed for use in "Extractor version" or in "Filter version".
Extractor Version
Fumes are extracted and expelled to the outside through an exhaust pipe (not supplied) fixed to the hood exhaust pipe connector (Fig.d, Fig.e).
Depending on the exhaust pipe purchased, provide for suitable fixing to the exhaust pipe connector.
Important: If already installed, remove the carbon filter/s.
Filter Version
Air is filtered through the carbon filter/s and recycled into the surrounding environment.
Important: check that air recirculation is facilitated (to this end, carefully follow the instructions given in the installation handbook)
Important! If the hood does not have a carbon filter/s, it/they must be ordered and fitted before use.
Preliminary information for installing the hood:
Expansion plugs are provided to secure the hood to most types of ceilings. However, a qualified technician is needed to make sure that the plugs are suitable for your ceiling. The wall/ceiling must be strong enough to take the weight of the hood. Remove the grease filters
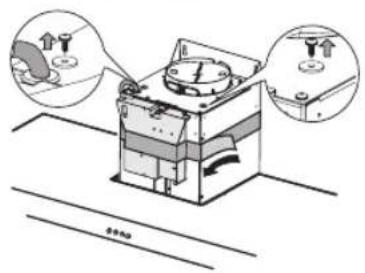
Pre-assembly of the electrical connection box:
(a.) remove the screws and washers on the extractor unit and remove the adhesive tape fixing the box to the extractor unit,
(b.) position the electrical connection box above the extractor unit, (c.) secure with 2 3.5× 9.5 screws and 2
14× 12 washers (previously removed).
- Using a pencil, draw the centre line on the wall up to the ceiling (Fig. 1).
- If necessary, cut the drilling template according to the width of the hood.
- Apply the drilling template to the wall: the vertical centre line printed on the drilling template must match the centre line drawn on the wall and, depending on the height of the hood, the lower horizontal edge of the drilling template must match the lower edge of the hood.
- Drill as shown on the template, insert the wall plugs and screw in the top 2 screws, leaving a space of approx. 1 cm between the screw head and the wall.
Note: Drill all the holes indicated on the template: the top 2 holes are for hanging the hood and the bottom holes are for fixing it securely to the wall.
-
Fit the flue support bracket "G" (Fig.1) to the wall and against the ceiling. Use the support bracket as drilling template (if present, the small slot on the support must match the line drawn on the wall) and mark 2 holes with the pencil, drill the holes and finally insert 2 plugs.
-
Fix the flue support bracket to the wall with 2 screws.
-
Remove the drilling template from the wall and hang the hood on the 2 top screws (Fig.1).
- Screw in the bottom screws (and washers!) to fix the hood securely in place (COMPULSORY!!). After checking the alignment of the hood, TIGHTEN ALL THE SCREWS - top and bottom.
Note: the bottom fixing points are visible upon removal of the grease filters.
- Connect an exhaust pipe to the exhaust pipe connector located above the extraction motor unit.
For extractor operation, connect the other end of the exhaust pipe to the home discharge device.
For filter operation, fix the deflector F to the flue support bracket G and connect the other end of the exhaust pipe to the deflector collar F (Fig.1).
- Make all necessary electrical connections.
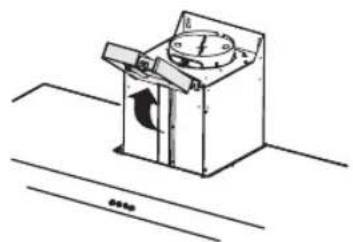
- Fit the flues over the extractor unit, engaging them in their seat above the hood.
- Slide the top section of the flue upwards and secure it with 2 screws (11a) to the flue support bracket "G" (11b).
Refit the grease filters and check for correct hood operation.
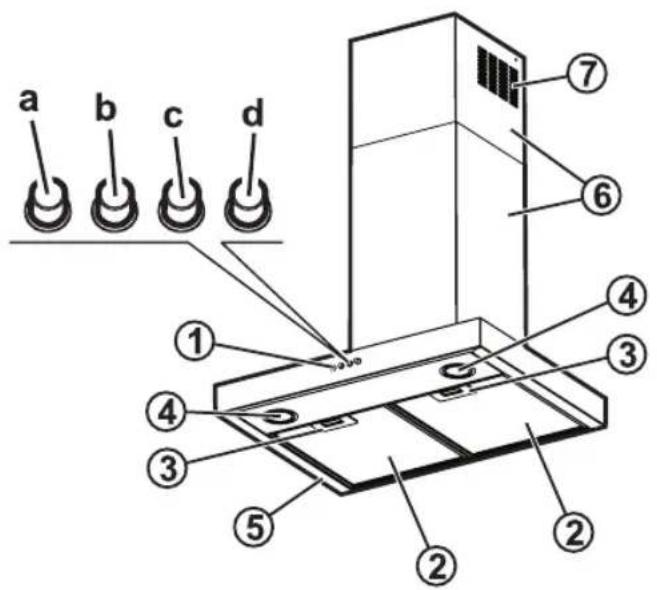
I. Control panel.
a. Light switch.
b. Extraction and minimum extraction speed ON/OFF switch.
c. Medium extraction speed switch.
d. Maximum extraction speed switch.
- Grease filter
- Grease filter release handle
- Halogen bulb
- Steam deflector
- Telescopic flue
- Air outlet (for filter version only)
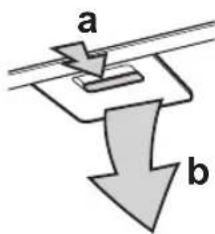
Grease filters:
Metal grease filters have an unlimited life and should be washed once a month either by hand or in a dishwasher at a low temperature and with a short cycle. Washing in a dishwasher can cause grease filters to turn white, but this in no way affects efficiency.
a. press the handle to remove the filter
b. remove it.
Wash the filter and leave it to dry, proceeding in reverse order to refit it.
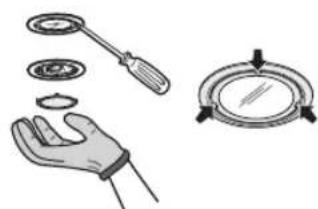
Halogen lamps:
- Disconnect the hood from the mains power supply.
WARNING: Wear gloves. - Use a small screwdriver to gently pris the lamp cover off (at the points indicated in Fig. 3).
- Remove the burnt-out lamp and fit a new one.
WARNING: Replace using 20W max G4 halogen bulbs only. - Close the lighting unit (snap-on).
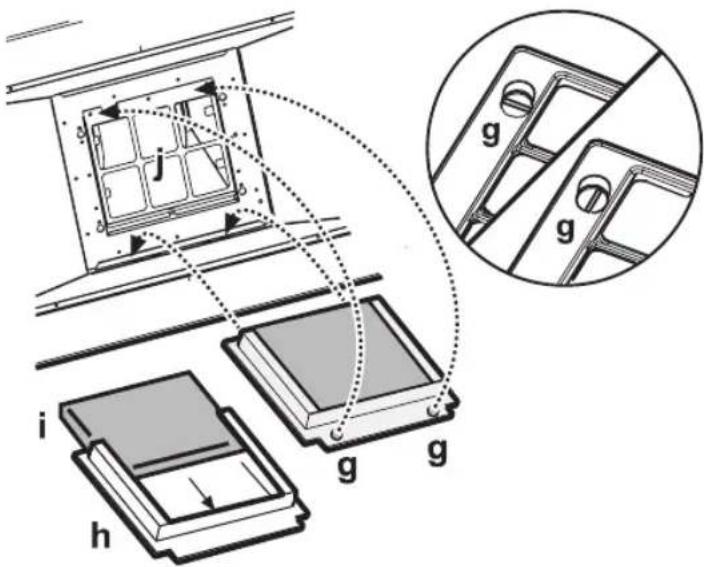
Active carbon filter
.filter hoods only):
The carbon filter must be cleaned once a month in a dishwasher at the highest temperature, using a normal dishwasher detergent. Wash the filters on their own.
After washing, reactivate the carbon filter by drying it in the oven at 100^ for 10 minutes.
Change the carbon filter every 3 years.
Fitting the carbon filter:
I. Remove the grease filter.
2. Remove the filter holder by turning the knobs 90^
3. Fit the carbon filter "i" in the filter holder "h".
Reverse the above procedure to re-fit the filter holder and grease filter.
a
b
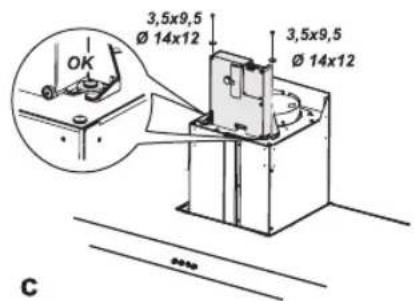
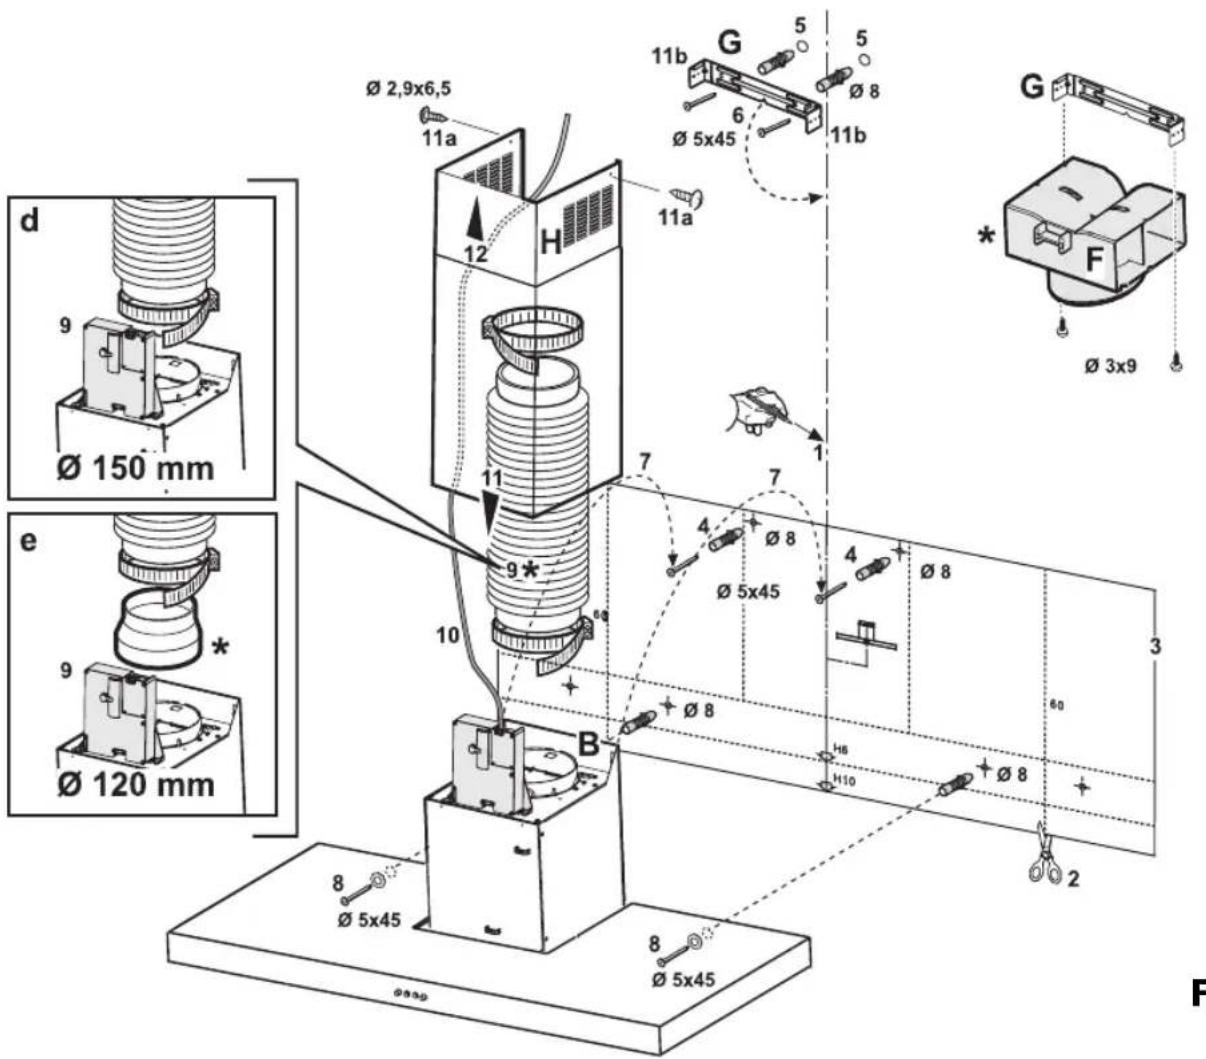
Fig.1