M1 - Robot vacuum and mop DREAME - Free user manual and instructions
Find the device manual for free M1 DREAME in PDF.
| Product type | Robot vacuum and mop |
| Model | RPM1GA |
| Brand | Dreame |
| Power supply | 14.4 V ---, 40 W |
| Charging station | RCM11 - Input 20.0 V --- 0.9 A, Output 20.0 V --- 0.9 A |
| Charger | SA182H-200090U / CZH024200090USWM - 100-240 V ~ 50/60 Hz, 0.4/0.8 A, output 20.0 V --- 0.9 A |
| Charging time | Approximately 4 hours |
| Connectivity | Wi-Fi 2.4 GHz, Dreamehome app |
| Cleaning modes | Silent, Standard, Powerful, Turbo |
| Main features | Quick mapping, targeted cleaning (1.5x1.5 m), scheduling, Do Not Disturb mode |
| Washing capacity | 2-in-1 water tank with dust compartment (integrated), reusable mop cloth |
| Brushes | Main brush, side brush (user-installed) |
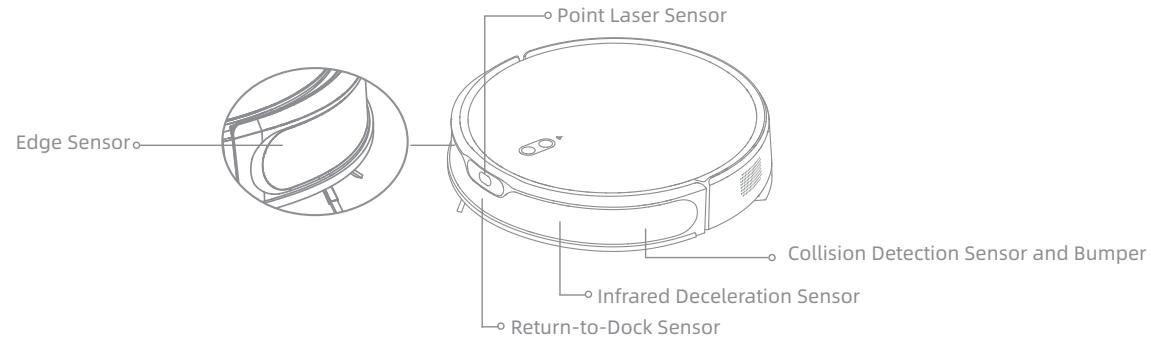
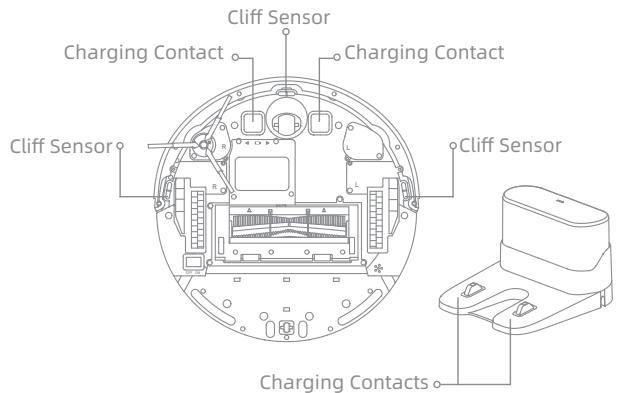
| Sensors | Pointing laser, edge sensors, void sensors, charging contacts |
| Battery | High-performance lithium-ion (recharge at least every 3 months if unused) |
| Routine maintenance | Mop cloth after each use, main brush every 2 weeks, filter every 3-6 months, side brush and sensors once a month |
| Safety | Automatic stop, fall protection, detailed safety instructions, household use only |
| Weight | Not specified in the manual (estimate: approximately 3.5 kg) |
| Dimensions (approx.) | 350 x 350 x 96 mm (estimate) |
| Noise level | Not specified (varies by mode) |
| Warranty | Not specified (contact support) |
Frequently Asked Questions - M1 DREAME
User questions about M1 DREAME
0 question about this device. Answer the ones you know or ask your own.
Ask a new question about this device
Download the instructions for your Robot vacuum and mop in PDF format for free! Find your manual M1 - DREAME and take your electronic device back in hand. On this page are published all the documents necessary for the use of your device. M1 by DREAME.
USER MANUAL M1 DREAME
For more support, contact us via support.us@dreame.tech
Website: https://global.dreametech.com
Tel: +1 (866) 977-5177
Manufactured by: Dreame Trading (Tianjin) Co., Ltd.
Address: Room 2112-1-1, South District, Finance and
Trade Center, No.6975 Yazhou Road, Dongjiang Bonded
Port Area, Tianjin Pilot Free Trade Zone, Tianjin, China
Made in China
RPM1GA-US-A00
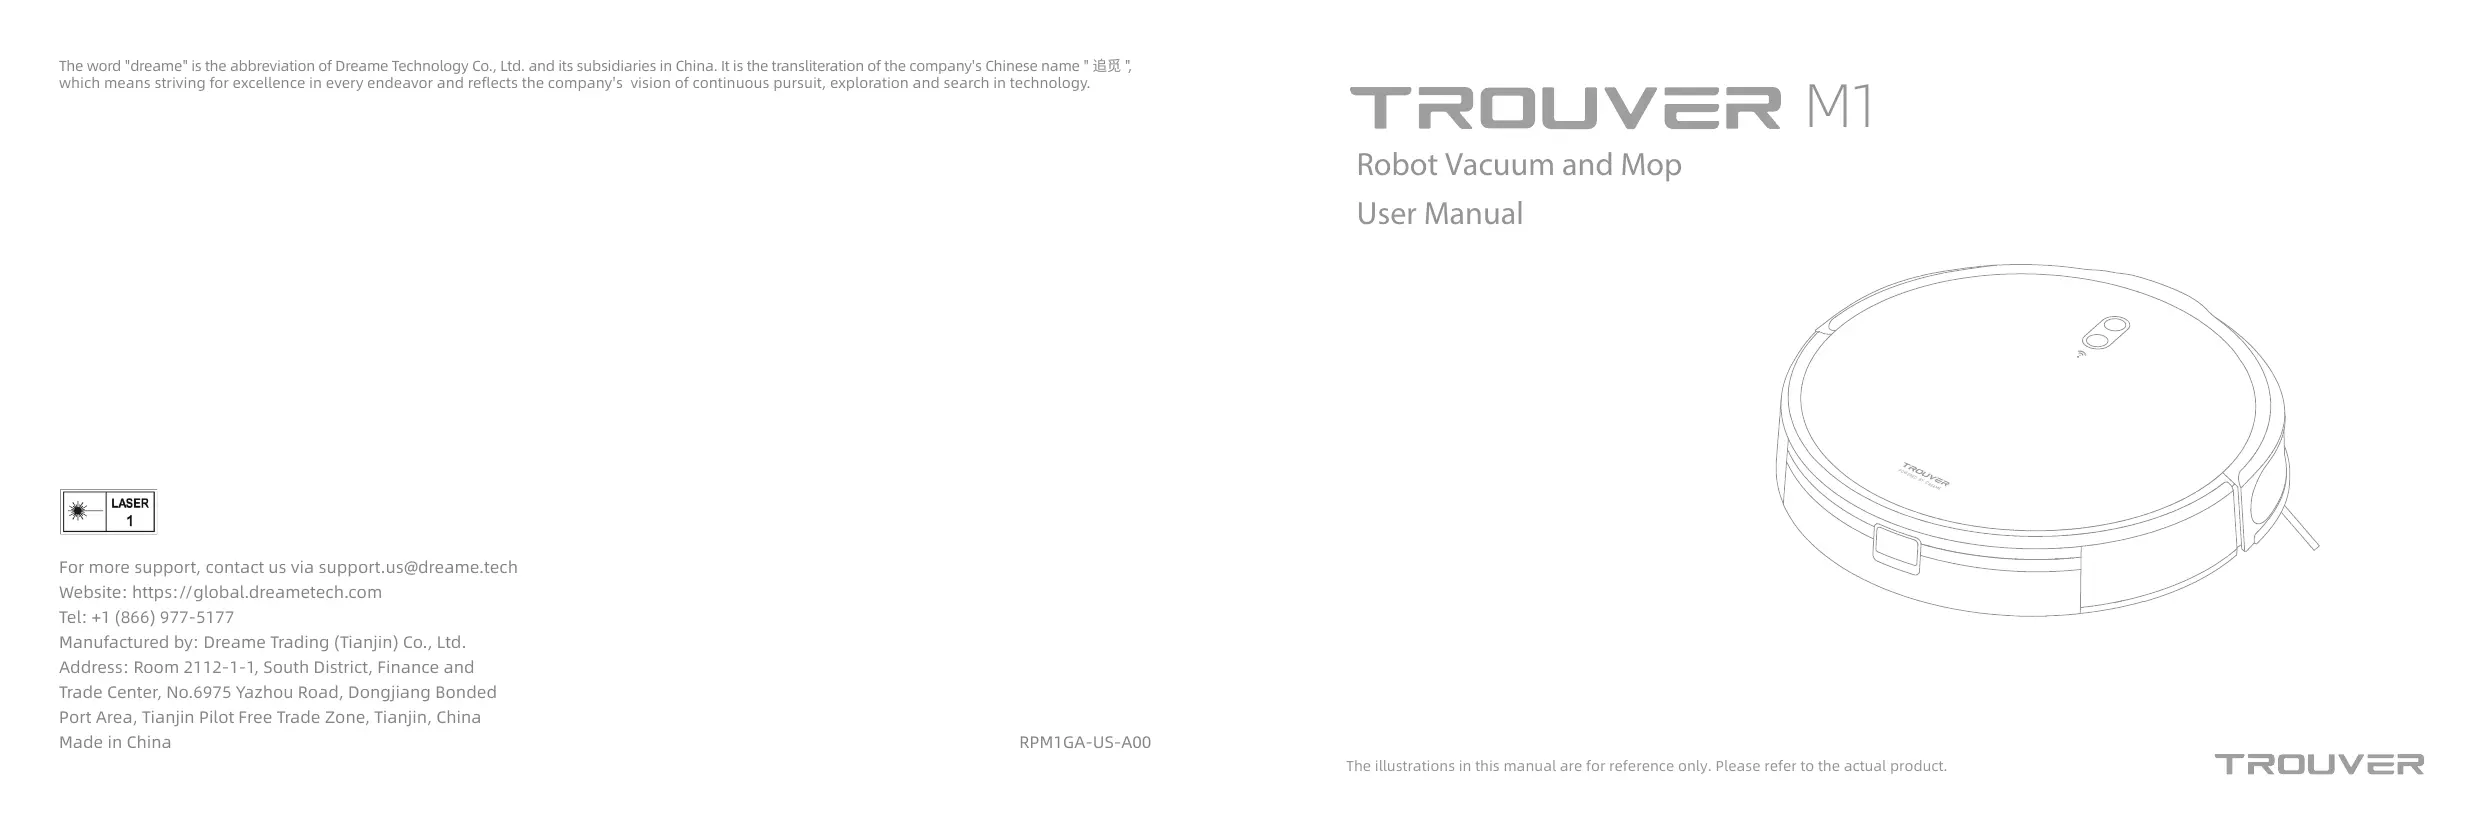
TROUVER M1
Robot Vacuum and Mop
User Manual
Contents
EN User Manual
FR Manuel d'utilisation 22
ES Manual de usuario 43
Safety Information
IMPORTANT SAFETY INSTRUCTIONS
When using an electrical appliance, basic precautions should always be followed, including the following: READ ALL INSTRUCTIONS BEFORE USING (THIS APPLIANCE), Failure to follow the warnings and instructions may result in electric shock, fire and/or serious injury.
WARNING- To reduce the risk of fire, electric shock, or injury:
- Do not use outdoors or on wet surfaces.
· Do not allow to be used as a toy. Close attention is necessary when used by or near children, pets or plants.
· Use only as described in this manual. Use only manufacturer's recommended attachments. - Do not use with damaged cord or plug. If appliance is not working as it should, has been dropped, damaged, left outdoors, or dropped into water, return it to a service center.
- Do not pull or carry by cord, use cord as a handle, close a door on cord, or pull cord around sharp edges or corners. Do not run appliance over cord. Keep cord away from heated surfaces.
- Do not unplug by pulling on cord. To unplug, grasp the plug, not the cord.
- Do not handle the charging dock, including charger plug, and charger terminals with wet hands.
- Do not put any object into openings. Do not use with any opening blocked; keep free of dust, lint, hair, and anything that may reduce air flow.
EN Safety Information
- Keep hair, loose clothing, fingers, and all parts of body away from openings and moving parts.
Do not use to pick up flammable or combustible liquids, such as gasoline, or use in areas where they may be present.
Do not pick up anything that is burning or smoking, such as cigarettes, matches, or hot ashes. - Do not use without dust box and filter in place.
- Prevent unintentional starting. Ensure the switch is in the off-position before connecting to battery pack, picking up or carrying the appliance. Carrying the appliance with your finger on the switch or energizing the appliance that has the switch on invites accidents.
- Do not use and store in extremely hot or cold environments (below 0^/ 32 ^ or above 40^/104^ ). Please charge the robot in temperature above 0^/ 32 ^ and below 40^/104^ .
- Recharge only with the charger specified by the manufacturer. A charger that is suitable for one type of battery pack may create a risk of fire when used with another battery pack.
· Use appliances only with specifically designated battery packs. Use of any other battery packs may create a risk of injury and fire. - When battery pack is not in use, keep it away from other metal objects, like paper clips, coins, keys, nails, screws or other small metal objects, that can make a connection from one terminal to another. Shorting the battery terminals together may cause burns or a fire.
- Under abusive conditions, liquid may be ejected from the battery; avoid contact. If contact accidentally occurs, flush with water. If liquid contacts eyes, additionally seek medical help. Liquid ejected from the battery may cause irritation or burns.
- Do not use a battery pack or appliance that is damaged or modified. Damaged or modified batteries may exhibit unpredictable behavior resulting in fire, explosion or risk of injury.
- Do not expose a battery pack or appliance to fire or excessive temperature. Exposure to fire or temperature above 130^ may cause explosion.
- Follow all charging instructions and do not charge the battery pack or appliance outside of the temperature range specified in the instructions. Charging improperly or at temperatures outside of the specified range may damage the battery and increase the risk of fire.
Safety Information
- Have servicing performed by a qualified repair person using only identical replacement parts. This will ensure that the safety of the product is maintained.
- Do not modify or attempt to repair the appliance or the battery pack except as indicated in the instructions for use and care.
- Place the cords from other appliances out of the area to be cleaned.
- Do not operate the vacuum in a room where an infant or child is sleeping.
Do not operate the vacuum in an area where there are lit candles or fragile objects on the floor to be cleaned. - Do not operate the vacuum in a room that has lit candles on furniture that the vacuum may accidentally hit or bump into.
- Do not allow children to sit on the vacuum.
- Do not use the vacuum on a wet surface.
· Use only with Dreame Trading (Tianjin) Co., Ltd. RCM11 charging dock. Use only with Dongguan Sunun Power Co., Ltd SA182H-200090U charger or Chanzeho Technology (HK) Co Ltd CZH024200090USWM charger.
Risk Of Injury. Brush May Start Unexpectedly. Switch off the appliance and Remove the brush Before Cleaning or Servicing.
Unplug before cleaning or servicing.
SAVE THESE INSTRUCTIONS
Household use only.
Caution:
This device complies with Part 15 of the FCC Rules / Innovation, Science and Economic Development Canada's licence-exempt RSS(s). Operation is subject to the following two conditions: (1) this device may not cause harmful interference. (2) this device must accept any interference received, including interference that may cause undesired operation.
Changes or modifications not expressly approved by the party responsible for compliance could void the user's authority to operate the equipment.
EN Safety Information
This equipment has been tested and found to comply with the limits for a Class B digital device, pursuant to part 15 of the FCC Rules. These limits are designed to provide reasonable protection against harmful interference in a residential installation. This equipment generates uses and can radiate radio frequency energy and, if not installed and used in accordance with the instructions, may cause harmful interference to radio communications. However, there is no guarantee that interference will not occur in a particular installation. If this equipment does cause harmful interference to radio or television reception, which can be determined by turning the equipment off and on, the user is encouraged to try to correct the interference by one or more of the following measures:
—Reorient or relocate the receiving antenna.
—Increase the separation between the equipment and receiver.
—Connect the equipment into an outlet on a circuit different from that to which the receiver is connected.
—Consult the dealer or an experienced radio/TV technician for help.
MPE Reminding
To satisfy FCC /IC RF exposure requirements, a separation distance of 20 cm or more should be maintained between the antenna of this device and persons during device operation.
To ensure compliance, operations at closer than this distance is not recommended.
To disable Wi-Fi module on robot, power the robot ON. Place the robot on the Charging Dock. Ensure the Charging Contacts on robot and the Charging Dock Pins make a connection.
Press and hold the Dock Button on the robot for 20 seconds until the Wi-Fi module is turned off.
When the Wi-Fi module is turned off, press any button on the robot to turn the Wi-Fi module on.
| --- | Direct current |
| ~ | Alternating current |
This Device Complies with DHHS Radiation Rules, 21CFR Chapter 1, Subchapter J.
I:ON
O:OFF
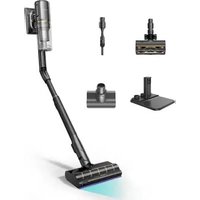
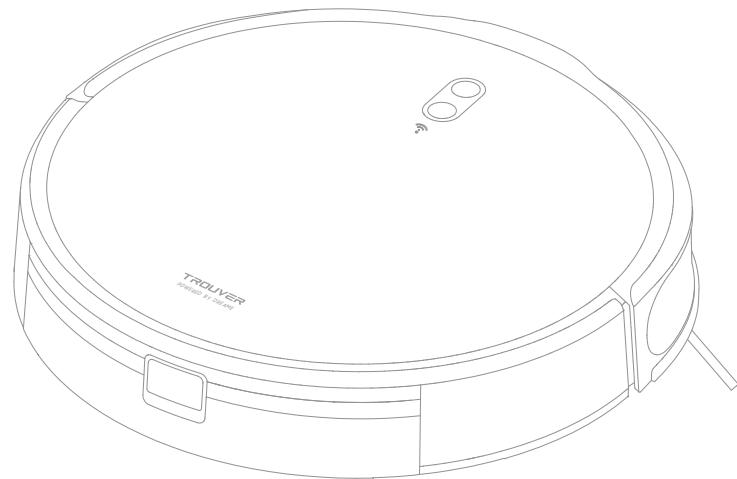
Product Overview
Accessories
Pre-Installed Accessories
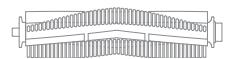
Main Brush
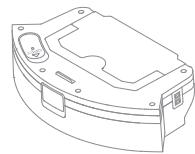
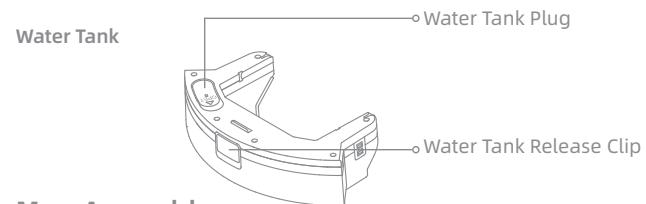
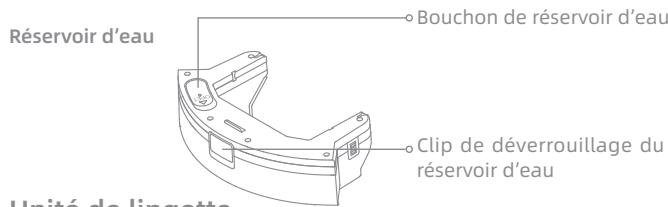
2-in-1 Water Tank with Dust Box
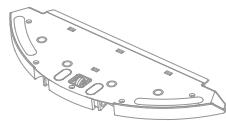
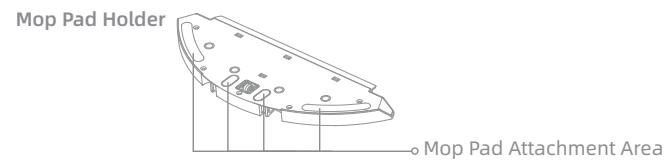
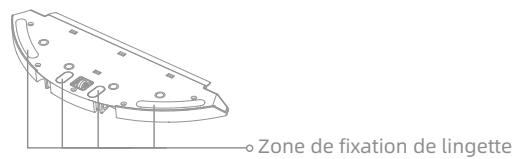
Mop Pad Holder
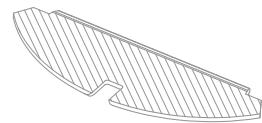
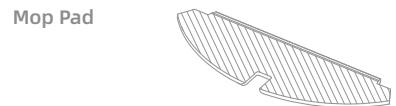
Mop Pad
Other Accessories

Cleaning Tool
Side Brush
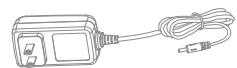
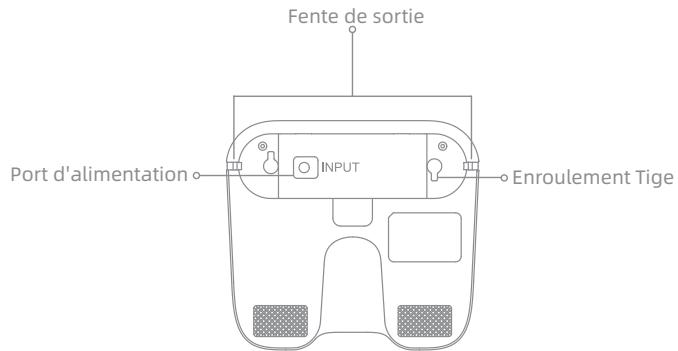
Charger

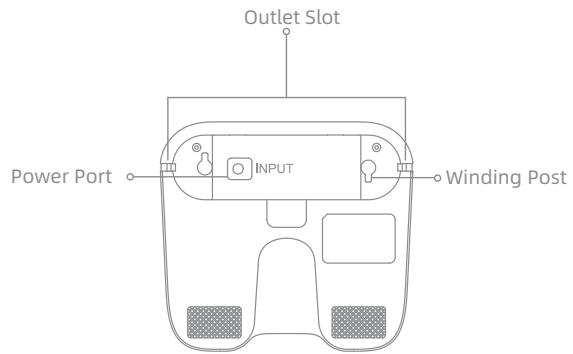
Charging Dock
EN Product Overview
Robot
Product Overview
Robot

EN Product Overview
2-in-1 Water Tank with Dust Box
Mop Assembly
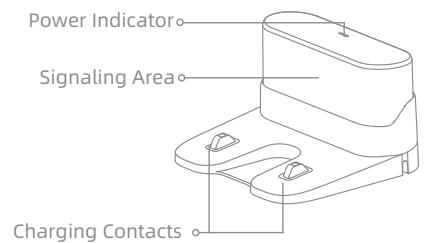
Charging Dock
Preparing Your Home
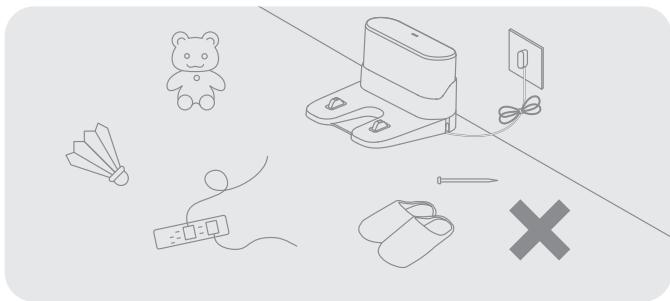
Before cleaning, please move away unstable, fragile, valuable or dangerous items, and clean up cables, cloths, toys, hard objects and sharp objects on the ground to avoid being entangled, scratched or knocked over by the robot and causing losses.
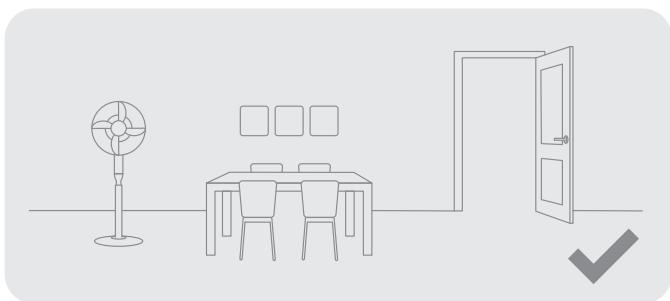
Open the door of the room to be cleaned, and put the furniture in its proper place to make more space.

Before cleaning, place a physical barrier at the edge of the stairs and sofa to ensure safe and smooth operation of the robot.
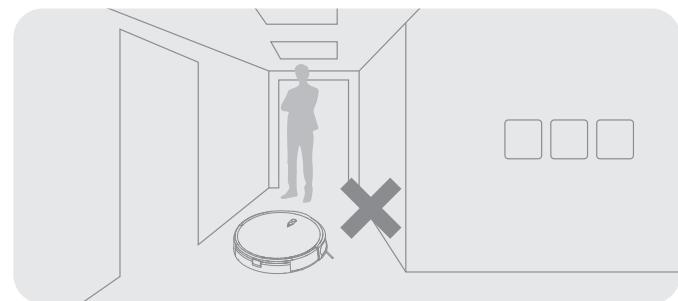
To prevent the robot from not recognizing the area that needs to be cleaned, do not stand in the front of the robot, threshold, hallway, or narrow places.
Note:
- When operating the robot for the first time, follow it around while cleaning to remove any potential obstacles in time.
- Do not vacuum hard objects like stones, steel balls and toy parts, or sharp objects like construction waste, broken glass and nails, otherwise the ground may be scratched.
EN Before Use
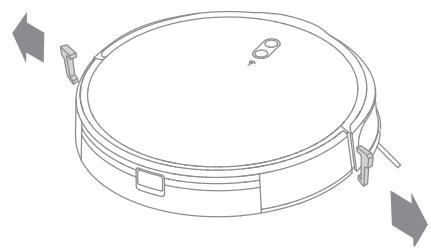
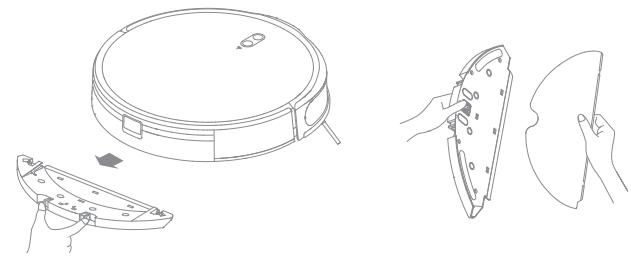
1. Remove the protections
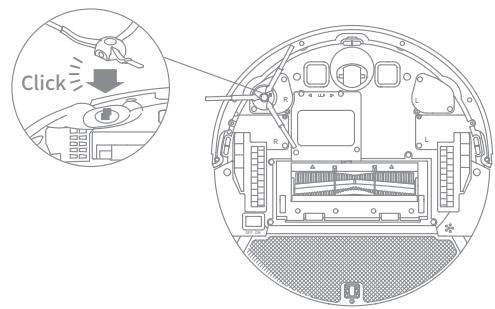
2. Install the side brush
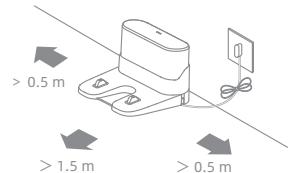
3. Place the charging dock on the level ground against the wall and connect it to a power outlet
Note:
- Keep the immediate area 1.5m in front of the charging dock and 0.5m to its both sides clear of objects.
- To ensure you can connect to the robot with your phone well, make sure the robot and charging dock are within WiFi range.
- Do not place the charging dock in an area with direct sunlight or where other objects might block the signal, as this may hinder the robot from returning to the charging dock.
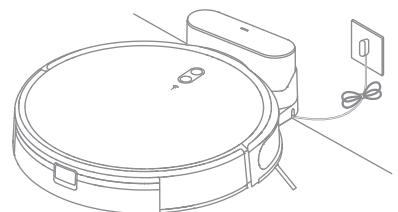
4. Place the robot onto the charging dock to charge
Note:
- Fully charging is recommended before first-time use. This ensures that the robot returns to the charging dock successfully.
- Do not move the the charging dock while the robot is cleaning.
Note: Install the side brush until it clicks into place.
Connecting with the Dreamehome App
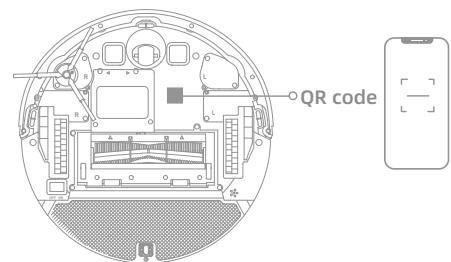
1. Download the Dreamehome App
Scan the QR code on the robot, or search "Dreamhome" in the app store to download and install the app.
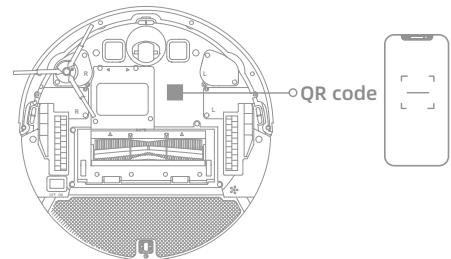
2. Add Device
Open the Dreamehome app, tap "+ in the upper right, and scan the same QR code again to add the device. Please follow the prompts to finish the Wi-Fi connection.
Note:
- Only 2.4 GHz Wi-Fi is supported.
- Due to upgrades in the app software, the actual operations may differ from the directions in this manual. Please follow the instructions based on the current app version.
3. Reset Wi-Fi
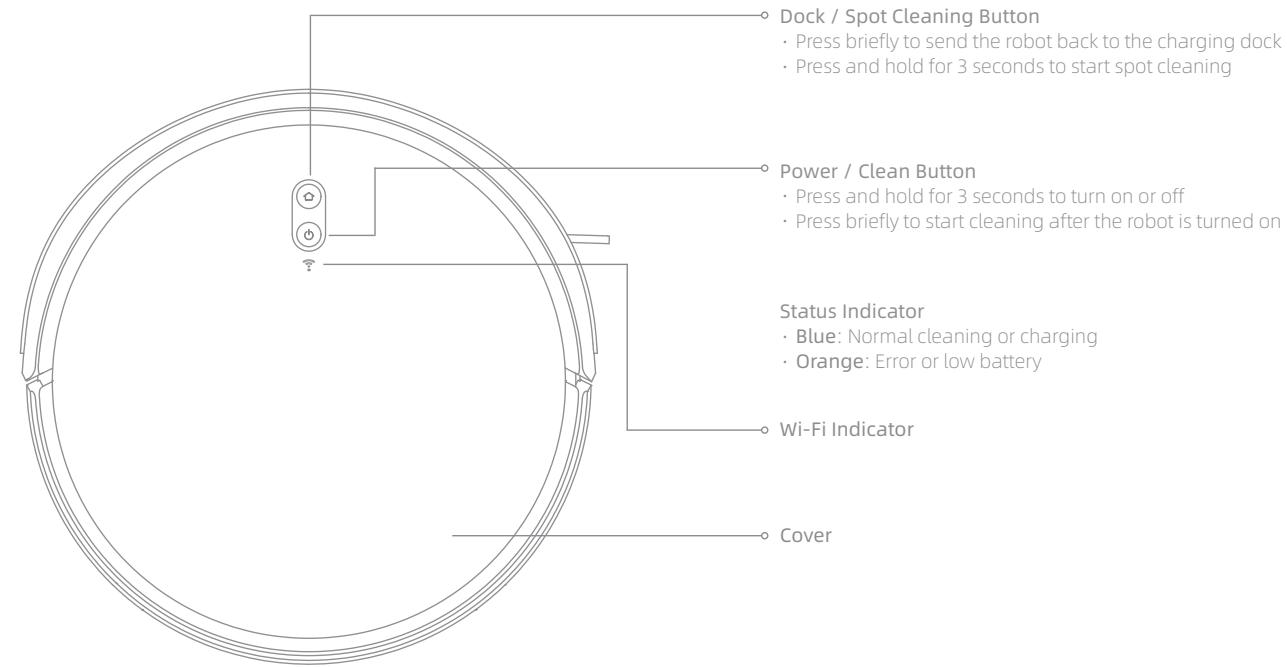
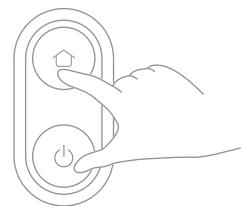
Simultaneously press and hold the buttons and until you hear a voice prompt saying, "Waiting for the network configuration." Once the Wi-Fi indicator turns solid white, the Wi-Fi has been successfully reset.
Note: If your robot cannot connect to the app successfully, reset the Wi-Fi and add the device again.
Wi-Fi Indicator
- OFF: Unconnected
Quick Blinking White:
Releasing the hotspot
- Slow Blinking White: Connecting
Solid White: Connected
1. Rocker Switch
Press the ON/OFF rocker switch on the bottom to activate the robot.
2. Turn On/Off
Press and hold the button for 3 seconds to turn on the robot. The power indicator should be illuminated. Place the robot onto the charging dock, the robot should turn on automatically and begin charging. To turn off the robot, move the robot away from the dock and press and hold the button for 3 seconds.
3. Fast Mapping
After configuring the network for the first time, follow the instructions on the app to quickly create a map, and the robot will start mapping without cleaning. The mapping process will be completed when the robot returns to the dock, and the map will be saved automatically.
4. Start Cleaning
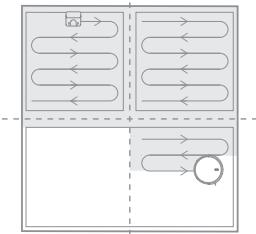
Press the button briefly to start cleaning after the robot is turned on. Then, the robot will accurately map out a route, methodically clean along the edges and walls, then finish by cleaning each room in an S-shaped pattern to ensure a thorough job.
Note: If vacuum only, please remove the mop pad holder.
5. Cleaning Mode
The robot has four cleaning modes: Quiet, Standard, Strong, and Turbo. The default mode is Standard. You can specify the cleaning mode in the app.
6. Pause/Sleep Mode
When the robot is running, press any button to pause it. If the robot is paused for more than 10 minutes, it automatically enters sleep mode. All indicators on the robot will turn off. Press any button on the robot, or use the app to wake up the robot.
Note: If the robot is paused and placed onto the charging dock, the current cleaning task will end.
7. Spot Cleaning
When the robot is paused or in Standby Mode, press and hold the button for 3 seconds to start Spot Cleaning Mode. In this mode, it will clean a square-shaped area of 1.5 × 1.5 meters directly around the robot. When the spot cleaning is done, the robot will automatically return to its original location and stop working.
Note: Activating Spot Clean Mode will end the current cleaning task of the robot.
8. Do Not Disturb (DND) Mode
When the robot is set to the Do Not Disturb (DND) mode, the robot will be prevented from resuming cleaning and the power indicator goes out. The DND mode is disabled by default at the factory. You can use the app to enable the DND mode or modify the DND period. The DND period is 22:00-8:00 by default.
Note:
- The scheduled cleaning tasks will be performed on time during the DND period.
The robot will resume cleanup where it left off after the DND period expires.
How to Use
9. Scheduled Cleaning
You can schedule cleaning time in the Dreamehome app. The robot will automatically start cleaning at the designated time and then return to the charging dock to recharge when the cleaning is done.
10. Additional App Functions
Follow the instructions on the app interface to use more functions. The version of the app might have been updated; please follow the instructions based on the current app version.
11. Use the Mopping Function
It is recommended that all floors are vacuumed at least three times before the first mopping session to achieve a better cleaning effect.
1) dampen the mop pad and wring out excess water. Install the mop pad as shown in the diagram.
2) Fill the tank with water.
Note:
- It is recommended to remove the dust box before filling the tank with water, to avoid dampening the dust box.
- Do not use detergent or disinfectant.
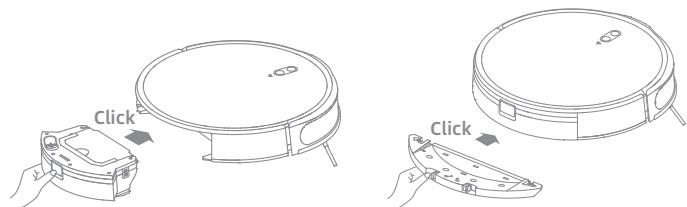
3) Slide the 2-in-1 water tank with dust box and mop assembly into the back of the robot until it clicks into place. Press the button or use the Dreamehome app to start cleaning.
Note:
- It is not recommended to use the mopping function on carpets.
- Use the app to adjust the water flow as required.
EN Routine Maintenance
To keep the robot in good condition, it is recommended to refer to the accessory usage in the app or the following table for routine maintenance.
| Part | Maintenance Frequency | Replacement Period |
| Mop pad | After each use | Every 3 to 6 months |
| Main brush | Once every 2 weeks | Every 6 to 12 months |
| Dust box's filter | Every 3 to 6 months | |
| Side brush | ||
| Charging dock's signaling area | Once every month | / |
| Charging contacts | ||
| Omnidirectional wheel | ||
| Bumper | ||
| Point laser sensor | ||
| Edge sensor | ||
| Cliff sensors | ||
| Water tank | Clean it as needed | / |
| Dust box |
Note: The replacement frequency will depend on your usage of the robot. If an exception occurs due to special circumstances, the parts should be replaced.
Routine Maintenance
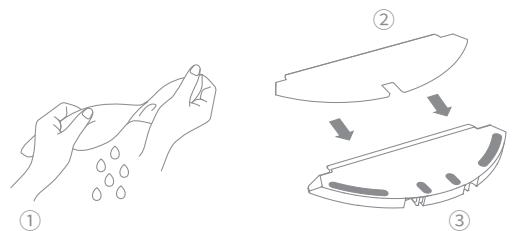
Clean the Mop Pad
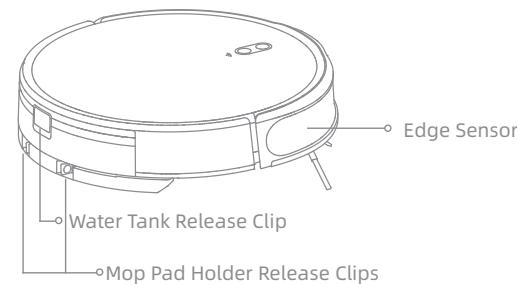
- Press the release clips on the mop pad holder to remove the mop assembly. Pull the mop pad off the mop pad holder.
Clean the Water Tank
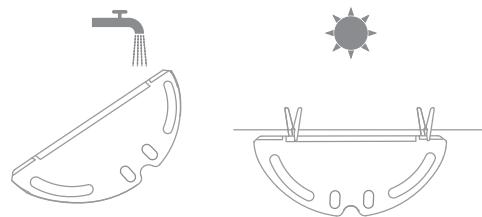
- Pour out the water in the tank. Clean with only water and leave it to air-dry before re-installing.

Note: Do not expose the tank to the sun directly.
- Clean the mop pad with water only and leave to air dry before re-installing.
EN Routine Maintenance
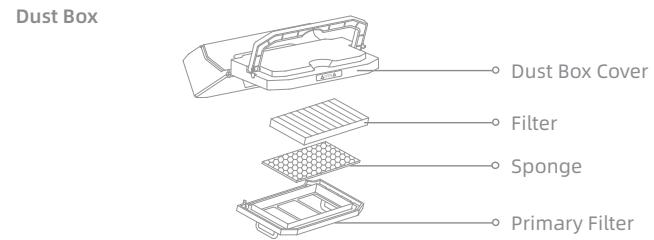
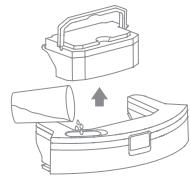
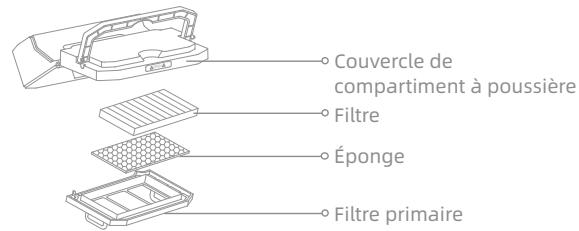
Clean the Dust Box and Filter
- Press the water tank release clip to remove the 2-in-1 water tank with dust box.
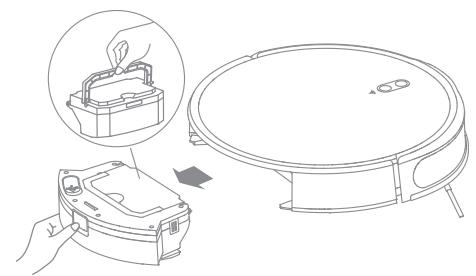
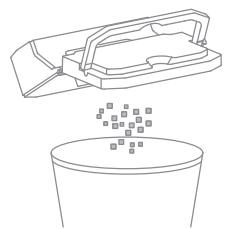
- Open the dust box cover and empty the dust box as shown in the diagram.
- Remove the filter and tap its basket gently.
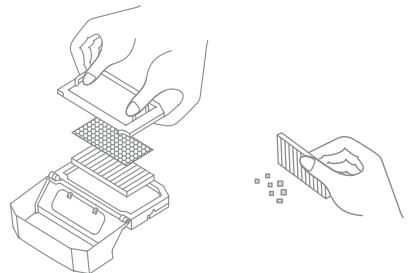
Note:
-
Do not attempt to clean the filter with a brush, a finger or sharp objects to prevent damage.
-
Rinse the dust box and filter with water and dry them completely before reinstalling.

Note:
- Rinse the dust box and filter with clean water only. Do not use any detergent.
- Use the dust box and filter only when they are completely dry.
Routine Maintenance
Clean the Main Brush
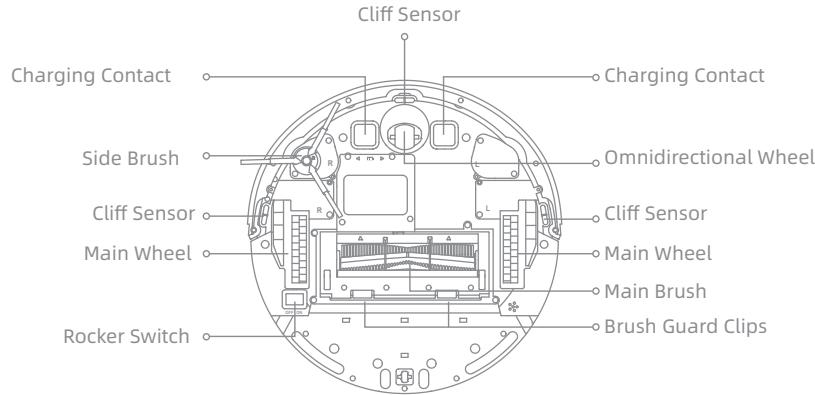
- Press the brush guard clips inwards to remove the brush guard and lift the brush out of the robot.
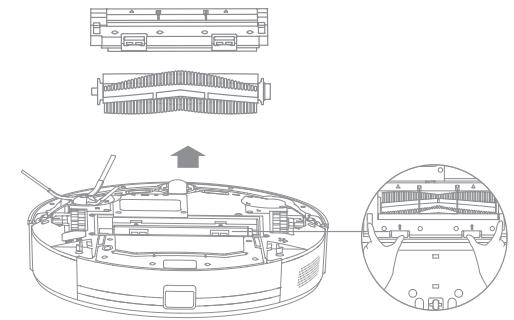
2.Use a proper cleaning tool to remove any hairs tangled in the brush.
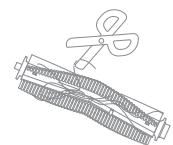
Note: Do not pull out the hair tangled in the main brush excessively. Otherwise, the brush may be damaged.
Clean the Main Wheel/Omnidirectional Wheel
Note: Use a tool such as a small screwdriver to separate the axle and tire of the omnidirectional wheel.
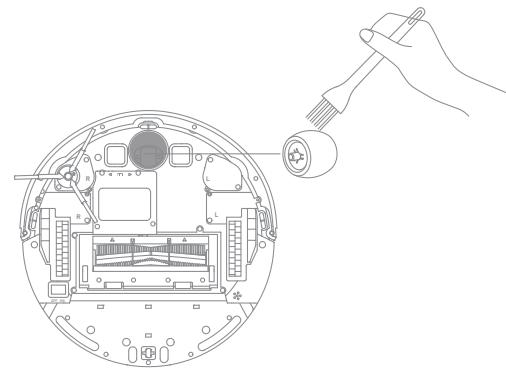
Clean the Side Brush
Pull out the side brush and use the included cleaning tool to remove any hair tangled in the brush.
EN Routine Maintenance
Clean the Sensors
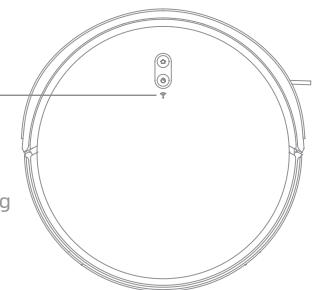
Wipe sensors and charging contacts by using a soft and dry cloth, as shown in the diagram.
Note: Wet cloths can damage sensitive elements within the robot and charging dock. Please use dry rags for cleaning.
Robot Restarting
If the robot stops responding or cannot be turned off, press and hold down the button for 10 seconds or press the ON/OFF rocker switch to forcefully turn it off. Then press and hold the button for 3 seconds to turn the robot on.
Battery
The robot contains a high-performance lithium-ion battery pack. Please ensure that it remains well-charged for daily use to maintain optimal battery performance. If the robot is not used for an extended period of time, turn it off and put it away. To prevent damage from over-discharging, the robot should be recharged at least once every three months.
Troubleshooting
| Problem | Solution |
| Robot does not turn on | The battery level is low. Recharge the robot on the charging dock, then try again. The temperature of the battery is too low or too high. It is recommended to operate the appliance at a temperature between 32 °F (0°C) and 104 °F (40°C). |
| Robot does not recharge | The charging dock is not receiving power. Please confirm that both ends of the charger are plugged in correctly. Poor contact. Clean charging contacts of the charging dock and robot. |
| Robot does not return to charging dock | There are too many obstructions around the charging dock. Place the charging dock in a more open area. Please clean the dock's signaling area. |
| Robot is malfunctioning | Turn off the robot and then reactivate it. |
| Robot is making a strange noise | A foreign object may be caught in the main brush, side brush, or one of the main wheels. Stop the robot and remove any debris. |
| Robot no longer cleans efficiently or leaves dust behind | The dust box is full. Please clean it. The filter is blocked. Please clean it. A foreign object is caught in the main brush. Please clean it. |
EN Troubleshooting
| Problem | Solution |
| Robot cannot connect to Wi-Fi | There is something wrong with the Wi-Fi connection. Reset the Wi-Fi and download the latest version of the Dremehome app, then try reconnecting. Location permission is not open. Please ensure the location permission on the Dremehome app is enabled. Wi-Fi signal is weak. Make sure the robot is in an area with good Wi-Fi coverage. 5GHz Wi-Fi is not supported. Please ensure your robot connects to 2.4GHz Wi-Fi. The username or password of Wi-Fi is incorrect. Please enter the correct username and password. |
| Robot does not perform scheduled cleaning | The robot has low battery. Scheduled cleaning will not start unless the robot has at least 15% battery left. |
| Does leaving the robot on the charging dock consume power if it is already fully charged? | Leaving the robot on the charging dock after it's fully charged consumes very little electricity and helps maintain optimal battery performance. |
| No water comes out of the water tank, or only a little bit comes out | Check whether there is water inside the water tank. Clean the mop if it becomes dirty. Make sure the mop pad is installed correctly according to the User Manual. |
| Robot doesn't resume cleaning after charging | Make sure the robot is not set to Do Not Disturb mode (DND), which will prevent it from resuming cleaning. The robot does not resume cleaning when it is manually recharged or placed onto the charging dock. |
| Robot doesn't return to charging dock after being moved | Moving the robot may cause it to re-position itself or re-map its surroundings. If the robot is too far from the charging dock, it might not be able to automatically return on its own, in which case you need to manually place the robot onto the charging dock. |
For additional services, please contact us via support.us@dreame.tech
Tel: +1 (866) 977-5177
Specifications
Robot
| Model | RPM1GA |
| Charging Time | Approx. 4 hours |
| Rated Voltage | 14.4 V--- |
| Rated Power | 40 W |
| Operation Frequency | 2400-2483.5 MHz |
| Maximum Output Power | < 20 dBm |
Charging Dock
| Model | RCM11 |
| Rated Input | 20.0 V --- 0.9 A |
| Rated Output | 20.0 V --- 0.9 A |
Charger
| Model | SA182H-200090U/CZH024200090USWM |
| Rated Input | 100-240 V~ 50/60 Hz 0.4/0.8 A |
| Rated Output | 20.0 V --- 0.9 A |
Under normal use of condition, this equipment should be kept a separation distance of at least 20cm between the antenna and the body of the user.
| --- | Courant continu |
| ~ | Courant alternatively |
Compartment a poussiere
Station de recharge

Unité de lingette
Support de lingette
Lingette